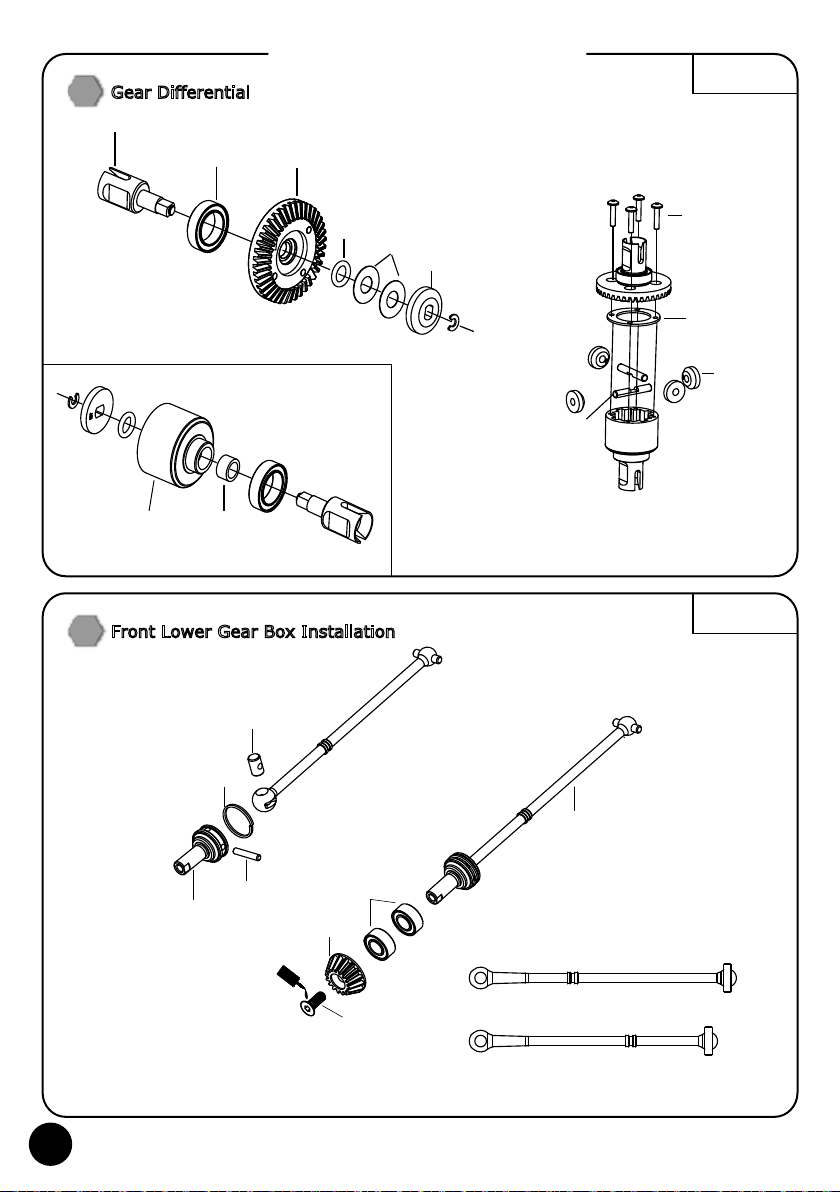
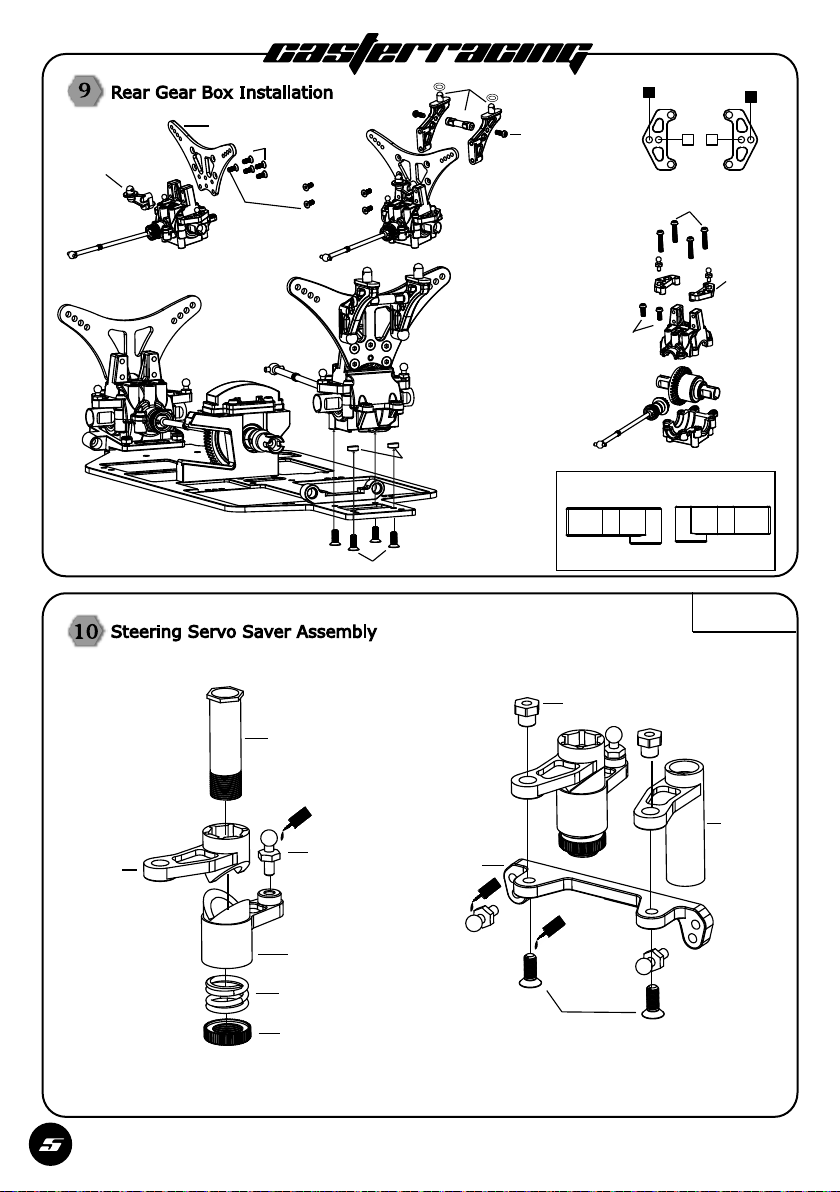
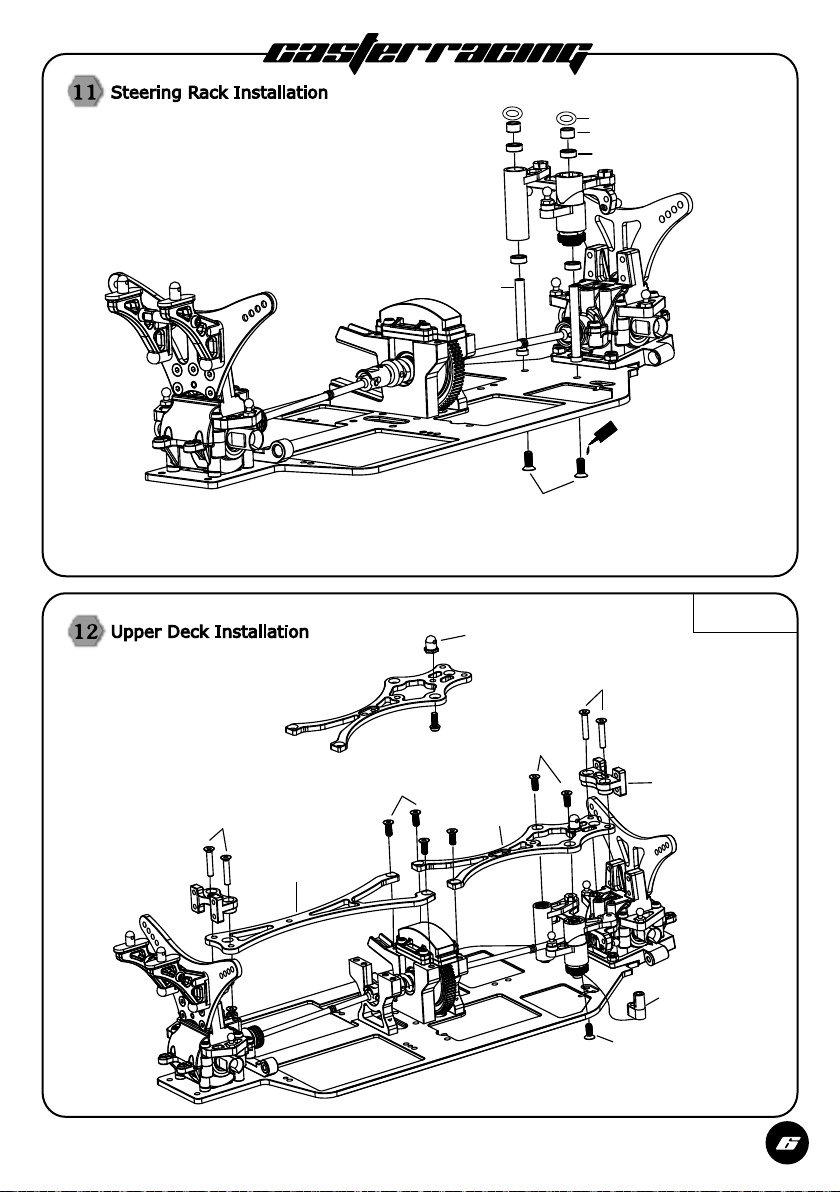
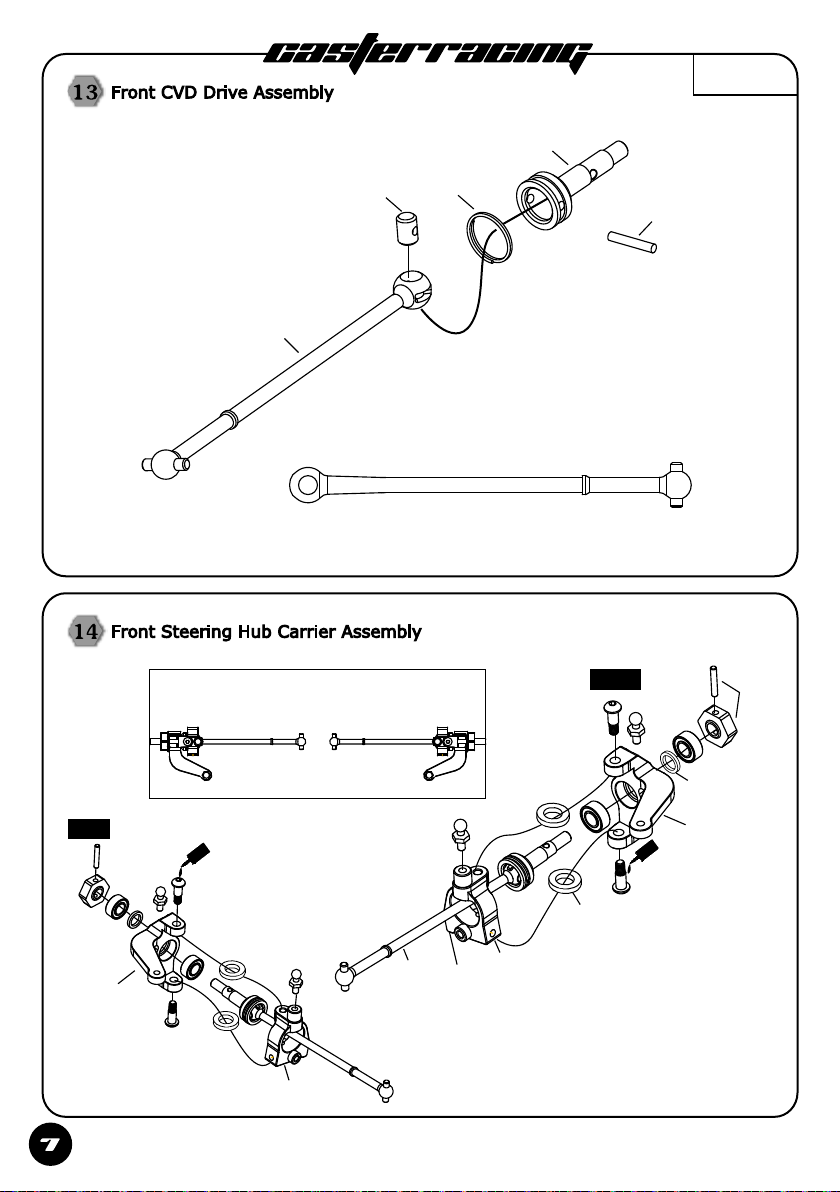
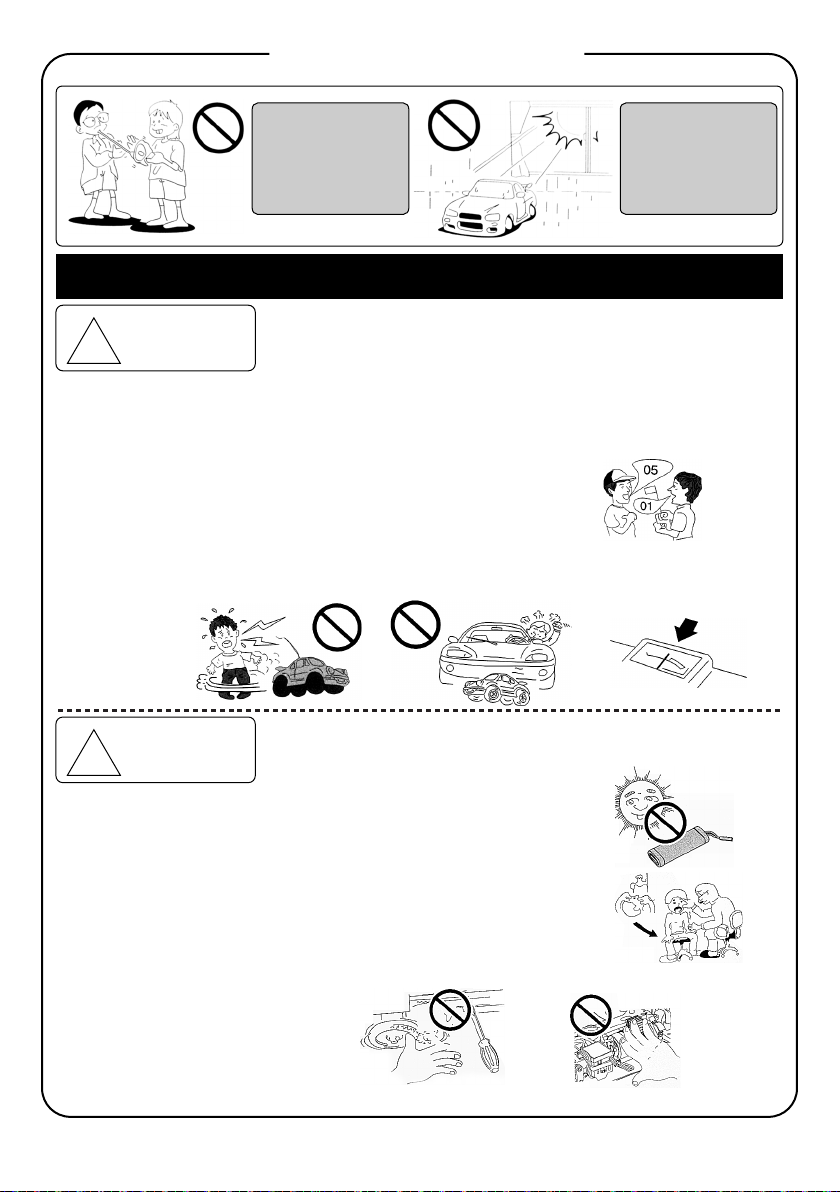
Caster Racing S10B PRO V4 User manual

S10b v4s
PRO
1/10 Scale EP 4WD
Buggy-PRO

casterracing
● Never reverse the
connections or disassemble
the batteries. This will lead
to damage and/or leakage.
● This product contains small
and sharp parts. Assemble
and store this product only in
places out of the reach of
children.
● Do not operate the model on
public roads, in crowded
places and near children as
it may cause accidents.
●Cutters, pliers, and
screwdrivers need careful
handling.
●Painting must be done in a
well ventilated area.
●When the model is not in use,
always turn off the receiver,
then the transmitter.
Furthermore, disconnect the
batteries and remove them
from the model and transmitter
to prevent possible electronics
damage.
●Never use the same
frequency with someone else
at the same time.
Otherwise, the radio signals
will be mixed and you will
lose control of your model.
This may lead to accidents.
● Be sure to read the manual
thoroughly before you begin.
New users should seek advice
from our forums in order to
make sure assembly is correct
if questions arise that the
manual doesn't answer.
<SAFETY PRECAUTIONS>
<In order to operate the car safely,
be sure that you have observed the following points:>
●This is a radio control model, not a toy!
Please follow the points as below in order to prevent an accident from
happening to the car and others.
●Improper usage with alkaline cells or rechargeable store batteries may damage the car.
●In order to enjoy running the car, you need to finish assembly before operation. You also need
to do routine maintenance work after operation. Replacement and optional parts are available
separately.
WARNING!
!
Please follow the following steps to operate this product in a safe
manner in order to prevent potential damage or injuries.
WARNING!
!

casterracing
●The antenna may
be dangerous, do not aim it
or swing it towards anyone's
face.
Do NOT operate the model in the following places or situations.
(Non-observance may lead to an accident!)
In order to avoid accidents and personal injury, be sure that you
observe the following points:
● Precautions when using batteries
● Do NOT put fingers or any other objects in
any rotating or moving parts.
● Right after use, do not touch the motor.
There is a potential danger of burning
yourself.
1. Proper disposal of old batteries.
2. Do not attempt to recharge non rechargeable batteries. They could cause a fire or explode.
3. Do not throw batteries in a fire. They will explode.
4. Do not swallow batteries.
5. Store only in cool and dry places out of the reach of children.
6. If the batteries leak liquid, do not get it in your eyes, otherwise, consult an emergency physician.
● Operate your model in open areas only out of the way
of people. Do not operate it:
● Keep in mind that people around you might also be
operating radio control models.
● Always check the radio batteries.
Never share the same frequency with someone else at the
same time. Otherwise, radio signals will cross and you will
lose control of your model which might lead to an accident.
Weak batteries will lead to lower reception and you can lose
control of your model. This may ALSO cause a potential accident.
Non-observance may result in personal injury and/or
property damage.
1. On public streets.
2. In places where people gather.
3. In residential areas and parks.
4. Indoors or in limited spaces.
● Stop the car immediately if it is operating
abnormally and check it out.
If the problem is not identified and fixed, do NOT operate
the car until it is fixed. This may lead to further trouble and
unforeseen accidents.
●Do not expose this model to
high temperature, humidity,
or direct sunlight for
extended periods of time.
Operating your model safely
(PROHIBITED)
(PROHIBITED)
(PROHIBITED)
WARNING!
!
WARNING!
!

Nut M3
3x10(FH)
S10B002
3x8(FH)
S10B001
S10B003
S10B005
S10B006
S10B004
3x8(FH)
BAG A
Put Loctite
Put Loctite
Put Loctite
Put Loctite
3x10(BH)
3x10(BH)
Please do not tighten the screw for now.
Please tighten the screws after you
have assemble the center diff.

S10B012
S10B013
S10B014
S10B015
S10B016
S10B019
S10B009
S10B008
S10B007
pre-assembled
S10B010
S10B017
S10B018
S10B011
Put Loctite
Put Loctite
3x10(FH)
S10B021
S10B022
S10B020
Put Loctite
When the center diff is apply and move
freely,then please tighten the screws
under the chassis which holds the
center mounts.
BAG B

casterracing
3
5
Gear Differential
6Front Lower Gear Box Installation
SK075
SK075
SK0P066
SK0P066
SK0P044(39T)
SK0P051
SK0P050
SK0P048 SK0P060
SK0P049
SK0P054
SK0P048
SK0P047
SK0P049
SK0P049
CLE2.5(10)
CLE2.5(10)
WS0501150020(10)
SK0P057
SK0P081
3 x 12(FH)
2 x 8(RH)
3 x 10(FH)
Grease/Oil
S10B024
S10B018 S10B023
S10B024
S10B025
S10B028 S10B027
S10B035
S10B037 S10B018
Front center:S10B033
Front:S10B032
Rear:S10B055
Rear center:S10B056
3x8(FH)
S10B038
S10B036
S10B034
S10B029
S10B030
S10B031
S10B026
CLE2.5(10)
2x8
BAG C
BAG D
Put Loctite
Please make sure you apply more loctite
here to make sure the screw will not get loose.
As here is running a very high speed and lots heat.
pre-assembled

S10B039
Make sure when you assemble the front
lower gear box have to be sure the screws
& the holes are paralleled.
3X10(FH)
3X12(FH)
S10B040
3X16(RH) 3X8(RH)
S10B042
S10B041
S10B043
R
L
S10B040
BAG E

3X16(RH)
3X12(FH)
3X10(FH)
3X8(RH)
upper
Lower
3X10(FH)
3X10(FH)
3X10(RH)
Lop-sided aluminm
spacers go in between
chassis and diff case.
S10B051
S10B054
S10B052
S10B042
S10B085
S10B048
S10B049
S10B050
S10B045
S10B046
S10B047
When you assembled make sure the
steering link is moving freely.
Plaese adjust the tightness of ther S10B047
to your preference.Tighter will improve steering
response.Looser will prevent damage from impacts.
S10B044
S10B053
BAG F
Put Loctite
Put Loctite
Put Loctite

S10B091
WS04009010
S10B092
S10B093
S10B060
S10B057
S10B058
S10B061
S10B059
3x10(FH)
3x8(FH)
3x5(FH)
3x8(FH)
3x15(FH)
3x10(FH)
BAG G
Put Loctite

S10B065
S10B037
S10B062
S10B036
S10B035
S10B063
S10B066
S10B134
R
L
S10B133
S10B067
R
L
S10B064
S10B068
L
When you assemble this step,please be aware
and adjust according to your demand torlence fits,
by using different S10B134 washer to adjust the play.
Put Loctite
BAG H
LEFT
RIGHT
R
Put Loctite
Front CVD

LEFT
RIGHT
S10B069
S10B070
Put Loctite
S10B072
S10B073
S10B071
3x8(FH)
BAG I
Please make sure donʼt over tighten S10B069.
Make sure the arm us moving freely.

S10B075
S10B074
M3X44
13.0mm
S10B084
M3X37
S10B076
Assemblex2
Assemblex2
BAG J
24.0mm

LEFT
RIGHT
BAG K
S10B081
S10B077
S10B035
S10B078
S10B036
S10B037
S10B082
S10B080
S10B079
S10B083
Please Make sure donʼt over tighten
S10B069.Make sure the rear hub and
arm is moving freely.
S10B070
S10B069

S10B086
S10B095
S10B072
S10B094
3x8(FH)
19.00mm
S10B074
M3x44
S10B075
BAG L

Front:Longer
Rear:Shorter
3x12(RH) Longer:S10B096
S10B131
3x10(FH)
S10B090
3x6(FH)
Shorter:S10B097
3x8(FH)
S10B089
3x8(Set)
S10B088
S10B087
BAG M

casterracing
13
25
Shock set Assembly
26 Shock set Assembly
SK160
SK114
SK160
SK152
SK152
SK114
M2.5 Nut
M2.5 Nut
SK011
SK012
SK115
SK115
SKOP086
SK128-BB03 SK128-BB04
F:SK128-BB01
R:SK129-BB01
SK128-BB02
SK027
SK027
SK093
SKOP082-01
SKOP083-01
SKOP084
SKOP084
SK093
FRONT
OPTION
OPTION
REAR
Oil
Slidethe sk114 washer over
the stepped end of the shock
shaft. Plase the piston, over the
shaft and washer. Tighten the
piston inplace using the lock nut.
Make sure you d on’t over tighten
the pioston, it will cause damage
on the shape of the piston. Repeat
for the other shock shafts.
Apply a dropofshock oil to the
Orings, Place theOring followed
by shock collar,another Oring
follow by shockcollar again.
Gentlypressthe collar to seat
the parts in theshock b ody.
Apply a dropof shock o il to the
threads of the shock shaft.
Gently slidethe shock shaft
through the shock bod y.
Tighten the shock shaft ball end
to the top of the threads.
Snap the ball into the ball end.
Apply a dropof shock oil to the
shock bladder. Spread the oil all
around the bladder.
Push the shock shaft to t he
bottom and fill the shock oil
to full, Push the shock shaft
all the way to the top(slowly).
And then pull the shaft back
down very very slow to bottom.
Repear this process at teast
twice to make sure that these
will be no air bubbles.
Make sure there isn’t a ny
bubbles in the shock. You can
atart to thread the shock cap.
Make sure when you thread
the cap. the shaft is at the
bottom position.
M2.5 Nut S10B098
S10B099 S10B100
Slide the S10B098 washer over
the stepped end of the shock
shaft.Please the piston over
the shaft and washer.Tighten
the piston in place using the
lock nut.Make sure you don't
over tighten the piston.It will
cayse damage on the shape
of the piston.Repeat for the
other shock shaft.
Apply a drop of shock oil to the
O ring,place the O ring followed
by shock collar,another Oring follow
by shock collar again.Gently press
the collar to seat the parts in the
shock body.
Apply a drop of shock oil
to the threads of the shock
shaft.Gently slide teh shock
shaft through the shock body.
Tighten the shock shaft ball
end to the top of the threads.
Snap the ball into the ball end.
Apply a drop of shock oil to the shock
bladder.Spread the oil all around the bladder.
Push the shock shaft to ther bottom
and fill the shock oil to full,push the
shock shaft all teh way to the top(slowly).
And then pull the shaft back down very
very slow to bottom.Repear this process
at teast twice to make sure that these will
be no air bubbles.
Make sure there isn't any bubbles in the
shock.You can start to thread the shock cap.
Make sure when you thread the cap,the shaft
is at the bottom position.
S10B102
S10B104
S10B106
S10B107
S10B101
S10B103
S10B105
S10B108
S10B109 S10B110
S10B111
F:S10B112
R:S10B113
S10B114
FONT
BAG N
REAR

M3 Nut
S10B117
3x20(RH)
S10B115
3x16(RH)
S10B116
3x20(RH)
3x12(RH)
M3 Nut

S10B132
S10B118
3x8(FH)
3x8(FH)
S10B119
S10B120
11.0mm
BAG O

1.9MM 朝中差
BAG P
3x3(Set)
3x10(BH)
3x10(BH)
S10B122 S10B121
S10B123
S10B124
S10B125
S10B126
3x8(FH)
Put Loctite

S10B128-Y
S10B128-W
S10B135-Y
S10B135-W
S10B138
S10B127
S10B129-Y
S10B129-W
S10B136-Y
S10B136-W
S10B137
Table of contents
Other Caster Racing Motorized Toy Car manuals
Popular Motorized Toy Car manuals by other brands

INJUSA
INJUSA aprilia 64900 user manual

Rollplay
Rollplay FLEX KART XL PEDAL Owner's manual and assembly instructions

Kyosho
Kyosho MINI-Z Racer MR-03 Supplementary instructions manual

marklin
marklin BR 189 manual

Horizon Hobby
Horizon Hobby Losi Super BAJA REY 2.0 RTR instruction manual

HPI Racing
HPI Racing CYCLONE instruction manual