CASTLE EXO-CX950 User manual

12
EN EN
1
Removable aero-tuned peak visor. Designed and optimized for maximum
airflow and mobility.
2
Aero-Tuned Peak Visor
Retractable internal sun visor changes positions with a simple
slide of a switch.
3
SpeedView® Retractable Sun-Visor
Optically-clear shield with state-of-the art fog-free technology,
anti-scratch hardened coating and 100% UV protection. City-Mode tab
allows the shield to be locked or left slightly open for a gentle flow of
air to the shield and helmet interior
4
Everclear® No Fog Face Shield
Scorpion’s moisture-wicking lining material feels cool to the
touch in warm weather and warm in cool weather while
maintaining anti-microbial and hypo-allergenic properties
5
KwikWick® II Washable Anti-Microbial Comfort Liner
6
Kwikfit™ cheek pads allow easy on and off of the most
common styles of eye glasses.
7
KwikFit® Cheek Pads
A single button release allows the chin bar to be raised or
lowered with ease for either hand.
Flip-up Chin Bar
Intake ports across the front of the helmet force cool air into the
helmet interior while exhaust vents maximize movement of hot air
out of the helmet.
Aero-Tuned Ventilation System
2
2
4
6
1
35
7
7
Introduction
Function
Fit
FaceShields
Ventilation Systems
Congratulations for acquiring a premium ScorpionExo®helmet.
This helmet embodies the latest, state-of-the-art design,
engineering and technology available in the market today
and is an excellent investment for your comfort and protection.
Please remember that no helmet can protect you against
all possible or foreseeable impacts even when built with
the latest and best materials and technology.
The following information will help you to enjoy and properly
care for your helmet.
A helmet’s main function is to protect your head from impact
in case of an accident. To accomplish this, a helmets surrounds
your head with a matrix of materials designed to absorb and
cushion impact energy in some accidents. A helmet is also
designed to provide you with comfort while riding at speed
and in various weather conditions. Yet, there is a trade-off:
A helmet decreases hearing sensitivity, peripheral vision and
physical movement to a certain extent while providing
protection and comfort.
It is important for maximum safety that your ScorpionExo®
helmet fit snugly and comfortably on your head with the
retention strap (chinstrap) properly and snugly fastened. With
the chinstrap firmly fastened, grab the back of the helmet with
both hands and try to roll the helmet forward. If you can roll the
helmet over the eyes, it is too loose and you should try another
size of helmet.
The faceshield on your ScorpionExo®helmet provides
protection from weather, small flying objects and wind.
Tinted shields are available to protect your eyes from excessive
sunlight. The ScorpionExo®SpeedView®internal sunvisor
system allows you to instantly tint the sunlight.
NEVER USE A DARK OR TINTED FACESHIELD OR SPEEDVIEW
VISOR IN DARK OR POOR VISIBILITY RIDING CONDITIONS.
This is not only unsafe, but also illegal in most countries.
NEVER WEAR A FACESHIELD THAT HAS BECOME SCRATCHED,
OR RIDE WITH A FACESHIELD THAT IS FOGGED BY CONDENSATION.
SCORPIONEXO®FACESHIELDS (CLEAR AND SMOKE ONLY)
COME WITH A SCRATCH-RESISTANT COATING.
Ventilation systems are designed and engineered to maximize
your comfort in a wide range of temperatures. Familiarize
yourself with the vents on your street helmet. Some vents
have detents allowing partial opening and closing, thereby
controlling intake and exhaust airflow. Your helmet ventilation
systems should be kept clear of any obstructions including
dirt, insects or other items which could interfere with proper
flow of air. The ventilation systems play an important role,
especially during physical exertion or hot-weather riding.
Ventilation helps decrease the possibility of fogging
on the faceshield.
8
8
Side covers are bundled to provide a perfect full-face look.
It is pre-installed to the helmet, and can be replaced with the peak visor.
Side Covers
WARNING

34
EN EN
Aero-Tuned Peak Visor
Speedview®Sunvisor
Retraction-lever
Speedview®
Internal Sunvisor
Faceshield
Lift/lock tab
Mouth Intake Vent
Single button Face Bar
release
Crown Liner
Exterior View of Liner
Cheek Pads
(Side View)
FRONT VIEW OF THE HELMET
DO NOT ATTEMPT TO ADJUST WHILE RIDING
USING THE RETRACTABLE
SPEEDVIEW® SUNVISOR
NOTE: THE RETRACTABLE INTERNAL SUNVISOR CAN
BE LOWERED AND RETRACTED, REGARDLESS OF
WHETHER OR NOT THE FACESHIELD IS UP OR DOWN.
To raise the sunvisor, just
slide the SpeedView®Sunvisor
Retraction-lever towards the front
of the helmet.
To lower the sunvisor, simply
slide the SpeedView®Sunvisor
Retraction-lever towards the back
of the helmet.
REMOVING THE CHEEKPADS
Gently pull cheek pads away from the interior wall of helmet
to unsnap the plastic clips on each side. Next, gently
tug away the cheek pads from helmet.
Always check to make sure the crown liner, neckroll and cheek pad are installed before using the helmet.
A helmet without the crown liner and/or cheekpad may increase your risk of serious injury or death.
WARNING

56
EN EN
REMOVING THE CROWN LINER
After removing the cheek pads, reach into the helmet and pull
out the crown liner shown below. The front part of the liner is
snapped to the helmet liner frame. Gently detach it from the
forehead channel and pull away from interior of helmet.
REMOVAL OF SPEEDVIEW®
SUNVISOR FOR CLEANING
OR REPLACEMENT
NOTE: FIRST, OPEN OUTER SHIELD TO THE HIGHEST POSITION.
THEN LOWER THE SUNVISOR TO LOWEST POSSIBLE POSITION.
Firmly hold the sunvisor with your hand and gently
pull one side out away from the helmet to release.
Repeat to release the opposite side.
Reverse process for installation.
REMOVING THE SIDE COVERS
INSTALL THE SIDE COVERS
To remove the side covers, first make sure chin bar is closed.
Then twist off each of the 2 peak visor screws from both sides.
Gently lift off helmet.
To install the side covers,
first remove the peak visor.
Then align each side cover
over the faceshield side
(see yellow arrows) and with
the peak visor screw hole.
Insert peak visor screws into
each side and firmly tighten
both sides by a tool like a coin.
INSTALL THE PEAK VISOR
To install the peak visor, align the visor in the upright position and
line-up the arrows on the chin bar and peak visor (circled in red).
Insert peak visor screws into each side and firmly tighten both sides
by a tool like a coin.
Peak Visor Screw
Peak Visor Screw
Side Cover
Peak Visor
Screw Hole
Use a tool
(like a coin)
to tighten
the screw.

78
EN EN
12
3
4
OPERATION OF FLIP UP CHIN BAR
!WARNING! BE SURE THAT CHIN BAR IS CLOSED SECURELY!
DO NOT OPERATE MOTORCYCLE WITH CHIN BAR IN OPEN POSITION!
DO NOT ATTEMPT TO ADJUST WHILE RIDING
PULL LEVER DOWN AND AWAY FROM FACE
INSTALLATION OF BREATH BOX
First, place the helmet upside down, then
slightly open the chin bar.
Note: The helmet should be placed on a
helmet pad or a soft and smooth surface
to avoid any scratch or damage.
Second, insert the tab of the
breath box into the hole inside the
chin bar (as seen in the red circle).
After inserting the tab, push the
flat side of the tab until
you hear it “click” into position.
Third, insert the side mounting tab
(refer to the red arrow) under the rubber
gasket on the top surface of the chin bar.
Once the side mounting tab on one side is
correctly seated, repeat this process on the other side
to completely install the breath box. Reverse
these steps in order to remove the breath box.
12
Push
Click!
3

9
10
EN EN
INSTALLING THE CHIN CURTAIN
Insert the hole (in red circle) to the post
hidden inside the lower edge of the chin bar.
Do the same to the other side to completely install
the chin curtain.
After installing the chin curtain, connect the chin curtain
to the breath box by the snaps (in red circles) .
Do these steps in reverse order to remove.
If you want to use the breath box or the chin curtain
separately, you can do it referring to the above
instructions.
INSTALLING THE ELECTRIC SHIELD
HELMET JACK
POWER TO BATTERY
1. Connect RED wire of the power cord to the POSITIVE (+) battery terminal.
2. Connect BLACK wire of the power cord to the NEGATIVE (-) battery terminal.
3. Plug the power cord jack into the female jack connection.
4. Never use power sources above 15 Volts @2 AMPS, as this may damage
the heating elements.
Easily connect your electric faceshield to
the accessory outlet!
Ask your retailer about the Electric Faceshield Jack
accessory.
Note: This instruction is for the EXO-CX950 Snow Electric Shield
Version. The helmet is also available with a standard dual pane shield.
1
2

11 12
EN EN
damaging the sweat-wicking material covering the liner parts, we
recommand to place the parts in a washing bag. Do not place
lining parts in the dryer: Excess heat may damage the foam and
coverings. The faceshield may be cleaned with plastic polish or
mild soap and water. The shell of your helmet should be cleaned
using only a mild detergent and water.
Warning
DO NOT
Warranty
For your safety, it is important that you completely read the
owner’s manual and all warning labels.
Although there is no visible damage on your helmet, general wear
and tear over time may affect overall function of protective
helmet and increase the risk of injury in accident. It is advisable
to replace your helmet no later than every 5 years from purchase.
DO NOT ride without snugly fastening your chinstrap.
DO NOT clean your helmet with petroleum products, solvents,
benzene, thinner or cleaning agents.
DO NOT paint over your helmet’s finish without totally protecting
and isolating the shock-absorbing liner and plastic parts.
Your warranty will otherwise be invalidated.
DO NOT drop your helmet from any height onto a hard surface.
This could cause damage to your helmet’s finished and/or
decrease its ability to protect you.
DO NOT place your helmet on your motorcycle’s rearview mirror:
The sharp pressure from the mirror’s edge will compress and
damage the helmet’s shock-absorbing liner.
DO NOT place your helmet on the motorcycle’s seat or fuel tank.
It can easily roll off and hit the ground causing damage to the
For on-line registration of your new ScorpionEXO helmet,
please log onto www.scorpionusa.com/support/
product-registration.html . Should you have a
warranty claim, please call 888-672-6774
business hours (PST). Details of your
ScorpionEXO warranty can be found online:
www.scorpionusa.com/support/warranty-and-returns.html
helmet. It is best to place your helmet on the ground so it cannot
fall in any direction.
DO NOT ride with a scratched faceshield. This can impair your
vision, especially at night.
DO NOT modify any part of your helmet, e.g., drilling the shell or
cutting and pressing the shock absorbing liner. Installation of
sound systems, speakers and microphones reduces your
helmet’s ability to protect you and is not recommended.
DO NOT use the helmet again if it has either been dropped or
involved in an accident. Replace it even if the damage is not
visible to the naked eye.
DO NOT wear a dark or tinted faceshield (including the
retractable SpeedViewTM Sunvisor) in dark or poor visibility riding
conditions.
DO NOT place your headliners and cheek pads in the dryer after
washing. Allow them to air dry.
DO NOT attempt to remove, change or replace your faceshield
while riding your motorcycle or ATV.
DO NOT use paint which requires heat curing.
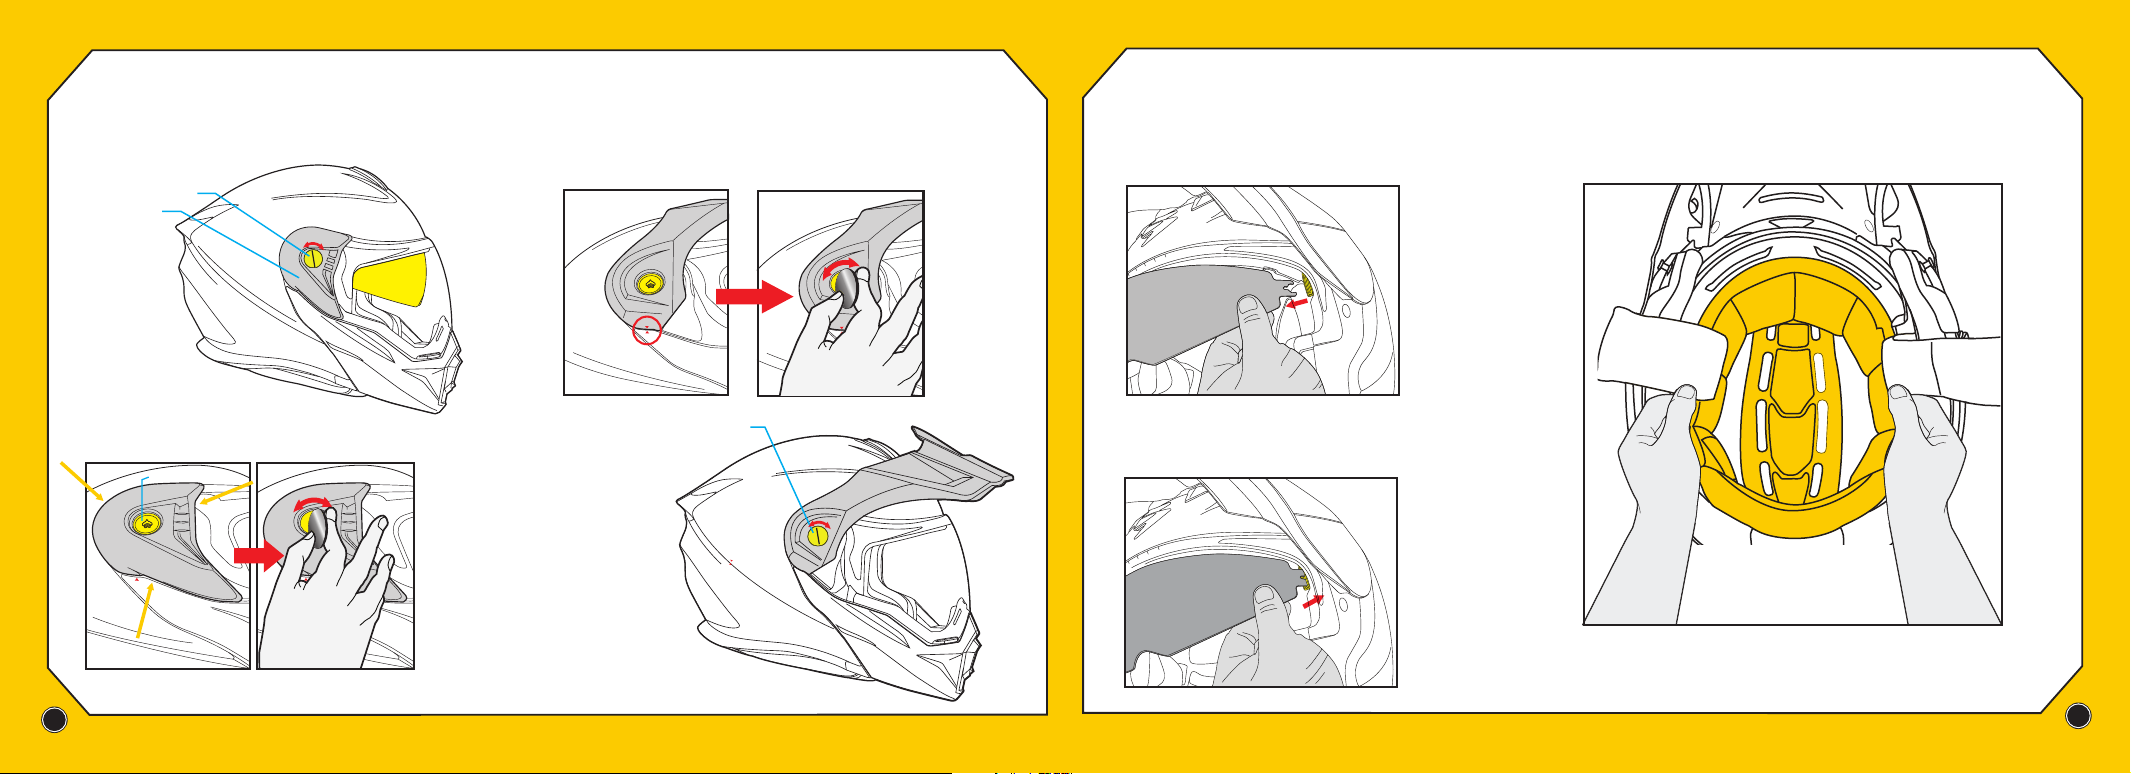
Cleaning Your Helmet System
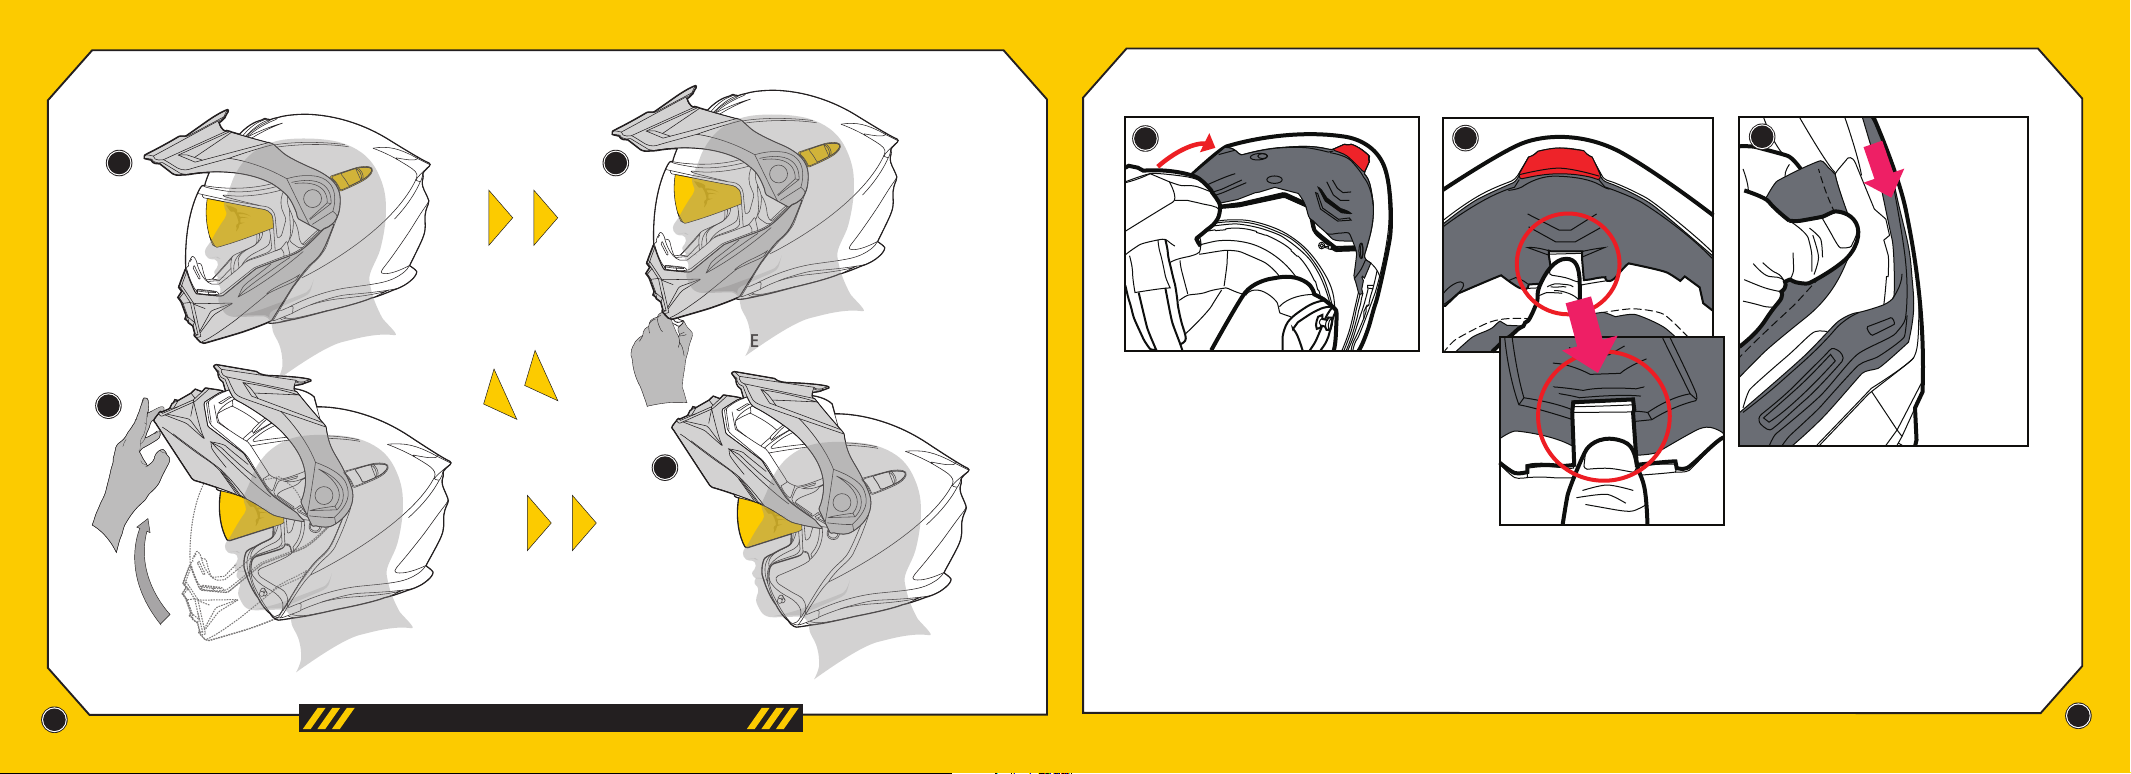
To remove your faceshield, first you will need to remove the peak
visor. See page 5 for detail. Once the peak visor is off. Remove the
faceshield one side at a time. Replace with new one.
Once the new faceshield is in position, re-install the peak visor
or side covers. See page 5 for details.
FIRMLY AND SECURELY FASTEN YOUR CHINSTRAP.
Check your chinstrap for tightness occasionally as vibration or wind
may loosen it.
Do not simply pull your helmet down onto your head like a hat. Your
ScorpionExo®helmet should be worn as follows: Using both hands
grab the helmet’s bottom rim while holding the chin straps with
your thumbs. Then “roll” the helmet onto your head starting at the
forehead. Continue rolling the helmet on towards the back of the
head until it comes to rest with your head fully in contact with the
inner lining and cheek pads.
FACESHIELD REPLACEMENT SECURING AND WEARING
YOUR HELMET
To remove the peak visor (or side covers), first make sure chin bar
is closed. Then twist off each of the 2 peak visor screws from
both sides. Gently lift off helmet.
Peak Visor Screw
None of the components of your ScorpionExo™ helmet can be damaged
by water. All headliners and sweat-wicking cheek pads are machine
washable. Wash them with a mild detergent in warm water and allow to
air dry. Hand washing is recommended, but machine washing is also
permitted. Use the “delicate” cycle to prevent the agitator from
HOW TO USE CHINSTRAP
1) Lead chinstrap through eyelets
of both rings.
2) Curl back and thread through taller
ring with nylon pull-tab.
3) Securely tighten chinstrap until
comfortable and safe.
4) Press and snap buttons together
to manage excessive strap.

13 14
EN EN
MEMO MEMO
Table of contents