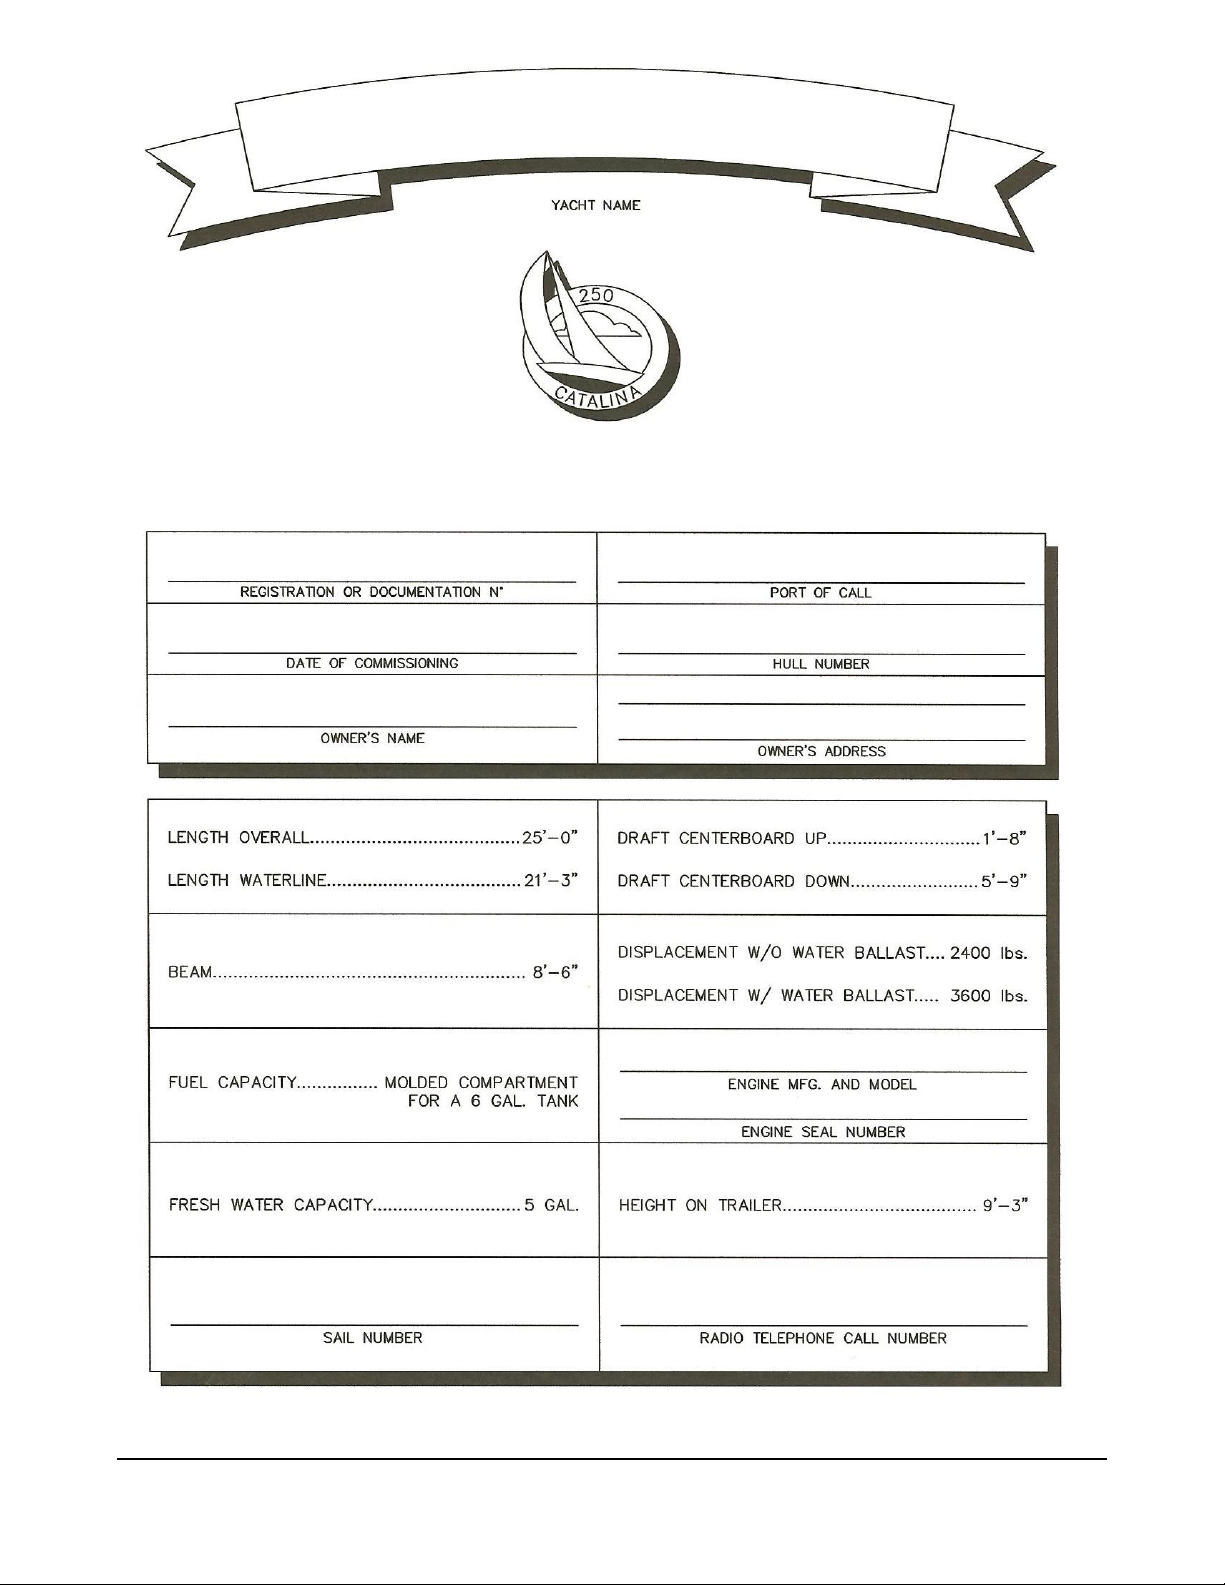
Catalina 250 User manual

Catalina 250

1
Owner’s Manual

i
W E L C O M E T O
Catalina Yacht Ownership
Catalina Yachts
21200 Victory Boulevard
Woodland Hills, California 91367
Phone 818.884.7700 • Fax 818.884.3810

ii
Preface
Congratulations on the acquisition of your new Catalina 250! All Catalina yachts are designed and built with
care, using quality materials, in order to provide you with years of sailing enjoyment while minimizing the
worries of upkeep and maintenance.
Before attempting maintenance or operation of your Catalina 250, please review the Catalina Yachts Limited
Warranty booklet and fill out the enclosed warranty registration card.
This registration card enables Catalina to inform you of developments and modifications that may enhance the
performance and comfort of your yacht. It is also important for us to be able to contact owners in order to
keep them in conformance with Coast Guard notifications and requirements.
The launching and rigging of the Catalina 250 should be performed by experienced professionals, under the
direction of your authorized Catalina dealer.
The index page lists the contents of this manual. Warranties and information pertaining to optional equipment
has been included where available and applicable.
The proper maintenance of your yacht can become a satisfying part of your sailing activities. Regular inspection
of your yacht’s running systems is the best preventive maintenance, and will ensure years of sailing enjoyment
while keeping your boat safe and in good operating condition.
Catalina encourages you to maintain your yacht as suggested in this manual, and to boat responsibly by
practicing good seamanship.

iii
Foreword
We have included this manual to provide answers to common questions regarding the maintenance and
systems design specific to your Catalina 250.
This manual is not intended to provide sailing instruction. It is assumed that the operator is either experienced
in sailing or has the intent to seek sailing instruction through courses and/or written materials that are available
on the subject. A thorough understanding of the fundamentals of sailing is important in order to ensure safe
operation of your Catalina 250.
The systems, descriptions, and illustrations in this manual apply to boats built at the time of publication. It is
our commitment to the current owners, and future owners, to constantly review and improve the Catalina 250.
Therefore, portions of the content of this owner’s manual may not apply to boats that have been manufactured
before the release date shown on this manual.
Owners of hulls that were built prior to the release of this owner’s manual are strongly encouraged to consult
their authorized Catalina dealer, or contact Catalina Yachts for information pertaining to their boat. Please
include your hull number when requesting information.
The maintenance checklists contained within this manual are provided as guidelines for boats operating in
typical conditions under normal service intervals.
Certain climates and conditions may require additional or specific maintenance, operational, and/or storage
procedures. Please consult local boating service professionals, or your authorized Catalina dealer, for
maintenance and service procedures that may be applicable to regional conditions where your boat is stored
and operated.
Caution: Aluminum and other metal parts on your boat conduct electricity. Coming in contact with or being
in the proximity of overhead power lines, or lightning; may cause serious injury or death. Keep a safe distance
from power lines while launching and/or operating your boat.
Literature pertaining to included or optional equipment, manufactured by others, will be provided with this
manual where available and applicable to the hull number for which this manual is supplied. This information
has been furnished by the manufacturer of these items and may contain illustrations or instructions that vary
from the procedures/practices that are recommended by Catalina Yachts. Catalina will not be held responsible
for the instructional information provided by others –please refer any questions to your local authorized
Catalina dealer.

iv

Table of Content
Introduction i
Preface ii
Foreword iii
Vessel Information iv
C H A P T E R 1
SPECIFICATIONS and LAYOUT
Yacht Information and Specifications 1
Deck Plan 3
Accommodation Plan 4
C H A P T E R 2
GENERAL OPERATION
Commissioning Checklist
Pre-launch check 5
In water check
Electrical 5
Plumbing 6
Rigging and hardware 6
Sailing checklist 6
Final check 6
Manual Bilge Pump 7
Pop Top Operation 7
Anchor, Anchoring, and Mooring 7
Recommended Outboard Engine 7
Recommendations for Trailering 8
C H A P T E R 3
YACHT SYSTEMS
Preparing Mast for Use
Mast Setup 9
Rig Setup and Tuning
Raising the Mast 10
Installing the Boom 11
Installing the Mainsail 11
Rig Specifications
Spar Information 12
Standing Rigging 12
Rigging Lengths 13
Centerboard System 0
Water Ballast System 0
C H A P T E R 4
ELECTRICAL
Batteries 0
D.C. 12 Volt Electrical System 0
Wiring Diagram 0
Navigation Lights 0
Preventative Maintenance 0

C H A P T E R 5
SAFETY
General Safety Tips 0
Required Minimum Safety Equipment 0
Suggested Safety Equipment 0
Safety Package (Optional) 0
Lightning
Protection and Recommendations 0
Warning Labels 0
C H A P T E R 6
MAINTENANCE
Maintenance Guide
Pre-use maintenance 0
Monthly maintenance 0
Seasonal maintenance 0
Spar and Rigging Maintenance 0
Sail Maintenance 0
Rudder Maintenance and Care 0
Fiberglass Maintenance and Repair 0
Fiberglass Touch-Up 0
Bottom Paint Preparation 0
Interior Cushion/Fabric Maintenance 0
Index 0
Notes 0
Revisions 0


C A T A L I N A 2 5 0
- 1 -
SPECIFICATIONS
and LAYOUT
P R I N C I P A L D I M E N S I O N S
Length Overall (LOA)* 26’-11” (8.20m)
Length of Hull 25’-0” (7.62m)
Length at
Waterline (LWL)* 21’-3” (6.48m)
Beam 8’-6” (2.59m)
Distance from Waterline
to Masthead 33’-3” (10.13m)
Theoretical Hull Speed 6.2 knots
*Length of rudder included.
W I N G K E E L
Draft 3’-5” (1.04m)
Ballast 1,050 lbs. (476kg)
Design Weight 4,200 lbs. (1,905kg)
Displacement/Length 195.4
Sail Area/Displacement 16.29
C E N T E R B O A R D
Draft (Board Up) 1’-8” (0.51m)
Board Down 5’-9” (1.75m)
Design Weight 3,250 lbs. (1,474kg)
Displacement/Length 151.2
Beam 19.32
S T A N D A R D R I G
Mainsail (rated) 135ft2(12.54m2)
Total with
100% Foretriangle 265ft2(24.62m2)
I 29’-0” (8.84m)
J 9’-0” (2.74m)
P 24’-4” (7.42m)
E 11’-0” (3.35m)
R I G G I N G
Single Spreaders Swept aft
Shrouds
Upper 5/32” (0.40cm) wire 1x19
Lowers 5/32” (0.40cm) wire 1x19
Forestay 3/16” (0.48cm) wire 1x19
Backstay 5/32” (0.40cm) wire 1x19
Raising Stays 5/32” (0.40cm) wire 1x19
Rope halyards/low stretch led aft.
Boom vang, block and tackle.
W I N C H E S
Primary and halyard - #14 Lewmar, chrome
bronze; self tailing.
Chapter
1

C A T A L I N A 2 5 0
- 2 -
H E A D R O O M
Centerboard
Pop Top Down 4’-8” (1.42m)
Up 6’-4” (1.93m)
Keel
Pop Top Down 5’-5” (1.65m)
Up 7’-1” (2.16m)
B E R T H S
Total sleeps 4
C O L D S T O R A G E
Optional Ice Chest 48 Quart (45.42L)
T A N K C A P A C I T I E S
Water (forward) 12 Gal. (45.4L)
Sewage Porta Potty*
Optional marine head 17 Gal. (64L)
Fuel (Outboard tank locker) 6 Gal. (23L)
*See manufacturer’s specifications.
E N G I N E A N D C O N T R O L S
Recommended (Outboard) 6-15 HP
Optional Saildrive (Keel Model Only)
Manufacturer Yanmar
Model 1GM10CE-SD20
(saltwater cooled)
Displacement 19.41cu.in. (0.32L)
Power 9 HP (6.7 kW)
Approx. Fuel Consumption
@2400 RPM 0.2 GPH (0.76 LPH)
Standard: 12 volt electrical system with control
panel and battery.
Options: Edson pedestal steering with 24” (0.61m)
Destroyer wheel, and Ritchie DNW 200 compass.
R A T I N G S
PHRF (May vary by area)
IMCI (CE) Boat Design Category: C
Please note: All dimensions and measurements are approximate and are subject to change, at any time,
without notice and may not apply to all hulls.

C A T A L I N A 2 5 0
- 3 -

C A T A L I N A 2 5 0
- 4 -

C A T A L I N A 2 5 0
- 5 -
GENERAL OPERATION
evelopment of a set of operational check lists, similar to the one provided below, is
strongly suggested. This will help to ensure that you do not skip over any part of the
pre-launch, in water, or post use procedures that are vital to the safe and trouble-free
operation of your Catalina Yacht. Space is provided in the margins throughout this
manual for additional notes you may wish to add. Enjoy your Catalina Yacht and have a safe
trip.
Commissioning Checklist
Pre-Launch Check:
__ 1. Check all through-hull fittings.
__ 2. Hull top sides –clean and waxed.
__ 3. Cushions and carpeting –clean and in place.
__ 4. Hatch lids –present and fitted to specifications.
__ 5. Lifelines and pulpits rigged to specifications.
__ 6. Spreaders taped and drilled at base end; upper shroud wired to top end and taped.
__ 7. Standing rigging pinned to mast.
__ 8. Rigging lengths verified with checklist in kit.
__ 9. Mast and boom inspected; cotter pins, sheaves, tangs, and spreaders to specifications.
__ 10. Mast lights checked before mast stepped.
__ 11. Check overhead for electrical wires which may interfere with the space required to raise the mast to its
full upright position. If there are wires, of any kind, anywhere near the boat; do not raise the mast.
Move boat to alternate location –free from the presence of wires –as contact with wires may result in
injury or death. (Refer to the safety recommendations outlined in Chapter 5.)
__ 12. Masthead sheaves lubricated and rotate freely.
Chapter
2
D

C A T A L I N A 2 5 0
- 6 -
In Water Check:
Electrical
__ 1. Electrical equipment operational; running, cabin, bow, anchor.
__ 2. Check battery fluid level.
__ 3. Check battery terminal connections.
__ 4. Check battery tie-down straps.
Plumbing
__ 1. No leaks at through hull fittings.
__ 2. Check and fill water tank.
__ 3. Test all pumps for leaks.
__ 4. Check for leaks at sink drain.
__ 5. Check bilge pump operation, handle present.
__ 6. Main hatch; no leaks, slides freely, hatch boards fit correctly.
__ 7. Cabin windows hose tested for leaks.
__ 8. Anchor locker drains correctly, no leaks.
__ 9. Stove operates correctly; check tank, fuel line, and burner.
Rigging and Hardware
__ 1. Mast stepped.
__ 2. Pin, tape, and tune standing rigging.
__ 3. Whisker pole, spinnaker gear, and boom vang operational (optional).
__ 4. Blocks and cars –rigged and operational.
__ 5. Check all winches; winch handles present.
Sailing Checklist
__ 1. Ballast tank full.
__ 2. Tiller moves freely; 35 degree minimum angle at each side.
__ 3. Sails and halyards operational.
__ 4. Boat performance under power and sail to specifications.
Final Check
__ 1. All accessory equipment is functional.
__ 2. All boat, engine, and accessory literature and/or manuals aboard.
__ 3. Warranty cards completed and mailed, owner registration card attached; owner informed of warranty
responsibilities.

C A T A L I N A 2 5 0
- 7 -
Manual Bilge Pump
The manual bilge pump is located in the port cockpit coaming. Insert the handle through the watertight fitting in
the cockpit to operate the pump. The pump intake hose (1” inside diameter) is in the bilge sump under the aft
berth on the centerline.
Pop Top Operation
The Catalina 250 is equipped with a “pop top” hatch. The pop top hatch has two positions; up and down.
When the hatch is placed in the up position the access to the cabin is greatly increased and also the interior
headroom.
To place the pop top hatch in the up position, you must enter the cabin and lift upward at the aft edge of the
pop top, with the sliding hatch fully open. With the pop top in the fully raised position, reach forward and pull
the stainless steel legs aft to engage the aft end of the slot.
Warning: Do not sail or motor your yacht with the pop top in the raised position. Always lower the pop top in
rough water.
The optional pop top cover fits over the pop top hatch in the raised position. The aft portion of the cover is
supported by a stainless steel “U” shaped frame which is inserted into the two holes in the hatch rails. The
fabric cover fastens in place with snaps which are screwed into the perimeter of the hatch opening.
Anchor, Anchoring, and Mooring
The anchor manufacturer suggests an anchor in the 13 pound range, to be used as a bow anchor in ordinary
condition. The anchor will only be effective with at least 6 feet of ¼” gauge or heavier chain and at least 3/8”
line or heavier.
Inquire in your local area about anchoring procedures relative to the place you plan to visit. Get opinions from
several experienced sailors and always stay on the conservative side in the choice and use of your anchoring
system. Do not forget to wire all shackle pins so they will not become loose during use.
Recommended Outboard Engine
An outboard engine of 6 to 10 horsepower should be adequate to propel the Catalina 250 at hull speed under
usual conditions.
A larger engine will not increase hull speed and may hinder the performance characteristics of the boat under
sail by adding unnecessary weight to the stern. Extra long shaft engines are recommended.
The center compartment will accommodate a standard 6 U.S. gallon outboard fuel tank. Do not make any
holes through the floor of this compartment into the interior of the boat. This compartment is sealed at the
factory to prevent explosive gasoline vapor from entering the cabin.

C A T A L I N A 2 5 0
- 8 -
Recommendations for Trailering
The Catalina 250 is an easy boat to trailer when following these precautions:
1. Be sure to read the trailer manufacturers instructions and warranty carefully, and do not exceed the
manufacturers gross vehicle weight rating (GVWR) for trailer, boat, and gear.
2. Check tongue weight. Most trailers tow well with 7-10% of the gross trailer and lost weight on the
tongue. If the trailer tends to “fishtail”, increase tongue weight by moving weight forward or reposition
the trailer axles aft.
3. Test the brakes by operating the master cylinder manually.
4. Inspect the winch cable for broken strands or fraying.
5. Tie the mast and boom securely to the bow pulpit and mast carrier. The spars should also be
supported in the middle by the cabin top. Pad the mast at all contact points to avoid damage.
6. The boat should be seated properly on the trailer; not ajar or tilted, and with the bow properly seated
into the rubber wedge at the front of the trailer.
7. Lower the centerboard so it is resting on the trailer bunk and there is not a load on the centerboard
lifting tackle.
8. Follow normal trailer procedures; connect lights, and safety chains. Be sure the winch is well secured.
Always test lights before leaving ramp area.
9. Do not allow anyone aft of the transom during launching or loading –serious injury may occur.
10. Always check for overhead wires before moving the boat with the mast up or while raising the mast.

C A T A L I N A 2 5 0
- 9 -
YACHT SYSTEMS
n this chapter we will provide easy to follow instructions on preparing to sail, adjusting the equipment for
optimal performance, and recommended procedures pertaining to your particular yacht. Please follow
these instructions closely as non-recommended use of your yacht’s systems may result in serious injury,
damage to your boat - which may also void your warranty.
Preparing Mast for Use
Before you begin, ensure that trailer is on level ground.
Mast Set-up:
1. Dress the mast with the standing rigging. With the mast totally unpacked, install the spreaders into the
cast spreader bracket. There are two bolts –one on each side –that connect the spreaders to the
bracket. Slide the spreaders into the bracket and secure with the 4 screws (M8x40) and lock nuts.
2. The first component of the rigging to connect is the forestay. You will find a toggle fork at the top end
that fits over the toggle in font of the masthead fitting. Check that all split pins are doubled over and
the legs of the pins are not going to catch on halyards or sails. A sealant can be used around any split
pin to deter snags.
3. Next, connect the backstay. You will find a stem ball at the top end of the backstay –to be inserted
into the aft side of the masthead. You will need to remove the turnbuckle body to allow the stud to
pass through the masthead. Reconnect the turnbuckle body once the backstay is installed on the
masthead.
4. The cap shrouds and lower shrouds have a ball and backing shell at the top. These fit into holes that
are located on the mast. The backing shell fits through the hole and then is pulled back against the
inside of the mast wall. As found on the forestay and backstay; the shrouds have a turnbuckle at the
bottom end.
5. With all of the rigging connected to the mast, lift the mast so the base fits into the mast step on the
deck. The top of the mast will roll on the aft support of the boat. Fit the bolt through the mast step and
the mast - secure with nut that is supplied. At this point, the spreaders will be pointing toward the
boat.
Connect the two side support wires (short wires that hook into mast and clip the stanchions with a
pelican hook) –these wires should be as tight as possible.
Chapter
3
I

C A T A L I N A 2 5 0
- 10 -
(Mast Set-up –Continued)
6. The forward trailer support needs to be extended up as far as it will go and pinned. Run the winch
strap up and over the roller on top of this support and pull it toward the mast. With the hook on the
strap about 10 feet aft of the roller, connect the end of the jib halyard to the hook. (It is recommended
that you tie the halyard to the hook and not use the shackle at the end of the halyard.) Tighten the
halyard by pulling it through the halyard exit (on the side of the mast), and secure it to the two cleats on
the side of the mast.
7. Attach the cap shroud and lower shroud turnbuckles to the chainplates; secure the clevis pins. Open
the turnbuckles so they are equal at the top and bottom of the turnbuckle body. Tighten the
turnbuckles so you can see the securing holes in the threaded parts. Do the same on the backstay.
Rig Set-up and Tuning
You are now prepared to raise the mast. Before you start, STOP and check that everything is connected and
that there are no hang-ups on any wires or halyards. Also, make sure that everyone is prepared and aware –
remember…safety first!
Raising the Mast:
1. Start winching the mast up, paying attention to the shrouds and backstay, so they do not get snagged
on any part of the boat. The hook on the winch strap will go over the roller and down toward the winch.
Keep winching until the mast is upright and you are able to attach the forestay wire. Once the forestay
is attached, go around and tighten the other 5 turnbuckles by hand. You may now release the winch
strap and the two support wires.
STOP and check that all turnbuckles are connected and secure and the mast is upright.
2. The mast requires a slight rake of 2”. This can be checked by utilizing the boom lift halyard with a
weight tied to the end. Measure at the boom height from the back of the mast to the boom lift halyard.
To increase rake you will need to loosen the forestay; to reduce rake you will need to tighten the
forestay. If you find that adjusting the forestay is not affecting the rake then you may have the side
shrouds too tight –which will not allow the mast to move.
3. Once the rake is set, the mast’s pre-bend is now induced. 1-2 inches of pre-bend is recommended –
which is important in order to stabilize the center of the mast. The bend is induced by tensioning the
cap shrouds and backstay. As the mast bends, you may need to loosen the lower shrouds to allow the
mast to bend. Use the boom lift in the same way as you did with the rake, but hold it against the mast
at the gooseneck height and look up to the center of the mast. Here is where you will look for the
distance from the back of the mast to the halyard. Without going up the mast, you will need to use
sight to estimate the bend. Once you have the correct bend, you can take up some tension on the
lowers to lock the bend in place. The following is a simple guide using the Loos tension gauge –this
will assist you in tuning your rig; (specifications provided by U.S. Spars)
Rigging tension using the Loos gauge:
Forestay –17%
Cap shroud –15%
Lower shroud –15%
Backstay –16%
Note: These numbers are a guide to setting up your yacht for optimal performance and stability. It is advised
that you re-check all of your rigging and make tuning a regularly scheduled part of your maintenance
procedure. Great care should be taken to ensure that your rig is safely installed and tuned correctly.

C A T A L I N A 2 5 0
- 11 -
Installing the Boom:
1. Once you have unpacked the boom and checked it for shipping damage, remove the connecting clevis
pin at the inboard end and slide the forks at this end over the gooseneck toggle on the mast. Push the
connection clevis pin through the fittings and secure with split pin.
2. Next, connect the boom lift to the eye at the aft end of the boom, and connect the mainsheet and vang
lines to the eyes under the boom. Reef lines and outhaul are already installed in the boom, and set up
for these lines is covered below.
Installing the Mainsail:
Once the mast is correctly installed, you will need to install the mainsail.
1. Start by sliding the clew slider into the forward end of the boom, then slide it aft to connect to the
outhaul line (this line is the shortest line in the boom). To tension this line, simply pull the line at the
inboard end of the boom and push the jammer onto the line –which will hold it into place. To release,
pull the line and the jammer will fall away from the line.
2. With the clew slider installed, undo the plastic screw head on the sail stopper (just above the boom in
the mainsail track). Then connect the main halyard shackle to the headboard of the sail.
3. Insert the plastic sliders on the sail into the sail gate opening (just above the boom), and hoist the
sail**.
4. Once all of the sliders are in place, slide the sail stopper up to fill the opening and tighten the screw.
This will prevent the sliders from dropping out of the opening.
** As you hoist the mainsail, you will need to thread the reef lines. The lines exit the outboard end of the
boom (reef one is the shorter of the two reef lines and ties off furthest aft on the boom). Run up to the
cringle in the leech of the sail, then down, and tie off around the boom through the slots cut in the foot of
the sail.
This drawing will assist you in identifying the components in your sailing package:
Other manuals for 250
1
Table of contents
Other Catalina Boat manuals

Catalina
Catalina Expo 12.5 User manual

Catalina
Catalina 22 1977 User manual

Catalina
Catalina 34 MK II User manual

Catalina
Catalina 36 User manual

Catalina
Catalina Jenny Lane User manual

Catalina
Catalina Expo 14.2 User manual

Catalina
Catalina 350 User manual

Catalina
Catalina Capri 22 User manual

Catalina
Catalina C-22 1977 User manual

Catalina
Catalina 250 User manual