CATHEXIS KBD-3100 User guide

005-20181010-185 Rev 1.1 February 18, 2019 R Solomon
Cathexis KBD-3100 Installation
and Setup Manual

005-20181010-185 Rev 1.1 February 18, 2019 Page 1
Contents
1 Introduction .....................................................................................................................................................2
1.1 Supported Systems and Software .......................................................................................................2
1.2 Hardware Requirements .....................................................................................................................2
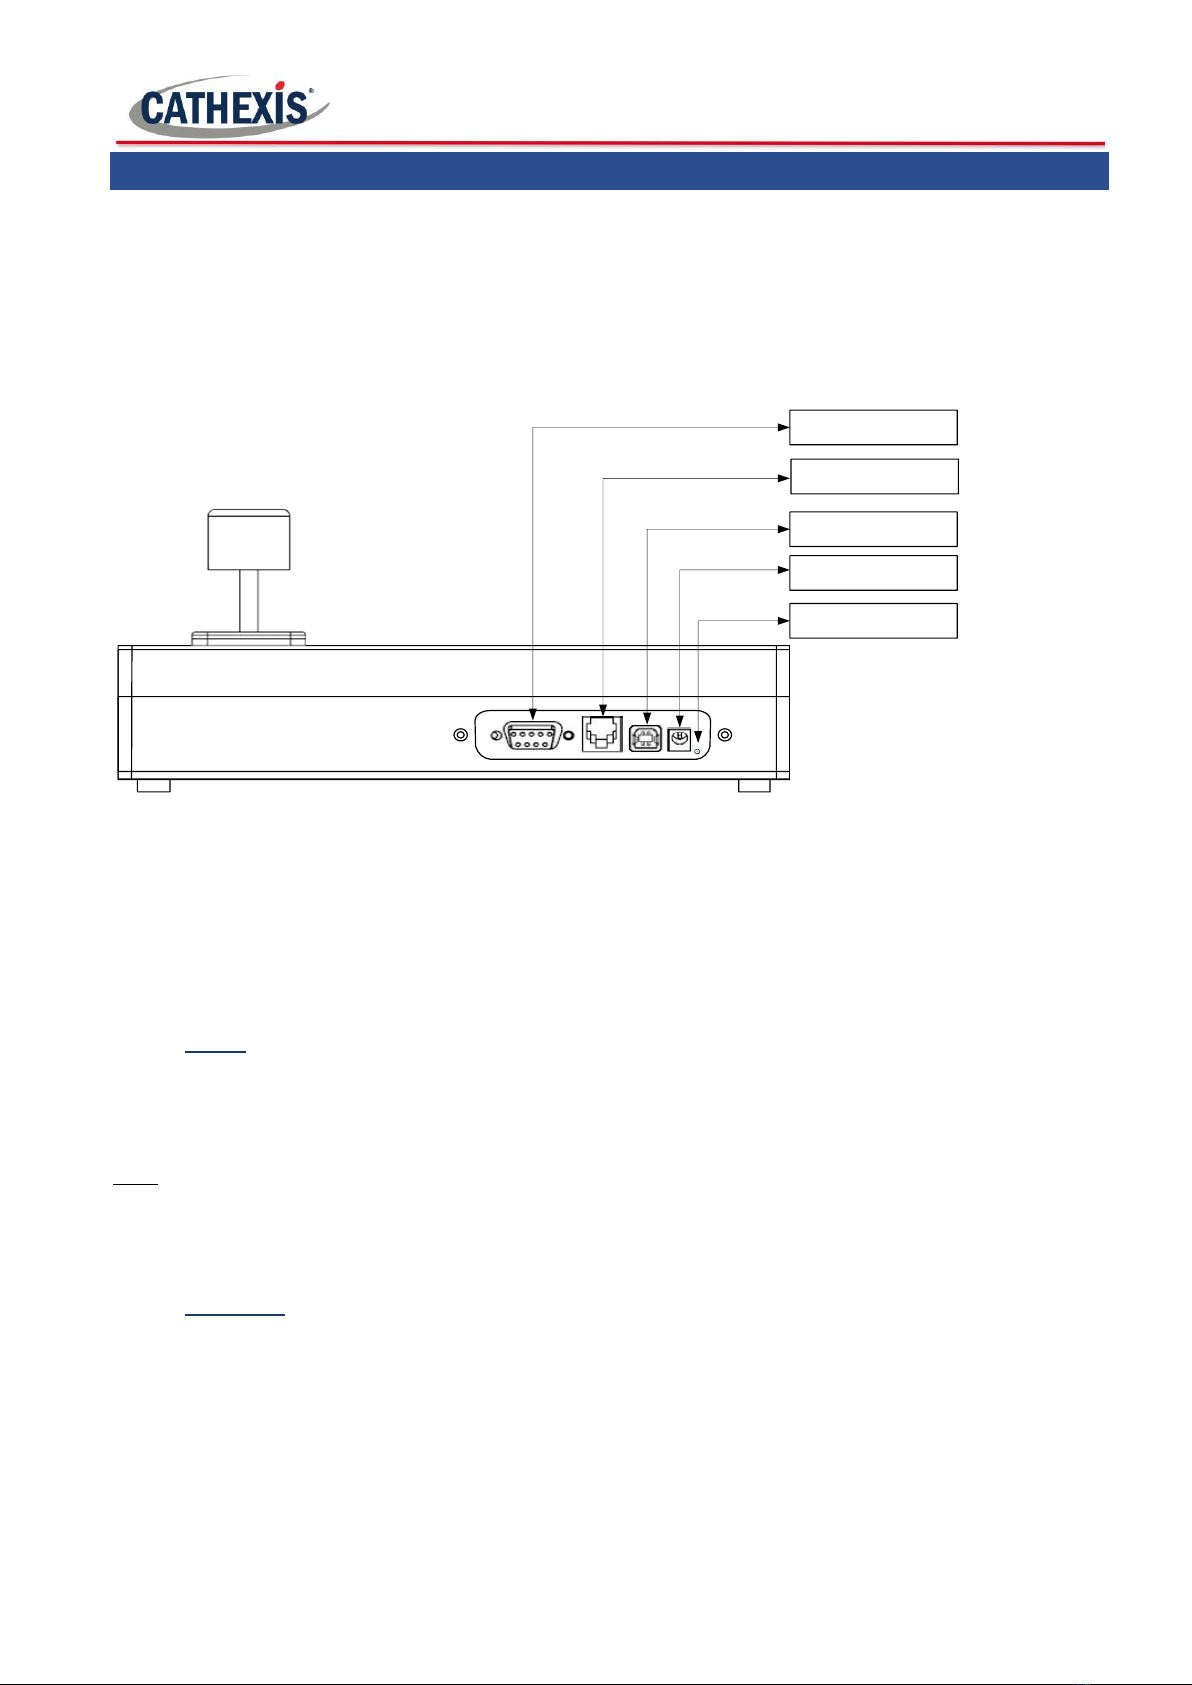
2 Connect the Keyboard......................................................................................................................................4
2.1 Connecting via USB..............................................................................................................................4
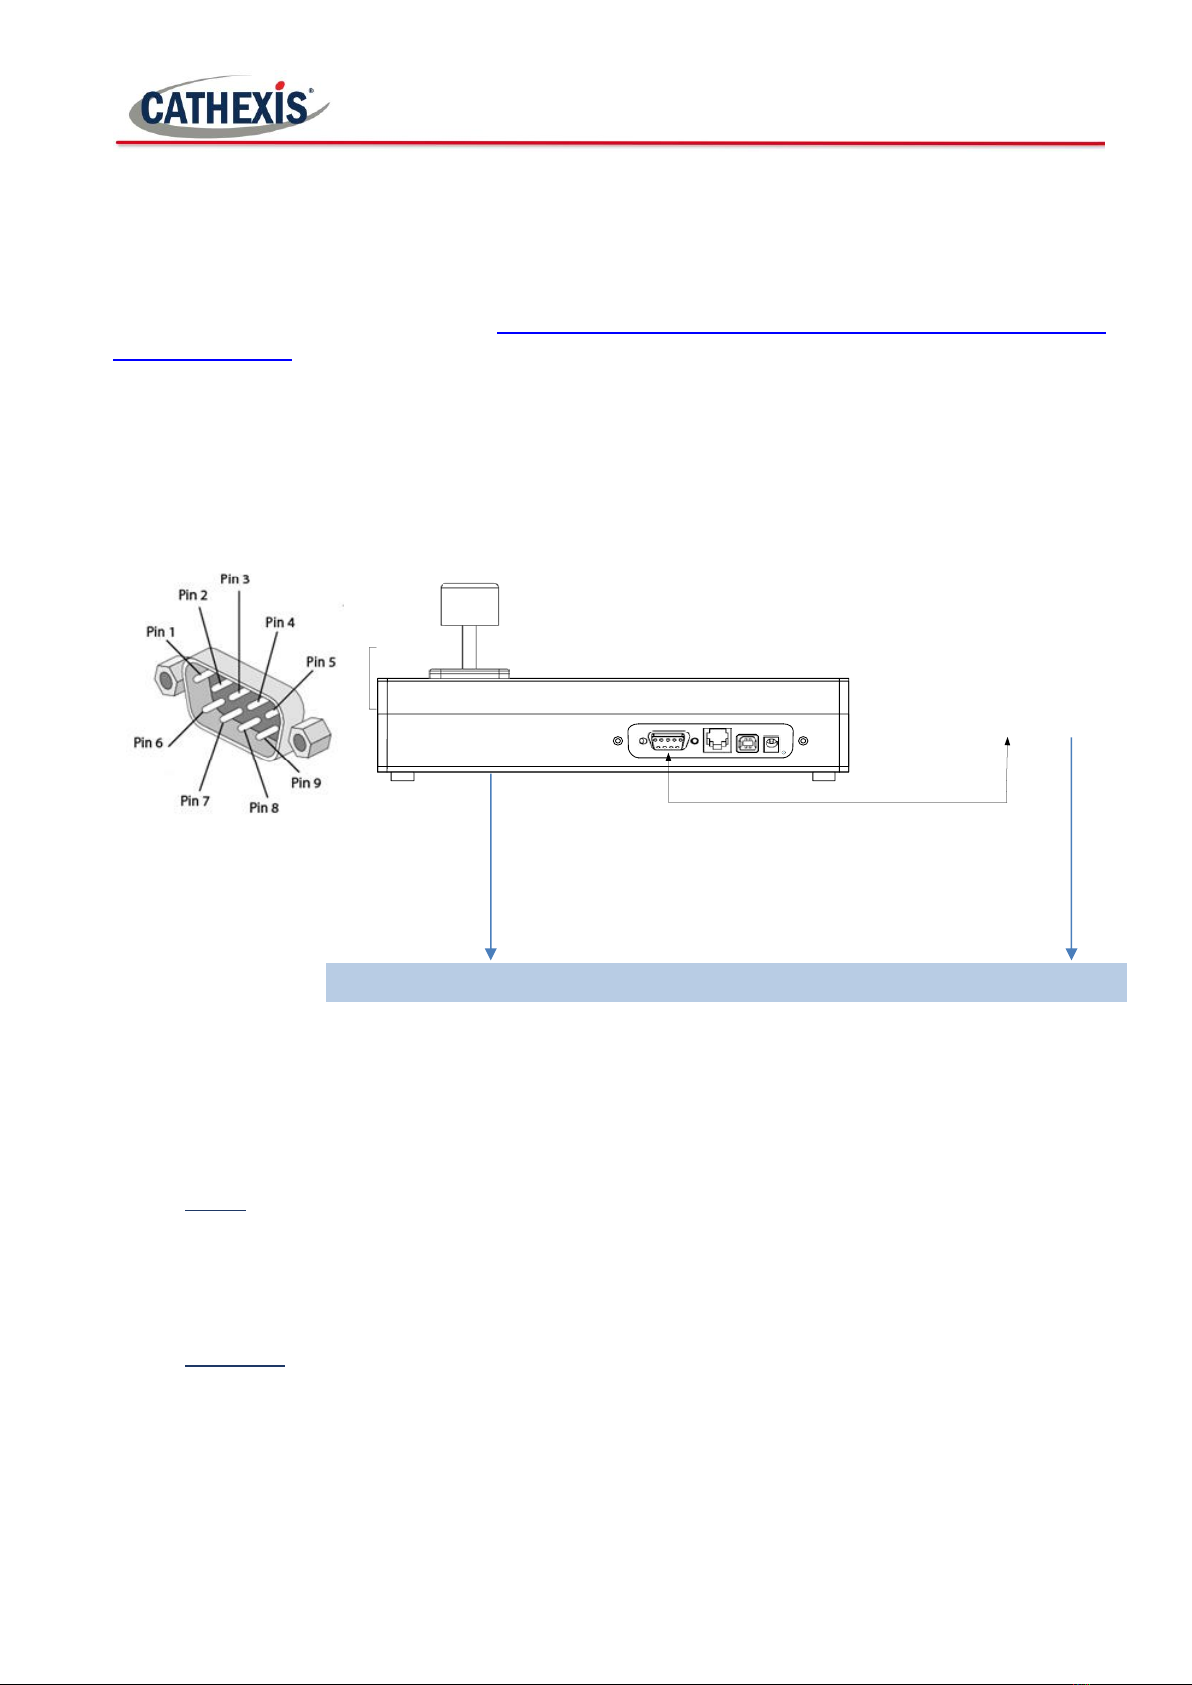
2.2 Connecting via RS232 ..........................................................................................................................5
2.3 Connecting via RS422 ..........................................................................................................................6
2.4 Manual COM Port Assignation (Windows)..........................................................................................7
2.5 Disconnect/Reset the Keyboard..........................................................................................................7
3 Enable Keyboard ..............................................................................................................................................8
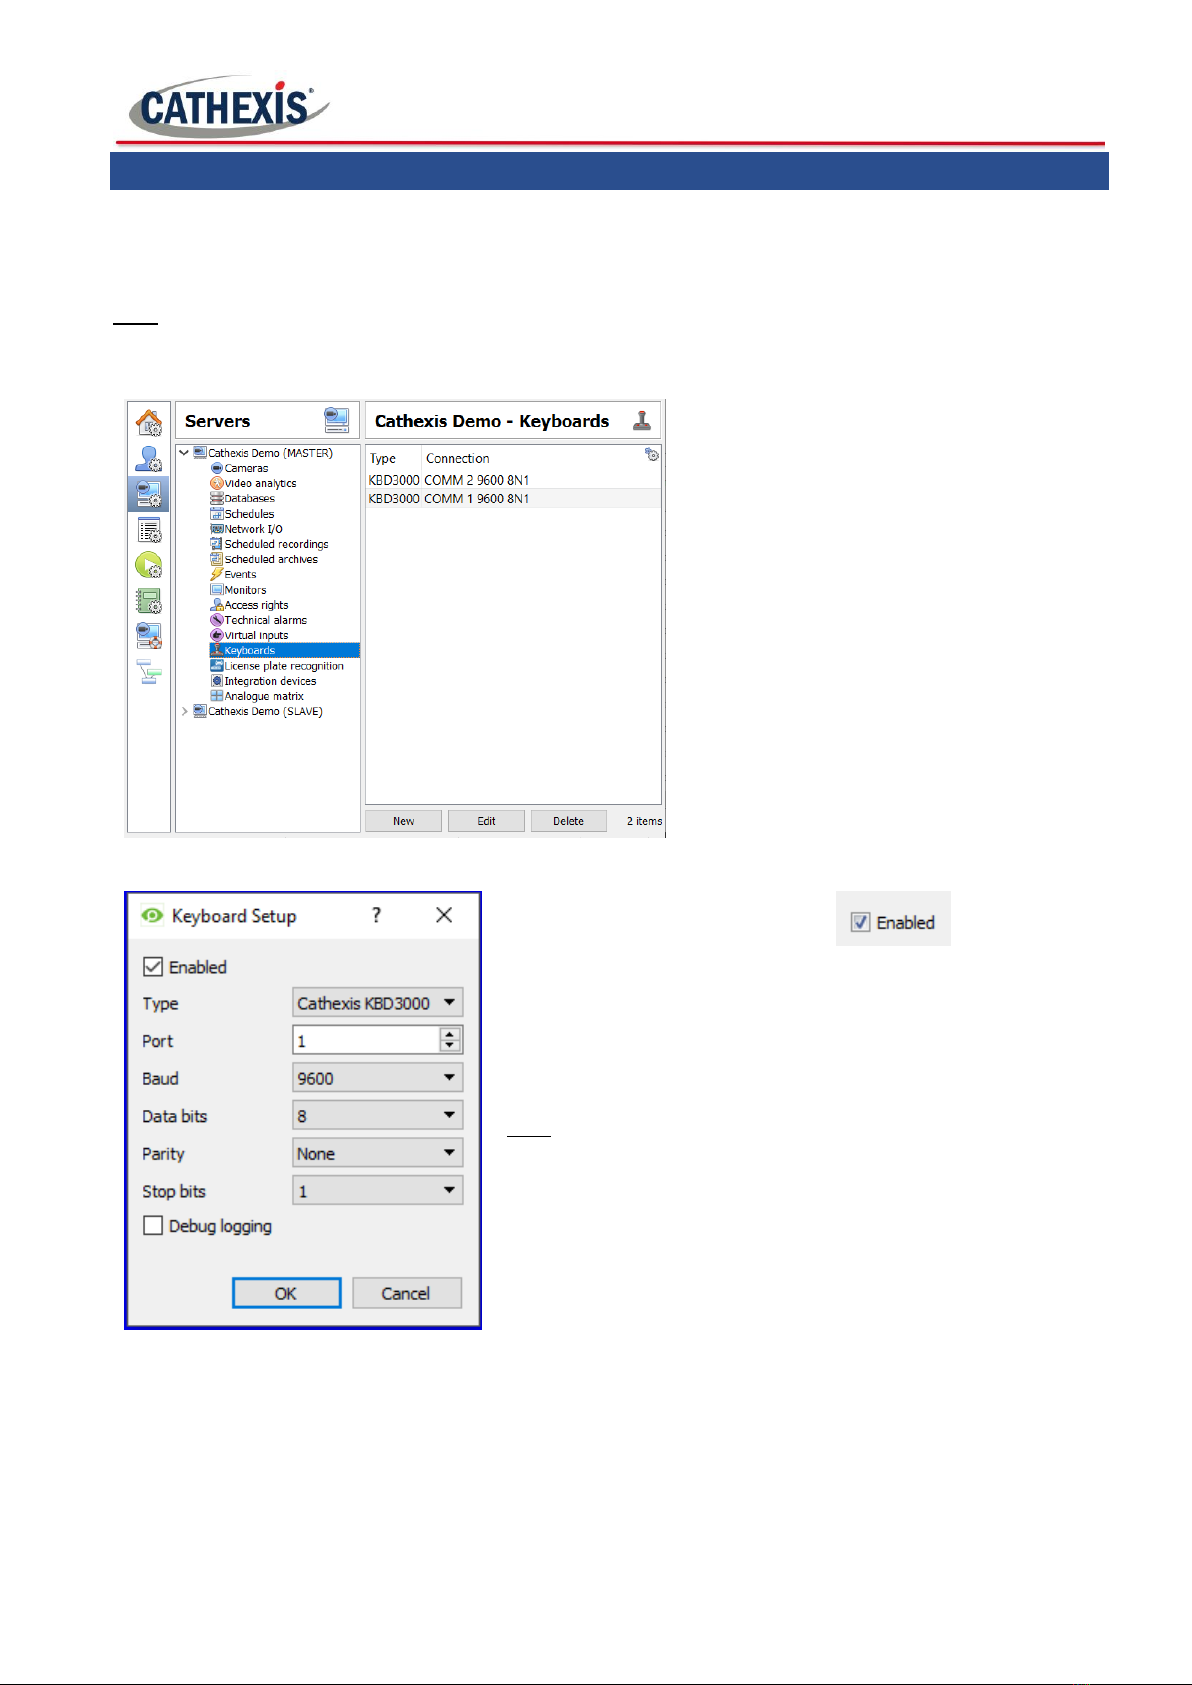
3.1 Enable in Server...................................................................................................................................8
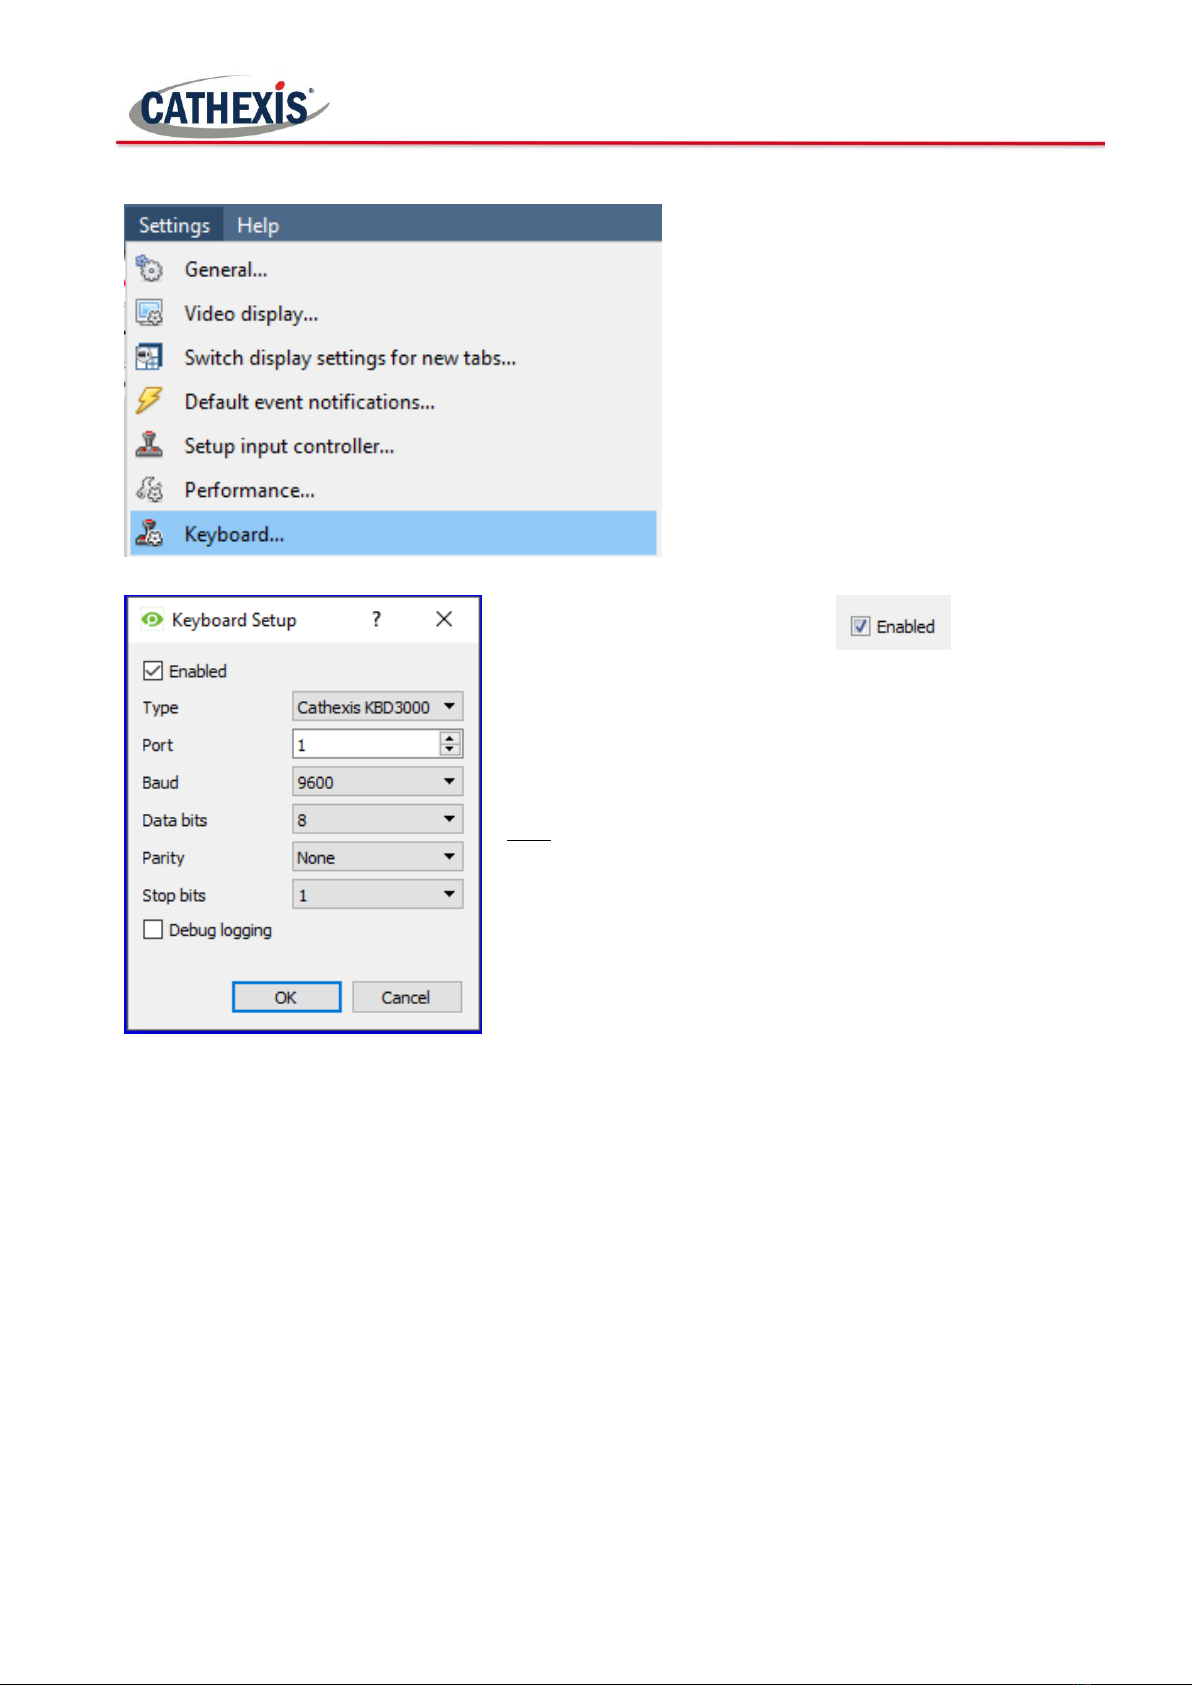
3.2 Enable in Client....................................................................................................................................9
4 Configure Keyboard Operations.....................................................................................................................10
4.1 Resource IDs ......................................................................................................................................10
4.2 Configure Operations ........................................................................................................................11
5 Logging In .......................................................................................................................................................13
5.1 Logging in on a Server........................................................................................................................13
5.2 Logging in on a Client.........................................................................................................................14
6 Conclusion......................................................................................................................................................15

005-20181010-185 Rev 1.1 February 18, 2019 Page 2
1Introduction
This document details the installation and setup of the Cathexis KBD-3100 Keyboard in the CathexisVision
software.
1
The KBD-3100 is compatible with both Windows and Linux systems. Consult the appropriate
requirements for the operating system in which the keyboard will be installed, follow the associated connection
procedures, and thereafter the operations configuration of the keyboard in both Windows and Linux is the same.
For information regarding the operation of the keyboard, please consult the KBD-3100 Operation Manual.
1.1 Supported Systems and Software
1.1.1 Windows Systems
•Windows 7 and later.
•CathexisVision software version 5041f1 (pre-2014), and CathexisVision 2014 and newer.
1.1.2 Linux systems
•Supported OS:
oUbuntu 16.04.
oUbuntu 12.04.
oFedora 16 (supported only for RS232 (serial) cable connection. USB connection not supported).
•Supported CathexisVision versions:
oCathexisVision5041f1 (pre-2014), and CathexisVision 2014 and newer if using RS232/serial cable
connection.
oCathexisVision 2019.1 and later if using USB cable connection.
1.2 Hardware Requirements
•RS232 cable [max length 15m].
oNot supplied.
oMust be straight through, with male and female DB9 connectors. One on each end.
oAdditional power supply required.
•USB cable.
oSupplied with keyboard.
oDevice powered over USB cable, no additional power supply required.
1
While Cathexis has made every effort to ensure the accuracy of this document, there is no guarantee of accuracy,
neither explicit, nor implied. Specifications are subject to change without notice.

005-20181010-185 Rev 1.1 February 18, 2019 Page 3
•Power supply:
oExternal power supply is supplied; however power lead/cord is not.
oRequired if connecting via RS232/serial cable.
•Compatible PTZ camera. See www.cathexisvideo.com for list of compatible cameras.
Note:
•The panic button is not supported from CathexisVision 2016 and onwards.
•The Keyboard PTZ setup button is only supported by legacy Analogue PTZ cameras. For new IP PTZ
cameras, advanced functions need to be configured by accessing the camera via a web browser.
Please see the KBD-3100 Operation Manual for more information.

005-20181010-185 Rev 1.1 February 18, 2019 Page 4
2Connect the Keyboard
The Cathexis KBD-3100 can be connected via either USB or RS232 (serial cable). The keyboard can be powered
using the USB cable, thus if the serial cable is used then the keyboard must be connected to an additional
power supply. See requirements section for more information.
Connect the keyboard to the unit running CathexisVision using the appropriate cable/s. See the connection
diagram below.
RS232/Serial Port
USB Port
DC Power Connector
Power Status LED
RS422 Port
2.1 Connecting via USB
The KBD-3100 can be powered over the USB cable, and thus does not need additional power.
The process of connecting the KBD-3100 via USB differs slightly for Windows and Linux systems, please consult
the appropriate section.
2.1.1 Linux
When the KBD-3100 is connected via USB to a Linux unit, the keyboard is auto-detected and is automatically
enabled in CathexisVision. No other connection configuration is required.
Note:
1. USB connection is not supported for Fedora 16.
2. The keyboard will still need to be configured for operations (see section 5).
2.1.2 Windows
Using a USB cable, connect the keyboard to the Windows unit. Windows will automatically assign a COM port
number to the USB device. CathexisVision communicates using COM ports 1 to 10; if Windows assigns the
keyboard a COM port number higher than 10, the COM port number will need to be manually changed. Please
see section 2.c.
Note: Make a note of the COM port number as this will be required when enabling the keyboard in
CathexisVision.

005-20181010-185 Rev 1.1 February 18, 2019 Page 5
2.1.2.1 Windows 7 Keyboard Drivers
For Windows installations, the device drivers need to be updated to version 2.12.16 and above.
Windows machines running automatic updates will handle the device driver updates, however machines which
do not run updates will require that the updated drivers are downloaded and installed manually.
The driver updates can be found here: https://cathexisvideo.com/video-surveillance/hardware/keyboards-
joystick-controllers/
2.2 Connecting via RS232
When connecting the KBD-3100 via RS232 (serial) cable, a power supply is required to power the keyboard. The
diagram below describes how to connect the serial cable.
Connection Diagram
CathexisVision Unit
Communication cable [not supplied] must be max 15m.
Require straight through RS232 serial with male DB9
connector at one end and female DB9 connector at
other end.
There is no
handshake required
between the
keyboard and the
PC. Connect as
follows:
KBD (DCE)
PC (DTE)
5 (GND)
5 (GND)
2 (TXD)
2 (RXD)
3 (RXD)
3 (TXD)
2.2.1 Linux
Using a RS232 (serial) cable, connect the keyboard to one of the numbered COM ports on the Linux unit. Take
note of the port number as this will need to be entered when enabling the keyboard in CathexisVision (see
section 4).
2.2.2 Windows
Using a RS232 (serial) cable, connect the keyboard to the Windows unit. Windows will automatically assign a
COM port number to the serial device. CathexisVision communicates using COM ports 1 to 10; if Windows
assigns the keyboard a COM port number higher than 10, the COM port number will need to be manually
changed. Please see section 2.c.

005-20181010-185 Rev 1.1 February 18, 2019 Page 6
2.3 Connecting via RS422
When connecting the KBD-3100 via RS422 (communications) cable to a Windows or Linux unit, a power supply
is required to power the keyboard. The diagram below describes how to connect the cable.
Note: See COM port assignation (below) if converting from RS422 to RS232 on a Windows unit.
Connection Diagram
CathexisVision Unit
RS422 cable [not supplied] must be max 12m.
Require a twisted pair (UTP), RS422 with male RJ45 connector
at one end and female DB9 connector at the other end.
There is no handshake
required between the KBD-
3000 and the PC. Connect as
follows:
KBD RJ45
Recorder PSP-1400 DB9S
3 (RX + )
4 (TX + )
4 (TX + )
8 (RX + )
5 (RX - )
5 (TX - )
6 (TX - )
9 (RX - )
1, 8 (GND)
1 (GND)
2.3.1 Connecting via RS422-RS232 Converter
Converter
Windows
System
CathexisVision Unit
KBD RJ45
ADEMCO RS422 DB9P
Converter to RS232 Cable
3 (RX + )
2 (TX + )
Converter to the NVR is dependent on
the converter switch settings. Contact
the 3rd Party company for more
information.
4 (TX + )
3 (RX + )
5 (RX - )
1 (TX - )
6 (TX - )
4 (RX - )
1, 8 (GND)
5 (GND)

005-20181010-185 Rev 1.1 February 18, 2019 Page 7
2.4 Manual COM Port Assignation (Windows)
When connecting via USB or RS232/serial cable, Windows will assign the KBD-3100 a COM Port value.
CathexisVision works with communication ports COM 1 to COM 10. If Windows has assigned the device a COM
port value that is higher than COM 10, the COM port number will have to be manually changed. See below.
Note: Take note of this value as it will be required to enable the keyboard in CathexisVision (see section 4).
Set the COM Port
The COM port that is configured here must match the one configured in CathexisVision when enabling the
keyboard (in the case of keyboards connected to Windows machines using serial or USB cable, and in the case
of keyboards connected to Linux units using serial cable).
While in the device manger (Start →Control Panel →Hardware and Sound →Device Manager), right click on
the device) →Properties →Port Settings Tab →Advanced.
2.5 Disconnect/Reset the Keyboard
To disconnect/reset the keyboard, simply disconnect and then reconnect the power supply. The KBD-3100 will
go through a normal power-up and return to the default state.

005-20181010-185 Rev 1.1 February 18, 2019 Page 8
3Enable Keyboard
If the KBD-3100 is connected to a Windows machine using USB or RS232 cables, or to a Linux machine using
RS232 cables, it will need to be enabled in CathexisVision. The Keyboard can be enabled in either the
CathexisVision Server or Client, and the setups differ accordingly. These processes are detailed below.
Note: These setups are identical in both Windows and Linux systems.
3.1 Enable in Server
Setup Tab →Configure Servers →
Keyboards →New.
To use the keyboard, make sure that is checked.
Select the Cathexis KBD-3000 from the Type drop-down
menu (note that selecting KBD-3000 does not affect setup of
KBD-3100).
Set the Port.
Note: If connecting via serial cable, this number needs to
match the COM port number configured in device manager.
See above.
Set the Baud.
Set the Data bits.
Set the Parity.
Set the Stop bits.
Debug logging is not supported for the KBD-3100.
Restart CathexisVision for these settings to take effect.

005-20181010-185 Rev 1.1 February 18, 2019 Page 9
3.2 Enable in Client
Settings Menu →Keyboard…
To use the keyboard, make sure that is checked.
Select the Cathexis KBD-3000 from the Type drop-down
menu (note that selecting KBD-3000 does not affect setup of
KBD-3100).
Set the Port.
Note: If connecting via USB to Serial converter, this number
needs to match the COM port number configured in device
manager. See above.
Set the Baud.
Set the Data bits.
Set the Parity.
Set the Stop bits.
Debug logging is not supported for the KBD-3100.
Restart CathexisVision for these settings to take effect.

005-20181010-185 Rev 1.1 February 18, 2019 Page 10
4Configure Keyboard Operations
The KBD-3100 will need to be configured for keyboard operations. These configurations are the same for
Windows and Linux.
4.1 Resource IDs
If they haven’t been already, cameras need to be assigned Resource IDs in CathexisVision. Keyboard users will
need to know these resource IDs to switch cameras quickly.
In CathexisVision, open the Setup Tab and enter the Configure Resources Panel. Select the correct server from
the Unit Resources List.
The Unit Resources list will be populated with all resources available to the site.
Each camera resource should be assigned a unique numerical ID in order for keyboard operators to be able to
switch between cameras quickly (without having to scroll through all the cameras using the arrow keys).

005-20181010-185 Rev 1.1 February 18, 2019 Page 11
4.1.1 Set ID
Right click on a camera resource and select Set ID.
In the dialog that opens, give the resource an ID:
4.2 Configure Operations
4.2.1 PTZ Wash/Wipe Functions
If intending to make use of the PTZ wash/wipe functions, the camera must support auxiliary relays:
Auxiliary relay 1 must be wired for Wash.
Auxiliary relay 2 must be wired for Wipe.
4.2.2 Panic Button (pre-2016 only)
The panic button is not supported from CathexisVision 2016 and onwards.
In pre-2016 versions of CathexisVision, the Panic button can be configured to send user triggers to pre-
configured IP addresses when pressed. These user triggers in turn can be configured to trigger a range of possible
event actions.
For example: A keyboard user has a technical problem. He presses the Panic button, which sends a user trigger
to a central unit that in turn sends a technical alarm to a control room.
Note: Panic Button not supported in keyboards used on Linux systems.
4.2.2.1 Requirements for Panic Button function
•Software 5041d11, or software 5041e2 and later.
•Windows OS.
•This file must be in the same directory that kserver200 is run from called: panictrigger.txt
•The DVR/PC that the keyboard is plugged into must have direct IP access to the systems at the addresses
specified in the file.
4.2.2.2 Create Panic File
1. Create this file: panictrigger.txt
2. Type the content of the file as follows:
IP address <space> trigger number (with the trigger number being 1-based)

005-20181010-185 Rev 1.1 February 18, 2019 Page 12
For example:
•10.0.0.1 1
•10.0.0.2 4
•10.0.0.1 16
In this example, when the panic button is pressed, the keyboard server will send user trigger 1 to 10.0.0.1, user
trigger 4 to 10.0.0.2 and user trigger 16 to 10.0.0.1.
4.2.2.3 Save Panic File
1. Save the file to:
•C:\dvs in Windows
•usr\dvs on the DVR
2. At each of the IP addresses, configure Events based on the user triggers (see CathexisVision Setup
Chapter for instructions).

005-20181010-185 Rev 1.1 February 18, 2019 Page 13
5Logging In
Depending on whether the keyboard has been configured on a Server or Client, the user may be required to log
in on the actual keyboard. This is true for all keyboards regardless of operating system.
5.1 Logging in on a Server
If the keyboard is being configured on a server, the user will have to log in on the keyboard as well as
CathexisVision. There is a way to get around this; see below.
If logging in on the keyboard, the user login must have been granted sufficient camera/PTZ access rights. This
can be done in Setup Tab →Configure Servers →Access Rights.
5.1.1 Log in on Keyboard
1.
On the keyboard, select the
LOG
In/Out
button to display Username and Password fields on the LCD
screen.
2.
Using the number pad, type the username and then press
Enter.
Enter
3.
Type the password, and then press
Enter.
Enter
To avoid having to log in on the keyboard (and/or in CathexisVision), an administrator can configure a default
site access level, for which he/she sets certain Access Rights. Thus, when the site is opened, the user is
automatically logged into CathexisVision and the keyboard, with the default access level and associated access
rights. In this case, the user will not have to log into either CathexisVision or the keyboard.
For example: An administrator sets the default site access level to Level 10 and then sets Level 10 to have PTZ
and PTZ Menu access rights. This means that when the site is opened, the user is logged into CathexisVision with
the default Level 10 access level and associated access rights. The user does not have to log into the software,
and the keyboard pulls through the default access level login details as well.
5.1.1.1 Configure Default Site Access Level
1. Open Setup Tab →General Site Setup .
Set the default access level.
2. Next, open Configure Servers →Access Rights
Click Show level and select the level
that was chosen as the default access
level.

005-20181010-185 Rev 1.1 February 18, 2019 Page 14
Then set the access rights for that level.
5.2 Logging in on a Client
If configuring the keyboard on a Client unit, the keyboard receives the login details and access rights of the
user logged into the CathexisVision Client. The user does not have to log into the keyboard; he/she need only
log into CathexisVision, unless a default site access level has been configured. See above.
Table of contents
Other CATHEXIS Recording Equipment manuals