CATOREX 1858 Series User manual

Instruction Manual
Manuel d'utilisation
Bedienungsanleitung
www.catorex.swiss
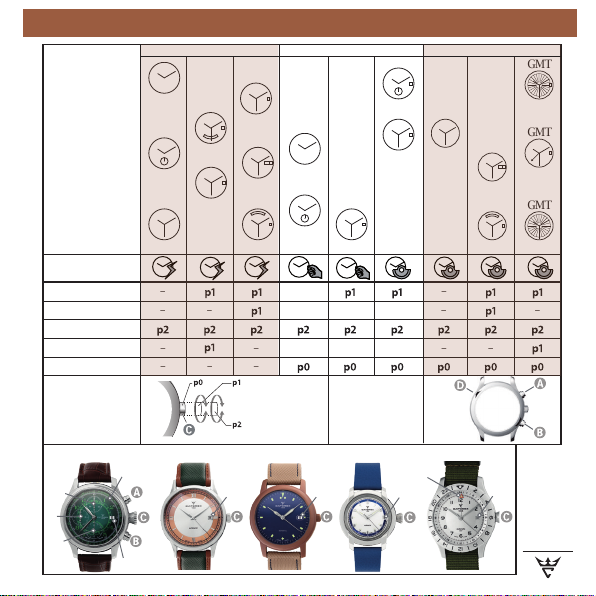
Movements
& Caliber
GMT
GMT
GMT
Date – – –
Day –– –––– –
Time
T2 – – – – – – –
Manual winding –––
Crown Push button
1
Quartz - Mechanical - Automatic
CATOREX 1858 automatics collections
5
4
2
3
6
5 5 5 5
7
QUARTZ MECHANICAL AUTOMATIC
English 3
Français 12
Deutsch 21
Swiss Made Certificate
After Sales Service
2
32
30
Recycling 31
Instruction Manual
Manuel d'utilisation
Bedienungsanleitung

3
Contents
1. Introduction
1.1 Illustration Keys
2. Quartz Watches
3. Mechanical Watches
4. Automatic Watches
5. Key Words
4
1.1 Illustration keys
Introduction
Congratulations
1
2
3
4
5
6
7
Start-Stop button
Button for resetting to zero
Crown for adjustments
Button for setting day or date
60-second counter
30-second counter
12-hour counter
24-hour hand
Small seconds display
Date or day-date display
Tachymeter or tachymiler scale
CATOREX is delighted that you have chosen a timepiece from its collection.
You have acquired a small technological marvel that will serve you faithfully for
many years. The most advanced technologies were used throughout its manu-
facture and it underwent stringent controls before it was released for sale.

5
2. Quartz Watches · Operating instructions
Quartz movement. The electrical energy provided by the battery causes
the quartz in the interior of the watch movement to oscillate 32,768 times
per second. This high frequency gives great accuracy. The seconds hand
advances in steps. Important : Do not leave the crown in position (p1)
for longer than 20 minutes, as this might interfere with the time function.
SETTING THE TIME
1. Pull out the crown completely to position (p2): the seconds hand stops*.
2. Set the time by turning the crown in the desired direction.
3. Push the crown back in completely to position (p0): the seconds hand starts
again, allowing perfect synchronization with a time signal.
* stop seconds according to model
SETTING THE DATE
1. Pull out the crown to position (p1).
2. Turn the crown clockwise to set the date.
3. Push the crown back in completely to position (p0).
SETTING THE UNIVERSAL-HOUR INDICATOR
1. Pull out the crown to position (p1).
2. Set the universal-hour indicator disk by turning the crown in the desired
direction.
3. Push the crown back in completely (p0).

6
3. Mechanical Watches · Operating instructions
Caliber 6497-1 6498-1 2801-2 UNITAS 6565
Mechanical movement. The most traditional of movements in
watchmaking is the mechanical one. To ensure that the watch
does not stop, it must be wound regularly – once a day.
SETTING THE TIME
1. Pull out the crown completely to position (p2).
2. Set the time by turning the crown in the desired direction.
3. Push the crown back in completely to position (p0): the seconds hand starts
again, allowing perfect synchronization with a time signal.
SETTING THE TIME
1. Pull out the crown completely to position (p2): the seconds hand stops.
2. Set the time by turning the crown in the desired direction.
3. Push the crown back in completely to position (p0): the seconds hand starts
again, allowing perfect synchronization with a time signal.
SETTING THE DATE
1. Pull out the crown to position (p1).
2. Turn the crown clockwise to set the date.
3. Push the crown back in completely to position (p0).
Caliber 2804-2

7
4. Automatic Watches ·Operating instructions
Automatic movement. The mechanism of the watch includes an
oscillating rotor that winds the mainspring via the motion of your
wrist. The running reserve is approximately 42 hours. If necessary,
the watch may be rewound manually. With most of our models, the
beauty of the inner working of the watch movement can be admired
through the transparent case back.
Caliber 2824-2 2834-2 2836-2 2671 2892A2 2895-2
AS2063 SW200 SW220 SW240 SW300 SW500
SETTING THE TIME
1. Pull out the crown completely to position (p2): the seconds hand stops*.
2. Set the time by turning the crown in the desired direction.
3. Push the crown back in completely to position (p0): the seconds hand starts
again, allowing perfect synchronization with a time signal.
* stop seconds according to model
SETTING THE DATE
1. Pull out the crown to position (p1).
2. Turn the crown clockwise to set the date and counterclockwise to display
the desired day.
3. Push the crown back in completely to position (p0).
8
4. Automatic Watches ·Operating instructions
Caliber 7750
SETTING THE TIME
1. Pull out the crown completely to position (p2): the seconds hand stops.
2. Set the time by turning the crown in the desired direction.
3. Push the crown back in completely to position (p0): the seconds hand starts
again, allowing perfect synchronization with a time signal.
SETTING THE DATE AND THE DAY
1. Pull out the crown to position (p1).
2. Turn the crown clockwise to set the date and counterclockwise to display
the desired day.
3. Push the crown back in completely to position (p0).
USING THE CHRONOGRAPH / START-STOP FUNCTION
Timing a single event:
1. Press button : the chronograph starts.
2. Press button : the chronograph stops.
3. Press button to reset to zero.
Note: Before you start timing, the hands should be reset to zero.
If necessary, press button .
CUMULATIVE TIME FUNCTION
This measures successive times. Each result is added to the previous one.
1. Press button : the chronograph starts.
2. Press button again: the chronograph stops.
Repeat these two steps as many times as desired. At the end of the last
measurement, the chronograph displays the total of all the times
measured. Press button to reset to zero.

4. Automatic Watches ·Operating instructions
Caliber 7753
SETTING THE TIME
1. Pull out the crown completely to position (p2): the seconds hand stops.
2. Set the time by turning the crown in the desired direction.
3. Push the crown back in completely to position (p0): the seconds hand starts
again, allowing perfect synchronization with a time signal.
SETTING THE DATE AND THE DAY
Set the date* by pressing button . The date changes at each press.
* date correction is not possible between 8.30 p.m. and 11 p.m.
USING THE CHRONOGRAPH / START-STOP FUNCTION
Timing a single event:
1. Press button : the chronograph starts.
2. Press button : the chronograph stops.
3. Press button to reset to zero.
Note: Before you start timing, the hands should be reset to zero.
If necessary, press button .
CUMULATIVE TIME FUNCTION
This measures successive times. Each result is added to the previous one.
1. Press button : the chronograph starts.
2. Press button again: the chronograph stops.
Repeat these two steps as many times as desired. At the end of the last
measurement, the chronograph displays the total of all the times
measured. Press button to reset to zero. 9
This manual suits for next models
21
Table of contents
Languages:


