IMPORTANT NOTE: in order to silence all your Wireless
alarms immediately, the alarm that has to be turned off
rst is the alarm that originally sensed the smoke or
re (and will be ashing). This silencing can be done by
pushing the hush button or using the Smart Remote. If you
silence an alarm other than the source of the alarm, the
remaining alarms will still sound.
The Smart Remote can only stop the alarmed device after
30 seconds in alarm mode. The reason for this is to make
sure you have identied the source of the re before using
the hush function.
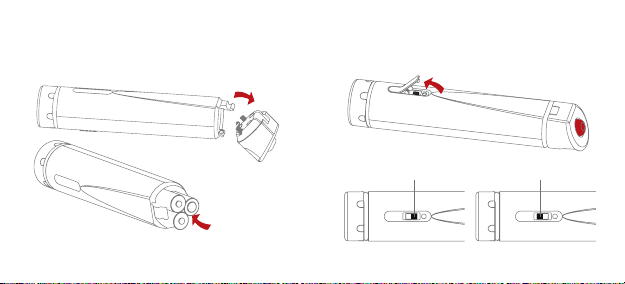
TORCH:
The torch can be turned on and off by pressing the side
button. Please note: The light will turn off automatically
after 5 minutes.
LOW BATTERY SIGNAL:
30 days before the battery is due to die, a short beep will
start to sound every 48 seconds.
Only the device affected by the low battery will beep,
no other connected devices will sound.
It is safe to change batteries in the Smart Remote
without going through the learn process again – it will
not forget the codes during the battery change process.
16 17
Please note: Due to coming legislation, the hush signal
is transmitted with reduced power (the remote must be
within short range from the silenced alarm, which means
you should be in the same room as the alarm).
You can hush any of your alarms in the system, as long
as you are in in the same room and within short range of
the alarm.