Cedam Plazza PLA02 User manual

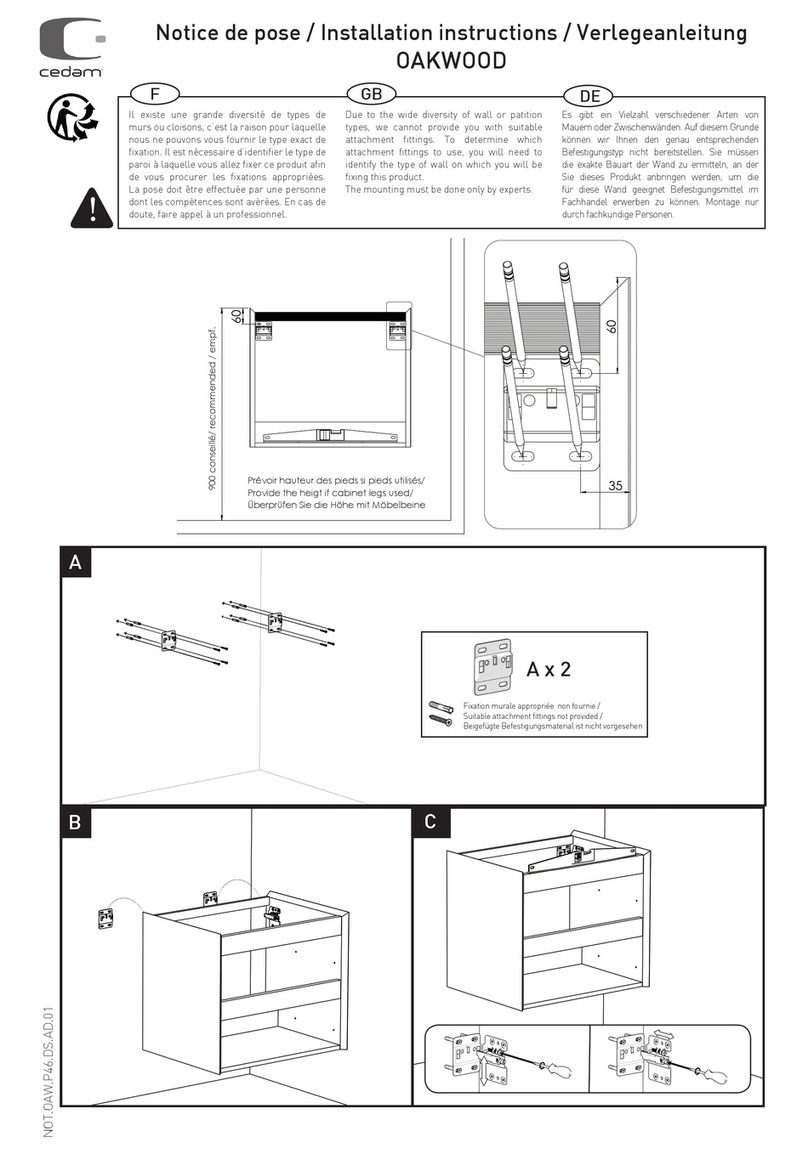
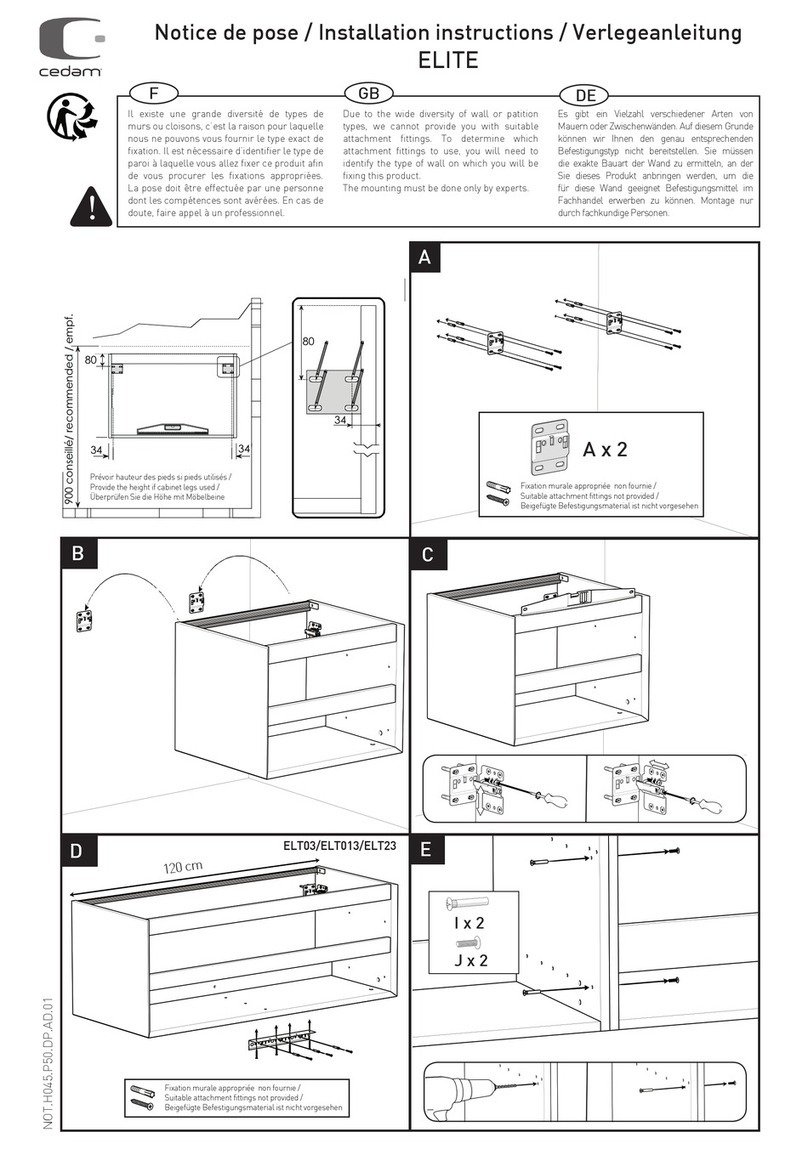
Notice de pose / Installation instruction sheet / Verlegeanleitung
Plazza 90-120 cm
B
A
C
200 229
835 / 1132
34
73
34
73
34
A x 2
PLA02/PLA03
NOT.PLA.P50.DP.AD.01
Il existe une grande diversité de types de
murs ou cloisons, c’est la raison pour laquelle
nous ne pouvons vous fournir le type exact de
fixation. Il est nécessaire d’identifier le type de
paroi à laquelle vous allez fixer ce produit afin
de vous procurer les fixations appropriées.
La pose doit être effectuée par une personne
dont les compétences sont avérées. En cas de
doute, faire appel à un professionnel.
Due to the wide diversity of wall or patition
types, we cannot provide you with suitable
attachment fittings. To determine which
attachment fittings to use, you will need to
identify the type of wall on which you will be
fixing this product.
The mounting must be done only by experts.
Es gibt ein Vielzahl verschiedener Arten von
Mauern oder Zwischenwänden. Auf diesem Grunde
können wir Ihnen den genau entsprechenden
Befestigungstyp nicht bereitstellen. Sie müssen
die exakte Bauart der Wand zu ermitteln, an der
Sie dieses Produkt anbringen werden, um die
für diese Wand geeignet Befestigungsmittel im
Fachhandel erwerben zu können. Montage nur
durch fachkundige Personen.
F GB DE
Fixation murale appropriée non fournie /
Suitable attachment fittings not provided /
Beigefügte Befestigungsmaterial ist nicht
vorgesehen
!

Notice de pose / Installation instructions / Verlegeanleitung
Plazza 120 CM avec séparation / with central panel / mit Mittelwand
B
A
PLA04
NOT.PLA.P50.DP.AD.02
Fixation murale appropriée non fournie /
Suitable attachment fittings not provided /
Beigefügte Befestigungsmaterial ist nicht vorgesehen
A x 2 B x 1
C
200
625
82
229 73
34 1132 34
73
34
Il existe une grande diversité de types de
murs ou cloisons, c’est la raison pour laquelle
nous ne pouvons vous fournir le type exact de
fixation. Il est nécessaire d’identifier le type de
paroi à laquelle vous allez fixer ce produit afin
de vous procurer les fixations appropriées.
La pose doit être effectuée par une personne
dont les compétences sont avérées. En cas de
doute, faire appel à un professionnel.
Due to the wide diversity of wall or patition
types, we cannot provide you with suitable
attachment fittings. To determine which
attachment fittings to use, you will need to
identify the type of wall on which you will be
fixing this product.
The mounting must be done only by experts.
Es gibt ein Vielzahl verschiedener Arten von
Mauern oder Zwischenwänden. Auf diesem Grunde
können wir Ihnen den genau entsprechenden
Befestigungstyp nicht bereitstellen. Sie müssen
die exakte Bauart der Wand zu ermitteln, an der
Sie dieses Produkt anbringen werden, um die
für diese Wand geeignet Befestigungsmittel im
Fachhandel erwerben zu können. Montage nur
durch fachkundige Personen.
F GB DE
!

Notice de pose / Installation instructions / Verlegeanleitung
Tiroir / Drawer / Schubkasten
A B
A
1
2
3
B
Réglage en hauteur / Height adjustments /
Höhenverstellung
desserer légèrement la vis 1 et positionner en hauteur
la façade à l’aide de la vis excentrique 2. Plage de
réglage ± 2mm. Resserer la vis 1.
Lightly loosen screw 1 and adjust the height of the
front to the desired position using excenter screw 2.
Adjustment range is ± 2 mm. Tighten screw 1.
Schraube 1leichtlösenundFrontüberExzenterschraube
2 in die gewünschte Höhenposition bringen. Verstellweg
± 2 mm. Schraube 1 festziehen.
Réglage latéral / Side adjustment /
Seitenverstellung
pousser légèrement le levier de serrage 3 vers l’arrière,
soulever légèrement la façade, puis la déplacer sur les
cannelures, plage de réglage +/- 1,5 mm. Relâcher le
levier de serrage.
Press the clamping lever 3 lightly to the back and
move over the ribbing. Adjustment range is ± 1,5 mm.
Release the clamping lever.
Klemmhebel 3 leicht nach hinten drücken, Front leicht
anheben und über Riffelung verschieben (Verstellweg
±1,5 mm). Klemmhebel loslassen.
Réglage de l’inclinaison / Tilt angle
adjustment / Neigungsverstellung
Uniquement possible sur certains modèles. Plage de
réglage ± 4 mm.
Only possible for a selection of models. Adjustment
range is ± 4 mm.
Nur bei einigen Modellen vorhanden. Verstellweg ± 4 mm.
Tirer la coulisse.
Pull out the drawer slide completely and lift.
Lade komplett herausziehen und anheben.
Mettre le tiroir sur la coulisse en l’inclinant vers l’avant.
Set drawer on cabinet by slightly tilting it forward.
Lade leicht schräg auf die Korpusschiene aufsetzen.
Pousserle tiroirsur lacoulisse horizontalementàfond.
Push in until drawer locks in place.
und einschieben bis die Lade einrastet.
Réglages de la façade / Drawer front adjustments / Frontblendeverstellung
Montage de tiroir / Drawer mouting / Schubkasten- Montage
Démontage de tiroir / Drawer dismouting / Schubkasten- Demontage
Tirer le tiroir et le lever vers le haut.
Pull out the drawer completely and lift it up.
Lade komplett herausziehen und anheben.
CBA
C
CLIC

Notice de pose / Installation instruction sheet / Verlegeanleitung
Plazza - Top suspendu - Hanging top - Hängeplatte
NOT.PLA.P50.DP.AD.02
Il existe une grande diversité de types de
murs ou cloisons, c’est la raison pour laquelle
nous ne pouvons vous fournir le type exact de
fixation. Il est nécessaire d’identifier le type de
paroi à laquelle vous allez fixer ce produit afin
de vous procurer les fixations appropriées.
La pose doit être effectuée par une personne
dont les compétences sont avérées. En cas de
doute, faire appel à un professionnel.
Due to the wide diversity of wall or patition
types, we cannot provide you with suitable
attachment fittings. To determine which
attachment fittings to use, you will need to
identify the type of wall on which you will be
fixing this product.
The mounting must be done only by experts.
Es gibt ein Vielzahl verschiedener Arten von
Mauern oder Zwischenwänden. Auf diesem Grunde
können wir Ihnen den genau entsprechenden
Befestigungstyp nicht bereitstellen. Sie müssen
die exakte Bauart der Wand zu ermitteln, an der
Sie dieses Produkt anbringen werden, um die
für diese Wand geeignet Befestigungsmittel im
Fachhandel erwerben zu können. Montage nur
durch fachkundige Personen.
F GB DE
B
A
D
C
E
A x 2
B x 2
Variable selon vasque
200
100
705 / 1002
100
229
835 / 1132
34
73
34
100
42 70
73
34
Fixation murale appropriée non fournie /
Suitable attachment fittings not provided /
Beigefügte Befestigungsmaterial ist nicht vorgesehen
Fixation murale appropriée non fournie /
Suitable attachment fittings not provided /
Beigefügte Befestigungsmaterial ist nicht vorgesehen
+ 120 cm
PLTOP02BLB - PLTOP03BLB-PLTOPSM50.120 - PLTOPSM120.180
PLTOPSM120.180 Porte serviette en option / optional towel holder /
mit optionalem Handtuchhalter
Découpe varie selon la vasque choisie / cut depending on
washbasin / Ausschnitt abhängig von den Waschbecken
!

Notice de pose / Installation instructions / Verlegeanleitung
EXTENSO PLAN DE TOILETTE EPAIS SUR-MESURE /
DICK WASCHTISCHPLATTE NACH MASS / THICK WASHBASIN COUNTERTOP
B
A
CD
Fixation murale appropriée non fournie /
Suitable attachment fittings not provided /
Beigefügte Befestigungsmaterial ist nicht vorgesehen
Tournez les patins de réglages pour mettre le plan à niveau /
Turn the adjusting pads to level the top /
Drehen Sie die Nivellierschuhe.
Fixez le/les équerre(s) de renfort au niveau des vasques /
Attach the reinforced brackets under the washbasins./
Befestigen Sie die Verstärkungswinkel unter den Waschbecken.
Appliquez un joint en silicone pour étanchéifier l’ensemble /
Apply seal to waterproof the top /
Fugen zwischen Wand und Waschtischplatte mit Silikon abdichten.
NOT.EXTOP.01
Il existe une grande diversité de types de
murs ou cloisons, c’est la raison pour laquelle
nous ne pouvons vous fournir le type exact de
fixation. Il est nécessaire d’identifier le type de
paroi à laquelle vous allez fixer ce produit afin
de vous procurer les fixations appropriées.
La pose doit être effectuée par une personne
dont les compétences sont avérées. En cas de
doute, faire appel à un professionnel.
Due to the wide diversity of wall or patition
types, we cannot provide you with suitable
attachment fittings. To determine which
attachment fittings to use, you will need to
identify the type of wall on which you will be
fixing this product.
The mounting must be done only by experts.
Es gibt ein Vielzahl verschiedener Arten von
Mauern oder Zwischenwänden. Auf diesem Grunde
können wir Ihnen den genau entsprechenden
Befestigungstyp nicht bereitstellen. Sie müssen
die exakte Bauart der Wand zu ermitteln, an der
Sie dieses Produkt anbringen werden, um die
für diese Wand geeignet Befestigungsmittel im
Fachhandel erwerben zu können. Montage nur
durch fachkundige Personen.
F GB DE
!
// // // //
49
+
10
0
70
90
890 conseillé
This manual suits for next models
8
Other Cedam Indoor Furnishing manuals
Popular Indoor Furnishing manuals by other brands

Coaster
Coaster 4799N Assembly instructions

GoodHome
GoodHome avela 5059340018027 Assembly instructions

PAIDI
PAIDI SINO 2 Assembly instructions

SUNVILLA
SUNVILLA FWA10224 Assembly / care & use instructions

OSP Designs
OSP Designs KENSINGTON KNS54 operating instructions

FURNITUREBOX
FURNITUREBOX CALLA Assembly guide

Leisure made
Leisure made PEARSON 163596V Assembly instructions

Timbertech
Timbertech Impression Rail Express installation guide

DITALIA
DITALIA CD-232 Assembly instructions

HoMedics
HoMedics EnviraScape Tabletop Relaxation Fountain... Instruction manual and warranty

Bonaldo
Bonaldo Hulahoop Assembly instruction

Knight
Knight Cubit Caddy Assembly instructions