CellarPro 1800QT User manual


1
C O N G R A T U L A T I O N S !
Thank you for purchasing a new CellarPro cooling system.
Please take a minute to read through this Owner’s Manual before you install and turn on
your Cooling Unit.
If you have any questions about your new cooling unit, it is likely that you will find the
answers in this Manual. We also have more information on our website at
www.cellarpro.com/customer-service .
If you still have questions, please don’t hesitate to contact your dealer or CellarPro
directly. We can be reached during normal business hours at 1.877.726.8496. You also
Serial Number*: ____________________
*We recommend that you take a minute to fill-in your CellarPro serial number, which has
15 characters: seven-digits and eight letters and can be found on the printed label on the
left side of your cooling unit). Don’t forget to register your cooling unit warranty at
www.cellarpro.com/register

2
Table of Contents
I. Important Notes 3
II. Overview 4
III. Replacement Instructions 8
IV. Operating Instructions 14
V. Normal Operation 20
VI. Troubleshooting 22
VII. Limited Warranty 23
VIII. Contact Information 24

3
Important Notes
•Before plugging in and operating your CellarPro cooling unit, remove any
materials that have been packed inside the exhaust cavity.
•Wait 24 hours before plugging in and operating your CellarPro cooling unit.
•Before installing the cooling unit, make sure it works by plugging it in and letting it
run on a hard, flat surface. Check that cold air is being produced by the unit.
•NEVER turn the cooling unit on its side or upside down
•The cooling unit should be plugged into an outlet connected to a 15-amp circuit
•Before installing the cooling unit, make sure that the exhaust panel is installed in
the correct position – it MUST cover
either the TOP or the REAR exhaust
vent:
oTOP VENT CONFIGURATION::
If the hot air will be discharged
through the TOP of the cellar,
install the exhaust panel on the
BACK of the cooling unit (as
shown in the Picture A). In this
configuration, the cavity on TOP
of the cooling unit is OPEN. Picture A
Top Vent Configuration
oREAR VENT CONFIGURATION:
If the hot air will be discharged
through the REAR of the cellar,
use the exhaust panel to seal
the TOP of the cooling unit (as
shown in the Picture B). In this
configuration, the cavity at the
REAR of the CellarPro is OPEN.
Picture B
Rear Vent Configuration

4
Overview
CellarPro cooling units are engineered to maintain optimal wine storage conditions
inside wine cellars.
•Temperature
Proper temperatures are maintained by transferring heat from inside wine cellars
and exhausting the heat through the top (top-vent) or rear (rear-vent) of the cooling
units.
CellarPro cooling units are designed to turn on when the temperature inside the
cellar exceeds the Minimum Set Point plus the Temperature Differential, and turn off
when the temperature inside the cellar drops below the Minimum Set Point. For
example, if the Minimum Set Point is 55°F and the Temperature Differential is 4°F,
the cooling unit will turn on when the temperature inside the cellar rises above 59°F,
and turn off when the temperature falls below 55°F.
A number of variables, including the temperatures of the ambient environment, the
insulation of the cellar and the thermal mass inside the cellar, will affect the speed
with which the temperature inside the cellar rises during the cooling unit’s “off” cycle.
It is normal for the cooling unit to run up to 75 percent of the time in order to
maintain proper conditions inside the cellar.
CellarPro cooling units are designed to cool up to 30°F below the ambient
temperature in the space outside the condenser coils.
•Humidity
Relative humidity is maintained by gently
cooling the cellar without removing
moisture from the environment.
Although the relative humidity in the
ambient environment will affect the level
of humidity inside the cellar, CellarPro
cooling units can be adjusted to increase
the level of relative humidity inside a
cellar,. The Fon setting (shown at right)
controls the amount of moisture
circulated inside the cellar. To increase
humidity inside the cellar, change the Fon setting per the instructions in Chapter III.

5
•Installation
CellarPro cooling units are designed to be installed inside the wine cellar, ideally
mounted to the ceiling of the cellar.
As warm air rises to the top of the cellar, it is pulled through the cooling unit where
the evaporator coils remove the heat from the warm air. Once cooled, the cold air is
discharged from the bottom of the cooling unit.
CellarPro cooling units should be mounted to the ceiling inside the cellar, or as close
to the top of the cellar as possible. Optional mounting clips for attaching the front of
the cooling unit to the ceiling are available for purchase from CellarPro. At a
minimum, the front 7” of the cooling unit must be inside the cellar, because the cold
air discharge is located underneath the cooling unit.
Once the cooling unit is installed, seal all the cracks and gaps between the cooling
unit and the cellar using the butyl tape provided in the cavity of the exhaust vent.
The butyl tape is becomes pliable by rolling it in your hands. Pay particular attention
to the seams on the back of the cellar (top and rear vent configurations) and the
seams at the top of the cellar (top-vent configuration).
CellarPro cooling systems should be plugged into an outlet connected to a 15-amp
circuit. The cooling unit uses approximately 3 amps during its “on” cycle. The cooling
unit also offers a grounded 115V AC outlet, which is rated for 3 amps.
We recommend plugging your CellarPro cooling unit into a surge protector (minimum
of 15-amps) to protect the electrical components from power surges or spikes. If
using an extension cord, use a grounded 14-gauge or heavier cord, and keep the
length to a minimum to avoid voltage drop.
•Ventilation
Proper ventilation is critically important for the proper operation of your CellarPro
cooling unit. The CellarPro cooling unit creates a significant amount of hot air, which
must be exhausted into an appropriately-sized space in order for the heat to
dissipate. If the space is constrained and/or too small, the heat will not dissipate
and the cooling unit will end up recirculating hot air. If this happens, the cooling
unit’s ability to create cold air inside the cellar will be compromised.
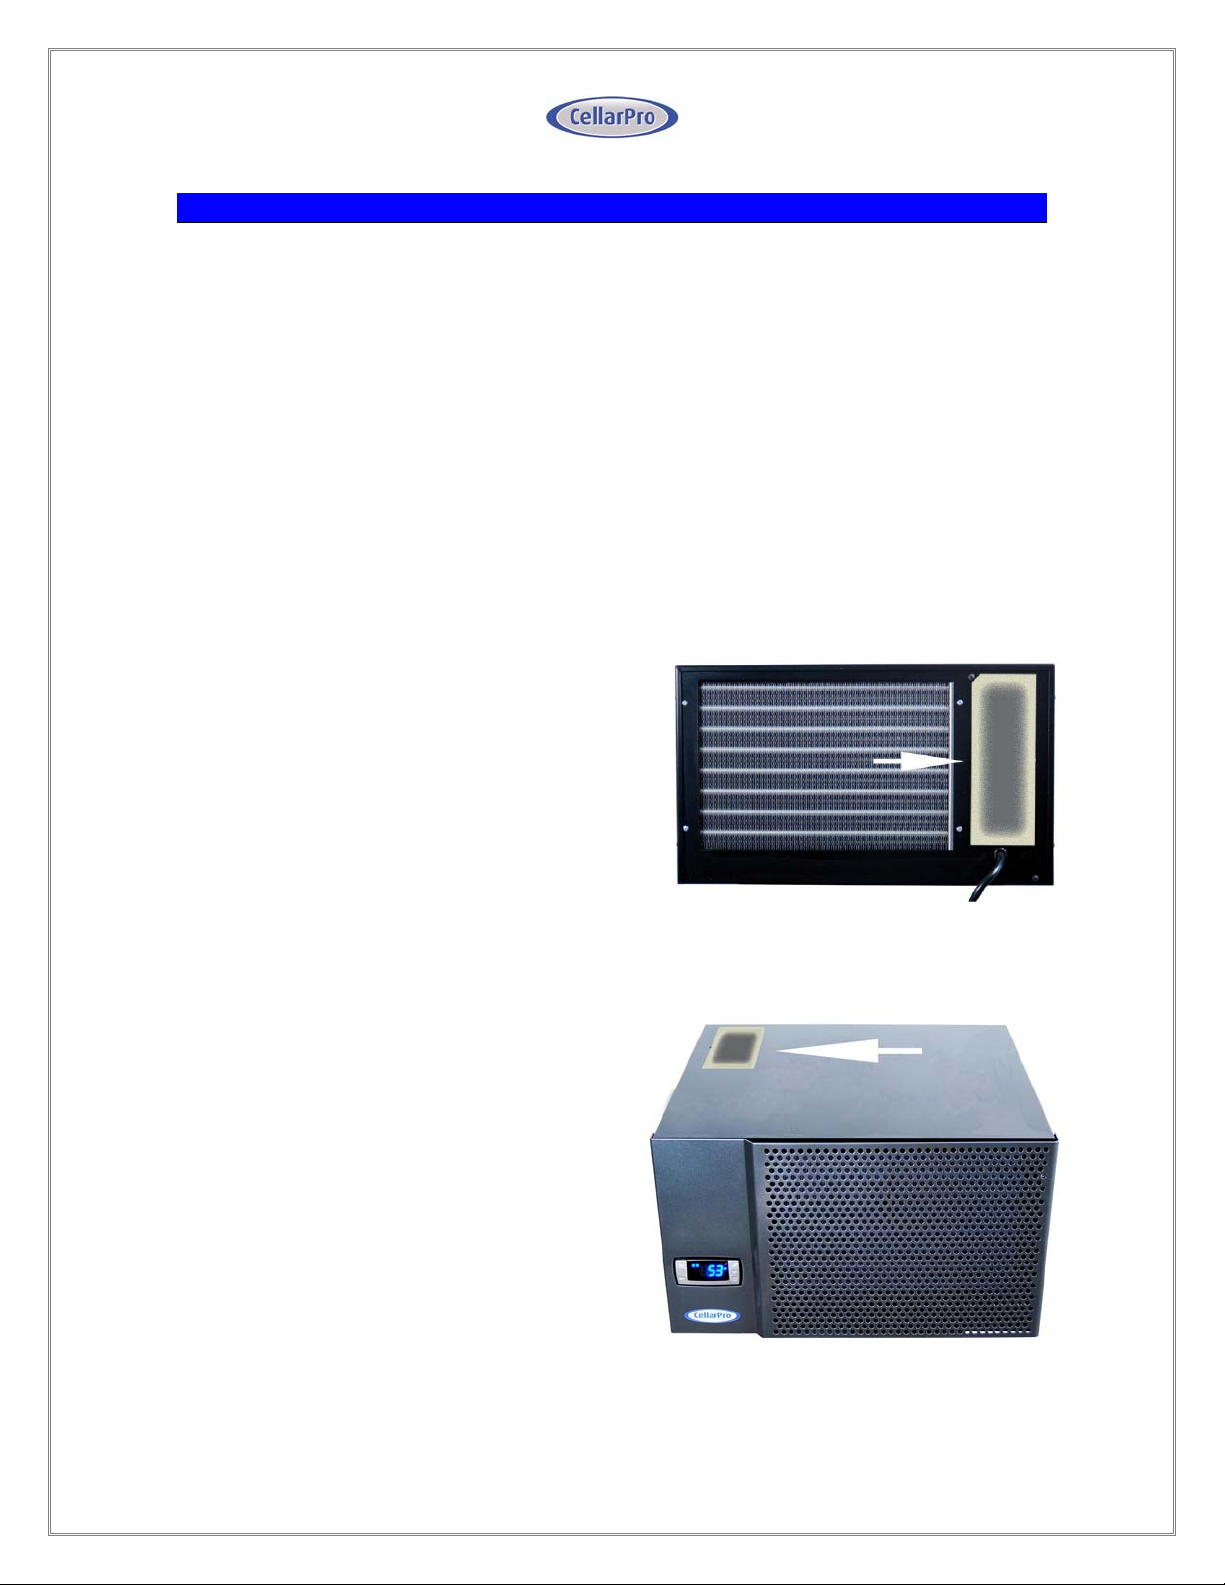
CellarPro cooling units have interchangeable vent panels that can be swapped
between the top and the rear of the cooling unit to match the configuration of your
cellar and exhaust space.
•Top-vent configuration: in this configuration, the panel is attached to the rear
of the cooling unit and hot air is freely exhausted from the top of the cooling
unit into the exhaust space.

6
-If the cellar’s air intake comes from BEHIND the cellar, the cooling unit
will require 3-4” of unobstructed clearance behind the cellar; and 8-9”
of clearance above the cellar;
-If the cellar’s air intake comes from the TOP of the cellar, the cooling
unit will require 18” of unobstructed clearance above and to both sides
of the cellar, unless:
1. The hot air exhaust is ducted away from the cellar; or
2. The hot air exhaust is evacuated via an exhaust fan.
•Rear vent configuration: in this configuration, the panel is attached to the top
of the cooling unit and hot air is freely exhausted from the rear of the cooling
unit into the exhaust space. This configuration requires 3-4” of unobstructed
clearance behind the cellar.
Under both configurations, access to the intake coils (either at the top or the back of
the cellar) is required for periodic maintenance.
It is critical to follow guidelines for recommended clearance so that the hot air
exhaust is properly dissipated, otherwise the hot air will become trapped and the
cooling unit will circulate its hot air exhaust, thereby compromising the cooling unit’s
cooling capacity.
•Ambient Environment.
CellarPro cooling units are designed to operate in ambient temperatures between
50°F and 85°F.
CellarPro cooling units cannot maintain temperatures inside the cellar that are more
than 30°F below the ambient temperature in the space outside the condenser coils.
For example, if the ambient temperature in the space outside the condenser coils is
85°F, the cooling unit should be able to maintain temperatures of 55°F inside the
cellar.
CellarPro cooling units do not have heating elements, so if temperatures inside the
cellar drop below proper wine storage temperatures, the cooling unit cannot create
heat inside the cellar.
•Cellar Capacity
The cooling capacity for each of our products is shown in the table below. These
capacities are estimates and are based on certain assumptions, including sufficient

7
insulation, adequate clearance and airflow, and proper ambient temperatures in and
around the cellar.
Model Dimensions (inches)
W x D x H
Operating
Amps
Cellar Capacity
(cubic feet)
1800QT 18 x 16.5 x 10.5 3 200
1800XT 18 x 16.5 x 10.5 3 250

8
Replacement Instructions
•Replacement Instructions – Top Vent Units
TOOLS NEEDED:
Phillips screwdriver
7/16" open end wrench or socket
Needlenose pliers
REQUIRED PARTS
Replacement Cooling Unit
Butyl Sealant Tape
REMOVAL OF OLD COOLING UNIT:
1. Unplug the cooling unit from the wall.
FROM THE TOP OF THE WINE CABINET
2. If your wine cabinet comes with a grill(s), remove the grill(s) on top of the wine
cabinet.
3. Pull the power cord through the back of the cellar.
FROM THE FRONT OF THE WINE CABINET
4. Open cabinet door and remove all bottles from the top of the rack.
5. Place a heavy towel or blanket on top of the wine rack for protection.
6. IF YOU HAVE A LE CACHE MODEL 2400 WITH A CENTER POST: Remove the
center post by unscrewing the screws (two at the top and two at the bottom)
that attach the post to the wine cabinet.
7. Unplug the light from the cooling unit inside the wine cabinet, and also unplug
the cord from the light fixture.
8. Remove the light fixture as follows:
- Slide the light left or right, and then unscrew and remove one of the two
mounting brackets that attach the light fixture to the ceiling of the wine
cabinet.
- Slide the light fixture off the second mounting bracket.

9
9. With 7/16 socket wrench, remove the two hex head bolts that attach the
cooling unit to the ceiling of the wine cabinet. Save these bolts! Leave
mounting brackets attached to the cooling unit so that the proper location can
be duplicated with the replacement cooling unit.
PLEASE NOTE: If the nut in the ceiling becomes loose, you will need to use pliers from
the top of the cabinet to hold the nut and keep it from spinning with the bolt.
10.The cooling unit is now free to remove. Drop front end down, and move side to
side to free from cabinet opening.
CAUTION: Two people may be required to remove the cooling unit, which weighs 45
pounds. Do not let the cooling unit drop on unprotected bottle racks.
TO INSTALL NEW COOLING UNIT
1. Wait 24 hours before plugging in and operating your CellarPro cooling unit.
2. Carefully remove the new cooling unit from the packaging. You may reuse this
packaging for shipping or storing the old cooling unit
3. Remove any materials that have been packed inside the exhaust cavity.
4. Before installing the cooling unit, make sure it works by plugging it in and
letting it run on a hard, flat surface. Check that cold air is being produced by
the unit.
5. NEVER turn the cooling unit on its side or upside down
6. The cooling unit should be plugged into an outlet with a 15-amp circuit
7. Before installing the cooling unit,
make sure that the exhaust panel
is installed in the correct position.
For top-vented cellars, the
exhaust panel MUST cover the
REAR exhaust vent (see picture at
right). In this configuration, the
cavity on TOP of the cooling unit is
OPEN.

10
8. Attach the mounting clips to the new cooling unit in the same position as located
on the old cooling unit. We recommend removing the two screws that attach the
left side of the front grill before attaching the mounting clips.
9. Some wine cabinets have three pieces of foam located on the bottom and on
each side of the bracket that supports the back of the cooling unit. These foam
pieces should be placed in their original locations
10. Follow the removal instructions described above in reverse.
11. After installing the cooling unit, It is not necessary to replace the grill
12. A complete and proper seal must be made between the cellar and the cooling unit
to ensure that outside air does not enter the cellar. Use the butyl tape to seal the
perimeter where the cooling unit touches the wine cabinet by rolling the tape with
your fingers into a thin (pencil diameter) "rope", then press the tape into the
cracks where the cooling unit touches the cellar.
13. Check the seal by having a helper stand in front of the cabinet while you shine a
flashlight around the cooling unit edges to discover any gaps in sealant.

11
•Replacement Instructions – Rear Vent Units
TOOLS NEEDED:
Phillips screwdriver
7/16" open end wrench or socket
Needlenose pliers
REQUIRED PARTS
Replacement Cooling Unit
Butyl Sealant Tape
REMOVAL OF OLD COOLING UNIT:
1. Unplug the cooling unit from the wall.
FROM THE REAR OF THE CELLAR
2. If your wine cabinet comes with a grill(s), remove the grill(s) on top of the wine
cabinet.
3. Roll up cord and place in fan cavity at rear of cooling unit.
FROM THE FRONT OF THE CELLAR
4. Open cabinet door and remove all bottles from the top of the rack.
5. Place a heavy towel or blanket on top of the wine rack for protection.
6. IF YOU HAVE A LE CACHE MODEL 2400 WITH A CENTER POST: Remove the
center post by unscrewing the screws (two at the top and two at the bottom)
that attach the post to the wine cabinet.
7. Unplug the light from the cooling unit inside the cellar. (If your cellar has a hard-
wired light, separate the lamp cord from the black and white leads at the back of
the cooling unit.) Remove the light fixture as follows:
- Slide the light left or right, and then unscrew and remove one of the two
mounting brackets that attach the light fixture to the ceiling of the wine
cabinet.
- Slide the light fixture off the second mounting bracket.
8. With 7/16 socket wrench, remove the two hex head bolts that attach the
cooling unit to the ceiling of the wine cabinet. Save these bolts! Leave
mounting brackets attached to the cooling unit so that the proper location can
be duplicated with the replacement cooling unit.

12
PLEASE NOTE: If the nut in the ceiling becomes loose, you will need to use pliers from
the top of the cabinet to hold the nut and keep it from spinning with the bolt.
9. The cooling unit is now free to remove. Drop front end down, and move side to
side to free from cabinet opening.
CAUTION: Two people may be required to remove the cooling unit, which weighs 45
pounds. Do not let the cooling unit drop on unprotected bottle racks.
TO INSTALL NEW COOLING UNIT
1. Wait 24 hours before plugging in and operating your CellarPro cooling unit.
2. Carefully remove the new cooling unit from the packaging. You may reuse this
packaging for shipping or storing the old cooling unit
3. Remove any materials that have been packed inside the exhaust cavity.
4. Before installing the cooling unit, make sure it works by plugging it in and
letting it run on a hard, flat surface. Check that cold air is being produced by
the unit.
5. NEVER turn the cooling unit on its side or upside down
6. The cooling unit should be plugged into an outlet with a 15-amp circuit
7. Before installing the cooling unit,
make sure that the exhaust panel
is installed in the correct position.
For rear-vented cellars, the
exhaust panel MUST cover the
TOP exhaust vent (see picture at
right). In this configuration, the
cavity at the REAR of the cooling
unit is OPEN.
8. Attach the mounting clips to the new cooling unit in the same position as located
on the old cooling unit. We recommend removing the two screws that attach the
left side of the front grill before attaching the mounting clips.
9. Some wine cabinets have three pieces of foam located on the bottom and on
each side of the bracket that supports the back of the cooling unit. These foam
pieces should be placed in their original locations

13
10. Follow the removal instructions described above in reverse.
11. After installing the cooling unit, It is not necessary to replace the grill
12. A complete and proper seal must be made between the cellar and the cooling unit
to ensure that outside air does not enter the cellar. Use the butyl tape to seal the
perimeter where the cooling unit touches the wine cabinet at the rear of the cellar
by rolling the tape with your fingers into a thin (pencil diameter) "rope", then press
the tape into the cracks where the cooling unit touches the cellar.
13. Check the seal by having a helper stand in front of the cabinet while you shine a
flashlight around the cooling unit edges to discover any gaps in sealant.

14
Operating Instructions
The settings on your CellarPro cooling unit have been preset and
optimized by the factory, and it is not necessary to change these settings
initially.
If you find that you want to change one or more of the settings, we
strongly recommend that you allow the cooling unit to operate for 14
days before making any changes.

15
Basic Operation
Power On/Off Button Press “Power On/Off” to turn the unit on and off
When the “Compressor On” indicator light is on (Row 1), the
Compressor is running
When the “Fan On” indicator light is on (Row 1), the Fan is
running
Digital Display The temperature displayed on the control indicates the real-
time air temperature as measured by Probe 1 (P1) located
behind the front grill of the cooling unit
Set Button The cooling unit is factory preset with a Minimum Set Point of
55°F and a Temperature Differential of 4°F. This means that
the cooling unit will turn on when the air temperature as
measured by Probe 1 (P1) rises above 59°F (55°F + 4°F), and
turn off when the air temperature measured by P1 falls below
55°F. This range in AIR temperature will result in 1/2°F
variation in LIQUID temperature.
To view the Minimum Set Point, press the “Set” button for one
second
To change the Minimum Set Point,
1. Press the “Set” button for three seconds until “°F”
blinks
2. Press the “Up” or “Down” button
3. Press the “Set” button to confirm
The “Set” temperature will blink three times to indicate
confirmation
The recommended range for the Minimum Set Point is 55 -
60°F.
To change the Temperature Differential, see the Advanced
Instructions below.

16
Energy Saver Button To activate and deactivate the “Energy Saver” mode, press
the “Energy Saver” button
The “Energy Saver” indicator light (Row 3) will turn on when
the cooling unit is in “Energy Saver” mode
In the “Energy Saver” mode, the Minimum Set Point will
increase 4°F
Quick Chill Button To activate the “Quick Chill” mode, press the “Up” / “Quick
Chill” button for three seconds
To deactivate “Quick Chill”, press “Quick Chill” button for
three seconds again
The “Quick Chill” indicator (Row 3) light will turn on when the
cooling unit is in “Quick Chill” mode,
In the “Quick Chill” mode, the cooling unit will run
continuously for 6 hours (or until the intake temperature
registers 50°F). This mode is useful after loading “warm”
bottles in a cellar
Up and Down
Buttons
To view the “High Temp” recorded by the cooling unit, press
the “Up” button once.
To view the “Low Temp” recorded by the cooling unit, press
the “Down” button once
To reset the “High Temp” or “Low Temp”, press the “Set”
button for three seconds while “Hi” or “Lo” is displayed.
“RST” will blink three times to indicate confirmation.
Auto Defrost Mode The cooling unit periodically checks the temperature of the
evaporator coils as measured by Probe 2 (P2) and initiates an
auto-defrost cycle if the coils drop below 38°F. When the
cooling unit is in auto-defrost mode, the “Auto-Defrost”
Indicator light (Row 2) will turn on

17
Alarms
Alarm Indicators* The control panel has an audible buzzer and an alarm
indicator light (Row 4) that turns on when an alarm is
triggered. In addition to audible and visual indicators, the
control panel will flash the following codes when an alarm is
triggered:
Alarm Code What it means What to do
P1, P2, P3 Probe Failure Call CellarPro
HA The temperature inside
the cellar is too warm
(above 70°F for more
than 1 hour)
Check seals;
Check if door was left open;
Lower the ambient temperatures
HA2 The condenser
temperature is too high
(above 125°F for 2
hours)
Clean the condenser coils (see
“Maintenance” in Chapter IV);
Check for obstructions to the intake
and/or exhaust vents;
Check that the condenser fan is
operating
LA The temperature inside
the cellar has dropped
below 45°F
Raise the ambient temperature;
Raise the “Minimum Set Point”
* Please note: the temperature alarms (HA, HA2 and LA) are disabled during the
first 23 hours of operation after the cooling unit is first plugged in and/or turned on.

18
Protection Mechanisms
Protection
Mechanisms
To protect the components in the cooling unit as well as the
wine inside the cellar, the cooling unit is programmed to
shut down certain components under certain
circumstances, as follows:
Scenario What it means What happens
P2 > 70°F for more
than 1 hour
The evaporator probe
is measuring
temperatures that are
too warm
The evaporator fan will turn off
until the evaporator temperature
falls below 70°F
P3 > 125°F for more
than 2 hours
The condenser probe
is measuring
temperatures that are
too hot
The compressor and condenser
fan will turn off until the condenser
temperature falls below 120°F

19
Advanced Settings
CellarPro cooling systems can be programmed with advanced settings to achieve
more control over conditions inside the cellar. Conditions like humidity, the
Temperature Differential, and alarm settings all can be modified for custom
applications.
To access the advanced settings, press the “Set” button and “Down” button together
for three seconds.
This setting determines the Temperature Differential when
the cooling unit cycles on. The factory preset for this setting
is “4”.
The recommended range for this setting is 4-5, which will
allow the cooling unit to cycle “on” and “off”, will maintain
consistent air temperatures throughout the cellar, and
results in liquid temperature swings of approximately 0.5°F
This setting increases or decreases the humidity inside the
cellar. The factory preset for this setting is “0”.
The recommended range for this setting is 0-6. If the
humidity inside the cellar is too low at a setting of “0”, this
setting should be increased in increments of 1-2 units until
the desired humidity inside the cellar is achieved.
This setting designates the High temperature inside the
cellar at which the alarm is triggered. The factory preset for
this setting is “70”.
We recommend leaving this setting at the factory preset.
This setting designates the Low temperature inside the
cellar at which the alarm is triggered. The factory preset for
this setting is “45”.
We recommend leaving this setting at the factory preset.
This setting increases or decreases the Temperature
Differential for the Energy Savings Mode. The factory preset
for this setting is “4”.
The recommended range for this setting is 2-4.
Other manuals for 1800QT
1
This manual suits for next models
1
Table of contents
Other CellarPro Wine Cooler manuals