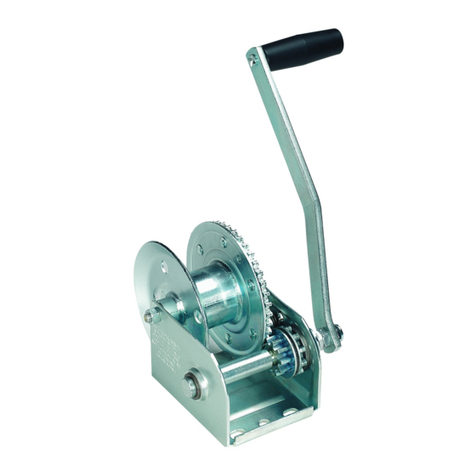
Central Forge 30905 Parts list manual

Copyrigh
t ©
2
005 by Harbor Freight Tools®.All rights reserved. No portion of this
manual or any artwork contained herein may be reproduced in any shape or form
without the express written consent of Harbor Freight Tools.
For technical questions and replacement parts, please call 1-800-444-3353
ASSEMBLY AND OPERATION INSTRUCTIONS
30905
GEARED WINCH
Distributed exclusively by Harbor Freight Tools®
3491 Mission Oaks Blvd., Camarillo, CA 93011
Visit our Web site at http://www.harborfreight.com
Due to continuing improvements, actual product may differ slightly from the
product described herein.
Rev 07i
Brought to You by AugustaFlint

SKU 30905 For technical questions, please call 1-800-444-3353. Page 2
Specifications
Save This Manual
You will need the manual for the safety warnings and precautions, assembly
instructions, operating and maintenance procedures, parts list and diagram.
Keep your invoice with this manual. Write the invoice number on the inside of the
front cover. Keep the manual and invoice in a safe and dry place for future
reference.
Safety Warnings and Precautions
WARNING: When using product, basic safety precautions should always be
followed to reduce the risk of personal injury and damage to equipment.
Read all instructions before using this product!
1. Keep work area clean. Cluttered areas invite injuries.
2. Check for damaged parts. Before using any product, any part that
appears damaged should be carefully checked to determine that it will
perform its intended function. Check for any broken or damaged parts and
any other conditions that may affect its operation. Replace or repair
damaged or worn parts immediately.
3. Replacement parts. When servicing, use only identical replacement parts.
Use of any other parts will void the warranty.
4. Always check hardware and assembled parts after assembling. All
connections should be tight and hardware tightened.
5. Keep children away. Children should not be allowed to be around the
Winch when operating.
6. Use eye and hand protection. Always wear ANSI approved impact safety
goggles and work gloves when setting up, using and maintaining this
product. These are available at Harbor Freight Tools.
Operation
Base Size
Drive Ratio
Cable
Handle Length
Tool Tow
Maximum Weight Capacity
Hand Crank
5-1/2” x 5-1/2”
4 to 1
3/16” x 25 Ft.
6”
7-1/2 Lbs.
1000 Lbs.
Brought to You by AugustaFlint

SKU 30905 For technical questions, please call 1-800-444-3353. Page 3
7. Do not exceed the Winch’s tow capacity of 1,000 lbs.
8. Be certain Winch is properly bolted to a secure structure that can hold the
Winch load.
9. Always use proper couplings when connecting Winch cable hook to load
cable or rope.
10. Do not lift items vertically. The Winch was designed for horizontal use only.
11. Do not overload the Winch. It will do the job better at the load it is intended.
12. Do not use inappropriate attachments to extend the length of the Winch
Cable.
13. Never lift people and animals or hoist loads over people.
14. Never come between the Winch and the load when operating.
15. Do not apply load to Winch when cable is fully extended. Keep at least 4
full turns of cable on the reel.
16. After moving an item with the Winch, secure the item. Do not rely on the
Winch to hold an object for an extended period. The Winch does not have a
locking mechanism.
17. Examine Winch before using. Components may be affected by exposure to
chemicals, salts, and rust.
18. Never fully extended Cable while pulling a load. Keep 4 complete turns of
cable around the Winch module.
19. When loading a boat into a trailer without keel or side hull rollers, make
sure the trailer is submerged in the water when the boat is loaded by the
Winch. Attempting to drag the boat on to the trailer while on land can cause
Winch failure and possible injury.
20. Never operate Winch if cable shows any signs of weakening, or is
knotted or kinked.
21. Never fully extend the cable while under load.
Warning: The warnings, cautions, and instructions discussed in this instruc-
tion manual cannot cover all possible conditions and situations that may oc-
cur. It must be understood by the user that common sense and caution are
factors which cannot be built into this product, but must be supplied by the
user.
Brought to You by AugustaFlint

SKU 30905 For technical questions, please call 1-800-444-3353. Page 4
Unpacking
When unpacking this product, check to make sure that all parts are
included as shown in the parts list. If any parts are missing or broken,
please call Harbor Freight Tools at the number below.
Assembly
Attaching Handle (Refer to the illustration on Page 6 when assembling).
1. Unscrew Nut (2) from Drive Shaft (4).
Figure 1
2. Slide Handle (1) onto Drive Shaft (4) with Handle (1) facing out.
3. Re-secure Nut (2) firmly to Drive Shaft (1).
Threading Cable
1. Loosen Cable Clamp (15).
2. Run Cable through hole in Winch Reel (14) through one side of Clamp (15),
then out the other in a counterclockwise direction. (Cable may have to be
pre-bent with pliers or other similar tool) (not provided).
3. Tighten Cable Clamp (15) securely.
4. Before attempting winching operation, make sure cable is wrapped around
Reel Shaft (13) at least 3 times.
Nut (2)
Handle (1)
Drive Shaft (4)
Figure 1
Brought to You by AugustaFlint

SKU 30905 For technical questions, please call 1-800-444-3353. Page 5
1. Clean and lubricate all moving parts including gears, rachets, and shafts to
insure safe operation. When not in use, keep clean, dry and covered.
Maintenance
Mounting Instructions
NOTE: Winch must be attached to a secured surface before using.
1. When mounting the Winch to a solid surface, be sure that the mounting
surface is capable of supporting the weight of the Winch and the horizontal
pulling force of up to 1000 lbs.
2. Use the base of the Winch as a template to mark the placement of the holes
on the mounting surface.
Secure with appropriate grade #5 hardware. If
unsure, have a qualified service technician anchor the Winch.
See Figure 2.
SEE FIGURE 2 FOR MEASUREMENTS OF MOUNTING HOLES.
WARNING: Keep hands away from load bearing cables and Winch‘s internal
mechanism when operating. If the Winch fails to move the load after exerting
pressure on the handle, the load may be too large for the Winch.
NOTE: THE WINCH is intended for horizontal use only. Do not attempt to use this
device or lowering or raising.
3/8” Width
3/8” Width
3/8” Width
View from
under the Winch.
Figure 2
Operation
1. Make sure cable is looped around Reel Shaft (13) at least three times.
2. Push down on the Ratchet Pawl (8) and pull the Cable (19) to the desired
length.
3. Securely connect load to Winch Cable hook.
4. Turn Winch Handle (1) clockwise until load is moved to new location.
5. Secure load with something other than the Winch.
6. Remove Winch Cable Hook and reel in Cable (19).
Brought to You by AugustaFlint

SKU 30905 For technical questions, please call 1-800-444-3353. Page 6
PLEASE READ THE FOLLOWING CAREFULLY
THE MANUFACTURER AND/OR DISTRIBUTOR HAS PROVIDED THE PARTS DIAGRAM IN THIS
MANUAL AS A REFERENCE TOOL ONLY. NEITHER THE MANUFACTURER NOR DISTRIBUTOR
MAKES ANY REPRESENTATION OR WARRANTY OF ANY KIND TO THE BUYER THAT HE OR SHE IS
QUALIFIED TO MAKE ANY REPAIRS TO THE PRODUCT OR THAT HE OR SHE IS QUALIFIED TO
REPLACE ANY PARTS OF THE PRODUCT. IN FACT, THE MANUFACTURER AND/OR DISTRIBUTOR
EXPRESSLY STATES THAT ALL REPAIRS AND PARTS REPLACEMENTS SHOULD BE UNDERTAKEN
BY CERTIFIED AND LICENSED TECHNICIANS AND NOT BY THE BUYER. THE BUYER ASSUMES
ALL RISK AND LIABILITY ARISING OUT OF HIS OR HER REPAIRS TO THE ORIGINAL PRODUCT OR
REPLACEMENT PARTS THERETO, OR ARISING OUT OF HIS OR HER INSTALLATION OF REPLACE-
MENT PARTS THERETO.
NOTE: Some parts are listed and shown for illustration purposes only and are not available individually as replacement parts.
Parts List
Parts Identification
1
2
3
4
5
6
7
8
9
Part # Description Qty.
Handle
Nut
Shaft Bushing
Drive Shaft
E-Ring
Shaft Bushing
Nut
Ratchet Pawl
Bushing
1
1
1
1
1
1
1
1
1
10
11
12
13
14
15
16
17
18
Part # Description Qty.
Spring
Winch Base
Bolt
Reel Shaft
Winch Reel
Cable Clamp
Carriage Bolt
Nut
Locknut
1
1
1
1
1
1
1
1
1
Part 2
Part 15
Part 14
Part 17
Part 1
Part 13
Part 12
Part 16
Part 18
Part 7
Part 6
Part 10
Part 9
Part 8
Part 3
Part 4
Part 11
Cable Attachment Methods
Part 5
19 Cable with Hook - 25” 1
#19 Cable with Hook
(not shown)
Brought to You by AugustaFlint
Table of contents
Popular Winch manuals by other brands

Gude
Gude GSZ 100/200 Translation of original operating instructions

Ramsey Winch
Ramsey Winch HD-P800 Operating, Service and Maintenance Manual

XPOtool
XPOtool 62973 Operation manual

Comeup
Comeup CHAMPIONSHIP WINCH instruction manual

Pattfield Ergo Tools
Pattfield Ergo Tools PE-1135 HSW Original instructions

Red Winches
Red Winches HAWK - UTV Technical manual