Central Pneumatic 05490 User manual

3491 Mission Oaks Blvd. / Camarillo, CA93011
Copyright © 1997 by Harbor Freight Tools®. All rights reserved.
No portion of this manual or any artwork contained herein may be reproduced in any
shape or form without the express written consent of Harbor Freight Tools.
For technical questions and replacement parts, please call 1-800-444-3353.
AIR HIGH SPEED CUTTER
ASSEMBLY and OPERATING INSTRUCTIONS
®
®

SPECIFICATIONS
FreeSpeed 5000 to 18000 RPM
Air Pressure 90PSI
Air Consumption 4CFM
AirInlet ¼” NPT
Weight 1-1/2 lbs.
SAVE THIS MANUAL
You will need the manual for the safety warnings and cautions, assembly instructions, operating
procedures, maintenance procedures, trouble shooting, parts list, and diagram. Keep your
invoice with this manual. Write the invoice number on the inside of the front cover. Keep both
this manual and your invoice in a safe, dry place for future reference.
SAFETY WARNING & CAUTIONS
WARNING: When using pneumatic equipment, basic safety precautions should always be
followed to reduce the risk of personal injury and hazards due to over pressurization.
READ ALL INSTRUCTIONS BEFORE USING THIS TOOL!
1. KEEPWORK AREACLEAN. Cluttered areas invite injuries.
2. OBSERVE WORKAREACONDITIONS. Do not use tools in damp, wet, or poorly lit
locations.Don’texposetorain.Keepworkareawelllit.Donotuseelectricallypowered
air compressors in the presence of flammable gases or liquids.
3. KEEP CHILDRENAWAY. Childrenmust neverbe allowed in the workarea. Do not let
themhandlemachines, tools, orhoses.
4. STORE IDLE EQUIPMENT. When not in use, tools must be lockedupin a dry location
toinhibitrust.Alwayslockuptoolsandkeepoutof reach of children.
5. DO NOT FORCE THE TOOL. It will do the job better and more safely at the rate for
whichit wasintended.Donot useinappropriateattachments inanattempttoexceedthe
tool’s capacities.
6. USE THE RIGHT TOOL FOR THE JOB. Do not attempt to force a small tool or
attachmenttodothe work of a larger industrial tool. Donotuseatool for a purpose for
whichitwas not intended.
7. DRESS PROPERLY. Donot wear loose clothingor jewelry as they can be caught in
movingparts.Non-skidfootwearisrecommended.Wearrestrictivehaircoveringto
containlonghair.
Page #2 -- SKU: 05490

8. USE EYEAND EAR PROTECTION.Always wearANSI approved chemical splash
goggleswhenworkingwithchemicals.AlwayswearANSI approved impactsafety
gogglesatothertimes. Wear a full face shield if youareproducing metal filings or
woodchips.WearanANSI approved dust mask or respirator when working around
metal,wood,andchemicaldustsandmists.
9. DO NOTABUSE THE POWER CORD. Do not yank compressor’scord todisconnect
itfromthereceptacle.Donotcarrytoolsbythecord.
10. DO NOT OVERREACH. Keep proper footing and balance at all times. Do not reach
overoracross running machines.
11. MAINTAIN TOOLS WITH CARE. Keep tools sharp and clean for better and safer
performance.Followinstructions for lubricating and changingaccessories.Inspect
compressor’scord periodically and, if damaged, have them repairedbyanauthorized
technician.Inspect all hosesforleaksprior touse.Thehandlesmust bekeptclean,dry,
and free from oil and grease at all times.
12. REMOVE ADJUSTING KEYS AND WRENCHES. Make it a habit to check that keys
andadjustingwrenchesareremovedfrom the tool or machine work surface before
pluggingitin.
13. AVOID UNINTENTIONAL STARTING. Donot carry any tool with your finger on the
trigger, whether it is connected to the compressor or not.
14. STAYALERT. Watch whatyouaredoing,usecommon sense. Do not operateanytool
whenyouare tired.
15. CHECK DAMAGED PARTS. Before using any tool, any part that appears damaged
shouldbecarefullycheckedtodeterminethatitwill operate properly and perform its
intendedfunction. Checkforalignmentandbindingofmovingparts; anybrokenpartsor
mountingfixtures;andanyotherconditionthatmayaffectproperoperation.Anypartthat
is damaged should be properly repaired or replaced by a qualified technician. Do not
usethetoolif any switch does not turnonandoffproperly.
16. REPLACEMENT PARTSAND ACCESSORIES. When servicing, use only identical
replacementparts.Useofanyotherpartswill voidthewarranty.Onlyuseaccessories
intendedforuse with thistool.Approvedaccessoriesareavailable from HarborFreight
Tools.
17. DO NOT OPERATE TOOL IF UNDER THE INFLUENCE OFALCOHOL OR DRUGS.
Readwarninglabelsonprescriptionstodetermineifyourjudgmentor reflexes are
impairedwhiletakingdrugs.Ifthereisanydoubt,donotoperatethetool.
18. DRAIN COMPRESSOR EVERY DAY. Do not allow moisture to build up inside the
compressor.Donotallowcompressortositpressurizedforlongerthanone hour.
19. MAKE SURE ALL EQUIPMENT IS RATED TO THE APPROPRIATE CAPACITY.
Makesurethatregulator is set at least 10 PSI lower thanthelowestratedpiece of
equipmentyouare using.
20. The Safety Guard must always be tightly secured in place whenusingtheAirHigh
SpeedCutter. Keep hands offguard when operatingthistool.
Page #3 -- SKU: 05490 REV 02/04
UNPACKING
Your High Speed Cutter comes fully assembled. When unpacking your High Speed Cutter,
check to make sure the following parts are included. If any parts are missing or broken, please
call Harbor Freight Tools at the number on the cover of this manual.
ASSEMBLY
Your High Speed Cutter comes completely assembled and is ready for use. Should you need to
remove and replace the CUTTING WHEEL (#33), refer to the steps below.
Step 1:Purchase an authorized replacement CUTTING WHEEL from Harbor Freight Tools. Use
only approved replacement accessories with your High Speed Cutter.
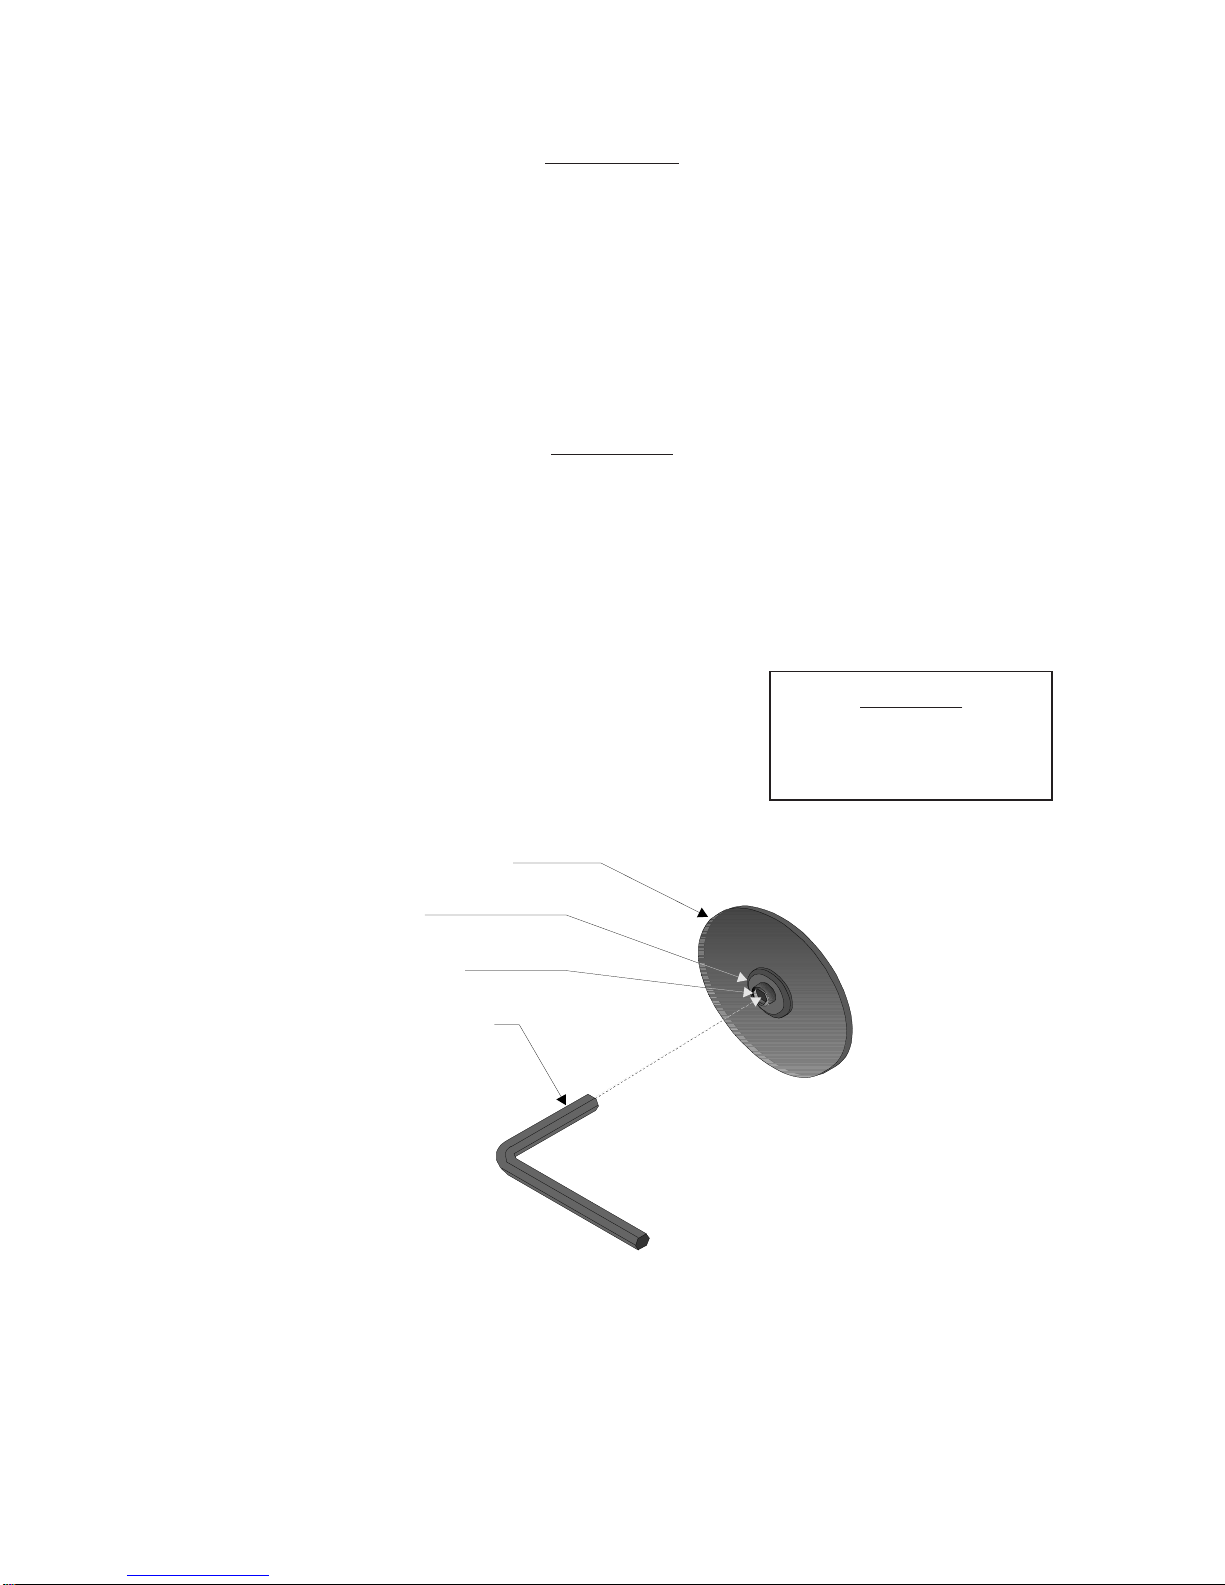
Step 2:Place the SPANNER (#32) on the flats of the
SPINDLE (#6).
Step 3:Insert the HEX WRENCH (#31) into the HEX SCREW
(#1) as shown in Figure 1.
Cutting Wheel (#33)
Spacer (#2)
Hex Screw (#1)
Hex Wrench (#31)
Figure 1 — Inserting the Hex Wrench
ITEM # DESCRIPTION
N/A HighSpeed Cutter
32 Spanner
31 HexWrench
CAUTION
Use only 3" Cutting
Wheels rated for more
than 18,000 RPM.
Page #4 -- SKU: 05490

Step 4:Hold the SPANNER and turn the HEX WRENCH counterclockwise to loosen the HEX
SCREW. Remove the HEX SCREW and SPACER (#2) as shown in Figure 2.
CAUTION
Do Not brace the SPANNER
against the PROTECTOR
GUARD while loosening or
tightening the HEX SCREW.
Spacer (#2)
Hex Screw (#1)
Hex Wrench (#31)
Spanner (#32)
Spindle (#6)
Cutting Wheel (#33)
High Speed Cutter
L
o
o
s
e
n
Step 5:Remove the CUTTING WHEEL and replace with a new one.
Figure 2 — Replacing the Cutting Wheel
Page #5 -- SKU: 05490
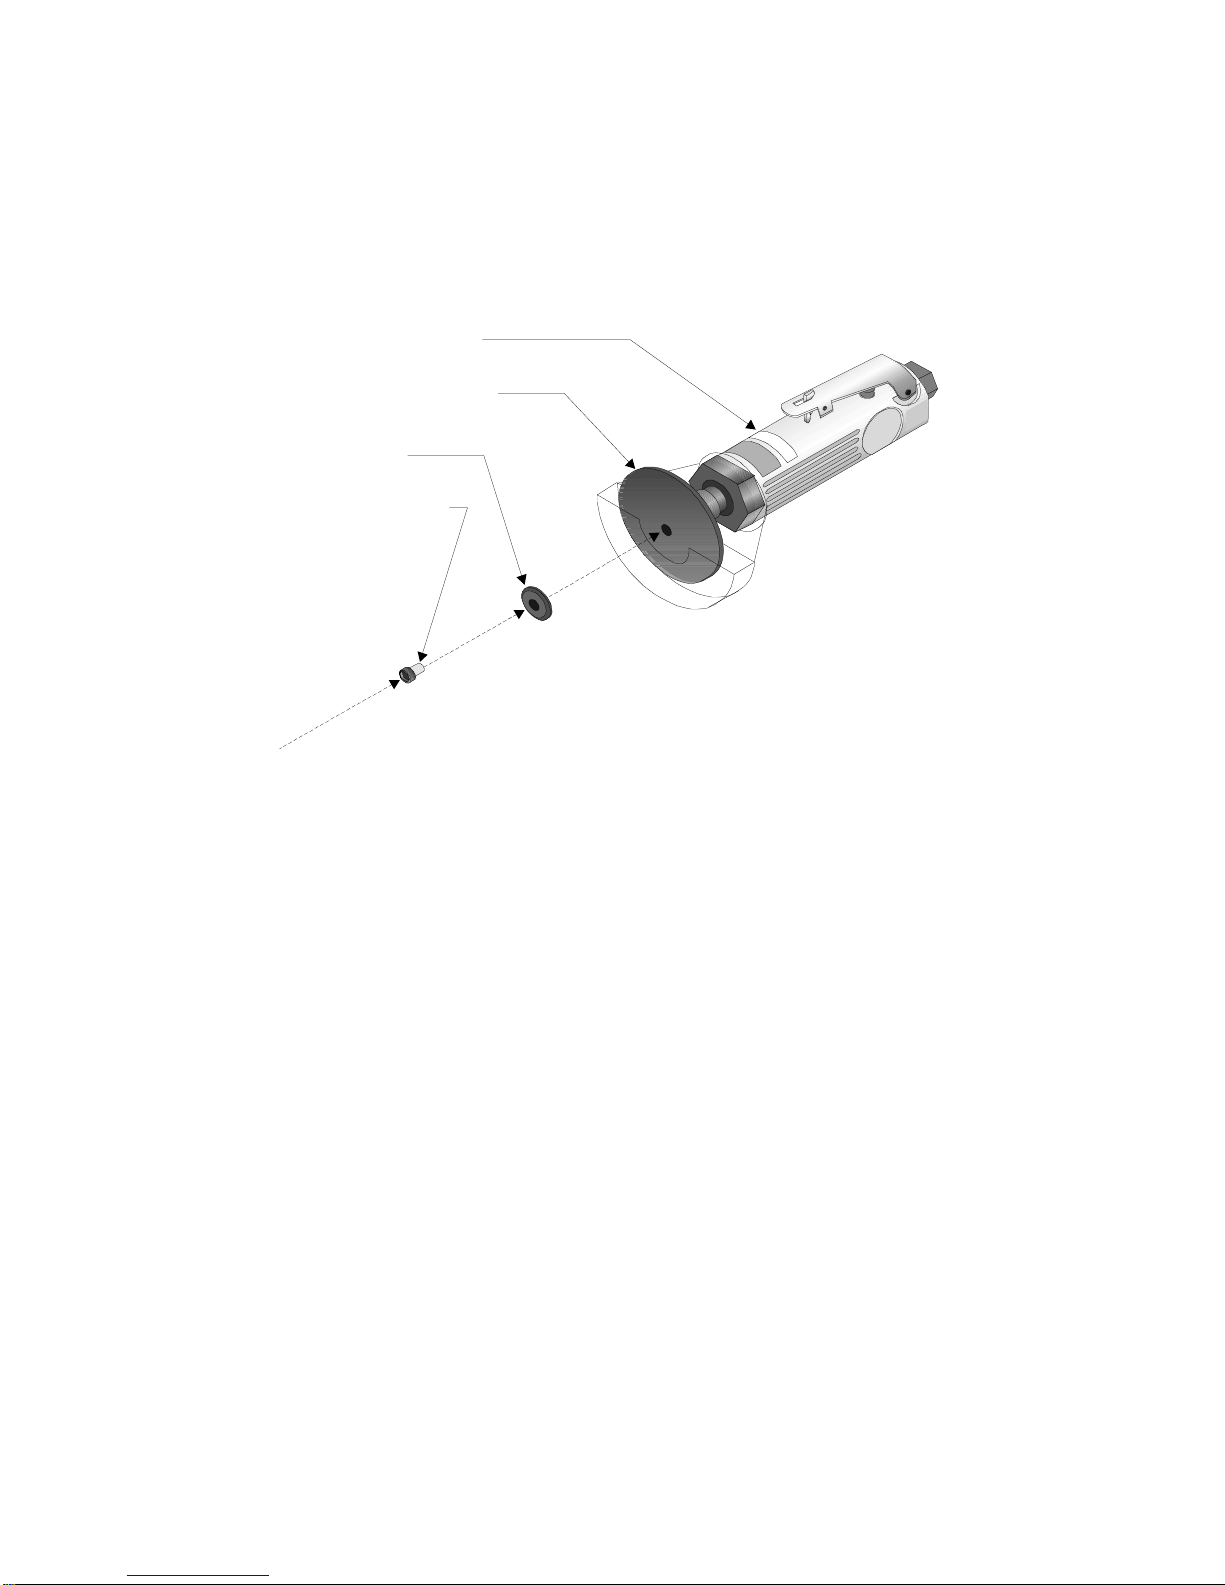
Step 6:Insert the HEX SCREW through the SPACER and thread into the SPINDLE as shown in
Figure3.
Hex Screw (#1)
Spacer (#2)
High Speed Cutter
Cutting Wheel (#33)
Figure 3 — Reassembling Cutting Wheel
Step 7:Place the SPANNER on the flats of the SPINDLE.
Step 8:Hold the SPANNER and firmly tighten the HEX SCREW with the HEX WRENCH.
Step 9:You will need a union fitting (sold separately) before you can connect your High Speed
Cutter to an air compressor.
Step 10:Attach anAir Coupler (sold separately) to the Union fitting if desired. This is a useful
accessory as it allows quick-coupling action when using a variety of tools with the same
air compressor.
Step 11:Your High Speed Cutter is ready for use.
Page #6 -- SKU: 05490

OPERATION
Setup
Frequent, but not excessive, lubrication is required for best performance. Oil added through the
airline connection will lubricate internal parts. An automatic airline oiler is recommended but oil
may be added manually before every operation or after about 1 hour of continuous use. Only a
few drops of oil at a time are necessary. Too much oil will collect inside the tool and be blown
out during the exhaust cycle. ONLY USE PNEUMATIC TOOL OIL. Do not use detergent oil or
additives as these lubricants will cause accelerated wear to the seals in the tool.
Dirt and water in the air supply are major causes of pneumatic tool wear. Use a filter/oiler for
better performance and longer life. The filter must have adequate flow capacity for the specific
application. Consult the manufacturer’s instructions for proper maintenance of your filter.
The connector on the tool must not hold pressure when the air supply is disconnected. If the
wrong fitting is used, the tool can remain charged with air after being disconnected and still be
able to drive a fastener. See Figure 4 for the recommended accessories and connection order.
High
Speed
Cutter
CAUTION
Always check CUTTING DISC for
possible wear. Never use a worn,
torn, or defective disc.
Use
Step 1:Check the CUTTING WHEEL for wear. Replace
if necessary.
Step 2:Set the compressor’s pressure regulator to 90
PSI. Do not set the compressor’s outlet regulator over
90PSI.
Step 3: Connect the High Speed Cutter to the air compressor’s hose. If leaking is detected,
disconnect the air hose and repair before use.
Figure 4 — Airline Oiler Assembly
Page #7 -- SKU: 05490
Warning: TheSafetyGuardmustalwaysbetightlysecured in place when using theAir
HighSpeedCutter. Keep hands offguardwhenoperatingthistool.
REV 02/04

Step 4:It is highly recommended that you wear protective gloves and eye protection when using
the High Speed Cutter.
Step 5:Place the material you will be cutting into a vise or otherwise secure material so that it
can not move while you are cutting. Mark the material
where you wish to cut it.
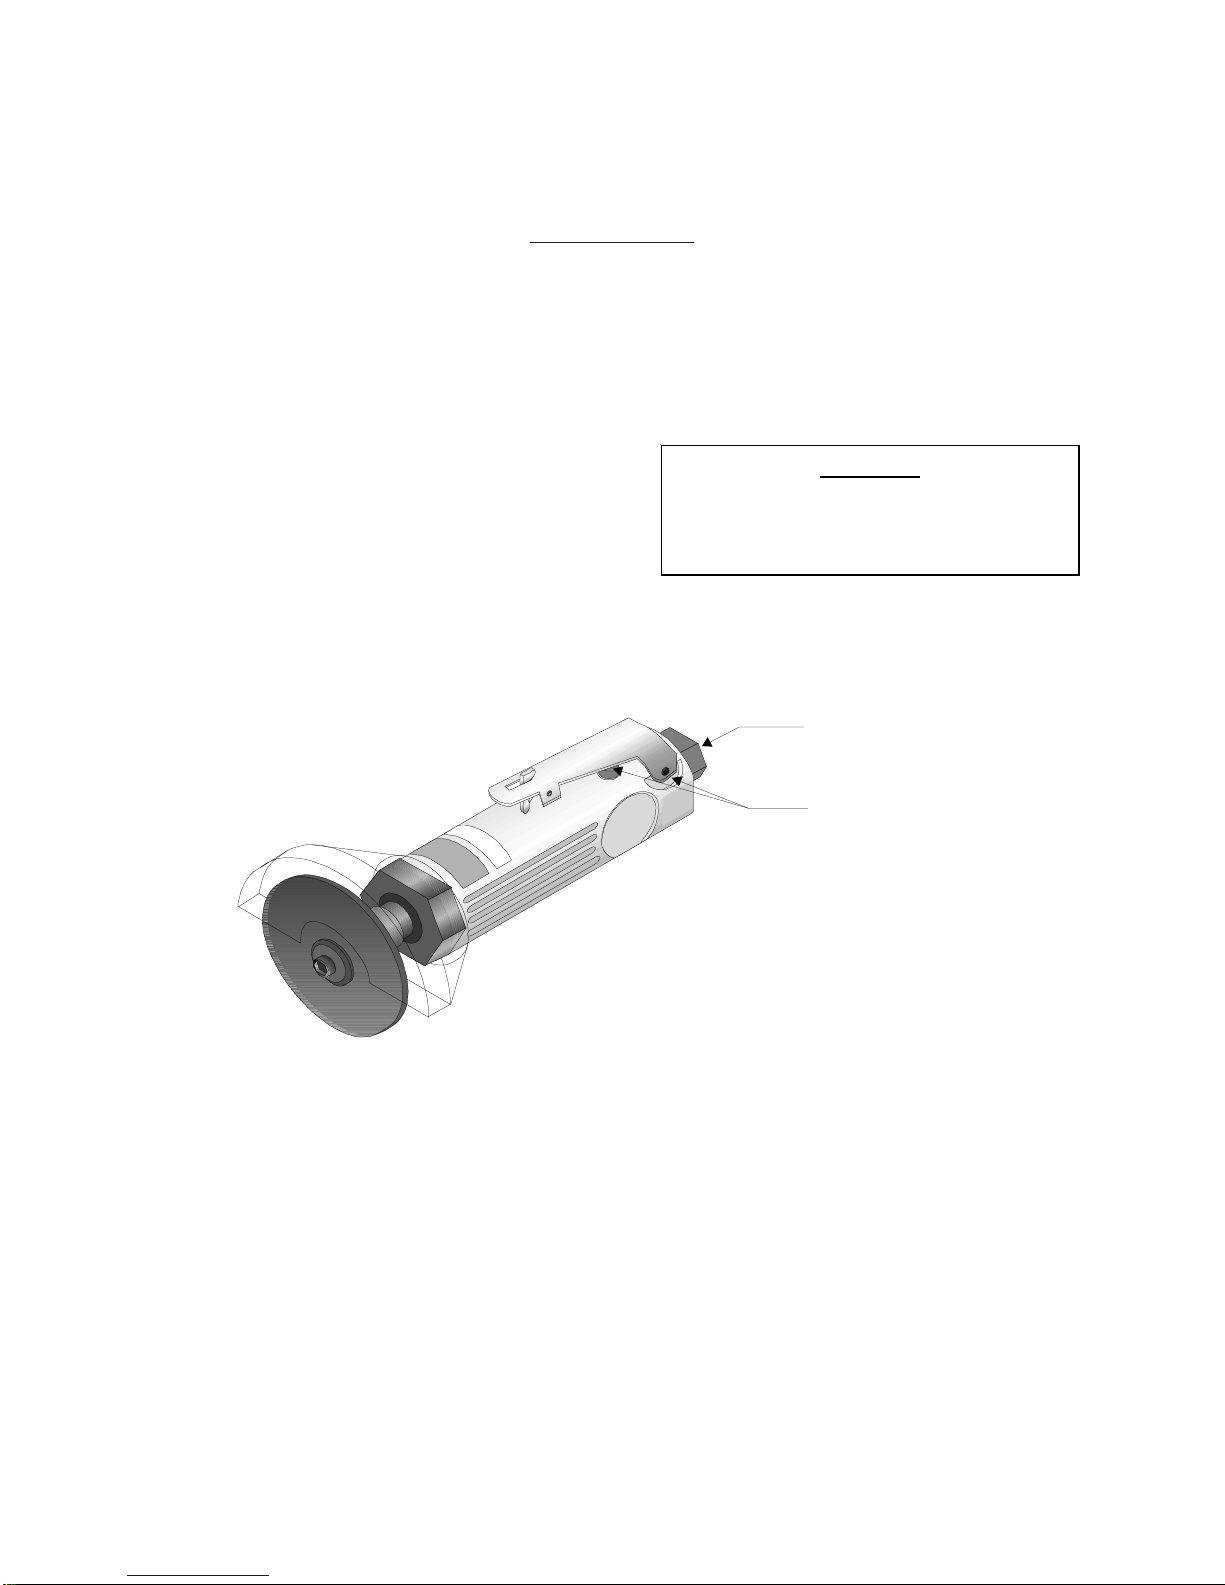
Step 6:Grip the High Speed Cutter so that your thumb
rests on the THROTTLE LEVER and Safety Latch. This
will keep the PROTECTOR GUARD properly oriented.
Step 7:Make sure the CUTTING WHEEL is not touching the cutting surface.
Step 8:Press the Safety Latch forward with your thumb as you press down on the THROTTLE
LEVER as shown in Figure 5.
Safety Latch
Throttle Lever (#26)
High Speed Cutter
Figure 5 — Operating the Safety Latch
Step 8:The High Speed Cutter’s cutting speed is variable between 5000 and 18,000 RPM. Vary
the pressure placed on the THROTTLE LEVER to vary the speed. Use only enough speed as
needed to cut through the material.
Step 9:Place the edge of the CUTTING WHEEL onto the surface to be cut.
Step 10:Keep a steady pressure on the High Speed Cutter as it cuts, but do not force the
CUTTING WHEEL as you will stall the High Speed Cutter. Use only enough pressure to keep
the CUTTING WHEEL moving through the material.
WARNING
Do Not place hands, hair, or
loose clothing near the CUTTING
WHEEL while using the High
Speed Cutter.
Page #8 -- SKU: 05490
Step 11:When you are finished with the High Speed Cutter, release all pressure on the
THROTTLE LEVER to stop the CUTTING WHEEL.
MAINTENANCE
Your High Speed Cutter is best operated with anAirline Oiler. If you are using the High Speed
Cutter without anAirline Oiler, follow the steps below for maintenance.
Step 1: Disconnect the High Speed Cutter from the air hose.
Step 2:Apply a few drops of PNEUMATIC TOOL OIL through the air line before each use, or
every hour if used continuously.
Step 3:Apply a few drops of oil to the THROTTLE
LEVER (#26) as shown in Figure 6. Work the
THROTTLE LEVER a few times to lubricate.
Air Line
Throttle Lever
Figure 6 — Lubrication Points
Step 4:Check the condition of the CUTTING WHEEL. Replace if necessary.
Step 5: Wipe off the High Speed Cutter. Pay special attention to cleaning the PROTECTOR
GUARD in order to be able to see your work when you cut.
CAUTION
Do not use detergent oil or additives as
these lubricants will cause accelerated
wear to the seals in the tool.
Page #9 -- SKU: 05490

PARTS LIST
Item# Description Qty Item# Description Qty
1 Hex Screw 1 18 Valve Screw “O” Ring 1
2 Spacer 1 19 Regulator “O” Ring 1
3 Lock Nut 1 20 Air Regulator 1
4 Protector Guard 1 21 ThrottleValve Spring 1
5 Lock Nut 1 22 ThrottleValve Bushing 1
6 Spindle 1 23 Valve Bushing “O” Ring 1
7 Front Rotor Ball Bearing 1 24 ThrottleValve 1
8 Front End Plate 1 25 Throttle Valve “O” Ring 2
9 Roll Pin 3 26 Throttle Lever with Safety Latch 1
10 Cylinder 1 27 Throttle Lever Pin 1
11 Rotor Collar 1 28 Exhaust Deflector 1
12 Rotor 1 29 Inlet Bushing “O” Ring 1
13 Rotor Blade 4 30 Air InletBushing 1
14 Rear End Plate 1 31 Hex Wrench 1
15 Rear End Ball Bearing 1 32 Spanner 1
16 MotorHousing 1 33 Cutting Wheel 1
17 Valve Screw 1
Page #10 -- SKU: 05490
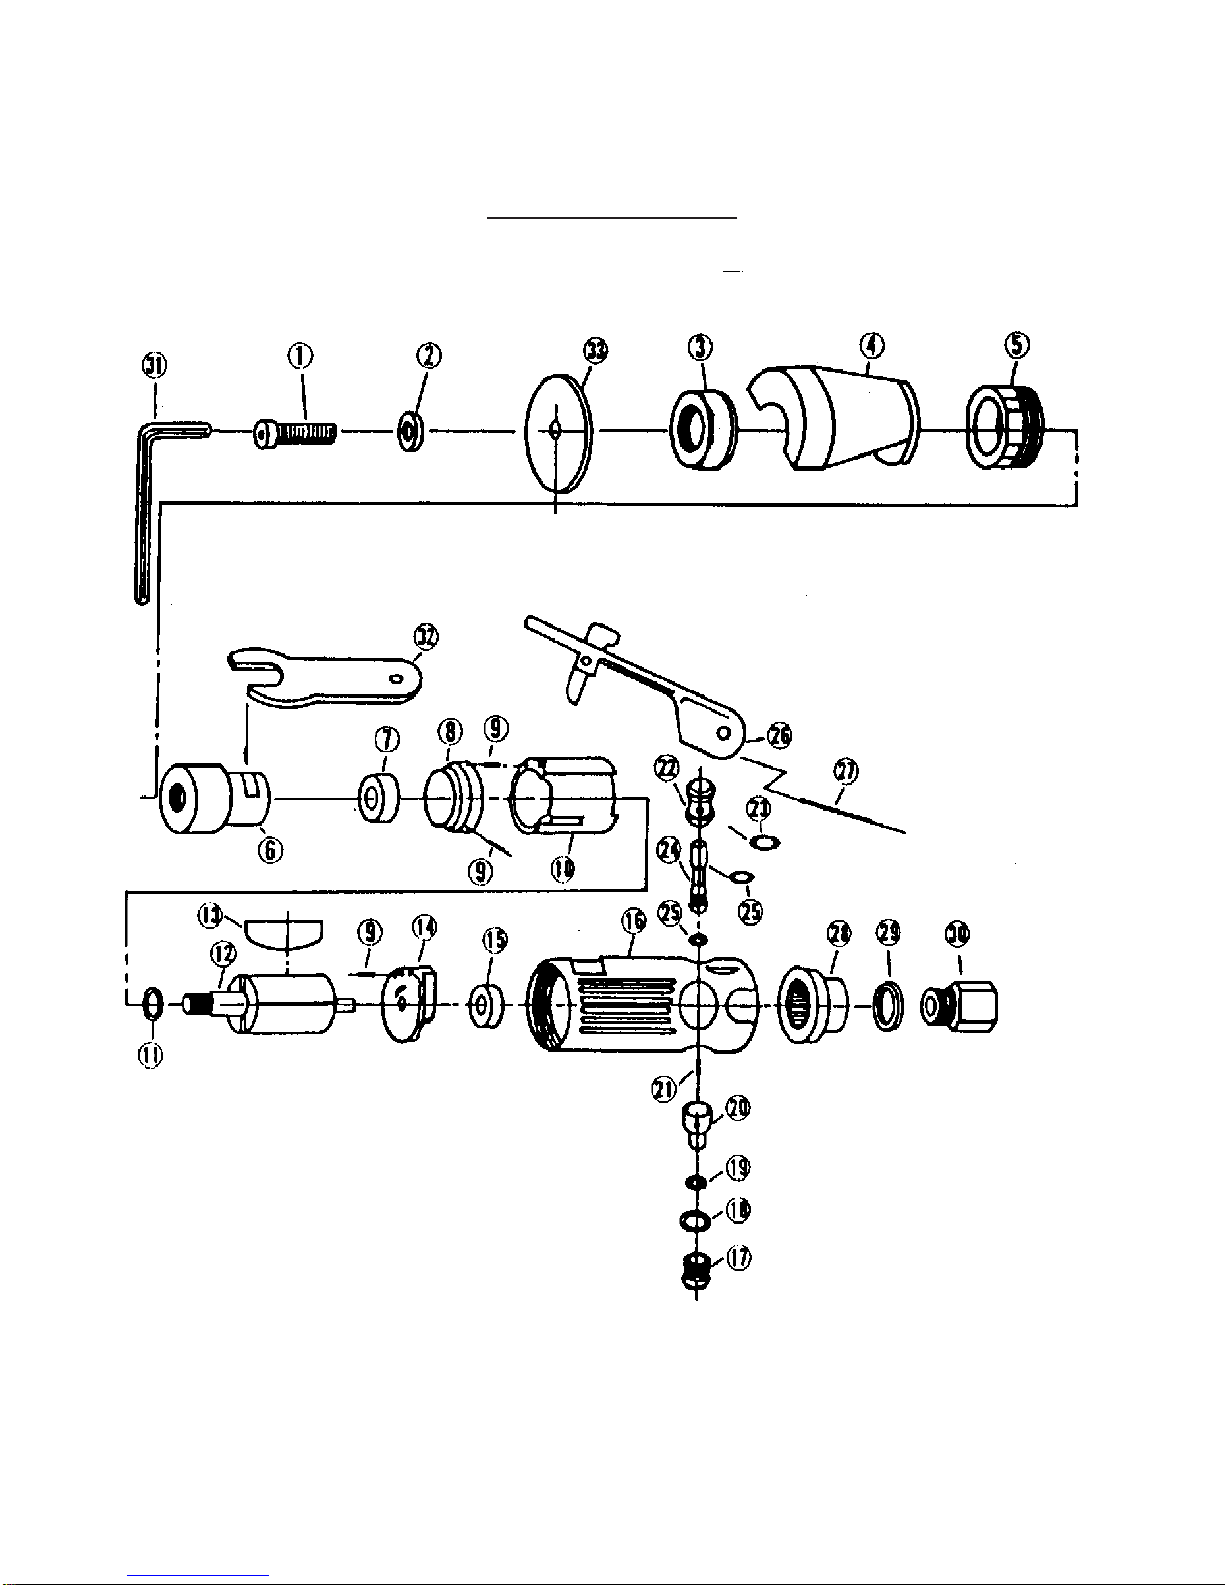
ASSEMBLYDIAGRAM
Page #11 -- SKU: 05490
Table of contents
Other Central Pneumatic Cutter manuals


Popular Cutter manuals by other brands


Bosch
Bosch GWS 18V-180 P Professional Original instructions

Ripley
Ripley Cablematic QCST Series manual

Scheppach
Scheppach FS3600 Translation from the original manual

Makita
Makita PC01 instruction manual

ESAB
ESAB Precision Plasmarc Installation, operation and maintenance manual

EINHELL
EINHELL TE-TC 620 U Original operating instructions


