Certa CT18VCIRCSWA User manual


Table of Contents
General Tool Safety Warnings......................................................................................................2
Work Area........................................................................................................................................2
Electrical Safety.............................................................................................................................2
Personal Safety..............................................................................................................................3
Power Tool Use and Care..........................................................................................................3
Battery Tool Use and Care........................................................................................................4
Additional Warnings A licable for the Circular Saw...................................................4
Im ortant Safety Instructions for Battery Charger.........................................................5
Im ortant Safety Instructions for the Battery Pack.......................................................6
Symbols.................................................................................................................................................6
Product Information.........................................................................................................................8
Layout................................................................................................................................................8
Technical S ecifications.............................................................................................................8
Battery & Charger Technical S ecifications......................................................................8
Charging Battery Pack.....................................................................................................................9
Circular Saw O eration...................................................................................................................9
Assembling and Removing the Saw Blade........................................................................9
Adjusting the Cutting De th..................................................................................................10
Adjusting the Bevel Cutting...................................................................................................10
Lock-Off Button...........................................................................................................................10
Variable S eed Controlled Switch Trigger........................................................................11
General Cutting.............................................................................................................................11
Plunge Cutting...............................................................................................................................11
Maintenance and Servicing..........................................................................................................12
Troubleshooting................................................................................................................................12
1

General Tool Safety Warnings
Save all warnings and instructions for future reference.
The term “ ower tool” refers to your mains o erated (corded) ower tool or
battery-o erated (cordless) ower tool.
Work Area
1. Kee your work area clean and well lit. Cluttered benches and dark areas
invite accidents.
2. Do not o erate ower tools in ex losive atmos heres, such as in the
resence of flammable liquids, gases, or dust. Power tools create s arks
which may ignite the dust or fumes.
3. Kee bystanders and children away while o erating a ower tool.
Distractions can cause you to lose control.
Electrical Safety
1. Power tool lugs must match the outlet. Never modify the lug in any
way. Do not use any ada ter lugs with earthed (grounded) ower tools.
Unmodified lugs and matching outlets will reduce risk of electric shock.
2. Avoid body contact with grounded surfaces such as i es, radiators,
ranges and refrigerators. There is an increased risk of electric shock if your
body is grounded.
3. Do not ex ose ower tools to rain or wet conditions. Water entering a
ower tool will increase the risk of electric shock.
4. Do not abuse the cord. Never use the cord to carry the tools or ull the
lug from an outlet. Kee cord away from heat, oil, shar edges or moving
arts. Re lace damaged cords immediately. Damaged cords increase the
risk of electric shock.
5. When o erating a ower tool outdoors, use an extension cord suitable for
outdoor use. Use of a cord suitable fir outdoor use reduces the risk of
electric shock.
6. If o erating a ower tool in a dam location is unavoidable, use a Ground
Fault Circuit Interru ter (GFCI) rotected su ly. Use of a GFCI reduces
the risk of electric shock.
Personal Safety
1. Stay alert, watch what you are doing and use common sense when
o erating a ower tool. Do not use tool while tired or under the influence
of drugs, alcohol, or medication. A moment of inattention while o erating
ower tools may result in serious ersonal injury.
2. Use ersonal rotective equi ment. Always wear eye rotection. Safety
equi ment such as dust mask, non-skid safety shoes, hard hat, or hearing
rotection used for a ro riate conditions will reduce ersonal injuries.
3. Prevent unintentional starting. Ensure the switch is in the off- osition
before connecting to ower source and/or battery ack, icking u or
carrying the tool. Carrying ower tools with your finger on the switch or
2

energizing ower tools that have the switch on invites accidents.
4. Dress ro erly. Do not wear loose clothing or jewellery. Kee your hair,
clothing, and gloves away from moving arts. Loose clothes, jewelry, or
long hair can be caught in moving arts.
5. Remove adjusting keys or wrenches before turning the tool on. A wrench
or a key that is left attached to a rotating art of the tool may result in
ersonal injury.
6. Do not overreach. Kee ro er footing and balance at all times. The
enables better control of the ower tool in unex ected situations.
7. Only use safety equi ment that has been a roved by an a ro riate
standards agency. Una roved safety equi ment may not rovide
adequate rotection. Eye rotection must be ANSI-a roved and
breathing rotection must be NIOSH-a roved for the s ecific hazards in
the work area.
Power Tool Use and Care
1. Do not force tool. Use the correct tool for your a lication. The correct
tool will do the job better and safer at the rate for which it is designed.
2. Do not use tool if switch does not turn it on or off. Any ower tool that
cannot be controlled with the switch is dangerous and must be re aired.
3. Disconnect the lug from the ower source and/or the battery ack from
the ower tool before making any adjustments, changing accessories, or
storing the tool. Such reventive safety measures reduce risk of starting
the tool accidentally.
4. Store idle ower tools out of the reach of children and other untrained
ersons. Power tools are dangerous in the hands of untrained users.
5. Maintain tools with care. Check for misalignment or binding of moving
arts, breakage of arts and any other condition that may affect the
ower tool’s o eration. If damaged, have the ower tool re aired before
use. Many accidents are caused by oorly maintained ower tools.
6. Kee cutting tools shar and clean. Pro erly maintained tools with shar
cutting edges are less likely to bind and are easier to control.
7. Use only accessories that are recommended by the manufacturer for your
model. Accessories that may be suitable for one tool may become
hazardous when used on another tool.
Battery Tool Use and Care
1. Ensure the switch is in the off osition before inserting battery ack. Insert
the battery ack into ower tools that have the switch on invites
accidents.
2. Recharge only with the charger s ecified by the manufacturer. A charger
that is suitable for one ty e of battery ack may create a risk of fire when
used with another battery ack.
3. Use ower tools only with s ecifically designated battery acks. Use of
any other battery acks may create a risk of injury and fire.
4. When battery ack is not in use, kee it away from other metal objects
like a er cli s, coins, keys, nails, screws, or other small metal objects that
can make a connection from one terminal to another. Shorting the battery
3

terminals together may cause burns or a fire.
5. Under abusive conditions, liquid may be ejected from the battery, avoid
contact. If contact accidentally occurs, flush with water. If liquid contacts
eyes, additionally seek medical hel . Liquid ejected from the battery may
cause irritation or burns.
Additional Warnings Applicable for the Circular Saw
•Always wear safety goggles or eye protection when using this tool Use a
dust mask or respirator for applications which generate dust This saw
may throw u debris that could lodge in the eyes causing severe ain or
injury.
•Inspect the bolts and blade washers before each use Damaged or
incorrect bolts or blade washers can cause injury.
•When using the Circular Saw, always maintain a firm grip on the tool
with both hands Never put your hands or feet in the cutting area Do not
grasp the tool or place your hands too close to the blade Kee your
hands well away from the blade. Never reach underneath the tool while
the blade is in motion. Do not use your legs or feet to stabilize the work
iece.
•Keep the handle of the Cordless Circular Saw dry, clean and free from oil
and grease
•Disconnect battery pack from tool and place the switch in the locked or
“OFF” position before making any assembly adjustments, changing
accessories, performing any inspection, maintenance or cleaning
procedures Such reventive safety measures reduce the risk of starting
the tool accidentally which could cause serious ersonal injury.
•Be extra careful when cutting in high or hard-to-reach locations Avoid
sawing overhead Be on the lookout for hidden wires and falling debris.
•Do not use the Cordless Circular Saw if it has been damaged, left
outdoors in the rain, snow, wet or damp environments, or immersed in
liquid
•Maintain labels and nameplates on the Cordless Circular Saw These carry
im ortant information. If unreadable or missing, contact All trade for a
re lacement.
•Keep your body positioned to either side of the saw blade, but not in
line with the saw blade KICKBACK could cause the saw to jum
backwards.
•Check lower guard for proper closing before each use Do not operate
saw if lower guard does not move freely and close instantly Never clamp
or tie the lower guard into the open position If saw is accidentally
dro ed, lower guard may be bent. Raise the lower guard with the
Retracting Lever and make sure it moves freely and does not touch the
blade or any other art, in all angles and de ths of cut.
•Check the operation and condition of the lower guard spring If the
guard and the spring are not operating properly, they must be serviced
before use Lower guard may o erate sluggishly due to damaged arts,
gummy de osits, or a buildu of debris.
•Lower guard should be retracted manually only for special cuts such as
4

"Pocket Cuts" and "Compound Cuts" Raise the lower guard by
Retracting Lever As soon as blade enters the material, lower guard must
be released For all other sawing, the lower guard should o erate
automatically.
•Always observe that the lower guard is covering the blade before
placing saw down on bench or floor An un rotected, coasting blade will
cause the saw to walk backwards, cutting whatever is in its ath. Be aware
of the time it takes for the blade to sto after switch is released.
•NEVER hold piece being cut in your hands or across your leg It is
im ortant to su ort the work ro erly to minimize body ex osure, blade
binding, or loss of control.
•Hold tool by insulated gripping surfaces when performing an operation
where the cutting tool may contact hidden wiring Contact with a “live”
wire will also make ex osed metal arts of the tool "live" and shock the
o erator.
•When ripping, always use a rip fence or straight edge guide This
im roves the accuracy of the cut and reduces the chance for blade
binding.
•Always use blades with correct size and shape (diamond vs round) arbor
holes Blades that do not match the mounting hardware of the saw will
run eccentrically, causing loss of control.
Important Safety Instructions for Battery Charger
•Before using battery charger, read all instructions and cautionary
markings on battery charger, battery pack, and product using battery
•Use only the charger which accompanied your product or direct
replacement Do not substitute any other charger. Use only same su lier
a roved chargers with your roduct.
•Do not disassemble charger or operate the charger if it has received a
sharp blow, been dropped or otherwise damaged in any way Incorrect
reassembly may result in a risk of electric shock, electrocution or fire.
•Do not recharge battery in damp or wet environment Do not expose
charger to rain or snow If battery case is cracked or otherwise damaged,
do not insert into charger Battery short or fire may result.
•Charge only same supplier approved rechargeable batteries See
Functional Descri tion and S ecifications. Other ty es of batteries may
burst causing ersonal injury and damage.
•Charge battery pack in temperatures above 0ºC and below 45ºC Store
tool and battery pack in locations where temperatures will not exceed
49ºC This is im ortant to revent serious damage to the battery cells.
•Pull by plug rather than cord when disconnecting charger or when
disconnecting cords using the daisy chain feature This will reduce risk of
damage to electric lug and cord.
•Make sure that cord is located so that it will not be stepped on, tripped
over, or otherwise subjected to damage or stress
•Do not use an extension cord unless it is absolutely necessary Use of
im ro er extension cord could result in risk of fire, electric shock, or
electrocution.
5

•Do not operate charger with damaged cords or plugs — have them
re laced immediately.
•Disconnect the charger from the outlet before attempting any cleaning
This will reduce the risk of electric shock Removing the battery ack will
not reduce this risk.
Important Safety Instructions for the Battery Pack
•Do not incinerate the battery pack even if it is severely damaged or is
completely worn out The battery ack can ex lode in a fire. Toxic fumes
and materials are created when lithium ion battery acks are burned.
•Do not charge or use battery in explosive atmospheres, such as in the
presence of flammable liquids, gases or dust Inserting or removing the
battery from the charger may ignite the dust or fumes.
•If battery contents come into contact with the skin, immediately wash
area with mild soap and water If battery liquid gets into the eye, rinse
water over the o en eye for 15 minutes or until irritation ceases. If medical
attention is needed, the battery electrolyte is com osed of a mixture of
liquid organic carbonates and lithium salts.
•Contents of opened battery cells may cause respiratory irritation
Provide fresh air. If sym toms ersist, seek medical attention.
•Charge the battery packs only in the charger which accompanied your
product
•DO NOT splash or immerse in water or other liquids This may cause
remature cell failure.
•Do not store or use the tool and battery pack in locations where the
temperature may reach or exceed 40°C (such as outside sheds or metal
buildings in summer)
•When batteries are not in tool or charger, keep them away from metal
objects
•DO NOT put batteries into fire or expose to high heat They may ex lode.
Symbols
The following symbols or initials may be used on the tool. Please see below to
learn their meaning. Pro er inter retation of these symbols will allow you to
o erate the tool better and safer.
Symbol Name Designation/Explanation
V Volts Voltage
A Am eres Current
Hz Hertz Frequency (cycles er second)
Kg Kilograms Weight
Min Minutes Time
s Seconds Time
Ø Diameter Size of drill bits, grinding wheel etc..
6
noNo load s eed Rotational s eed at no load
…/min Revolutions or
reci rocation er minute
Revolutions, strokes, surface s eed,
orbits etc.. er minute
0 Off osition Zero s eed, zero torque...
Arrow Action in the direction of the arrow
Direct current Ty e or a characteristic of current
Read manual symbol Alerts user to refer to the manual
Wear eye rotection Alerts user to wear eye rotection
Class II contruction Double insulated construction tools
Product Information
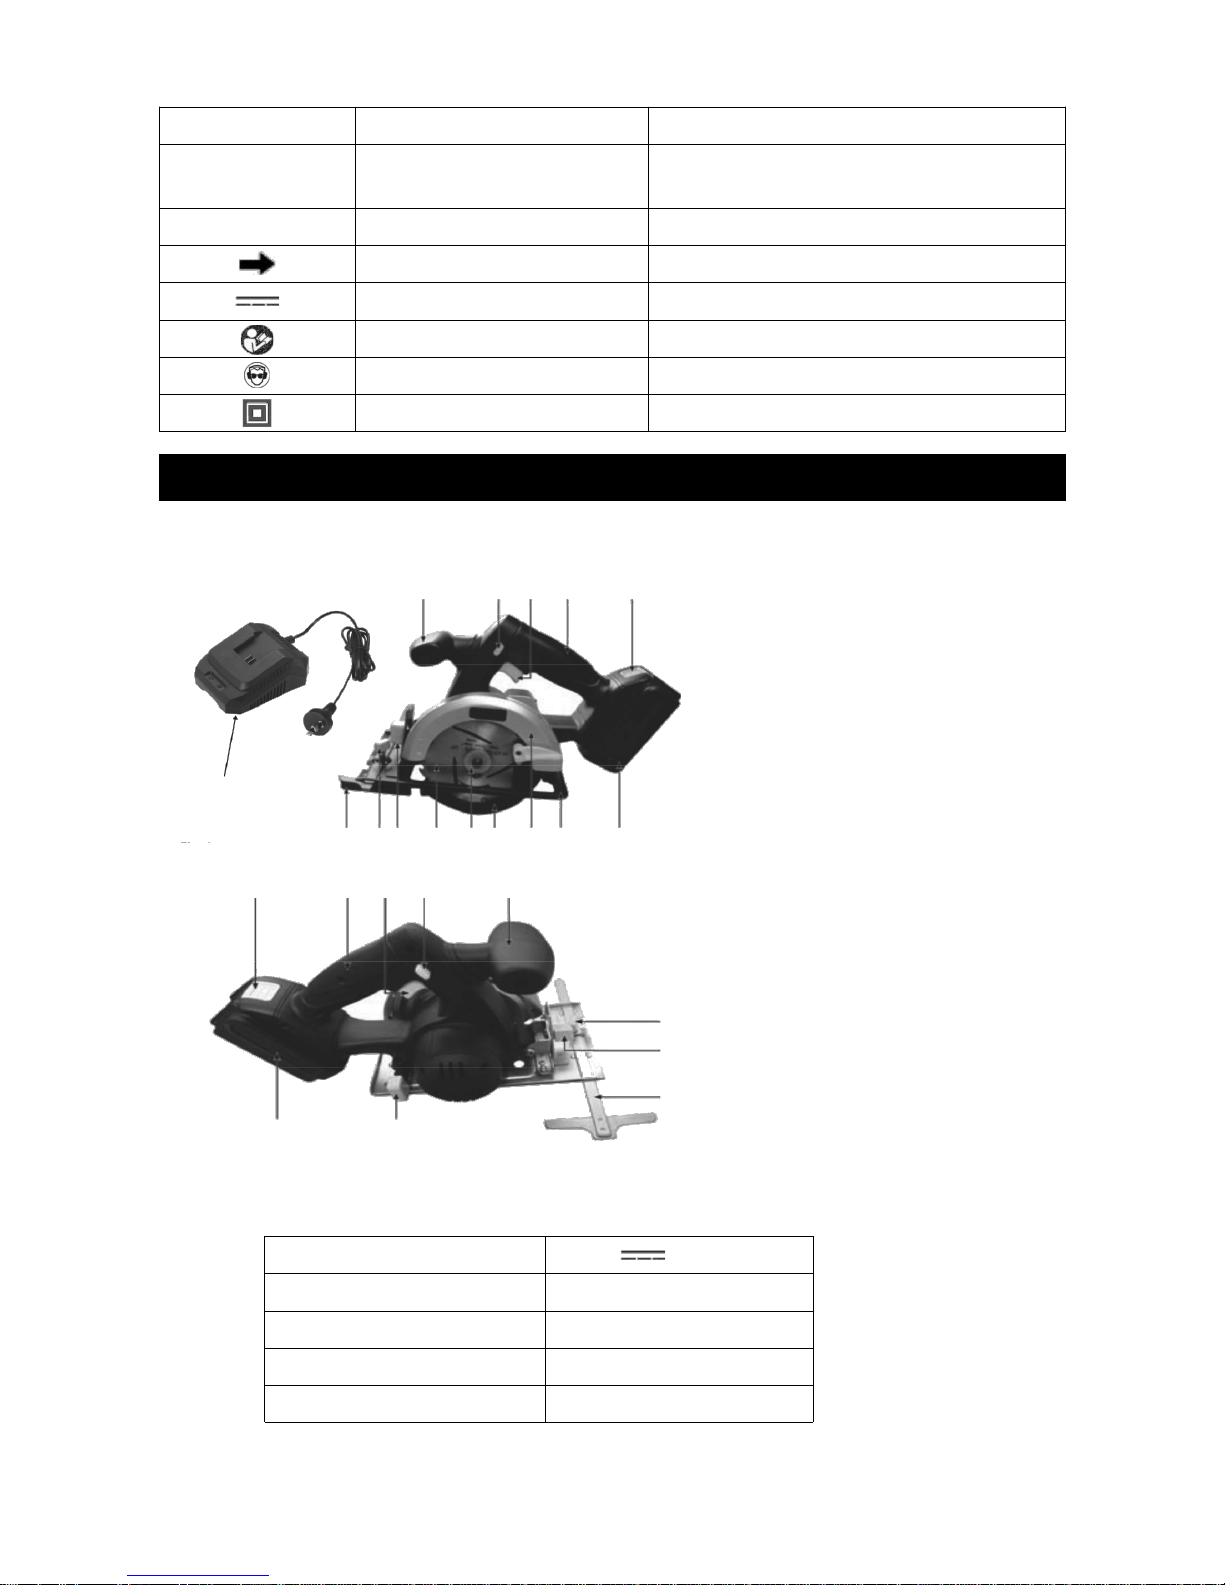
Layout
1. Front Handle
2. Lock-Off Button
3. Switch Trigger
4. Main Handle
5. Battery Release Button
6. Battery Pack
7. Base Plate
8. U er Guard
9. Lower Guard
10. Blade Washer
11. Saw Blade
12. Bevel Adjustment Knob
13. Lock Knob for Ri Guide
14. Ri Guide
15. De th Adjustment Knob
16. Battery Charger
Technical Specifications
Rated Voltage 18V
No Load S eed 0-3800/min
Blade Size 136mm
De th of Cut 38mm at 90°
Bevel Range 0° - 50°
7
12345
16
6
7
89
10
11
1213
14
1
2
3
4
5
615
13
12
14

Battery & Charger Technical Specifications
Battery Pack 18V 1300mAh Li-ion
Battery Pack
Charging Time 1 hour
Charger Ada ter In ut: 100-240V 50-60Hz
Out ut: 21V 2A
Charging Battery Pack
Place battery pack and charger on flat non-flammable surfaces and away from
flammable materials when re-charging battery pack
1. Remove the battery ack (6) from the handle, ress the
battery release button (5) downwards to do so.
2. Check that your mains voltage is the same as that marked
on the rating late of the battery.
3. Plug the mains lug of the charger (16) into the mains
socket outlet, turn on the ower, the green LED will
illuminate.
4. Push the battery ack onto the battery charger. The
green LED extinguishes and the red LED will illuminate,
which indicates that the battery ack is being charged.
5. When the charging eriod is com leted after a rox 1
hour, the green LED will illuminate and the red LED will extinguish.
Circular Saw Operation
•Always wear eye protection while operating this power tool
•Always remove battery pack before assembling and removing blade
Failure to remove battery pack from saw could result in accidental
starting, causing possible serious personal injury
•A 5-3/8 inch blade is the maximum blade capacity of your saw Never
use a blade that is too thick to allow outer blade washer to engage with
the flats on the spindle Larger blades will come in contact with the
blade guard, while thicker blades will prevent blade screw from securing
blade on spindle Either of these situations could result in a serious
accident
Kogan com accepts no liability for accidents caused through misuse or not
following the instructions supplied here Usage of power tools carries the risk
of property damage, serious injury or even death
8
Green Red
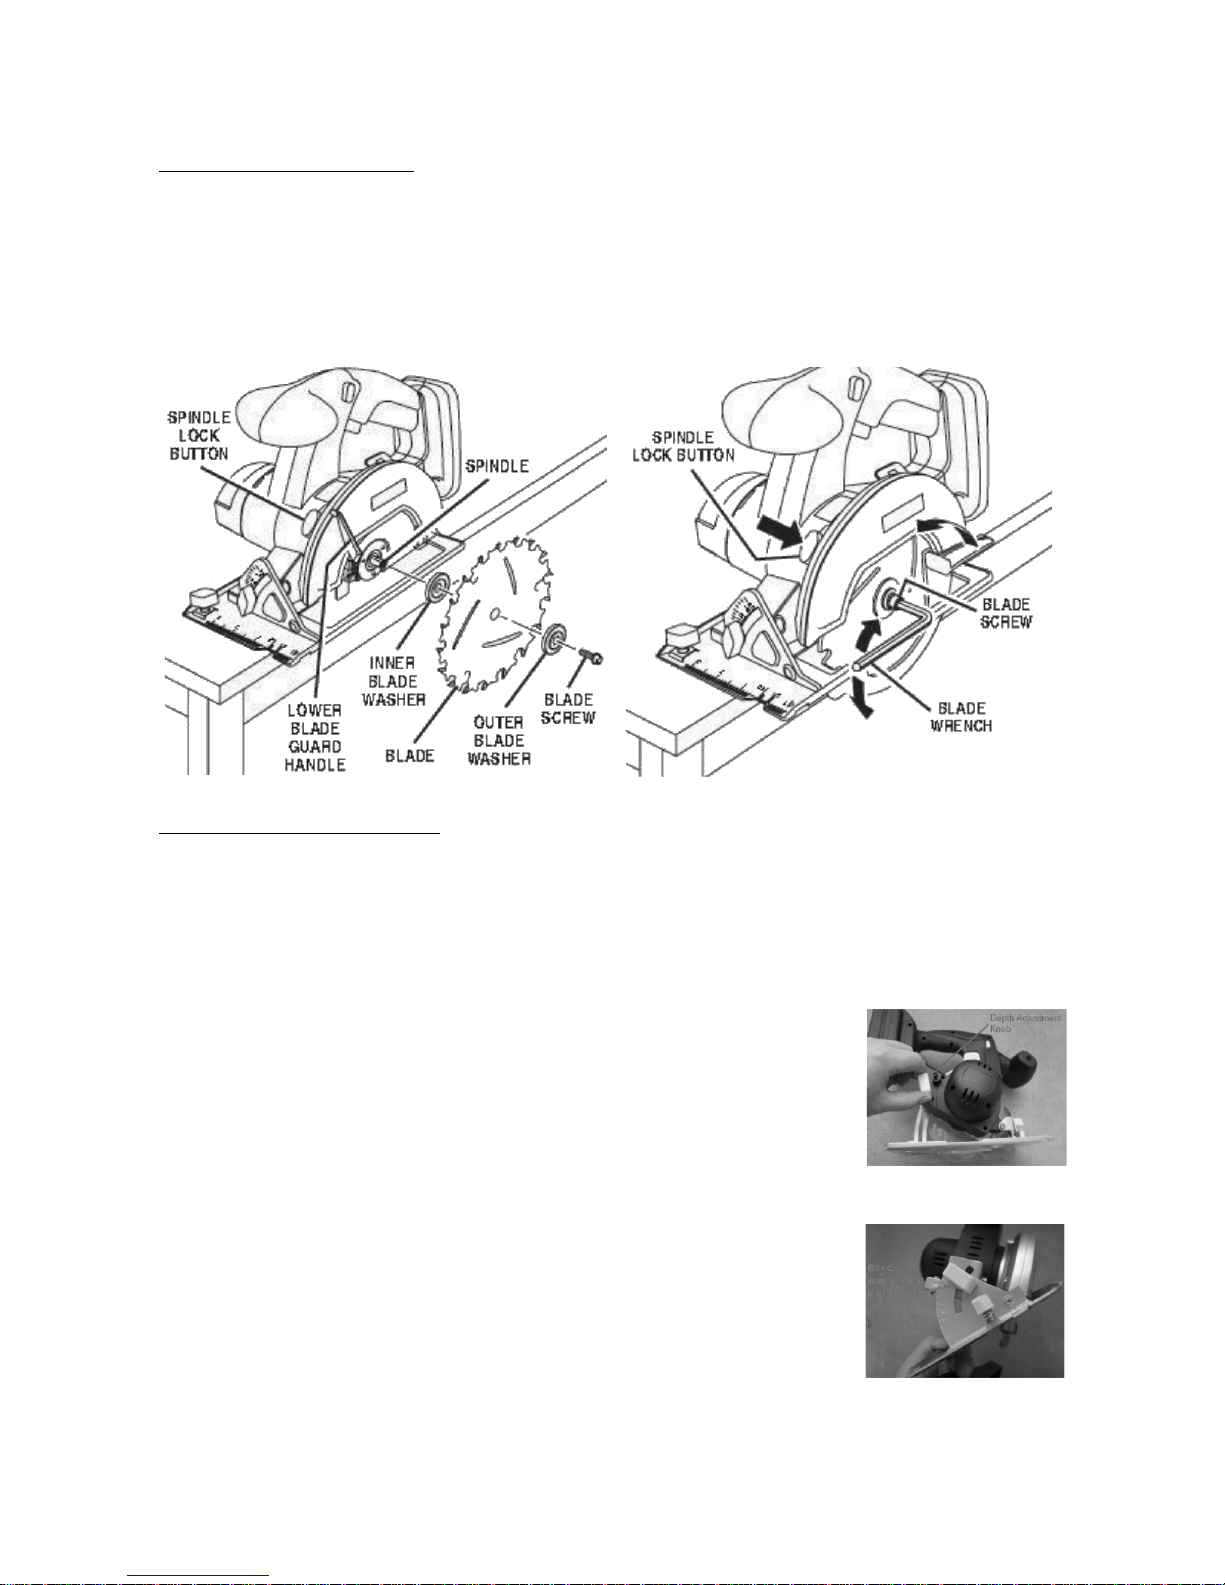
Assembling and Removing the Saw Blade
Assembling Saw Blade
1. Remove battery ack from saw.
2. Retract the lower guard (9).
3. Sli the saw blade onto the inner blade washer.
4. Re lace the outer blade washer.
5. De ress the s indle lock button, then re lace the blade screw. Turn the
blade screw counter-clockwise with the blade wrench.
Removing the Saw Blade
1. Remove the battery ack from the saw.
2. De ress the s indle lock button, then turn the blade screw clockwise to
loosen with the blade wrench.
3. Remove the outer blade washer then the saw blade.
Adjusting the Cutting Depth
1. Remove the battery ack.
2. Hold the saw firmly and loosen the de th adjustment
knob (15), by turning it counter-clockwise.
3. Move the base late to obtain the desired de th of cut.
4. Tighten the de th adjustment knob securely by turning
is clockwise before o erating the saw.
Adjusting the Bevel Cutting
1. Remove the battery ack.
2. Loosen the bevel adjustment knob (12) by turning it
counter-clockwise.
3. Adjust the bevel to set the cutting angle in the range of
0° to 50°, with the angle scale showing the current
angle set in degrees.
4. Tighten the bevel adjustment knob securely by turning clockwise.
9

Lock-Off Button
Your saw is equi ed with a lock-off button (2) which reduces the ossibility of
accidental starting.
The lock-off button is located on the handle above the switch trigger. You must
de ress the lock-off button in order to ull the switch trigger.
The lock resets each time the trigger is released.
Note: You can de ress the lock-off button from either the left or right side.
Variable Speed Controlled Switch Trigger
This tool has a variable s eed switch (3) that delivers higher s eed with
increased trigger ressure. S eed is controlled by the ressure you a ly to the
trigger.
To turn your saw ON, de ress the lock-off button and ull switch trigger down.
Release switch trigger to turn your saw OFF.
General Cutting
•Before cutting any ty e of material, be sure it is firmly anchored or
clam ed to revent sli ing. Always hold the saw in front of you and
away from your body. Kee your hands and feet well away from the work
iece.
•Never feed the blade into the work iece until the blade is at full s eed. If
the blade is not at full s eed, the saw may kick back causing serious
ersonal injury.
•Put on eye rotection.
•Clear the saw of any foreign material.
•Make sure the work iece is held securely in lace. Hold smaller ieces in a
vice or attach to the workbench with clam s.
•Mark out the line to be cut so it is easily visible.
•Always use the right blade for the material.
•Make sure all bolts, screws and locking levers are secure before starting
tool.
•De ress the lock-off button and ress the switch trigger down to start the
saw.
•Set the base late against the work iece.
•When the blade reaches full s eed, slowly feed the blade into the work
iece.
•After you com lete your cut release the trigger and allow the blade to
come to a com lete sto .
Plunge Cutting
1. Mark out the line to cut so it is easily visible.
2. Start inside the area to be cut.
3. Set the base late against the work iece at an angle.
4. Lift the lower blade guard with the handle.
5. De ress the lock-off button and ress the switch trigger down to start the
saw.
10

6. When the blade reaches full s eed, slowly feed the blade into the work
iece.
7. After you com lete your cut, release the trigger and allow the blade to
come to a com lete sto . After the blade has sto ed, you can remove it
from the work iece.
Maintenance and Servicing
To prevent serious injury or death from accidental operation, turn the Power
Switch of the tool to its “OFF” position and disconnect battery pack from tool
before performing any inspection, maintenance, or cleaning procedures
•Clean out dust and debris from vents and electrical contacts by blowing
with com ressed air. Always wear safety goggles when cleaning tools
with com ressed air.
•Kee tool handles clean, dry and free of oil or grease.
•Use only mild soa and a dam cloth to clean the tool, kee ing away from
all electrical contacts.
Note: Certain cleaning agents and solvents are harmful to lastics and other
insulated arts. Some of these include gasoline, tur entine, lacquer thinner,
aint thinner, chlorinated cleaning solvents, ammonia and household detergents
containing ammonia.
Tool maintenance must only be erformed by qualified re air ersonnel. If the
tool is not working ro erly, do not attem t to re air it yourself. Contact the
Kogan customer su ort team.
11

Troubleshooting
Problem Possible Causes Likely Solutions
Tool will not start. •Battery ack not
installed ro erly.
•Battery ack not
charged.
•Check battery ack
installation.
•Check battery ack
charging requirements.
Battery ack will
not charge.
•Battery ack not
inserted into charger.
•Charger not lugged
in.
•Surrounding air
tem erature.
•Battery ack too hot
or too cold.
•Insert battery ack
into charger until red
LED a ears.
•Plug charger into a
working outlet. Refer
to “Im ortant
Charging Notes” for
more details.
•If chargers are daisy
chained together
check all connections.
•Check current at
rece tacle by lugging
in a lam or other
a liance.
•Check to see if
rece tacle is
connected to a light
switch which turns
ower off when you
turn out the lights.
•Move charger and
battery to a
surrounding air
tem erature of above
4.5°C or below 40.5°C.
•The charger will not
charge a battery ack
if the cell tem erature
is below a roximately
0°C or above 60°C.
•The battery ack
should be left in the
charger and the
charger will begin to
charge automatically
when the cell
tem erature warms u
or cools down.
12
Other Certa Power Tools manuals


