Cetrek Propilot 725 User manual

Welcome All of us at Cetrek would like to welcome you to the world of
Cetrek Autopilot Systems. At Cetrek we did not invent the
word satisfaction we just helped to define it and we assure
you that your new autopilot will give you many hours of
satisfaction.
Your Propilot 725 is easy to operate ensuring that you and
your friends can enjoy your boating to the full. It will
effortlessly steer your boat on a straight course moving the
rudders with the minimum of fuss to ensure the absolute
minimum wear and tear on the steering system. When
properly set up it will also help to optimise fuel economy and
minimise power consumption.
Your Safety THE USE OF AN AUTOPILOT DOES NOT AVOID THE NEED
FOR NORMAL WATCHKEEPING.
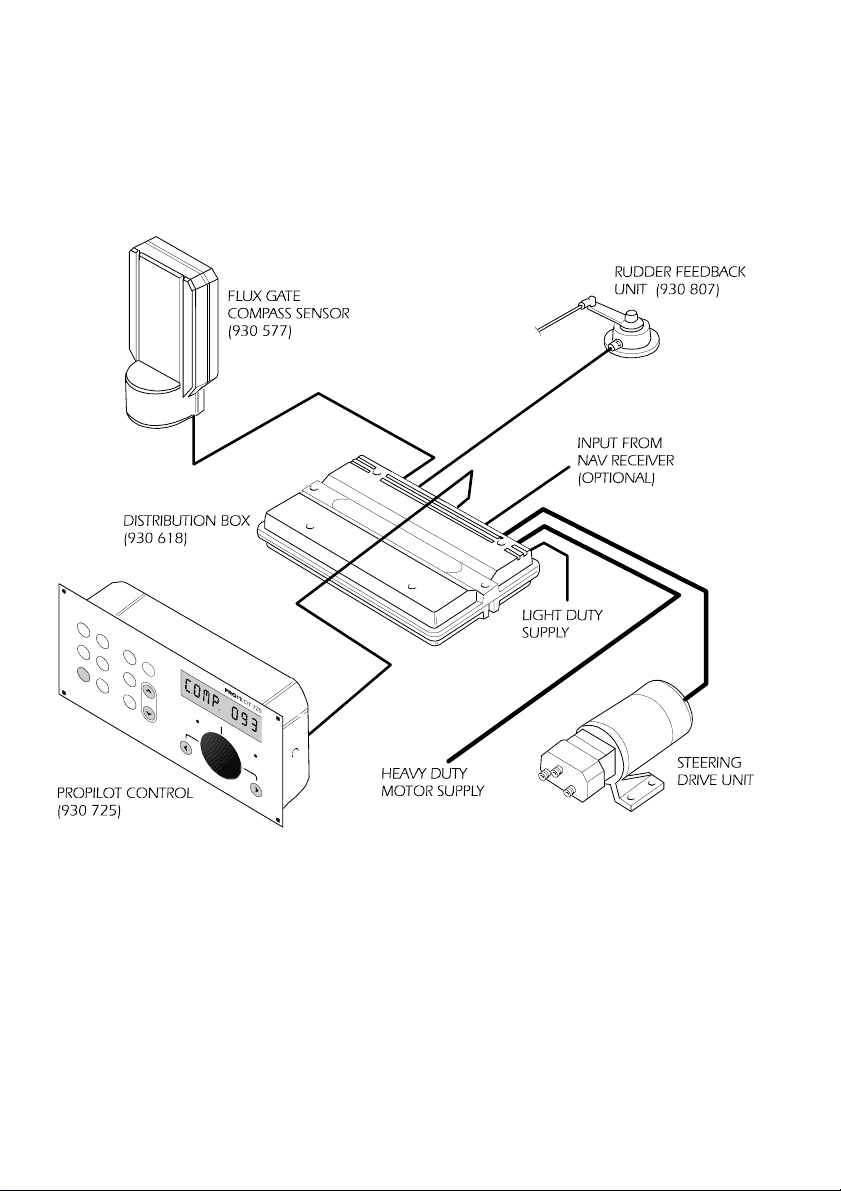
Your System The Autopilot System consists of five basic units:
• The 930 725 Autopilot Control
•ADistribution Box
•AHeading Sensor, normally a Compass
•ADrive Unit to power the steering system
•ARudder Feedback Unit
It may also include any of these options:
• Dodge and Course Change remote controls
• Power Steer remote controls
• Rudder Position Indicators and Repeaters
• Compass Repeaters
• External Audible Alarms
• A Windvane
•ANavigator
• Gyro Synchro/Stepper Interface
•Asecond station Autopilot Control
Most of these options can be added to your system at any
time. Your Cetrek Dealer will be glad to give you the latest
information on any of them.
EMC Directive 89/336/EEC
This product has been designed to be compliant with the
above Directive.
The information contained in this manual is believed to be accurate at the
time of going to print but no responsibility, direct or consequential, can be
accepted by Cetrek Ltd for damage resulting from the use of this
information. Cetrek Ltd reserve the right to make changes without notice
to any of its products, documentation or services. © Cetrek Ltd 1996
The Propilot 725 System

CONTENTS
USING YOUR PROPILOT 725.................. 5
The Autopilot Control ...................... 5
Getting Started ........................... 5
Changing Course .......................... 6
Pre-Selecting a Course ...................... 6
Course Dodging .......................... 6
Using Two Courses ........................ 7
Propilot 725 Front Panel (Key) Functions .......... 8
180º Turns (Man Overboard Turns) ............ 10
Using the Next Course Function .............. 10
Port and Starboard Turns ................... 11
Adjusting the LCD Backlighting ............... 11
Power Steer ............................ 11
Rudder Position and Off Course Indicators ....... 11
Local Compass Variations ................... 12
ALARMS................................. 13
Off Course ............................. 13
Watch ................................ 14
Timed ................................ 14
SFIA Versions ............................ 15
SEA STATE ADJUSTMENTS................... 16
Selecting Pilot A, B or C .................... 16
Rudder Ratio ............................ 16
Response (Yaw) .......................... 17
Pulse Width Modulation .................... 18
NAVIGATOR CONTROL ..................... 19
Using Navigator Control .................... 19
NMEA 0182 or 0183 Navigators .............. 19
NMEA 0180 Navigators .................... 20
Cross Track Error Display ................... 21
Cancelling Navigator Control ................ 21
WINDVANE CONTROL ..................... 22
Wind Trim .............................. 22
GYRO COMPASS CONTROL .................. 23
OPERATION SUMMARY ..................... 25
APPENDICES
Warranty
UK Dealer List
Overseas Distributor List
INDEX

PROPILOT 725 USER’S GUIDE
-4- 807-251-1-96
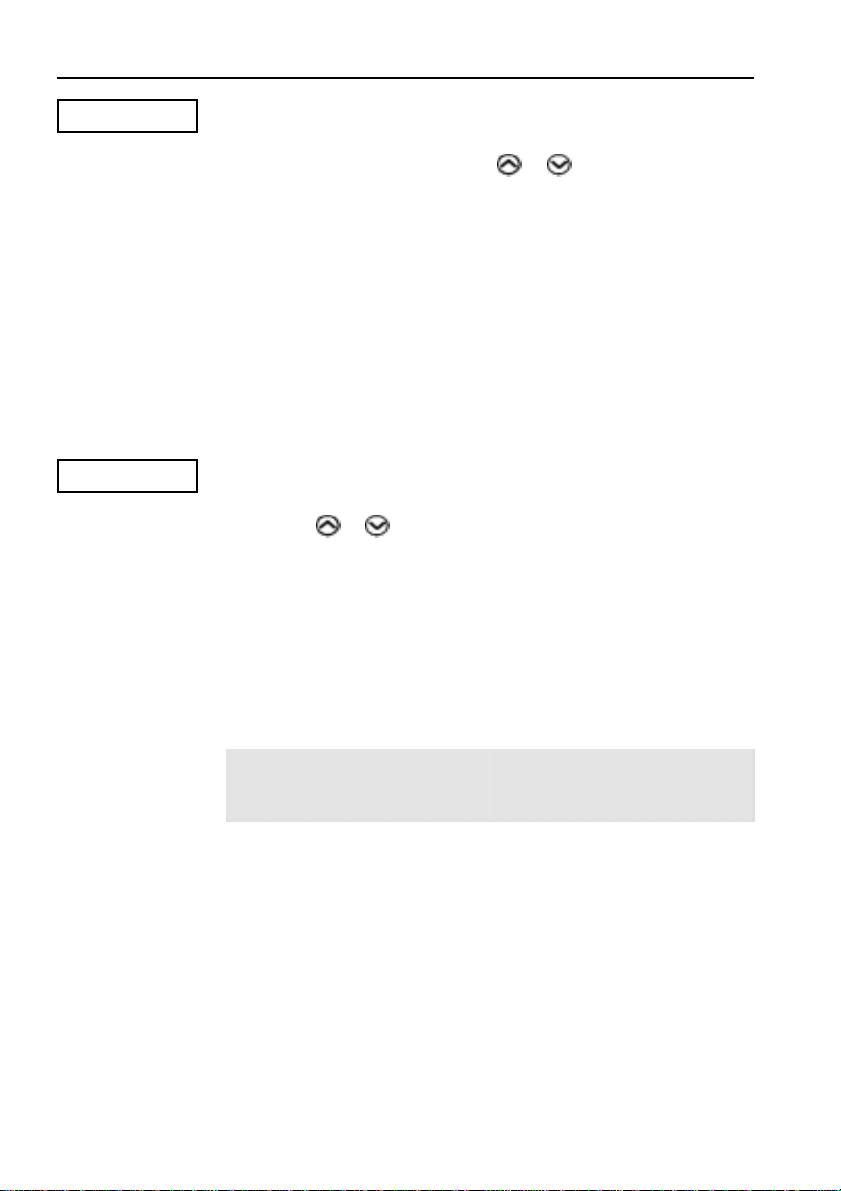
The Propilot 725 Autopilot Control
PROPILOT 725
1$9, 1$9 36WU *<52 9$5
$872 &203 02'( $/$50
21
67%< 1$9
2)) )81&7
/,*+7
3:5
67((5
6($
67$7(
. .
V
i
s
u
a
l
A
l
a
r
m
I
n
d
i
c
a
t
o
r
CourseSelector Knob
L
C
D

PROPILOT 725 USER’S GUIDE
-5-
807-251-1-96
Using Your Propilot 725
USING YOUR PROPILOT 725
The Autopilot Control
This is the unit where you, the Helmsman, tell your autopilot
what you require is to do for you.
It communicates to you using an 8 digit Liquid Crystal Display
(LCD), a Light Emitting Diode (LED) and its internal audible
alarm. You communicate with it using the 14 keys and the
rotary Course Selector Knob.
Remember Inan EMERGENCY press OFF to regain manual control.
Getting Started The autopilot has 2 basic modes of operation.
1. Standby Mode where the autopilot is switched on but not
in control of the vessel.
2. Auto Mode where the autopilot is in control of the vessel.
The ON/ST’BY key turns the autopilot on. There will be a
delay of about 10 seconds while the autopilot checks itself. If
it detects something is wrong it will display an error message.
These are explained in the section on Error and Fault Displays
in the Installation and Servicing Manual.
HEAD 035 Usually all will be OK so the LCD displays HEAD to tell you
the autopilot is in Standby Mode and is displaying the vessel’s
heading (035º in this example). This changes as you steer,
just like a conventional compass. The autopilot is not in
control of the vessel.
The AUTO key now switches the autopilot from Standby to
Auto Mode which puts the autopilot in control of the vessel’s
course.
Full stops within the LCD text align with a sub-menu at the
base of the LCD to indicate whether the autopilot is under
Navigator Control (NAV 1/NAV 2), if the Gyro is operational, if
Power Steer is on or if a Compass Variation is entered. In
addition flashing points above the directional arrows indicate
that the vessel is off course.

PROPILOT 725 USER’S GUIDE
-6- 807-251-1-96
C.OMP 08.1 The LCD displays COMP to tell you the autopilot is in Auto
Mode, steering from a compass, steering the course displayed
(081º in this example).
So you could simply turn your autopilot on, steer to the
heading you want to maintain then switch to Auto Mode
letting the autopilot hold that course until you tell it
otherwise. This method is termed Autofollowing.
Changing Course
Changing course is just as simple. You could switch your
autopilot back to Standby Mode, steer to the new course
manually then switch back to Auto Mode.
COMP 091 Alternatively, if you are in Auto Mode you can just rotate the
Course Selector Knob until the new course is displayed on the
LCD. The autopilot will then bring the vessel to the new
course for you.
Pre-selecting a Course
You may pre-select a course while the autopilot is in Standby
Mode. Simply rotate the Course Selector Knob.
CTS 120 The LCD will display CTS so that you know the reading is no
longer your heading but the autopilot’s Course To Steer. The
numbers indicate the heading that the autopilot will steer the
vessel to if you press the AUTO key and put the autopilot
into Auto Mode.
WARNING This can cause a very sudden and severe course change if
the Course to Steer is a lot different from the current
course.
When you put the autopilot into Auto Mode the LCD will
change from CTS to COMP.
Course Dodging
When you are in Auto Mode and you press the or key
the vessel will turn and continue to turn until you release the
key. The autopilot will then return you to its preset heading.
Using Your Propilot 725
PROPILOT 725 USER’S GUIDE
-7-
807-251-1-96
This function is used to sidestep small obstacles in the vessel’s
path and will return you to a parallel track from your original.
The internal alarm will sound and the warning light will
illuminate while the key is being pressed.
Press the key and the display will indicate a dodge to Port
(left) and the vessel will turn to Port.
Press the key and the display will indicate a dodge to
Starboard (right) and the vessel will turn to Starboard.
Using Two Courses
There is a function which allows the Helmsman to quickly
and easily alternate between two courses, ideal for tacking
sailing vessels.
PREV 127 Each time the AUTO key is pressed, the autopilot remembers
the course prior to the press of the key. This course can then
be recalled by pressing the FUNCT key once. The LCD will
display the prefix PREV to tell you that it is the previously
stored course.
COMP 127 Pressing the AUTO key will instruct the autopilot to follow
this new course and at the same time store the old course.
PREV 213 Pressing the FUNCT key once again will display the
previously stored, or old, course.
COMP 213 Pressing the AUTO key will instruct the autopilot to follow
this course and at the same time store the previous course.
So by following this simple sequence the Helmsman can
alternate between two courses as often as he likes.
If you press the FUNCT key and the previously stored course
is not the one that you wish to use, you can change it:
a) by rotating the Course Selector Knob until the required
course is displayed, or
b) by pressing either the or key to enter the current
heading.
Using Your Propilot 725

PROPILOT 725 USER’S GUIDE
-8- 807-251-1-96
Using Your Propilot 725
PROPILOT 725 FRONT PANEL (KEY) FUNCTIONS
Key Primary Function Secondary Function
1. Adjust LCD backlighting When within a function used to switch
functions ON/OFF or to adjust settings.
1. Dodges to Port
1. Dodges to Starboard
AUTO 1. Select Autopilot Mode 1. Rudder Position & Off Course Indicator
2. Cross Track Error
(only if a Navigator is fitted)
ON/ST'BY Switches Autopilot on 1. Rudder Position
1. Selects Standby Mode 2. Cross Track Error
(only if a Navigator is fitted)
OFF 1. Power off Autopilot None
COMP 1. Select Compass Control With LCD displaying COMP ON/OFF
press & hold for:
1. VAR--EOO Compass Variation
2. DAMP--07 Compass Damping
3. GYRO--ON Gyro Selection
If Gyro is ON press again for:
GCAL--120 Gyro Calibration
(Must be switched OFF after calibration)
RATIO 0 Gyro Ratio (Gyro Type)
2. Selects Windvane Control With LCD displaying WINDON/OFF
press & hold for:
1. WIND-0 Windvane Interface Format
2. WTRM-05 Wind Trim
NAV 1. Selects NAV1 Press & hold for:
1. NAV1-0 Navigator Interface Format
2. NMG1-05 Navigator Gain
2. Selects NAV2 Press & hold for:
1. NAV2-0 Navigator Interface Format
2. NMG2-05 Navigator Gain
Pwr STEER 1. Switches Power Steer on/off
P/S 198

PROPILOT 725 USER’S GUIDE
-9-
807-251-1-96
Using Your Propilot 725
PROPILOT 725 FRONT PANEL (KEY) FUNCTIONS (cont..)
Key Primary Function Secondary Function
MODE 1. Cycles through Sea State
Adjustments - Pilot A, B or C
PILOT A
SEA STATE 1. RUD--05 Rudder Ratio Press & hold to enter Configurations:
2. RESP--07 Response (Yaw) CONFIG
3. PWM--ON 1. C/R--03 Counter Rudder
Pulse Width Modulation 2. TRIM--04 Trim
3. GAIN--03 Rudder Ratio Gain
4. RDB--03 Rudder Deadband
5. RLIM--07 Rudder Limit
6. TURN--20 Max Turn Rate
7. PSG--07 Power Steer Gain
8. AUTO-DEV Auto-deviation
FUNCT 1. PREV 127 Previous Course
2. 180 TURN 180º Turn
3. NEXT 331 Next Course
4. PORT TRN Port Turn
5. STBD TRN Starboard Turn
ALARM 1. Clear Alarm Press & hold to enter Alarm settings:
1. OCAL--00 Off Course Alarm
2. WATCH AL Watch Alarm
30 mins
60 mins
2 hours
4 hours
3. XALM--ON External Alarm

PROPILOT 725 USER’S GUIDE
-10- 807-251-1-96
180º Turns (Man Overboard Turns)
There is a function which allows the Helmsman to quickly
and easily turn the vessel through 180º and go
back along the course previously being followed.
This is useful as a Man Overboard Routine.
180 TURN With the autopilot in Auto Mode, press the
FUNCT key twice and the LCD will display the
function selected.
COMP 195 Press the AUTO key to accept the function and the vessel will
turn to Starboard, navigate round and turn back down the
track that it has just been travelling.
Using the Next Course Function
There is a function which allows the Helmsman to quickly
and easily enter a new course from the autopilot’s memory.
NEXT 000 Press the FUNCT key three times so that the LCD displays the
course held in its memory.
NEXT 331 Should you wish to enter the vessel’s present heading into
the memory, press either the or key. Enter any other
heading by rotating the Course Selector Knob until the
required heading is displayed.
COMP 195 When the displayed course is the desired one, you can leave
it stored for future use and return to normal Auto or Standby
Mode by pressing the FUNCT key again.
COMP 331 Orif you are in Auto Mode, you can tell the autopilot to
accept the heading from the memory straight away by
pressing the AUTO key.
So if you are in Auto Mode and want to enter the course from
the memory, just press the FUNCT key three times then the
AUTO key once.
Using Your Propilot 725
PROPILOT 725 USER’S GUIDE
-11-
807-251-1-96
Note: Memory can be set with the autopilot in either Standby or
Auto Mode. The memory is not stored when the autopilot
is turned off.
Port and Starboard Turns
These functions are accessed with the forth and fifth press of
the FUNCT key. They will give a 180º turn, in the direction
selected, at a maximum turn rate to a course parallel with the
present one.
PORT TRN While in Auto Mode, press the FUNCT key four or five times
and the LCD will display the function selected. Press the
AUTO key to accept the turn.
Adjusting the LCD Backlighting
Ensuring the autopilot is not within a function use the blue
(light) buttons and to increase or decrease the
backlighting. If the autopilot is within another function these
buttons are used to increase, decrease or confirm settings.
Power Steer It is possible to use the autopilot’s Power Steering facility
simply to position the rudder, so that the Helmsman can steer
the vessel under direct rudder control.
P/S 193 Simply press the PWR STEER key. The LCD will display P/S
to tell you that you are under Power Steer control. It will also
display your live heading.
P/S 198 Tochange the rudder position, rotate the Course Selector
Knob. You can view the rudder position display by pressing
the AUTO key, as explained below.
COMP 198 To disengage the Power Steer function, press the PWR STEER
key. The power steering is disengaged and the vessel is back
under autopilot control steering the new course.
Rudder Position and Off Course Indicators
The LCD can display a pictorial representation of the position
of the rudder. In addition, an Off Course Indicator is shown if
the autopilot is in Auto Mode.
Using Your Propilot 725

PROPILOT 725 USER’S GUIDE
-12- 807-251-1-96
If the autopilot is in Standby Mode, a second press of the
ON/ST’BY key will activate the Rudder Position Display.
When the rudder is amidships, two vertical bars are shown in
the centre of the LCD.
As the rudder moves to Port, the lower half of the bars to the
left of the centre bar are gradually displayed.
As the rudder moves to Starboard, the lower half of the bars
to the right of the centre bar are gradually displayed.
HEAD 081 Press the ON/ST’BY key again to revert back to the heading
display.
Note: If a Navigator is connected the second press of the
ON/ST’BY key will bring up the Cross Track Error Display,
press the ON/ST’BY key again to revert to the heading
display.
If the autopilot is in Auto Mode, press the AUTO key to show
the Rudder Position Display. The top row of bars provide an
Off Course Indicator.
COMP 198 Press the AUTO key again to revert back to the course
display.
Note: If the autopilot has a Navigator connected you will need to
press the AUTO key twice to return to the course display.
Local Compass Variations
If you need to enter a local compass variation you can do so
by following the procedure outlined in the Installation and
Servicing Manual. When a variation is entered, a single dot
over “Var” on the LCD sub-menu will remind you of this.
Using Your Propilot 725

PROPILOT 725 USER’S GUIDE
-13-
807-251-1-96
ALARMS
The autopilot has its own internal audible alarm and a red
visual alarm that will light up. You may also connect further
external alarms to the autopilot system.
There are three alarms that can be set by the Helmsman, an
Off Course Alarm, a Watch Alarm and a Timed Alarm.
Off Course Alarm
This alarm will trigger after the vessel has been off course by
more than the set amount, for a period of 30 seconds. The
alarm will be triggered instantly if the vessel is off course by
more than twice the set amount.
OC ALARM When the alarm triggers, the LCD will display the Off Course
Alarm message. Once the vessel is back on course the alarm
will cancel, it cannot be manually cancelled.
Setting the Off Course Alarm
OCAL--00 Press and hold the ALARM key to enter the alarm options,
the Off Course Alarm setting is the first option and will be
displayed immediately. The right had two digits indicate the
number of degree’s the vessel may go off course before the
alarm is triggered. The OCAL--00 value is the alarm’s
default setting and represents a maximum setting of 20º, the
Off Course Alarm cannot be switched off.
OCAL¦15 To set a higher value, press the key and the set value will
increase. An arrow will also appear to confirm the value is
increasing.
OCAL§10 Press the key and the value will start to decrease. An
arrow will confirm that the value is decreasing.
The value displayed is the one that the autopilot will use. The
ALARM key will step through the other alarm settings or the
AUTO or ON/ST’BY keys will take you back to the
appropriate displays.
Alarms

PROPILOT 725 USER’S GUIDE
-14- 807-251-1-96
Remember.. ..changed settings will only be stored if the autopilot is
turned off by pressing the OFF key.
Watch Alarm When turned on, if the autopilot is in Auto Mode and a key
has not been pressed after four minutes the integral audible
*WATCH** alarm will be triggered and the LCD will display the Watch
Alarm message. If a key is not then pressed within a further
minute any external alarm that is connected will also be
triggered.
WATCH AL To set the Watch Alarm, press and hold the ALARM key to
enter the Alarm options and then press again to display the
Watch Alarm message. If the message flashes the alarm is
turned ON. If it does not flash, it is turned OFF. Press either
the or key to change between the ON and OFF
setting.
To reset the alarm, press the ALARM key.
Timed Alarm A timed alarm for 30 minutes, 60 minutes, two hours or four
hours can be set if the Watch Alarm is not used.
*WATCH** When the alarm is triggered the LCD will show the Watch
Alarm message.
30 MINS Touse the alarm, access the Alarm options by pressing and
holding the ALARM key, then press the ALARM key twice for
a 30 minute alarm.
60 MINS Press the ALARM key three times for a 60 minute alarm.
2HOURS Press the ALARM key four times for a two hour alarm.
4HOURS Press the ALARM key five times for a four hour alarm.
Pressing either the or key turns the alarm ON or OFF.
If the alarm is turned on the display will flash.
Note: Only a Watch Alarm or a Timed Alarm can be selected, not
both.
Alarms
PROPILOT 725 USER’S GUIDE
-15-
807-251-1-96
SFIA Versions The SFIA (Sea Fish Industries Authorities) version includes a
Watch Alarm and Power Fail Alarm that comply with the SFIA
regulations and therefore cannot be disabled.
Watch Alarm
*WATCH** Ifthe autopilot is in Auto Mode and a key has not been
pressed after four minutes the alarm is activated. This display
indicates that the watch alarm has been triggered and is
accompanied by the integral low level audible alarm. If this is
not reset by pressing the ALARM key within one minute, an
external high level audible alarm will sound.
*RESET* Toreset the high level alarm, press either the or key.
Note: ALARM can be pressed at any time before the alarm
sounds, at which point the alarm cycle is reset.
Power Fail Alarm
The external, high level alarm shares the autopilot’s primary
supply but has an independent secondary supply. In the
event of a power failure of either the primary or secondary
supplies, the audible alarm will sound.
PWR FAIL If the secondary power supply fails, the display PWR FAIL
can be cleared by pressing either the or key. The
audible alarm can only be cancelled by restoring the
secondary power supply.
If the primary power supply fails, the autopilot also switches
off and the display will be blank. The external audible alarm
will sound. This can be cancelled by switching off the
secondary supply. The primary supply will have to be
restored for the autopilot to operate again.
Note: Any adjustments made to autopilot settings during
operation prior to a primary supply failure will be lost. The
autopilot only stores in its permanent memory changes in
settings when it is switched off using the OFF key.
Alarms

PROPILOT 725 USER’S GUIDE
-16- 807-251-1-96
SEA STATE ADJUSTMENTS
As conditions around you vary, it is best to optimise how
your autopilot reacts in order to obtain optimum
performance. The two settings RESPONSE and RUDDER
should enable you to fine tune the autopilot’s performance to
most conditions.
Proper setting of these controls has a marked effect on
steering system wear and tear and in sailing craft, also upon
battery life. Aim to set these controls so that the autopilot-
controlled helm movements are of roughly the same
frequency and magnitude as those performed by hand when
steering manually.
Selecting Pilot A, B or C
You can store three sets of Sea State adjustments, called
PILOT A, PILOT B and PILOT C. These enable the
autopilot to be tuned for differing speeds and sea conditions.
They are linked to the Configuration Settings which are
explained in the Installation and Servicing Manual.
To select a pilot set press the MODE key.
PILOT A The set which the autopilot is currently using will be
displayed.
PILOT B Press the MODE key and the alternative sets are displayed,
once displayed these are automatically selected.
You may change any of the settings and the autopilot will use
them but it will not store them until the unit is turned off by
the OFF key.
Rudder Ratio The Rudder Ratio setting is used primarily to match rudder
movement to boat speed. Generally the higher the speed,
the lower the setting needs to be.
If the setting is too low the vessel will understeer and tend to
drift off course to one side.
Sea State Adjustments

PROPILOT 725 USER’S GUIDE
-17-
807-251-1-96
If the setting is too high the vessel will oversteer and build up
oscillations from side to side.
To Adjust the Rudder Setting
Use the MODE key to select Pilot A, B or C then press the
SEA STATE key and the LCD will show the rudder setting.
RUD--05 Thesetting will be between 0 and 20.
Change the setting by using the or key.
RUD¦08 Press the key and the setting value begins to increase.
An arrow on the display confirms that it is increasing.
RUD§06 Press the key and the setting value begins to decrease.
An arrow on the display confirms that it is decreasing.
Response (Yaw) The Response setting, also known as the Yaw setting, is
primarily the autopilot’s “weather” control. It sets the
amount that the vessel is permitted to move off course before
rudder is applied to bring it back onto its set heading.
You may need to open the Response (ie increase the setting
value) in heavy seas and close it (ie decrease the setting value)
in calm seas.
If the Response setting is too high the vessel moves a long
way from the course before it is corrected. You will need to
decrease the Response setting to overcome this.
If the Response setting is too low the vessel will hold its
course but the helm will be constantly and rapidly moving,
making small unnecessary corrections. You will need to
increase the Response setting to overcome this.
To Adjust the Response Setting
Select Pilot A, B or C using the MODE key and then press the
SEA STATE key two times, the LCD will show the Response
setting.
Sea State Adjustments
PROPILOT 725 USER’S GUIDE
-18- 807-251-1-96
RESP--07 The setting will be between 0 and 20.
Change the setting by using the or key as detailed in
the Rudder Ratio section above.
Pulse Width Modulation
Also accessible within this group of settings is the Pulse Width
Modulation (PWM). This is a method of controlling the
steering motor of the vessel’s drive unit, so that it gives a
smoother rudder operation, especially useful if the vessel has
a high steering inertia. It can however, generate RFI (Radio
Frequency Interference) in some instances and so there is a
simple means of switching it off if necessary.
PWM-ON The third press of the SEA STATE key will display the status
of the PWM setting. It can only be ON or OFF. Pressing
either the or key will change the setting.
For all settings, the value displayed is the one that the
autopilot will use. Pilot A settings can be set different to Pilot
B or Pilot C settings.
The SEA STATE key will step through the other Sea State
adjustments, alternatively the AUTO or ON/ST’BY keys will
take you back to the relevant displays.
Remember... ..changed settings will only be stored if the autopilot is
turned off using the OFF key.
Sea State Adjustments

PROPILOT 725 USER’S GUIDE
-19-
807-251-1-96
NAVIGATOR CONTROL
Using Navigator Control
Connection and message format selection information for the
Navigator are given in the Installation and Servicing Manual.
Ensure that the autopilot is programmed to receive the
correct format messages.
In the event of the Navigator indicating an alarm condition,
the autopilot will display NAV DATA on the LCD. The
autopilot will hold the vessel on its present heading and will
not accept any further changes until this error is cleared.
(Note: the Navigator should also indicate this alarm
condition.) To clear the above alarm from the autopilot, press
any key except , or OFF. If the alarm clears the
autopilot will accept data. If the above condition still exists,
turn the autopilot off and resume autopilot control under
Compass Control or manually steer the vessel.
NMEA 0182 or NMEA 0183 Navigators
HEAD 081 Programme the Navigator with the required Waypoints.
Turn the autopilot on by pressing the ON/ST’BY key.
NAV1--OFF Select Navigator Control by pressing the NAV key, once to
select Nav 1 or twice to select Nav 2.
NAV1--ON Use the or key to switch a Navigator on, the vessel is
not yet under Navigator Control. (If Nav 2 is selected the
display will read NAV2--ON.)
NAV1 090 Engage the autopilot by pressing the AUTO key. The vessel
is now under Navigator Control. (If Nav 2 is selected the
display will read NAV2 090.)
Note: It is recommended that the vessel’s heading should be
within 30º of the course before engaging the autopilot.
The vessel will now follow the Navigator’s course,
automatically changing at Waypoints if the Navigator outputs
Waypoint Number data.
Navigator Control

PROPILOT 725 USER’S GUIDE
-20- 807-251-1-96
If the Navigator does not Output Waypoint Numbers
HEAD 090 When the Waypoint is reached press the ON/ST’BY key,
NAV1 135 then press the AUTO key and the vessel turns onto the new
course given to it by the Navigator.
NMEA 0180 Navigators
Programme the Navigator with the required Waypoints and
select the display on the Navigator to show the course to the
next Waypoint.
HEAD 190 Turn the autopilot on by pressing the ON/ST’BY key then
steer to the heading for the next Waypoint.
COMP 190 Press the AUTO key to engage the autopilot.
<<47 Check the Cross Track Error by pressing the AUTO key twice.
The number displayed is the Cross Track Error in one
hundredths of a nautical mile. The arrows indicate if the error
is to Port or Starboard (in this example you are 0.47 miles
Starboard of the track).
<<02 Ifthe Cross Track Error is greater than 0.4, reduce it by
steering the vessel using the rotary Course Selector Knob.
Steer in the direction of the arrows, returning the vessel to
the approximate heading to Waypoint.
NAV1--OFF When the error is 0.4 or below, select Navigator Control by
pressing the NAV key, once to select Nav 1 or twice to select
Nav 2.
NAV1--ON Use the or key to switch a Navigator on, if Nav 1 is
turned ON Nav 2 will automatically be switched off and vice
versa.
NAV1 185 Engage the autopilot by pressing the AUTO key. The vessel
is now under Navigator Control. (If Nav 2 is selected the
display will read NAV2 185.)
Navigator Control
Other manuals for Propilot 725
1
Table of contents
Other Cetrek Marine Equipment manuals


