CFLYAI DF801B User manual

DF801B USER MANUAL
APP Store
Google Play
IMPORTANT
○Before using the product, please carefully read this manual and strictly comply with the operating
instructions.
○Do not attempt to disassemble, modify or repair the aircraft. If necessary, please contact your local
retailer.
○For the electronic version of this manual, please navigate to the APP’s main interface and click the“Help”
on the upper right corner to download.
○All the contents of this manual are subject to change without prior notice.

Content
I.Important Notes-------------------------------1
1.Flight safety --------------------------------------1
2.Flight environment -------------------------------1
3.GPS mode and ight mode----------------------2
4.RTH (Return to home) ---------------------------2
5.Low battery RTH---------------------------------2
6.Control loss RTH---------------------------------2
7.Compass calibration -----------------------------2
II.Instructions for lithium battery usage ---------5
1.Usage--------------------------------------------5
2.Charging ----------------------------------------5
3.Storage and transportation-----------------------6
4.Disposal -----------------------------------------6
5.Maintenance -------------------------------------6
6.Attention for boarding----------------------------6
III.Disclaimers and warnings --------------------6
IV.Technical support ----------------------------7
V.Newbie mode --------------------------------7
VI.Know DF801B ------------------------------7
1.Aircraft -------------------------------------------7
2.About the Remote Controller --------------------8
3.About optical ow positioning system------------9
4.Download the APP----------------------------- 10
VII.Pre-ight Preparation --------------------- 11
1.Battery Charging for the Aircraft --------------- 11
2.Remote Controller Preparation----------------- 12
3.Insert the TF Card------------------------------ 12
4.Battery Installation ----------------------------- 13
VIII.Control via the Remote Controller -------- 13
1.Power on the Aircraft -------------------------- 13
2.Connect with the APP-------------------------- 14
3.Operating the Aircraft -------------------------- 15
4.Photo and video ------------------------------- 16
5.Adjustment of the Camera's Pitch Angle------- 17
6.Flight Mode ------------------------------------ 18
7.Return To home-------------------------------- 18
8.Battery Storage -------------------------------- 19
9.Pair the Aircraft with the Remote Controller---- 19
IX.Control via the APP------------------------ 20
1.Power on the Aircraft -------------------------- 20
2.Connect with the APP-------------------------- 20
3.Fly the Aircraft --------------------------------- 20
4.Photo and video ------------------------------- 22
5.Adjustment of the camera's pitch angle ------- 23
6.Flight Mode ----------------------------------- 23
7.Return to home-------------------------------- 25
8.Waypoint ying-------------------------------- 26
X.MV lming --------------------------------- 27
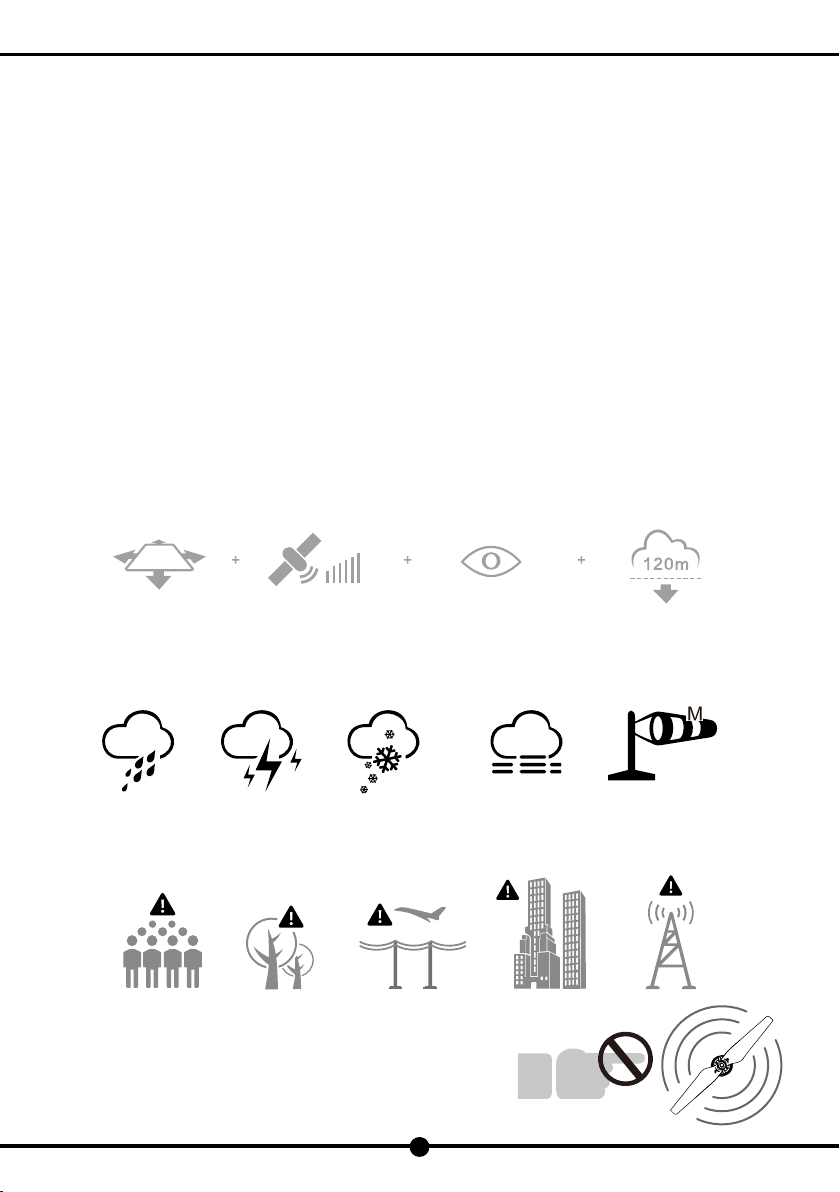
Fly in Open Area Strong GPS Signal
Strength Within Line of Sight Fly Below 400
feet(120m)
≥4
1
DF801B USER MANUAL
I. Important Notes
1. Flight safety
(1) This aircraft is not a toy. It is applicable for users of 14 years of age and above.
(2) Please familiarize with the local laws, regulations and ying environment before ying. Stay away from sensitive places, and only
y where it's legal to y a drone.
(3) Please make sure that the aircraft ies within your sight. DO NOT y the aircraft around the obstacles, otherwise it might lead to
accidents.
(4) Please make sure you have the remote controller and the mobile device in your hand so that the aircraft can be controlled at any
time in case of accidents!
(5) Please keep away from the drone when it is in motion.
(6) Please turn off the aircraft and remote controller immediately when it completes ying.
(7) Please strictly comply with the safety rules when using the lithium battery. Never leave the battery unattended while charging to
avoid any accidents.
(8) DO NOT y the drone or use any type of remote controller within a radius of 500 meters of an airport. DO NOT use the remote
controller when and where the radio restrictions might apply.
2. Flight environment
(1) Choose an open area,far away from people,animals,buildings, trees, high-voltage cables and other obstacles etc.
(2) Do not y in bad weather, such as windy, rainy, snowy and foggy weather etc.
(3) Stay away from tall buildings, high-voltage cables, communication base stations and WiFi hotspots, which will severely affect the
signal receiving of the aircraft , resulting in ight accidents caused by abnormal ight data.
(4) Do not contact the propeller in motion, otherwise it may cause
serious injury.Safety is the priority for both you and your surrounding
environment and people. Therefore please familiarize with the no-fly
zone and the safety instructions before ight. Please enter the APP to
download and read the disclaimer.
2
DF801B USER MANUAL
3. GPS mode and ight mode
The aircraft has built-in GPS positioning module, which will be used to position locations in autonomous ight. Follow the steps
herein and the aircraft will enter GPS Positioning Mode:
(1) The remote controller is in P (Position Hold) Mode.
(2) The GPS DOP is at a proper rate for accurate positioning.
At this time, the aircraft can hover and y autonomously.
If any of two conditions is missing, the aircraft would automatically enter the altitude hold mode. However, due to the interference
effect of the wind force, the aircraft might drift while hovering and the functions are not able to use at all.
Notice:Autonomous ight refers to ights that are controlled by internal programming that tells where it
is positioned and where to y, rather than a person sending radio signals, including,RTH, one key
return,way point ight and point of interest, etc.
4. RTH (Return to home)
When the aircraft enters the GPS positioning mode, the built-in GPS can automatically record its takeoff point as home point. In the
following circumstances, the aircraft will automatically initiate RTH:
Notice:When the aircraft initiates auto return to home, users can only control the function when it
has returned and starts to land.
(1) When the battery level is low, the aircraft would automatically initiate RTH.
(2) When the aircraft is disconnected with the remote controller, the aircraft would automatically initiate RTH.
In the RTH mode,if the aircraft ies under 30 meters, it will automatically ascend to the altitude of 30 meters before returning to the
home point and landing. If it ies over 30 meters, it will directly return to the home point and then land on the ground.
During the ight, ensure that the aircraft ies within the line of sight, and do not y around the obstacles (such as buildings,
trees, etc.). Obstacles might block signals, which will lead to the disconnection between the aircraft and the remote controller,
thus triggering the aircraft to enter the RTH mode. This may cause the aircraft to hit an obstacle in the course of RTH and cause
accidents.
5. Low battery RTH
(1) Low battery RTH
During the ight, when the battery level is low, the status indicator light of the aircraft would turn slowly blinking red with a prompt
message from the APP as well. At this point, the aircraft automatically initiates the RTH mode.
Once the low battery RTH mode is enabled, you can only change the landing site but not turn it off.
(2) Critical low battery warning
When the battery level is at a critical low condition, the status indicator light of aircraft would turn quickly blinking red and the aircraft
would immediately land on the ground.
6. Control loss RTH
(1) Control loss RTH with GPS positioning
In the GPS positioning mode,if the signal of the remote controller has been interrupted, the aircraft will hover at the current altitude
for 5 seconds. If the signal has not been reconnected, the aircraft would automatically enter RTH mode.
(2) Control loss RTH without GPS positioning
When the aircraft fails to locate the position and the signal of the remote controller has been interrupted for 2 seconds, the aircraft
would automatically land.
7. Compass calibration
Notice:When changing the ight site, it is necessary to calibrate the compass before the rst ight.
During usage , if the aircraft indicates with "alternating ashing blue and green lights", which means that
Preparing to y Position
3
DF801B USER MANUAL
the compass is abnormal , please re-calibrate the compass.
Please keep away from the environment with magnetic interference when calibrating, otherwise it may
cause calibration failure.
The built-in compass helps keep the aircraft oriented.Please ensure it works well every time before ight.
○Please calibrate the aircraft compass, if one of the following scenarios happen:
(1) Fly at the new ight site;
(2) The aircraft status indicator light indicates the abnormal situation of the compass;
(3) APP and aircraft prompt you to calibrate the compass;
(4) Hovering or drifting in mid-ight.
○Calibrate the compass via the APP:
(1) Enter the calibration mode
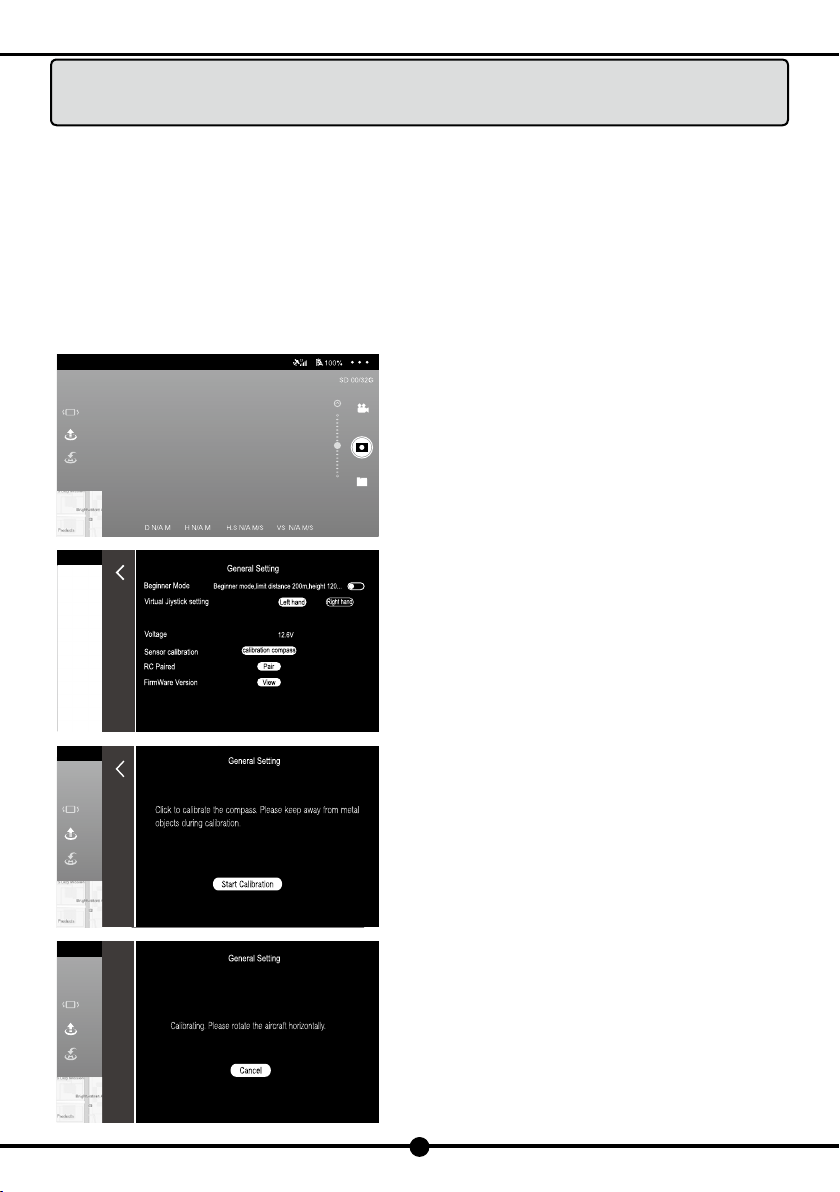
When the aircraft and APP are connected, click the"..."icon in the upper
right corner of the APP control interface to enter the "General Setting"
menu.
Then click the "compass calibration" icon.
When APP pops up the prompt, check the current environment and stay
away from metal objects. then click the "calibration" icon.
Meanwhile,the status indicator light on the aircraft's rear arm will turn blue
and red lights ashing alternately, indicating that it has been ready for
calibration.

4
DF801B USER MANUAL
(2) Compass calibration
Step 1:Horizontal calibration
When the APP prompts you to rotate the aircraft horizontally,put the aircraft in your hand horizontally and then rotate it horizontally
until the status indicator light on the arm of the aircraft turns red and green light ashing alternately (i.e., the horizontal calibration is
successful).
Step 2:Vertical calibration
When APP prompts you to rotate the aircraft with its nose
facing up, hold the aircraft in your hand with its nose facing up.
Place the aircraft on the ground and then rotate it horizontally.
The compass has been calibrated successfully when the status
indicator light on the aircraft's rear arm turns green (solid or
ashing).
When the APP prompts you with "calibration is successful",
click "Complete" to complete calibration.
If the status indicator light turns red (about 6 seconds),which
means compass calibration fails, please change the position
and re-calibrate.

5
DF801B USER MANUAL
II. Instructions for lithium battery usage
Warning:Read the entire user manual and familiarize with the functions of the product before proceeding.
If the product is not properly operated, it may cause serious injury, or lead to product damage and
property loss.
This product requires sophisticated pilots with experienced operation. Without a strong sense of
safety, improper operation may lead to damage and property loss, or even serious injury.
This product is not suitable for children. Do not use components that are not provided or recommended
by us. Please strictly comply with the instructions for product installation and usage. This user manual
includes safety, operation and maintenance instructions.
Please read through the instructions and warning tips carefully before assembling, setting up and using
the product. Improper usage, charging or battery storage may cause re, property loss or personal
injury. It is important to refer to the following instructions for battery usage.
1. Usage
(1) No battery is allowed to be exposed to any liquid. Do not immerse the battery in water or get it wet. Never use batteries in rain or
damp environment. Soaked with water may lead to decomposition, self-ignition, or even explosion.
(2) Do not use non-specified batteries. For replacement, please contact the local retailer for additional information.Using non-
specied batteries may lead to product damage or ight failures, or even cause accidents.
(3) It is strictly prohibited to use batteries that are swollen, leaky, or worn. If any of the above occurs, please contact the sales agent
or local retailer for further processing.
(4) Do not hit the battery. Do not place objects over batteries or chargers.
(5) The battery should be used between ambient temperature of 0 to 40 degrees Celsius. When the temperature is too high (above
50 degrees Celsius), the battery will catch re or even explode. Low temperature (below 0 degrees Celsius) might lead to a
decrease of the battery lifespan.
(6) It is forbidden to use batteries in strong static or magnetic elds. Otherwise, the battery protection board might not work, resulting
in malfunction of the aircraft.
(7) It is forbidden to disassemble the battery or pierce it with sharp objects. Otherwise, it might cause battery ignition or explosion.
(8) The liquid inside the battery is highly corrosive. If there is any leakage, keep away from the battery. If the liquid inside the battery
splashes onto human skin or eyes, please rinse it out immediately with clean water for at least 15 minutes and seek medical
treatment immediately.
(9) If the battery drops or is hit by external force, it must not be used anymore.
(10) If the battery accidentally falls into the water during the ight or under other circumstances, pull out the battery immediately and
place it in a safe open area. At this time, keep away from the battery until the battery is completely dry. Do not use the battery,
and dispose it properly. If the battery catches on re, use solid materials to put out the re, such as sand, blanket, dry powder
and carbon dioxide re extinguishers.
(11) Do not place batteries in a microwave oven or pressure cooker.
(12) Do not place battery cell over the conductor.
(13) No wires or other metal objects are allowed in case of short circuits.
(14) If there is dirt on the battery interface, clean it up with a piece of dry cloth. Otherwise, it might cause contact failure, resulting in
energy loss or charging failure.
2. Charging
(1) The battery must be charged with the specic charger. Charging with a non-specic charger might cause product damage and

6
DF801B USER MANUAL
even accidents. We will not bear the responsibility for consequences resulting from improper charging.
(2) When charging, please place the battery and charger on the non-ammable and combustible ground (such as cement ground).
Please pay attention to the charging process to avoid accidents.
(3) It is forbidden to charge the battery immediately when the ight completes, with that the battery is not cooled down yet and
charging might lead to a decrease of the battery lifespan. Charge the battery when its temperature approaches to the room
temperature. The ideal charging temperature (5℃-40℃) can greatly extend the battery lifespan.
(4) After charging, please disconnect the charger from the battery immediately. Regularly check and maintain the charger. Do not
use damaged charger.
3. Storage and transportation
(1) Please store batteries in places where children can't reach. If children accidentally swallow some parts of the product, please
immediately seek for medical help.
(2) It is forbidden to place batteries in direct sunlight or near heat sources, such as cars, fires or heaters. The ideal storage
temperature is 22 ℃~28 ℃Store the battery in dry environment. Do not place batteries in water or where there is water
leakage.
(3) Do not impact, crush or puncture batteries.Do not drop or short circuit the battery.
(4) Do not store or transport batteries with spectacles, watches, metal necklaces, hairpins or other metal objects.
(5) Do not transport worn batteries.If necessary,discharge the battery until 30% battery level remains before transport.
(6) If not in use for more than 10 days, please store the battery with 40%~65% battery level remaining, which can extend its
lifespan.
(7) Do not completely discharge the battery if not intended to use it for a long time, as to avoid over-discharging, which will ultimately
disable the battery.
4. Disposal
(1) The battery must be completely discharged before being placed in the recycling bin. Batteries are dangerous chemicals. It is
strictly prohibited to dispose the battery in regular garbage bins. Please follow the local laws and regulations for battery disposal.
(2) Over-charging batteries are unable to use. Please dispose them.
5. Maintenance
(1) Do not use charger when the temperature is too high or too low.
(2) Do not store batteries when the room temperature reaches above 60 degrees Celsius.
(3) Do not overload the battery, otherwise it might cause damage to the cell.
(4) If the battery is idle for a long time, its performance will be affected.
(5) Recharge and discharge once every 3 months to maintain battery activity.
6. Attention for boarding
(1) Before bringing the battery to the airplane, please discharge the battery until 5% battery level remains.
(2) Please store the battery in a ventilated and dry place.
III. Disclaimers and warnings
This product is not a toy! In the process of using, please adhere to the safety rules. This product is not suitable for children under 14
years of age. Do not expose children to this product. Be careful when using this product in places within children's reach.
For novice pilots, please have an experienced pilot to be supervised for the ight.
Be sure to read this manual carefully before using the product and familiarize with individual rights and responsibilities and related
1
2
5
6
3
4
7
8
9
7
DF801B USER MANUAL
safety instructions. Otherwise, it may bring about property loss, safety accident and personal injury. Once this product is used, it is
deemed that you have understood, approved and accepted all the terms and conditions of this statement. Users promise to be
responsible for all their consequences and their actions. The user shall undertake the responsibility of using the product for legitimate
purposes and agree with this clause and any relevant policies or guidelines that we may formulate.
IV. Technical support
We guarantee that all products are strictly inspected and tested before coming into the market. Any new information or technology,
we will update on the ocial website.
Users can contact the local distributor to seek for technical support or purchase additional spare parts.
V. Newbie mode
For novice pilot, please turn on the newbie mode. Once the newbie mode is activated, the aircraft will locate its own position before
ready to take off. If the aircraft can not be controlled after take-off, the RTH can be used to allow the aircraft to return automatically.
VI. Know DF801B
DF801B is a ying camera with HD camera and smart ight mode. It features with multiple functions such as one key takeoff/
landing, auto return to home, ight planning, follow me, point of interest, etc. Equipped with the two-axis gimbal stabilizer, it allows
you to have a unique perspective and compose great photos, offering a wonderful photographing experience.
DF801B has up to 15 minutes of ight time.
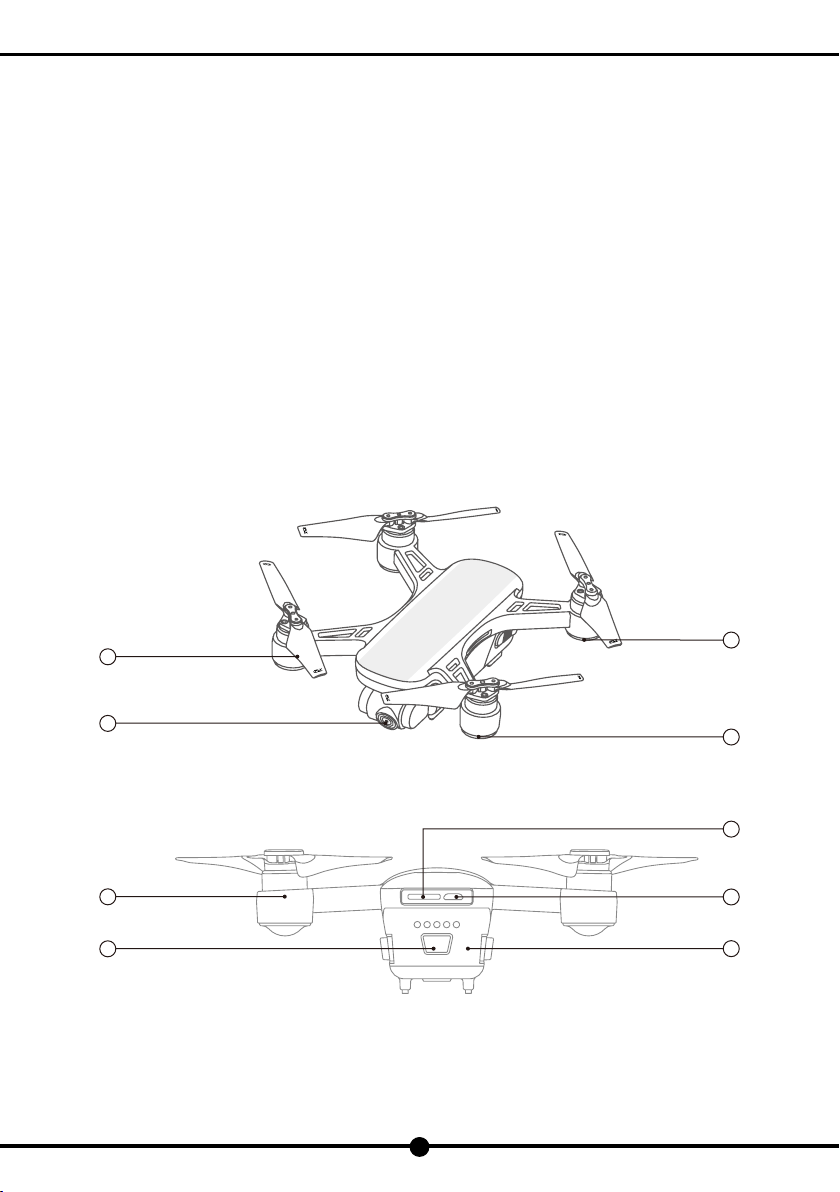
1. Aircraft
1) About the aircraft
aPropeller bGimbal Camera cFlight Status Indicator Light
dOptical Positioning Status Indicator Light eMotor fPower Switch
gTF Slot hMicro USB Interface iAircraft Battery

lm
k
aa
c
g
h
j
b
d
f
i
e
8
DF801B USER MANUAL
2) Flight status indicator light
With the indicator light, the ight status of the aircraft can be checked, listed as below:
○Flight Status Indicator Light (Rear Light)
Indicator Light Status Indication
▂▂▂▂▂▂▂▂▂▂ Solid blue light on start-up Self-inspection
▂▂▂▂▂▂▂▂▂▂ Solid green light RC and aircraft is paired,GPS is located
▂ ▂ ▂ ▂ ▂ ▂ ▂ ▂ ▂ Flashing green light RC and aircraft is paired,GPS is not located
▂ ▂ ▂ ▂ ▂ ▂ ▂ Blue and red light ashing alternately Horizontal calibration process
▂ ▂ ▂ ▂ ▂ ▂ ▂ Red and green light ashing lternately Vertical calibration process
▂ ▂ ▂ ▂ ▂ ▂ ▂ ▂ Flashing blue light No RC signal
▂▂▂▂▂▂▂▂▂▂▂▂ Solid blue light RC and aircraft is not paired,GPS is located
▂▂▂▂▂▂▂▂▂▂▂▂ Solid red light Serious error
▂ ▂ ▂ ▂ ▂ ▂ Double-ashing red light Serious low battery level
▂ ▂ ▂ ▂ ▂ ▂ ▂ ▂ ▂ Flashing red light Low battery level
▂ ▂ ▂ ▂ ▂ ▂ ▂ ▂ ▂ Blue and green light ashing lternately Compass data error
2. About the Remote Controller
1) Console
aAntenna bFlight Mode Switch cReturn dMode Indicator Light
ePower Indicator Light fLeft Joystick gRight Joystick hPower Switch
iOne Key Takeoff/Landing jPhoto/Video kPhone Holder lUSB Charging Interface
mPitch Angle Adjustment

9
DF801B USER MANUAL
2) Power indicator light
○Charging
Indicator Light Status Indication
▂ ▂ ▂ ▂ ▂ ▂ ▂ ▂ ▂ Blinking green Charging
▂▂▂▂▂▂▂▂▂▂▂▂ Solid green Charging completed
○In operation
Indicator Light Sound Status Indication
▂▂▂▂▂▂▂▂▂▂▂▂ Solid green light Null RC is working normally
▂ ▂ ▂ ▂ ▂ ▂ Slowly ashing red light B-B- B-······ Low battery warning,please charge RC immediately
▂ ▂ ▂ ▂ ▂ ▂ ▂ ▂ ▂ Quickly ashing red light B-B-B-······ Serious low battery warning,RC will automatically turn off when
the sound stops
▂▂▂▂▂▂▂▂▂▂▂▂ Solid red light Null Serious error
▂ ▂ ▂ ▂ ▂ ▂ ▂ ▂ Double-ashing green light BB-BB-BB-······ If motionless for 5 minutes, operate the RC and the beep
sounds will stop.
3) Mode indicator description
Indicator Light Sound Status Indication
▂▂▂▂▂▂▂▂▂▂▂▂ Solid green light /GPS mode
▂▂▂▂▂▂▂▂▂▂▂▂ Slowly ashing green light B-B- B-······ Altitude hold mode
3. About optical ow positioning system
Placed on the bottom of the aircraft, the optical ow positioning system senses the movements of the aircraft with the assistance of
the camera, and calculates the current altitude, helping to precisely locate the aircraft’s position.
When the aircraft is ready to take off, the optical ow positioning function cannot be activated due to the low altitude with the
aircraft’s front indicator light blinking slowly. After the aircraft has taken off and the conditions are satised, the optical ow
positioning function will automatically turn on and locate the aircraft’s position as to enable hovering with the aircraft’s indicator
light turning solid red.
Attention: In mid-ight, the optical ow positioning function cannot be activated if the aircraft’s front indicator light turns slow
blinking red. Please pay proper attention for a safe ight.
The optical ow positioning system is signicantly affected by the intensity of the light and the surface texture of the physical object.
If the optical ow positioning system fails to work, its function of horizontal centered absolute positioning will be ineffective. In this
situation, please manually control the aircraft and pay proper attention whist ying the aircraft in the following scenarios.
Usage Scenarios
•The optical ow positioning system is applicable for altitude between 0.5 and 4 meters and suitable for either indoor or outdoor
windless environment.
•The aircraft’s indicator light turns slow blinking red when the system fails to locate position and turns solid red when the system
functions properly.
•Do not y the aircraft if the app reminds you that the system is not able to function properly in the current environment (such as
badly-lit environment).
•Do not cover up the camera. Keep the camera clean and in good condition at all times.
•The optical ow gives information about object movement within the environment based on moving object detection on the ground
surface. Ensure the surrounding environment is brightly lit and rich in texture.
•The optical ow positioning system may fail to work in such conditions as water bodies, badly-lit environment or poorly-textured

Google Play APP Store
10
DF801B USER MANUAL
surfaces.
1) The system may fail to locate position when the aircraft ies fast at a low altitude (0.5 meter below).
2) The surfaces in pure colors (such as pure black, pure white, pure red, pure green).
3) Highly reective surfaces.
4) Water bodies or the transparent surfaces.
5) The surfaces of moving objects (such as the crowds, and bushes or brushwood with strong wind blowing).
6) The environment where the light changes rapidly.
7) Badly-lit (light intensity less than 300 lux) or brightly-lit (light intensity more than 10,000 lux) surfaces of the objects.
8) Poorly-textured surfaces.
9) The surfaces that have been featured with highly-repeated textures (such as same-colored checker bricks).
10) Tiny barriers.
11) Control the aircraft to y at an appropriate speed of about 5m/s at the altitude of 1 meter.
4. Download the APP
Please connect the aircraft with the APP before using it. The aircraft can be controlled via the APP, allowing for a full control of
different directions and other functions, such as taking photos or videos and parameter settings.
Scan the following QR code to download the APP.
Notes:For more details on how to control the aircraft via the APP, please refer to "Control via the APP" in
this manual. When using the APP, make sure your mobile phone supports 5G Wi-Fi, otherwise the APP is
unable to connect with the aircraft.

Household power socket
USB adapter USB charging cable
Insert the battery into the charger Charger
Blinking green light (Charging)
Solid green light (Charging completed)
11
DF801B USER MANUAL
VII. Pre-ight Preparation
1. Battery Charging for the Aircraft (Comply with the following steps)
(1) Connect the USB charging cable with the USB adapter and the ight battery charger.
(2) Connect one end of the power cord to the charger and plug the other end into the socket.
(3) Insert the aircraft battery into the charger with the battery line well connected.
○Charger Status Indication
Warning:Please use the specic ight battery and charger to avoid injuries and property loss.
Please charge the battery in a well-ventilated environment and keep away from heat sources.
Do not charge the battery next to ammable or on the surface of electro-conductive objects (Places
like cement ground is suggestive).
When charging, please observe the battery at all times.
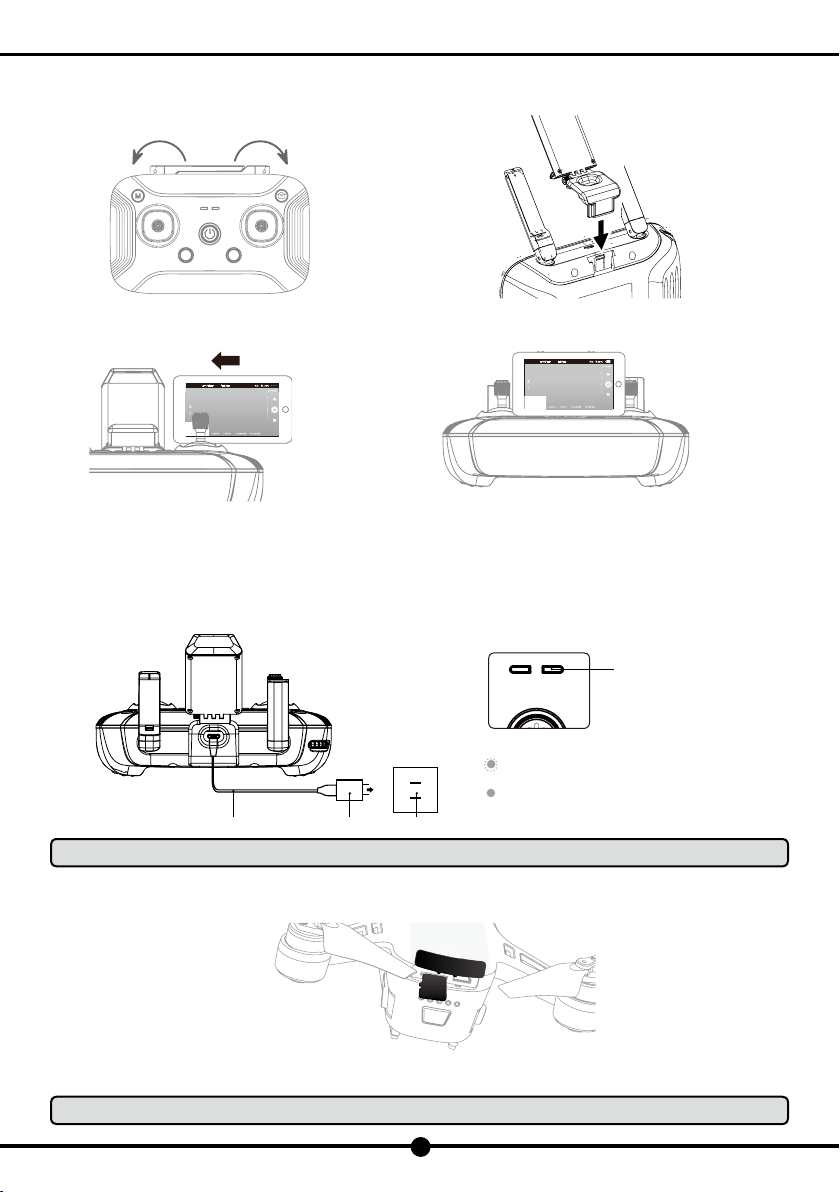
a.Stretch out the antenna. b.Insert the phone holder into the slot on the back of the remote controller.
Indicator Light
Blinking green light (Charging)
Solid green light (Charging completed)
Household power socketUSB adapter
USB charging cable
c.Mount the phone to the phone holder. d.Adjust the phone and the antenna.
TF
Insert the TF card into the slot
12
DF801B USER MANUAL
2. Remote Controller Preparation (Skip this step if you are using the APP)
Get the remote controller ready before ight
1) Battery charging for remote controller
Long press the power switch for 2 seconds to power on the remote controller. The indicator light turns solid green when the battery
level is sufcient and turns blinking green when the battery level is low. To charge the battery, please comply with the following steps:
Warning:Disconnect the charging cable before using the remote controller.
3. Insert the TF Card
Attention: Do not insert or remove the TF card when the aircraft on to avoid data loss.
13
DF801B USER MANUAL
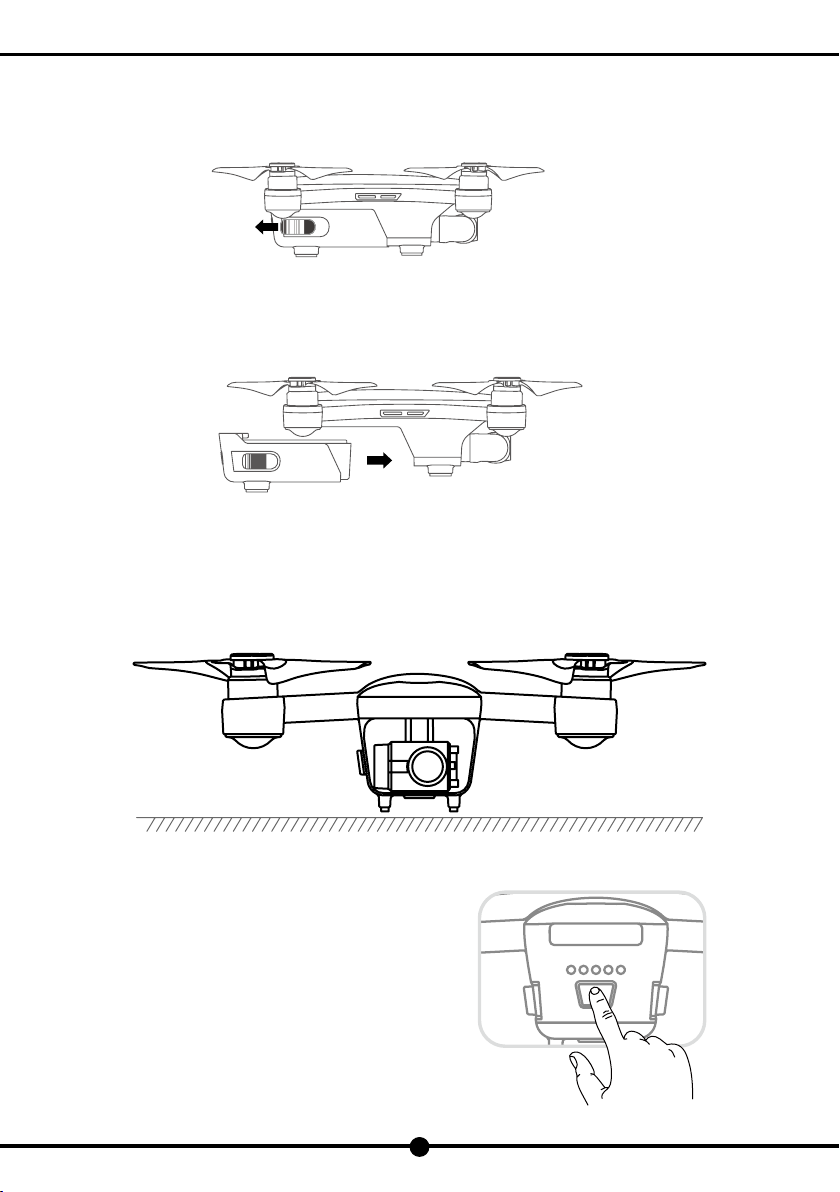
4. Battery Installation
1) Install
Push the battery into the battery compartment as shown in the below picture.
2) Remove
Unlock the battery buckle to take the battery out of the compartment.
VIII.Control via the Remote Controller
1. Power on the Aircraft
1) Put the aircraft on a at level surface.
2) Power on the aircraft.
Long press the power switch for 2 seconds to switch on the aircraft.

The light turns from blinking blue to blinking
or solid green.
14
DF801B USER MANUAL
3) Self-check and pairing
Power on the aircraft and put it on a at level surface for 30 seconds for self-checking. When the aircraft's indicator light turns from
blinking or solid blue to blinking or solid green, the aircraft has successfully paired with the remote controller.
2. Connect with the APP
1) GPS signal status with the aircraft connected with the APP
Connect the aircraft with the APP. When the indicator light of the aircraft turns solid green, indicating strong GPS signal and the
position located, switch the ight mode to GPS mode to get ready for takeoff.
When the indicator light of the aircraft turns blinking green, indicating weak GPS signal or even no signal, manually choose Mode A
(Manual Mode) to control the aircraft (It requires experienced skills for operation and may not be suitable for novice pilots).
Notes: Set the drone up and get ready to take off after the aircraft’s indicator light turns solid green (indicating
good GPS signal).
Please choose a wide open space for your ight. Do not y over tall steel structures or metal materials,
which may interrupt the GPS signal.
2) Connect with the APP
Open the APP, enter the WLAN settings,
click "Controller-XXXXXX" to connect.
Open the APP and enter the main interface as shown in the below
left picture. Click "Start Flying" to enter the ight control interface as shown in the below right picture.
Notes:The aircraft can only connect to 5G Wi-Fi enabled mobile phone.
Use the APP to monitor the real-time image and video footages and the ight status of the aircraft. It
is able to use both of the remote controller and the APP to control the aircraft. However, some functions
Left Joystick Ascend
Descend
Turn Left Turn Right
Right Joystick Forward
Backward
RightLeft
Left Joystick Right Joystick
15
DF801B USER MANUAL
are not supported on the APP when the controller is being used, such as taking photos or videos,
follow me mode, point of interest mode or waypoint ying mode. The APP can only be used when the
remote controller turns off.
For more details on how to control the aircraft via the APP, please refer to “Control via the APP”in
this manual.
3. Operating the Aircraft
1) Take off
○Method 1: Manually control it to take off
When the aircraft's light turns from blue to green (as shown in the
right picture), toggle the left and right joysticks outward for at least
3 seconds (as shown in the picture) as to get the propellers started
to rotate.
Slowly toggle the throttle joystick upward to control the aircraft to
take off quickly, and then toggle again to make it ascend slowly.
○Method 2: Press "One Key Takeoff/ Landing" to control it to take off
Long press the "One Key Takeoff/ Landing" button for 2 to 3 seconds. When the remote controller beeps continuously, the aircraft
will automatically take off and ascend to the altitude of 1.2 meters and hover.
2) Land
Do not land near crowds of people or obstacles. Choose a wide open space as the landing site and control the drone to hover over
the landing site before proceeding to make it land.
○Method 1: Manually control it to land
Slowly toggle the throttle joystick to control the aircraft to land. When the aircraft lands on the ground, continue to toggle the joystick
towards the lowest position until the propellers stop rotating.
○Method 2:Press "One Key Takeoff/ Landing" to control it to land
Long press the "One Key Takeoff/ Landing" button for 2 to 3 seconds. When the remote controller beeps continuously, the aircraft
will land vertically.
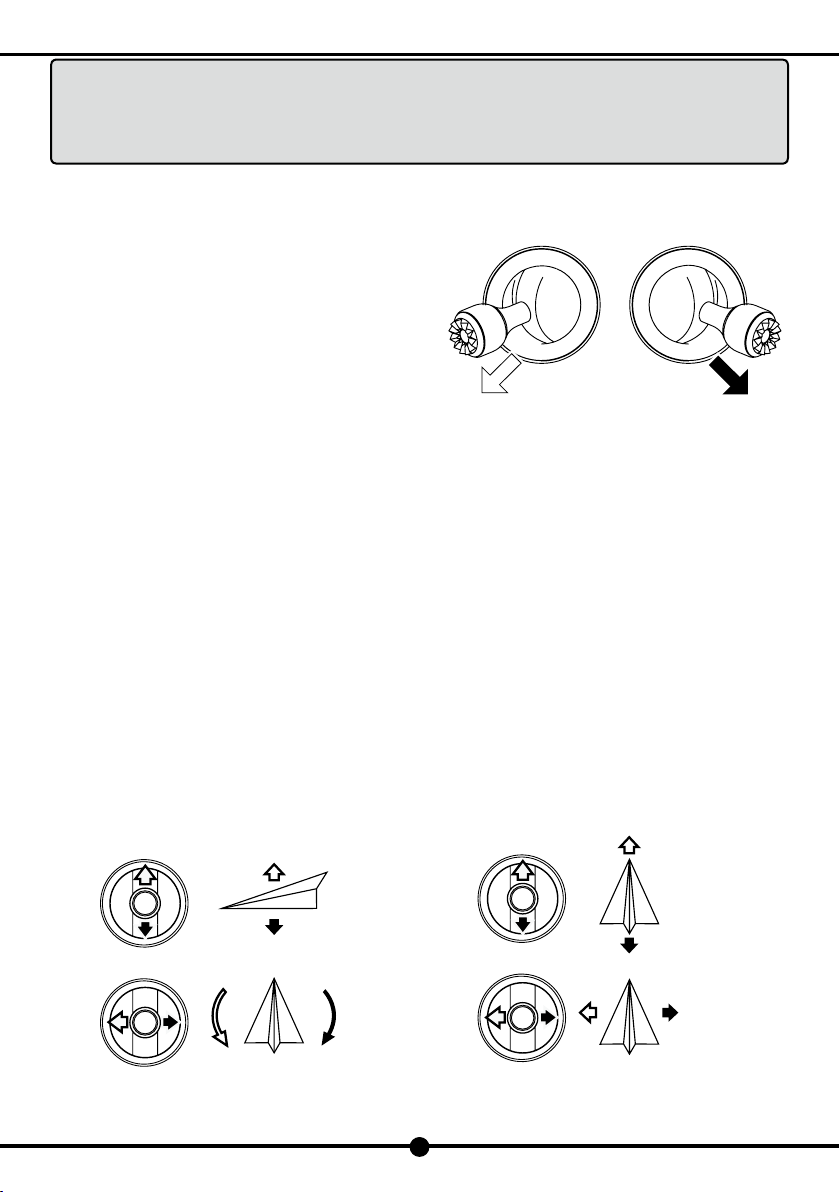
3) Joystick control
(1) Mode 2 (Left joystick is the throttle joystick)
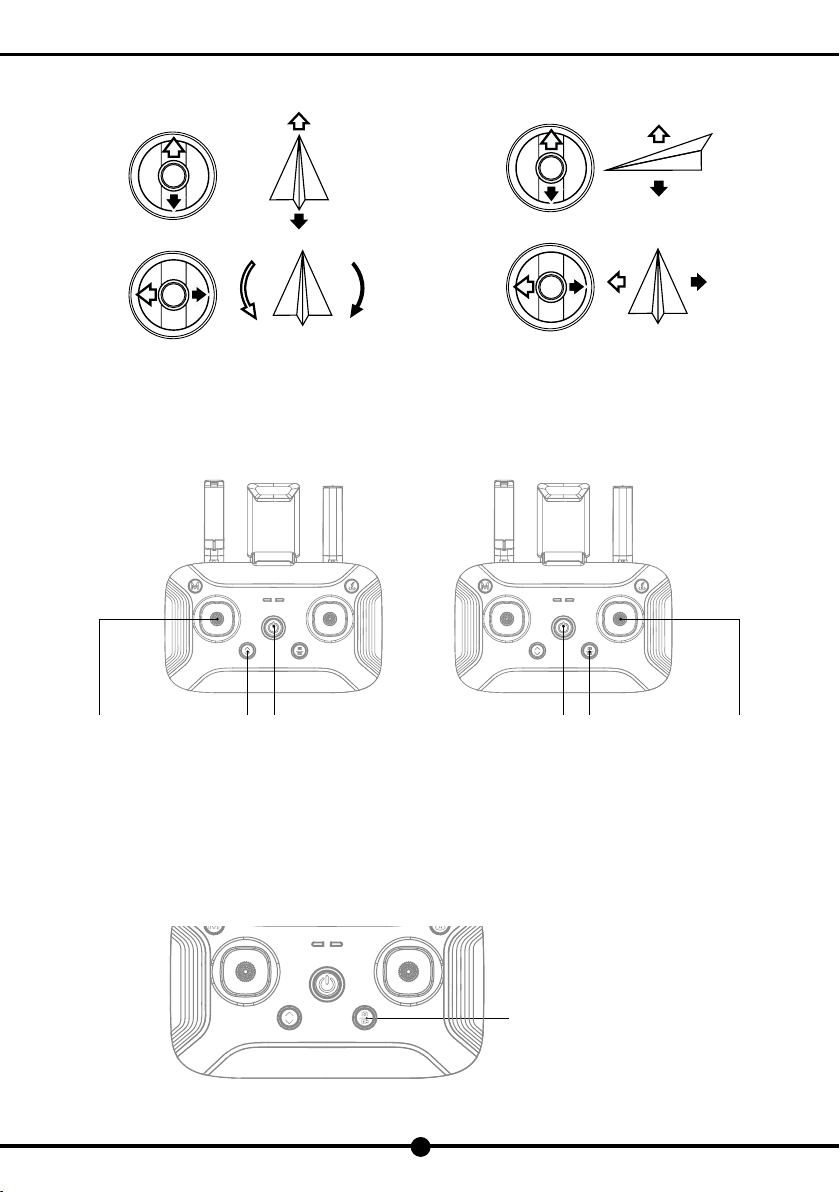
Ascend
Descend
Right Joystick
RightLeft
Left Joystick
Turn Left Turn Right
Forward
Backward
a b c a
bc
Short press to take a photo
Long press to start/stop shooting
16
DF801B USER MANUAL
(2) Mode 1 (Right joystick is the throttle joystick)
4) Switch Between Mode 1 and Mode 2
(1) Switch to Mode 2
Toggle the left joystick ①to the lowest position and press the "One Key Takeoff/ Landing" button ②at the same time. Then turn
on the remote controller ③. Release the joystick ①and the button ②to enter Mode 2.
(2) Switch to Mode 1
Toggle the right joystick ①to the lowest position and press the "Photo/ Video" button ②at the same time. Then turn on the
remote controller ③. Release the joystick ①and the button ②to enter Mode 1.
4. Photo and video
1) Take photos and videos with the remote control
During the ight, you can take photos and videos of the current scene through the "Photo/Camera button" on the remote control.

17
DF801B USER MANUAL
Short press " / " Photo/Camera button, the remote control will give "B" sound, indicating that the camera is successful.
Press and hold the " / " Photo/Camera button, the remote control will give "B" and "B" sound, and the camera icon on
the APP will change from white to red, indicating that it has entered the camera mode. Press and hold the " / " Photo/
Camera button again, the remote control will give "B" and "B" sound , and the camera icon on the APP will change from red to
white, indicating that the camera has stopped.
2) Use gestures to take photos and videos
The drone is featured with gesture recognition. To activate it, open App and turn on "Gesture Recognition". In mid-ight, you can use
the following gestures in front of the drone camera to take photos or videos.
(1) Victory Gesture
Keep 2 meters from the drone and face the drone camera, raise one of your hands in front of you and make a V
shape. When your gesture has been successfully recognized, it will automatically set a three second countdown
before taking pictures.
(2) Square Gesture
Keep 2 meters from the drone and face the drone camera, make square gestures for shooting around your chin.
When your gesture has been successfully recognized, it will automatically start lming. When it recognizes your
gesture for the second time, it will automatically nish lming (The interval between the rst and second time for
recognition should be at least 3 seconds).
(3) Palm Gesture
Keep 2 meters from the drone and face the drone camera, close your hand rmly and raise it in front of you. When
your gesture has been successfully recognized, it will automatically start lming. When it recognizes your gesture
for the second time, it will automatically nish lming (The interval between the rst and second time for recognition
should be at least 3 seconds).
Note: To ensure a high recognition, please note that:
1. Face the drone camera;
2. Fly the drone in well-lit environment;
3. Use gestures when you stay around 2 meters away from the drone camera.
It has a lower recognition rate when:
1. In badly-lit or backlighting environment;
2. Weak Wi-Fi signal or signal has been interfered.
○Aerial photography tips
(1) Check the condition of all parts before ight.
(2) Take photos or vides when the drone is in position hold mode.
(3) Shoot on sunny and breezy days.
(4) Slightly toggle the joystick in mid-ight as to ensure a smooth ight.
Note: In order to avoid possible damage or loss,please ensure that the camera is free to rotate. High
temperature may cause damage to the camera and even cause injury.
5. Adjustment of the Camera's Pitch Angle
Tilt the camera upward or downward as to achieve the best shooting angle and capture the perfect images or footages when taking
photos or videos.
Scroll the scroll button on the top left corner of the remote controller as to control the pitch angle, as shown below.

Scroll the button upward as
to tilt the camera upward.
Scroll the button downward as
to tilt the camera downward.
Forward
Left Sideward Right Sideward
Forward/Backward
Backward
18
DF801B USER MANUAL
6. Flight Mode
1) Position Hold Mode
○How to enter position hold mode
a. The drone will automatically enter position hold mode after start-up.
b. If the drone is in altitude hold mode and the GPS positioning system is working well, long press the "Flight Mode Switch" button
to switch to position hold mode.
○Status of the aircraft and the remote controller
The left indicator light on the controller turns solid green.
○Notice
In position hold mode, the aircraft will automatically locate its own position and hover steadily. Please choose a wide open space in
the outdoor eld, and wait until the GPS has been turned on before ying it.
2) Altitude Hold Mode
○How to enter altitude hold mode
If the aircraft is in position hold mode, long press the "Flight Mode Switch" button to switch to altitude hold mode.
○Status of the aircraft and the remote controller
In this mode, the left indicator light on the controller turns solid red.
○Notice
The aircraft is more responsive and agile in altitude hold mode, which requires pilots with experienced operation skills. However,
certain environmental factors, such as airow, might affect the ight, resulting in drifting or hovering failure.
Please familiarize yourself with the position hold mode rst and learn how to handle altitude hold mode before using it.
Notes: As for the return to home point as precise as possible, please y the aircraft in open at terrain (no
tall buildings in 50 meters of radius, at terrain in 10 meters of radius) with the GPS working well. Thus
the return to home function will be able to activate.
7. Return To home
In GPS positioning mode, you can press the "One Key Return" button to return the aircraft. Do not control any functions during the
process of return or ascent. When the aircraft is landing, you can toggle the joystick to control it to land on your desired location.
When the aircraft is returning to home point, long press the "One Key Return" button to exit auto return mode.
Table of contents


