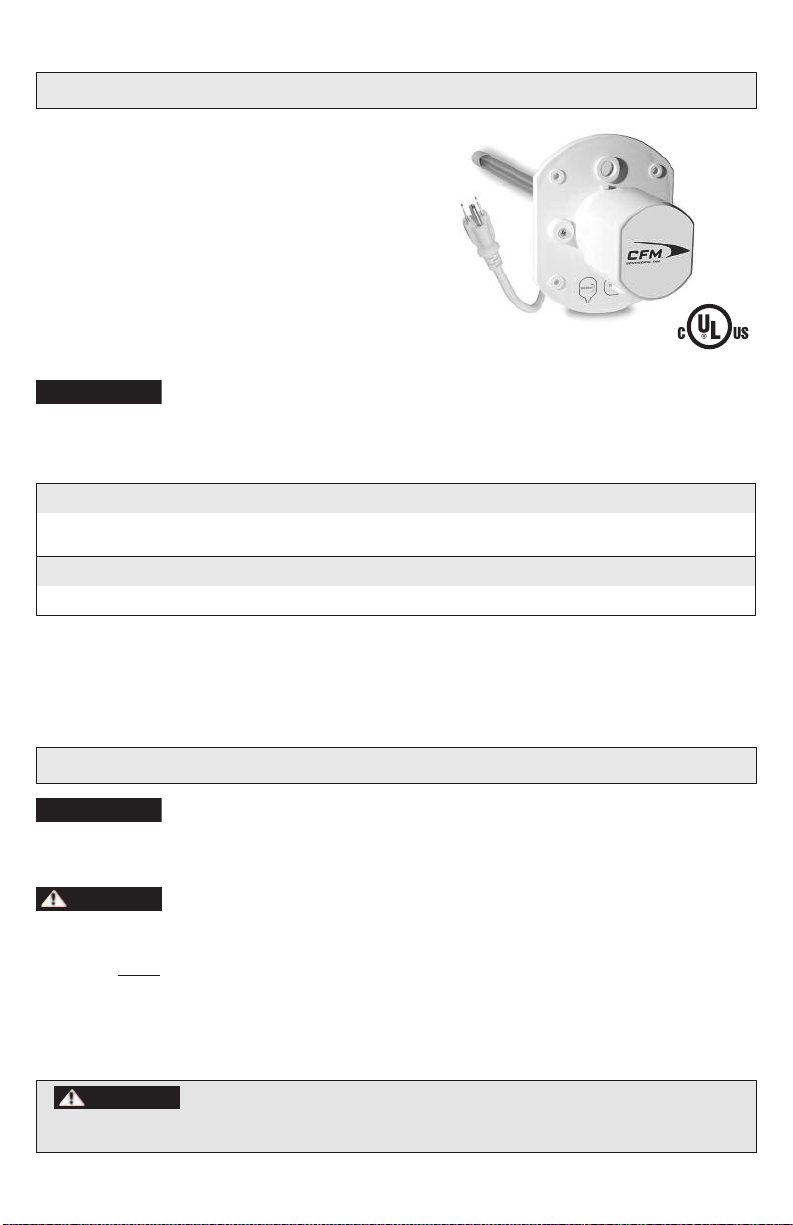
CFM CX-AIRE Maintenance and service guide

Installation & Maintenance
CX-AIRE
IN-DUCT AIR PURIFIER
READ AND SAVE HESE INS RUC IONS FOR FU URE REFERENCE.

2
Never expose eyes or skin to UVC light from any source. Looking directly at the UVC
light may cause permanent eye damage or blindness. Never operate the CX-Aire Air Purifying System
out of the plenum. Avoid touching the glass portion of the lamp with your hands.
WARNING
SAFE Y INS RUC IONS
Never expose eyes or skin to UVC light from any source.
• Looking directly at the UVC light may cause permanent eye damage or blindness.
• Never operate the CX-Aire Air Purifier out of the plenum.
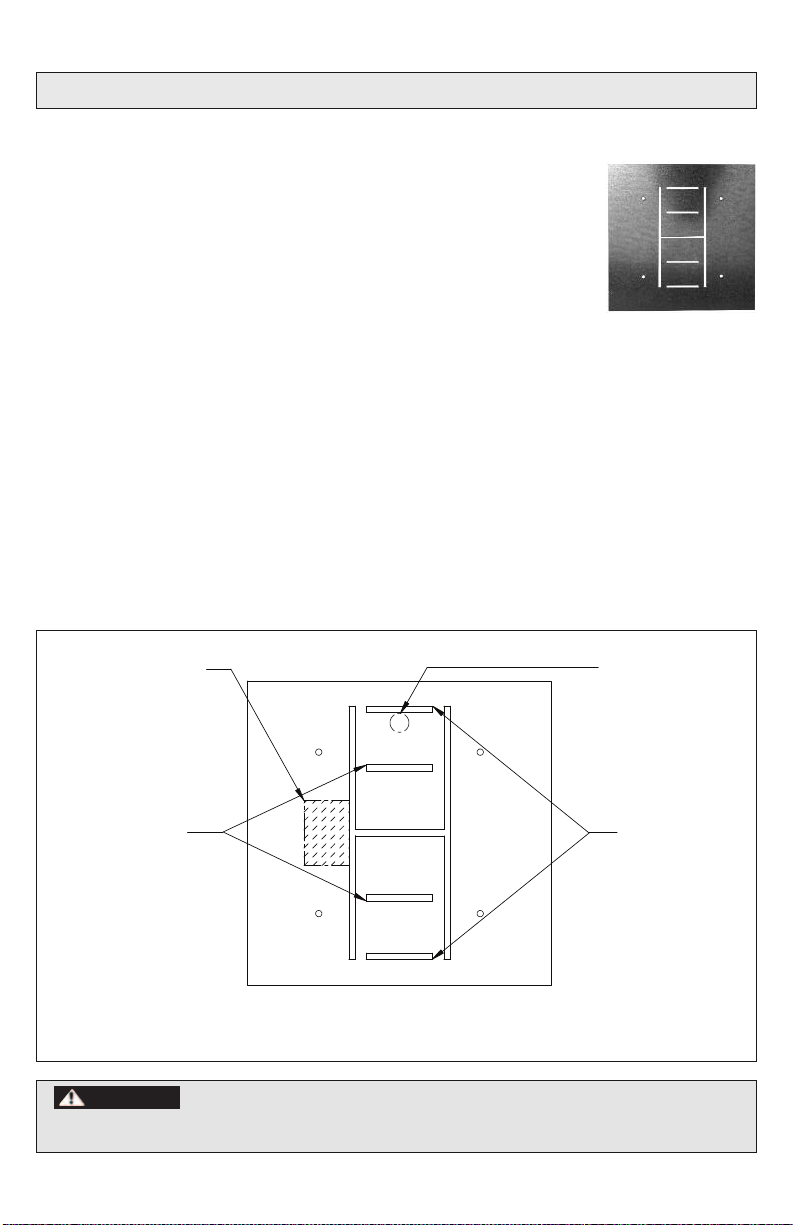
• Designed for a closed duct system. Do not mount near a supply or a return air opening.
• Mount the UV lamp unit not less than 181 ft in the line of sight to any openings in the air duct
and not less than 44 ft in the line of sight to any non-metallic parts.
• All duct openings in direct line of site of the UVC light must be sealed with aluminum tape or
equivalent sealing methods.
UVC light will break down plastic materials not rated for UV exposure, like wire
insulation, flex duct, drain pans, humidifiers, etc.
• The unit must be mounted at least 30" from the above stated types of materials.
• f it is necessary to mount the unit in direct line of sight of these types of materials, they must
be shielded with aluminum foil, aluminum foil tape, or sheet metal.
DO NOT mount this unit outdoors.
• This product is designed for indoor installation only (i.e. attics, crawl spaces, basements, etc.).
Never touch broken lamp or internal contents of lamp. The lamp contains mercury.
• After opening the carton, unpack and inspect the unit and lamp for damage. Do not install
this unit if any damage is noticeable. f lamp is damaged, cracked or broken, do not touch
lamp or other contents in carton. Close carton and return to seller immediately.
• n case of accidental exposure to internal contents of lamp, wash hands and any other affected
skin area with mild detergent. Remove affected clothing immediately. f skin surface is pierced,
seek medical attention immediately.
NO E: f you touch the glass of the lamp, you should wipe the glass clean with isopropyl
alcohol and a lint free wipe. f the lamp is not cleaned, the film from hand oils will cause a
reduction in the light intensity.
Before installing or servicing a humidifier, air filter, HVAC system, or this unit,
etc., always turn all power OFF and have unit unplugged. Electrical shock can cause personal injury
or death. Never expose eyes or skin to direct UVC light from any source.
To prevent water damage or electric shock, do not mount unit under a humidifier.
This product is designed for indoor installation only (i.e. basements, crawl spaces,
attics, etc.). For use on gas fired, oil fired, electric and split system heat pump forced air systems*. This
product is NOT designed to be mounted outside on gas fired or heat pump packaged units**.
* Split system heat pumps are systems where the air handler and the air conditioning compressor are separate units.
** Packaged units are systems where the air handler and the air conditioning compressor are built together and are installed
outside of the building.
WARNING
WARNING
WARNING
WARNING
WARNING
WARNING
WARNING

3
Never expose eyes or skin to UVC light from any source. Looking directly at the UVC
light may cause permanent eye damage or blindness. Never operate the CX-Aire Air Purifying System
out of the plenum. Avoid touching the glass portion of the lamp with your hands.
WARNING
CXAIRE INDUC AIR PURIFIER
MODEL: CXAire
The delivery set includes:
• Ballast assembly and power cord
• Mounting base
• UVC germicidal lamp
• UVC light shield
• Sheet metal mounting screws (6)
• Mounting template
• Ductboard adapter plate
This product is not sold as a medical device and is not for the purpose of
diagnosis of any disease or condition nor for use in the mitigation, treatment, or prevention
of any disease or condition.
Note:
• For applications with multiple systems, one unit per system is recommended.
• For larger applications, multiple units are recommended.
BEFORE INS ALLA ION
READ THESE NSTRUCT ONS CAREFULLY AND COMPLETELY BEFORE PROCEED NG
W TH THE NSTALLAT ON.
Disconnect and lock out power supply before performing any installation work.
Working on or near energized equipment could result in death or serious injury.
This device MUST be installed by a qualied agency in accordance with the manufacturer's installation
instructions. The denition of a qualied agency is any individual, rm, corporation or company that
either in person or through a representative is engaged in, and is responsible for, the installation and
operation of HVAC appliances, who is experienced in such work, familiar with all the precautions
required, and has complied with all the requirements of the authority having jurisdiction.
SIZING & SELEC ING UNI S
SQUARE
FOO AGE
CX-AIRE
(for ducts at least 16” wide)
VOL S / HZ WA S AMPS
Up to 2000 1 120 / 60 30 .5
4000 2 120 / 60 30 .5
NOTICE
WARNING
NOTICE

4
INS ALLA ION
S EP 1. CHOOSE A LOCA ION FOR HE CXAIRE
To prevent water damage or electric shock, do NOT mount unit under a humidifier.
A. CX-Aire may be installed in supply air plenum, return air plenum or above AC coil (Figure 1).
B. CX-Aire may be installed directly onto a sheet metal air duct using the mounting template,
or onto a fiberglass ductboard using the ductboard adapter plate.
C. Choose a suitable location for the unit downstream from the AC coil in the supply air plenum
or in the return air plenum; preferably downstream from the air filter.
D. For optimum "cleaning" effect on the AC coil, mount the unit in the supply plenum as close as
possible to the AC coil (Figure 1).
E. Mount the UV lamp unit not less than 181 ft in the line of sight to any openings in the air duct
and not less than 44 ft in the line of sight to any non-metallic parts.
Use care to avoid damage to the AC coil, wiring or other components while
installing the CX-Aire.
CAUTION
WARNING
Optional
Location
Minimum
Length or Width
Minimum
Length or Width
16” 16”
Return Air Plenum
Supply Air
Plenum
Best Location
AC Coil
Note: Seal joints and seams
of the plenum near the
mounting location to reduce
any direct viewing of light.
Figure 1
Never expose eyes or skin to UVC light from any source. Looking directly at the UVC
light may cause permanent eye damage or blindness. Never operate the CX-Aire Air Purifying System
out of the plenum. Avoid touching the glass portion of the lamp with your hands.
WARNING
WARNING

5
Optional UVC light shield mounting:
Head of mounting screw
cannot be located in shaded area.
Drill mounting holes
using 1/8”drill bit
(4 holes)
Drill viewport hole
using 1/4”to 1/2”drill bit
Center of
mounting base
Drill 1-1/2”diameter
Mounting template
Mount unit either
horizontal or vertical
Duct
Figure 2
Figure 3
Never expose eyes or skin to UVC light from any source. Looking directly at the UVC
light may cause permanent eye damage or blindness. Never operate the CX-Aire Air Purifying System
out of the plenum. Avoid touching the glass portion of the lamp with your hands.
WARNING
INS ALLA ION
S EP 2. MOUN ING EMPLA E OR DUC BOARD ADAP ER PLA E A or B
NO E: f installing on sheet metal air duct, follow step A using the the supplied mounting template.
f mounting onto a fiberglass ductboard, follow step B (page 6) using the ductboard adapter plate.
nvestigate and determine the location of the AC coil prior to drilling holes in duct
for mounting unit.
A. Pre-drilling with mounting template
a. Apply supplied mounting template to air duct in either a vertical or horizontal position
(Figure 2).
b. Drill 1⁄ 8" diameter mounting holes at positions indicated on template (Figure 3).
c. Cut out the large opening (1-1⁄ 2" hole) on the template (Figure 3).
d. Using a 1⁄ 4" to 1⁄ 2" drill bit, drill a viewport hole as indicated on the template (Figure 3).
NO E: DO NOT remove template from duct.
CAUTION

6
Never expose eyes or skin to UVC light from any source. Looking directly at the UVC
light may cause permanent eye damage or blindness. Never operate the CX-Aire Air Purifying System
out of the plenum. Avoid touching the glass portion of the lamp with your hands.
WARNING
INS ALLA ION
S EP 2. MOUN ING EMPLA E OR DUC BOARD ADAP ER PLA E A or B
B. Installing ductboard adapter plate
NO E: Viewport must be located adjacent to either crease formed by
this step. Refer to the diagram and instructions below to attach the
adapter plate to ductboard. Pay careful attention to reference locations
noted on the diagram (Figure 4).
a. Mount the supplied metal mounting plate onto the duct with duct tape in either a vertical
or horizontal position (Figure 5).
b. Bend tabs outward (Figure 6).
c. Using a knife or blade, cut out a rectangle opening in the duct using the mounting plate
as a template (Figure 7).
d. Remove the cut piece of duct (Figure 8).
e. Bend both tabs down and through the duct at the first bend point (Figures 9 & 10).
f. Bend both tabs at the second bend point up or down to pinch the duct material and grip
the duct material (Figures 11 & 12).
g. Using a screwdriver or pointed object, locate mounting holes by poking holes through
the duct tape (Figure 13).
First Bend Point
Second Bend Point
Viewport Location
(Not shown on plate)
Do not locate mounting
screws for light shield
in this region.
(Not shown on plate)
Ductboard Adapter Plate
Figure 4

Figure 12
7
Never expose eyes or skin to UVC light from any source. Looking directly at the UVC
light may cause permanent eye damage or blindness. Never operate the CX-Aire Air Purifying System
out of the plenum. Avoid touching the glass portion of the lamp with your hands.
WARNING
INS ALLA ION
Figure 9
Figure 10
Figure 11
Figure 13
Figure 5
Figure 6
Figure 7
Figure 8

8
Never expose eyes or skin to UVC light from any source. Looking directly at the UVC
light may cause permanent eye damage or blindness. Never operate the CX-Aire Air Purifying System
out of the plenum. Avoid touching the glass portion of the lamp with your hands.
WARNING
INS ALLA ION
S EP 3. OP IONAL UVC LIGH SHIELD
Designed to guard or shield certain plastics, wiring or air lters that
may be affected by UVC light.
A. The light shield may be mounted at virtually any angle. However, when deciding on a suitable
location, the mounting screw head cannot be in the shaded area of template (Figure 14).
B. Press shield onto duct wall. Then secure with (2) sheet metal mounting screws (Figure 15).
S EP 4. MOUN ING BASE
A. Attach the CX-Aire mounting base onto the plenum with (4) sheet metal mounting screws.
(Refer to template in Figure 3.) This must be tight in order to activate the built in safety switch.
NO E: DO NOT remove template from duct.
Duct wall
Duct wall
Opening for unit
Press UVC light shield onto duct wall and
secure with (2) sheet metal mounting screws
Insert UVC light shield
through lamp mounting hole
Head of mounting screw cannot be located in shaded area.
Figure 14
Figure 15
UVC Light Shield

9
Never expose eyes or skin to UVC light from any source. Looking directly at the UVC
light may cause permanent eye damage or blindness. Never operate the CX-Aire Air Purifying System
out of the plenum. Avoid touching the glass portion of the lamp with your hands.
WARNING
INS ALLA ION
S EP 5. UVC LAMP & BALLAS
A. Do not touch the glass section of the lamp
with bare hands. Oils on hands tend to
reduce lamp intensity. nstall lamp into
ballast (Figure 16).
B. Wipe off the lamp glass with the supplied
alcohol wipe. Then insert the lamp through
the center hole of the mounting base
(Figure 17). The power cord must be 90
degrees to the viewport hole on the
mounting base.
C. With the ballast pressed against the
mounting base, rotate the ballast clock-
wise 90 degrees.
D. Do not wire the unit into the appliance fan
circuit. Premature failure of the ballast and
lamp will occur. The warranty will be
voided. Plug the power supply cord into a
standard 120VAC electric outlet. Check
lamp operation by looking through the
viewport hole.
NO E: The viewport hole is made of glass
and will not allow any UVC rays to pass
through. A blue glow should be seen in the
duct.
E. f blue glow is not seen, make sure the base
is properly installed onto duct. There is a
proving switch located on the base that
needs to be seated properly onto the duct.
When installing the base, make sure the
plated washer on the switch is raised
approximately 3 ⁄ 16". The proving switch
must be fully engaged (Figure 18).
S EP 6. SEALING
A. With aluminum or foil tape, seal all joints
and seams of the plenum near the mounting
location to reduce any direct viewing of
light.
NO E: DO NOT remove template from duct.
Proving switch WILL NOT
operate in this position
Proving switch
in operating
position
Base
3/16”
Proving
switch
Remove
ballast assembly
Clean lamp glass with alcohol wipe
then insert
ballast assembly
Ballast assembly
Lamp sockets
Insert lamp
Remove lamp
Long pin must
be inserted in
position shown
Figure 18
Figure 17
Figure 16

10
Never expose eyes or skin to UVC light from any source. Looking directly at the UVC
light may cause permanent eye damage or blindness. Never operate the CX-Aire Air Purifying System
out of the plenum. Avoid touching the glass portion of the lamp with your hands.
WARNING
ROUBLESHOO ING
Only qualified personnel should work on electrical equipment. Working on or
near energized equipment could result in death or serious injury.
1. Check to make sure 120VAC power is available at the electrical outlet.
2. Do not wire the unit into the appliance fan circuit. This will cause premature ballast or lamp
failure and void the warranty. For proper operation, the unit requires 120VAC at all times.
3. Pull back metal washer on mounting base. f lamp comes on, the base needs tightening to
ensure that the safety switch is fully engaged.
4. f lamp does not light up, rotate ballast slightly clockwise or counterclockwise.
5. f lamp does not light up after rotating ballast, replace lamp.
6. f unit still does not light up after replacing lamp, replace unit.
RECOMMENDED MAIN ENANCE
Unplug unit from the electrical outlet before commencing inspection and cleaning.
NO E: Wear oil-free cotton gloves prior to maintenance in case of accidental breakage of glass.
1. The lamp should be inspected and cleaned at least every 6 months. Frequency depends upon
the environment such as the type of air filter, duration of use and replacement cycle.
2. To maintain maximum output intensity, replace the CX-Aire-RL lamp every 2 years. The lamp
should operate continuously for maximum lamp life and light effectiveness.
REPLACEMEN PAR S
Replacement parts are available from the following sources:
• Your local HVAC wholesaler or contractor
• Continental Fan Manufacturing nc., Buffalo, NY (1-800-779-4021)
• www.continentalfan.com
WARNING
WARNING
MODEL DESCRIP ION UPC CODE
CX-Aire-RL 16” UVC Lamp (1 Only) 6 27249 12224 1
CX-Aire-TB Ballast 6 27249 12225 8

11
LAMP REPLACEMEN PROCEDURE
Unplug unit from the electrical outlet before starting replacement procedure.
NO E: Wear oil-free cotton gloves prior to procedure in case of accidental breakage of glass.
1. Rotate the CX-Aire ballast assembly counterclockwise
until it stops (Figure 19).
2. Remove the ballast assembly and lamp from the
mounting base (Figure 20).
3. Remove the lamp from the lamp socket (Figure 21).
4. nstall the replacement lamp into lamp socket. Do not
handle the lamp with bare hands. Oils on the hands
tend to reduce lamp intensity.
5. Wipe off the glass with the supplied alcohol wipe.
6. Position the ballast assembly power cord 90 degrees
to the viewport hole on the mounting base and press
the ballast against the mounting base. Rotate the
ballast assembly clockwise until it stops and is locked
in place (Figure 22).
7. After assembly is firmly in place, plug the power
supply cord back into the standard electrical outlet.
Check lamp operation by looking through the viewport
hole. A blue glow should be seen in the duct.
8. After replacing the lamp, make sure to install the
Lamp Replacement Label. Print the date on the label
and apply to the side of ballast assembly.
NO E: f blue light leaks through any portion of
plenum and/or around mounting plate, unplug
power supply cord immediately and seal affected
areas and/or rotate ballast and repeat step #6 above.
9. UVC lamps contain a small amount of mercury, like a
typical fluorescent lamp. Check with your local waste
management authority for local disposal or recycling
requirements.
Never touch broken lamp or internal
contents of lamp. The lamp contains mercury.
NO E: n case of accidental exposure to internal contents
of lamp, wash hands and any other affected skin area
with a mild detergent. Remove affected clothing imme-
diately. f skin surface is pierced, seek medical attention
immediately.
WARNING
WARNING
Rotate
clockwise
Viewport
hole
Ballast assembly
Lamp sockets
Insert lamp
Remove lamp
Long pin must
be inserted in
position shown
Proving
switch
Remove
ballast assembly
Clean lamp glass with alcohol wipe
then insert
ballast assembly
Rotate
counter
clockwise
Viewport
hole
Figure 22
Figure 21
Figure 20
Figure 19
Never expose eyes or skin to UVC light from any source. Looking directly at the UVC
light may cause permanent eye damage or blindness. Never operate the CX-Aire Air Purifying System
out of the plenum. Avoid touching the glass portion of the lamp with your hands.
WARNING

CX-AIRE-I&M-2012
Bualo, New York | Mississauga, Ontario | Dayton, Ohio
www.continentalfan.com | 1-800-779-4021
The health aspects associated with the use of these products and their ability to aid in disinfecting of environmental air have not been investigated by UL.
CONNEC ION CER IFICA E
Company name
nstalled by
nstallation date
Signature
LIMI ED WARRAN Y
Subject to the provisions of the clauses herein, Vendor agrees to correct any defect or defects in
workmanship or materials which may develop under proper and normal use, by repair or by
replacement of the defective part or equipment, at Vendor’s option, FOB factory. Unless otherwise
stated, the warranty period for the CX-Aire shall be ten (10) years from date of shipment. The
exceptions to this warrant period are:
UVC Lamp - ninety (90) days
This warranty is provided to the original Buyer, and may not be transferred, sold or bartered.
Motors, drives, electrical controls and other components manufactured for Vendor by others
are not covered by these warranty provisions. All warranty claims must be processed through
point of purchase. All warranty repair work must be performed either at the factory or by a factory
certified service center. For additional information regarding warranties, see Vendor document:
Limited Warranty-1105.
CLEAN-UP OF BROKEN LAMPS
See warnings on page two of this manual.
UVC lamps contain a small amount of mercury, like a typical fluorescent lamp. DO NOT touch any
of the mercury with your bare hands.
1. While wearing disposable, non-absorbent protective gloves, carefully pick up the large pieces
of glass with your hands.
2. Then, vacuum the entire area with a standard household vacuum cleaner ensuring the removal
of all lamp material.
3. Dispose of the pieces of glass, the vacuum cleaner bag, and the disposable gloves in a sealed
garbage bag.
4. Check with your local waste management authority for local disposal or recycling requirements.
5. Wash hands and remove and wash clothes for added safety measures.
NOTICE
Table of contents
Other CFM Air Cleaner manuals
Popular Air Cleaner manuals by other brands

Aerus
Aerus Air Scrubber owner's manual

Surgically Clean Air
Surgically Clean Air JADE Operation manual

Whirlpool
Whirlpool 1188694 Use and care guide

Amway
Amway Ambreeze User's manual & warranty information

Flanders
Flanders Bolt Lock HEPA Filter Housing Surelock B Specification sheet

Milestone
Milestone HistosMATE Operator's manual