Chal-tec electronic.star 10006681 User manual
Dampfbügelstation
10006681

Sehr geehrter Kunde,
zunächst möchten wir Ihnen zum Erwerb Ihres Gerätes gratulieren.
Bitte lesen Sie die folgenden Anschluss- und Anwendungshinweise sorgfältig durch und befolgen Sie diese
um möglichen technischen Schäden vorzubeugen.
Wichtige Sicherheitshinweise
1. Verwenden Sie das Gerät nur für den dafür vorgesehenen Zweck.
2. Das Gerät ist nur für den Hausgebrauch geeignet.
3. Stellen Sie das Gerät nicht in Wasser, um einen elektrischen Schlag zu verhindern.
4. Verbinden Sie das Gerät nur mit einer Stromquelle, die die passende Spannung liefert. Um eine
Spannungsüberladung zu verhindern, verwenden Sie zeitgleich kein anderes Hochleistungsgerät am
selben Stromkreis.
5. Schalten Sie das Gerät aus, bevor Sie es von der Stromquelle trennen oder an die Stromquelle
anschließen. Ziehen Sie niemals am Kabel sondern nur am Stecker.
6. Verhindern Sie, dass das Kabel oder der Versorgungsschlauch auf heiße Oberflächen kommt.
7. Trennen Sie das Gerät von der Stromquelle, wenn Sie es befüllen, entleeren oder das Gerät nicht in
Gebrauch ist.
8. Verwenden Sie das Gerät nicht, wenn das Stromkabel beschädigt ist oder das Gerät heruntergefallen
ist. Reparieren Sie das Gerät niemals selbst, lassen Sie es nur von einem Elektrofachmann
reparieren.
9. Stellen die Das Bügeleisen außerhalb der Reichweite von Kindern auf. Lassen Sie das Bügeleisen
niemals unbeaufsichtigt.
10. Stellen Sie die Dampfstation während des Gebrauchs auf eine stabile, ebene Oberfläche oder
Bügelbrett.
11. Stellen Sie das Bügeleisen immer auf die Station und niemals auf das Stromkabel oder den
Versorgungsschlauch.
12. Verbrennung können durch die heißen Metallteile oder den Dampf hervorgerufen werden.
Verwenden Sie das Bügeleisen mit absoluter Vorsicht.
13. Richten Sie das Bügeleisen niemals auf Personen, da Verbrennungen durch den heißen Dampf
hervorgerufen werden können.
14. Verdrehen Sie niemals den Versorgungsschlauch während des Gebrauchs.
15. Das Gerät verursacht ohne Wasser eine Lautstärke von <70dBA
16. Kinder ab 8 Jahren dürfen das Gerät verwenden, Körperlich und geistig eingeschränkte Personen
dürfen das Gerät nur unter Aufsicht verwenden.

Geräteübersicht
1. Wassertank
2. Griff
3. Bügelsohle
4. Abdeckung
5. Status-Lampe Heizelement
6. Dampfschalter
7. Stromkabel/Versorgungsschlauch
8. Stromkabel
9. Griffschalter
10. Filter
11. Wassertankverschluss
12. Temperaturwahlregler
Bügelhinweise
Temperatureinstellung
● Synthetik
●● Wolle/ Seide
●●● Baumwolle
Faser
Synthetik, Seide, Nylon
Wolle, Seide, Polyester
Baumwolle, Leinen
Bügelanleitung
Bügeln ohne Dampf
Dampfbügeln auf der
anderen Seite des Stoffs
Dampfbügeln
Dampfeinstellung
-----------------------------
Bügeltemperatur-Einstellungen
1. Folgen Sie den Bügelhinweisen auf dem Kleidungsstück. Fall es keine Bügelhinweise gibt und Sie
wissen um welche Faser es sich handelt, folgen Sie den oben aufgeführten Bügelhinweisen.
2. Die Bügelhinweise sind nur bei reinen Fasern zu gebrauchen und nicht bei Stoffen, die dekorativ
verändert wurden. Bei dieser Art von Stoffen ist es besser eine niedrige Bügeltemperatur zu
wählen.
3. Sortieren Sie Ihre Kleidungsstücke entsprechend der Bügeltemperatur.
4. Das Bügeleisen heizt sich schneller auf als es abkühlt. Deshalb ist es sinnvoll erst mit der
niedrigsten Temperatur zu beginnen.
5. Falls der Stoff aus unterschiedlichen Fasern besteht, verwenden Sie die Bügeltemperatur für die
empfindlichste der Fasern.

6. Falls Sie die Faser nicht kennen, bügeln Sie erst auf einer verdeckten Stelle des Stoffes um die
richtige Bügeltemperatur herauszufinden.
7. Reine Woll-Stücke (100% Wolle) sollten auf der maximalsten Bügeltemperatur dampfgebügelt
werden und es sollte ein feuchtigkeitsaufsaugendes Stoffstück dazwischen verwendet werden.
8. Um glänzende Stellen beim Bügeln von Wolle zu verhindern, drehen Sie die das Kleidungsstück
beim Bügeln auf links.
9. Wenn Sie auf der höchsten Temperaturstufe gebügelt haben, bügeln Sie bitte nicht direkt im
Anschluss Kleidungsstücke, die eine sehr niedrige Bügeltemperatur verlangen.
Wichtiger Hinweis:
Füllen Sie den Wassertank niemals mit Essig oder chemisch angereichertem Wasser.
Bedienung der Bügelstation
Aufbau:
1. Überprüfen Sie ob Ihre Versorgungsspannung mit der auf der auf dem Typenschild
angegebenen Spannung übereinstimmt.
2. Drücken Sie die den Griffschalter um den Griff herunterzudrücken.
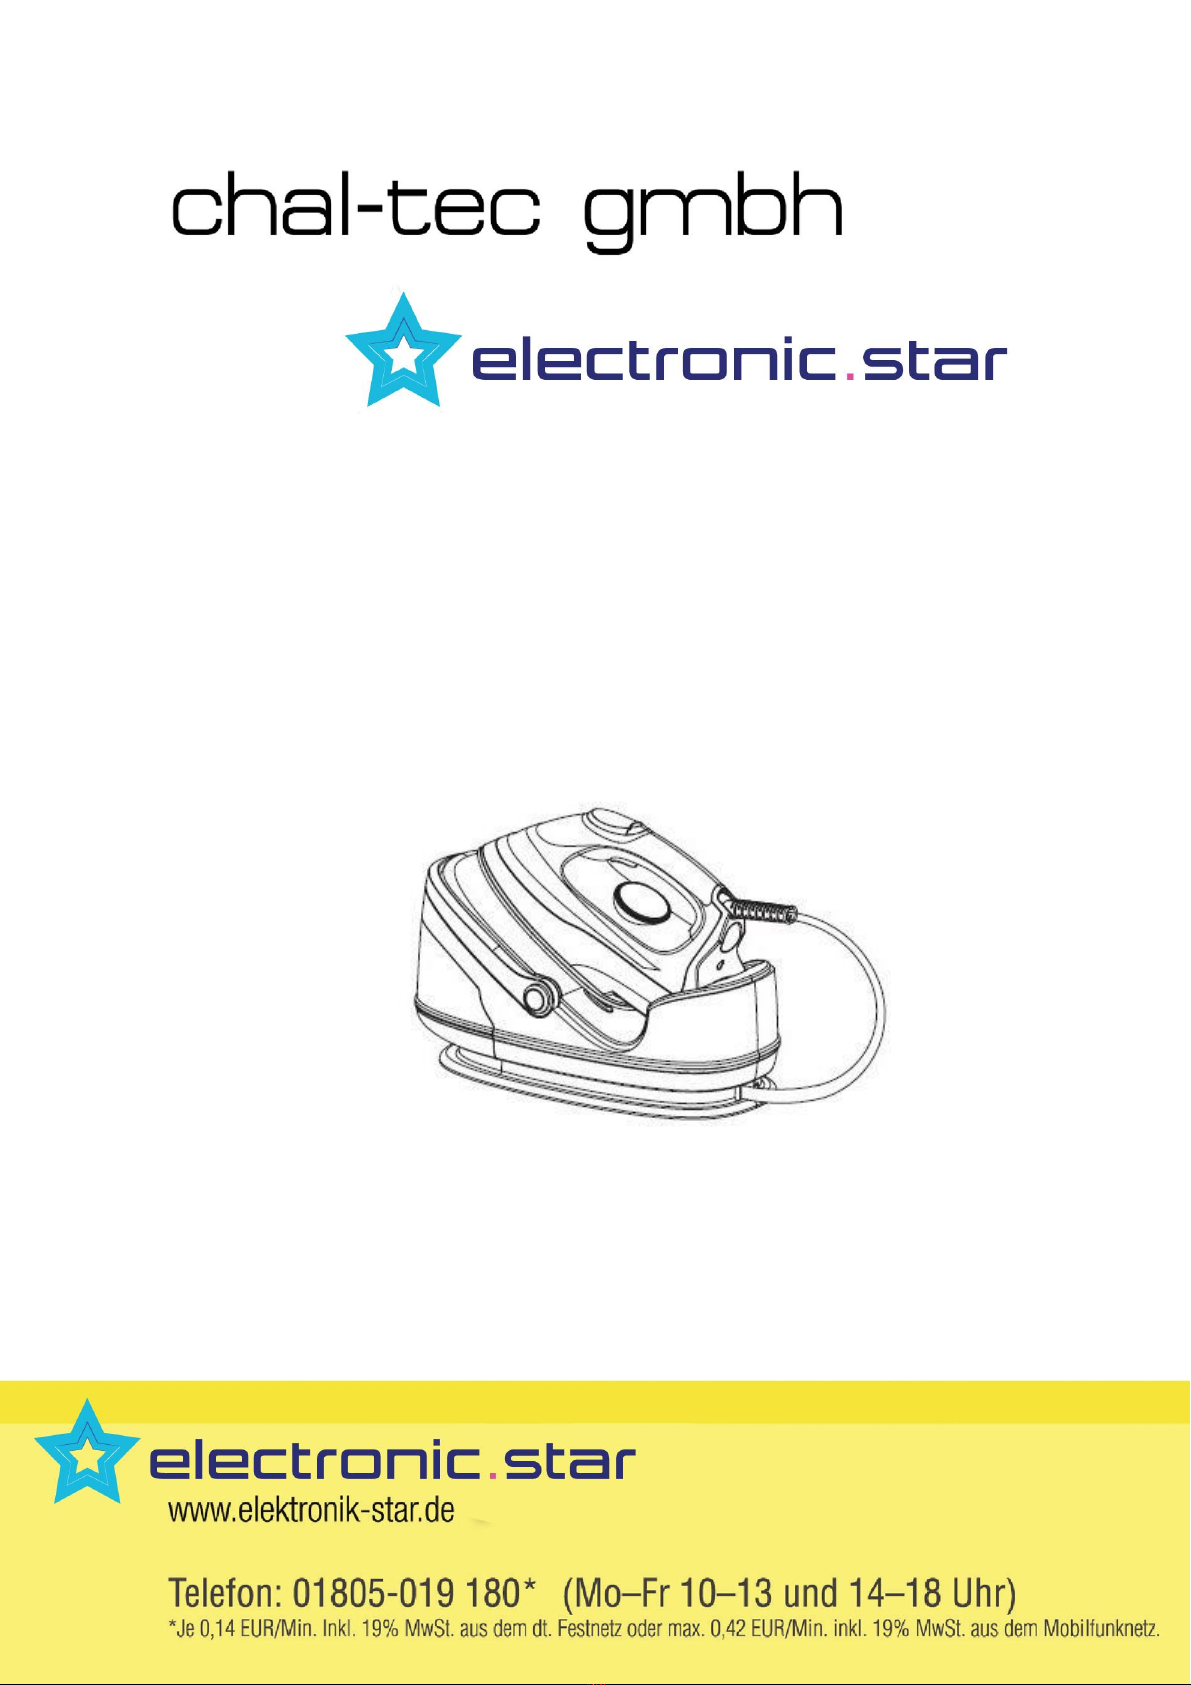
3. Entfernen Sie alle Folien und Aufkleber von der Bügelsohle. (Abb. 1)
4. Wickeln Sie das Stromkabel vollständig ab und straffen Sie dieses uns den
Versorgungsschlauch.
5. Stellen Sie die Station auf eine stabile und ebene Oberfläche.
6. Stellen Sie das Bügeleisen auf die Bügelstation.
Wassertank befüllen:
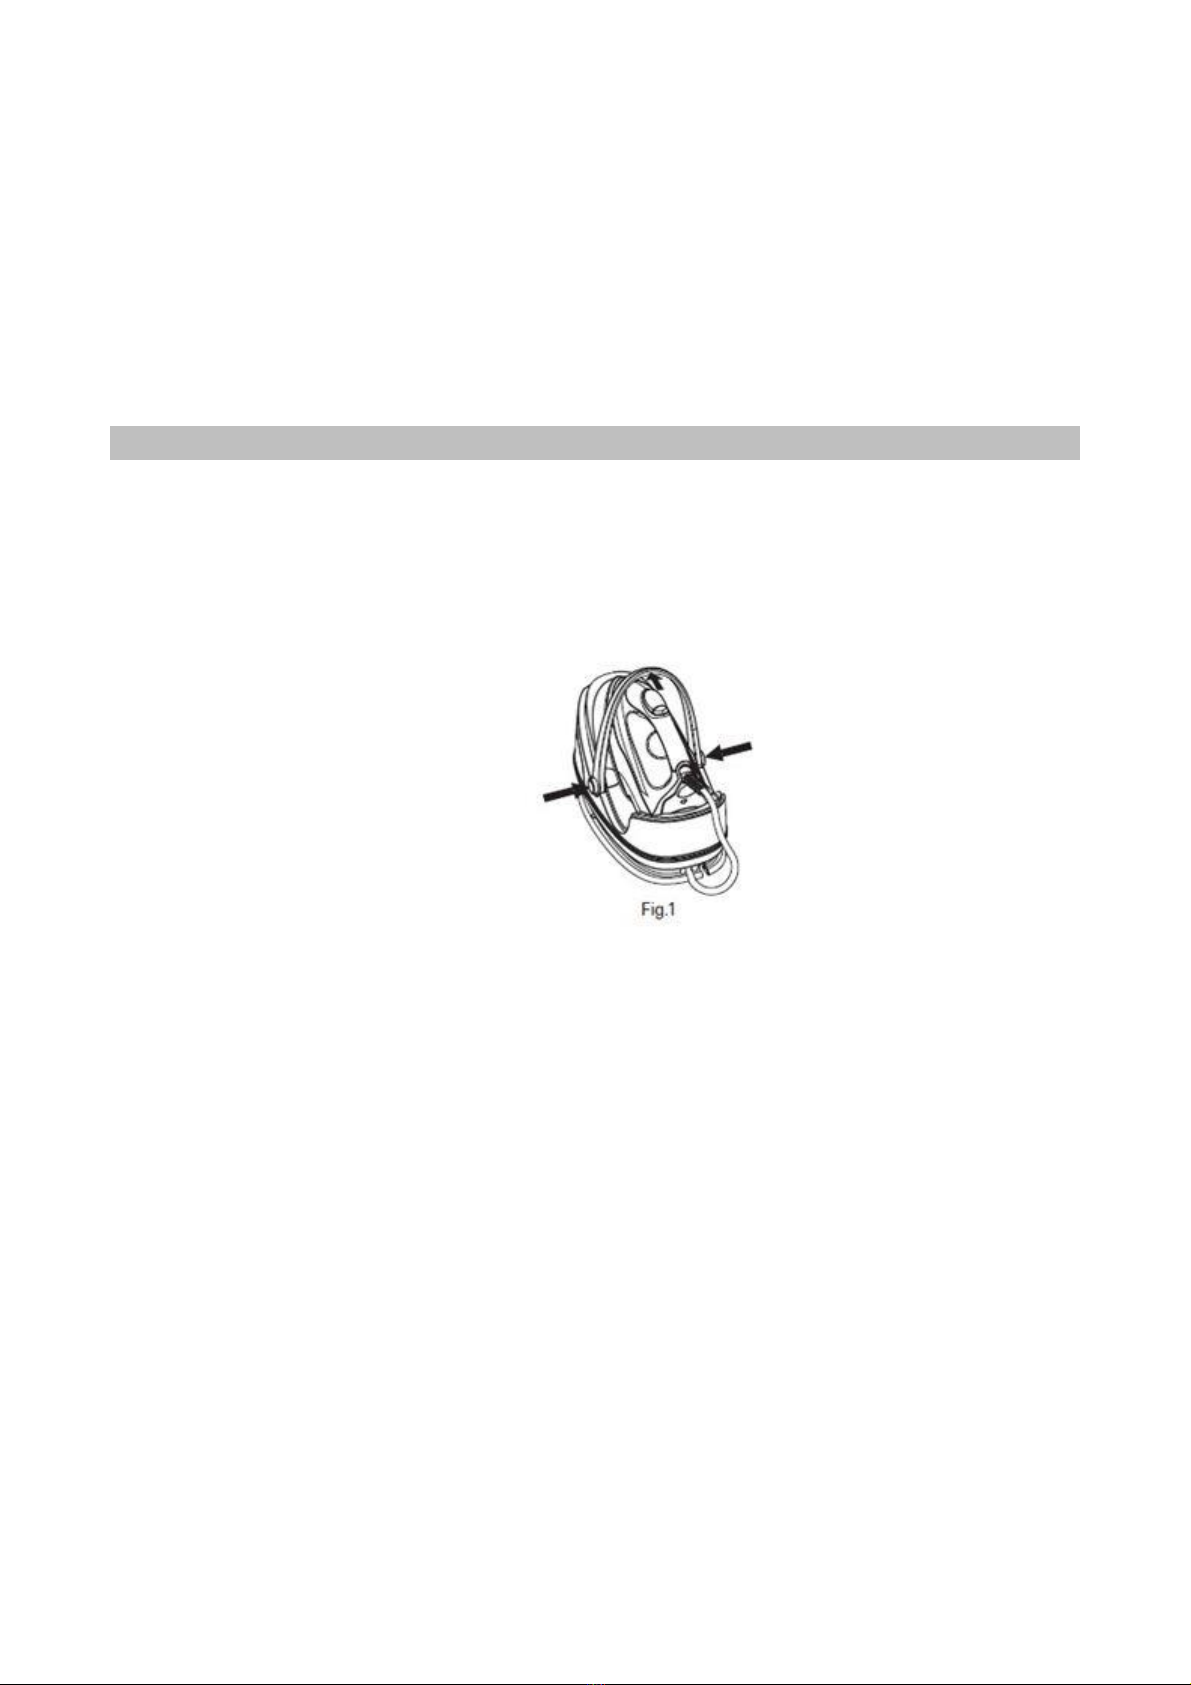
1. Drücken Sie den Wassertankverschluss nach oben und schieben Sie den Wassertank von der
Station. (Abb. 2)
2. Ziehen Sie den Filter nach oben aus der Wasserbefüllöffnung und befüllen Sie den Tank mit
Wasser (das Entfernen des Filters ist hierfür nicht notwendig).
3. Befüllen Sie den Wassertank bis unterhalb oder bis zur Maximalgrenze.
4. Stecken Sie den Filter wieder in die Wasserbefüllöffnung.
5. Schieben Sie den Wassertank wieder auf die Station bis dieser „klickt“.
6. Bitte entleeren Sie den Wassertank nach dem Gebrauch.

Notiz:
Wenn das Wasserlevel zu niedrig ist, erzeugt die Pumpe einen Ton, der anzeigt, dass Wasser nachgefüllt
werden muss. Bitte befüllen Sie den Wassertank umgehend.
Dampfbügeln:
Nach dem Anschließen und Anschalten des Gerätes regeln Sie den Temperaturregler auf die
Dampfbügelposition. Die Statuslampe leuchtet, bis das Gerät aufgeheizt ist. Die Statuslampe leuchtet ab und
zu um Nachzuheizen.
Drücken Sie den Dampfschalter um das Dampfbügeln zu beginnen. Wenn Sie die Bügeltemperatur regeln,
regelt sich automatisch der Dampf.
1. Befüllen Sie den Wassertank.
2. Regeln Sie den Temperaturregler auf Dampfbügeln.
3. Wenn Sie das erste Mal Dampfbügeln, reinigen Sie das Bügeleisen. Lassen Sie hierfür 30
Sekunden lang Dampf ausströmen und stoppen dann für 30 Sekunden. Wiederholen Sie diesen
Vorgang.
4. Drücken Sie den Dampfschalter um das Dampfbügeln zu beginnen. Wenn Sie die
Bügeltemperatur regeln, regelt sich automatisch der Dampf.
5. Nach dem Bügeln stellen Sie das Bügeleisen auf die Station und regeln Sie die Temperatur auf
„Min“.
6. Entleeren Sie den Wassertank.
Notiz:
a) Es ist normal, wenn beim ersten Gebrauch eine leichte Vibration zu hören ist. Diese kommt von der
Wasserpumpe. Diese hört auf, wenn die Luft aus dem Filter gepumpt wurde.
b) Auf der Synthetik Position können Sie nur ohne Dampf bügeln.

Bügeln ohne Dampf:
1. Schließen Sie die Bügelstation an eine Stromquelle an.
2. Stellen Sie die Temperatur gemäß dem Bügelhinweis Ihres Kleidungsstückes ein. Die Statuslampe
leuchtet, bis die Temperatur erreicht ist.
3. Nach dem Bügeln stellen Sie das Bügeleisen auf die Station und regeln Sie die Temperatur auf „Min“.
Notiz:
Beim Einstellen einer niedrigeren von einer höheren Temperatur ist es nicht möglich direkt mit dem Bügeln
zu beginnen, da sich das Bügeleisen erst abkühlen muss.
Vertikales Dampfbügeln:
Folgen Sie den Anweisungen des Dampfbügelns und halten Sie das Bügeleisen in einer vertikalen Position.
Halten Sie einen Abstand von 5-15cm ein.
Griff
Der Griff ist zum Transportieren der Station.
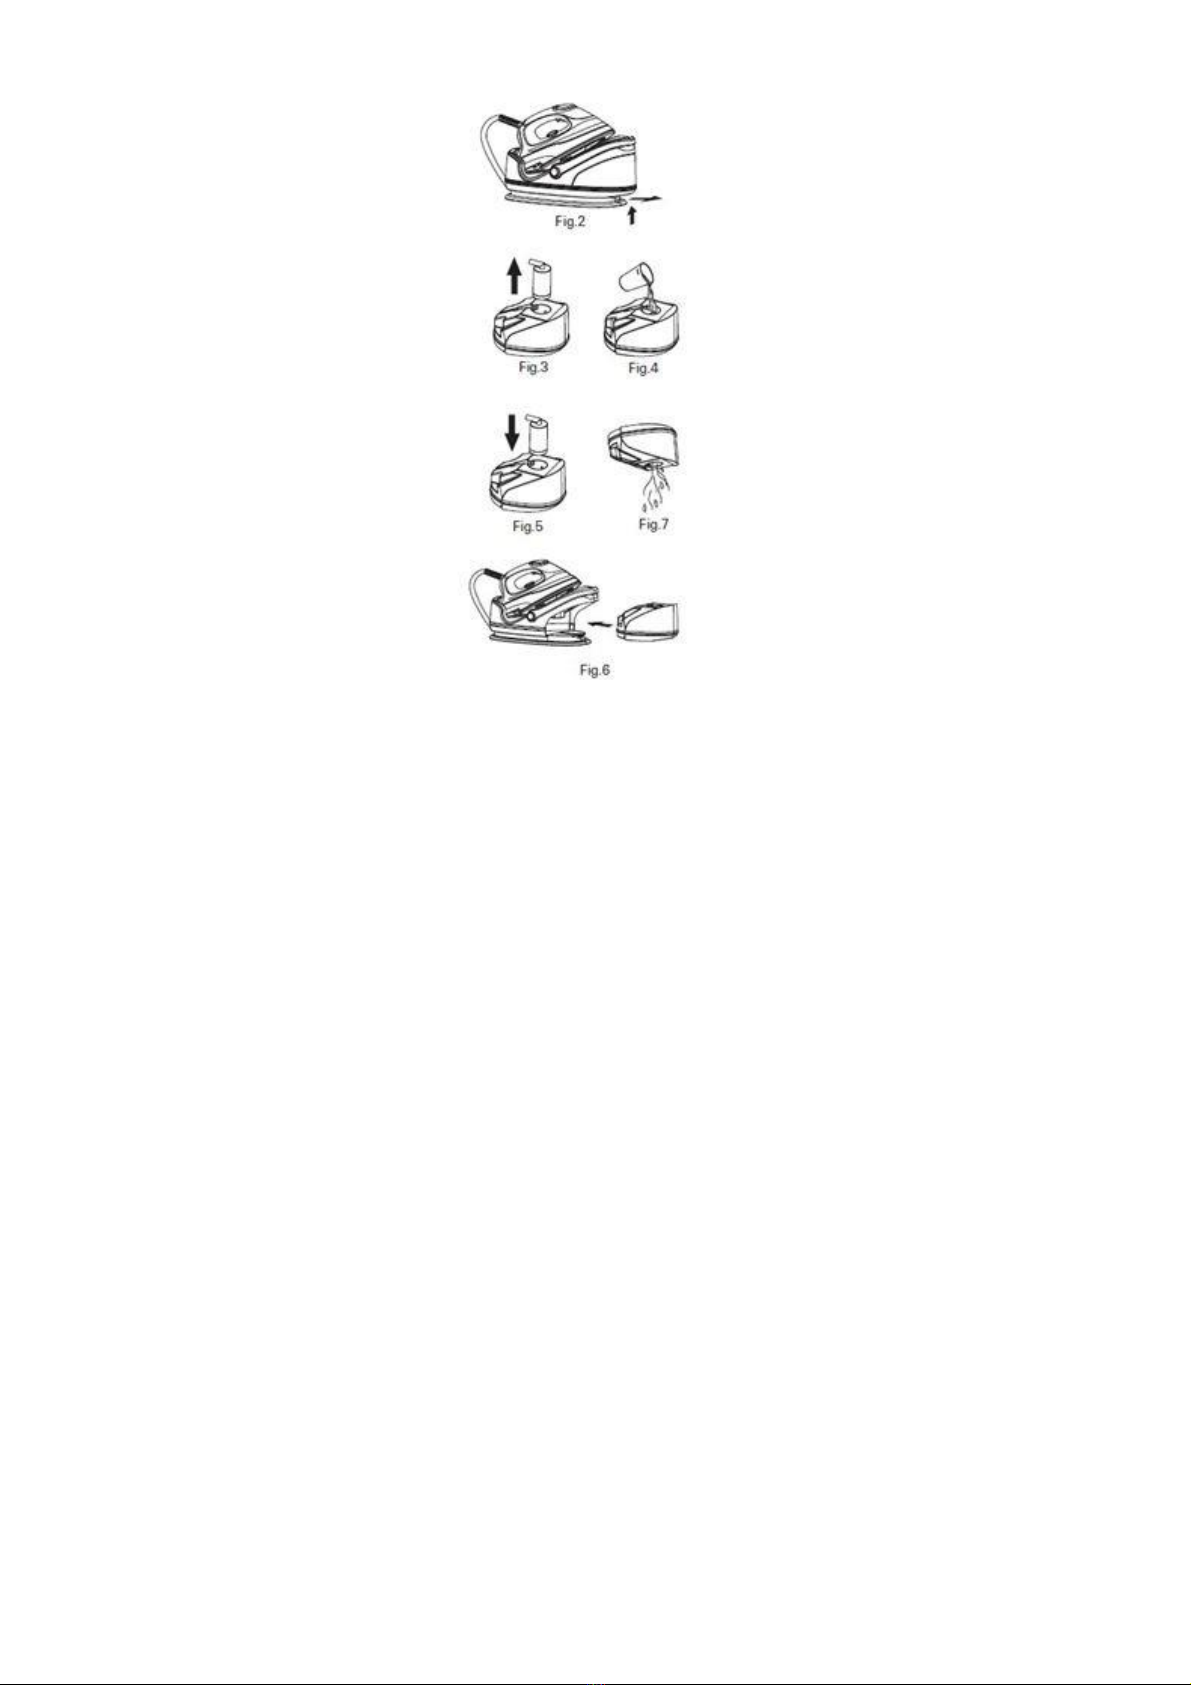
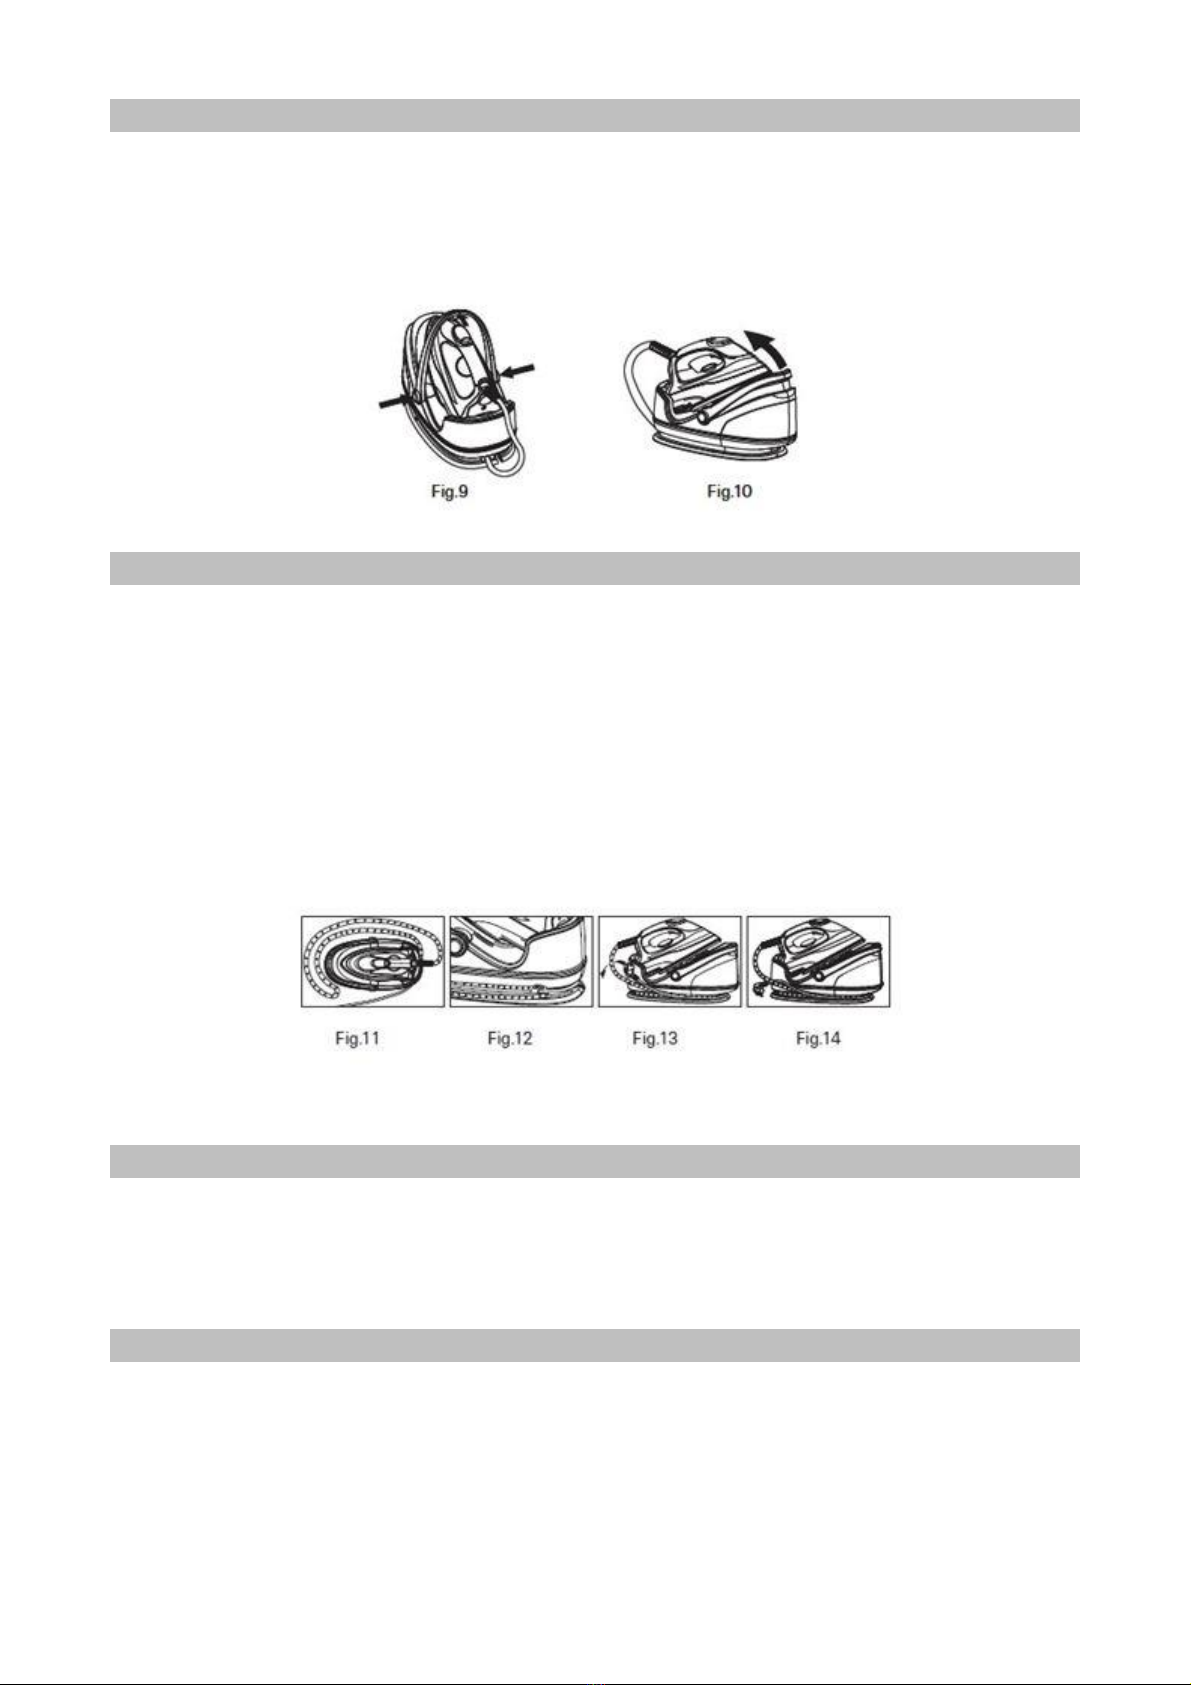
Bitte drücken Sie den Griff vor Gebrauch der Dampfbügelstation herunter. Drücken Sie dafür gleichzeitig die
beiden Griffschalter. Nach dem Abkühlen des Gerätes können Sie den Griff wieder hochklappen.

Kabelaufbewahrung (optional)
1. Ziehen Sie den Stecker nach dem Gebrauch aus der Steckdose, entleeren Sie den Wassertank.
2. Stellen Sie das Bügeleisen auf die Station. Falten Sie den Versorgungsschlauch und wickeln Sie
diesen im Uhrzeigersinn um das Untergestell. Binden Sie das Stromkabel und den
Versorgungsschlauch zusammen und wickeln Sie dieses um das Untergestell.
Filterwechsel
Entnehmen Sie den Wassertank von der Station und ziehen Sie den Filter aus der Wasserbefüllöffnung.
Ersetzen Sie den alten Filter durch einen neuen Filter.
Anti-Kalk-System
1. Der Filter verringert das Ansammeln von Kalkrückständen. Dies verlängert die Lebensdauer Ihres
Bügeleisens.
2. Der Filter sollte alle 2-3 Monate getauscht werden. Die Haltbarkeit hängt von dem verwendeten
Wasser ab. Es wird empfohlen Ihr Wasser mit 50% destilliertem Wasser zu mischen.
Entleerung und Aufbewahrung
1. Trennen Sie das Gerät vom Strom und lassen Sie es für 60 Minuten abkühlen.
2. Entleeren Sie den Wassertank.
3. Wickeln Sie das Stromkabel auf.
4. Verstauen Sie die Dampfbügelstation und klappen Sie den Griff herunter.
Reinigung und Pflege
1. Trennen Sie das Gerät vom Strom und lassen Sie es abkühlen.
2. Reinigen Sie das die Bügelsohle mit einem feuchten Tuch.
3. Entfernen Sie alle Rückstände von der Bügelsohle mit einem feuchten Tuch.
4. Reinigen Sie das Gerät niemals unter fließendem Wasser.

Fehlerbehebung
Fehler
Mögliche Ursache
Lösung
Bügeleisen wird nicht heiß
Stromverbindung ist nicht richtig
Schließen Sie das Gerät erneut an
den Strom an
Temperatur ist auf „Min“
Regeln Sie die Temperatur auf die
gewünschte Position
Unbekannte Fehlfunktion
Suchen Sie einen
Elektrofachmann auf
Kein Dampf beim Betätigen der
Dampftaste
Temperatur ist auf „Synthetik“
eingestellt
Regeln Sie die Temperatur auf die
gewünschte Position
Kein Wasser im Wassertank
Befüllen Sie den Wassertank
Filter sitzt nicht richtig
Setzen Sie den Filter richtig ein
Wassertank sitzt nicht richtig
Setzen Sie den Wassertank richtig
ein, bis es klickt
Wasser tritt aus der Bügelsohle
aus
Das Bügeleisen wurde nicht
aufgeheizt
Lassen Sie das Bügeleisen
aufheizen, bis die Statuslampe
erlischt
Unbekannte Fehlfunktion
Suchen Sie einen
Elektrofachmann auf
SICHERHEITSHINWEISE UND GEWÄHRLEISTUNG
Diese Bedienungsanleitung dient dazu, Sie mit der Funktionsweise dieses Produktes vertraut zu
machen. Bewahren Sie diese Anleitung daher stets gut auf, damit Sie jederzeit darauf zugreifen
können.
Sie erhalten bei Kauf dieses Produktes zwei Jahre Gewährleistung auf Defekt bei sachgemäßem
Gebrauch.
Bitte verwenden Sie das Produkt nur in seiner bestimmungsgemäßen Art und Weise. Eine
anderweitige Verwendung führt eventuell zu Beschädigungen am Produkt oder in der Umgebung des
Produktes.
Ein Umbauen oder Verändern des Produktes beeinträchtigt die Produktsicherheit. Achtung
Verletzungsgefahr!
Öffnen Sie das Produkt niemals eigenmächtig und führen Sie Reparaturen nie selber aus!
Behandeln Sie das Produkt sorgfältig. Es kann durch Stöße, Schläge oder den Fall aus bereits
geringer Höhe beschädigt werden.
Halten Sie das Produkt fern von Feuchtigkeit und extremer Hitze.
ACHTUNG:
Es wird keine Haftung für Folgeschäden übernommen. Technische Änderungen und Irrtümer
vorbehalten!
Wichtige Hinweise zur Entsorgung
Dieses Elektrogerät gehört NICHT in den Hausmüll. Für die fachgerechte Entsorgung wenden Sie sich bitte
an die öffentlichen Sammelstellen in Ihrer Gemeinde.
Einzelheiten zum Standort einer solchen Sammelstelle und über ggf. vorhandene Mengenbeschränkungen
pro Tag/ Monat/ Jahr sowie über etwa anfallende Kosten bei Abholung entnehmen Sie bitte den
Informationen der jeweiligen Gemeinde.
Viel Spaß mit unserem Produkt.

Warnhinweise
Reparaturen am Gerät sollten nur von einer autorisierten Fachwerkstatt durchgeführt werden.
Öffnen Sie in keinem Fall das Gerät.
Falscher Zusammenbau führt möglicherweise zu Fehlfunktionen oder dem Totalausfall.
Das Gerät sollte vor jeglichen Feuchtigkeit und direkter Sonneneinstrahlung geschützt werden.
Das Gerät bitte nicht mit Reinigungsmitteln reinigen.
Verwenden Sie zur Reinigung nur ein trockenes (Mikrofaser) Tuch.
Schließen Sie das Gerät nur an die dafür vorgesehene Netzspannung.
Schließen Sie das Gerät in keinem Fall an andere Spannungen als vorgesehen an.
Die Gewährleistung verfällt bei Fremdeingriffen in das Gerät.

Important Safeguards
1. Make sure to read all the safety precautions below and look at the illustrations before you start using
the appliance.
2. Use the appliance for its intended use only described in this manual.
3. The appliance is intended for household use only.
4. In order to protect against the risk of electric short, do not immerse ironpower base into water or
any other liquids.
5. Connect the appliance only to an alternating current of the voltage specified on the rating plate and
only to an earthed socket. To avoid a circuit overload, do not operate another high wattage
appliance in the same circuit
6. Turn the appliance to OFF before plugging or unplugging from outlet. Never yank cord to disconnect
from outlet; instead, grasp plug and pull to disconnect.
7. Do not allow power cord or supply hose to touch hot surface.
8. Unplug the appliance from main socket before filling or empty or when not in use.
9. Do not operate the appliance with a damaged cord or if the appliance has been dropped or
damaged. To avoid a hazard such as the risk of electric shock, do not disassemble the appliance, it
must be taken to a qualified serviceman or manufacturer or its service agent for examination and
repair. Incorrect re-assembly can cause a risk of electric shock when the iron is used.
10. Place the iron out of reach of children; close supervision is necessary for any appliance being used
by or near children. Do not leave the iron unattended while connected to the supply mains.
11. During use, always place its stand on a stable, level and horizontal surface or ironing board.
12. Always place the iron on its stand, and do not allow the hot soleplate touch power cord or supply
hose
13. Burns can occur from touching hot metal parts, hot water or steam. Use caution when using the
appliance.
14. Never use the iron facing towards people because the steam can cause burns. Never twist the
supply hose during use. The appliance must be used and resed on a stable, level and horizontal
surface. When placing the iron on its stand, ensure that the surface on which the stand is placed is
stable. The iron is not to be used if it has been dropped, if there are visible signs of damage or if it
is leaking.
15. The iron must not be left unattended while it is connected to the supplymains.
16. The appliance must be rest or stocked in a on a stable, level and horizontal surface.
17. During use, if no water in the reservoir, it will produce noise<70dBA .
18. This appliance can be used by children aged from 8 years and above andpersons with reduced
physical,sensory or mental capabilities or lack ofexperience and knowledge if they have been given
supervision orinstruction concerning use of the appliance in a safe way and understandthe hazards
involved ,children shall not play with the appliance .cleaningand user maintenance shall not be
made by children withoutsupervision .
19. Keep the iron and its cord out of reach of children less then 8 years of agewhen it is energized or
cooling down.

Parts and Features
1. Water tank
2. Handle
3. Soleplate
4. Decorated cover
5. Heating indicator light
6. Steam Release button
7. Power cord/supply hose
8. Power cord
9. Handle Button
10. Filter
11. Water tank lock
12. Temperature control dial
Fabric Setting Chart
Temperature Setting
● Synthetic
●● Wool/Silk
●●● Cotton
Fabric
Synthetic, Silk, Nylon
Wool, Silk, polyester
Cotton, Linen
Ironing Instruction
Dry Ironing
Steam iron on the wrong
side oft he fabric
Steam Ironing
Steam Selection
-----------------------------
Ironing Temperature - Setting Guide
1. Follow up the ironing instructions on the garment label. If there is not any instruction label, but you
know what kind of the fabric is, please refer to the fabric setting chart described in this instruction
manual.
2. The fabric setting chart is only valid for plain fabrics and not for materials to which finishes, glosses
etc, have been applied. Textile to which some kind of finish has been applied (gloss, crinkle, relief
etc.) is best ironed at lower temperature.
3. First sort laundry according to ironing temperature setting guide: wool with wool, cotton with cotton,
etc.
4. The iron heats up more quickly than it cools down. Therefore, start ironing articles that need to be
ironed at the lowest temperature, such as those made of synthetic fibres.
5. If the fabric consists of various kinds of fibres, always select the temperature required by the most
delicate fibres, i.e. the lowest temperature. If, for example, an article consists of 60%polyester and
40%cotton, according to the fabric setting chart it should be ironed for polyester and without steam.
6. If you do not know what kind of fabric the article is made of, iron a piece of the material which is
not visible when you wear to find out the appropriate temperature for your articles.
7. Pure woolen fabrics (100% wool) should be ironed with the iron setting to steam ironing position. It
is advisable to set the temperature control dial to ¨Max〃position and use a dry pressing cloth.
8. When steam ironing woolen fabrics, shiny patches may occur. You may prevent this by turning the
article inside out and ironing the reverse side.
9. After using of steam ironing for cotton fabrics, do not iron articles required by lower temperature
(such as nylon etc.) immediately. It is advisable to adjust the temperature dial to the lower setting,
waiting till the power indicator light turn off, and then you can start ironing.
IMPORTANT HINTS: Do not fill water tank with vinegar, starch, chemically descaled water or descaling
agents.
How to use your Station
Prepare the appliance for use
1. Check if the rating indicated in the rating plate corresponding to the main voltage in your home.
2. Press handle button to lay handle down.
3. Remove the protective foil or sticker or card from the soleplate.(Fig. 1)
4. Fully unwind and straighten the power cord and the supply hose.
5. Place the appliance on a stable, level and horizontal surface such as ironing board
6. Place the iron onto the iron rest plate horizontally at the base unit.
7.
Fill water tank:
1. Press the water tank lock upwards and slide the detachable water tank outwards from the
base.(Fig.2)
2. Take the filter upwards out from the water fill hole. (You can take the filter out of the opening for
filling water into water tank, or fill water into water tank directly with the filter existing in the
opening).(Fig.3)
3. Fill the water tank up to or below the ¨MAX〃fill line with clean tap water. (Fig.4)
4. Replace filter back into water tank. When move, please hold the water tank by two hands. (Fig.5)
5. Replace the water tank into the base unit again. It will be locked in place with the base unit until a
¨click〃sound is provided. (Fig.6)
6. Always pour out the remaining water after use. (Fig.7)
Note:
When the water level reaches a low level or empty, pump will provide sound to indicate refilling. It must
stop to use the appliance immediately and refill water tank as the methods mentioned above.
Steam function setting:
After power on, set temperature control dial to steam ironing position. Heating the indicator light on an iron
unit lights up to indicate the unit being heated up. When desired temperature has been reached, heating
indicator light turns off, it is ready for using. During use, heating indicator light will cycle from ON to OFF
and then OFF to ON, it indicates that the iron is automatically heat preservation. Press steam button to start
steam ironing. When you adjust the temperature control dial, steam rate will be adjusted accordingly. MAX
steam will be obtained when set at MAX position, it will be smaller gradually when turn to 〃WOOL/SILK〃
position.
Note: When temperature control dial is located at SYNTHETIC 〃, it is proposed not to activate steam
ironing since temperature is too low to produce steam, it only suits for dry ironing,
1. Fill water tank with clean tap water refer to above filling instruction. For better performance, please
immerse filter in water for several minutes before installing it into the water tank).
2. Connect the unit into a suitable main socket. Turn temperature control dial to steam ironing position,
heating indicator light on iron unit lights up to indicate that the unit is being heated up. When it turn
off, the desired temperature has been reached,it is ready for steam ironing.During use,heating
indicator light will cycle from ON to OFF and then OFF to ON, it indicates that the iron is
automatically heat preservation. Before first time use of steam ironing, please clean the iron as
below methods: Take the iron unit up from the base unit, press steam button underneath the
handle to allow steam release for 30 seconds and then stop for 30 seconds, do so as a cycle, and
repeat above cycle again. The iron is not ready for using until the heating indicator light turns OFF.

3. During steam ironing, steam rate will be varied when temperature control dial is adjusted to
different positions. This can prevent water leakage caused from soleplate.
4. After using, take the iron unit back onto base unit,turn temperature control dail to ¨MIN〃, and then
unplug from main socket.
5. Slide water tank out from the base unit and empty it.
Note:
a. For every first time use, it is normal thatˇs a slightly vibration sound may be occurred from electrical
pump inside the base unit for a few seconds when steam ironing started. It is because there is air inside the
filter, it will stop till the air inside the filter has been pumped out. If this abnormal conditions coutinuously
happen for more than 60 seconds, please check whether water tank and filter assembled correctly or not.
b. When temperature control dial is set at ¨synthetic〃position, it only suits for dry ironing, max steam will
be obtained when set at ¨MAX〃position, when set at ¨Wool Silk〃steam will be smaller gradually.
Dry Ironing:
1. Connect the appliance to a suitable socket outlet.
2. Set temperature control dial to desired position according to ironing instructions on the garment
label or fabric setting chart. Heating indicator light (red) at iron unit lights up to indicate the unit
being heated up. When the heating indicator light turn off, the desired temperature has been
reached. During use, heating indicator light will cycle from ON to OFF and then OFF to ON. It
indicates that the unit is heat preservation.
3. After using, take the iron unit back onto base unit, turn temperature control dial to ¨MIN〃, and
then unplug from main socket.
Note: When changing your Temp setting from higher setting to lower, it is proposed that not to start ironing
immediately since it may cause burns to your fabrics. Please wait till temperature indicator light lights up
steadily, and then start ironing.
Vertical steam ironing:
Follow the steam ironing process, and then hold the iron in vertical position between 5cm and 15cm away
from the hanged fabrics. Press down steam switch, this will create vertical steam. This feature is especially
used for removing creases from hanging clothes and curtains. Never directly perform steam ironing on
people. (Fig.8)
Handle
Handle attached to the base unit used to carry the appliance. Before use, please put the handle down as
following method: Press down two handle buttons synchronously, and then lay the handle down. (Fig.9)
After use, allow the appliance completely cool down, then wind power cord around the cord storage of base
unit and put the iron onto base unit. Lift handle up until a ¨pa〃sound is provided, it indicates that the
handle has been locked in place and you can carry the appliance by the handle.
Cord Storage (optional)
1. Unique design for cord storage of base unit provide not only beautiful features, but also easy
storage:
2. After use, unplug the unit from main socket, pour out the remaining water from water tank after the
unit has been completely cooled down.
3. Place iron on base unit, fold supply hose and wind it clockwise around the cord slots of the base
unit. Tie power cord and folded supply hose together,then wind power cord clockwise around the
cord slots of the base unit, and lock the plug with supply hose. (Fig.11 - Fig.14)
Note: G-1033STB-90 does not have thisfeature.
Replacement of filter
Method: Slide water tank out from base unit, take the filter out from water tank, and then replace with a
new one. After new filter has been installed well into water tank, fill water into water tank to Max fill level,
and then slide water tank back into base unit.(Immerse filter in water for several minutes in order togain
better performance in future use.)
Anti-calc-system
1. The filter is designed to reduce the build-up of limescale which occurs during steam ironing, this will
prolong the working life of your iron. However, please note that the filter will not completely stop
the natural process of limescales build-up.
2. The filter should be replaced with a new one after 2-3 months, in case of using one time each day.
Working life of the filter depends on water you used. Before replace, the filter can still be used
continuously. However, limescales may be most probably built up in steam chamber. This happens

always depending on your local water quality. I t is proposed that replace filter as soon as possible
or mix your water with 50% proportion of distilled water.
Emptying and storing
1. Disconnect the appliance from the power supply and allow the appliance to cool down for 60
minutes at least.
2. After use, slide out the water tank and pour out all the remaining water.
3. Wind the power cord around cord storage of the base unit.
4. The iron should be placed on the iron rest plate, lay handle down.
Cleaning and Maintenance
1. Unplug the appliance from the main supply and let the iron cool down.
2. Clean the iron with a damp cloth.
3. Wipe off scale and any other deposits on the soleplate with a damp cloth or non-abrasive(liquid)
cleaner.
4. Never clean the appliance under the tap water.

Trouble shooting
Problems
Possible causes
Solution
Iron won’t
heat
Incorrect connection to the main
socket
Re-plug the unit to main socket.
Temperature control dial is set
“MIN”position
Set temperature control dial to
desired position according to Fabric
setting chart.
Unknown malfunctions
Take to a qualified serviceman or
manufacturer or its service agent
for examination and repair.
No steam go
out
Temperature control dial is at
SYNTHETIC position
Set temperature control dial to the
desired set position.
when
No water in water tank
Fill water into water tank
pressing
steam
switch after
the desired
temperature is
reached.
Filter has not been well installed
into water tank.
Install filter into water tank Slide
water tank into the power
Water tank has not been well
installed.
base and it will be locked in place
until a “click”sound produced.
Water leakage
from
soleplate
Iron has not been heated up to
desired temperature
The desired temperature has been
reached when heating indicator
light turn OFF
Unknown malfunctions
Take to a qualified serviceman or
manufacturer or its service agent
for examination and repair.
Table of contents
Languages:


