Chal-tec Resident DJ Kontrol 3 User manual
Resident DJ Kontrol 3
10006364
Sehr geehrter Kunde,
zunächst möchten wir Ihnen zum Erwerb Ihres Gerätes gratulieren.
Bitte lesen Sie die folgenden Anschluss- und Anwendungshinweise sorgfältig durch und befolgen Sie diese
um möglichen technischen Schäden vorzubeugen.
Lieferumfang
1. USB-MIDI-Mischpult
2. VIRTUALDJ LE Software CD-ROM & Lizenzcode
3. USB-Kabel
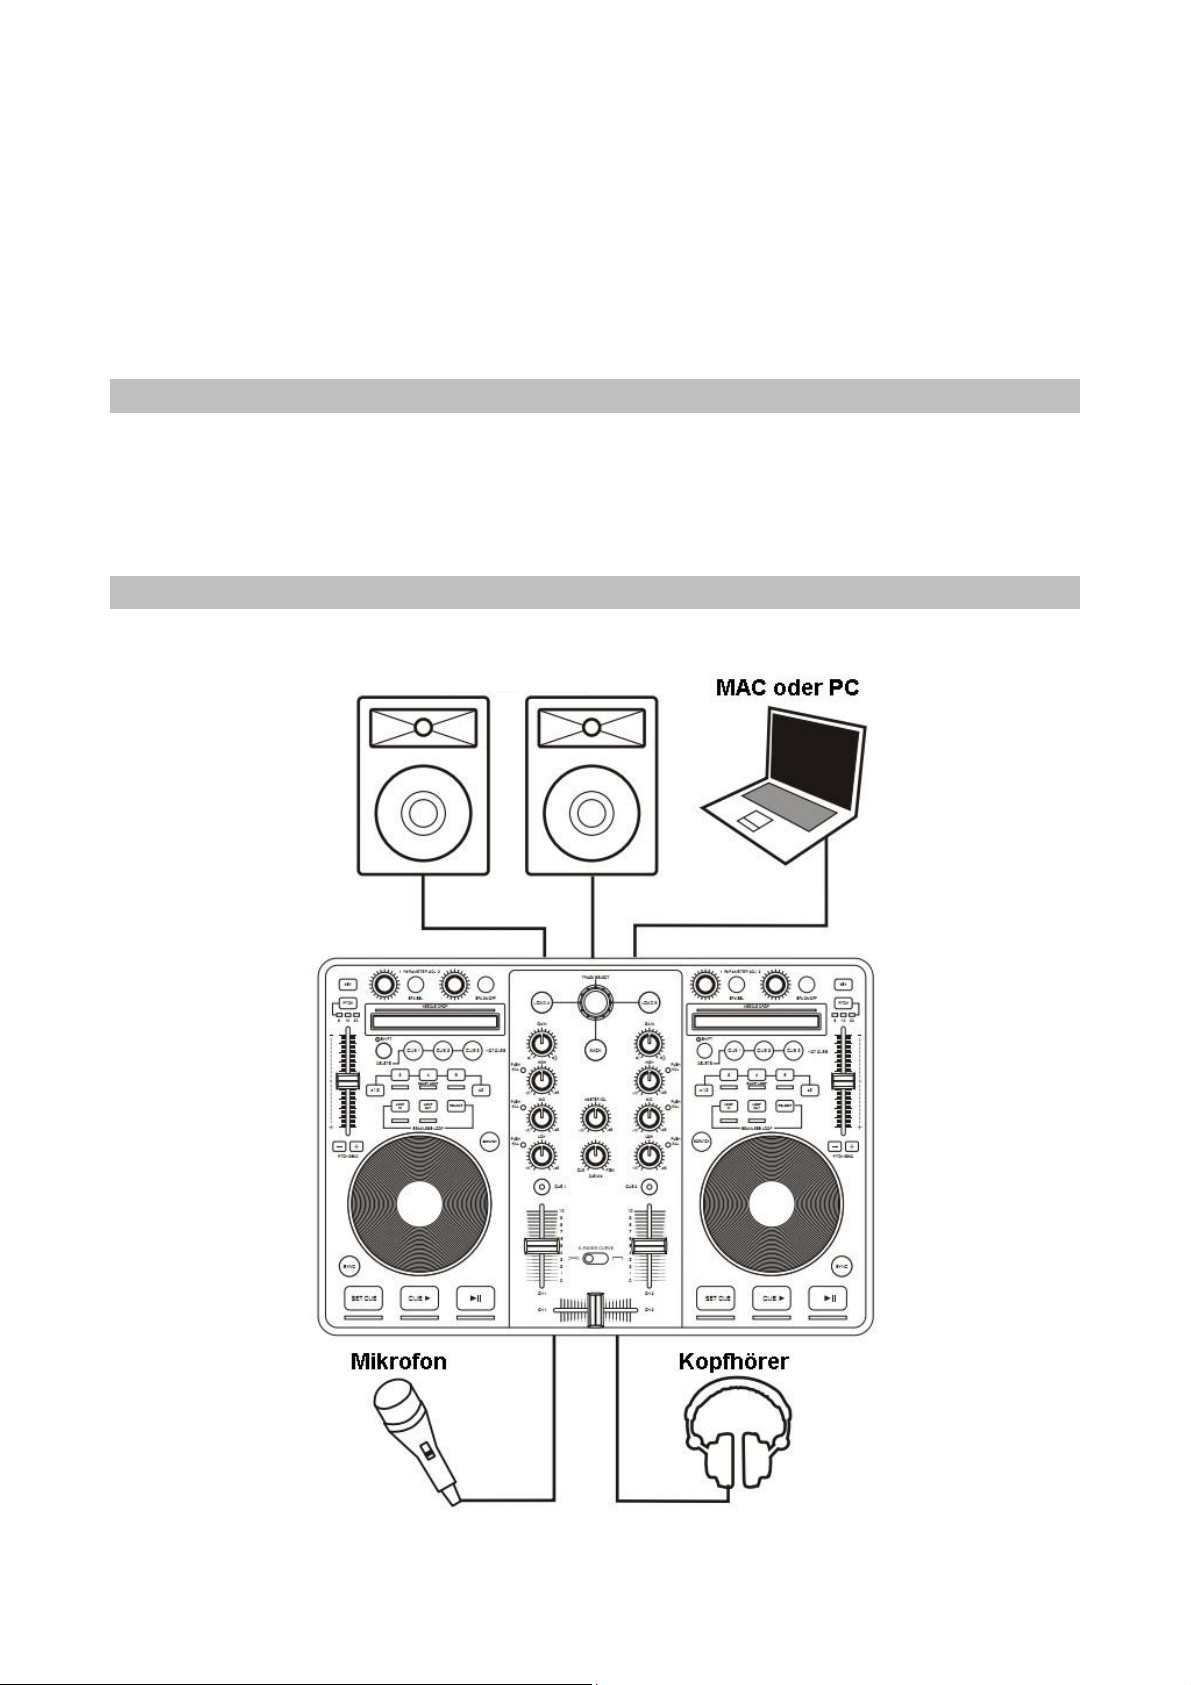
Anschlussplan
Siehe Diagramm:
Verstärker/Aktivlautsprecher

Audio-Treiber
Das Gerät ist so konstruiert, dass keine weiteren Treiber benötigt werden. Schließen Sie das Mischpult an
den Computer an und befolgen Sie die Installationsroutine. Das Gerät ist nun betriebsbereit.
Installation von VIRTUALDJ LE auf Ihrem Mac/PC
1. Schließen Sie das Mischpult mittels USB an und warten Sie bis die automatische Installation beendet
ist.
2. Legen Sie nun die VIRTUALDJ CD ein. Das Setup startet automatisch.
3. Befolgen Sie die nun angezeigten Anweisungen. Geben Sie den Lizenzcode der sich auf der CD-Hülle
befindet ein.
4. Nach Eingabe des Lizenzcodes erscheint der Kontrollbildschirm auf Ihrem Monitor. Alle am Mischpult
betätigten Regler werden auf dem Kontrollbildschirm angezeigt.
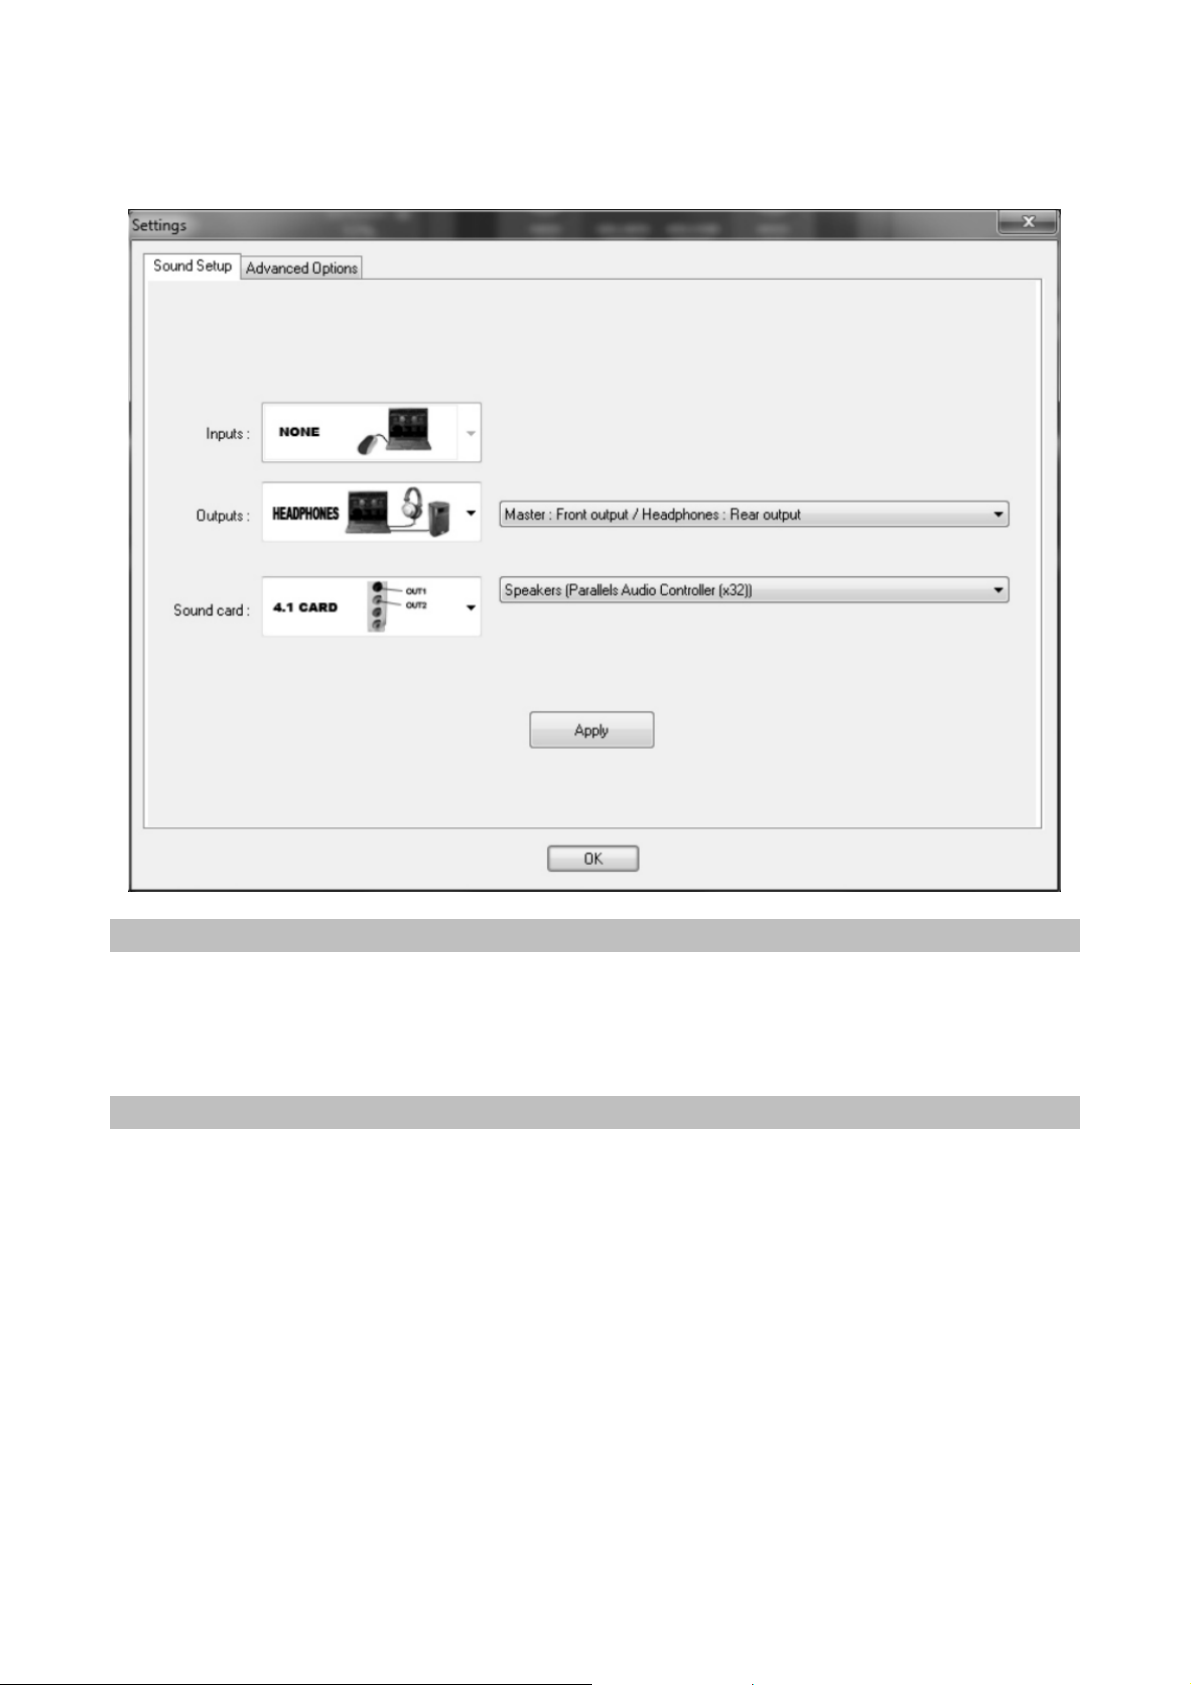
Audiokonfiguration von VIRTUALDJ
1. Klicken Sie auf „CONFIG“ an der oberen, linken Seite des Programmfensters.
2. Wählen Sie den Tab „Sound Set Up“.
3. Wählen Sie die Einstellungen wie unten angezeigt.
4. Klicken Sie auf „apply“.
Für Mac-Benutzer - Wählen Sie das Mischpult als Soundcard. Siehe unten:

Für Mac-Benutzer - Wählen Sie die interne Soundcard. Siehe unten:
Für PC-Benutzer - Wählen Sie das Mischpult als Soundcard. Siehe unten:
Für PC-Benutzer - Wählen Sie die interne Soundcard. Siehe unten:
MIDI
Dieses Mischpult ist MIDI-kompatibel. Das bedeutet, dass Sie jede MIDI-Software mit diesem Gerät
verwenden können. Hierzu müssen Sie das Mischpult in der verwendeten Software anwählen.
Funktionen
2 berührungsempfindliche Jog-Wheels (LED-Hintergrundbeleuchtung)
17 Drehregler (inkl. 1x Titelwahl und 6x Abschalten)
51 Druckknöpfe (viele mit LED-Hintergrundbeleuchtung)
5 Schieberegler, 1 Schalter
2 sehr berührungsempfindliche Felder zur schnellen Suche
Integrierter „Audio Codec IC“-Anschluss
4 Ausgangskanäle (balanciert XLR & umschaltbarer Cinch)
Mikrofoneingang & Kopfhörerausgang mit Lautstärkeregulierung
PC & Mac kompatibel
Inklusive Software: VIRTUALDJ 7 LE
Kompatibel mit MP3, AIFF, WAV, WMA, OGG und CD
Kompatibel zu Ihrer iTunes Musik-Bibliothek
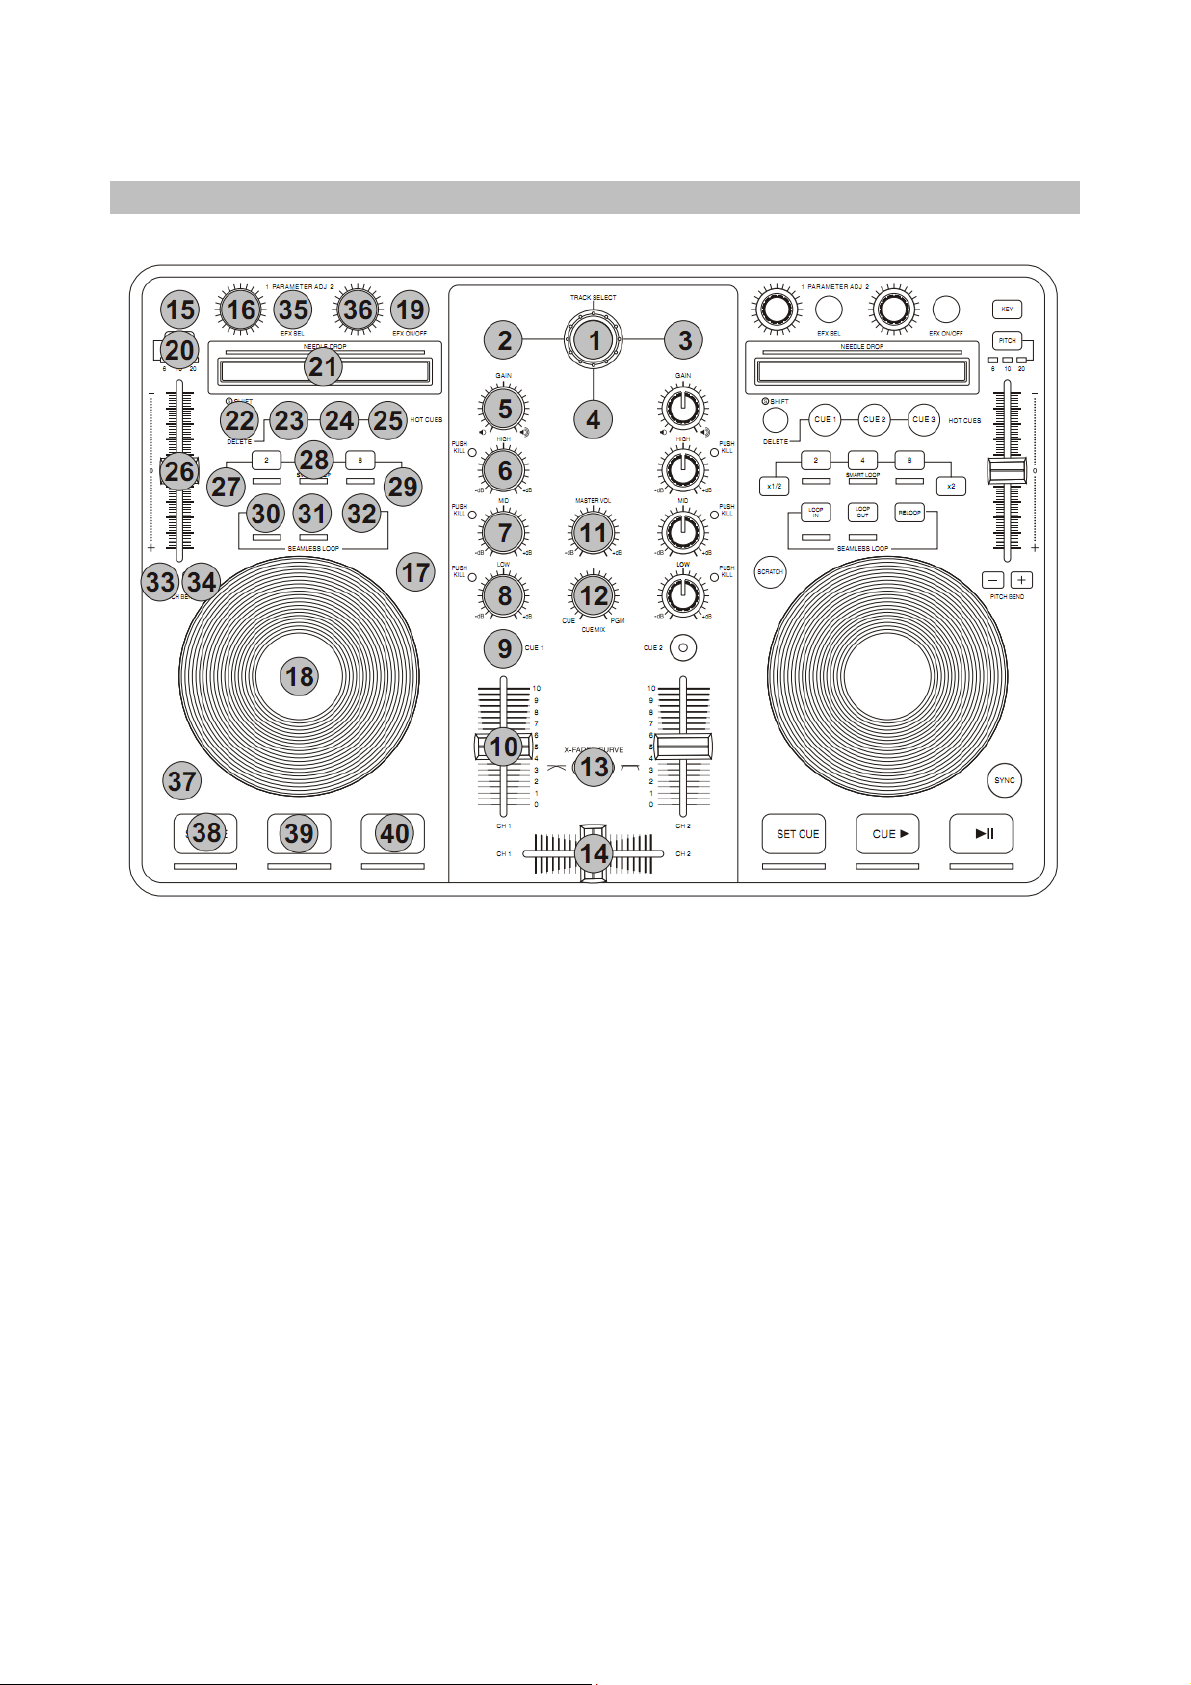
Bedienelement
Oben
1. TRACK SELECT
Drehen, um einen Titel zu suchen und drücken um diesen auszuwählen.
2. LOAD A
Lädt den in der A-Seite (links) der Software ausgewählten Titel.
3. LOAD B
Lädt den in der B-Seite (rechts) der Software ausgewählten Titel.
4. BACK
Einen Order in der Titelauswahl zurück.
5. GAIN
Lautstärke des gewählten Kanals einstellen.
6. HIGH
Höhen des gewählten Kanals einstellen.
7. MID
Mitten des gewählten Kanals einstellen.
8. LOW
Tiefen des gewählten Kanals einstellen.
9. CUE
Kanal als Vorhörkanal wählen.
10. CHANNEL FADER
Lautstärke des gewählten Kanals einstellen.
11. MASTER VOL
Master-Lautstärke anpassen.

12. CUE MIX
Mischt den Einzel- und den Masterkanal beim Vorhören.
Linke Seite = Einzelkanal. Rechte Seite = Master.
13. CROSS FADER CURVE
Auswahl zwischen einer sanften (links) und einer scharfen (rechts) Crossfadereinstellung.
14. CROSS FADER
Deck A & B mischen.
15. KEYLOCK
16. PARAMETER1
Effektparameter regeln; bei aktivierter SHIFT-Taste Regelung des Filtereffekts.
17. SCRATCH
Drücken zur Auswahl zwischen Scratch- und Pitchbend-Modi des Jogwheels; halten zur Aktivierung
des Jog-Modus.
18. JOG WHEEL
Im Pause-Modus: Suche; im Play-Modus: Pitchbend; im Scratch-Modus: Scratchen
19. EFX ON/OFF
Effekt ein-/ausschalten.
20. PITCH
Pitchbereich einstellen.
21. NEEDLE DROP
Hiermit können Sie schnell zu einer bestimmten Stelle im Titel springen.
NOTIZ: Blinkt die LED, kommen Sie zum Ende des Titels.
22. DELETE/SHIFT
Löschen Sie hiermit gespeicherte Hot Cues. Halten Sie diese Taste um diese als SHIFT-Taste für
weitere Funktionen zu nutzen.
23. HOT CUE 1
Drücken Sie diese Taste an einer beliebigen Stelle des Titels, um diesen Punkt zu speichern. Drücken
Sie die Taste erneut um diese Stelle erneut aufzurufen.
24. HOT CUE 2
Drücken Sie diese Taste an einer beliebigen Stelle des Titels, um diesen Punkt zu speichern. Drücken
Sie die Taste erneut um diese Stelle erneut aufzurufen.
25. HOT CUE 3
Drücken Sie diese Taste an einer beliebigen Stelle des Titels um diesen Punkt zu speichern. Drücken
Sie die Taste erneut, um diese Stelle erneut aufzurufen.
26. PITCH FADER
Wiedergabegeschwindigkeit erhöhen/reduzieren.
27. X1/2
Die Länge der Wiederholungsschleife (Loops) reduzieren. Um die Schleife zu verlassen, drücken Sie
Taste 31.
28. SMART LOOPS
Automatische Erstellung eines beat-Intelligenten Loops. Um den Loop zu verlassen, drücken Sie die
Taste erneut.
29. X2
Die Länge des Loops erhöhen. Um die Schleife zu verlassen, drücken Sie Taste 31.
30. LOOP IN
Setzt den Anfang des Loops.
31. LOOP OUT
Setzt das Ende des Loops.
32. RELOOP
33. PITCHBEND -
Temporäre Pitchanpassung.
34. PITCHBEND +
Temporäre Pitchanpassung.
35. EFX SEL
Wählen Sie einen der softwareseitigen Effekte aus.
36. PARAMETER 2
Effektparameter regeln; bei aktivierter SHIFT-Taste Regelung des Filtereffekts.
37. SYNC
Synchrosieren Sie die BPM der beiden Decks.
38. SET CUE
Cue-Punkt setzen; Cue Preview durch Halten der Taste.
39. CUE PLAY
Zum gesetzen Cue- Punkt wechseln und den Titel ab dort wiedergeben.
40. PLAY/STOP
Abspielen und Pausieren des Tracks
Front
1. Mikrofoneingang
Mikrofone mit ¼“- Anschluss
2. Mikrofonlautstärkeregler
3. Kopfhörerlautstärke
4. Kopfhörerausgang
Kopfhörer mit ¼“- Anschluss
Rückseite
1. Cinch/XLR-Schalter
Schaltet die Soundkartenausgabe zu Cinch oder XLR
NOTIZ: Eine gleichzeitige Ausgabe an Cinch und XLR ist nicht möglich.
2. XLR-Ausgänge
Hier können Sie einen Verstärker oder aktive Lautsprecher anschließen.
3. Cinch-Ausgang
Hier können Sie einen Verstärker oder aktive Lautsprecher anschließen.
4. USB-Anschluss
Diesen Anschluss ist mit einem USB-Typ B-Stecker zu verwenden. Ihr Computer muss mindenstens
über USB 2.0 verfügen. (Beachten Sie falls Sie einen Hub verwenden, dass dieser stromversorgt ist.
Es kann sonst zu zeitverzögerten Eingaben führen.)
5. Stromanschluss
Anschluss für ein optionales Netzgerät (DC 5V 500mA ~ 1000mA)
Systemvoraussetzungen
PC
Minimum Voraussetzungen:
Intel Pentium 4 oder AMD Athlon XP
1024x768 Auslösung
DirectX kompatible Soundkarte
512MB RAM
50MB freier Festplattenspeicher
Mac
Minimum Voraussetzungen:
Intel Prozessor
Mac OS X v10.5
1024x768 Auslösung
CoreAudio kompatible Soundkarte
1024MB RAM
50MB freier Festplattenspeicher

Empfohlene Voraussetzungen:
Intel Core 2 oder AMD Athlon X2
1280x1024 Auflösung
Mehrkanal DirectX kompatible Soundkarte
1024MB RAM
200MB freier Festplattenspeicher
Empfohlene Voraussetzungen:
Intel Prozessor
Latest Mac OS X v10.7.x
1440x900 Auflösung
Mehrkanal CoreAudio kompatible Soundkarte
2048MB RAM
200MB freier Festplattenspeicher
Datenblatt
Betriebsspannung und Stromverbrauch: DC5V 500mA
Audioanschluss: 24bit/192KHz
Abmessungen (L x B x H): 358 x 275 x 65mm
Gewicht: 1.9kg
SICHERHEITSHINWEISE UND GEWÄHRLEISTUNG
Diese Bedienungsanleitung dient dazu, Sie mit der Funktionsweise dieses Produktes vertraut zu
machen. Bewahren Sie diese Anleitung daher stets gut auf, damit Sie jederzeit darauf zugreifen
können.
Sie erhalten bei Kauf dieses Produktes zwei Jahre Gewährleistung auf Defekt bei sachgemäßem
Gebrauch.
Bitte verwenden Sie das Produkt nur in seiner bestimmungsgemäßen Art und Weise. Eine
anderweitige Verwendung führt eventuell zu Beschädigungen am Produkt oder in der Umgebung des
Produktes.
Ein Umbauen oder Verändern des Produktes beeinträchtigt die Produktsicherheit. Achtung
Verletzungsgefahr!
Öffnen Sie das Produkt niemals eigenmächtig und führen Sie Reparaturen nie selber aus!
Behandeln Sie das Produkt sorgfältig. Es kann durch Stöße, Schläge oder den Fall aus bereits
geringer Höhe beschädigt werden.
Halten Sie das Produkt fern von Feuchtigkeit und extremer Hitze.
ACHTUNG:
Es wird keine Haftung für Folgeschäden übernommen. Technische Änderungen und Irrtümer
vorbehalten!
Wichtige Hinweise zur Entsorgung
Dieses Elektrogerät gehört NICHT in den Hausmüll. Für die fachgerechte Entsorgung wenden Sie sich bitte
an die öffentlichen Sammelstellen in Ihrer Gemeinde.
Einzelheiten zum Standort einer solchen Sammelstelle und über ggf. vorhandene Mengenbeschränkungen
pro Tag/ Monat/ Jahr sowie über etwa anfallende Kosten bei Abholung entnehmen Sie bitte den
Informationen der jeweiligen Gemeinde.
Hinweise zur Batterieentsorgung
Batterien dürfen nicht in den Hausmüll gegeben werden. Als Endverbraucher sind Sie zur
Rückgabe gebrauchter Batterien gesetzlich verpflichtet. Sie können Batterien nach
Gebrauch in der Verkaufsstelle oder deren unmittelbarer Nähe (z.B. in kommunalen
Sammelstellen oder im Handel) unentgeltlich zurückgeben. Sie können Batterien auch per
Post an uns zurücksenden.
Batterien oder Akkus, die Schadstoffe enthalten, sind mit dem Symbol einer
durchgekreuzten Mülltonne gekennzeichnet, wie das oben stehende Symbol.
In der Nähe zum Mülltonnensymbol befindet sich die chemische Bezeichnung des Schadstoffes. »Cd« steht
für Cadmium, »Pb« für Blei und »Hg« für Quecksilber.

Viel Spaß mit unserem Produkt.
Warnhinweise
Reparaturen am Gerät sollten nur von einer autorisierten Fachwerkstatt durchgeführt werden.
Öffnen Sie in keinem Fall das Gerät.
Falscher Zusammenbau führt möglicherweise zu Fehlfunktionen oder dem Totalausfall.
Das Gerät sollte vor jeglichen Feuchtigkeit und direkter Sonneneinstrahlung geschützt werden.
Das Gerät bitte nicht mit Reinigungsmitteln reinigen.
Verwenden Sie zur Reinigung nur ein trockenes (Mikrofaser) Tuch.
Schließen Sie das Gerät nur an die dafür vorgesehene Netzspannung.
Schließen Sie das Gerät in keinem Fall an andere Spannungen als vorgesehen an.
Die Gewährleistung verfällt bei Fremdeingriffen in das Gerät.
In the box
1. USB MIDI controller
2. VIRTUALDJ LE Software CD-ROM & License code
3. USB cable
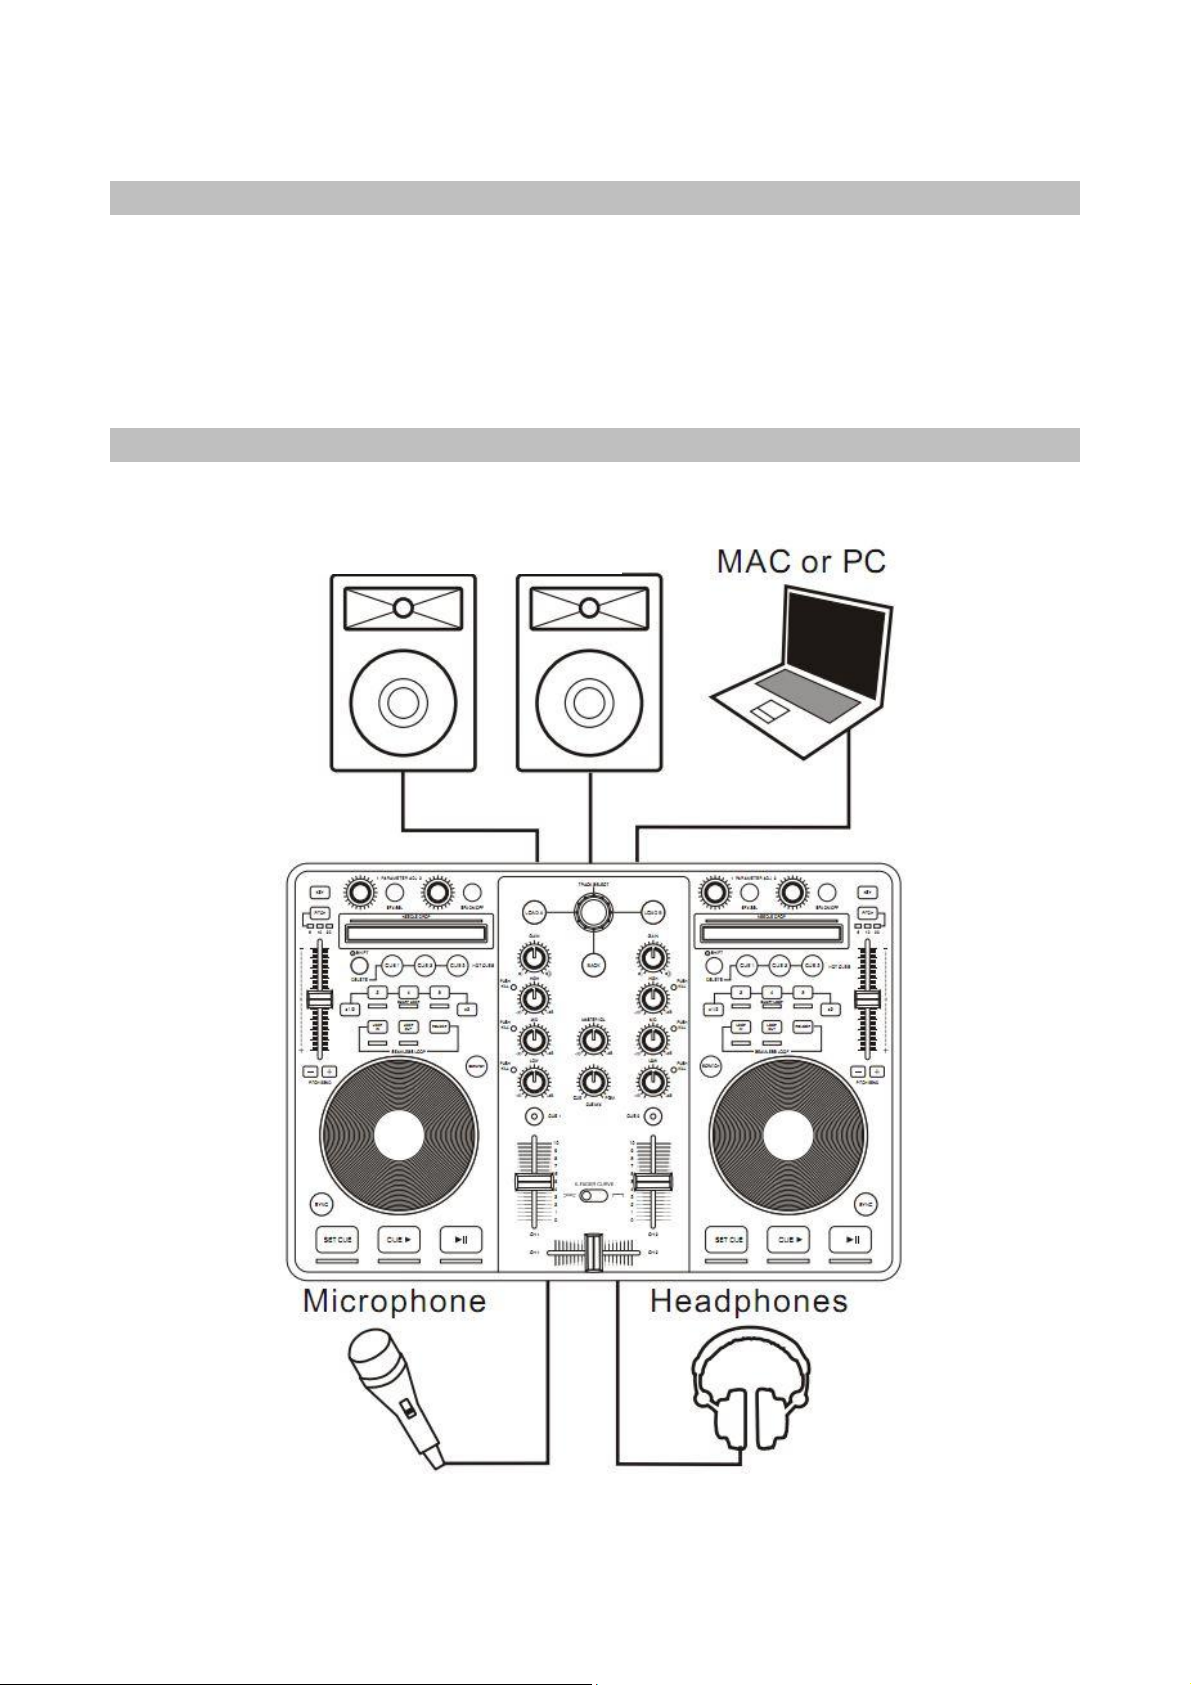
Wiring the system
Please see the suggested connection diagram below:
Active Speaker / Amplifier
Audio Drivers
The Controller has been designed using the latest technology and to make life easy, thus during initial
setup, no audio drivers are required. You can simply plug in the USB, set up the audio routing and it is
ready for use.
Installation of VIRTUALDJ LE into your Mac/PC
1. Connect the Controller to the PC via USB Cable. It may take a few minutes for the initial
configuration to complete.
2. Insert the VIRTUALDJ Installation disc into the CD/DVD Drive. The setup will run automatically.
3. Follow the on-screen instructions to install the VIRTUALDJ Program. Enter the System Serial Number
which can be found on the CD cover to activate the program.
4. After entering the Serial Number, the VIRTUALDJ control screen will appear on screen. The
controller
will receive a signal connecting itself with the VIRTUALDJ and Power up with the LED of jog wheels
being illuminated.
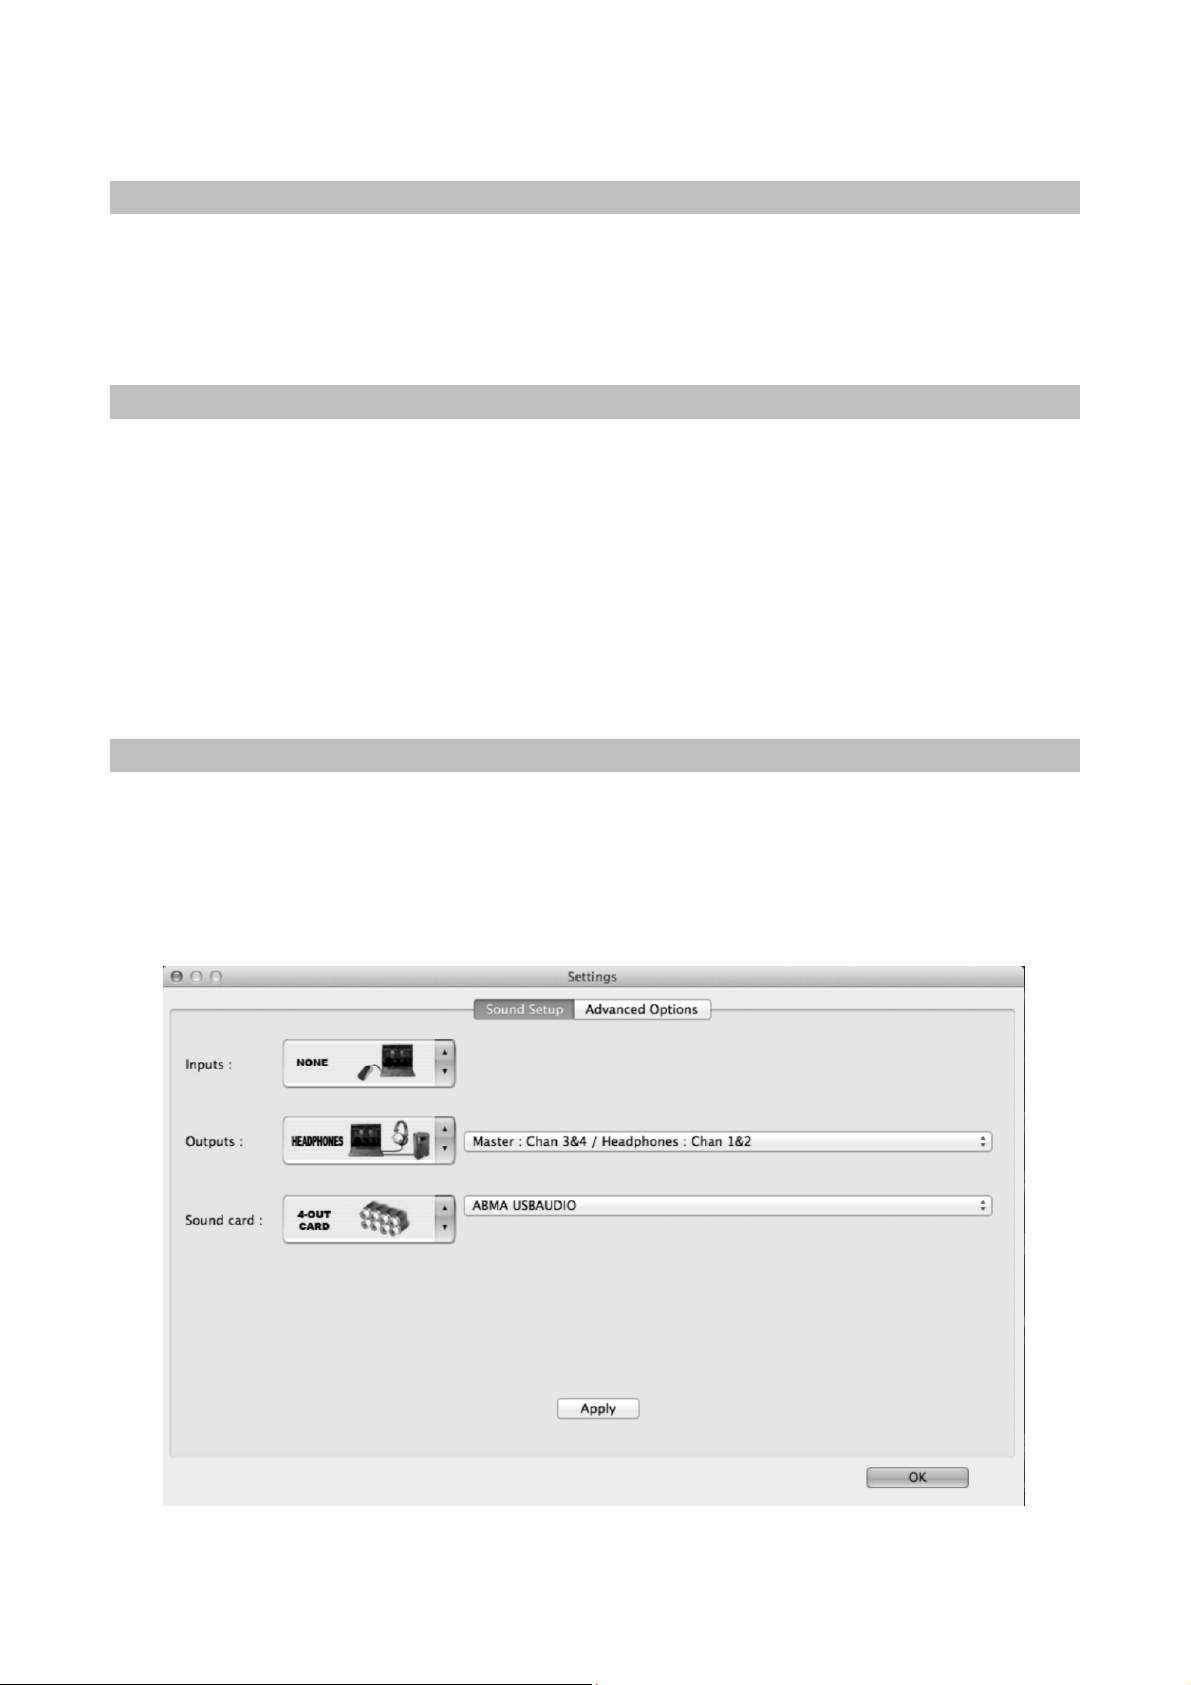
To configure the audio routing in VIRTUALDJ
1. Click on the “CONFIG” box at the top left side of the VIRTUALDJ Software.
2. Select the “Sound Set Up” tab.
3. Select the settings as show in the diagram below.
4. Click “apply”.
For Mac User - Select Controller Soundcard, please refer to the setting below:
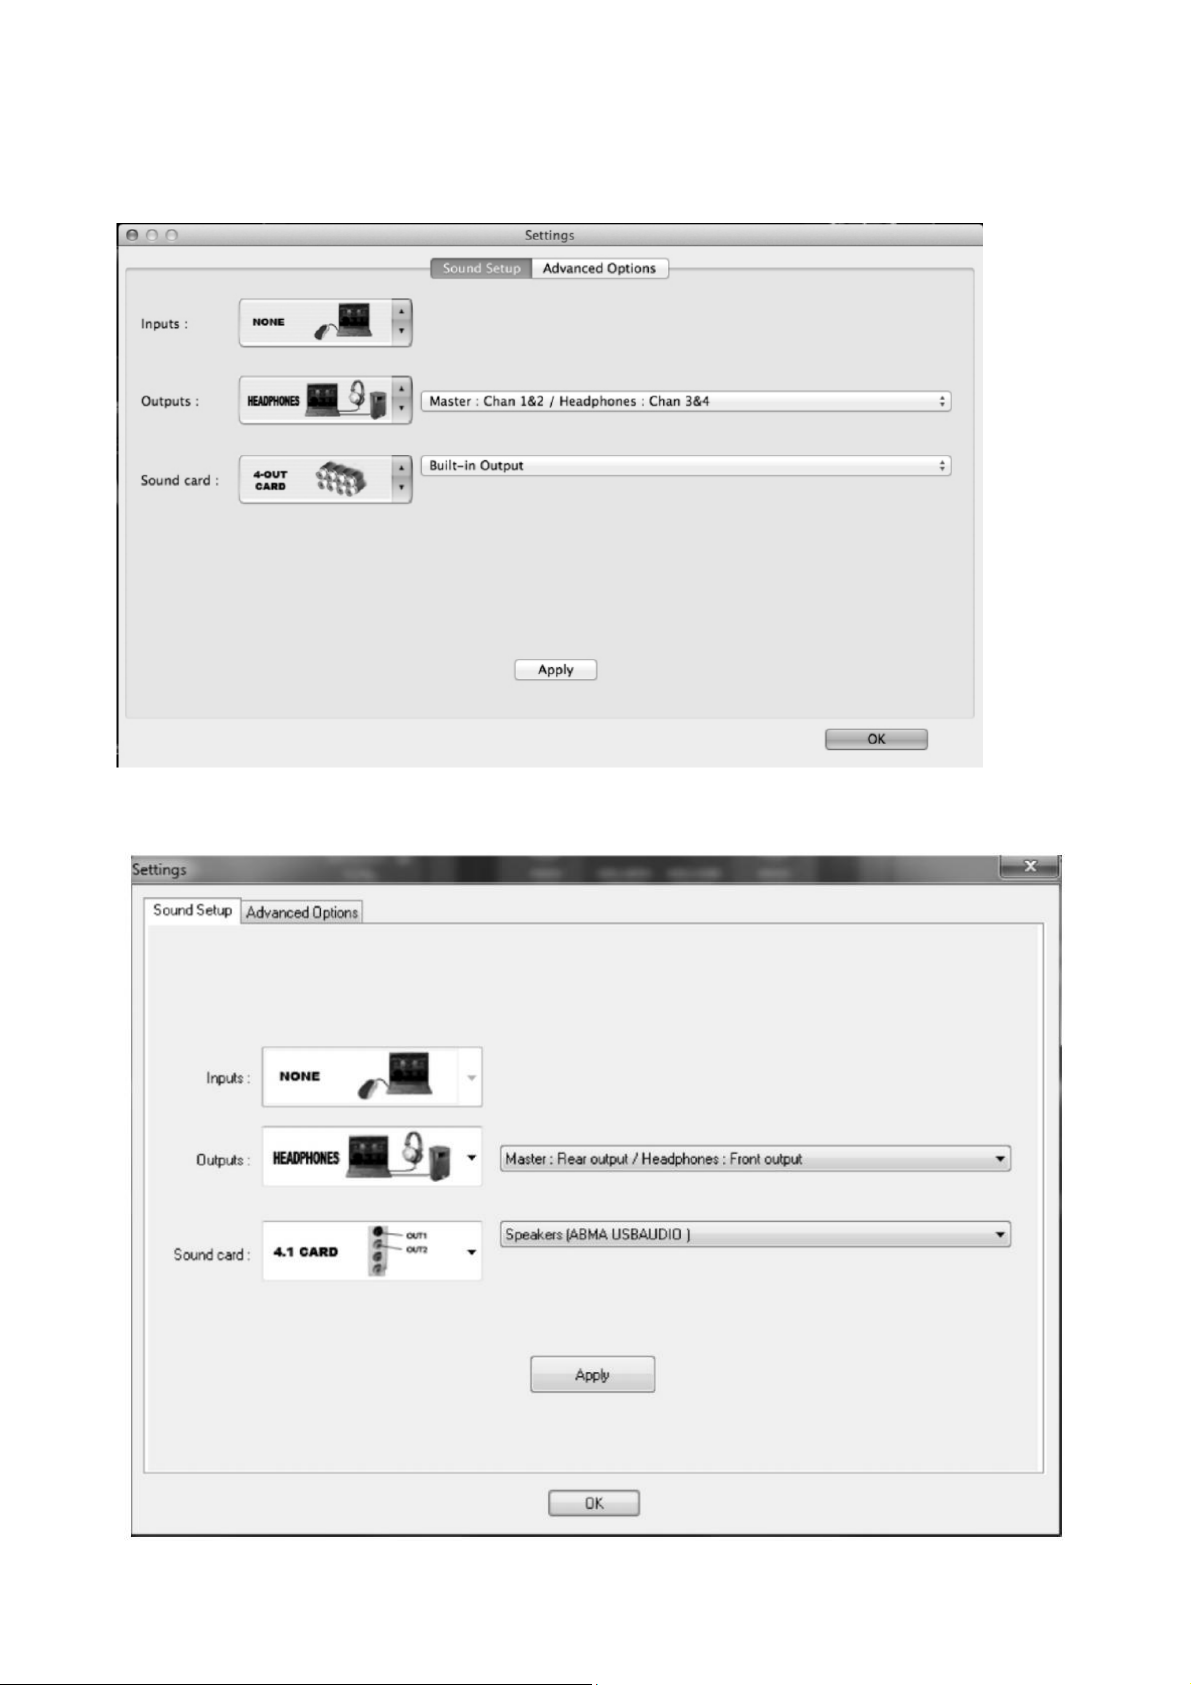
For Mac User - Select Mac Built-In Soundcard, please refer to the setting below:
For PC User - Select Controller Soundcard, please refer to the setting below:

For PC User - Select PC Built-In Soundcard, please refer to the setting below:
MIDI
This controller is designed as a Midi-compatible device, meaning that you can use this for any Midi
software. In order to use this with other software, you will need to locate the Midi settings inside the
software and enable this device.
Features
2 touch sensitive ultra-precise jog wheels (LED backlight)
17 rotary knobs (incl. 1 track select push; 6 kill push)
51 push buttons (many featuring LED back lighting)
5 faders, 1 switch
2 needle drop touch sensitive panels for ultra fast searching
Built-in audio interface with Audio Codec IC
4 output channels (balanced XLR & RCA switchable)
Mic input & headphone output with volume controls
PC & Mac compatible
Included software: VIRTUALDJ 7 LE
Compatible with MP3, AIFF, WAV, WMA, OGG and CD
Full compatible with iTunes music libraries

Control Panel
Top Panel
1. TRACK SELECT
Rotate this knob to the left or right to scroll up or down in the browser or music library. Press down
on the knob to select the folder or file.
2. LOAD A
Pressing the button will load the selected track to side A (left side) of the software.
3. LOAD B
Pressing the button will load the selected track to side B (right side) of the software.
4. BACK
This button allows you to return to the previous selection in the music library of the browser.
Please note this will stop once you have reached the main root folder.
5. GAIN
Rotate this knob to increase/decrease the volume of the corresponding channel.
6. HIGH
Rotate this knob to increase/decrease the high band frequencies of the corresponding channel.
7. MID
Rotate this knob to increase/decrease the middle band frequencies of the corresponding channel.
8. LOW
Rotate this knob to increase/decrease the low (bass ) band frequencies of the corresponding channel.
9. CUE
This button when pressed will allow the audio from that channel to be cued in the headphone.
Please ensure that headphone volume is turned up.
10. CHANNEL FADER
Adjusts the volume level of the corresponding audio channel.
11. MASTER VOL
Allows adjustment of the main audio level.
12. CUE MIX
Allows the user to hear mixed audio of the monitor (cue) audio and the program (master) audio in
the headphones. When the knob is rotated to the left only the cue audio will be heard, when in the
right position only the program audio will be heard.

13. CROSS FADER CURVE
This switch allows the users to choose the type of cross fader curve they desire. Switching to the
left side will have a "smooth" curve, while switching to the right will have a "sharp" curve.
NOTE: A sharp curve is usually required when the user is performing scratch techniques.
14. CROSS FADER
Allows you to fade the audio between decks A and B. When the fader is in the left position, only the
audio from channel A will be heard. When the fader is in the right position, only the audio from
channel B will be heard. Moving the fader to the middle position allows audio from both channels
A & B to be heard.
15. KEYLOCK
When activated, this feature will "lock" the key of the music even when the pitch is adjusted.
16. PARAMETER 1
Use this to adjust the parameters of the selected effect. Use this with the "shift" button (22.) to
adjust the filter effect.
17. SCRATCH
Pressing this button will allow the user to toggle between scratch or pitch bend modes. Holding the
scratch mode button enables "jog mode". This allows the user to use the jog wheel as a fast search
which allows fast searching through a song/track.
18. JOG WHEEL
When in pause mode, the wheel will allow the user to search/scroll through the track. When in play
mode, the wheel will act as pitch bend. If Scratch mode (17.) is enabled the wheel will allow the user to scratch
the track much like a vinyl record.
19. EFX ON/OFF
Toggles the effect on or off.
20. PITCH
Adjusts the pitch range on the fly.
21. NEEDLE DROP
This is a touch sensitive pad that allows you to search through the music or jump to a specific
location. NOTE: When the LED flashes, it's an indication that the track is coming to the end.
22. DELETE/SHIFT
Use this button to delete any hot cues that have been previously stored. Hold this button as a
"shift" button for other features in the software.
23. HOT CUE 1
Allows you to instantly jump to a set cue position and instantly play from that cue point. Press the
button once to set the cue, and then repeat to play from that cue position.
24. HOT CUE 2
Allows you to instantly jump to a set cue position and instantly play from that cue point. Press the
button once to set the cue, and then repeat to play from that cue position.
25. HOT CUE 3
Allows you to instantly jump to a set cue position and instantly play from that cue point. Press the
button once to set the cue, and then repeat to play from that cue position.
26. PITCH FADER
Allows increase or decrease of the music's tempo.
27. X1/2
Allow the user to decrease the size of a loop in increments.To exit the loop, press the button (31).
28. SMART LOOPS
This will automatically create a loop for a certain amount of beats, 2, 4 or 8. To exit the loop, press
the button again.
29. X2
Allow the user to increase the size of a loop in increments. To exit the loop, press the button (31).
30. LOOP IN
Sets a loop in position.
31. LOOP OUT
Closes the loop to create a loop, or when in a loop will exit the loop and continue to play the track.
32. RELOOP
Will put the track back into the last loop played.
33. PITCH BEND -
Allows small adjustments in the tempo/pitch, this button is usually used to allow seamless mixing.
You can use this button to temporarily decrease the pitch and tempo of the music.

34. PITCH BEND +
Allows small adjustments in the tempo/pitch, this button is usually used to allow seamless mixing.
You can use this button to temporarily increase the pitch and tempo of the music.
35. EFX SEL
Pressing this will allow you to scroll through the software effects.
36. PARAMETER 2
Use this to adjust the parameters of the selected effect. Use this with the "shift" button (22.) to
adjust the filter effect.
37. SYNC
Pressing this button will automatically synchronize the BPM of the song to the same BPM of the
track playing on the other deck.
38. SET CUE
This button will set the cue at the desired location. It will also return the audio to the last set cue
position. Holding this button will also allow the user to preview the cue point until the button is
released.
39. CUE PLAY
Will return the track to the last set cue position and play the track.
40. PLAY/PAUSE
This allows the user to play or pause the track.
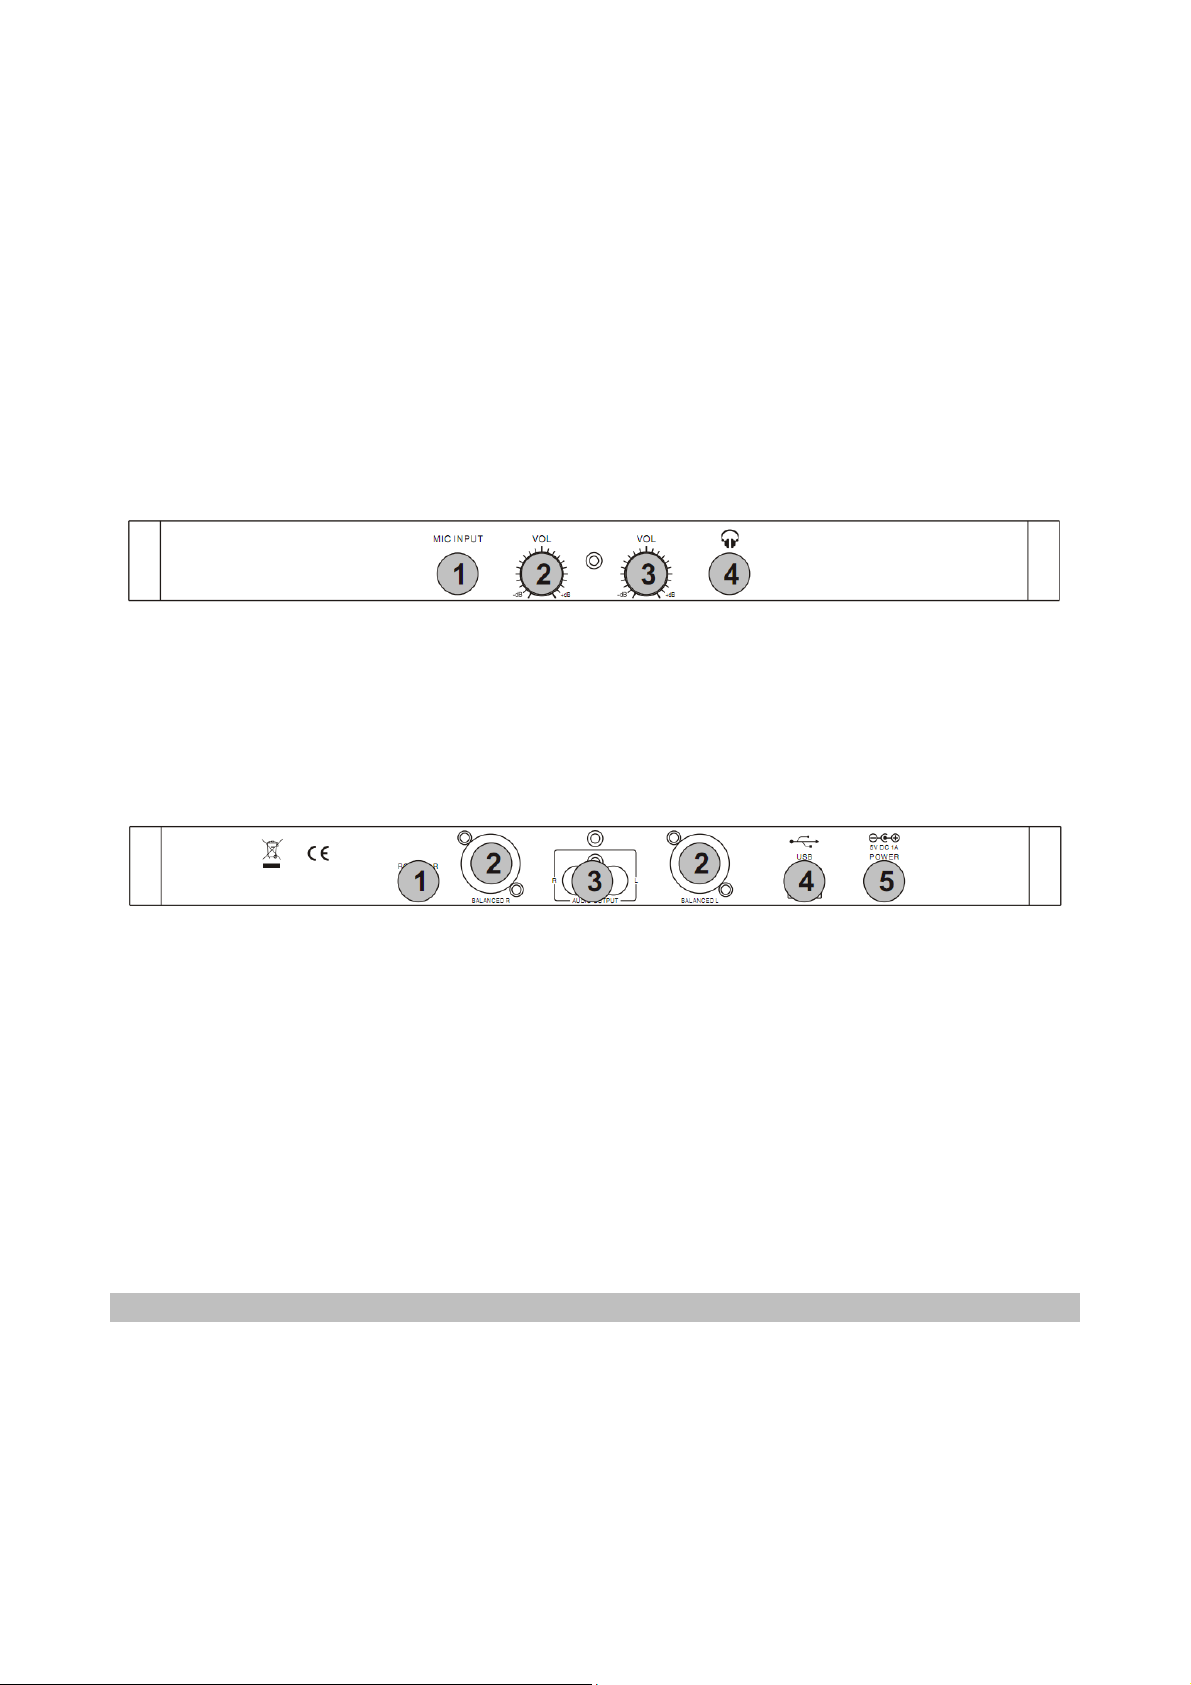
Front Panel
1. MIC INPUT
Input for microphone with a 1/4" connector.
2. MIC VOLUME
Adjusts the microphone level.
3. HEADPHONE VOL
Adjusts the headphone level.
4. HEADPHONE OUTPUT
Output for headphone with a 1/4" connector.
Rear Panel
1. RCA/XLR SWITCH
Switches the output of the soundcard to either RCA or XLR.
NOTE: It is not possible to use both RCA & XLR at the same time.
2. XLR OUTPUTS
Connect output cable (XLR female) from here to amplifier or powered speakers.
3. RCA OUTPUT
Connect output cable from here to amplifier or powered speakers.
4. USB
USB connection for use with B Type connector - please be sure to use the USB 2.0 cable that came
with this unit. (Please note, if you are using a USB hub, please ensure it is a powered hub as if not
you may experience latency problems)
5. POWER
Input for optional power adaptor ( DC 5V 500mA ~ 1000mA ).

System Requirements
PC
Minimum system requirements:
Intel Pentium 4 or AMD Athlon XP
1024x768 resolution
DirectX compatible soundcard
512MB RAM
50MB free on the hard drive
Recommended system requirements:
Intel Core 2 or AMD Athlon X2
1280x1024 resolution
Multi-channel DirectX compatible soundcard
1024MB RAM
200MB free on the hard drive
Mac
Minimum system requirements:
Intel Processor
Mac OS X v10.5
1024x768 resolution
CoreAudio compatible soundcard
1024MB RAM
50MB free on the hard drive
Recommended system requirements:
Intel Processor
Latest Mac OS X v10.7.x
1440x900 resolution
Multi-channel CoreAudio compatible
soundcard
2048MB (2GB) RAM
200MB free on the hard drive
Technical Data
Power rating and consumption: DC5V 500mA
Audio Interface: 24bit/192KHz
Dimensions (L x W x H): 358 x 275 x 65 mm
Weight: 1.9 kg
This manual suits for next models
1
Table of contents
Languages:
Popular Recording Equipment manuals by other brands

Tentacle Sync
Tentacle Sync TRACK E operating manual

DEVA Broadcast
DEVA Broadcast DEVA DB8000 Maintenance and operation instruction manual

Northern Airborne Technology
Northern Airborne Technology AMS43 Installation and operation manual

Plum Audio
Plum Audio RO VED quick start guide

Net2Edge
Net2Edge Liberator CE quick start guide

Omnitronic
Omnitronic FAD-9 user manual


