Chamber BD208 User manual

Model: BD208 Dual System Draft Beer Dispenser
Quick Set-Up Guide for PRESSURIZED Kegs
Step One Step Four
Step Five
There are 2 options for chilling
your keg prior to serving.
Option 1: Place keg into the Chambrer
Draft Beer Dispenser, turn on and leave
for 24 hours.
Option 2: Place the keg into your
refrigerator for 10 hours before placing
it into your Chambrer Draft Beer
Dispenser.
(DO NOT put the keg
into your freezer.)
Your Chambrer Draft Beer Dispenser
will keep your 5 liter keg cool for 30
days after opening.
This Draft Beer Dispenser has built-in
temperature sensors that have been
programmed to automatically keep your
beer chilled to 2ºC – 5ºC (37ºF - 42ºF).
Therefore, your beer will automatically
maintain it’s ideal serving temperature.
** PLEASE NOTE: The factory will
have pre-assembled the keg adapter
for use with a pressurized keg. Please
refer to page 6 of the Instruction
Manual for the Pressurized Tapping
System assembly procedure.
Please refer to the Instruction Manual
for detailed information regarding
the proper installation, care and
maintenance of your Chambrer Beer
Dispenser.
Place red ring onto the top of the keg.
Pressing down gently until it clicks into
place.
*MAKE SURE TAP IS IN
CLOSED POSITION
Step Two
Step Three
Connect keg adapter onto top of the
keg, pushing down until it clicks into
place.
Insert blue pin into hole in the top
of the keg and align tabs within red
ring.
Slide white ring down over pin. Push
down on blue pin while tightening
white ring. Do not over tighten.
Using keg handles carefully lift and
place into the keg cavity of the
dispenser. Close the lid gently.
Your beer is ready to be
served. Cheers!
Your beer is ready to be
served. Cheers!
Step Five
Step Four
Step Three
Step Two
Dual System Draft Beer Dispenser
Quick Set-Up Guide for NON-PRESSURIZED Kegs
Step One
Step Six
** PLEASE NOTE: the factory will
have pre-assembled the keg adapter
for use with a pressurized keg. Please
refer to page 8 of the Instruction
Manual for the Non-Pressurized
Tapping System assembly procedure.
Please refer to the Instruction Manual
for detailed information regarding
the proper installation, care and
maintenance of your Chambrer Draft
Beer Dispenser.
A Non-Pressurized keg must be
decompressed prior to inserting the
tapping system.
Follow the directions on the keg and
pour 1/2 a glass of beer.
Now that you have decompressed
the keg we suggest you let it settle
for a short time (20-30min) before
proceeding with the insertion of the
tap system.
Slowly insert the tapping tube attached
to the tapping system through the
venting plug on the top of the keg.
There will be a small tab inside the
venting plug that you push into the
keg. This will not affect the taste of
your beer.
Completely insert the
tube into the keg until
the tapping system
clips onto and is fully
attached to the keg.
Gently place keg into
cavity using handle
on tapping system.
Be sure the
connection is
tight from the
tube to the unit
otherwise CO2
will escape!
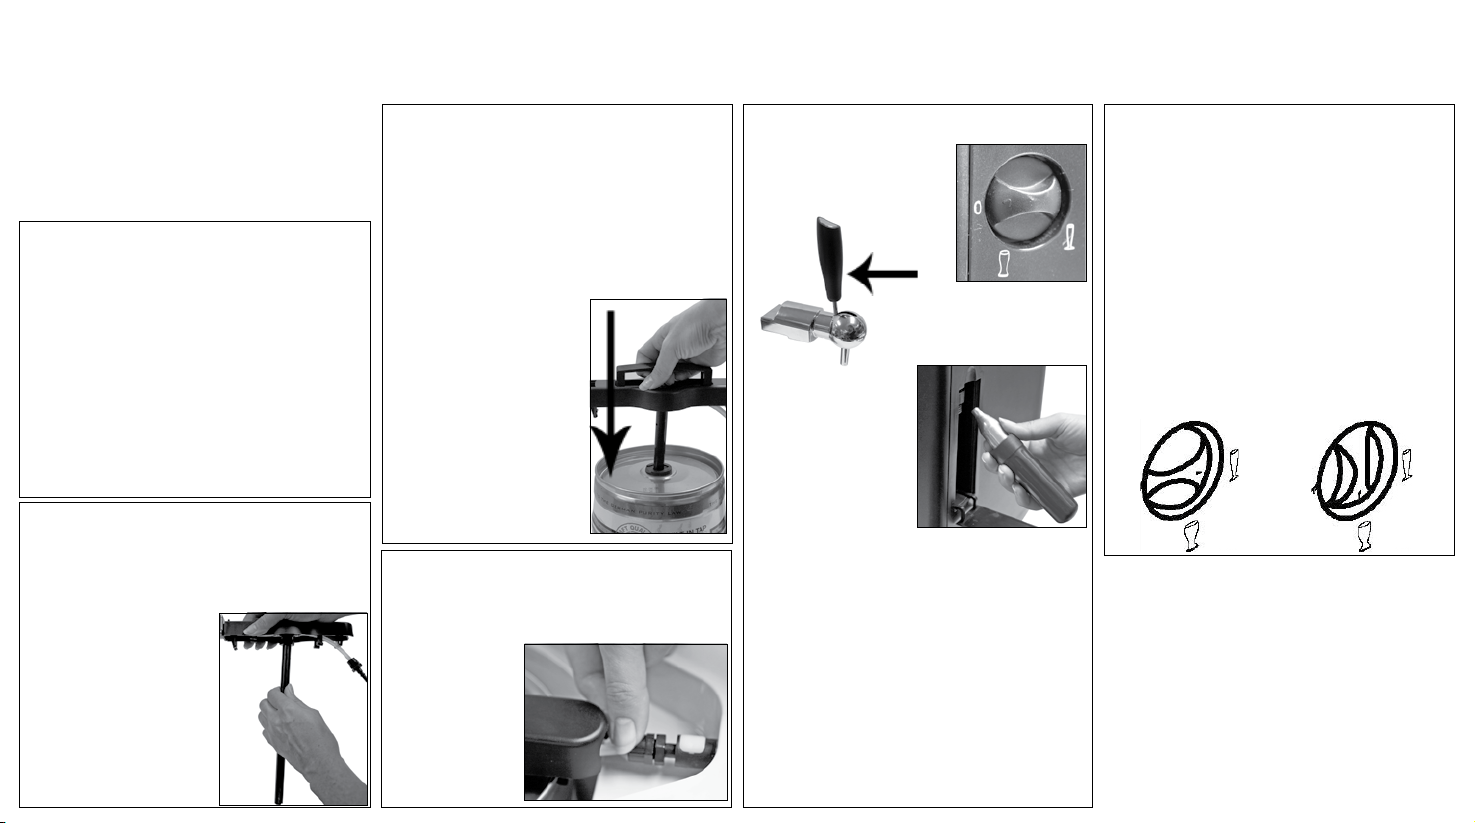
Attach tapping tube to tapping system.
Lubricate the tube that is connected to
the tapping system with fresh water
and insert it into the
keg. (This will make
it easier to insert into
the plug / adaptor.
Set pressure control
knob on the side to
the ”0” position!
Plug in the CO2inlet tube (back of the
tapping system) into the unit.
Your choice of beer will determine
how much pressure you need. For
most beers (Lagers and Pilsner) a
low pressure is sufcient in order to
tap the beer. We suggest setting the
pressure control knob towards the
small draft beer icon. For wheat beers
and Guinness we suggest to set the
pressure control knob towards the
large draft beer icon.
Screw holder back on quickly to
avoid CO2escaping. You will hear a
short burst of air when the cartridge
is pierced. Return holder to original
position and close the door.
Wait 10-30 minutes before selecting
preferred pressure to allow the CO2to
disperse throughout the system.
Remember to turn pressure control
back to “0” when replacing a keg.
Make sure tap is in
closed position.
Open the CO2
door and swing
cartridge holder
out. Unscrew and
drop a 16g CO2
cartridge into the
holder.
Lager / Pilsner Wheat Beers
Refer to page 8 of
the Manual for
tapping system
assembly directions.


