manuals.online logo
Brands
  1. Home
  2. •
  3. Brands
  4. •
  5. Chamberlain
  6. •
  7. Remote Control
  8. •
  9. Chamberlain LiftMaster Security+ 355LMC User manual

Chamberlain LiftMaster Security+ 355LMC User manual

This manual suits for next models

4

Other Chamberlain Remote Control manuals

Chamberlain CPTX User manual

Chamberlain

Chamberlain CPTX User manual

Chamberlain 821LMC-S User manual

Chamberlain

Chamberlain 821LMC-S User manual

Chamberlain LiftMaster Security+ 973-315LM User manual

Chamberlain

Chamberlain LiftMaster Security+ 973-315LM User manual

Chamberlain Liftmaster Security+ 974LM User manual

Chamberlain

Chamberlain Liftmaster Security+ 974LM User manual

Chamberlain LiftMaster Professional 33LM User manual

Chamberlain

Chamberlain LiftMaster Professional 33LM User manual

Chamberlain 41A6408 Installation guide

Chamberlain

Chamberlain 41A6408 Installation guide

Chamberlain LiftMaster Security+ 973LM User manual

Chamberlain

Chamberlain LiftMaster Security+ 973LM User manual

Chamberlain LiftMaster 81LM User manual

Chamberlain

Chamberlain LiftMaster 81LM User manual

Chamberlain 825LM User manual

Chamberlain

Chamberlain 825LM User manual

Chamberlain Power Drive Whisper Drive Security+ 953D User manual

Chamberlain

Chamberlain Power Drive Whisper Drive Security+ 953D User manual

Chamberlain 811LM User manual

Chamberlain

Chamberlain 811LM User manual

Chamberlain KLIK3C-BK2 User manual

Chamberlain

Chamberlain KLIK3C-BK2 User manual

Chamberlain 64LM User manual

Chamberlain

Chamberlain 64LM User manual

Chamberlain Passport MAX PPV3M User manual

Chamberlain

Chamberlain Passport MAX PPV3M User manual

Chamberlain 895MAX User manual

Chamberlain

Chamberlain 895MAX User manual

Chamberlain LiftMaster Professional Security+ 974-315LM User manual

Chamberlain

Chamberlain LiftMaster Professional Security+ 974-315LM User manual

Chamberlain 890MAX User manual

Chamberlain

Chamberlain 890MAX User manual

Chamberlain 375LM User manual

Chamberlain

Chamberlain 375LM User manual

Chamberlain PASSPORT CPTK3 User manual

Chamberlain

Chamberlain PASSPORT CPTK3 User manual

Chamberlain 412HMC User manual

Chamberlain

Chamberlain 412HMC User manual

Chamberlain LiftMaster Security+ 970LM User manual

Chamberlain

Chamberlain LiftMaster Security+ 970LM User manual

Chamberlain LiftMaster 361LM User manual

Chamberlain

Chamberlain LiftMaster 361LM User manual

Chamberlain 750CBM User manual

Chamberlain

Chamberlain 750CBM User manual

Chamberlain LiftMaster Security+ 372LM User manual

Chamberlain

Chamberlain LiftMaster Security+ 372LM User manual

Popular Remote Control manuals by other brands

Bircher Reglomat RC Duo 2 user guide

Bircher Reglomat

Bircher Reglomat RC Duo 2 user guide

Emerson RCBT100 owner's manual

Emerson

Emerson RCBT100 owner's manual

BILDA Element-6 user manual

BILDA

BILDA Element-6 user manual

Absima CR7P manual

Absima

Absima CR7P manual

Mitsubishi Electric PAR-32MAAG Instruction book

Mitsubishi Electric

Mitsubishi Electric PAR-32MAAG Instruction book

RCA RCRTBL08BE1 quick start guide

RCA

RCA RCRTBL08BE1 quick start guide

US Electronics NOVARI user guide

US Electronics

US Electronics NOVARI user guide

Panasonic EUR7622KB0 Operation guide

Panasonic

Panasonic EUR7622KB0 Operation guide

Bang & Olufsen Beo4 user manual

Bang & Olufsen

Bang & Olufsen Beo4 user manual

Marantz RC101 user guide

Marantz

Marantz RC101 user guide

FUTABA 9ZAP - PART2 manual

FUTABA

FUTABA 9ZAP - PART2 manual

HR Matic HR MULTI 3 quick start guide

HR Matic

HR Matic HR MULTI 3 quick start guide

Anritsu MP1777A Operation manual

Anritsu

Anritsu MP1777A Operation manual

Niles WVC100 Installation & operating guide

Niles

Niles WVC100 Installation & operating guide

Bang & Olufsen BEO6 Getting started

Bang & Olufsen

Bang & Olufsen BEO6 Getting started

GE 94901 instruction manual

GE

GE 94901 instruction manual

FUTABA R7108SB Full manual

FUTABA

FUTABA R7108SB Full manual

Invacare G91S user manual

Invacare

Invacare G91S user manual

manuals.online logo
manuals.online logoBrands
  • About & Mission
  • Contact us
  • Privacy Policy
  • Terms and Conditions

Copyright 2025 Manuals.Online. All Rights Reserved.

To prevent possible SERIOUS INJURY or DEATH from electrocution:
• Be sure power is NOT connected BEFORE installing the receiver.
To prevent possible SERIOUS INJURY or DEATH from a moving gate
or garage door:
• ALWAYS keep remote controls out of reach of children. NEVER
permit children to operate, or play with remote controls.
• Activate gate or door ONLY when it can be seen clearly, is properly
adjusted, and there are no obstructions to door travel.
• ALWAYS keep gate or garage door in sight until completely closed.
NEVER permit anyone to cross path of moving gate or door.
SECURITY
✚
®
UNIVERSAL RADIO CONTROL
MODELS 355LM & 355-2LM* (315 MHz)
MODELS 535LM & 535-2LM* (390 MHz)
*Indicates 2 remote controls are provided
MOUNTING RECEIVER
1. Disconnect power to the garage door opener.
2. Fully extend antenna wire below bottom of case as shown.
3. Mount the receiver directly onto the garage door opener with the clips
provided (Figure 1).
OR
Attach to a ceiling/inside wall of the garage with connecting bell wire
(not provided). Fasten the receiver to the ceiling or inside garage wall
with dry wall screws provided (Figure 2).
NOTE: Transformer Model 85 or 95 is required if your residential garage
door opener is a LiftMaster, Chamberlain or Sears.
INSTALLATION USING CLIPS
1. Loosen the three terminal screws on the receiver (labeled 1, 2 and 3)
(Figure 1).
2. Insert one end of a mounting clip under each terminal. Do not
re-tighten at this time.
3. Loosen the three terminal screws on the garage door opener used for
push button controls and radio power.
4. Leaving the push button bell wire in place, insert the other ends of the
mounting clips under the garage door opener terminal screws.
NOTE: If the number sequence of the garage door opener terminals does
not match the receiver, turn the receiver around (so back is facing out)
and complete the connection.
5. Re-tighten the terminal screws on the garage door opener and
receiver.
6. Reconnect power to the garage door opener.
NOTE: If the receiver push bar does not light, use Transformer
Model 85 or 95.
INSTALLATION USING BELL WIRE
1. Attach one end of 3-strand bell wire (not provided) to receiver
terminals 1, 2 and 3.
2. Connect the other end to the three garage door opener terminals used
for push button controls and radio power.
3. Use insulated staples to secure bell wire between receiver and garage
door opener (Figure 2).
4. Reconnect power to the garage door opener.
NOTE: If the receiver push bar does not light, use Transformer
Model 85 or 95.
INSTALLATION WITH TRANSFORMER
1. With the transformer, use a 2-wire connection only.
2. Attach wire to receiver terminals 1 and 2 and to the garage door
opener terminals used for push button control.
3. Plug the transformer into receiver and 120 Volt outlet (Figure 3).
Antenna Wire Fully Extended
Radio Power
Push Button
Common
Garage Door
Opener Terminals
Garage Door
Opener Terminals
Transformer
321
Antenna Wire
Fully Extended
Radio Power
Push Button Common
123
Garage Door
Opener Terminals
Figure 1
Figure 2
Figure 3
NOTE: Transformer Model 85 or 95 is required if your residential garage
door opener is a LiftMaster, Chamberlain or Sears.
This product should be used only in connection
with garage door openers equipped with
photoelectric sensors. If your garage door opener
does not have photoelectric sensors, you should
consider a replacement garage door opener.
Please go to www.liftmaster.com to find a local
LiftMaster dealer or call 1-800-528-9131.
STOP
WARNING
For more information, please visit www.devancocanada.com or call toll free at 855-931-3334
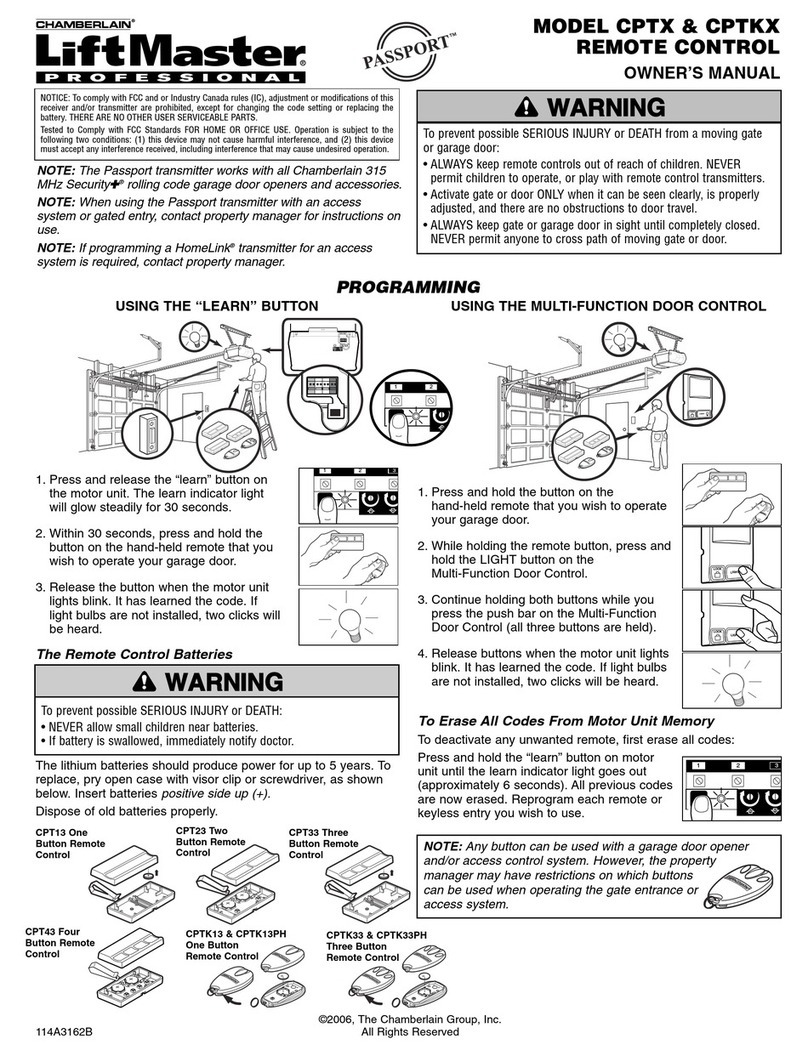
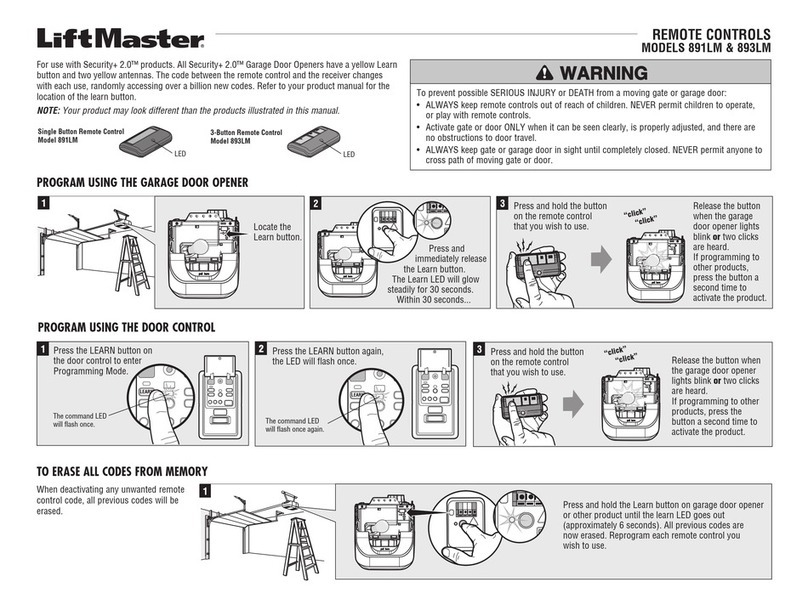
PROGRAMMING THE REMOTE CONTROL TO THE RECEIVER
With Security✚®remote controls, the code between the remote control
and the receiver changes with each use, accessing over 100 billion new
codes.
You can activate your garage door opener with up to 8 Security✚®
remote controls and one Security✚®Keyless Entry.
1. Pry open the front panel of receiver case with a coin or a screwdriver
(Figure 4). Re-connect power to the garage door opener.
2. Press and release the “SMART” button on the receiver. The “SMART”
indicator light will glow steadily for 30 seconds (Figure 5).
3. Within 30 seconds, press and hold the button on the hand-held
remote control that you wish to operate your garage door opener
(Figure 6).
The garage door opener will now operate when the push button on either
the receiver or the remote control is pressed.
Repeat steps 2 and 3 for each remote control that will be used to operate
the garage door opener.
TO ERASE ALL REMOTE CONTROL CODES
Press and hold the “SMART” button on the receiver panel until the
indicator light turns off (about 6 seconds). All remote control codes are
now erased. Then follow the steps above to reprogram each remote
control.
REPLACING THE REMOTE CONTROL BATTERY
The lithium battery should produce power for up to
5 years. To replace battery, pry open case with visor
clip or screwdriver as shown. Insert battery positive
side up.
Dispose of old battery properly. Replace the battery
with only 3V2032 coin cell batteries.
SET OUTPUT DURATION (COMMERCIAL APPLICATIONS ONLY)
For commercial applications, the receiver can be set for either constant or
momentary closure on the output contacts. Use of constant closure is
prohibited on residential garage door openers because it overrides the
safety reversal devices.
With the jumper in the “M” (Momentary) position, the contacts will close
for 1/4 second regardless of the length of radio transmission. With the
jumper in “C” (Constant) position, the contacts will stay closed as long as
the radio continues transmitting.
The receiver is factory set at M.
SPECIFICATIONS
Output Rating . . . . . . . . . . . . . . . . . . . . . . . . . . 5 Amps 28 Vac or dc Max.
Power . . . . . . . . . . . . . . . . . . . . . . . . . . . . . . . .18V - 30V ~, 30 mA, 60 Hz
18 - 30V , 30 mA
RF Frequency . . . . . . . . . . . . . . . 315 MHz (Models 355LM and 355-2LM)
390 MHz (Models 535LM and 535-2LM)
NOTE: If the power is other than shown in specifications, Accessory
Transformer Model 85 or 95 is required.
ACCESSORY REMOTE CONTROLS
Series 300. . . . . . . . . . . . . . . . . . . . . . . . . . . Models 355LM and 355-2LM
Series 60. . . . . . . . . . . . . . . . . . . . . . . . . . . . Models 535LM and 535-2LM
(for commercial applications only)
Series 80 and 900. . . . . . . . . . . . . . . . . . . . . Models 535LM and 535-2LM
(for residential applications)
To prevent possible SERIOUS INJURY or DEATH, the use of
CONSTANT OPERATION on residential openers is PROHIBITED.
To prevent possible SERIOUS INJURY or DEATH:
• NEVER allow small children near batteries.
• If battery is swallowed, immediately notify doctor.
To reduce risk of fire, explosion or chemical burn:
• Replace ONLY with 3V2032 coin batteries.
• DO NOT recharge, disassemble, heat above 100°C (212°F) or
incinerate.
3
2
1
Indicator
Light
“SMART”
Button
Option
Jumper
C
P2
M
C
P2
M
FOR SERVICE DIAL OUR TOLL FREE NUMBER: 1-800-528-9131
Output
Duration
Terminals
Jumper
M
MOMENTARY
OPERATION
Output
Duration
Terminals
Jumper
M
CONSTANT
OPERATION
NOTICE: To comply with FCC and or Industry Canada (IC) rules, adjustment or modifications of
this receiver and/or remote control are prohibited, except for changing the code setting or
replacing the battery. THERE ARE NO OTHER USER SERVICEABLE PARTS.
Tested to Comply with FCC Standards FOR HOME OR OFFICE USE. Operation is subject to the
following two conditions: (1) this device may not cause harmful interference, and (2) this device
must accept any interference received, including interference that may cause undesired operation.
Figure 5
Figure 6
Figure 4
WARNING
WARNING
HOW TO ORDER
REPAIR PARTS
DEVANCO CANADA
19192 HAY ROAD, UNIT Q
SUMMERSTOWN, ON K0C 2E0
TOLL FREE: 855-931-3334
www.devancocanada.com
WHEN ORDERING REPAIR PARTS
PLEASE SUPPLY THE
FOLLOWING INFORMATION:
3PART NUMBER
3DESCRIPTION
3MODEL NUMBER