TÉLÉCOMMANDE UNIVERSELLE
MODÈLES 375LM & 375LMC
Afin d’éliminer les risques de BLESSURES GRAVES ou de MORT découlant de l’actionnement d’une clôture
ou d’une porte de garage :
• NE JAMAIS laisser la télécommande à portée des enfants. Ne JAMAIS laisser un enfant manipuler une
télécommande ni jouer avec elle.
• Actionner la clôture ou la porte UNIQUEMENT lorsqu’elle est clairement visible, correctement ajustée et
que le mécanisme est libre de toute entrave.
• TOUJOURS garder la clôture ou la porte de garage en vue jusqu’à sa fermeture complète. NE JAMAIS
permettre à quiconque de passer lorsqu’une clôture ou une porte est en mouvement.
ATTENTION
AVERTISSEMENT
AVERTISSEMENT
AVERTISSEMENT
Pour prévenir d’éventuelles BLESSURES GRAVES ou LA MORT :
• Ne JAMAIS laisser de petits enfants à proximité des piles.
• Aviser immédiatement un médecin en cas d’ingestion d’une pile.
Pour réduire le risque d’incendie, d’explosion ou de brûlure chimique :
• Remplacer les piles UNIQUEMENT par des piles capsules 3V2032.
• NE PAS recharger, ni démonter, ni chauffer à une température supérieure à 100 °C (212 °F), ni incinérer.
ATTENTION
AVERTISSEMENT
AVERTISSEMENT
AVERTISSEMENT
AVIS : Les règles de la FCC ou d’Industrie Canada (IC), ou les deux, interdisent tout ajustement ou toute modification de ce
récepteur et/ou de cet émetteur, sauf pour modifier le code ou pour remplacer la pile. IL N’EXISTE AUCUNE AUTRE PIÈCE
SUSCEPTIBLE D’ÊTRE ENTRETENUE PAR L’UTILISATEUR.
Vérifié pour conformité avec les normes de la FCC POUR UTILISATION À LA MAISON OU AU BUREAU. L’utilisation est sujette aux
deux conditions ci-après : (1) ce dispositif ne peut causer des interférences nuisibles, et (2) ce dispositif doit accepter toute
interférence reçue, y compris une interférence pouvant causer un fonctionnement non désiré.
Chamberlain et LiftMaster sont des marques de commerce de Chamberlain Group. Genie est une marque de commerce d’Overhead Door Corporation. Overhead Door est une marque de commerce d’Overhead Door
Corporation. Linear est une marque de commerce de Linear Corporation. Master Mechanic est une marque de commerce de TruServ. Sears est une marque de commerce de Sears & Roebuck. Stanley est une marque de
commerce de The Stanley Works. Wayne Dalton est une marque de commerce de Wayne Dalton Corporation. Do It est une marque de commerce de Do It Best Corporation.
LES PILES DE TÉLÉCOMMANDE
Batterie
Se débarrasser des vieilles piles
convenablement.
Remplacer les piles UNIQUEMENT
par des piles capsules 3V2032.
www.liftmaster.com
1-800-442-1255
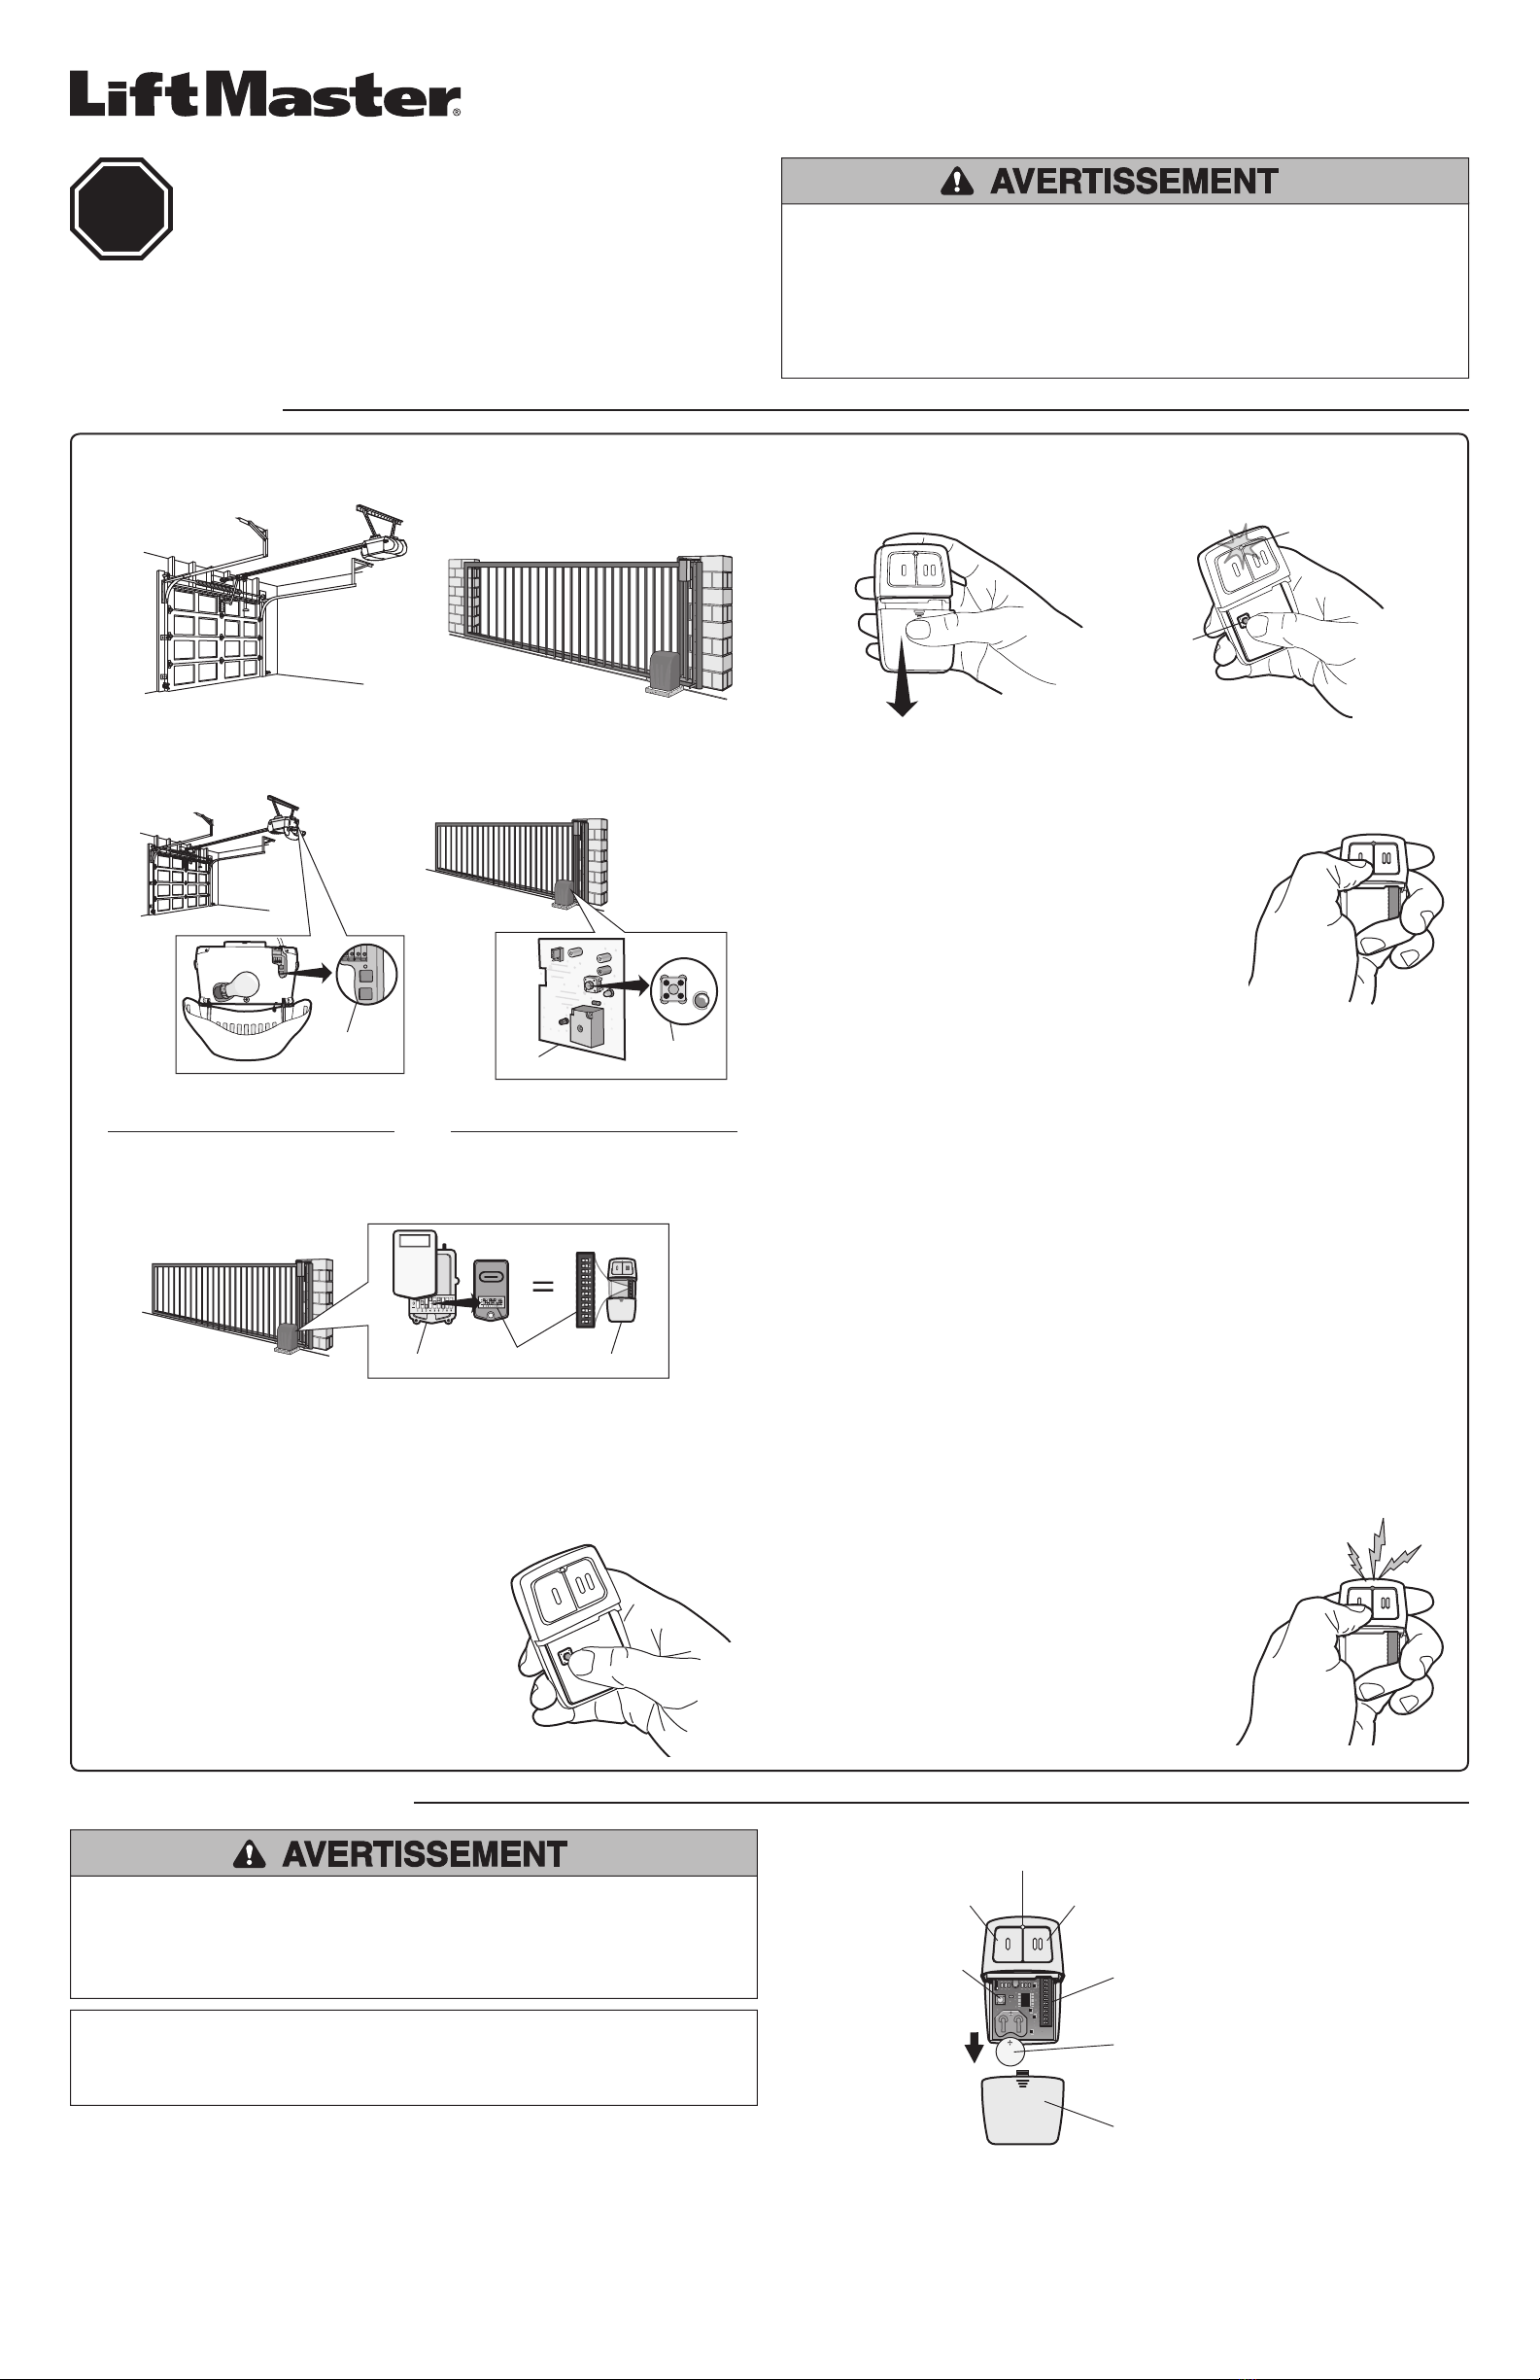
PROGRAMMATION
1Commencer avec la porte du garage fermée.
REMARQUE : Le bouton INTELLIGENT/D’APPRENTISSAGE ou les COMMUTATEURS DIP sont situés
sur le produit ou dans un récepteur extérieur ou encore, à proximité du produit. Consulter le manuel du
propriétaire de votre produit pour localiser le bouton INTELLIGENT/D’APPRENTISSAGE ou les
COMMUTATEURS DIP.
Bouton 1 Bouton 2
Indicateur LED
© 2013, The Chamberlain Group, Inc.
All Rights Reserved
114A3492C Tous droits réservés
Lire les instructions en entier AVANT de commencer. Lors de l’utilisation d’une
télécommande universelle avec un ouvre-porte de garage universel, celle-ci ne doit être
utilisée qu’avec des ouvre-portes de garage fabriqués après 1993 et qui fonctionnent avec
des capteurs photoélectriques. Les capteurs photoélectriques sont toujours situés sur ou
près de la partie inférieure du guide de la porte.
La télécommande universelle peut être programmée pour activer jusqu’à deux produits,
comme un ouvre-porte de garage, un actionneur de portail ou de porte commerciale. Chaque bouton de la
télécommande universelle fonctionne indépendamment l’un de l’autre et doit être programmé séparément. Le
deuxième bouton de la télécommande universelle peut être programmé pour des produits différents sans
compromettre la programmation du premier bouton. Les illustrations de ce manuel ne sont fournies qu’à titre
de référence; votre produit peut avoir une apparence différente.
3Tenir enfoncé le bouton intelligent/d’apprentissage de votre produit.
Faire correspondre les COMMUTATEURS DIP de la télécommande au récepteur existant ou à la
télécommande existante.
4Enfoncer et relâcher le bouton. Lorsque le DEL cesse de clignoter, continuer d’enfoncer et de
relâcher le bouton jusqu’à ce qu’un déclic se fasse entendre de l’ouvre-porte de garage, une
lampe sur l’ouvre-porte de garage clignote, la porte de garage s’ouvre/se ferme ou un bip
retentit de l’actionneur du portail (18 fois au maximum).
OU
Presser et relâcher le bouton télécommande universelle...
... 8 fois Chamberlain®*bouton jaune 2011-Actuel
... 3 fois Chamberlain®*bouton violet 2005-Actuel
... 2 fois Chamberlain®* bouton orange 1997-2005
... 4 fois Chamberlain®*bouton vert 1993-1996
... 5 fois Genie Overhead Door® Intellicode 1995-Actuel
... 6 fois Genie Overhead Door® Intellicode 2005-Actuel
... 1 fois Linear® Mega-Code 1997-Actuel
... 7 fois Stanely® Security Code 1998
... 9 fois Wayne Dalton® Rolling Code 372.5 MHz
1999-Actuel
... 14 fois Linear Multicode®10 Position Interrupteurs Dip
... 16 fois Stanley Multicode®10 Position Interrupteurs Dip
... 18 fois Linear® 8 Position Interrupteurs Dip
La DEL de la télécommande universelle DOIT cesser de clignoter entre chaque pression exercée
sur le bouton. Le code est accepté lorsqu’un déclic ou un bip retentit, qu’une lampe clignote ou
que la porte/le portail s’actionne.
*LiftMaster, Do-It, Master Mechanic, Raynor, True Value et Sears Craftsman sont compatibles
avec la technologie Chamberlain.
5Appuyer sur le bouton de programmation pour quitter le
mode de programmation. La programmation est terminée.
6Appuyer sur le bouton de programmation pour activer votre produit. Si le
produit ne s’active pas, répéter les étapes de programmation 3 à 6.
REMARQUE : Interrupteur DIP 2 Positions : Si la programmation échoue,
inverser les interrupteurs DIP (de OFF à ON et de ON à OFF).
ARRÊT
LEARN
XMITTER
BOUTON
SMART/LEARN CARTE DE CONTRÔLE
1211109853 7641 2
RÉCEPTEUR TÉLÉCOMMANDE
INTERRUPTEURS
DIP
2Ouvrir la télécommande. Tenir enfoncé le bouton de programmation jusqu’à ce que la DEL
s’allume (environ deux seconds).
OU
Indicateur LED
Bouton
Programme
Bouton Programme Interrupteurs DIP
Couvercle de Batterie


