Chandler Systems Drop D-CPS User manual

Chandler Systems
Installation
Manual
Commercial Protection Valve
D-CPS

2
INTRODUCTION
Privacy Statement
For more information about privacy, visit our privacy policy
(https://dropconnect.com/sites/default/files/DROP-Privacy-Statement.pdf) online.
DROP Patents
For the most up-to-date list of patents, visit our patents on our website: https://dropconnect.com/patents.
Thank You for Purchasing a DROP System!
We know you’ll love your leak detection ability and water conservation benefits of your new DROP Water
Management System from Chandler Systems. Protecting your facility and conserving water are just a few
of the ways that the DROP Water Management System can improve your water system.
Be sure to check out the dropconnect.com website periodically for more information about additional DROP
products as they are released.
833.BUY.DROP
(833.289.3767) dropconnect.com
To further help you operate your new DROP system, we have provided you with many other resources for
you to learn more. Feel free to call Chandler Systems when you need additional help. We also have many
resources located on our website including instructional videos, and images.
DROP Connect is also active on various social media pages! Feel free to follow us for the most up to date
information and news!
@dropconnect
FCC Compliance Statement:
https://dropconnect.com/sites/default/files/FCC_Compliance_Statement.pdf
Industry Canada Compliance Statement:
https://dropconnect.com/sites/default/files/Industry_Canada_Compliance_Statement.pdf

3
TABLE OF CONTENTS
CAUTION:
• Do not locate unit where it will be subject to temperatures below freezing.
• Do not use Vaseline or any petroleum-based lubricants on O-rings or rubber seals. Only use food-grade silicone lubricant.
• Do not use pipe dope or any sealant other than Teflon tape on threaded connections. Threads on the tool free connection nuts do not
require any tape because they use an O-ring seal. Tape is only required on the inlet/outlet adapter fittings.
Introduction................................................................................................... 2
Table of Contents......................................................................................... 3
How to Use Your System............................................................................. 4
Contents of Carton.................................................................................... 5
Precautions.................................................................................................. 6
Installation Instructions................................................................................... 8
The DROP Remote....................................................................................... 12
DROP Limited Warranty............................................................................... 14

4
HOW TO USE YOUR SYSTEM
6
Your DROP Commercial Protection System uses advanced technology to protect your facility from leaks,
and save you money, all while providing years of trouble-free operation.
Additional Features You’ll Find on Your DROP Home Protection System
• Power Backup: To continue to protect your facility during a power outage
• Water Usage Monitoring - DROP monitors your water usage and provides real
time information including: current water flow, peak flow today, daily average of the
last 90 days, as well as many useful historical charts.
• Automatically integrates with other components on your DROP System - DROP is
a water management system that integrates all of the water related devices in your facility
including: water softeners, backwashing filters, leak detectors, sump pump alarms, and many
more to come!
• Convenient User Interface on your Smart Phone or Tablet
• LED Light Codes: Alert you to system status at a glance.
• Temperature Monitoring: Provides notice of high or low temperature conditions.
• Pressure Monitoring: To recognize problems with your plumbing system.

5
Manually Bypassing Your System: The Commercial Protection System requires a bypass loop to be installed to allow
the system to be taken in and out of service. To take your system out of service close the ball valve on the inlet side of the
Motorized Valve and the ball valve on the outlet side of the Transducer Assembly. Then open the ball valve for the bypass
loop.
System In Service
Building is being protected
System Out of Service
Building is not protected
HOW TO USE YOUR SYSTEM

6
Contents of Carton
COMMERCIAL PROTECTION
CONTROL VALVE
FLOW METER
1.5”, 2” or 3”
LEAK DETECTORS
(Contains 2 or 4 and
includes batteries)
HUB
(Mounting Rack)
REMOTE
1.5” NPT
CONNECTORS
*Optional
MOTORIZED
VALVE
1.5”, 2” or 3”
HOW TO USE YOUR SYSTEM

7
Precautions
HOW TO USE YOUR SYSTEM
1
4
2
6
Read Manual
Ventilate
Use Eye Protection
Protect nearby materials
when soldering
Use only lead-free solder
5If existing plumbing is copper,
install grounding strap before
creating plumbing gaps. 5
3
4

8
STEP 1: Plumb the system into your water supply
INSTALLATION INSTRUCTIONS
Unpack equipment.
Systems are sized for 1.5”, 2”, or 3” inlet / outlet.
With the bypass loop in bypass position, turn on the main water supply. Open
a cold soft water tap nearby and let run a few minutes or until the plumbing
is free from foreign material (usually solder or debris from cutting the pipe)
that may have resulted from the installation. Once clean, close the water tap.
*
Note: This system is for INDOOR use only. The system may be installed in
any orientation as long as it is configured in the order shown above.
Hub

9
INSTALLATION INSTRUCTIONS
As shown above, all DROP devices that plug into 120 volt outlets expand the DROP Link mesh network.
When placing the DROP Hub and Remote, keep in mind that installing them in separate areas of the
facilty will expand the network. This is important to consider if you have leak detectors that are located
in far extremes of the building.
If you wish to connect your system to local WiFi for remote control and notifications,
please install the DROP Hub in a location that has a good WiFi signal.
STEP 2: Download the DROP Connect Mobile
STEP 3: Determine where you want to locate
the HUB and REMOTE
*

10
INSTALLATION INSTRUCTIONS
STEP 4: Follow Mobile Onboarding in the DROP Connect App
See Users Guide for detailed instructions
STEP 5: Add & Name Each Device
See Users Guide for detailed instructions
STEP 6: Install 9V Battery into your Hub & CPS Control Box
9 Volt Battery back up enables your valve to continue
to protect your facility from leaks during a power
outage. To install the battery, remove the 4 phillips
head screws on the cover of the case.
9 volt battery back up is recommended for DROP Hub.
STEP 7: Ensure the ball valves are in service positions
System In Service
Building is being protected

11
STEP 9: Configure the System
INSTALLATION INSTRUCTIONS
DEVICES > HOME PROTECTION VALVE > STATUS
(Navigation description examples can be found in the User Guide)
Set High and Low
Temperature Notifications
The DASHBOARD provides a system information overview
The DEVICES screen allow you to customize how your system operates.

12
THE DROP REMOTE
In addition to acting as a DROP Link mesh
network extender, the DROP Remote has
additional features:
At a glance the remote can provide the status of
your water system through color codes.
Water is in Service Water is Shutoff
Slow blinking indicates you have a
notification in your DROP App that
has not been seen
Flashes indicate that the DROP
Remote is communicating with other
devices
Color codes for normal operation
To turn off water in your facility, place your finger on the water DROPlet button for about 2 seconds.
Once the lights turn orange, remove your finger.
If your system is in the Shutoff mode and you would like to turn your water back on, place your
finger on the DROPlet button for about 2 seconds. When it turns to green, remove your finger and,
your water will turn back on.

13
SYSTEM NOTES

14
WATER MANAGEMENT SYSTEMS
This warranty cannot be transferred - it is extended only to the original
purchaser or first user of the product. By accepting and keeping this
product, you agree to all of the warranty terms and limitations of liability
described below.
Important Warning: Read carefully the DROP Water Management
Systems Equipment Installation, Operating and Maintenance Instructions
Manual to avoid serious personal injury and property HAZARDS and to
ensure safe and proper care of this product.
*FOR AS LONG AS YOU OWN AND LIVE IN YOUR SINGLE FAMILY
HOME, this warranty covers your water treatment equipment, if you are
the first user of this DROP Water Treatment Systems equipment and
purchased it for single family home use - subject to all of the conditions,
limitations and exclusions listed below. Purchasers who buy the DROP
equipment for other purposes, and other component parts are subject to
more limited warranties and you should read all of the terms included in
this form to make sure you understand your warranty.
What is covered by this warranty?
Chandler Systems, Inc. warrants that at the time of manufacture, the
DROP equipment shall be free from defects in material and workmanship
as follows:
Product Warranty
Residential Mineral Tank 10 Years
DROP Control Valves 5 Years
DROP Pump Controllers 5 Years
DROP Home Protection Valve 5 Years
DROP Commercial Protection Systems 5 Years
Brine Tank 5 Years
DROP Hub and Remote 1 Year
DROP Wireless Low Salt Alarm 1 Year
Other Accessories and Parts 1 Year
Brine Tank Components 1 Year
* This warranty does not include media and/or cartridge filter elements.
Additional Terms & Conditions
What Chandler Systems Inc will do if you have a covered warranty claim;
Chandler Systems Inc will at its discretion either make repairs to correct
any defect in material or workmanship or supply and ship either new
or used replacement parts or products. Chandler Systems, Inc. will not
accept any claims for labor or other costs.
Additional Exclusions and Limitations
This warranty is non-transferable and does not cover any failure
or problem unless it was caused solely by a defect in material or
workmanship. In addition, this warranty shall not apply:
• If the equipment is not correctly installed, operated, repaired and
maintained as described in the Installation, Operating & Maintenance
Instructions Manual provided with the product.
• Defects caused as a direct result of the incoming water quality
• If the DROP equipment is not sized appropriately for the intended job.
• To any failure or malfunction resulting from abuse (including freezing),
improper or negligent; handling, shipping (by anyone other than
DROP)
• If the unit has not always been operated within the factory
recommended temperature limits, and at a water pressure not
exceeding 125 psi, during storage, use, operation, accident; or
alteration, lightning, flooding or other environmental conditions.
• To any failure or malfunction resulting from failure to operate the
system with potable water, free to circulate at all times; and free of
damaging water sediment or scale.
• This warranty does not cover labor costs, shipping charges, service
charges, delivery expenses, property damage, administrative fees or
any costs incurred by the purchaser in removing or reinstalling the
water management equipment.
• The warranty does not cover any claims submitted more than 30 days
after expiration of the applicable warranty, and does not apply unless
prompt notice of any claim is given to an authorized DROP Dealer
or to DROP or a designated contractor is provided access to the
installation and to the water treatment equipment.
THESE WARRANTIES ARE GIVEN IN LIEU OF ALL OTHER EXPRESS
WARRANTIES. NO DROP REPRESENTATIVE OR ANY OTHER
PARTY IS AUTHORIZED TO MAKE ANY WARRANTY OTHER THAN
THOSE EXPRESSLY CONTAINED IN THIS WARRANTY AGREEMENT.
Additional Warranty Limitations
ANY IMPLIED WARRANTIES THE PURCHASER MAY HAVE,
INCLUDING THE IMPLIED WARRANTIES OF MERCHANTABILITY
AND FITNESS FOR A PARTICULAR PURPOSE, SHALL NOT EXTEND
BEYOND THE APPLICABLE TIME PERIODS SPECIFIED ABOVE.
Some states do not allow limitations on how long an implied warranty
lasts, so the above limitations may not apply to you.
Limitations of Remedies
The remedies contained in this warranty are the purchaser’s exclusive
remedies. In no circumstances will Chandler Systems, Inc. or the seller
of the product be liable for more than, and purchaser-user’s remedies
shall not exceed, the price paid for the product. In no case shall
Chandler Systems, Inc. or seller be liable for any special, incidental,
contingent or consequential damages. Special, incidental, contingent
and consequential damages for which Chandler Systems, Inc. is not
liable include, but are not limited to, inconvenience, loss or damage to
property, consequential mold damage, loss of profits, loss of savings
or revenue, loss of use of the products or any associated equipment,
facilities, buildings or services, downtime, and the claims of third parties
including customers. Some states do not allow the exclusion or the
limitation of incidental or consequential damages, so the above limitations
or exclusion may not apply to you.
What to do if you have a problem covered by this warranty
Any warranty coverage must be authorized by Chandler Systems, Inc..
Contact the person from whom you purchased the product, who must
receive authorization from a DROP Dealer.
If your product is new and not used and you wish to return it, contact your
DROP Dealer.
Limited Warranty

15
Note: This equipment has been tested and found to comply with the limits for a Class B digital device, pursuant
to part 15 of the FCC Rules. These limits are designed to provide reasonable protection against harmful
interference in a residential installation. This equipment generates, uses and can radiate radio frequency
energy and, if not installed and used in accordance with the instructions, may cause harmful interference
to radio communications. However, there is no guarantee that interference will not occur in a particular
installation. If this equipment does cause harmful interference to radio or television reception, which can be
determined by turning the equipment off and on, the user is encouraged to try to correct the interference by
one or more of the following measures:
—Reorient or relocate the receiving antenna.
—Increase the separation between the equipment and receiver.
—Connect the equipment into an outlet on a circuit different from that to which the receiver is connected.
—Consult the dealer or an experienced radio/TV technician for help.
Chandler Systems Inc.
710 Orange St.
Ashland, OH 44805
P. 1 833 BUY-DROP
www.dropconnect.com

DROPCPS1121TV
Table of contents
Other Chandler Systems Control Unit manuals
Popular Control Unit manuals by other brands
Fire-Lite
Fire-Lite CMF-300-6 Installation and maintenance instructions
Meteo Control
Meteo Control Power Control operating manual
SIGMA TEK
SIGMA TEK HMI-Link G2 Device operating manual

Delta
Delta DVP01LC-SL instruction sheet
Alfalaval
Alfalaval Unique Single Seat Valve instruction manual
Zksoftware
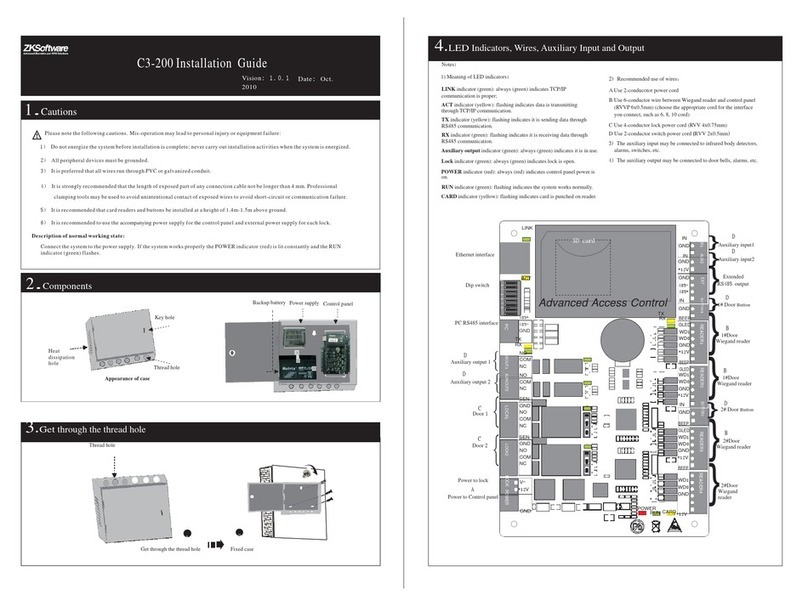
Zksoftware C3-200 installation guide
