Channel Vision 6530 User manual

6530
Indoor Dome Color 1.3 Megapixel IP Camera

Table Of Contents
2
Model Info Page 3
Warnings Page 4
Cable Pin-out Page 5
Assigning an IP Address Page 6
Assigning an IP Address /cont. Page 7
Assigning an IP Address /cont. Page 8
Assigning an IP Address /cont. Page 9
Connecting To Your Camera Page 10
ActiveX Control Page 10
Configuring Internet Explorer Page 11
Live Viewing Page 12
Live Viewing /cont. Page 13
Configuration Page 14
System Configuration Page 15
User Management Page 16
]System Update Page 17
Network Page 18
Network /cont. Page 19
Network /cont. Page 20
Network /cont. Page 21
Video Settings Page 22
Video Settings /cont. Page 23
Video Settings /cont. Page 24
Event List Page 25
Event List /cont. Page 26
Schedule Page 27
Micro SD Card Page 28
Micro SD Card /cont Page 29
Port Forwarding Page 30
Port Forwarding/cont Page 31
Specifications Page 32
Warranty Page 33

The 6530 is an indoor 1.3 megapixel dome CMOS IP camera. Key features include:
Built-in web server, allows users to view high quality, real-time video with the Internet Explorer browser
Uses H.264, MJPEG and MPEG4 codecs
Live video can be recorded to a computer and played back remotely, as well as viewed from many
mobile phones and other devices
Designed for large commercial projects using hundreds of cameras or a single family house requiring a
camera at the front door
6530 Features:
Channel Vision’s 6530 indoor IP Dome offers superior image quality with a 1.3 megapixel CMOS sensor
and has the ability to capture images up to 1200 x 800 pixels
With H.264 compression, less bandwidth and storage space are used, while delivering full resolution at
max frame rate with faster speeds over the internet
The 6530 also features event triggered micro SD card recording
Monitoring can be done anywhere an internet connection is available even from a 3G Smart-phone or
touch-screen tablet
Model 6530
3
•
•
•
•
•
•
•
•

CAUTION
RISK OF ELECTRIC SHOCK
DO NOT OPEN
CAUTION:TO REDUCE THE RISK OF ELECTRIC SHOCK.
DO NOT REMOVE COVER (OR BACK).
NO USER-SERVICEABLE PARTS INSIDE.
REFER SERVICING TO QUALIFIED SERVICE PERSONNEL.
WARNINGS
TO REDUCE THE RISK OF FIRE OR ELECTRIC SHOCK, DO NOT EXPOSE THIS
PRODUCT TO RAIN OR MOISTURE.
DO NOT INSERT ANY METALLIC OBJECT THROUGH VENTILATION GRILLS.
COPYRIGHT
ALL TRADEMARKS MENTIONED IN THE MANUAL ARE LEGALLY REGISTERED
TO THEIR RESPECTIVE COMPANIES.
Warnings
4

Cable Pin Out
5
DC 12V (Opt o if n t usi g oE swit h)
i n o n PcDC 12V (Opt o if n t usi g oE swit h)
i n o n Pc
Ether et Conn tor
nec
(T568B Standard)
Ether et Conn tor
nec
(T568B Standard)
Rv 1
eRv 1
e
WARNING:
DO NOT CUT THE BREAKOUT CABLE.
CUTTING THE CABLE WILL VOID THE WARRANTY ON THE DEVICE.
Channel Vision will still provide technical support if the cable is cut,
but cannot guarantee functionality.

1.) Connect the IP camera to the switch/router.
2.) Power on the IP camera.
3.) Use the software, “IP Installer” to assign the IP address to your 6530. You can find "IP
Installer" in the supplied CD.
4.) Execute IP Installer. This is located on your disk under the folder “IP Installer”.
5.) Press “Search”
6.) Click on the “Server name” that is found in IP Installer.
7.) If Windows prompts you to unblock IP Installer, you must select “unblock”.
There are 3 kinds of IP configuration:
A.) Fixed IP (Public IP or Virtual IP)
B.) DHCP (Dynamic IP)
C.) Dial-up (PPPoE)
"IP Installer" will search all IP Cameras connected to your LAN network.The user can
click “Search Device” to search again.
Assigning an IP Address
6

1.) Click the start icon on your computer
2.) Click the ‘Run’ icon on your computer.
3.) Type in ‘cmd’ and press enter on your keyboard, or press ok.
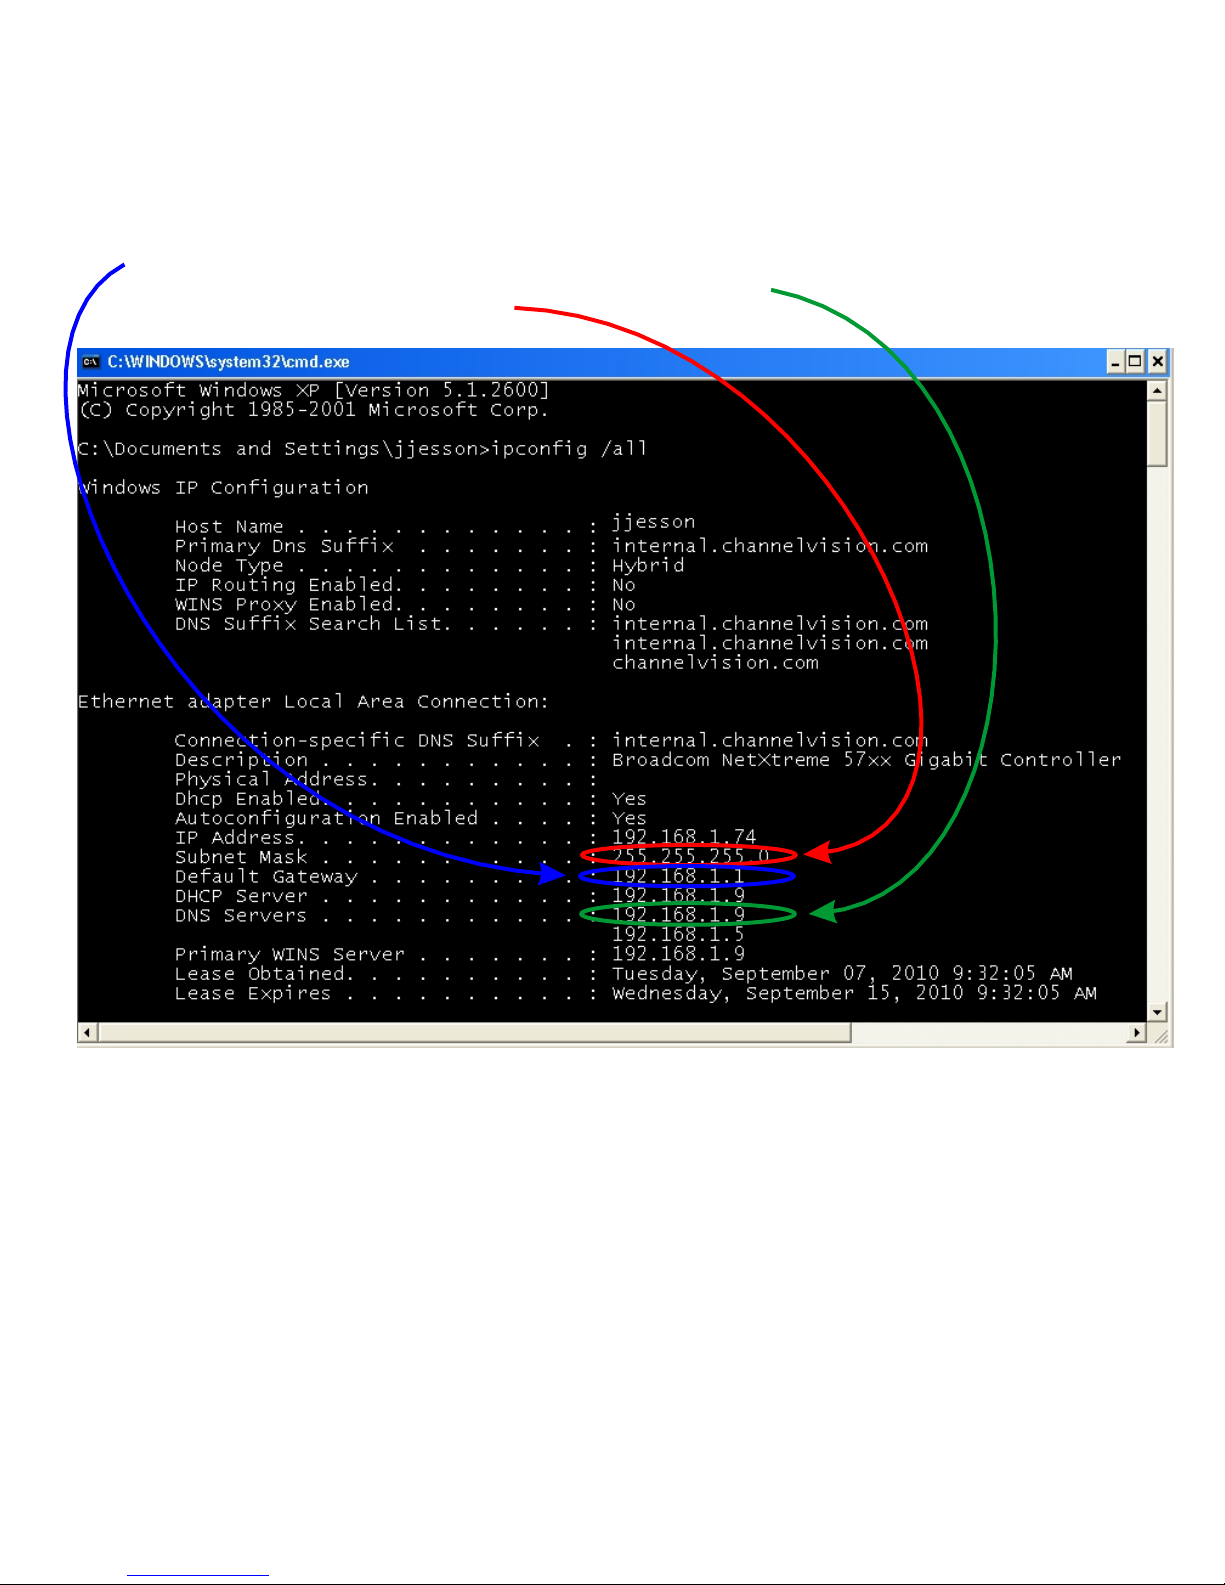
4.) Type in ‘ipconfig /all’ into the DOS prompt that appears. Press enter.
5.) Write down your computer’s IP address.
It is important that you do not use the same IP address for your IP Camera.
In the example below, the computer’s IP address is 192.168.1.74.
The IP address of the IP Camera must be different than the IP address in the computer.
Each networkable device in your network has an IP address assigned. You need to be sure the IP you
choose for your IP camera is not the same as any other device on your network.
Assigning an IP Address /cont
7
Assigning an IP Address /cont
6.) Copy/write down the following information from the DOS prompt:
A.) Default Gateway (Example 192.168.1.1)
B.) DNS Server (if 2 servers, use the first one, for example 192.168.1.9)
C.) Subnet Mask (Example 255.255.255.0)
8

Assigning an IP Address /cont
To change numbers, select the appropriate area on IP installer
with your mouse, and type in the info.
Name
Fourth number (different than computer)
Select “Static”
Subnet Mask (same as computer)
Default Gateway (same as computer)
DNS Server 1 (same as computer)
DNS Server 2 (same as computer)
Port (A port between 8000-8999 is
recommended, but any network
port can be used)
First 3 numbers are
same as computer
7.) Enter the information you wrote down from step 6 on page 9 into the IP camera network page
A.) Default Gateway (Enter this number under “Gateway”)
B.) DNS Server (Enter this number under “DNS 1”)
C.) Subnet Mask (Enter this number under “Netmask”)
8.) Giving the IP Camera a unique IP address.
Assign and IP address to the IP Camera by using the first 3 sets of numbers of your default gateway. A
IP address, has 4 sets of numbers, each followed by a period. Xxx.xxx.xxx.xxx Using 192.168.1.1 as an
example of the default gateway, the IP Camera’s address will start with 192.168.1.xxx
9.) Make sure you use a number different than that of your computer’s IP address.
(Generally between 2-250) This number needs to be out of the range of DHCP.
DHCP is assigned with your router, and can be checked by logging into the router.
For example, if the IP address of the computer you are using is 192.168.1.74, 192.168.1.208 could be
used for your IP Camera.
You must choose a number that is different from your computer’s IP.
If your IT technician has designated a static internal IP for your IP Camera, use that address.
10.) To assign the port, choose a port between 5400-9000, and type it into “Port 1” If a specific port has
been designated for your security system, that can also be used, even if the number is not within the
range of 5400-9000.
9
*Disclaimer: This is an example based on a general network setup.
All networks do not match these settings exactly, as all networks are different
Connecting To Your Camera
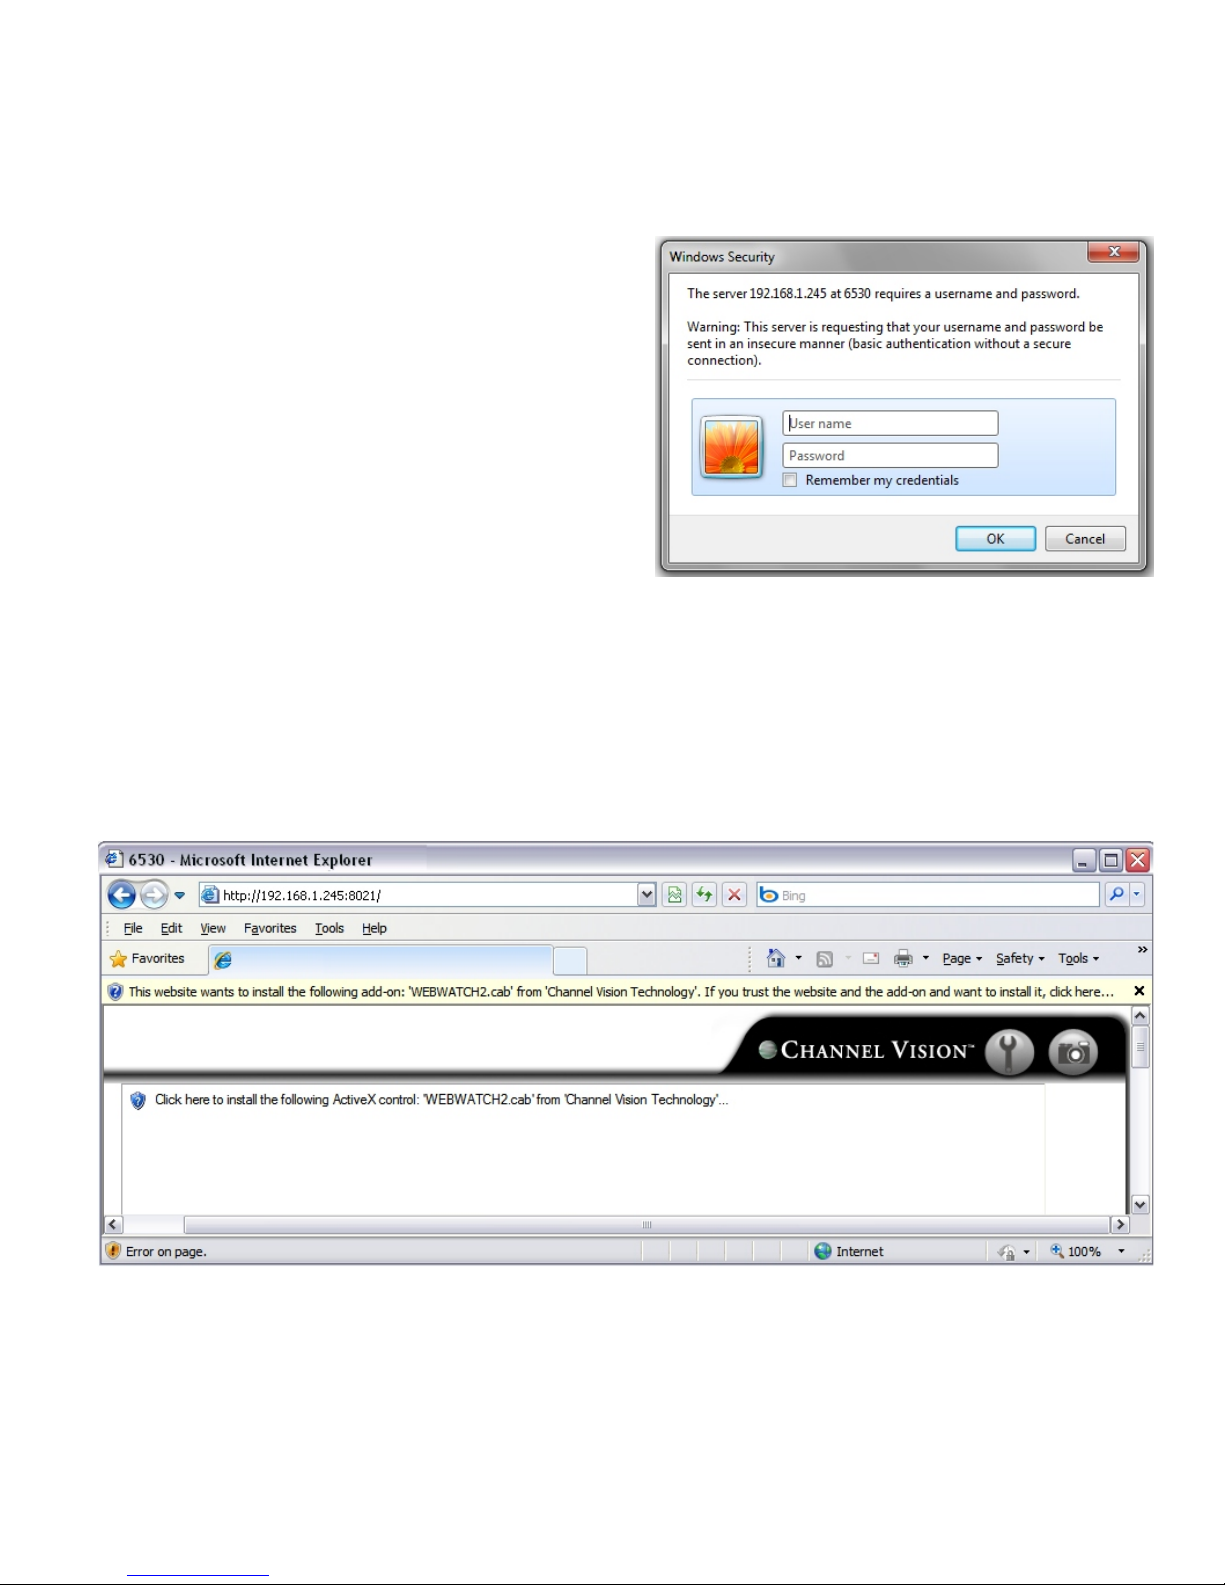
1.) The first time you connect to the camera via Internet Explorer, it will ask you to install the
ActiveX control. Internet Explorer 6, 7, 8, or 9 must be used to run this ActiveX control.
1.) Open Internet Explorer. Type the IP address of the IP camera into the browser link window.
Also, make sure to type the port at the end of the link.
For example, http://192.168.1.245:8021 has been used.
2.) You will be prompted for a username and password.
The default username is ‘admin’
The default password is ‘admin’
Installing The ActiveX Control
10
Other Channel Vision IP Camera manuals


