Charnwood W413 User manual

c\\an\u)oo&
Woodworking
machinery
at its best!
12"DISCSANDER
OPERATING
INSTRUCTIONS
MODEL:
W413
C€
Charnwood,CedarCourt,WalkerRoad,BardonHill,Leicester,LE67
1TU
Tel.
01530
516926
Fax.
01530
516929
email;[email protected]twebsite;www.charnwood.net

£^
WARNING!
Donotoperatethisunituntil
readingandbecomingfamiliar
withtheentireoperation
manual.
WARNING!
DonotusethisSanderSystem
nearflammableorcombustible
liquids,gases,gasolineorother
fuels,
lighter
fluid,
cleaners,oil-
basedpaints,naturalgas,
hydrogen,orexplosivedustslike
coaldust,magnesiumdust.grain
dust,orgunpowder.

Contents
IMPORTANTSAFETYRULES3,4
IMPORTANTSAFETYRULESFORDISCSANDER5
GROUNDING,UNPACKINGANDINSTALLATION.....6
EXTENSIONCORDS7
MACHINERYDATA8
HOWTOREPLACETHE304mmSANDINGPAPER.....9
HOWTOCHANGE304mmALUMINUMDISC10
OPERATION11
NOISEDATA11
PARTSLIST12
EXPLODEDDIAGRAM13
ORDERINGREPLACEMENTPARTS14

IMPORTANT
SAFETYRULES
Woodworkingcanbedangerousif safeandproperoperatingproceduresarenotfollowed.Aswithallmachinery,
therearecertainhazardsinvolvedwiththeoperationoftheproduct.Usingthemachinewithrespectandcautionwill
considerablylessenthepossibilityofpersonalinjury.However.ifnormalsafetyprecautionsareoverlookedorignored,
personalinjurytotheoperatormayresult.
Safetyequipmentsuchasguards,pushsticks, hold-downs,featherboards,goggles,dustmasksandhearing
protectioncanreduceyourpotentialforinjury.Buteventhebestguardwon'tmakeupforpoorjudgment,
carelessnessorinattention.Alwaysusecommonsenseandexercisecautionintheworkshop.Ifa procedurefeels
dangerous,don'ttryit.Figureoutanalternativeprocedurethatfeelssafer.REMEMBER:Yourpersonalsafetyis
yourresponsibility.
WARNING:FAILURE
TO
FOLLOW
THESERULES
MAY
RESULT
IN
SERIOUSPERSONAL
INJURY
1.
FORYOUROWNSAFETY,READINSTRUCTION
MANUALBEFOREOPERATINGTHETOOL.Learnthe
tool'sapplicationandlimitationsaswellasthespecific
hazardspeculiartoit.
2.
KEEPGUARDSINPLACEandinworkingorder.
3.ALWAYSWEAREYEPROTECTION.
4.
GROUNDALLTOOLS.
5.REMOVEADJUSTINGKEYSANDWRENCHES.
Formhabitofcheckingtoseethatkeysandadjusting
wrenchesareremovedfromtoolbeforeturningit"on".
6.KEEPWORKAREACLEAN.Clutteredareasand
benchesinviteaccidents.
7.DON'TUSEINDANGEROUSENVIRONMENT.Don't
usepowertoolsindamporwetlocations,orexpose
themto
rain.
Keepworkareawell-lighted.
8.KEEPCHILDRENANDVISITORSAWAY.Allchildren
andvisitorsshouldbekepta safedistancefromwork
area.
9.MAKEWORKSHOPCHILDPROOF- withpadlocks,
masterswitches,orbyremovingstarterkeys.
10.
DON'TFORCETOOL.Itwilldothejobbetterand
besaferattherateforwhichitwasdesigned.
11.
USERIGHTTOOL.Don'tforcetoolorattachmentto
doa jobforwhichitwasnotdesigned.
12.
WEARPROPERAPPAREL.Nolooseclothing,
gloves,neckties,rings,bracelets,orotherjewelrytoget
caughtinmovingparts.Nonslipfootwearisrecommend-
ed.
Wearprotectivehaircoveringtocontainlonghair.
13.
ALWAYSUSESAFETYGLASSES.Wearsafety
glasses.Everydayeyeglassesonlyhaveimpactresistant
lenses;theyarenotsafetyglasses.Alsousefaceordust
maskif cuttingoperationisdusty.
14.
SECUREWORK.Useclampsora visetoholdwork
whenpractical.It'ssaferthanusingyourhandandfrees
bothhandstooperate
tool.
15.
DON'TOVERREACH.Keepproperfootingand
balanceatalltimes.
16.
MAINTAINTOOLSINTOPCONDITION.Keep
toolssharpandcleanforbestandsafestperfor-
mance.Followinstructionsforlubricatingand
changingaccessories.
17.
DISCONNECTTOOLSbeforeservicingand
whenchangingaccessoriessuchasblades,bits,
cutters,etc.
18.
USERECOMMENDEDACCESSORIES.The
useofaccessoriesandattachmentsnorecom-
mendedbyusmaycausehazardsorriskofinjury
to persons.
19.
REDUCETHERISKOFUNINTENTIONAL
STARTING.Makesureswitchisin"OFF"position
beforeplugginginpower
cord.
20.
NEVERSTANDON.TOOL.Seriousinjury
couldoccurif thetoolistippedorifthecutting
toolisaccidentallycontacted.
21.
CHECKDAMAGEDPARTS.Beforefurtheruse
ofthe
tool,
a guardorotherpartthatisdamaged
shouldbecarefullycheckedtoensurethatitwill
operateproperlyandperformitsintendedfunction-
checkforalignmentofmovingparts,bindingof
movingparts,breakageofparts,mounting,and
anyotherconditionsthatmayaffectitsoperation.
Aguardorotherpartthatisdamagedshouldbe
properlyrepairedorreplaced.
22.
DIRECTIONOFFEED.Feedworkintoa blade
orcutteragainstthedirectionofrotationofthe
bladeorcutteronly.
23.
NEVERLEAVETOOLRUNNINGUNATTEND-
ED.
TURNPOWEROFF.Don'tleavetooluntilit
comestoa completestop.
24.
DRUGS,ALCOHOL,MEDICATION.Donot
operatetoolwhileundertheinfluenceofdrugs,
alcoholoranymedication.
25.
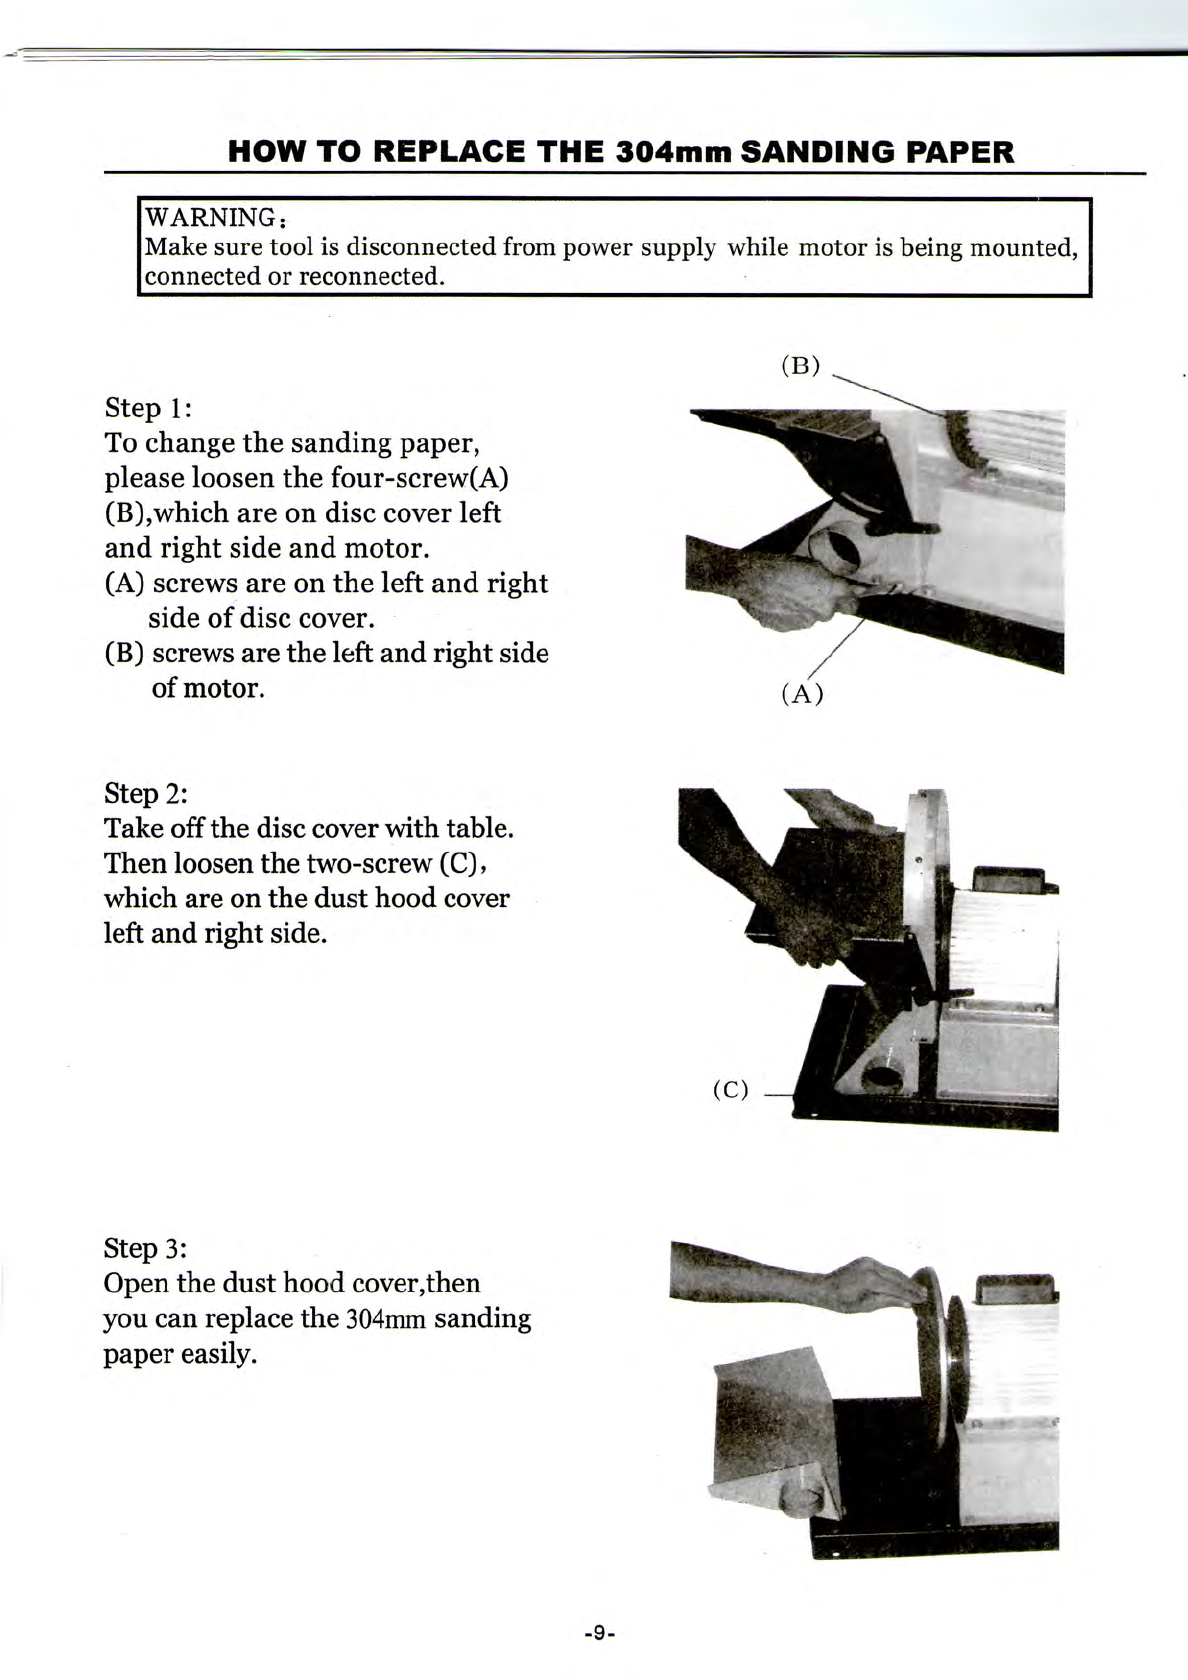
MAKESURETOOLISDISCONNECTED
FROMPOWERSUPPLYwhilemotorisbeing
mounted,
connectedorreconnected.
26.
WARNING: Thedustgeneratedbycertain
woodsandwoodproductscanbeinjurioustoyour
health.
Alwaysoperatemachineryinwellventilated
areasand-provideforproperdustremoval.Use
wooddustcollectionsystemswheneverpossible.

GENERAL
SAFETY
RULES
FORPOWERTOOLS
WARNING:Whenusingelectrictoolsthefollowingbasicsafetyprecautions
should
alwaysbefollowedtoreducetheriskoffire,electricshock
andpersonalinjury.
PLEASE
READALL
THESE
INSTRUCTIONS
BEFORE
ATTEMPTINGTO
OPERATE
THIS
PRODUCT.
1.
KEEP
GUARDSIN
PLACE,
andinworking
order.
2.REMOVEADJUSTING
KEYS
AND
WRENCHES.
Formhabitofcheckingtosee
that
keysandadjustingwrenchesare
removed
from
tool
beforeturningiton.
3.
KEEP
WORK
AREA
CLEAN.
Clutteredareas
andbenchesinviteaccidents.
4.DON'TUSEINDANGEROUS
ENVIRONMENT.Donotusepowertoolsin
damporwetlocation,orexpose
them
torain.
Donotoperate
them
inanarea
with
flammableliquidsor
gases.
Keepworkarea
welllighted.
5.
KEEP
CHILDRENAWAY.Allvisitorsshould
bekeptata safedistance
from
workarea.
6.MAKEWORKSHOPCHILDPROOF.Lock
access
ofyourworkshop.Whennotinuse.
toolsshouldbestoredina drylockedup
place,
outofreachofchildren.
7.DON'T
FORCE
TOOL.It
will
dothejob
better
andsaferattherate forwhichitwasdesigned.
8.USERIGHTTOOL.Don'tforce
tool
or
attachmenttodoa jobforwhichitwasnot
designed.
9.USE
PROPER
EXTENSIONCORD.
Make
sure
yourextensioncordisingoodcondition.
Whenusinganextensioncord.besuretouse
oneheavyenoughtocarrythecurrentyour
product
will
draw.Anundersizecord
will
cause
a dropinlinevoltageresultingin
loss
ofpowerandoverheating.
10.WEAR
PROPER
APPAREL.
Donotwear
loose
clothing,gloves,neckties,rings,
bracelet,orothersjewellerywhichmayget
caughtinmovingparts.Nonslipfootwearis
recommended.Wearprotectivehaircovering
tocontainlonghair.Rolllongsleevesabove
elbows.
11.ALWAYSUSE
SAFETY
GOGGLES.
Everyday
glasses
onlyhaveimpactresistant
lenses,
theyareNOTsafety
glasses.Also
use
faceordustmaskifcuttingoperationisdusty.
12.
SECURE
WORK.Useclampsora viceto
holdworkwhenpractical.ltissaferthanusing
yourhandanditfrees
both
handstooperate
tool.
13.DON'T
OVERREACH.
Keep,proper
footing
andbalanceatalltimes.
14.
MAINTAIN
TOOL
WITH
CARE.
Keep
tool
sharp
andcleanforbestandsafest
performance.Followinstructionsfor
lubricationandchanging
accessories.
15.DISCONNECTTOOLSbeforeservicing;
whenchanging
accessories,
such
asblades,
bits,
cuttersandthelike.
16.USERECOMMENDED
ACCESSORIES.
Consult
theowner'smanualforrecommended
accessories.
Theuseofimproper
accessories
maycauseriskofinjurytopersons.
17.NEVERSTANDONTOOL.Seriousinjury
couldoccurifthe
tool
istippedorifcutting
tool
isunintentionallycontacted.
18.
CHECK
DAMAGED
PARTS.
Shouldany
part
ofthe
tool
bemissing,damagedorany
electricalcomponentfailsto
perform
properly,
turn
offthepowerandremoveplug
from
powersupply.Properlyrepairorreplace
damaged,missingand/orfailedpartsbefore
resumingoperation.
19.DIRECTIONOF
FEED.
Feedwork
into
a
bladeorcutteragainstthedirectionof
rotation
ofthebladeorcutteronly.
20.NEVER
LEAVE
TOOLRUNNING
UNATTENTED.
TURNPOWEROFF.Don't
leave
tool
until
itcomestoa completestop.
21.DONOT
ABUSE
THECORD.Donotuse
cordtodisconnectduringoperation.Never
yankthecordtodisconnectit
from
thesocket.
22.ALWAYS
KEEP
ALERT.
Donotlet
familiarity
gained
from
frequentuseofyour
tool
causea
careless
mistake.Alwaysremember
that
a
careless
fractionofa secondissufficientto
inflictsevereinjury.
23.THINK
SAFETY.
Safetyisa combinationof
common
sense
andalertnesswheneverthe
tool
isinoperation.
-4-

IMPORTANT
SAFETYRULES
FOR
DISC
SANDER
WARNING:
Basicprecautionsshouldalwaysbefollowedwhenusingyourdiscsander.
To
reducetheriskofinjury,
electricalshouldon
fire,
complywiththesafetyruleslistedbelow:
1.WARNING:Donotoperateyourmachine
untilitiscompletelyassembledandinstalled
accordingtotheinstructions.
2.
CAUTION:Themachineisdesignedtosand
woodorwood-likeproductsonly.Sandingor
grindingothermaterialscouldresultinfire,
injuryordamagetoproduct.
3.
THISMACHINEisintendedforindooruse
only.
4.
IFYOUARENOTthoroughlyfamiliarwith
theoperationofAbrasiveFinishingMachines,
obtainadviceformyoursupervisor,instructor
orotherqualifiedperson.
5.
Theproperwoodsizeis120x60x60mm,ifthere
isanytendencyforthemachinetotipoveror
moveduringcertainoperationswhensanding
longorheavyboards.Themachinemustbe
securelyfastenedtoasupportingsurface.
6.ALWAYSholdtheworkfirmlyonthetable
whensandingonthedisc.
7.
ALWAYSsandondownwardsideofdisc,
whenusingthediscportionofthemachine,
sothattheworkisheldsecurelyonthetable.
Sandingontheupwardsideofthedisccould
causetheworkpiecetoflyupwhichcouldbe
hazardous.
8.NEVERwearglovesorholdtheworkwitha
ragwhensanding.
9.SANDwiththegainofthewood.
10.
DONOTsandpiecesofmaterialthataretoo
smalltobesafelysupported.
11.
AVOIDawkwardhandpositionswherea
suddenslopcouldcausea handtomoveinto
thedisc.
12.
WHENsandinga largeworkpiece,provide
additionalsupportattableheight.
13.
DONOTsandwiththeworkpiece
unsupported.Supporttheworkpieceonthe
worktable.
14.
ALWAYSremovescrappiecesandother
objectsfromthetable,backstopbefore
turningthemachine"ON"
15.
NEVERperformlayout,assemblyorset-up
workonthetablewhilethesanderis
operating.
16.
Alwaysturnthemachine"OFF"and
disconnectthecordfromthepowersource
beforeinstallingorremovingaccessories.
17.
NEVERleavethemachineworkareawhen
thepoweris"ON"orbeforethemachinehas
cometoa completestop.
18.
Makesuresandingdiscrunsintheproper
diretion.
19.
Makesurethesandingdiscisnotturnor
loose.

GROUNDING
1.
Intheeventofa malfunctionorbreakdown,groundingprovidesa pathof
least
resistance
fortheelectriccurrent,toreducethe
risk
of
electric
shock.
2.
Donot
modify
theplugprovided,if
it
will
notfit theoutlet,
have
theproperoutlet
installed
bya
qualified
electrician.
3.Improperconnectionoftheequipmentgroundingconductor canresultinthe
risk
of
electricshock.Theconductor
with
thegreenouter
insulation(with
or
without
a
yellow
stripe),istheequipmentgroundingconductor,ifrepairorreplacementof
theelectricalcordis
necessary,
donotconnecttheequipmentgroundingconductor
to
a
live
terminal.
4.
Check
with
a
qualified
electricianorserviceman
if
thegroundinginstructionsare
not
completelyunderstood, orifthereisdoubtastowhetherthemachinein
properly
grounded.
5.Using
only
threeextensioncords.
6.Repairorreplacedamagedor
worn
cordimmediately.
7.
Your
unit
isforuseon230volts
only.
8.Thisapplianceisnotfused,make
sure
theapplianceisgrounded.
NOTE:
Thetypeof
electrical
plugandreceptaclediffers
form
countrytocountry.
1.
UNPACKING
Lay
cartononstableworkbenchor
floor,
unpackthecartontocheckoffin
accordance
with
the
following
list.
Ifyou
find
anypartsmissingordamaging,
please
contactyour
local
dealerforreplacementsimmediately.
PACKING
LIST
1.
Main
machine
1
2.
Gauge
w/
scale
1
3.
Instruction
Manual
1
4.
Wrench
8-10
2
5. Screwdriver
1
6.
Wrench
75
1
3.
INSTALLATION
Lay
this
unit
onstableworkbench,slide
gauge
w/
scale
intosloton
working
table.
Usehex
bolt
M8
X
40andHexnutM8tomount machineonworkbench,insertthe
powerplugintothepropersocket
with
a supplyvoltage of230V Thisappliance
is
readyfor
working.

EXTENSION
CORDS
Extension
Cords
WARNING:
Theuseofdamagedcordscanshock,burnor
electrocute.
Replacedamagedorworncordsimmediately.
WARNING:
1.
Makesurediscisnottornorloose.
2.
Avoidkickbackbysandinginaccordancewithdirectionalarrows,sandonthedownwardsideofthedisc.
Sandingontheupwardsidecouldcausetheworkpiece toflyupcausinginjury.
3.Alwaysmaintaina maximumclearance of1.6mmbetweenthetableandthesandingdisc.
4.
Alwaysweareyeprotectionwhenoperatingthesander.
5.Theworktableisthesurfaceonwhichtheworkpiecerestswhenperforinga sandingoperation.
6.Transporting/ Carryingthemachinerybyholdingthehandlebarbyoneperson.
7.Fixingthediscsanderontheworkbenchbyusing4 pes5/1.6"x3/4"(M8x20)HEX.HD.screw.

MACHINERYDATA
MOTOR
DISC
TABLE
DISC
SPEED
DUST
HOOD
NET
WEIGHT
GROSS
WEIGHT
230V/50HZ/750W
304mm
400x225mm(Aluminum)
1430mm-1
2-1/2"(63mm)
30kg
32kg
12"Disc
Sander
Disc
Sandersaregreataccessory
to
form
and
shape
the
edges
of
parts.
The
aluminum
table
canbe
from
0
to45degreeeachwayforanyangle
work.
Thisdiscsanderhasone
63.5mm
dust
port
to
make
hoolup
toa dust
collection
systemorhose.
Motor
Switch
Disc
Cover
Safety
Guard
Table
Aluminum
Miter
Gauge
Base
Table
Tilt

HOW
TO
REPLACE
THE
304mm
SANDINGPAPER
WARNING:
Makesuretoolisdisconnectedfrompowersupplywhilemotorisbeingmounted,
connectedorreconnected.
Step1:
Tochangethesandingpaper,
pleaseloosenthefour-screw(A)
(B),whichareondisccoverleft
andrightsideandmotor.
(A)screwsareontheleftandright
sideofdisccover.
(B)screwsaretheleftandrightside
ofmotor.
Step2:
Takeoffthedisccoverwithtable.
Thenloosenthetwo-screw
(C),
whichareonthedusthoodcover
leftandrightside.
Step3:
Openthedusthoodcover,then
youcanreplacethe
304mm
sanding
papereasily.

HOW
TO
CHANGE
THE
304mmALUMINUM
DISC
Opendusthoodcover,fixthemotor
shaftbyopen-endwrench(p/no.47).
Thenturnthediscinthereversing
directiontotakethediscofffrom
themotorshaft.
Whenoperatingthemachinery,
pleaseensurethedirectionof
rotation.(Reversing)
Beforeturningontheswitch,
pleasemakesuretoputonthe
flexiblehoseintothedusthood,
2-1/2"(63mm),andwithhose
clamp.
-10-

Operation
Operationexample1
BEVELSANDING
Loosenthehandle(p/no.l5)at
doubleside,andtheyoucan
putthetabletotilr
45
degree.
Operationexample2
SURFACESANDING
Fastenthehandletightly
(p/no.
15)
at
doubleside,andthenyoucan
putthetabletotilt
90
degree.
La.
eq=957
dB(A)
Thesoundpowerlevelemittedbythetoolis
L.w.eq=97.9dB(A)

PARTLIST
PARTNO. DESCRIPTION SPECIFICATION Q'TY
1 Base 1
2 MotorBase 1
3 Motor 1 HP 1
5 Rightsidedisccover 1
7 Disc(Rightside) 305 1
9 Sandingpaper 1
10 Leftsidetiltingturning 2
11 Rightsidetiltingturning 2
12 Table Aluminum 2
14 Rightsidedusthoodcover 1
15 Handle M8xl6 2
16 Pointer 1
17 Panheadscrew M4x8 1
18 Springwasher M6 6
19 Panheadscrew M6x8 2
20 Hex.headscrew M8xl2 6
21 Washer M8 6
22 Hex.headscrew M8x20 4
23 Washer M8xl8 12
24 Nut M8 8
25 Hex.headscrew M8xl6 2
26 Hex.headscrew M6xl2 6
27 Washer M6xl3 6
28 Nut M6 6
3o Safetyguard(Rightside) 1
31 RoundheadScrew M5x8 2
32 Hex.headscrew M6xl0 2
34 Scalelabel(Rightside) 1
35A Switch CE 1
41 Miterbar 1
42 Mitergage 1
43 bolt M6 1
44 Pointer 1
45 RoundheadScrew M5x6 1
46 Pin 1
47 Hex.headscrew M6x60 4
48 Motorjunctionbox 1
-12-

-13-

ORDERING
REPLACEMENTPARTS
Replacementpartsmaybeorderedfromyourlocaldistributor.Whenordering
replacementparts,alwaysprovidethefollowinginformation:
1.
Themodelnumberandserialnumberofthe12"discsander.
2.
Thepartsnumber.
3.Thepartsname.
4.
Thedesiredquantityofthepart.
TROUBLE
SHOOTING
TROUBLE PROBABLECAUSE CORRECTION
Motordoesnotrunwhen
powerswitchispressed
"ON"
1.
Switchisburntout.
2.
Connectionwireisloose
ordamaged.
1.
Replacetheswitch.
2.
Tightenwireorreplace
wire.
Motordoesnotrunatfull
speed.
1.
Powervoltageistoolow.
2.
Motorisdamaged.
1.
Testvoltage.
2.
Checkandrepairmotor
Motordoesnotreachfull
power.
1.
Incorrectpowerwiring.
2.
Overloaded.
1.
Replacewiththecorrect
sizeofthepowerwiring.
2.
Reduce
load.
Motoroverheating
1.
Motorvoltageisdifferent
2.
Moterisdamaged
1.
Checkthevoltagelabel
2.
Checkandrepairmotor
-14-
Other manuals for W413
1
Table of contents
Other Charnwood Sander manuals
Popular Sander manuals by other brands

Power Fist
Power Fist 8726788 user manual

Power Fist
Power Fist 9073925 instructions

Central Pneumatic
Central Pneumatic 66881 Set up and operating instructions

Lumberjack
Lumberjack PS240 Safety and operating manual

BLACK DECKER
BLACK DECKER BEW220 Original instructions

Central Pneumatic
Central Pneumatic 98895 Owner's manual & safety instructions

Power Fist
Power Fist 9049107 manual

PROPOINT
PROPOINT 8349821 user manual

PROPOINT
PROPOINT 8630790 user manual

Far Tools
Far Tools XF-Orbital2 Original manual translation

OEM Tools
OEM Tools 24417 Operating instructions and parts manual

Central Pneumatic
Central Pneumatic 98189 Set up and operating instructions