CHCNAV i90 GNSS User manual

Make your work more efficient
CHCNAV i90 GNSS
User Guide
Revision 1.0
June 01, 2018

Table of Content
CHCNAV i90 GNSS USER GUIDE | 2019-9 P a g e | 2
Table of Content
Table of Content...............................................................................................................2
Preface ............................................................................................................................5
Copyright ........................................................................................................................... 5
Safety Warnings................................................................................................................. 5
FCC Interference Statement .............................................................................................. 5
CE Interference Statement ................................................................................................ 6
1Introduction..............................................................................................................7
1.1 Safety Information....................................................................................................... 7
1.1.1 Warnings and Cautions..................................................................................... 7
1.2 Regulations and Safety ................................................................................................ 7
1.2.1 Use and Care..................................................................................................... 8
1.3 Technical Support ........................................................................................................ 8
1.4 Disclaimer.................................................................................................................... 8
1.5 Your Comments ........................................................................................................... 8
2Getting Started with i90 ............................................................................................9
2.1 About the Receiver...................................................................................................... 9
2.2 Parts of the Receiver.................................................................................................... 9
2.2.1 Front Panel........................................................................................................ 9
2.2.2 Lower Housing................................................................................................ 11
2.2.3 Receiver Ports................................................................................................. 11
2.3 Batteries and Power .................................................................................................. 12
2.3.1 Internal Batteries............................................................................................ 12
2.3.2 Charging the Battery....................................................................................... 13
2.3.3 Battery Safe .................................................................................................... 13
2.3.4 External Power Supply.................................................................................... 14
2.4 Inserting Battery and SIM Card.................................................................................. 15
2.5 Product Basic Supply Accessories.............................................................................. 16
2.5.1 Base Kit Basic Supply ...................................................................................... 16
2.5.2 Rover Kit Basic Supply..................................................................................... 17
2.6 Connecting to an Office Computer............................................................................ 18
2.7 Connecting to a Controller ........................................................................................ 18
2.7.1 Connecting via Wi-Fi with LandStar 7 Software ............................................. 18
2.7.2 Connecting via Bluetooth with LandStar 7 Software...................................... 20
2.8 Downloading Logged Data......................................................................................... 22
2.8.1 FTP Download................................................................................................. 22
2.8.2 Web Server Download.................................................................................... 24
2.8.3 USB Download................................................................................................ 24

Table of Content
CHCNAV i90 GNSS USER GUIDE | 2019-9 P a g e | 3
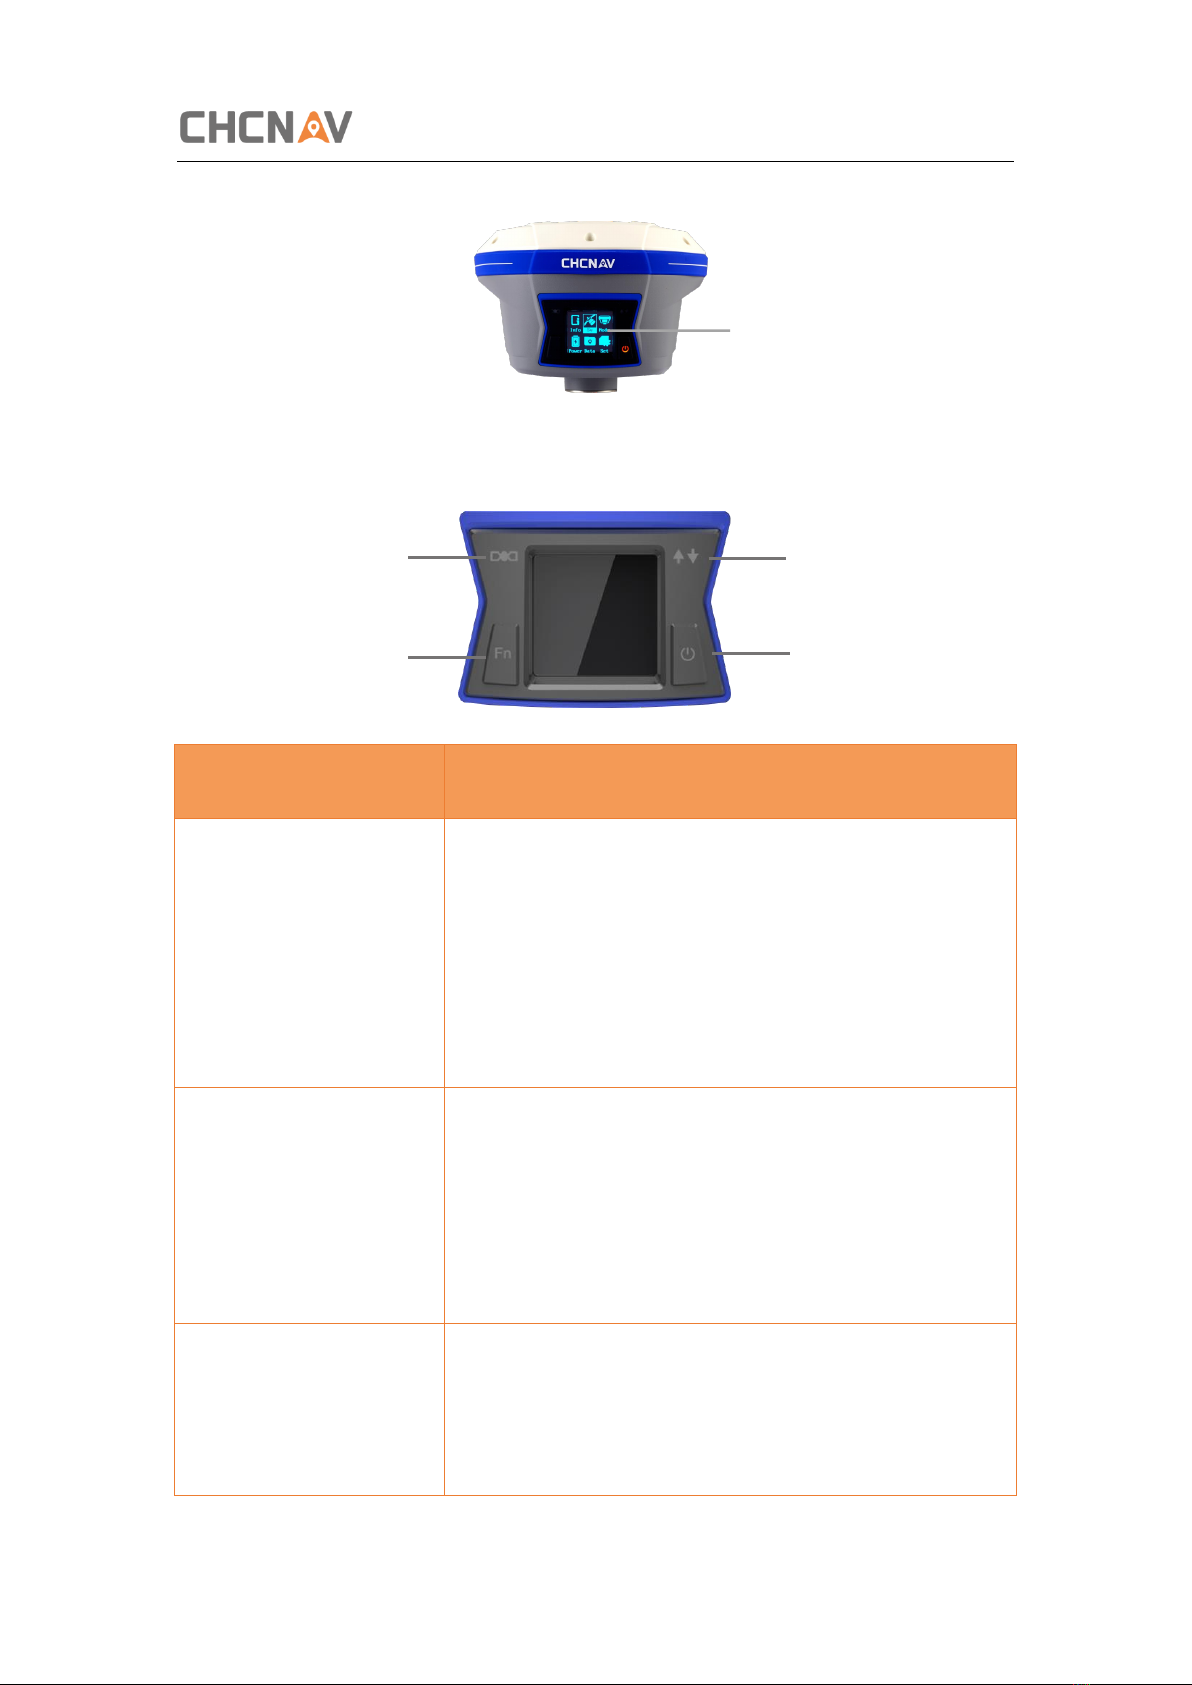
3Front Panel Operation ............................................................................................. 26
3.1 Main Operation Menus ............................................................................................. 26
3.2 Configure the Working Mode.................................................................................... 28
4Equipment Setup and Operation.............................................................................. 33
4.1 Post-processing Base Station Setup........................................................................... 33
4.2 Real-Time Base Station Setup.................................................................................... 34
4.2.1 Internal Cellular or UHF .................................................................................. 34
4.2.2 External UHF................................................................................................... 35
4.3 Real-Time Rover Station Setup.................................................................................. 37
4.4 Working with the Tilt Compensation......................................................................... 38
4.4.1 Operation Steps.............................................................................................. 38
4.4.2 Notes of using tilt measurement.................................................................... 41
5Configuring Through a Web Browser........................................................................ 42
5.1 Status Menu............................................................................................................... 43
5.1.1 Position Submenu........................................................................................... 44
5.1.2 Activity Submenu............................................................................................ 44
5.1.3 Google Map Submenu.................................................................................... 45
5.2 Satellites Menu.......................................................................................................... 45
5.2.1 Tracking Table Submenu................................................................................. 46
5.2.2 Tracking Info. Table Submenu......................................................................... 46
5.2.3 Tracking Skyplot Submenu.............................................................................. 47
5.2.4 Satellite Activation Submenu.......................................................................... 47
5.3 Receiver Configuration Menu.................................................................................... 48
5.3.1 Description ..................................................................................................... 48
5.3.2 Antenna Configuration Submenu ................................................................... 49
5.3.3 Reference Station Settings Submenu ............................................................. 49
5.3.4 Receiver Reset Submenu ................................................................................ 51
5.3.5 Languages Submenu....................................................................................... 52
5.3.6 User Management Submenu.......................................................................... 52
5.4 Data Recording Menu................................................................................................ 52
5.4.1 Log Settings Submenu .................................................................................... 53
5.4.2 FTP Push Settings Submenu ........................................................................... 55
5.4.3 FTP Push Log Submenu................................................................................... 56
5.4.4 Data Download Submenu............................................................................... 56
5.5 IO Settings Menu ....................................................................................................... 58
5.5.1 IO Settings Submenu ...................................................................................... 58
5.6 Network Setting Menu .............................................................................................. 65
5.6.1 Description Submenu ..................................................................................... 65
5.6.2 Mobile Network Setting Submenu ................................................................. 65
5.6.3 Email Alarm Submenu .................................................................................... 66
5.6.4 HTTP Submenu ............................................................................................... 67

Table of Content
CHCNAV i90 GNSS USER GUIDE | 2019-9 P a g e | 4
5.6.5 HTTPS Submenu ............................................................................................. 68
5.6.6 FTP Service Submenu ..................................................................................... 68
5.7 Module Setting Menu................................................................................................ 68
5.7.1 Description Submenu ..................................................................................... 69
5.7.2 WiFi Submenu ................................................................................................ 69
5.7.3 Bluetooth Settings Submenu.......................................................................... 69
5.7.4 Radio Settings Submenu................................................................................. 70
5.8 Firmware Menu ......................................................................................................... 71
5.8.1 Firmware Info Submenu ................................................................................. 71
5.8.2 Hardware Version Submenu........................................................................... 71
5.8.3 Config File Submenu....................................................................................... 72
5.8.4 System Log Download Submenu .................................................................... 72
5.8.5 User Log Submenu.......................................................................................... 72
5.8.6 Firmware Update Submenu............................................................................ 73
5.8.7 GNSS Board Upgrade Submenu...................................................................... 74
5.8.8 Radio Upgrade Submenu................................................................................ 74
5.8.9 Upgrade Online Submenu .............................................................................. 74
5.8.10 GNSS Registration Submenu......................................................................... 75
5.9 Cloud Service Setting Menu ...................................................................................... 75
5.9.1 Cloud Service Setting Submenu...................................................................... 75
ACommunication Ports Definition.............................................................................. 76
AI CHC i90 Receiver IO Port (7-pin Lemo Port) Definition .............................................. 76

Preface
CHCNAV i90 GNSS USER GUIDE | 2019-9 P a g e | 5
Preface
Copyright
Copyright 2016-2017
CHC | Shanghai Huace Navigation Technology Ltd. All rights reserved. The CHC are trademark
of Shanghai Huace Navigation Technology Limited. All other trademarks are the property of
their respective owners.
Trademarks
All product and brand names mentioned in this publication are trademarks of their respective
holders.
Safety Warnings
The Global Positioning System (GPS) is operated by the U.S. Government, which is solely
responsible for the accuracy and maintenance of the GPS network. Accuracy can also be
affected by poor satellite geometry and obstructions, like buildings and heavy canopy.
FCC Interference Statement
This equipment has been designed to comply with the limits for a Class B digital device,
pursuant to part 15 of the FCC Rules in the Portable Mode. These limits are designed to provide
reasonable protection against harmful interference in a residential installation.
Operation is subject to the following two conditions: (1) this device may not cause harmful
interference and (2) this device must accept any interference received, including interference
that may cause undesired operation.

Preface
CHCNAV i90 GNSS USER GUIDE | 2019-9 P a g e | 6
CE Interference Statement
Declaration of Conformity: Hereby, Shanghai Huace Navigation Technology Ltd. declares that
this i90 is in compliance with the essential requirements and other relevant provisions of
Directive 2014/53/EU. A copy of the Declaration of conformity can be found at Shanghai Huace
Navigation Technology Ltd.

Introduction
CHCNAV i90 GNSS USER GUIDE | 2019-9 P a g e | 7
1 Introduction
The i90 GNSS Receiver User Guide describes how to set up and use the CHC® i90 GNSS receiver.
In this manual, “the receiver” refers to the i90 GNSS receiver unless otherwise stated. Even if
you have used other Global Navigation Satellite Systems (GNSS) products before, CHC
recommends that you spend some time reading this manual to learn about the special
features of this product. If you are not familiar with GNSS, go to www.chcnav.com for an
interactive look at CHC and GNSS.
1.1 Safety Information
1.1.1 Warnings and Cautions
An absence of specific alerts does not mean that there are no safety risks involved.
A Warning or Caution information is intended to minimize the risk of personal injury and/or
damage to the equipment.
WARNING - A Warning alerts you to a potential misused or wrong setting of the
equipment.
CAUTION - A Caution alerts you to a possible risk of serious injury to your person and/or
damage to the equipment.
1.2 Regulations and Safety
The receivers contain a built-in wireless modem for signal communication through Bluetooth®
wireless technology or through external communication datalink. Regulations regarding the
use of the wireless modem vary greatly from country to country. In some countries, the unit
can be used without obtaining an end-user license. However, in some countries, the
administrative permissions are required. For license information, consult your local dealer.
Bluetooth® operates in license-free bands.
Before operating a i90 GNSS receiver, determine if authorization or a license to operate the
unit is required in your country. It is the responsibility of the end-user to obtain an operator's
permit or license for the receiver for the location or country of use.

Introduction
CHCNAV i90 GNSS USER GUIDE | 2019-9 P a g e | 8
1.2.1 Use and Care
This receiver is designed to withstand the rough environment that typically occurs in the field.
However, the receiver is high-precision electronic equipment and should be treated with
reasonable care.
CAUTION - Operating or storing the receiver outside the specified temperature range
will cause irreversible damage.
1.3 Technical Support
If you have a problem and cannot find the information you need in this manual or CHC website
(www.chcnav.com), contact your local CHC dealer from which you purchased the receiver(s).
If you need to contact CHC technical support, please contact us by email
(support@chcnav.com) or Skype (chc_support).
1.4 Disclaimer
Before using the receiver, please make sure that you have read and understood this User Guide,
as well as the safety information. CHC holds no responsibility for the wrong operation by users
and for the losses incurred by the wrong understanding about this User Guide. However, CHC
reserves the rights to update and optimize the contents in this guide regularly. Please contact
your local CHC dealer for new information.
1.5 Your Comments
Your feedback about this user guide will help us to improve it in future revision. Please email
your comments to support@chcnav.com.

Getting Started with i90
CHCNAV i90 GNSS USER GUIDE | 2019-9 P a g e | 9
2 Getting Started with i90
2.1 About the Receiver
The new CHCNAV i90 GNSS receiver offers integrated IMU-RTK technology to provide a robust
and accurate GNSS positioning in any circumstances. Unlike the standard MEMS based GNSS
receivers, the i90 GNSS IMU-RTK combines state-of-the-art GNSS RTK engine, calibration-free
professional IMU sensor and advanced GNSS tracking capabilities. Survey projects are
achieved with high productivity and reliability pushing the boundaries of conventional GNSS
RTK survey.
The LCD panel enables user to check satellite-tracking status, internal battery status, Wi-Fi
status, working mode, data logging status and basic receiver information. Bluetooth and Wi-Fi
technology provides cable-free communication between the receiver and controller.
The receiver can be used as the part of an RTK GNSS system with CHC LansStar7 software.
Moreover, user can download the GNSS data that recorded in the internal memory of receiver
to a computer.
The receiver can be used as the part of an RTK GNSS system with CHC LandStar 7 software.
And you can download the GNSS data that recorded in the internal memory of receiver to a
computer.
To configure the receiver for performing a wide variety of functions, you can use the web
interface by connecting the receiver with PC or smartphone through Wi-Fi.
2.2 Parts of the Receiver
The operating controls are all located on the front panel. Battery compartment and SIM card
slot are on the backside. Serial ports and connectors are located on the bottom of the unit.
2.2.1 Front Panel
The following figure shows a front view of the receiver.

Getting Started with i90
CHCNAV i90 GNSS USER GUIDE | 2019-9 P a g e | 10
The front panel contains four indicator LEDs and two buttons.
Name
Description
Correction LED (Green)
•Indicates whether the receiver is
transmitting/receiving differential data.
•The green LED flashes once per second when
As a Base station: successfully transmitting
differential data.
As a Rover station: successfully receiving
differential data from Base station.
Satellite LED (Blue)
•Shows the number of satellites that the receiver
has tracked.
•When the receiver is searching satellites, the blue
LED flashes once every 5 seconds.
•When the receiver has tracked N satellites, the
blue LED will flash N times every 5 seconds.
Fn button (Yellow)
•Move to next line of the menus or options.
•Move to next character of the value that you
want to make change.
•Cancel the change you make on a function.
Front panel
Satellite LED
Function button
Power button
Correction LED

Getting Started with i90
CHCNAV i90 GNSS USER GUIDE | 2019-9 P a g e | 11
Power button (Red)
•Works as a Power button:
•Press and hold this button for 3 seconds to turn
on or turn off the receiver.
•Works as a Confirmbutton
•Hold Fn button and press this button for 5 times
continuously to reset the mainboard.
2.2.2 Lower Housing
The lower housing contains one SIM card slot, two battery compartments, one TNC radio
antenna connector, two communication and power ports, one 5/8-11 threaded insert, and
two nameplates.
2.2.3 Receiver Ports
SIM card slot
Battery compartment
USB communication
and power in port
5/8-11 threaded
insert
TNC radio antenna connector
IO serial communication
and power in port

Getting Started with i90
CHCNAV i90 GNSS USER GUIDE | 2019-9 P a g e | 12
Port
Name
Description
IO port
•This port is a 7-pin LEMO connector that
supports RS-232 communications and
external power input.
•Users can use HCE320 Type-c Cable supplied
with the system to realize RS-232
communications between the receiver and
computer or controller. Also, users can use a
7-pin cable to transmit differential data to an
external radio.
USB port
•This port is a mini-USB connector that
supports USB communications.
•Users can use USB Cable supplied with the
system to download the logged data to a
computer.
Radio antenna
connector
•Connect a radio antenna to internal radio of
the receiver. And this connector is not used if
you are using an external radio.
2.3 Batteries and Power
2.3.1 Internal Batteries
The receiver has two rechargeable Lithium-ion batteries, which can be removed for charging.

Getting Started with i90
CHCNAV i90 GNSS USER GUIDE | 2019-9 P a g e | 13
2.3.2 Charging the Battery
The rechargeable Lithium-ion battery is supplied partially charged. Charge the battery
completely before using it for the first time. To charge the battery, first remove the battery
from the receiver, and then place it in the battery charger which is connected to AC power.
WARNING – Charge and use the rechargeable Lithium-ion battery only in strict
accordance with the instructions. Charging or using the battery in unauthorized equipment
can cause an explosion or fire and can result in personal injury and/or equipment damage.
To prevent injury or damage:
•Do not charge or use the battery if it appears to be damaged or leaking.
•Charge the Lithium-ion battery only in a CHC product that is specified to charge it. Be sure to
follow all instructions that are provided with the battery charger.
•Discontinue charging a battery that gives off extreme heat or a burning odor.
•Use the battery only in CHC equipment that is specified to use it.
•Use the battery only for its intended use and according to the instructions in the product
documentation.
2.3.3 Battery Safe
WARNING – Do not damage the rechargeable Lithium-ion battery. A damaged battery
can cause an explosion or fire and can result in personal injury and/or property damage.
To prevent injury or damage:
•Do not use or charge the battery if it appears to be damaged. Signs of damage include, but
are not limited to discoloration, warping, and leaking battery fluid.
•Do not expose the battery to fire, high temperature, or direct sunlight.
•Do not immerse the battery in water.
•Do not use or store the battery inside a vehicle under hot weather condition.
•Do not drop or puncture the battery.
•Do not open the battery or short-circuit its contacts.
WARNING – Avoid contact with the rechargeable Lithium-ion battery if it appears to be
leaking. Battery fluid is corrosive and contact with it can result in personal injury and/or

Getting Started with i90
CHCNAV i90 GNSS USER GUIDE | 2019-9 P a g e | 14
property damage.
To prevent injury or damage:
•If the battery leaks, avoid with the battery fluid.
•If battery fluid gets into your eyes, immediately rinses your eyes with clean water and seek
medical attention. Please do not rub your eyes!
•If battery fluid gets onto your skin or clothing, immediately use clean water to wash off the
battery fluid.
2.3.4 External Power Supply
Two methods are available for providing the external power to the receiver by the GPS to PC
Data Cable+ Power Adapter, or GPS to PC Data Cable + external power cable (option purchase)
+ vehicle battery.
In the office:
The Power Adapter is connecting with AC power of 100-240V, the output port of the Power
Adapter connects with the Power Port of the GPS to PC Data Cable.
In the field:
The external power cable is connecting with a vehicle battery, the output port of the external
power cable connects with the Power Port of the GPS to PC Data Cable.
WARNING – Use caution when connecting external power cable’s clip leads to a vehicle
battery. Do not allow any metal object to connect (short) the battery’s positive (+) terminal to
either the negative (-) terminal or the metal part of the vehicle battery. This could result in
high current, arcing, and high temperatures, exposing the user to possible injury.

Getting Started with i90
CHCNAV i90 GNSS USER GUIDE | 2019-9 P a g e | 15
2.4 Inserting Battery and SIM Card
(1) Inserting battery:
(a) Push down the spring-loaded button on the battery cover to open the cover.
(b) Make electrode sheets of battery turn toward the receiver, align the socket of the battery
and the lug of the battery compartment, and then insert the battery into the battery
compartment until it is locked by the battery bail.
I Close the battery cover to prevent water immersion.
(d) To remove the battery, slide the battery bail to the left or right.
(2) Inserting SIM card:
(a) Push down the spring-loaded button on the battery cover to open the cover.
(b) Insert the SIM card with the contacts facing upward, as indicated by the SIM card icon next
to the SIM card slot.
(c) Close the battery cover to prevent water immersion.
(d) To eject the SIM card, slightly push it in to trigger the spring-loaded release mechanism
Insert the SIM card with the contacts facing upward, as indicated by the SIM card icon next to
the SIM card slot.
To eject the SIM card, slightly push it in to trigger the spring-loaded release mechanism.
Push down
Battery bail
Battery cover

Getting Started with i90
CHCNAV i90 GNSS USER GUIDE | 2019-9 P a g e | 16
Tip – The SIM card is provided by your cellular network service provider.
2.5 Product Basic Supply Accessories
2.5.1 Base Kit Basic Supply
Item
Picture
i90 GNSS Receiver
UHF Bar Antenna (410-470 MHz)
HCE320 USB Type-C
Lithium Battery
H.I. Tape
Extension pole
Tribrach with optical plummet
Auxiliary H.I. Tool

Getting Started with i90
CHCNAV i90 GNSS USER GUIDE | 2019-9 P a g e | 17
Transport Hard Case
2.5.2 Rover Kit Basic Supply
Item
Picture
i90 GNSS Receiver
UHF Bar Antenna (410-470 MHz)
HCE320 USB Type-C
Tribrach adaptor
C300 Pedestal charger
C300 Power Adapter with Cord
Lithium Battery
2M Range Pole w/bag

Getting Started with i90
CHCNAV i90 GNSS USER GUIDE | 2019-9 P a g e | 18
Auxiliary H.I. Tool
Transport Hard Case
2.6 Connecting to an Office Computer
The receiver can be connected to an office computer for serial data transfer or settings via a
HCE320 USB Type-C. Before you connect to the office computer, ensure that the receiver is
powered on by internal battery or external power.
The following figure shows how to connect to the computer for serial data transfer or settings:
2.7 Connecting to a Controller
2.7.1 Connecting via Wi-Fi with LandStar 7 Software
Turn on the controller → run LandStar 7 → go to Config main menu → tap Connect.
In the Connect screen, select CHC for the Manufacture field, i90 for Device Type field, WIFI for
Connection Type field.
HCE320 USB Type-C

Getting Started with i90
CHCNAV i90 GNSS USER GUIDE | 2019-9 P a g e | 19
Tap the Wireless Lan icon on the right side to select the hot spot → Switch on the WiFi module
by the top switch → select the target device in the list.
Tap Connect to link to the hot spot. If the first-time connection to this hot spot, user may type
in the password.

Getting Started with i90
CHCNAV i90 GNSS USER GUIDE | 2019-9 P a g e | 20
Tip – The Wi-Fi key of the receiver is 12345678 by default.
Tap the Connect button to build the connection.
2.7.2 Connecting via Bluetooth with LandStar 7 Software
Turn on the controller → run LandStar 7 → go to Config main menu → tap Connect.
In the Connect screen, select CHC for the Manufacture field, i90 for Device Type field,
Bluetooth for Connection Type field.
Table of contents
Other CHCNAV Receiver manuals
Popular Receiver manuals by other brands

TV Star
TV Star TV STAR T1030 HD USB PVR Short user manual

lynx System Developers
lynx System Developers LaserLynx quick start guide

Denon
Denon DN-200WS user guide

GW4GTE
GW4GTE RAT5 Information manual

Behringer
Behringer UL 1000G2-R quick start guide

golden interstar
golden interstar XPEED LX2 instruction manual