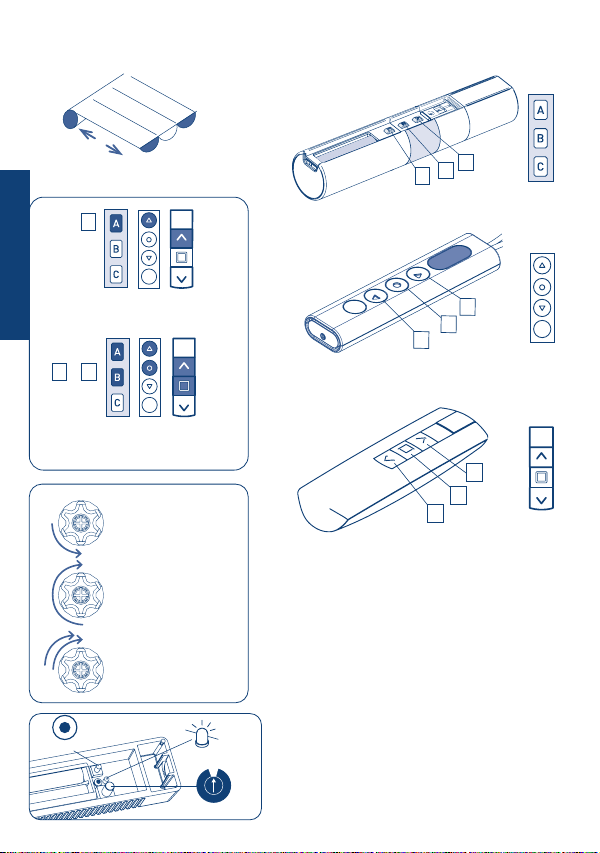
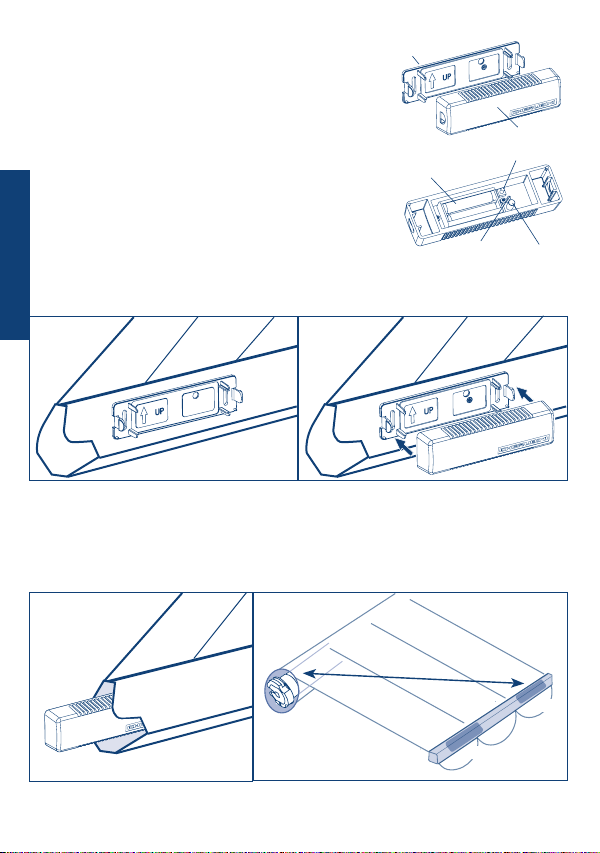
CHERUBINI MISTRAL User manual

ISTRUZIONI - INSTRUCTIONS - EINSTELLANLEITUNGEN
INSTRUCTIONS - INSTRUCCIONES
A520012
MISTRAL
I
GB
D
F
E
SENSORE A VIBRAZIONE PER
TENDE DA SOLE
MISTRAL VIBRATION WIND SENSOR
FOR AWNINGS
VIBRATIONS-WINDWÄCHTER
ZU MARKISEN
CAPTEUR À VIBRATION
POUR STORES
CENTRAL DE VIENTO POR VIBRACIÓN
DEL TOLDO


1
9
2
3
4
5
8
7
6
16
PRODUCT FEATURES
FUNCTION DIAGRAM
GUARANTEE
MISTRAL
WAVE RX / SENSO RX
A510020 TDS GOLD
A510036 RX MINI
A510038 TDS COMPACT
A510062 MYROLL
COMPATIBILITY
√
√
√
√
√
√
AUTOMATIC
REOPENING
The Mistral vibration wind sensor detects wind caused stresses on the structure of arm
awnings, which then become vibrations of the terminal bar.
The sensor indicates an alarm status, by radio, to the motor (or the radio receiver), which
then closes the awning.
LED
ROTATING SELECTOR
BATTERY COMPARTMENT SET BUTTON
ATTACHMENT SCREWS
0
CLOSING
BY WIND ALARM
Failure to comply with these instructions annuls CHERUBINI’s responsibilities and
guarantee.
CHERUBINI S.p.A. declares that the product is in conformity with the relevant Union
harmonisation legislation: Directive 2014/53/EU, Directive 2011/65/EU.
The full text of the EU declaration of conformity is available upon request at the following
website: www.cherubini.it.
EU DECLARATION OF CONFORMITY
ENGLISH

Up
Stop
Down
SEL (POP Lux)
Activating/ Deactivating
the Sun sensor
Up
Stop
Down
SEL (POP P-Lux)
Activating/ Deactivating
the Sun sensor
17
ENGLISH
COMPATIBLE REMOTE CONTROLS
LED DISPLAY
GIRO GIRO Wall
DISPLAY
Change
channel +
Change
channel -
up
stop
down
A
B
C
UP
DOWN
LED
STOP
GIRO Plus LED DISPLAY
GIRO Lux
Activating the
Sun sensor
Deactivating the Sun sensor
Sun sensor is “ON”
Wind sensor
is “ON”
GIRO P-Lux
DISPLAY
Change channel
Activating/ Deactivating the Sun sensor
Wind sensor
is “ON”
Sun sensor is “ON”
display -
Channel selector
LED -
Check the specic instruction
book
Skipper
Skipper
Skipper
Skipper
Skipper
Skipper
Skipper
Skipper
Skipper
Skipper
POP
POP Lux
Sun/wind sensor
(POP Lux)
POP Plus
POP P-Lux
Sun/wind sensor
(POP P-Lux)
Activating/ Deactivating the Sun sensor
Skipper
Skipper

18
TECHNICAL FEATURES
- Battery powered: LR03 (AAA)
- Dimensions: 140x38x26 mm
- Weight: 100 g
- Degree of protection: IP44
- Carrier frequency: 433.92 MHz
- Irradiated RF power (ERP): 2 mW
- Operating range in open
space: max. 10 m
- Vibration threshold
adjustment range: 1-9 m/s2
0
set
rotating selector
Led
short motor rotation
in one direction
long motor rotation
in other direction
double short
rotation
Press button A
A
Press buttons A and B
at the same time
+
A B
DOWN
UP
GIRO
Skipper
POP
KEY TO SYMBOLS
down
stop
up
A
B
C
stop
up
A
B
Cdown
A
B
C
ENGLISH

19
COMMAND SEQUENCES EXAMPLE
Most of the command sequences have three distinct steps, at the end of which the motor
indicates if the step has been concluded positively or not, by turning in different ways.This
section is provided to demonstrate the motor indications.The buttons must be pressed as
shown in the sequence, without taking more than 4 seconds between one step and the
next. If more than 4 seconds are taken, the command is not accepted and the sequence
must be repeated.
Command sequence example:
As we can see from the example, when the sequence ends positively, the motor returns to
its starting position in one long rotation. In fact, two short rotations in the same direction
correspond to one long rotation in the opposite direction.The motor returns to the starting
position even when the sequence is not completed; in this case by performing one or two
short rotations.
Example of a wrong sequence:
Step 1 Step 3Step 2
+
A B B B
Step 1
Step 1 Step 2
> 4 sec repeat the
sequence
repeat the
sequence
> 4 sec
+
A B
+
A B B
ENGLISH

20
ENGLISH
FUNCTION OPEN/CLOSE PROGRAMMING
REMOTE CONTROL SKIPPER PLUS - SKIPPER LUX - SKIPPER P-LUX
REMOTE CONTROL POP PLUS - POP LUX - POP P-LUX
To prevent accidental changes to the programming of the motor during the daily use of
the remote control, the possibility of programming is disabled automatically 8 hours after
sending the last sequence (A+B or B+C).
CHECKING THE STATUS OF THE FUNCTION
To change the status of the function, see the sequences “ENABLE/DISABLE
PROGRAMMING”.
Proceed with programming as the instructions booklet.
ENABLE PROGRAMMING
DISABLE PROGRAMMING
Open
or after
30 sec.
Remove and replace
a battery
OPTION 2
OPTION 1
or after
30 sec.
Open
programming
Closed
programming
3 sec
or after
30 sec.
3 sec
Closed
3 sec
OPTION 2
+ +
A B C
Tn
+ +
A B C
Tn
+ +
A B C
Tn
B
B
B
C
A

21
ENGLISH
FUNCTION OPEN/CLOSE PROGRAMMING
REMOTE CONTROL SKIPPER - SERIES GIRO - REMOTE CONTROL POP
To prevent accidental changes to the programming of the motor during the daily use of
the remote control, the possibility of programming is disabled automatically 8 hours after
sending the last sequence (A+B or B+C).
CHECKING THE STATUS OF THE FUNCTION
To change the status of the function, see the sequences “ENABLE/DISABLE
PROGRAMMING”.
Proceed with programming as the instructions booklet.
ENABLE PROGRAMMING
DISABLE PROGRAMMING
ON
Open
programming
Closed
programming
....
ON
....
.... Closed
Open
ON
or after
30 sec.
or after
30 sec.
1 2 3
OPTION 1
1 2 3
1 2 3 or after
30 sec.
OPTION 2 OPTION 2
+ +
A B CB
B
C
+ +
A B C
+ +
A B C
A
B
Tn
Tn
Tn
Remove one battery and wait minimum 5 seconds or press any button.
2 sec
B
OPTION 2

The base is attached to the terminal bar with M4 screws
(not included) or the double-sided adhesive already found
on the back. Inside of the base,there is an arrow that enables
the identication of the proper direction for assembly of the sensor: put arrow upwards.
The sensor must be assembled parallel with the end bar.
Attention: do not insert the sensor inside of the end bar prole but install
the sensor on the internal side of the end bar, at the end closest to the motor or to the
control unit or in any event within 10 metres.
22
INSTALLATION
The sensor is housed in a plastic container made up
of two parts: a base attached to the terminal bar
and a snap-on shell.
The shell contains the sensor processor board,
the battery compartment and the programming
commands.
Best Position: internal side of the bar.
Make sure that there is enough space and MISTRAL does not get damaged by
closing the awning!
YES
max 10 m
YES
NO
BATTERY COMPARTMENT
BASE
SET BUTTON
LED SELECTOR
SHELL
ENGLISH

SETTING THE SENSOR
TnTn 2 sec
set
Tn: already programmed remote control
To associate the sensor to a motor, a remote control must be already memorised on the
motor. The setting sequence is the following:
At this point, do not assemble the sensor shell on the base.
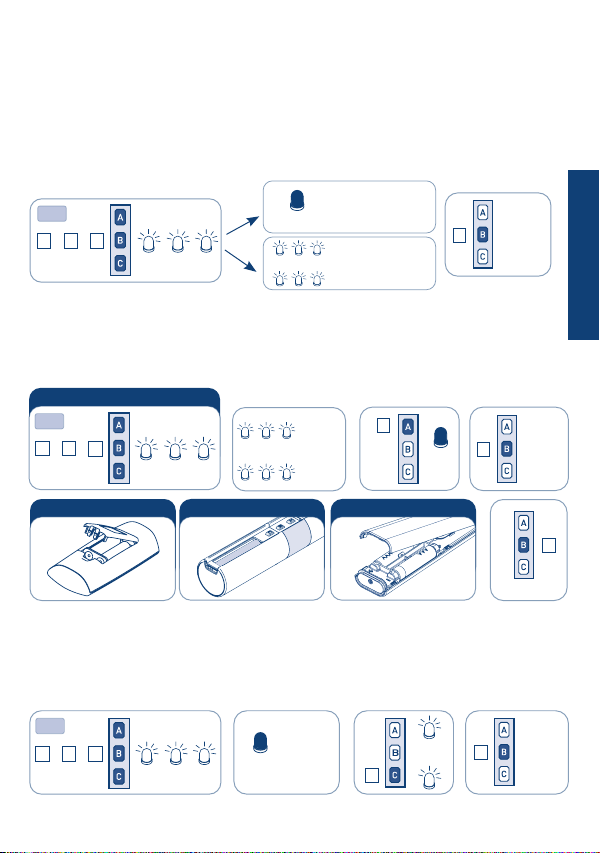
Note: to check proper memorisation, press the SET button briey again: the awning should
move about half way through its path. When the check is completed, open the awning
once again.
1
9
2
3
4
5
8
7
6
0
23
• Press the buttons on the remote control in this sequence:A+B and B, and then the SET
button for 2 seconds on the Mistral sensor; until the motor performs the conrmation
movement (around 2 second).
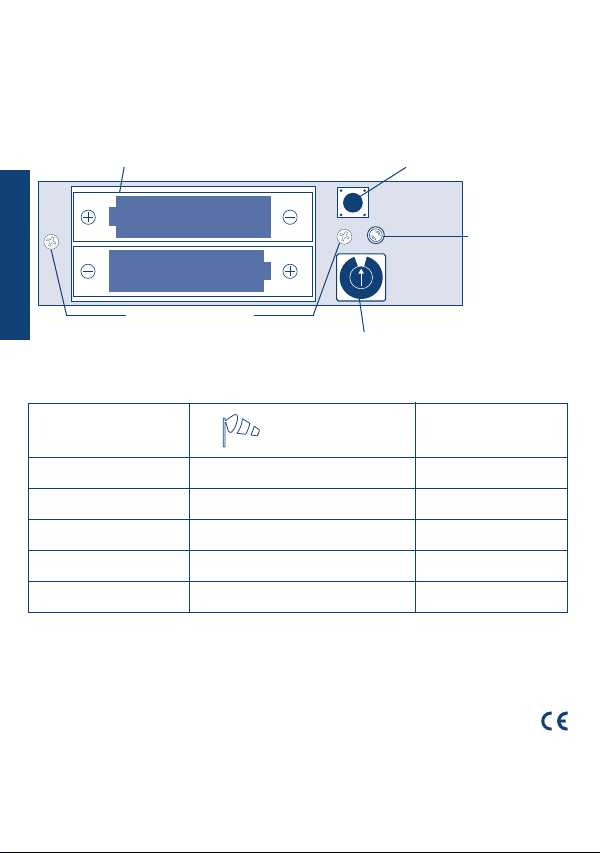
The vibration detection threshold is set by choosing one of the positions on the rotating
selector, from 1 (light vibrations) to 9 (strong vibrations). The proper threshold setting for
each type of awning must be determined, through trial and error. Start out by setting a
middle value (e.g. 5) and then activate the sensor. After activation it will be possible to
perform tests to nd the best threshold.
VIBRATION THRESHOLD
• Insert the batteries provided;
• Open the awning completely (button C);
• Rotate the selector to the 0 position;
set
+
A B B
C
ENGLISH

- Snap the shell onto the base.
- Stand by for 10 seconds until the sensor detects the rest position and the motor makes
its conrmation movements*.
Before assembling the shell on the base:
- Rotate the selector to a middle value from 1 to 9 (e.g. 5).
- Activate the sensor by pressing the SET button for at least 4 seconds until the LED
ashes twice quickly.
SENSOR ACTIVATION
2
4 sec
set
5
SELECTOR
4PROCEDURE
24
*Note: for Wave RX motors manufactured before 01/2013 and TDS Gold control units
manufactured before 04/2013 the procedure ends without conrmation movements.
Within three minutes proceed with the SENSOR TEST OPERATION.
10 sec.
........
*
ENGLISH

SENSOR TEST OPERATION
When the sensor has detected its rest position it will run in test mode for the rst three
minutes of operation: in case of alarm the awning will close but without application
of the eight-minute period when reopening is disabled, which is what occurs in normal
operational mode.
During these 3 minutes it is necessary to:
- Verify the alarm threshold for wind caused vibrations;
- Verify the absence of alarms when opening the awning.
VERIFY WIND ALARM THRESHOLD
Open the awning completely. Apply a vibration to the end bar, gradually increasing its
amplitude, until the motor closes the awning.
If the awning closes even with slight vibrations, then the threshold set is too low.
If the awning does not close, even when applying large amplitude vibrations, then the
threshold set is too high, or there is a malfunction in the radio communications between
the sensor and the motor.
Whilst the awning is closing, it is possible to use the remote control to stop it and open
it back again.
Note: to properly check the wind alarm threshold, the vibrations have to be applied
constantly for at least 5 seconds.
VERIFY ABSENCE OF ALARMS
To complete the checks, make sure that the sensor detects no alarms from vibrations or
changes in the slope that might be caused by the awning’s structure when moving.
If the end bar vibrates notably when opening or closing the sensor could detect an
unwanted alarm condition.
Close the awning completely and wait at least 15 seconds. Give the open command and
verify that the awning opens completely.
If the awning stops and closes may be due to excessive vibrations on the end bar: in this
case, increase the vibration detection threshold.
To change the thresholds set, unsnap the shell, deactivate the sensor and then
reactivate it.
25
ATTENTION!!! To avoid any hazardous situations, before unsnapping the shell,
see the proper procedure in the section: “DISABLE THE SENSOR”.
ENGLISH

26
DELETING THE SENSOR
To delete the Mistral sensor from the motor, an already programmed remote control must
be used. The deleting sequence is the following:
TnTn 2 sec
set
Following a wind alarm, the motor closes automatically the awning, overriding user
commands until the wind alarm passes (8 minutes). If the automatic reopening function
is active, after 8 minutes the awning returns to the position it was before the alarm. This
waiting time is set to ensure the awning protection and to prevent continuous motor
movement in the event of sporadic gusts of wind.
ACTIVATING AUTOMATIC REOPENING
Tn Tn Tn (2 sec)
With the automatic reopening system, at the end of the wind alarm, the awning opens
again. From factory this function is not activated in the motor, but can be easily activated
with the following command sequence:
Tn: Already programmed remote control
AUTOMATIC REOPENING
- only with Wave RX and Senso RX motors -
Tn Tn Tn (2 sec)
DEACTIVATING AUTOMATIC REOPENING
The automatic reopening function can be deactivated at any moment with the following
command sequence:
+
A B
C C
+
A B
A
C
+
A B
A
ENGLISH

27
To make any changes to the alarm trip thresholds, to change the batteries or to perform
any other programming operation, the shell must be unsnapped from its base.To perform
this procedure, without the sensor tripping an alarm that will close the awning, creating
a potentially hazardous situation for persons in the vicinity, it’s necessary to disable the
MISTRAL (check paragraph DISABLE THE SENSOR).
When the batteries are almost drained, the LED will ash regularly every two seconds.
Change the batteries.
When changing the batteries, it’s possible to use the Automatic Deactivation of
the sensor:
- Unsnap the shell from the base
- Rotate the shell and keep it vertical for
around 3 seconds
- The sensor will automatically deactivate.
To enable the sensor once again, follow the activation procedure as indicated
on page 23.
SELECTOR
1
9
2
3
4
5
8
7
6
0
DISABLE THE SENSOR
To deactivate the MISTRAL proceed as following:
- Open the awning completely and wait for at least ten seconds after the terminal bar has
stopped moving before beginning to unsnap the sensor.
- Press both snap hooks sideways at the same time while pulling the shell downward,
until it comes away from its base. Use no tools for this procedure (screwdrivers, or
similar items).
- As soon as the shell has been unsnapped, rotate the selector to the 0 position: the LED
will then ash three times slowly (0.5 seconds ON - 0.5 seconds OFF), to conrm the
fact that the sensor has been deactivated and cannot trip an alarm.
MAINTENANCE
CHANGING BATTERIES
When the new batteries are placed, the sensor will reactivate automatically: just snap
again the shell on the base.
Under normal use conditions, the batteries should last over two years. In any event, it is
suggested that the batteries be changed at the beginning of each new season.
3 sec
ENGLISH

WHAT TO DO IF....
28
ENGLISH
Symptom Cause Remedy
The awning closes even
without any wind
blowing.
Low batteries. Open the sensor shell and
deactivate it: if the LED ashes, the
batteries are almost drained. If the
LED is OFF and it does not come
back on, the batteries are dead.
Change the batteries.
Problems with radio
communications.
Check that the sensor is not too
far from the motor or the radio
receiver. Change the position of
the sensor.
Sensor deactivated. The sensor is not active. Perform
the activation procedure again.
The awning motor
does not make its
activation conrmation
movements, when the
shell is snapped onto
the base.
The sensor was not
able to detect a
stable position.
Check the sensor attachment.
Check that the terminal bar is not
vibrating.
The sensor detected
a stable position
before being
snapped into place.
Repeat the activation procedure,
taking care to attach the sensor
within ten seconds of the
conrmation ash.
*Note: for Wave RX motors manufactured before 01/2013
and TDS Gold control units manufactured before 04/2013
the procedure ends without conrmation movements.
By swinging the awning,
the sensor does not
activate closing.
The awning has just been
opened and the stabilization
time is still active.
Open the awning and
wait a few minutes before
performing the test.

Rev: 9 08/2020 - Cod: A4518_6A87
CHERUBINI Deutschland GmbH
Siemensstrasse, 40 - 53121 Bonn - Deutschland
Tel. +49 (0) 228 962 976 34 / 35 | Fax +49 (0) 228 962 976 36
info@cherubini-group.de | www.cherubini-group.de
CHERUBINI France S.a.r.l.
ZI Du Mas Barbet
165 Impasse Ampère
30600 Vauvert -France
Tél. +33 (0) 466 77 88 58 | Fax +33 (0) 466 77 92 32
info@cherubini.fr | www.cherubini.fr
CHERUBINI Iberia S.L.
Avda. Unión Europea 11-H
Apdo. 283 - P. I. El Castillo
03630 Sax Alicante - Spain
Tel. +34 (0) 966 967 504 | Fax +34 (0) 966 967 505
info@cherubini.es | www.cherubini.es
CHERUBINI S.p.A.
Via Adige 55
25081 Bedizzole (BS) - Italy
Tel. +39 030 6872.039 | Fax +39 030 6872.040
info@cherubini.it | www.cherubini.it
This manual suits for next models
1
Table of contents
Other CHERUBINI Accessories manuals
Popular Accessories manuals by other brands

PROZIS
PROZIS Essence user manual

eufy Security
eufy Security T8200S quick start guide

Garmin
Garmin LIDAR-LITE V4 LED Operation manual and technical data

Gared Sports
Gared Sports Scholastic Telescopic 6100 Installation, operation and maintenance instructions

BEA
BEA EAGLE 6+DRO Troubleshooting

Gin Gliders
Gin Gliders Safari Pilot 2 user manual