CHERUBINI A520007 WindTec User manual

ISTRUZIONI - INSTRUCTIONS - EINSTELLANLEITUNGEN
INSTRUCTIONS - INSTRUCCIONES
I
GB
D
F
E
SENSORE VENTO E VENTO/LUCE
WIND SENSOR & SUN SENSOR
WETTERSTATION WINDWÄCHTER & SONNENSENSOR
CAPTEUR DE VENT ET DE VENT-LUMIÈRE
ANEMÓMETRO CON SENSOR LUZ
PARA EL CONTROL DEL TOLDO
A520007 WindTec
A520008 WindTec Lux


15
Table of contents:
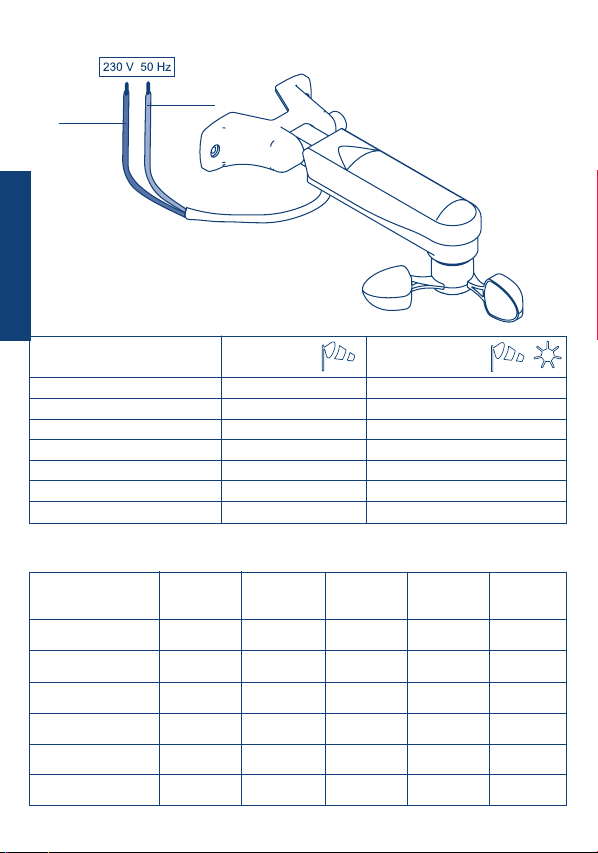
Electrical connections ............................................................................................. p. 16
Technical features ................................................................................................... p. 16
Lux function............................................................................................................ p. 17
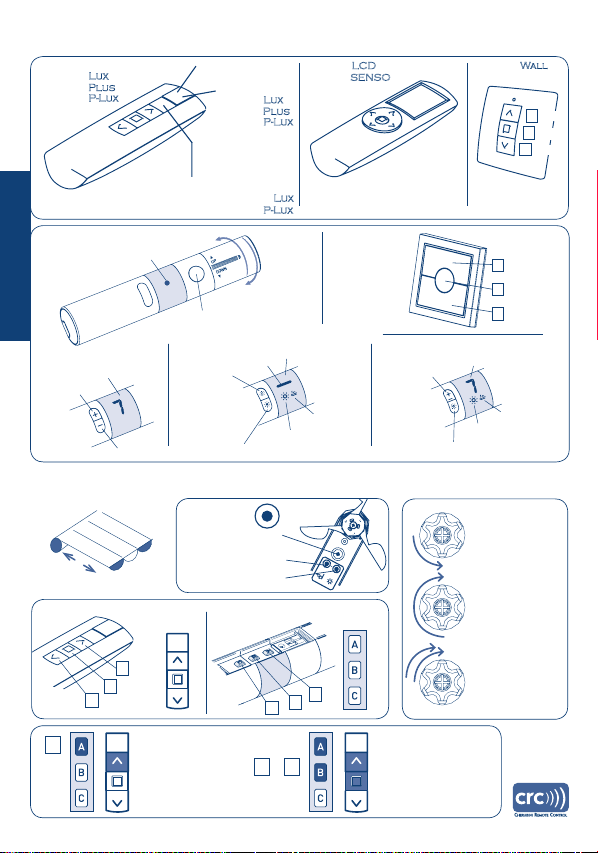
Compatible remote controls ................................................................................... p. 18
Key to symbols ....................................................................................................... p. 18
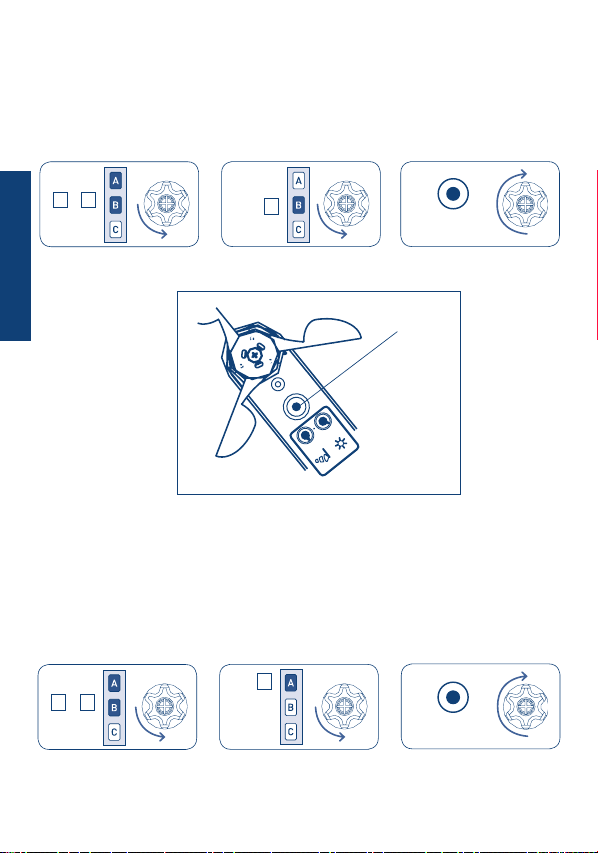
Command sequences example ............................................................................... p. 19
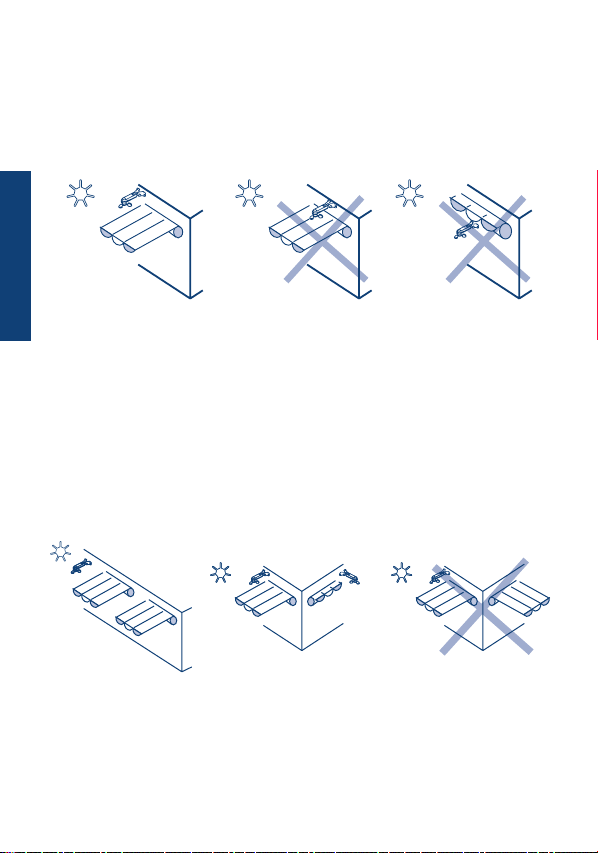
Where to place the Wind & Sun sensor .................................................................. p. 20
Setting of several motors to one sensor ................................................................. p. 20
Fitting the Wind & Sun sensor ................................................................................ p. 21
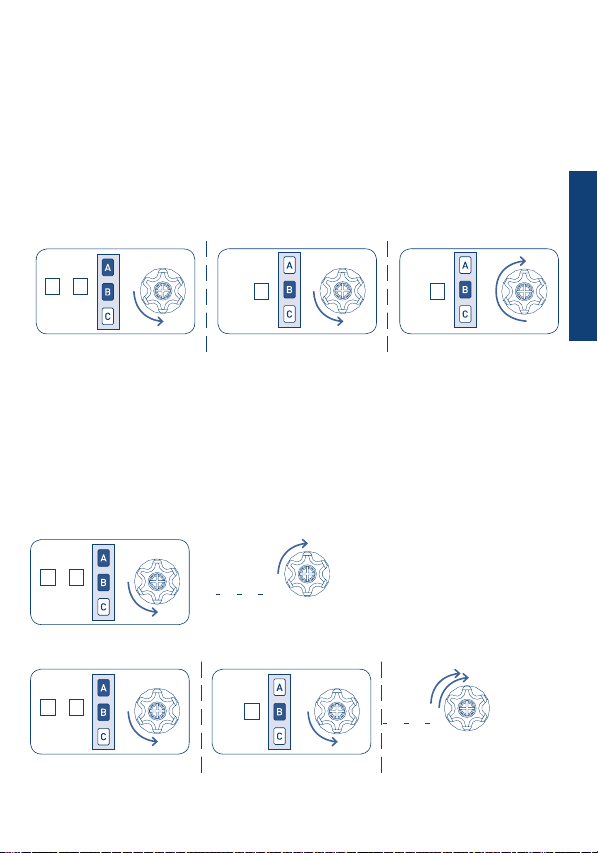
Setting the Wind & Sun sensor ............................................................................... p. 22
Deleting the Wind & Sun sensor ............................................................................. p. 22
Setting the Wind sensor .......................................................................................... p. 23
Activating automatic reopening.............................................................................. p. 23
Deactivating automatic reopening.......................................................................... p. 24
Setting the Sun sensor (WindTec Lux) ..................................................................... p. 24
Activating the automatic or manual setting mode
by the remote control series Skipper....................................................................... p. 24
Activating the automatic or manual setting mode
by the remote control series Giro............................................................................ p. 25
Test mode................................................................................................................ p. 26
EU Declaration of conformity.................................................................................. p. 26
TRANSLATION OF THE ORIGINAL INSTRUCTIONS
ENGLISH

16
ELECTRICAL CONNECTIONS
TECHNICAL FEATURES
There are two versions of the WindTec sensor:
- WindTec: Wind sensor
- WindTec Lux: Wind & Sun sensor.
Blue
Brown
WAVE RX / SENSO RX
Radio receiver
TDS GOLD
Radio receiver
TDS COMPACT
Radio receiver
MINI
Radio receiver
BLUE BUS TDS RX
*only with WindTec Lux
Radio receiver
ORIENS CRC
COMPATIBILITY CLOSING
BY WIND
ALARM
√
√
√
√
√
√
√ √
√
√
√
√
√
√
√
√
AUTOMATIC
REOPENING OPENING AND
CLOSING
WITH LIGHT*
ADDITIONAL
MIDDLE
POSITION*
“PRIVACY”
POSITION*
According to the motor / control unit to which the WindTec is associated, the availability
of certain features changes as indicated in the following table:
WINDTEC
WIND SENSOR
WINDTEC LUX
WIND & SUN SENSOR
Power supply (V) / (Hz)
Radio frequency (MHz)
Setting Wind sensor (km/h)
Setting Sun sensor (klux)
Degree of protection
Dimensions (mm)
Weight (g)
230 / 50
433,92
7,5 - 45
IP33
300x140xH95
365
230 / 50
433,92
7,5 - 45
2,5 - 100
IP33
300x140xH95
365
WINDTEC A520007
WINDTEC LUX A520008
ENGLISH

17
LUX FUNCTION
ATTENTION! The light function in model “WindTec Lux” can by activated only by using
a remote control series SKIPPER or GIRO with the LUX function (Skipper Lux / Skipper P-Lux
or Giro Lux / Giro P-Lux).
Activating/ Deactivating the Sun sensor
Wind & Sun sensor activate.
Only Wind sensor activate.
Series SKIPPER
Series GIRO
ENGLISH
Skipper
Skipper
GIRO Lux
Activating the Sun sensor
Deactivating the Sun sensor
GIRO P-Lux
Activating/ Deactivating the Sun sensor
Wind & Sun sensor activate.
Only Wind sensor activate.

18
COMPATIBLE REMOTE CONTROLS
KEY TO SYMBOLS
short motor
rotation in one
direction
long motor
rotation in other
direction
double short
rotation
Press buttons A and B
at the same time
Press button A
A
+
A B
down
up
N
OPQ
RN
OPQ
R
Wind-speed tuning
Sun-sensor tuning
set
GIRO
down
stop
up
A
B
C
Skipper
A
B
C
ENGLISH
GIRO GIRO Wall
DISPLAY
Change
channel +
Change
channel -
up
stop
down
A
B
C
UP
DOWN
LED
STOP
GIRO Plus
Display -
Activating/ Deactivating the Sun sensor
Channel selector
LED -
Check the specic
instruction book
Skipper
Skipper
Skipper
Skipper
Skipper
Skipper
Skipper
Skipper
Skipper
Skipper
Skipper
Skipper
Skipper
up
stop
down
A
B
C
LED DISPLAY
GIRO Lux
Activating the
Sun sensor
Deactivating the Sun sensor
Sun sensor is “ON”
Wind sensor
is “ON”
GIRO P-Lux DISPLAY
Change channel
Activating/ Deactivating the Sun sensor
Wind sensor
is “ON”
Sun sensor is “ON”

I
19
COMMAND SEQUENCES EXAMPLE
Most of the command sequences have three distinct steps, at the end of which the motor
indicates if the step has been concluded positively or not, by turning in different ways.This
section is provided to demonstrate the motor indications. The buttons must be pressed as
shown in the sequence, without taking more than 4 seconds between one step and the
next. If more than 4 seconds are taken, the command is not accepted and the sequence
must be repeated.
Command sequence example:
As we can see from the example, when the sequence ends positively, the motor returns to
its starting position in one long rotation. In fact, two short rotations in the same direction
correspond to one long rotation in the opposite direction.The motor returns to the starting
position even when the sequence is not completed; in this case by performing one or two
short rotations.
Example of a wrong sequence:
Step 1
Step 1
Step 1
> 4 sec repeat the
sequence
repeat the
sequence
Step 3Step 2
Step 2
> 4 sec
+
A B B B
+
A B
+
A B B
ENGLISH

I
20
WHERE TO PLACE THE WIND & SUN SENSOR
SETTING OF SEVERAL MOTORS TO ONE SENSOR
ATTENTION!
The WindTec sensor must be positioned to the side, as close as possible to its awning, and
not above or below the awning coverage area.
One single WindTec sensor can be used to automate a group of motorised awnings. For a
correct function, the coupled awnings must be mounted and exposed to sunlight and wind
in the same way. Do not connect more then 5 motors to one wind sensor.
RIGHT
RIGHT RIGHT
WRONG WRONG
WRONG
ENGLISH

21
FITTING THE WIND & SUN SENSOR
The WindTec sensor has a positioning mechanism for tting to any surface.
To adjust tting-angle, press the button to rotate the support (see drawing).
PRESS
ENGLISH

22
SETTING THE WIND & SUN SENSOR
DELETING THE WIND & SUN SENSOR
To associate WindTec sensor to a motor, a remote control must be already memorised on
the motor. The setting sequence is the following:
Tn: Already programmed remote control
To delete the WindTec sensor from the motor, an already programmed remote control must
be used. The deleting sequence is the following:
Tn: Already programmed remote control
TnTn 2 sec
set
TnTn 2 sec
set
Button set
N
OPQ
RN
OPQ
R
+
A B B
+
A B
A
ENGLISH

23
SETTING THE WIND SENSOR
The wind level point can be set using the button provided in the lower part of the WindTec
sensor, identied by the windsock symbol. The speed can be set from a minimum of 7,5
Km/h to a maximum of 45 Km/h.
Following a wind alarm, the motor closes automatically the awning, overriding user
commands until the wind alarm passes. To deactivate the wind alarm, it’s necessary that
the wind speed remains below the set level for at least 8 minutes. After these 8 minutes
the awning returns to the position it was in before the alarm, if the automatic reopening
function is active. This pause time is included to ensure awning protection and to prevent
continuous motor movement in the event of sporadic gusts of wind.
It’s prudent not to set the wind speed over the fourth level, which corresponds
to 35 Km/h.
“WIND-SPEED”
SETTING. MAXIMUM RECOMMENDED SPEED
FOR THE WIND-ALARM (35 km/h)
Tn Tn Tn (2 sec)
N
OPQ
RN
OPQ
R
ACTIVATING AUTOMATIC REOPENING
- only with Wave RX / Senso RX motors -
With the automatic reopening system, at the end of the wind alarm, the awning opens
again. From factory this function is not activated in the motor, but can be easily activated
with the following command sequence:
Tn: Already programmed remote control
1
2
3
4
51
2
3
4
5
+
A B
C C
ENGLISH

24
SETTING THE SUN SENSOR
(WindTec Lux)
The light level point can be set using the button
provided in the lower part of the WindTec Lux sensor,
identied by the sun symbol.
The light intensity can be set from a minimum of 2.5 kLux (dawn light) up to a maximum of
100 kLux (midday sunlight). To activate the automatic awning opening, the light intensity
must exceed the set level for 1 minute, while for automatic closing, the light intensity
must remain below the set level for at least 10 minutes. These pause times are included
to prevent the motor from moving continuously in the event of passing clouds. Automatic
opening and closing only work when the motor is set to the automatic wind + light mode.
ACTIVATING THE AUTOMATIC OR MANUAL SETTING MODE
BY THE REMOTE CONTROL SERIES SKIPPER
Tn Tn
“SUN LIGHT”
SETTING
Tn (2 sec)
The manual mode (wind only), or automatic mode (wind +
sun) setting has to be done by the Skipper Lux or Skipper P-Lux
remote control. By briey pressing the “SEL” button, the remote
control shows the current setting.
To change the setting press the SEL button again and hold it down for around 2 sec, until
the motor replies with a conrmation sequence.
DEACTIVATING AUTOMATIC REOPENING
- only with Wave RX / Senso RX motors -
The automatic reopening function can be deactivated at any moment with the following
command sequence:
Tn: Already programmed remote control
Wind & Sun sensor
activate.
Only Wind sensor
activate.
Tn (2 sec)Tn
SEL SEL
N
OPQ
RN
OPQ
R
+
A B
C
A
ENGLISH

The manual mode (wind only), or automatic mode (wind
+ sun) setting has to be done by the Giro Lux or Giro
P-Lux remote control.
To change setting, press for at least 3 seconds the button related to the desired function,
till the motor fedback.
To change setting press the same button for at least 3 seconds till the motor feedback.
Wind & Sun sensor
activate.
Only Wind sensor
activate.
ACTIVATING THE AUTOMATIC OR MANUAL SETTING MODE
BY THE REMOTE CONTROL SERIES GIRO
GIRO Lux
By pressing briey one button the display will show the
current setting.
GIRO P-Lux
By pressing briey the button the display will show the
current setting.
Using the front buttons on the remote control do the following:
(3 sec)
or
(3 sec)
Activating
Deactivating
Activating/ Deactivating
25
ENGLISH

set
26
TEST MODE
This function is useful to check the correct communication via radio, and to perform the
wind and sun function test.
To activate the TEST function, hold the SET button down for around 2 seconds, until
the motor conrms the command by bringing the awning to half opening distance. The
test function lasts for 3 minutes, during which the wind and light level settings can be
checked, without waiting for the activation times. After 3 minutes, the WindTec sensor
returns to normal mode function.
WIND FUNCTION TEST
To avoid errors during the wind function test, we advise setting the motor to manual mode
(wind only).With the anemometer blades moving, when the speed detected by the sensor
exceeds the set level, the motor will close completely the awning. After the awning is
closed and the anemometer blades stop turning, the awning returns to halfway out if the
automatic reopening function is active; if it is not, the awning remains closed.
SUN FUNCTION TEST (WindTec Lux)
Check that the motor is set to the automatic mode. When the sensor detects a change in
light intensity, it opens the awning if brighter than the set point or closes it if weaker. This
test can be repeated several times to establish the desired automatic opening and closing
level according to the light.
(2 sec)
Set button
N
OPQ
RN
OPQ
R
I
CHERUBINI S.p.A. declares that the product is in conformity with the relevant Union
harmonisation legislation: Directive 2014/53/EU, Directive 2011/65/EU.
The full text of the EU declaration of conformity is available upon request at the
following website: www.cherubini.it.
EU DECLARATION OF CONFORMITY
ENGLISH


Rev: 9 07/2018 - Cod: A4518_5407
CHERUBINI Deutschland GmbH
Siemensstrasse, 40 - 53121 Bonn - Deutschland
Tel. +49 (0) 228 962 976 34 / 35 | Fax +49 (0) 228 962 976 36
info@cherubini-group.de | www.cherubini-group.de
CHERUBINI France S.a.r.l.
ZI Du Mas Barbet
165 Impasse Ampère
30600 Vauvert -France
Tél. +33 (0) 466 77 88 58 | Fax +33 (0) 466 77 92 32
info@cherubini.fr | www.cherubini.fr
CHERUBINI Iberia S.L.
Avda. Unión Europea 11-H
Apdo. 283 - P. I. El Castillo
03630 Sax Alicante - Spain
Tel. +34 (0) 966 967 504 | Fax +34 (0) 966 967 505
info@cherubini.es | www.cherubini.es
CHERUBINI S.p.A.
Via Adige 55
25081 Bedizzole (BS) - Italy
Tel. +39 030 6872.039 | Fax +39 030 6872.040
info@cherubini.it | www.cherubini.it
This manual suits for next models
1
Table of contents
Other CHERUBINI Accessories manuals