manuals.online logo
Brands
  1. Home
  2. •
  3. Brands
  4. •
  5. Cheviot
  6. •
  7. Plumbing Product
  8. •
  9. Cheviot 5115 User manual

Cheviot 5115 User manual

Tel :(800)-444-5969
www.cheviotproducts.com
CARE AND MAINTENANCE
Minimum Maintenance is required to maintain product finish. With proper
maintenance your CHEVIOT Faucet will continually look like new. Special care
should be taken when cleaning your faucet and the following suggestions should help
extend your faucet life.
a) Cleaning should be done regularly using a soft cotton cloth and warm water, then
towel dry.
b) Do not use cleaners that contain abrasives or harsh chemicals; Care should be
taken in selecting cleaning supplies. Many cleaners contain detergents, ammonia, or
other corrosive solvents that could damage your faucet finish.
c) occasionally clean with a non-abrasive wax polish.
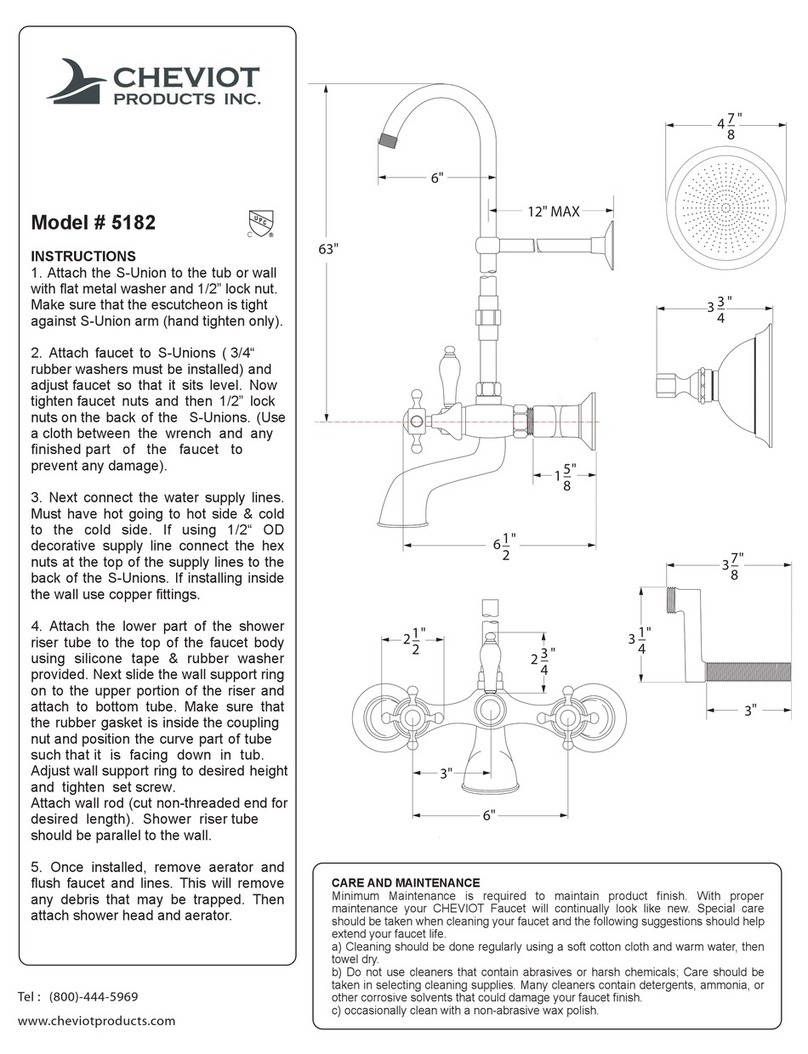
Model # 5115
INSTRUCTIONS
1. Attach the S-Union to the tub with flat
metal washer and 1/2” lock nut. Make
sure that escutcheon is tight against
S-Union arm (hand tighten only).
2. Attach faucet to S-Unions (3/4“ rubber
washers must be installed) and adjust
faucet so that it sits level. Now tighten
hex nuts on back of faucet to secure the
S-Unions. Then tighten the 1/2” lock
nuts on the back of the S-Unions to
secure faucet on vertical surface.
3. Next connect the water supply lines.
Must have hot going to hot side & cold
to the cold side. If using 1/2“ OD
decorative supply line connect the hex
nuts at the top of the supply lines to the
back of the S-Unions. If installing inside
the wall use copper fittings.
4. Install the hand shower cradle on to
the top of the faucet body. Place the
rubber washer in the hex nut at the base
of the cradle and tighten until sealed and
secure.
5. To install the shower hose place the
1/2” rubber washers in the cone nuts at
both ends of the shower hose. Install
one end to the side port on the cradle
stand and one end to the bottom of the
hand shower. Hand tighten.
6. Once installed, remove aerator and
hand shower to flush faucet and water
lines. This will remove any debris that
may be trapped. Then attach shower
head and aerator.
1
13"
61
_
2
"
6"
3"
51
_
4
"
23
_
4
"
21
_
2
"
8"
23
_
4
"
5
_
8
"
45
_
8
"
83
_
8
"
21
_
2
"
37
_
8
"
21
_
4
"
Note: S Unions allow 3” to 8” Centers
Tel : (800)-444-5969
www.cheviotproducts.com
CARE AND MAINTENANCE
Minimum Maintenance is required to maintain product finish. With proper
maintenance your CHEVIOT Faucet will continually look like new. Special care
should be taken when cleaning your faucet and the following suggestions should help
extend your faucet life.
a) Cleaning should be done regularly using a soft cotton cloth and warm water, then
towel dry.
b) Do not use cleaners that contain abrasives or harsh chemicals; Care should be
taken in selecting cleaning supplies. Many cleaners contain detergents, ammonia, or
other corrosive solvents that could damage your faucet finish.
c) occasionally clean with a non-abrasive wax polish.
Model # 5121
INSTRUCTIONS
1. First check to see that the brass
shanks are secure. Place the mounting
legs on the tub, then tighten the lock nuts
from underneath. Water supply lines are
to be connect to bottom of mounting legs
using Teflon tape.
2. Install the faucet body by connecting
the 3/4” end nuts on the back of the
faucet body to the top end of the
mounting legs. Be sure that the rubber
washers are installed, and tighten the
nuts down with a wrench. (Careful not to
damage the finish of the faucet. Use a
piece of cloth between the finished
surface and the wrench)
3. Install the hand shower cradle on to
the top of the faucet body. Place the
rubber washer in the hex nut at the base
of the cradle and tighten until sealed and
secure.
4. To install the shower hose place the
1/2” rubber washers in the cone nuts at
both ends of the shower hose. Install
one end to the side port on the cradle
stand and one end to the bottom of the
hand shower. Hand tighten.
5. Once installed, remove aerator and
hand shower to flush faucet and water
lines. This will remove any debris that
may be trapped. Then attach shower
head and aerator.
8"
23
_
4
"
13"
7"
3"
51
_
4
"
23
_
4
"
21
_
2
"
6"
53
_
8
"
3
_
8
"
45
_
8
"
83
_
8
"
2.0
"
3/4”-14 NPSM
Tel : (800)-444-5969
www.cheviotproducts.com
Model # 5127
INSTRUCTIONS
1. First check to see that the brass
shanks are installed in the mounting
legs. Next place mounting legs on the
tub, then tighten the lock nuts from
underneath.
Water supply lines are to be connected
to bottom of mounting legs using teflon
tape.
2. Install the faucet body by connecting
the 3/4” end nuts on the back of the
faucet body to the top end of the
mounting legs. Be sure that the rubber
washers are installed, and tighten the
nuts down with a wrench. (Careful not to
damage the finish of the faucet. Use a
piece of cloth between the finished
surface and the wrench)
3. Install the hand shower cradle on to
the top of the faucet body. Place the
rubber washer in the hex nut at the base
of the cradle and tighten until sealed and
secure.
4. To install the shower hose place the
1/2” rubber washers in the cone nuts at
both ends of the shower hose. Install
one end to the side port on the cradle
stand and one end to the bottom of the
hand shower. Hand tighten.
5. Once installed, remove aerator and
hand shower to flush faucet and water
lines. This will remove any debris that
may be trapped. Then attach shower
head and aerator.
2"
1
8"
23
_
4
"
13"
6"
3"
51
_
4
3
_
4
3
_
8
"
"
23
_
4
"
21
_
2
"
6"
"
1"
4
CARE AND MAINTENANCE
Minimum Maintenance is required to maintain product finish. With proper
maintenance your CHEVIOT Faucet will continually look like new. Special care
should be taken when cleaning your faucet and the following suggestions should help
extend your faucet life.
a) Cleaning should be done regularly using a soft cotton cloth and warm water, then
towel dry.
b) Do not use cleaners that contain abrasives or harsh chemicals; Care should be
taken in selecting cleaning supplies. Many cleaners contain detergents, ammonia, or
other corrosive solvents that could damage your faucet finish.
c) occasionally clean with a non-abrasive wax polish.
“
61
_
2
"
45
_
8
"
83
_
8
"
NPT connections

This manual suits for next models

5

Other Cheviot Plumbing Product manuals

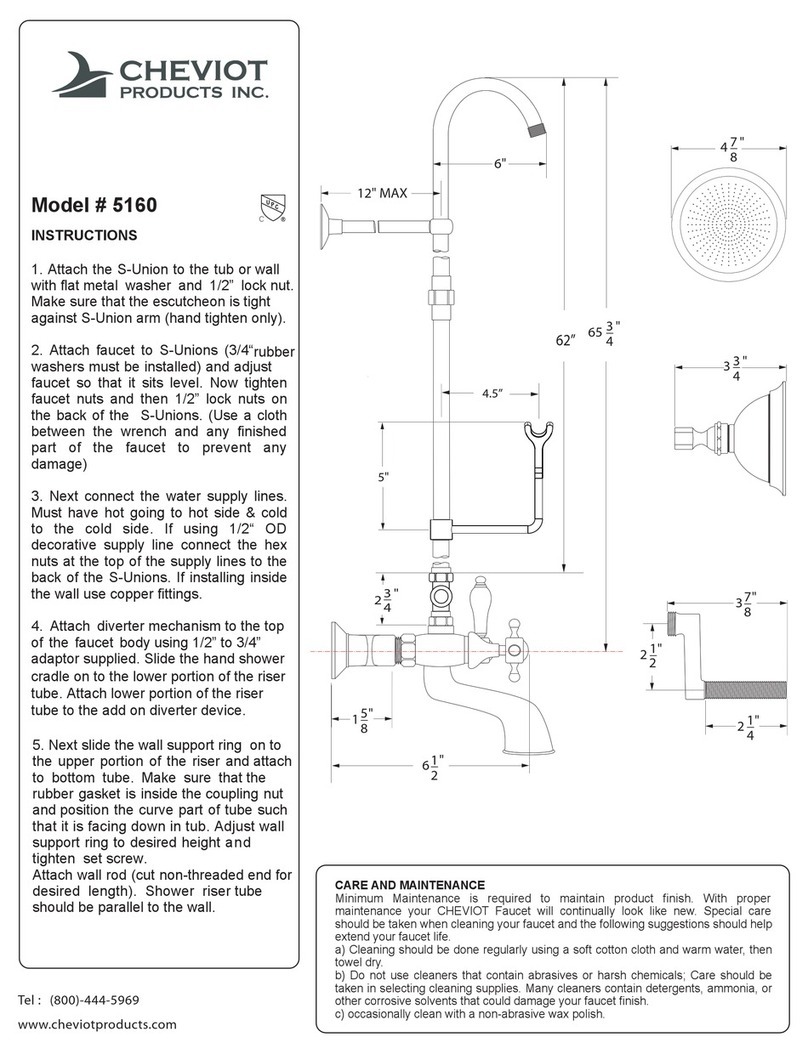
Cheviot 5160 User manual

Cheviot

Cheviot 5160 User manual

Cheviot 7550 User manual

Cheviot

Cheviot 7550 User manual

Cheviot 5138 User manual

Cheviot

Cheviot 5138 User manual

Cheviot 5138 User manual

Cheviot

Cheviot 5138 User manual

Cheviot 5166 User manual

Cheviot

Cheviot 5166 User manual

Cheviot 5138 User manual

Cheviot

Cheviot 5138 User manual

Cheviot 5182 User manual

Cheviot

Cheviot 5182 User manual

Popular Plumbing Product manuals by other brands

Sterling Plumbing WINDHAM 402015 Specifications

Sterling Plumbing

Sterling Plumbing WINDHAM 402015 Specifications

Elkay DRKAD2822 Specifications

Elkay

Elkay DRKAD2822 Specifications

Olympia B-8170 Installation and maintenance instructions

Olympia

Olympia B-8170 Installation and maintenance instructions

Sentiotec Concept R  CP-RC-AF Instructions for installation and use

Sentiotec

Sentiotec Concept R CP-RC-AF Instructions for installation and use

Glacier bay HD67112W-8004 Installation and care guide

Glacier bay

Glacier bay HD67112W-8004 Installation and care guide

ZACK SCALA 40055 quick start guide

ZACK

ZACK SCALA 40055 quick start guide

Excellent AREX.9008CR Installing

Excellent

Excellent AREX.9008CR Installing

Symmons Dia SLS-3522-1.5 Installation Brief

Symmons

Symmons Dia SLS-3522-1.5 Installation Brief

Kohler K-45346T installation instructions

Kohler

Kohler K-45346T installation instructions

Kohler K-8801 Installation and care guide

Kohler

Kohler K-8801 Installation and care guide

newform BLINK CHIC instructions

newform

newform BLINK CHIC instructions

OLI NO-TOUCH user manual

OLI

OLI NO-TOUCH user manual

Hans Grohe iBox Universal Plus Rough 01850181 Installation/User Instructions/Warranty

Hans Grohe

Hans Grohe iBox Universal Plus Rough 01850181 Installation/User Instructions/Warranty

Sensea HILO Assembly, Use, Maintenance Manual

Sensea

Sensea HILO Assembly, Use, Maintenance Manual

Helvex Magna DX TV-048-S installation guide

Helvex

Helvex Magna DX TV-048-S installation guide

Toto GE TBG07201U Installation and owner's manual

Toto

Toto GE TBG07201U Installation and owner's manual

BERNSTEIN G30014A Assembly instructions

BERNSTEIN

BERNSTEIN G30014A Assembly instructions

pure cube CU550 Assembly instructions

pure cube

pure cube CU550 Assembly instructions

manuals.online logo
manuals.online logoBrands
  • About & Mission
  • Contact us
  • Privacy Policy
  • Terms and Conditions

Copyright 2025 Manuals.Online. All Rights Reserved.