Cheviot 5166 User manual
Tel :(800)-444-5969
www.cheviotproducts.com
Model # 5166
INSTRUCTIONS
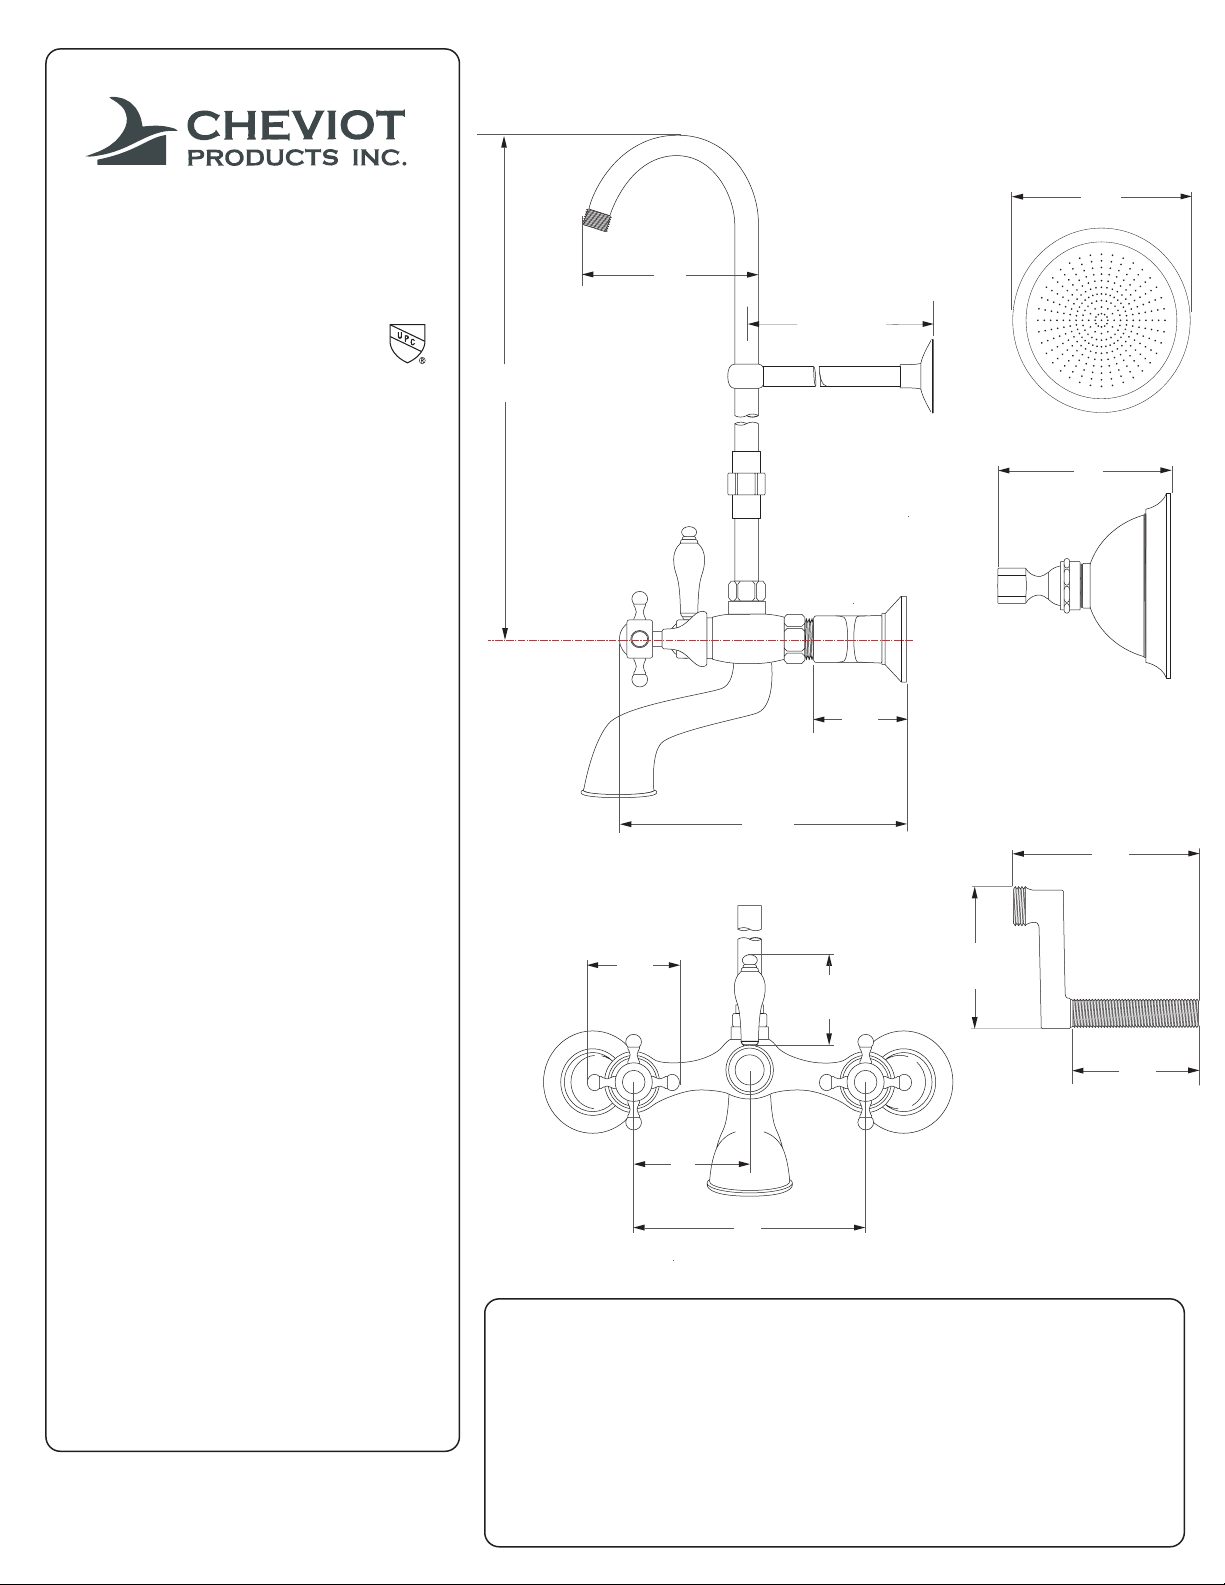
1. Attach the S-Union to the tub or wall
with flat metal washer and 1/2” lock nut.
Make sure that the escutcheon is tight
against S-Union arm (hand tighten only).
2. Attach faucet to S-Unions ( 3/4“
rubber washers must be installed) and
adjust faucet so that it sits level. Now
tighten faucet nuts and then 1/2” lock
nuts on the back of the S-Unions. (Use
a cloth between the wrench and any
finished part of the faucet to
prevent any damage).
3. Next connect the water supply lines.
Must have hot going to hot side & cold
to the cold side. If using 1/2“ OD
decorative supply line connect the hex
nuts at the top of the supply lines to the
back of the S-Unions. If installing inside
the wall use copper fittings.
4. Attach the lower part of the shower
riser tube to the top of the faucet body
using silicone tape & rubber washer
provided. Next slide the wall support ring
on to the upper portion of the riser and
attach to bottom tube. Make sure that
the rubber gasket is inside the coupling
nut and position the curve part of tube
such that it is facing down in tub.
Adjust wall support ring to desired height
and tighten set screw.
Attach wall rod (cut non-threaded end for
desired length). Shower riser tube
should be parallel to the wall.
5. Once installed, remove aerator and
flush faucet and lines. This will remove
any debris that may be trapped. Then
attach shower head and aerator.
CARE AND MAINTENANCE
Minimum Maintenance is required to maintain product finish. With proper
maintenance your CHEVIOT Faucet will continually look like new. Special care
should be taken when cleaning your faucet and the following suggestions should help
extend your faucet life.
a) Cleaning should be done regularly using a soft cotton cloth and warm water, then
towel dry.
b) Do not use cleaners that contain abrasives or harsh chemicals; Care should be
taken in selecting cleaning supplies. Many cleaners contain detergents, ammonia, or
other corrosive solvents that could damage your faucet finish.
c) occasionally clean with a non-abrasive wax polish.
C
15
_
8
"
63"
6"
61
_
2
"
12" MAX
31
_
4
"
37
_
8
"
6"
3"
23
_
4
"
33
_
4
"
47
_
8
"
21
_
2
"
3"

�CHEVIOT
Model # 51
66
INSTRUCTIONS
4
Make
Next,
DMAX 12"
D
'
CARE AND MAINTENANCE
►
wax
M12-055
This manual suits for next models
1
Other Cheviot Plumbing Product manuals


Popular Plumbing Product manuals by other brands

Oras
Oras Electra Installation and maintenance guide

Haws
Haws 8320 Installation, operation & maintenance instructions

Dornbracht
Dornbracht Smart Set manual

KWC
KWC DOMO 10.661.023.000FL Installation and service manual

Hans Grohe
Hans Grohe AXOR Citterio E Assembly instructions

ProFlo
ProFlo PFWSC4757CP installation instructions

KWC
KWC Systema 10.501.173. Specification sheet

Kalia
Kalia KACHET KF1425 Installation instructions / warranty

Mirabelle
Mirabelle CALVERTON MIRXCCA100CP installation instructions

Sloan
Sloan TRF 156-1.1 installation instructions

Blaufoss
Blaufoss PHANTOM 37531 installation guide

Heritage Bathrooms
Heritage Bathrooms PGRW01L Fitting Instructions & Contents List


