Chicago Electric 47996 User manual

WELDING HELMETWELDING HELMET
WELDING HELMET
AUTO-DARKENINGAUTO-DARKENING
AUTO-DARKENING
ASSEMBLY AND OPERATING INSTRUCTIONS
3491 Mission Oaks Blvd., Camarillo, CA 93011
Visit ourWeb site at http://www.harborfreight.com
Copyright © 2002 by Harbor Freight Tools®. All rights reserved. No portion of this manual or
any artwork contained herein may be reproduced in any shape or form without the express
written consent of Harbor FreightTools.
For technical questions and replacement parts, please call 1-800-444-3353
47996
Important: Read and understand the entire manual before using the
welding helmet.
REV 05/05

Page 2SKU 47996
Specifications
ITEM DESCRIPTION
Welding Protection Types For MIC / MAG, Flux Cored, TIC, Plasma /
Microplasma Arc
Not Protected From Laser welding and oxyhydrogen welding
Filter Standard ANSI Z87.1 -- 1989 (R1998) Standard
Switch On / Off to use power from internal batteries; auto-off
Construction High impact resistant plastic polyamide nylon;
Full Face; Retainer and ratchet headband
Darkness Range Shade Control: Clear state # 3; Dark: DIN 4, 9 ~ 13
adjustable
Lens Protection Ultraviolet and infrared
Lens Viewing Size 3.5 (W) x 1.5 (H) inches
Lens Switching Speed 1/1000 second (to dark); 1/2 second (to light)
Lens Shade Green
Filter Overall Size 4.75 (W) x 3-1/2 (H) x 5/8 (D) inches
Power Source Solar powered with two AAA backup batteries
Operating Temperature 23° ~ 131° F; (- 5° ~ 55° C)
Weight 1.15 lbs.
Save This Manual
You will need the manual for the safety warnings and precautions, assembly instructions,
operating and maintenance procedures, parts list and diagram. Keep your invoice with this
manual. Write the invoice number on the inside of the front cover. Keep the manual and
invoice in a safe and dry place for future reference.
Safety Warnings and Precautions
WARNING:When using tool, basic safety precautions should always be followed to re-
duce the risk of personal injury and damage to equipment.
Read all instructions before using this tool!
1. Do not attempt to use the Auto Darkening Welding Helmet if the Lens has been
damaged in any way. Severe eye damage will occur.
2. Keep work area clean. Cluttered areas invite injuries.
3. Observe work area conditions. Do not use machines or power tools in damp or wet
locations. Don’t expose to rain. Keep work area well lighted. Do not use electrically
powered tools in the presence of flammable gases or liquids.
4. Keep children away. Children must never be allowed in the work area. Do not let them
handle machines, tools, or extension cords.
5. Store idle equipment. When not in use, tools must be stored in a dry location to inhibit
rust. Always lock up tools and keep out of reach of children.
6. Use the right tool for the job. Do not attempt to force a small tool or attachment to do
the work of a larger industrial tool.There are certain applications for which this tool was
For MIG / MAG, Flux Cored, TIG, Plasma /
Microplasma Arc
REV 05/05

Page 3SKU 47996
designed. Do not modify this tool and do not use this tool for a purpose for which it was
not intended.
7. Dress properly. Do not wear loose clothing or jewelry as they can be caught in moving
parts. Protective, electrically non-conductive clothes and non-skid footwear are
recommended when working. Wear restrictive hair covering to contain long hair.
8. Use eye and ear protection. Always wear ANSI approved impact safety goggles.Wear
afullfaceshieldifyouareproducingmetalfilingsorwoodchips.WearanANSIapproved
dustmaskorrespirator when workingaroundmetal,wood,andchemical dustsandmists.
When welding, use the Auto Darkening Welding Helmet.
9. Do not overreach. Keep proper footing and balance at all times. Do not reach over or
across running machines.
10. Stay alert. Watchwhatyouaredoing,usecommonsense.Donot operate anytoolwhen
you are tired.
11. Check for damaged parts. Beforeusinganytool,anypartthatappears damagedshould
be carefully checked to determine that it will operate properly and perform its intended
function.Check for alignment andbinding ofmovingparts;any broken parts or mounting
fixtures;and anyothercondition thatmayaffectproperoperation.Anypartthatis damaged
should be properly repaired or replaced by a qualified technician.
12. Replacement parts and accessories. When servicing, use only identical replacement
parts. Use of any other parts will void the warranty. Only use accessories intended for
use with this tool. Approved accessories are available from Harbor Freight Tools.
13. Do not operate tool if under the influence of alcohol or drugs. Read warning labels
onprescriptionstodetermine if yourjudgmentorreflexesareimpairedwhile taking drugs.
If there is any doubt, do not operate the tool.
14. Maintenance. For your safety, service and maintenance should be performed regularly
by a qualified technician.
Warning:The warnings,cautions,and instructions discussed in this instruction manual
cannot cover all possible conditions and situations that may occur. It must be under-
stood by the operator that common sense and caution are factors which cannot be
built into this product,but must be supplied by the operator.
Helmet Safety Warnings and Precautions
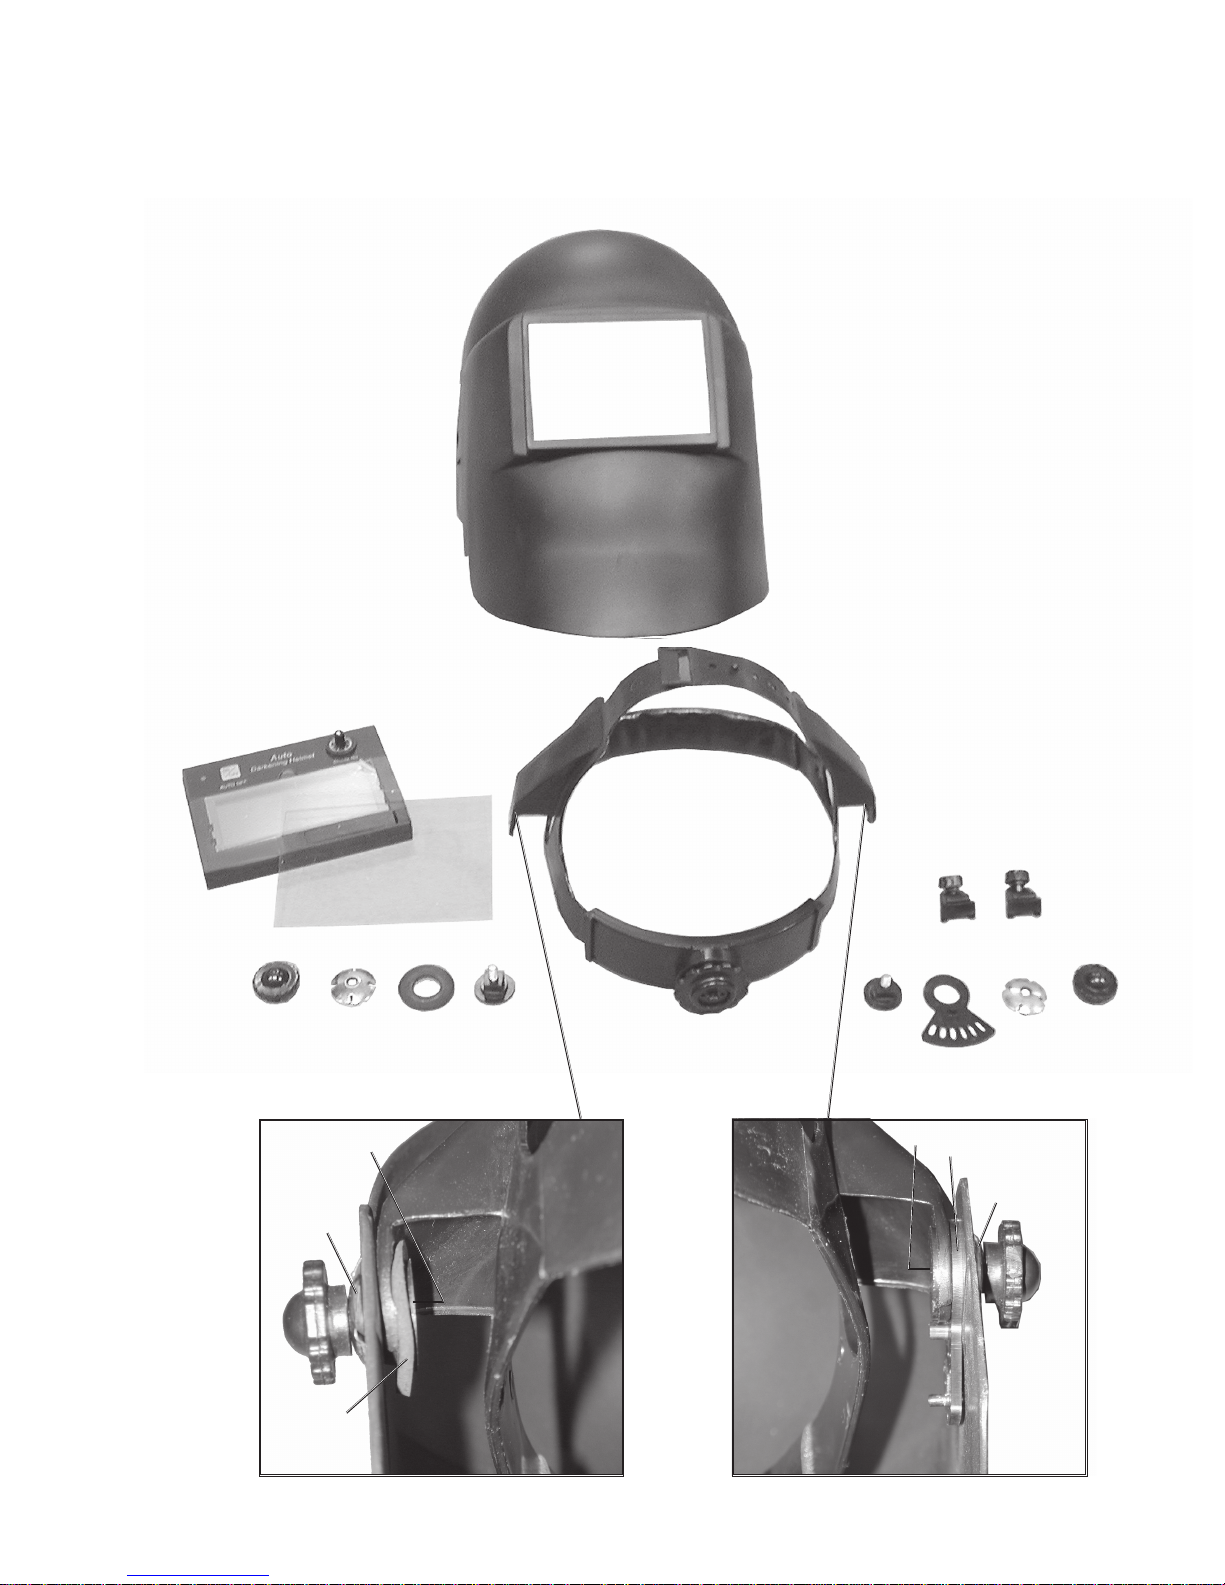
Remove the protective film from both sides of the new cover lens.
1. Use this helmet for eye and face protection against harmful rays, sparks and splatter
generated during welding and cutting operations.
2. Always have the clear plastic protection cover over the filter lens. Failure to do so could
result in damage to the filter lens.
3. The protection cover and lens in this helmet are breakable.They will not protect against
someimpacthazards, such as fragmenting grinding wheel,abrasive discs fragments, or
corrosive liquids. Machine guards or other devices must be used where these hazards
exist.
4. Before each use, inspect the helmet and lens carefully.Cracked or scratched filter lenses
or clear plates impair vision and seriously reduce light filtering and impact protection.

Page 4SKU 47996 REV 03/04 REV 05/04
Unpacking
When unpacking, check to make sure the following parts are included:
Welding Helmet
with Filter Lens.
If any parts are missing or broken, please call Harbor Freight Tools at the
number on the cover of this manual as soon as possible.
Repair or replace damaged components immediately. Replace the two AAA backup
batteriesoften.
5. Be sure the welding filter shade setting is correct for your application.
6. Test the helmetauto-darkeningfilterlensbeforewelding.Whilewearingthehelmet,briefly
strike an arc, keeping your face and eyes turned slightly away from the arc, and to one
side.The lens should darken even when not directly facing the arc.If it does not darken
after repeated tests, replace the lens filter.
7. Impact resistant eye protection such as safety glasses or goggles must be worn at all
times when using this helmet.Wear ear protection.
8. Avoid exposing the Auto Darkening Lens unit to high temperature.
Operation
WARNING: Do not use the Auto Darkening Welding Helmet if the lens does not auto-
darken. Severe eye damage or blindness can occur when welding. Always verify that
the helmet is functioning before use. Remove the backup batteries and check monthly
withamultimeter thateachone is1.5 volts. Replacebatteries every threemonths whether
they are good or not.
WARNING:This product is used with welding or similar applications that produce
chemicals known to the State of California to cause cancer and birth defects (or
other reproductive harm).
(California Health & Safety Code 25249.5 et seq.)

Page 5SKU 47996
Maintenance
Replacing Batteries
1. Turn the Helmet over to expose the inside.
2. Remove the Battery Cover. Lift the right side of the battery cover and pop it out.
3. Remove two batteries from the battery compartment.
4. Place both new batteries negative side (left) into the battery compartment.
The batteries should be completely clean of grease and dirt.
5. Replace the Battery Compartment Cover, left side first, then push in the right side until
it snaps into place.
General
1. Use a clean, soft cloth to clean the Lens Filter.Do not use water or cleaning liquids.
2. Store the helmet in a cool and dry location.
ShadeControl
On / Off Button
AAABatteryCompartment
BatteryCompartmentCover
WARNING:This Helmet does not provide protection for LASER AND OXYHYDROGEN
welding.
1. Verify that the batteries are good.
2. Turn the helmet over and adjust the Shade Knob to the desired shade (9 ~ 13).
3. Push the Switch Button to turn the lens on and open the window.
4. Adjust the helmet Side Knobs for a proper fit.Tighten the Lens Clamp Screws.
5. Put on a pair of safety glasses first, then the helmet.
6. While looking to one side, strike an arc briefly (see # 6 above).
Check to see if the welding filter lens went dark. If it did, the auto-darkening function is
working. Continue arc welding.When finished, the lens filter will turn off automatically.

Page 6SKU 47996
NOTE:Somepartsarelistedand shownfor illustrationpurposes
only and are not available individually as replacement parts.
PLEASE READTHE FOLLOWING CAREFULLY
THE MANUFACTURER AND/OR DISTRIBUTOR HAS PROVIDEDTHE PARTS DIAGRAM INTHIS MANUAL
AS A REFERENCE TOOL ONLY. NEITHER THE MANUFACTURER NOR DISTRIBUTOR MAKES ANY
REPRESENTATION ORWARRANTY OF ANY KINDTOTHE BUYERTHAT HE OR SHE IS QUALIFIEDTO
MAKE ANY REPAIRSTOTHE PRODUCT ORTHAT HE OR SHE IS QUALIFIEDTO REPLACE ANY PARTS
OFTHE PRODUCT. IN FACT,THE MANUFACTURER AND/OR DISTRIBUTOR EXPRESSLY STATESTHAT
ALL REPAIRS AND PARTS REPLACEMENTS SHOULD BE UNDERTAKEN BY CERTIFIED AND LICENSED
TECHNICIANSANDNOT BYTHE BUYER.THEBUYERASSUMES ALL RISKANDLIABILITYARISINGOUT
OFHISOR HER REPAIRSTOTHE ORIGINAL PRODUCTORREPLACEMENTPARTSTHERETO,OR ARISING
OUT OF HIS OR HER INSTALLATION OF REPLACEMENT PARTSTHERETO.
Troubleshooting
The following lists possible causes for non operation:
1. Batteries are not inserted correctly.
2. Battery Cover not completely secure.
3. Batteries are dead.
4. On / Off Button was not pressed on.
5. Solar Cells are damaged. Replace Lens Filter unit.
6. Lens Filter is cracked. Replace Lens Filter unit.
Parts List
Item # Description Qty
1 Front Cover Protective Lens 1
2 Auto Darkening Lens Unit 1
3 Helmet Shell 1
4 Headband 1
5 Knob 1
6 Round Washer 1
7 Metal Washer 2
8 Limitation Washer 1
9 Hinge Screw 2
10 Lens Unit Screw Clamps 2
Replacing the Lens Cover
Lift the Lens Cover and remove the clear plastic. Replace it when it becomes scratched,
cracked, or pitted, and cannot be cleaned.
Removing the Lens
1. Turn the Helmet over to view the Lens from the inside.
2. Unscrew the two Lens Unit Screw Clamps (10). Pull it out from the inside.

Page 7SKU 47996
Assembly Drawing
(3)
(2)
(1)
(4)
(5) (7) (7) (5)(6) (9) (9)
(10)
(8)
(5)
(7)
(8)
(9)
(5)
(7)
(6)
(9)
Table of contents
Other Chicago Electric Motorcycle Accessories manuals

Chicago Electric
Chicago Electric 94337 User manual

Chicago Electric
Chicago Electric 91212 User manual

Chicago Electric
Chicago Electric 67854 Instruction Manual

Chicago Electric
Chicago Electric 64527 User manual

Chicago Electric
Chicago Electric 46092 Assembly instructions

Chicago Electric
Chicago Electric 91214 Installation manual

Chicago Electric
Chicago Electric 46092 User manual

Chicago Electric
Chicago Electric 67618 Installation manual

Chicago Electric
Chicago Electric 91214 Assembly instructions

Chicago Electric
Chicago Electric 91212 Installation manual