manuals.online logo
Brands
  1. Home
  2. •
  3. Brands
  4. •
  5. CHIEF
  6. •
  7. Industrial Monitor
  8. •
  9. CHIEF ConnexSys Series User manual

CHIEF ConnexSys Series User manual

INSTALLATION GUIDE
ConnexSys series
™
CURVED VIDEO WALL GUIDELINES
The ConnexSys™ LVSXU is UL listed for use in certain curved video wall applications – but how do you know
if your install fits the criteria? Use this guide to determine if ConnexSys is a good match for your curved wall
installation. For comprehensive guidelines on mounting the LVSXU please reference the installation manual.
Strut Channel & Curve Radius Requirements
ConnexSys is compatible with curved walls built in a radius of 200"(5.08 m) or greater. The strut channel
material being used should also follow the guidelines listed in the chart below
Calculating the Wall Radius
1. Place a rigid, flat stick or strut channel (at least 3 ft or 1 m long – preferably longer) against the curved
wall as shown in the example below. Do NOT bend the stick or strut.
2. Measure the largest gap between the stick or strut and the wall.
3. Calculate the radius with the following equation:
Gap/2 + (Length/8 x Length/Gap) = Radius
Example
Stick/Strut Length: 48” (121.9 cm)
Gap: 0.375” (9.5 mm)
0.375/2 + (48/8 x 48/0.375) = 768” (19.5 m) Radius
STRUT CHANNEL MATERIAL
Aluminum Steel
Minimum Wall Radius Greater than 200"(5.08 m) Greater than 400"(10.16 m)
Minimum Yield Strength 30 ksi (207 MPa) 33 ksi (230 MPa)
Material Thickness 0.078” (2 mm) 14 ga – 0.075"(2 mm) or 12 ga – 0.104"(2.5 mm)
Strut Channel Depth 13/16"(21 mm) or 7/8"(22 mm)
Flange Length 1/4 - 9/32"(6-7 mm)
Curved Wall
Flat Stick or Strut
(view from above - image is exaggerated)
Gap
A BRAND OF MILESTONE AV TECHNOLOGIES | www.milestone.com
USA P866.977.3901 E[email protected]
CANADA P877.345.4329 E[email protected]
EMEA P+31 495 580 840 E[email protected]
APAC P+852 2145 4099 E[email protected]
In British Columbia, Milestone AV Technologies ULC carries on business as MAVT Milestone AV Technologies ULC.
©2016 Milestone AV Technologies. 160076 4/16 Chief is a registered trademark of Milestone AV Technologies. All
other brand names or marks are used for identification purposes and are trademarks of their respective owners. All
patents are protected under existing designations. Other patents pending.
Milestone AV Technologies is home of Chief,
Da-Lite, Sanus and Projecta. Across these
brands, Milestone produces a wide range of
innovative audiovisual solutions.
INSTALLATION GUIDE
ConnexSys series
™
Curved Video Walls on Flat Walls
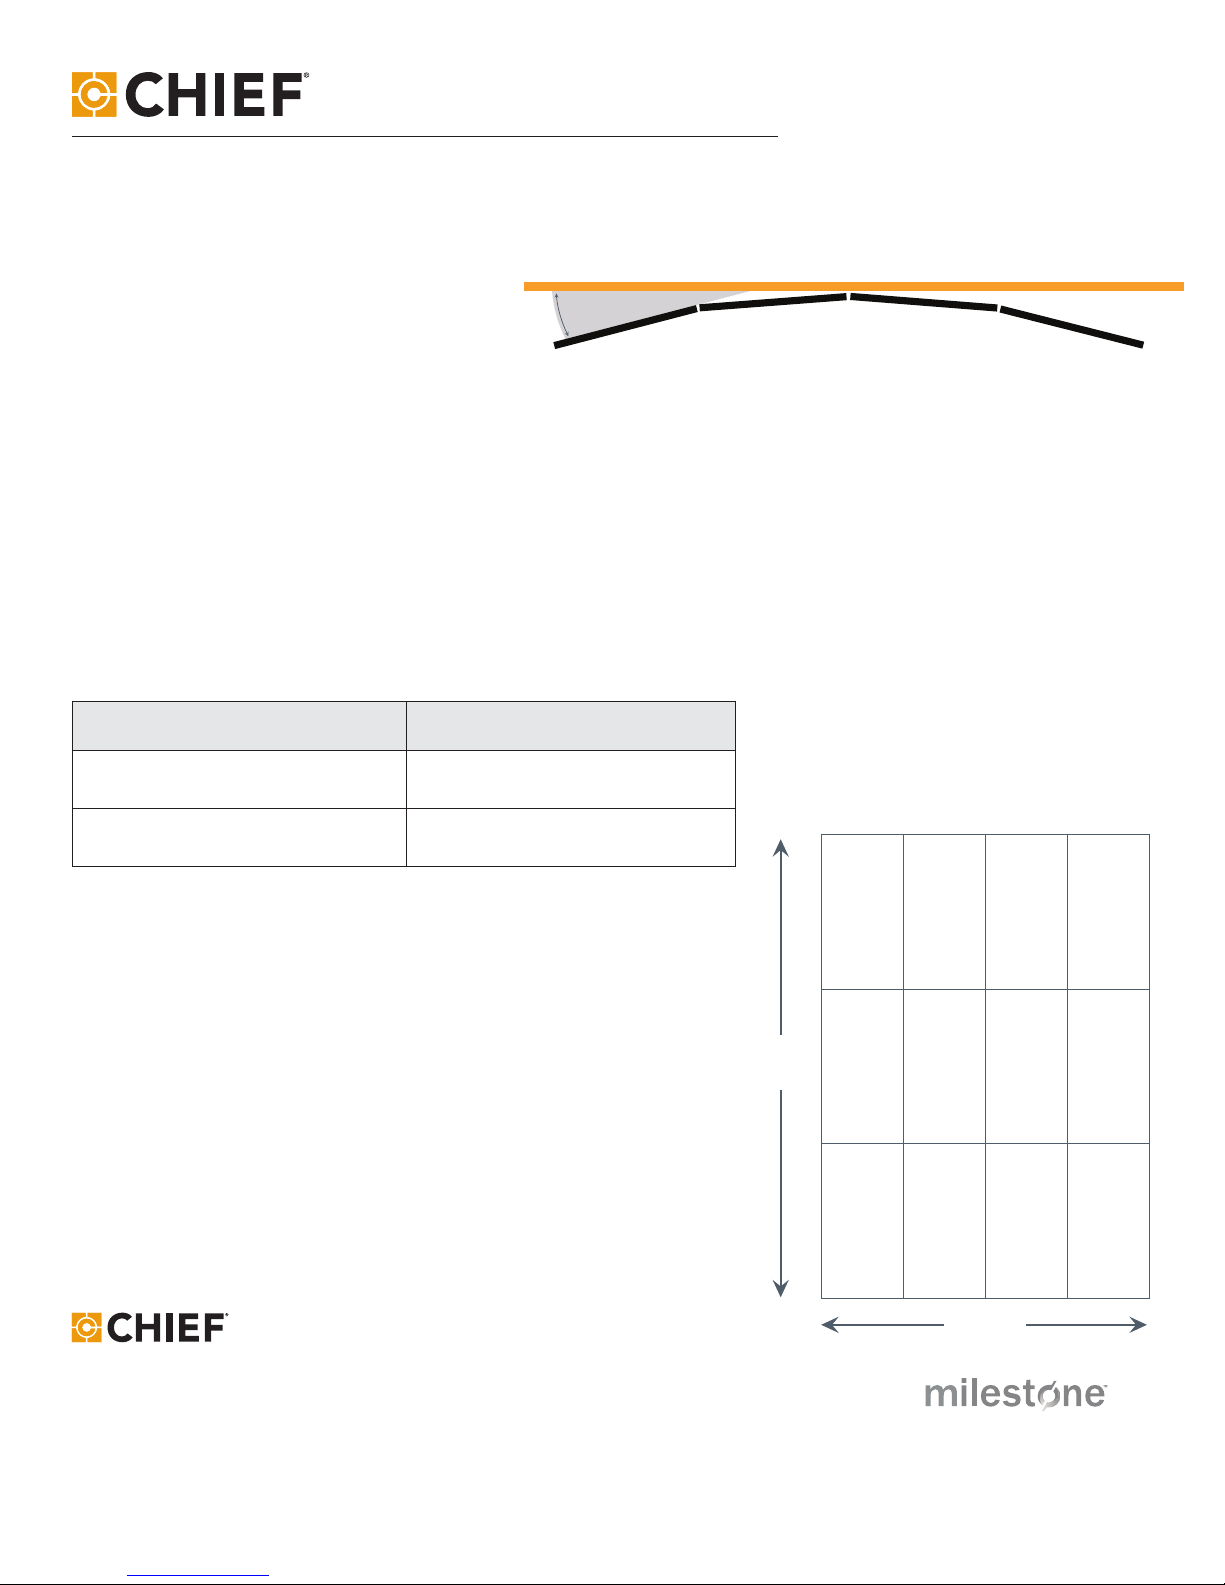
ConnexSys™can also be used to create curved
video walls when mounted on flat walls. Things
to note when designing a curved video wall on a
flat surface:
• The maximum angle a mount can make from vertical is 5.5 degrees
• Two or more mounts placed side-by-side can create a maximum angle of 11 degrees
• All other criteria listed in the above “Strut Channel Requirements” still apply
Allowing Space for Mount Adjustability
To retain the maximum amount of adjustability for video wall alignment, you will need to plan to use more than
the minimum depth capabilities of the ConnexSys mount. As a rule of thumb, assume the mount is 4.5" (11.4 cm)
deep. Then take the longest dimension of the video wall and multiply by the relevant depth adjustment factor to
determine the minimum mount depth needed for your installation.
Wall Radius Depth Adjustment Factor
Radius > 500" (12.7 m) .0025" per inch (2.5 mm per meter)
200" (5.08 m) < Radius < 500” (12.7 m) .00312" per inch (3.12 mm per meter)
Example
In the example shown on right, you should install under the
assumption that the depth will be 4.86” (12.36 cm).
Because 146.7" is greater than 113.2", we use 146.7".
4.5” + (146.7” x .0025”) = 4.86”
Questions?
Contact us online or by phone for guidance.
P: 1.866.977.3901
E: info@milestone.com
113.2"
(2.87 m)
146.7"
(3.72 m)
Wall Radius 600" (15.24 m)
5.5°
(view from above - image is exaggerated)
Flat Wall
Curved Video Wall

This manual suits for next models

1

Popular Industrial Monitor manuals by other brands

Winmate R19L-PM Series user manual

Winmate

Winmate R19L-PM Series user manual

Bernecker + Rainer 5AP923.1215-00 user manual

Bernecker + Rainer

Bernecker + Rainer 5AP923.1215-00 user manual

Unitronics UniStream USP-070-B08 installation guide

Unitronics

Unitronics UniStream USP-070-B08 installation guide

Blue Corvus baby Bird user guide

Blue Corvus

Blue Corvus baby Bird user guide

Kübler SMCB-Display operating manual

Kübler

Kübler SMCB-Display operating manual

Hitachi P50X901/DW3D Service manual

Hitachi

Hitachi P50X901/DW3D Service manual

Siemens SIMATIC Industrial Flat Panel IFP2200 Product information

Siemens

Siemens SIMATIC Industrial Flat Panel IFP2200 Product information

Rockwell Automation Allen-Bradley 6186M-12PN installation instructions

Rockwell Automation

Rockwell Automation Allen-Bradley 6186M-12PN installation instructions

Rockwell Automation 6186-M12AL user manual

Rockwell Automation

Rockwell Automation 6186-M12AL user manual

NENKO 29010085 manual

NENKO

NENKO 29010085 manual

HEIDENHAIN ND 261 Series manual

HEIDENHAIN

HEIDENHAIN ND 261 Series manual

Acnodes APH 9190 user manual

Acnodes

Acnodes APH 9190 user manual

BeiJer iX Panel T4A installation manual

BeiJer

BeiJer iX Panel T4A installation manual

Nexcom VTK 33M-01 user manual

Nexcom

Nexcom VTK 33M-01 user manual

Contec FPD-M21VT-AC user manual

Contec

Contec FPD-M21VT-AC user manual

I-Tech SNP717 user manual

I-Tech

I-Tech SNP717 user manual

CyberView RP-F719 user manual

CyberView

CyberView RP-F719 user manual

Pro-face GP3700 Series installation guide

Pro-face

Pro-face GP3700 Series installation guide

manuals.online logo
manuals.online logoBrands
  • About & Mission
  • Contact us
  • Privacy Policy
  • Terms and Conditions

Copyright 2025 Manuals.Online. All Rights Reserved.