ChillX AutoEgg Litter Box User manual

AutoEgg Litter Box
Quick Start Guide
PLEASE READ THIS ENTIRE GUIDE BEFORE BEGINNING
chillx.co

1
We’re constantly eveloving the AutoEgg,
get the latest quick start guide with videos at support.chillx.co
Follow our ocial Facebook Page (@ChillX.co)
to get updates and responsive customer service
fb.com/chillx.co

2
Thank you
for purchasing
the ChillX AutoEgg
self-cleaning litter box.
Finally, a Chill Pill that Works!
At ChillX, we aim to bring your more inner chill by
resolving your everyday pain points with modern design.
This guide will help you get the most out of your
AutoEgg. We will guide you through the setup process,
as well as provide essential tips and advice.
Enjoy your ChillX AutoEgg, and have a ChillX day!
#gotchillx
3
Let’s Get Started
Package Includes
x1 ChillX AutoEgg Base
x1 ChillX AutoEgg Top Cover
x1 5V/2A USB Wall Charger with Type-C Cable
x1 Litter Scooper
x1 Waste Drawer Liner Roll
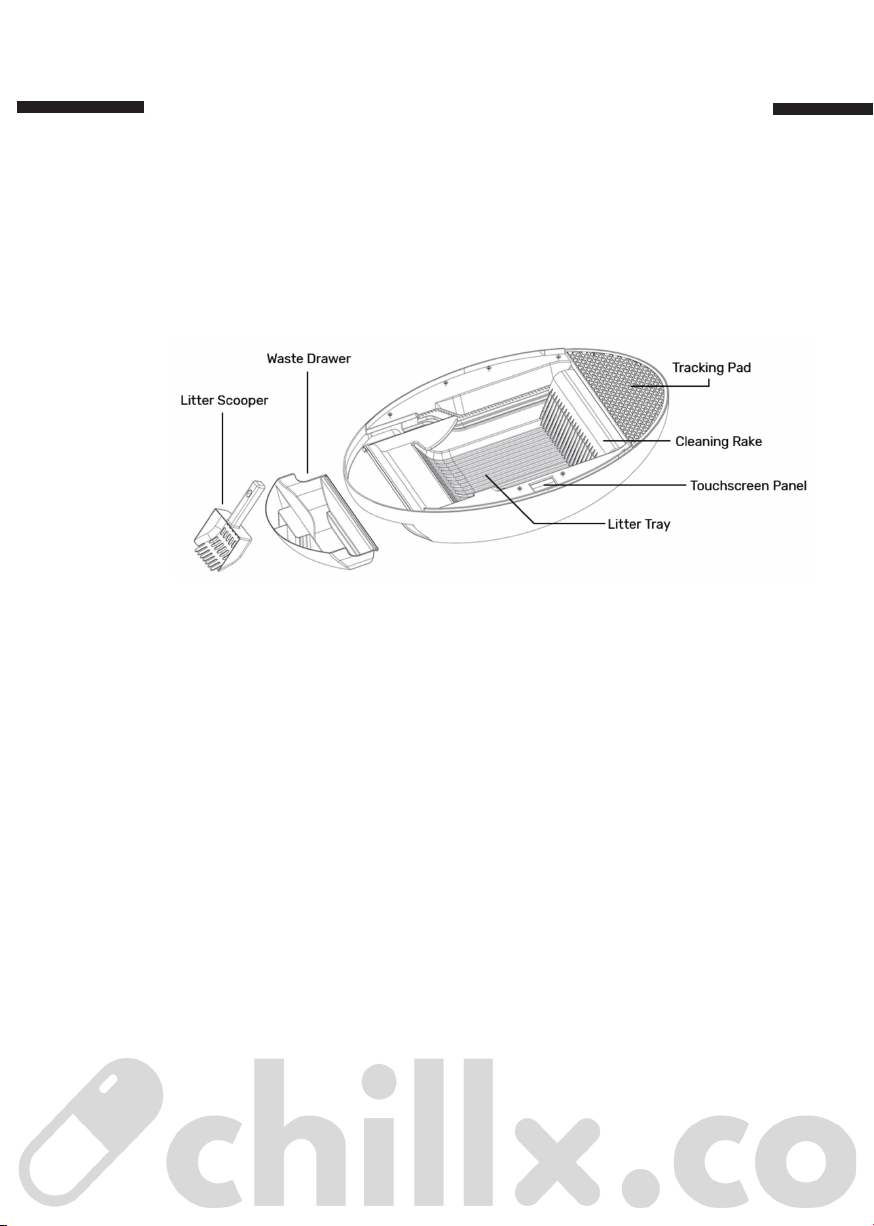
Get to Know Your ChillX AutoEgg
Main Features
• Automatic Self-Cleaning: 5 mins after detecting the presence of 5+ g
(0.17+ oz) of excretion; Plus, self-clean every day at 3 & 9 A.M., and 3 & 9
P.M. in automatic mode
• Weight Log: Records a log of date, time, duration, weight, and waste
data for the last seven days on the touchscreen panel
• Odor-Seal: Traps litter in the waste drawer
• Ultra-Silent: Chill or sleep without disruptions
Specications
Cat Supported: 2 kg (4.4 lb.) to 7 kg (15.4 lb.)
Maximum Load: 20 kg (44 lb.)
Gravity Sensor Accuracy: 1 g (0.03 oz)
Waste Drawer Capacity: 2 L (122 ci)
Eco-Friendly Material: PP/ABS
Power Adapter: 5V/2A USB Type-C
Product Weight: 5 kg (11 lb.)

4
Watch the video guide at support.chillx.co
1. Remove Foam Spacers
Remove the anti-shock foam spacers from the AutoEgg base and rails.
2. Ensure Sturdy Placement
Find a rm and level oor surface for the AutoEgg near an electrical outlet.
Avoid soft carpeted surfaces — the automatic self-cleaning function fully
relies on four gravity sensors on the bottom of AutoEgg. If you have to put the
AutoEgg on carpet, please place a hard mat completely underneath the unit.
3. Plug the Type-Cable into the Base
Plug the USB Type-C cable into the socket on the bottom of the AutoEgg
base. DO NOT plug the AC/DC adapter into a wall outlet yet.
4. Add Litter
Add clumping litter into the litter tray. For the best tracking control and litter
saving, remain in the middle of “Min” & “Max” line. Never overll.
DO USE fast- and hard-clumping clay cat litter with small particles.
NEVER USE silica gel crystals, recycled paper, tofu, pine, corn, or wheat litter.
5. Install the Liner
Put the litter drawer liner on the waste drawer drawer.
6. Attach the Top Cover
Align the tail end of the cover with the rear slot of the base.
Press downwards and inwards at the convex buckle.
7. Power the AutoEgg On
Plug the AC/DC adapter into a wall outlet. The cleaning rake of the AutoEgg
will be reset to the starting positing automatically.
Warning: Whenever you add litter or move your AutoEgg, please unplug the
power plug for ve seconds and then plug it back in to re-activate the auto-
matic self-cleaning function.
How to Set Up?

5
How Does Self-Cleaning Work?
Automatic Clean Cycle
The automatic self-cleaning cycle works for cats weighing from 2 kg (4.4
lb.) to 7 kg (15.4 lb.).
We recommend the use of one AutoEgg unit per cat. Each AutoEgg can-
not support more than two cats.
The AutoEgg has four high-precision gravity sensors on the bottom. The
gravity sensors support a weight of up to 20 kg (44 lb.) with an accuracy
of 1 g (0.03 oz).
DO NOT place the AutoEgg near air vents or high-power appliances.
DO NOT drag the AutoEgg on the ground when moving.
The AutoEgg is a smart device that will not perform self-cleaning if your
cat only steps inside but does not defecate. The device will automatically
clean after 5 minutes after detecting the presence of 5+ g (0.17 oz) of
excretion.
In Automatic mode, the AutoEgg will self-clean every day at 3:00 A.M., 9:00
A.M., 3:00 P.M., and 9:00 P.M. It makes the AutoEgg work for smaller kittens.
Do not worry about the noise. The AutoEgg ultra-quiet when cleaning.
Each clean cycle runs for about 5 minutes.

6
Automatic Cat-Stuck Prevention
In Automatic mode, if the AutoEgg detects sudden weight above 0.5 kg (1.1
lb.), the Cat-Stuck Prevention function will be enabled, and the self-clea-
ning will pause immediately.
If the sudden weight disappears
• within ve seconds, the AutoEgg will immediately resume self-cleaning.
• after ve seconds, the AutoEgg will wait for 5 minutes before resuming.
How Often to Replace the Waste Drawer Liner?
We recommend replacing the liner every three to ve days, depending on
your cat’s excretion amount.
AutoEgg Touchscreen Display Panel
Setting
• Time: Set time (the automatic clean cycle runs four times per day at 3:00
A.M., 9:00 A.M., 3:00 P.M., and 9:00 P.M.)
• Mode: Switch between Automatic and Manual mode.
• Sensor: Restart and check the gravity sensors if they perform abnormally,
or the weight log does not clear.
• Language: Select your preferred language.
Rake
Press the Rake button to reset the position of the cleaning rake.
• Press once to move the rake to one end and press again to move it to the
other end.
• When the rake’s moving, press once to pause the movement and press
again to resume the movement.
Log
The AutoEgg records a log of date, time, duration, weight, and waste data
for the last seven days.*
If the cat’s waste is less than 5 g (0.18 oz), the data line will be displayed in
red to show the abnormal situation.
If red data appears frequently, take your cat to a veterinarian to check the
cat’s excretory system.
*All data is for reference only. Waste data of 0 g may be recorded if the cat
plays inside the AutoEgg.
Main Features
7
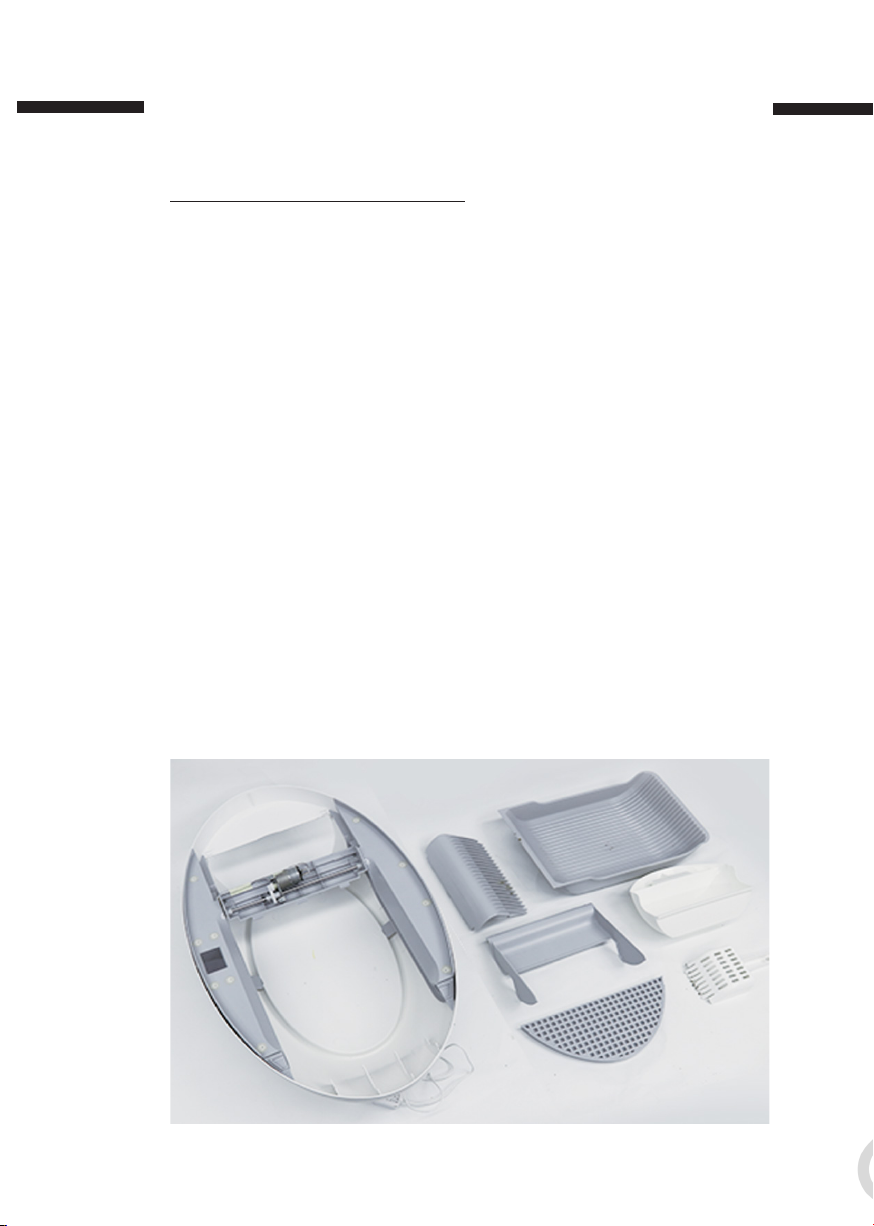
Watch the dissembly video guide at support.chillx.co
The litter box can be removed and washed. We recommend replacing the
litter completely and cleaning the litter tray every 15 days.
1. Take o the top cover
2. Press “rake” in the display panel
to move the rake to the end of the autoegg
3. Rotate and remove the waste drawer
4. Remove the litter residue on the rake with the litter scooper
5. Remove the rake from the base
With one hand, press on the side of the top ap. With the other hand,
gently pull the rake rails out of the two snaps. (There are two snaps be-
tween the rake and the base)
6. Remove the tracking pad and litter tray
7. Clean AutoEgg
DO NOT soak and wash the autoegg base. Wash the removable parts
8. Dry removable parts completely
How to Dissemble for Cleaning?
8
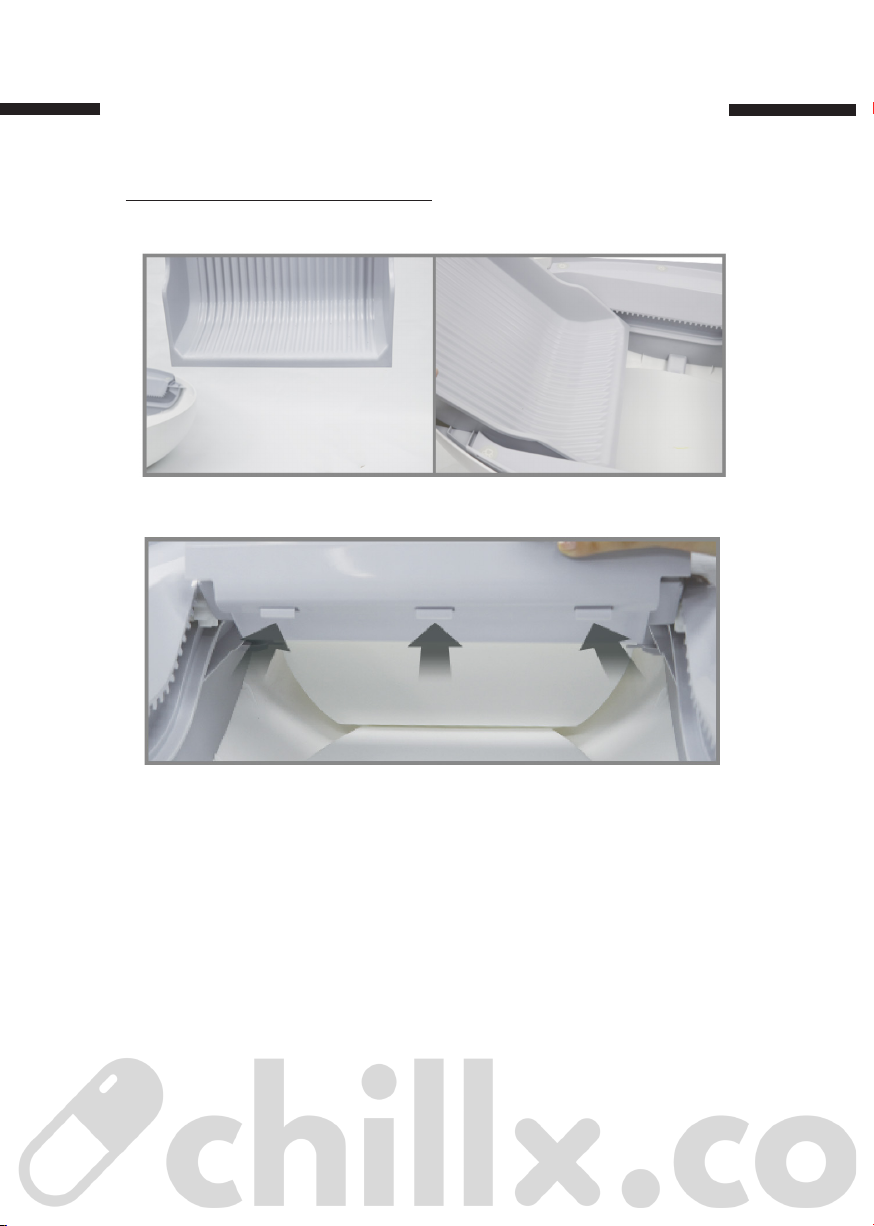
Watch the reassembly video guide at support.chillx.co
1. Insert The Litter Tray From The Right-Angled Edge
2. Align The Cleaning Rake With Three Holes, Insert, And Press Down
3. Connect The Two Snaps Between The Rake And The Base
4. Insert The Waste Drawer Cover On An Angle
5. Put On The Litter Tracking Pedal
How to Reassemble?

9
Why did my new AutoEgg come with existing log? Is it a used unit?
Your unit is brand new. We test and record data one or two times in the
factory for quality control purposes.
What if my cat is reluctant to use the AutoEgg?
We recommend that you place the AutoEgg in the same location as your
previous litter box. You can leave the old litter box near the AutoEgg for a
short time. You can start by taking a cup of litter from the old litter box
and adding it to the clean litter in the AutoEgg.
Why won’t my AutoEgg perform automatic self-cleaning?
1. Check your cat’s weight. The automatic cleaning after each excretion only
works for cats above 2 kg (4.4 lb.). *If you have a kitten that weighs less
than 4.4 lbs, power on your AutoEgg, then place any object above 4.4 lbs
for 15 seconds to activate the four-time automatic cleaning throughout the
day.
2. Make sure the AutoEgg is placed on a hard and at surface, is not tou-
ching a wall or other objects, and is a safe distance from air vents.
3. Make sure to unplug and re-plug the power cord to reset the weight sen-
sors whenever after you touch the AutoEgg (add litter, move the AutoE-
gg, or enclose the hood, etc).
4. Check the two rake position limit triggers to make sure they are clickable.
5. Check that the cleaning mode is set to “Automatic” and not “Manual” in
the settings menu.
6. Press the “Sensor” button in the settings to reset the weight sensors.
Why is the touchscreen unresponsive?
1. There may be some litter stuck in the display panel. Use a needle, thin
strip of plastic, or a thin toothpick to remove the litter from the perimeter
of the screen.
2. Then, gently press down on the four corners of the screen panel until
the touchscreen functionality returns.
Frequently Asked Questions

10
Returns & Replacements
Try the ChillX AutoEgg self-cleaning litter box in your home. If you or your
cats are not completely satised for any reason, return or replace it within
30 days from the purchase date for a full refund. Please note that the re-
conditioned unit is not eligible for a refund, but we stand behind with the
same 12-month warranty as our new products.
Please note that you are responsible for return shipping costs.
To return the AutoEgg, please make sure the AutoEgg is clean (which allows
us to extend the lifespan of our products and support local rescues and
shelters) and carefully packed in the original carton and packaging ma-
terials to avoid damage during shipment.
10%-25% cleaning fee will be deducted if it’s not thoroughly cleaned.
You must obtain an RMA (Return Merchandise Authorization) number. We
do not accept responsibility for return shipments without an RMA number. To
request one, contact us with your order number and reason at support@
chillx.co.
One Year Non-Transferable Limited Warranty
What Is Covered
We cover labor and parts for the rst year of ownership from the purchase
date. We warrant to the original retail purchaser and no other purchaser or
subsequent owner that the product, when subjected to normal and proper
residential use, will be free from defects in material or workmanship for a
period of one year from the purchase date.
What Is Excluded
Accidental damage due to cat or dog scratches, chewing, urination, li-
ghtning damage, neglect, alteration, misuse, and mis-repair are not
covered under our warranty. We do not provide refunds, replacements, or
upgrades for change of mind or any other reason outside of these warranty
terms.
After the expiration of the warranty period, the user can still receive paid
repair services provided by the company.
Any claim made under this warranty should be made directly to the company
Support

Finally, A Chill Pill that Works!
Designed with love and chill in Los Angeles
Table of contents


