WUIPET DU4L-WC-01 User manual

WIFI Automatic Pet Feeder
Model:DU4L-WC-01
Please read this entire guide before beginning
Quick Start Guide

Welcome
CONTENT
You and your fur friends were made for each other. We are keen on
making pet parents and your fur kids' lives beer. Your New Auto Feeder
helps make life with your pet endlessly beer and gives you peace of mind
knowing your pet will be fed on time.
If we can do anything beer, we would love to hear from you, stay
connected with us via support@wuipet.com
SAFETY PRECAUTIONS 1-2
21SPECIFICATIONS
22NEW TO AUTOMATIC FEEDER
3IN THE BOX
4PRODUCT DIAGRAM
5BUTTONS AND DISPLAY OVERVIEW
6LED INDICATORS
7-9SET UP THE FEEDER
10-14CONTROLLING VIA APP
15CLEAN AND CARE
16-17DIY CAT HOUSE
18-20TROUBLESHOOTING

SAFETY PRECAUTIONS:
Warning
Dispose of all packaging materials properly. Some items may be
packed in polybags; these bags could cause suocation; Keep away
from children and pets.
Do NOT allow small children to play with, in or around the pet feeder.
Do NOT use the feeder with pets not able to reach the food tray or
with any physical disability.
Do NOT immerse the base part in water at any time as it may damage
electronic components like the control panel.
Do NOT use outdoors. Check operation frequently to be sure the unit
is dispensing properly.
Do NOT use wet, canned or moist food.
Do NOT disassemble the unit other than as instructed in this Quick
Start Guide.
Do NOT use the feeder for anything other than its intended use.
Only use aachments recommended or sold by the manufacturer. The
use of aachments not recommended or sold by the manufacturer
may cause an unsafe condition. Do NOT modify the pet feeder.
Do NOT operate any appliance if the unit is malfunctioning or has
been damaged. Do NOT aempt to repair the pet feeder by yourself.
Contact our customer service immediately for further instructions.
To reduce the risk of injury, please keep close supervision when an
appliance is used near children.
Do NOT place any foreign object in the pet feeder.
1

Caution
Always unplug when not in use and before cleaning.
Never pull on the electrical power cord to remove the plug from the
wall outlet.
If the plug of this device gets wet, turn o electricity to that wall
outlet. Do NOT aempt to unplug.
To avoid tripping, always position power cord out of the way of foot
traic.
Do NOT allow pets to chew on or swallow any parts. If you are
concerned about the power cord, purchase a cord conduit (a hard
plastic protector) at any hardware store to protect the power cord.
Do NOT install or store the pet feeder where it will be exposed to
weather or temperatures below 4°C / 39°F.
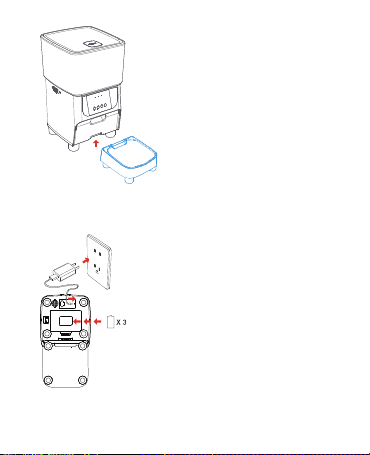
Use alkaline D baeries to power. Do NOT use rechargeable baeries.
Check the baeries regularly. Before leaving for extended time,
always replace baeries with new ones.
Suitable for dry food ONLY, with kibble size ranging from 2-12mm
/0.07-0.47in in diameter. Larger kibble may get stuck at the food
outlet.
Read and observe all important notices listed on the pet feeder and
in the packaging.
Examine the feeder after installation. Do NOT plug in if there is water
on the power cord or plug.
If an extension cord is necessary, one unit with a proper rating should
be used.
Do NOT lift the pet feeder by lid, food tank, or food tray. Lift and
carry it using both hands and the base, while keeping the unit in an
upright position.
2

IN THE BOX
3
1 x Automatic
Pet Feeder
1 x Stainless Steel
Bowl and Holder
1 x Power
Adapter
15 x2 Anti-slip
Stickers
10 x 1inch
Feeder Raisers
10 x 2inch
Feeder Raisers
1 x Desiccant
Bag
1 x User
Guide
WIFIAutomatic Pet Feeder
Model:DU4L-WC-01
Pleasereadthis entire guide before beginning
QuickStart Guide

PRODUCT DIAGRAM
4
Desiccant
Carrier
Food Tank
Buckle
Base
Stainless Steel
Bowl & Holder
Baery
Compartment
Rocker Switch
Ty p e - C
Interface
Speaker
Lid
Open
Lid Buon
Food Tank
Control Panel
Feeder Raisers

BUTTONS AND DISPLAY OVERVIEW
ln the unlocked mode, press and hold the Record buon, start
recording after a beep is heard. Record your voice for less than
10s. Release the buon, 2 beeps will be heard indicating it's
saved.
Lock/Unlock Buon
Recording Buon
ln the unlocked mode, press and hold for 6s to lock the system.
Repeat to unlock.
Feed Buon
Press to manually feed a portion of food.
Set Buon
· When the device is not connected to the App, Press and hold for
7s to switch between Manual Mode and AP Mode.
· In the locked mode, press and hold for 6s to reset the device.
LED Indicator
MIC
Record Buon
Lock/Unlock
Buon Feed Buon
Set Buon
5
FEED
FEED
LED Indicator

LED Indicators
6
Blue
Flash every
0.5s
The Feeder is in Bluetooth or Manual
mode, ready to connect with App.
The Feeder is in AP Mode, ready
to connect with App.
Connected to WIFl and fully operational.
Slowly blink
Stay solid
O Normal
Food dispensing system error
*Press and hold the set Buon for
6s to reset device.
Reseing WIFI connection.
Blink
Stay for about
6s
Red

7
SET UP THE FEEDER
(1) Take out the food bowl inside the
food tank.
(2) Remove the anti-slip stickers on
the boom of the base and food
tray.
(4) Install the raisers on the base
and the food tray.
(3) Choose the suitable height of
feeder raisers you need (1 inch/
2 inch), then put anti-slip
stickers on the boom of the
raisers.
1.Installation
Warning: Please use the original 5V power supply.
To increase the height of the feeder, you need to perform these
operations.
Note:

(4) Place the feeder in a desired
location. Check the food tank is
in place.
(5) Align the bulging of the food tray
and holes in the base, and push
upward to connect the two.
Insert the 5V power adapter into a
wall socket. Plug in the power socket of the
feeder.There are 2 pillars near the power
socket of the feeder, you can tie up a part
of the USB cable around the pillars to
prevent the cable from accidentally pulling
out of the power socket.
Open the baery compartment at the
boom of the unit, and install 3 alkaline D
baeries (not necessary) in case of power
outage.
The LCD display will light up automatically
indicating the feeder is on now.
2.Connecting Power
DSize
Baer
(1)
(2)
(3)
8

Baeries are NOT included.
Do NOT use canned, wet or moist pet food.
Recommend kibble size ranging from 2-12mm/ 0.07-0.47in in
diameter.
Before connecting to power, make sure all parts are clean and
completely dry.
Fill food tank with dry pet food.
Close the lid and the food will snap
into place due to gravity.
The baery should power with an output of 4-5V; the baery level
icon on the display blinks on a low baery level (<4V).
Notes:
Notes:
3.Filling Food Tank
9

CONTROLLING VIA APP
iPhone on ios 11.0 or later; smartphone on Android 6.0 or later
Wireless router 2.4GHz [802.11b/g/n]
High-speed internet connection
1.System Requirements
Please use indoor only to avoid direct exposure to the sunlight.
Please connect the feeder via 2.4GHz only. If your WlFl is 5GHz only,
set it to be compatible with 2.4GHz mode.
The WIFI password is composed of no more than 12 digits and leers.
No special symbols are supported.
Please keep the feeder close to the router. The distance in a range of
6 meters without wall barriers is recommended.
lf the configuration fails, please power o and restart the feeder
(press and hold the set buon for 6s), then wait for about 2mins to
re-configuration.
2.Before the Configuration
The WUIPET WIFI Automatic Feeder connects to your home's wireless
router and allows you to program and monitor your pet's meals from
anywhere, right from your smartphone with the Smart Life app. Use
the app to schedule your pet's meal times and portion sizes, view the
last 7 days of feeder activity, and even dispense a meal remotely.
Smartphone alerts let you know when your pet has been fed for
added peace of mind. Delivering a convenient lifestyle to you and
helping your pets become their best, the WUIPET WIFI Automatic
Feeder keeps you connected to your pet's feeding routine wherever
you are!
3.How the System Works
10

Scan the QR code or search for "Smart Life" on App Store or Google
Play to download the app.
Sign up or Log in to your account.
4. Download the App & Log ln
11
App Store Google Play

A. Configuring via Bluetooth Mode
5.Three Ways to Connect Your Feeder with APP
12
· Trun on the Bluetooth on
your phone, open the App,
select Home page, tap "Add
Device" or “+”in the upper
right corner.
· To add the auto-pop-up
device by entering WIFI
account and password.
· Feeder Connected, start
to set the meal times and
portion sizes.
B.Configuring via Manual Mode
- Add the device via "Pet Feeder" in Small Home Appliances.

C.Configuring via AP Mode
· Note: Please make sure the Bluetooth is turned o on your mobile before
starting the AP mode connection.
· When the blue LED indicator flashes, press and hold the SET buon for
6s until 3 beeps are heard. The LED indicator will turn to blink slowly. Now
the feeder is under AP mode.
· Open the app on your mobile, tap Add Device → Small Home Appliances
→Pet Feeder, tap the icon and enter your WlFl name and password, click
"Next" and "Confirm the indicator is blinking", select "Blink Slowly".Then go
to the WIFl connection interface on your mobile, find the device
"smartlife-xxxx"and tap to connect. Return to the app and wait for
connecting.
Note:
· Device name: WIFI Feeder
· Connect the Feeder via 2.4GHz only, if your WIFI is 5GHz, please set it to
2.4GHz before the connection.
· lf it still fails connecting, please contact our Support Team.
Scan QR code for the
operation video
13
·Enter Seing on Control Center, Select Factory Reset.
· 3 beeps will be heard, wait for about 7s until the blue light starts to flash
slowly and your device is ready for re-connection.
6. Reset Feeder on App

Enter Seing, select Share Device, add Sharing Via Smart Life Account
Name.
7. Share Your Feeder
8. Control Center on APP
14
FEED FEED
Feeder Name
Profile Image
Portions of Manual
Feeding (1-12)
Manual Feeding
Buon
Seing Buon
Reset Buon
Mealtimes (1-10) and
Portion Sizes (1-12)
Feed Records (record
cover: 7 days/1000
feeding activities)

To remove the food tank, use
your thumbs to toggle the switch
from to on both sides, then
push upwards the tank.
CLEAN AND CARE
It's recommended to clean the feeder regularly for the health of your pet.
Disconnect power before cleaning. Remove the lid and take out
the desiccant bag in the
carrier under the lid.
Clean the lid, food tank, food tray
The washable parts are as follows: lid, food tank, stainless bowl, bowl holder
feeder raisers.
(1)
To remove the food tray, press
down the stainless steel bowl with
holder.
(3)
(2)
(4)
Rinse and air dry the lid, food
tank, food tray thoroughly
before refiing them to the
machine.
(5)
15

16
DIY Cardboard Cat House
It’s a widely known fact that cats love boxes. To them, no toy in the
world, no maer how expensive
or fancy it may be, compares to a simple cardboard box. Let's
transform this box into a cat house.
1 2
3

Still don't know how to DIY Cat house?
Visit the YouTube channel "WUIPET" or Scan QR codes below for the
feeder operation video.
17

Troubleshooting
l can't configure
the feeder on
my mobile.
Prolem Solution
Feeder appears
disconnected
from WIFI.
· Reset the device. In the locked mode,
press and hold the Set Buon for 6s
to reset.
· The router is not connected to the
network.
· WiFi cannot be a hidden network.
·lncorrect account and password format.
· Use only number and leer for username
and password, 12 digits at most.
· 5G not supported - Please use 2.4G
wirelessnetwork.
· Application problem - Some program
conflicts may happen. Please restart
your mobile.
· The distance between the feeder and
the router is too far, or there is an
obstacle between the two.
· The network connected to the router is
unstable.
Weak disconnection - Please check that
the distance between your feeder and
router is no more than 10m / 33ft, and no
concrete walls or too many obstacles
between them. Otherwise the WIFl
network can be weak and cause unstable
connection.
18
Table of contents
Other WUIPET Pet Care Product manuals
Popular Pet Care Product manuals by other brands

Dog Care
Dog Care TC05 user manual

Pet Gear
Pet Gear The ON-THE-GO Pet EASY STEP instruction manual

I-care
I-care Tonovet TV01 User and maintenance manual

Cabela's
Cabela's GS-100 operating guide

Primetime Petz
Primetime Petz Hausepanther Nest Perch Assembly/installation instructions

Cuckoo
Cuckoo nello ND-A0609F Series user manual