manuals.online logo
Brands
  1. Home
  2. •
  3. Brands
  4. •
  5. Chimera
  6. •
  7. Lantern
  8. •
  9. Chimera 1827 Guide

Chimera 1827 Guide

®
18279800
INSTRUCTIONS FOR CARE AND USE
CHIMERA LIGHTING • 1067 TELLEEN AVE. ERIE, CO 80516 • (303) 444-8000
WWW.CHIMERALIGHTING.COM • [email protected]
1827
LANTERN w/ SKIRT KIT
FOR
1 x 2 PANEL STYLE LED FIXTURES
WARRANTY INFORMATION
At Chimera, we stand behind our Lightbanks, Speed Rings, and light control accessories with
a limited 5-year warranty against manufacturing defects in materials, workmanship, and color
stability. If our products are not fully operational out of the box or if they fail to perform within
five years from the date of purchase, return for repair or replacement at no charge. Of course,
Chimera’s warranty cannot cover damage caused by accidents, improper care or use, or the
natural deterioration of materials over an extended period of time. This warranty does not apply
to expendables, such as light bulbs, and certain OEM products.
TIPS FOR CARE AND USE
Cleaning - Your Chimera Lightbank can be cleaned by hand washing with cold water, a sponge
and mild soap. Do not machine wash. To dry, assemble the Lightbank onto a Speed Ring and
completely air dry.
Repair - Chimera has an expert in-house repair department. Lightbanks need to be clean,
with any added tape removed before sending in for repair. If the Lightbank is received in dirty
or in taped condition, the repair may be refused and returned to the sender. Please call in
advance to get a Return Authorization Number and repair estimate at +1.888.444.1812 or
+1.303.444.8000.
RECOMMENDED BEST PRACTICES FOR CLEANING AND DISINFECTING
CHIMERA LIGHTBANKS & TEXTILES
DO NOT USE HARSH CLEANERS LIKE BLEACH OR OTHER CHLORINATED
PRODUCTS ON ANY TEXTILE FROM CHIMERA
DO NOT MACHINE WASH OR DRY ANY TEXTILE FROM CHIMERA
Fabric Diffusions:
All diffusions should only be cleaned and disinfected by hand. DO NOT MACHINE WASH OR
DRY! Use mild soap (something like Dawn) and hand wash thoroughly in warm water. Air dry.
Lightbanks and Items with Laminated Textiles i.e., Black + Reflection:
Thoroughly wet a clean cloth using a solution of warm water with mild soap. Wipe each surface
completely with the soap solution and then repeat with a clean, wet cloth to rinse. Air dry.
Alcohol-based aerosol spray with at least 70% alcohol can be effective for both sides of the tex-
tiles. Spray evenly to coat all surfaces, use a clean cloth to reach hard to spray areas. Air dry.
Lighttools Fabric Grids:
Thoroughly wet a clean cloth using a solution of warm water with mild soap. Wipe each surface
completely with the soap solution and then repeat with a clean, wet cloth to rinse. Air dry.
Alcohol-based aerosol spray with at least 70% alcohol can be effective for both sides of the tex-
tiles. Spray evenly to coat all surfaces, use a clean cloth to reach hard to spray areas. Air dry.
Rings & Frames:
Wipe all surfaces clean with at least 70% alcohol solution and allow to air dry.
It may seem like you’ll bend the pole to break-
ing but you won’t. Grip the pole diagonally
opposite from the pole you are inserting to
provide extra leverage. Make sure to align the
short side of the fixture with the short side of
the lantern.
ASSEMBLY
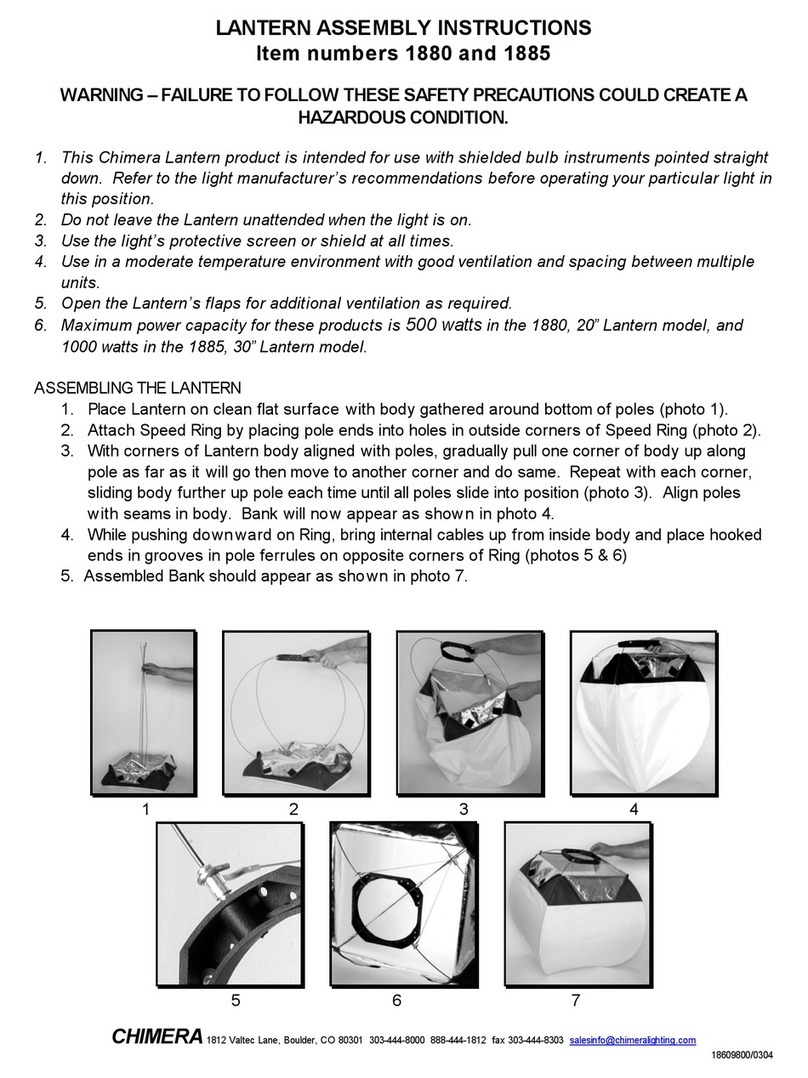
Remove the Lantern body from the storage sack
and unfold. Attach frame to fixture. Place pole
ends into corresponding holes in frame.
1
With the corners of the lantern body aligned
with the poles, gradually pull one corner of
the body up along the pole as far as it will go.
Then move to another corner and do the same.
Repeat with each corner.
4
Optional: Attach skirt using the hook-
and-loop. Start with one skirt corner
and work your way around the
perimeter of the Lantern for an even
and level installation.
6
5Be sure to align poles with seams in the body.
Connect hook and loop tabs of the Lantern
body for a good fit. Once completed, your
lantern should appear like the image on the
front page. DISASSEMBLY AND STORAGE
Disassemble and repack the Soft Lantern with Skirt Kit by following the
assembly instructions in reverse.
2
3While pushing downward on the center of the
lantern, bring the internal cables down and
place hooked ends in the grooves in the pole
ferrules on opposite corners of the fixture.
WARNING
FAILURE TO FOLLOW THESE SAFETY PRECAUTIONS COULD CREATE
A HAZARDOUS CONDITION
»This product is NOT intended for household use.
»Do not leave unattended.
»Use in a moderate temperature environment.
»Open the flaps for ventilation as required.
»Maximum lamp rating for this product is 2,000 watts.

Other Chimera Lantern manuals

Chimera 1860 User manual

Chimera

Chimera 1860 User manual

Chimera 1880 Installation guide

Chimera

Chimera 1880 Installation guide

Popular Lantern manuals by other brands

Conrad 11 04 73 operating instructions

Conrad

Conrad 11 04 73 operating instructions

Dale Tiffany PG80516 Assembly instructions

Dale Tiffany

Dale Tiffany PG80516 Assembly instructions

Intermatic Malibu LZ414 instructions

Intermatic

Intermatic Malibu LZ414 instructions

Eterna WP51SDEM3 installation instructions

Eterna

Eterna WP51SDEM3 installation instructions

Heitronic 35293 Installation and operating instructions

Heitronic

Heitronic 35293 Installation and operating instructions

Arcadia CLASSICA Installation and maintenance instructions

Arcadia

Arcadia CLASSICA Installation and maintenance instructions

Panlux PN12300001 instructions

Panlux

Panlux PN12300001 instructions

WAGNER STOCKHOLM manual

WAGNER

WAGNER STOCKHOLM manual

Pro-Idee 650-853 quick guide

Pro-Idee

Pro-Idee 650-853 quick guide

MPOWERD Luci Pro Series instruction manual

MPOWERD

MPOWERD Luci Pro Series instruction manual

Strend Pro SL6251 manual

Strend Pro

Strend Pro SL6251 manual

ROBLAN VIASOL installation manual

ROBLAN

ROBLAN VIASOL installation manual

Omnilux BCL-1 manual

Omnilux

Omnilux BCL-1 manual

Sealite Apollo-155 Installation and programming manual

Sealite

Sealite Apollo-155 Installation and programming manual

Finelite E2-ID Disassembly instructions

Finelite

Finelite E2-ID Disassembly instructions

Teknoware TWT17 Series Installation and maintenance manual

Teknoware

Teknoware TWT17 Series Installation and maintenance manual

Platinum Customer Care GX-2476-Twin Care and use instructions

Platinum Customer Care

Platinum Customer Care GX-2476-Twin Care and use instructions

Lumiqs LED Highbay installation manual

Lumiqs

Lumiqs LED Highbay installation manual

manuals.online logo
manuals.online logoBrands
  • About & Mission
  • Contact us
  • Privacy Policy
  • Terms and Conditions

Copyright 2025 Manuals.Online. All Rights Reserved.