chinesport Ercolina User manual
1
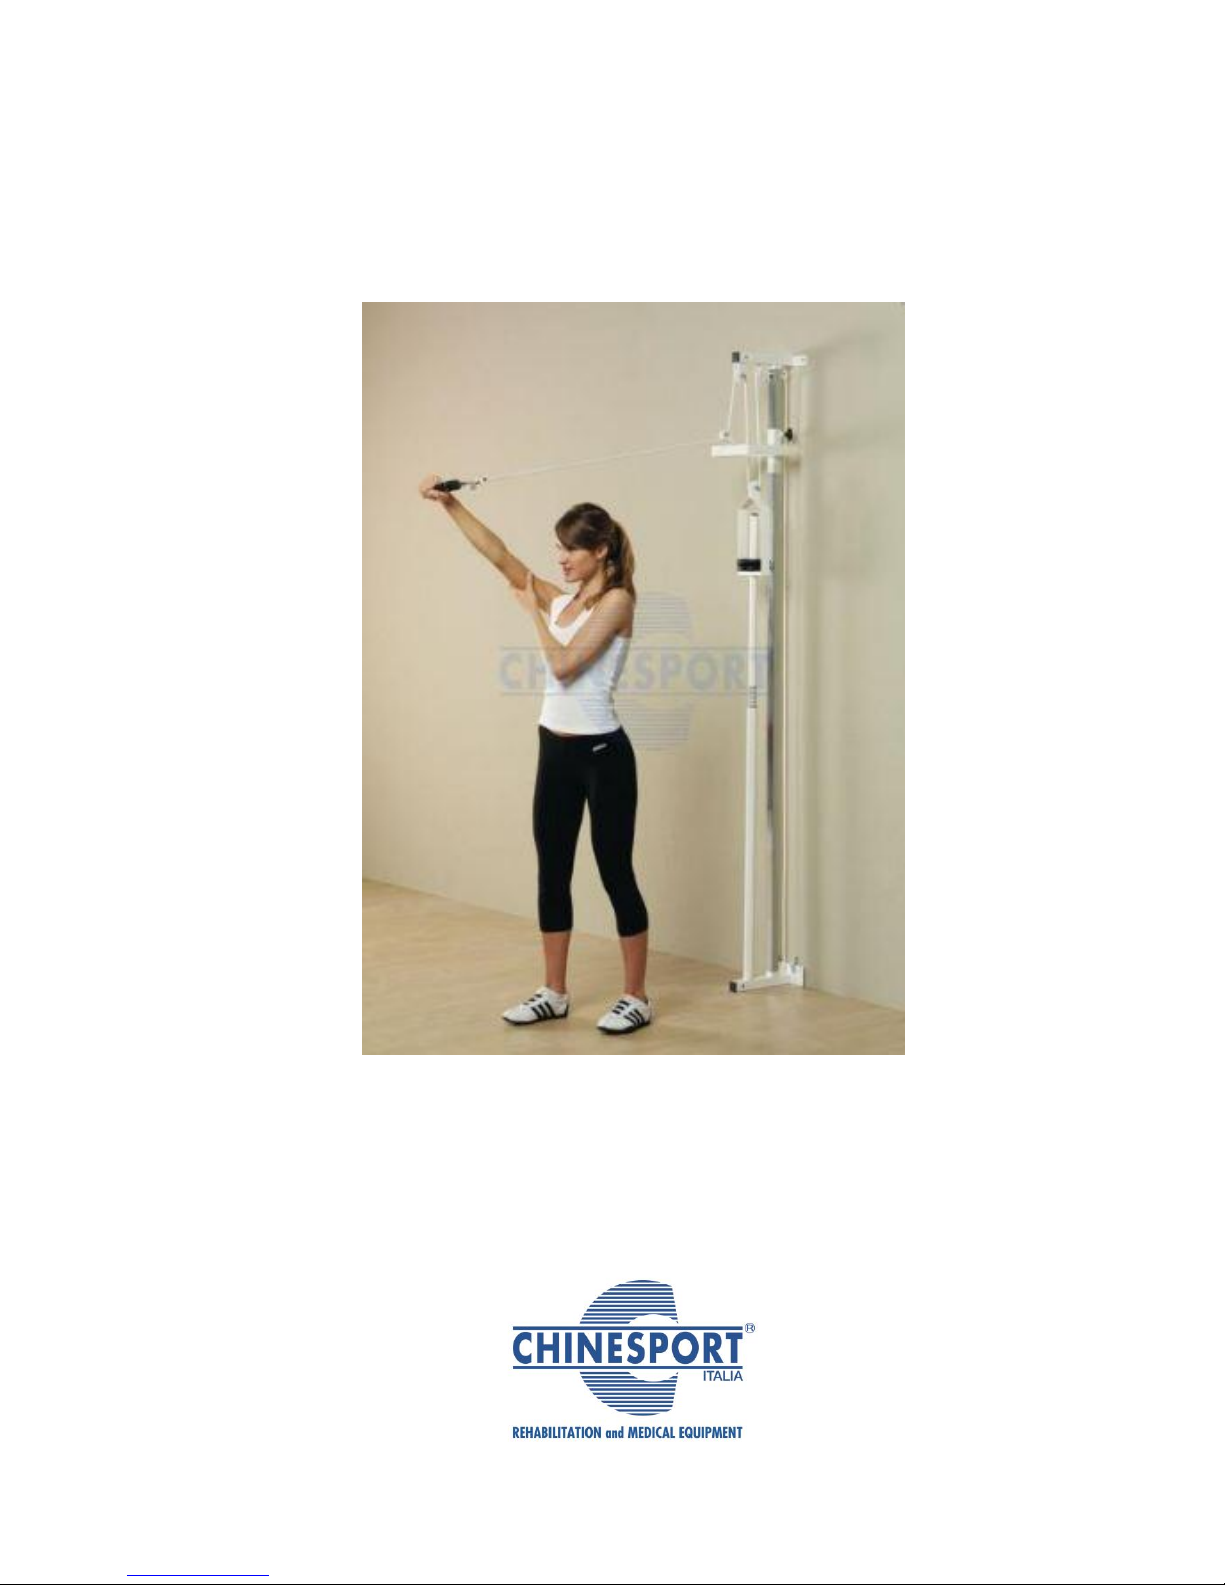
Ercolina and Poliercolina Pulley System
User Manual
Edited by Giancarlo Pellis

2
CONTENTS
Assembly - Basic Ercolina Pulley System 07405 4
Assembly - Poliercolina Pulley System 07415 6
A description of our Ercolina Pulley System 7
Accessories 8
Exercises recommended by Chinesport 9
How to use this information to prepare rehabilitation protocols 10
Definitions 11
List of exercises by accessory 15
Upper limbs exercises
Exercise 1 FRONTAL ADDUCTION 17
Exercise 2 : LATERAL ADDUCTION 18
Exercise 3 : BACK PULL 19
Exercise 4 : LATERAL RAISE 20
Exercise 5 : FRONTAL RAISE 21
Exercise 6 : BACK PUSH 22
Exercise 7 : SHOULDER - LIFT 23
Exercise 8 : DOWNWARD PUSH 24
Exercise 9 : ARM EXTENSION 25
Exercise 10 : ARM FLEXION 26
Exercise 11 : DOWNWARD TRACTION 27
Exercise 12 : ARM INTERNAL ROTATION ON TRANSVERSE PLANE 28
Exercise 13 : ARM EXTERNAL ROTATION ON TRANSVERSE PLANE 29
Exercise 14 : ARM INTERNAL ROTATION 30
Exercise 15 ARM EXTERNAL ROTATION 31
Exercise 16 : LATERAL TILT 32
Exercise 17 : UPPER BODY TWIST 33
Exercise 18 : HAND - DORSAL FLEXION 34
Exercise 19 : HAND - PALMAR FLEXION 35
Exercise 20: OPENING ON TRANSVERSE PLANE 36
Exercise 21 : PULLING TO THE CHIN 37
Exercise 22 : TRACTION WITH PULLEY MACHINE 38
Exercise 23 : CLOSING ON TRANSVERSE PLANE 39
Exercise 24 : ARM STRETCH 40
Exercise 25 : UPWARD STRETCH ON RECLINED BENCH 41
Exercise 26 : UPWARD STRETCH FROM CHEST 42
Exercise 27 : UPWARD STRETCH FROM BEHIND THE HEAD 43
Exercise 28 : FRONTAL ADDUCTION WITH STRETCH 44
Exercise 29 : CLOSING ON RECLINED BENCH 45
Exercise 30 : ARM EXTENSION 46
Exercise 31 : ARM KICKBACK 44
Exercise 32 : ARM FLEXION 48
Lower limbs exercises
Exercise 33 : BACKWARD LEG RAISE 44
Exercise 34 : FORWARD PULL 51
Exercise 35 : LATERAL LEG RAISE 52
Exercise 36 : INWARD LEG RAISE 53
Exercise 37 : THIGH - INTERNAL ROTATION 54
Exercise 38 : THIGH - EXTERNAL ROTATION 55
Exercise 39 : LEX EXTENSION OVER THE THIGH 56
Exercise 40 : LEG FLEXION OVER THE THIGH 57
Abdominal and back exercises
Exercise 41 : SIT-UPS WITH FLEXED LEGS 59
Exercise 42 : SIT-UPS WITH BENT LEGS 60
Exercise 43 : PELVIS TWIST 61
Exercise 44 : TWISTING SIT-UPS 62
Exercise 45 : DORSAL MUSCLE EXERCISES 63
Exercise 46 : OBLIQUE MUSCLES EXERCISES 64
Exercise 47 : LATERAL FLEXION 65

3
Summary table of accessories/exercises 66
Bibliography 67
4
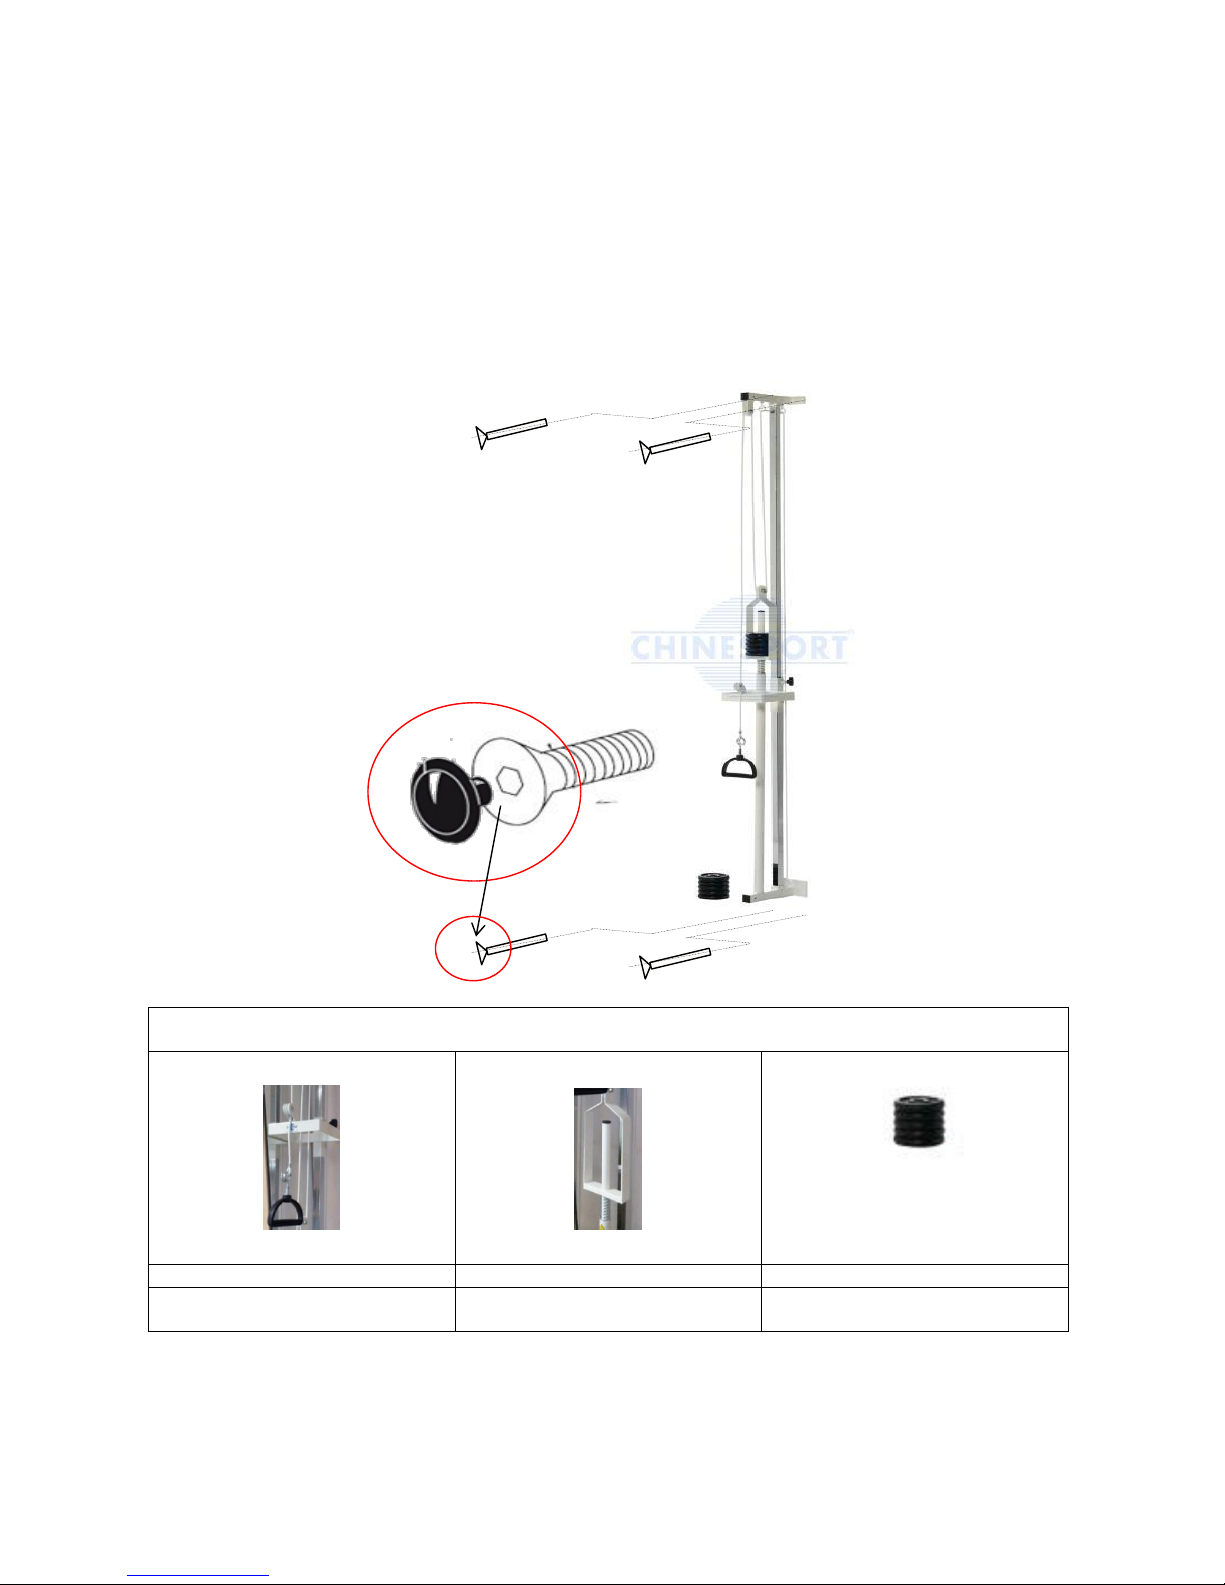
Assembly
Basic Ercolina 07405
Ercolina needs to be secured to the wall using the 4 screws included in the Assembly Kit.
Assembly Kit
4 screws Ø 6 x 85 mm
4 Screw covers
Main components
Exercise handle
Weight stack cage
Weight discs
This is the part you hold to perform
the exercise
This is where you place the
resistive load
10 discs weighing 1 kg each so
you can choose your load

5
Assembly
Poliercolina 07415
Poliercolina needs to be secured to the wall using the 8 screws included in the Assembly Kit.
Assembly Kit
8 wall screws with dowel Ø 6 x 85 mm
8 Screw covers
6 cheese-head screws to attach the ladder to the top pole
4 self-threading screws to attach the ladder to the bottom pole
1 - Securing the poles/ladder
2 - Securing the Ercolina ladder
2 x M8 cheese-head screws
4 self-threading screws
4 x M8 cheese-head screws
3 - Securing the Poliercolina to the wall
8 wall screws Ø6 (with dowel)
2 x M8 cheese-head screws
4 wood self-threading screws
6
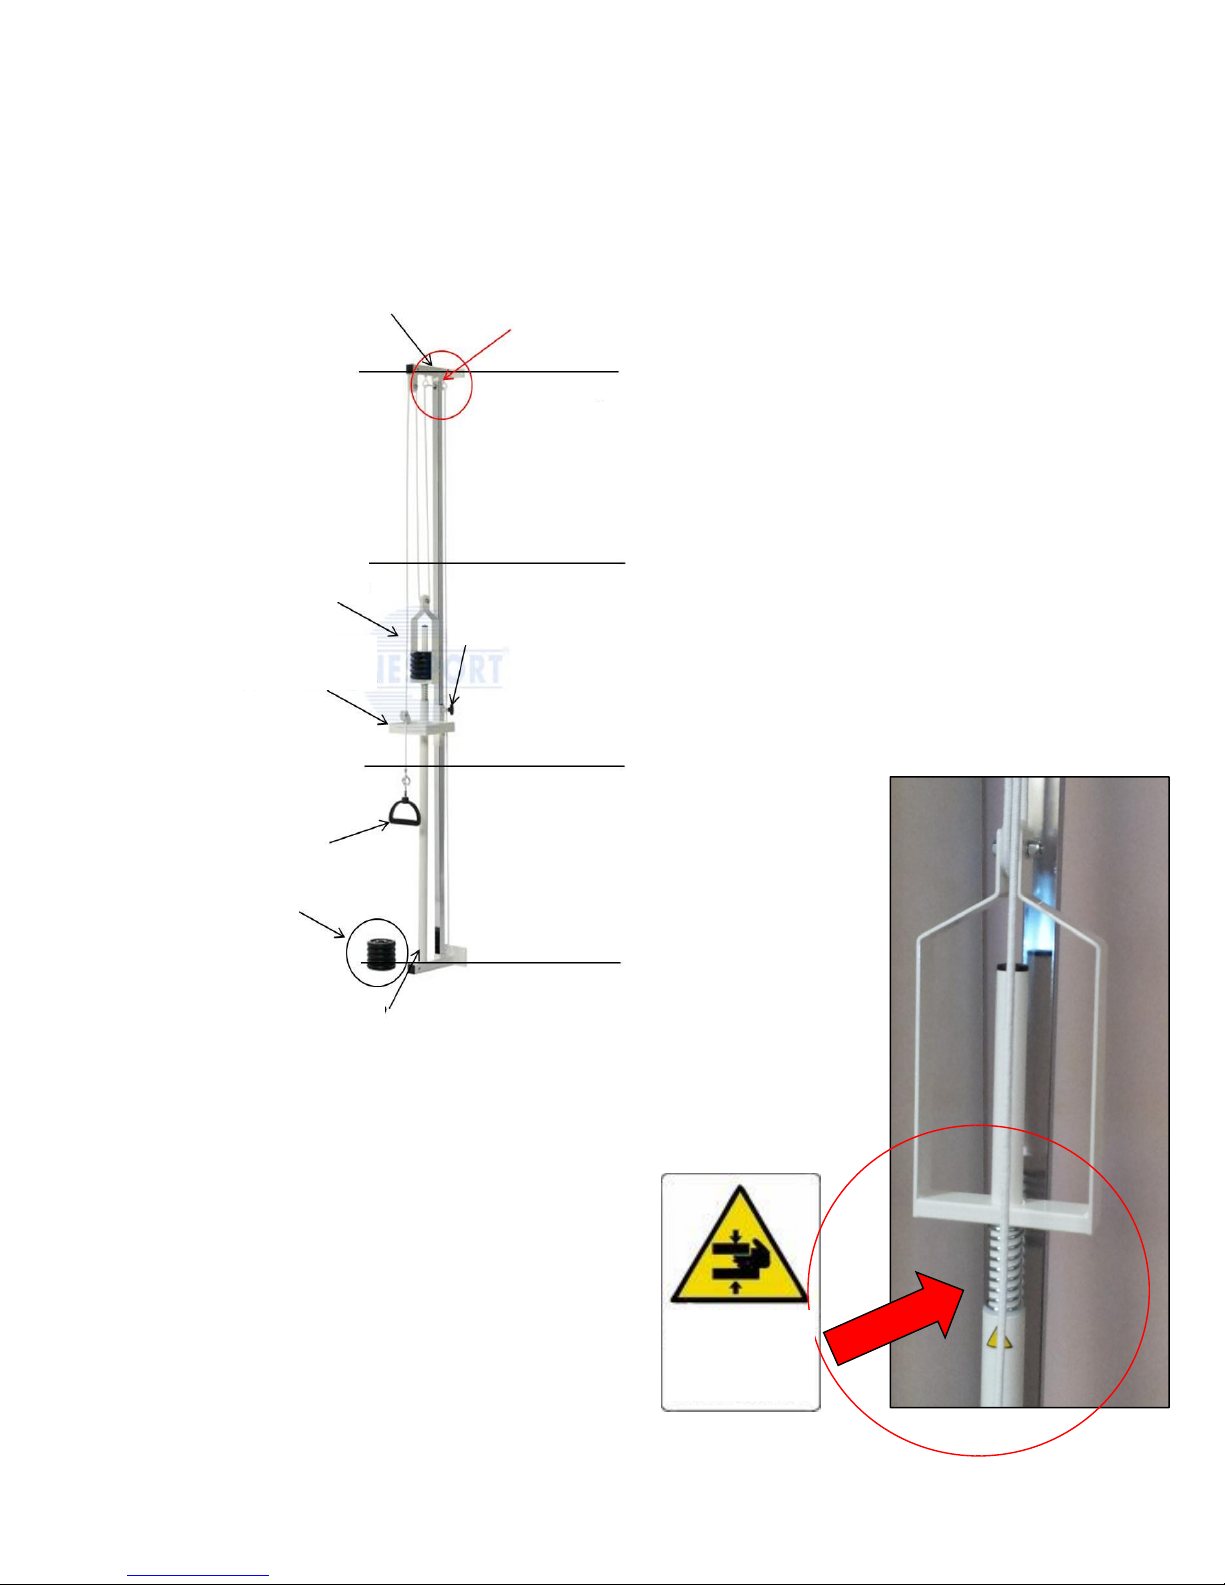
A description of our Ercolina Pulley System
Exercise equipment used to strengthen the muscles of the scapulo-humeral
girdle, upper limbs, pelvic girdle and lower limbs using overload techniques
Basic Ercolina 07405 Technical Specifications
Dimensions: 20 x 33 x h 220 cm
Weight: 12 kg
Max load 10 kg (10 discs x 1 kg)
Ercolina can be divided into 3 areas (top,
middle, bottom) where the “exercise
handle” can be attached
The “adjustment knob” allows you to slide
the handle plate along the main stand
placing it at the height recommended for
the exercise you are going to perform.
IMPORTANT: be extra careful when
you want to put the handle plate at
the top as this is where the rope
runs and it needs to be kept free.
The weight discs are placed at the end of the weight stack strut.
IMPORTANT: do not put your hands under
the weight stack cage while exercising as
this needs to be able to run freely within the
strut.
Main stand
Weight stack
Handle plate
Adjustment
knob
Exercise handle
Weight discs
Weight stack strut
top section
rope runs through
top section
middle section
bottom section
MIND
YOUR
HANDS

7
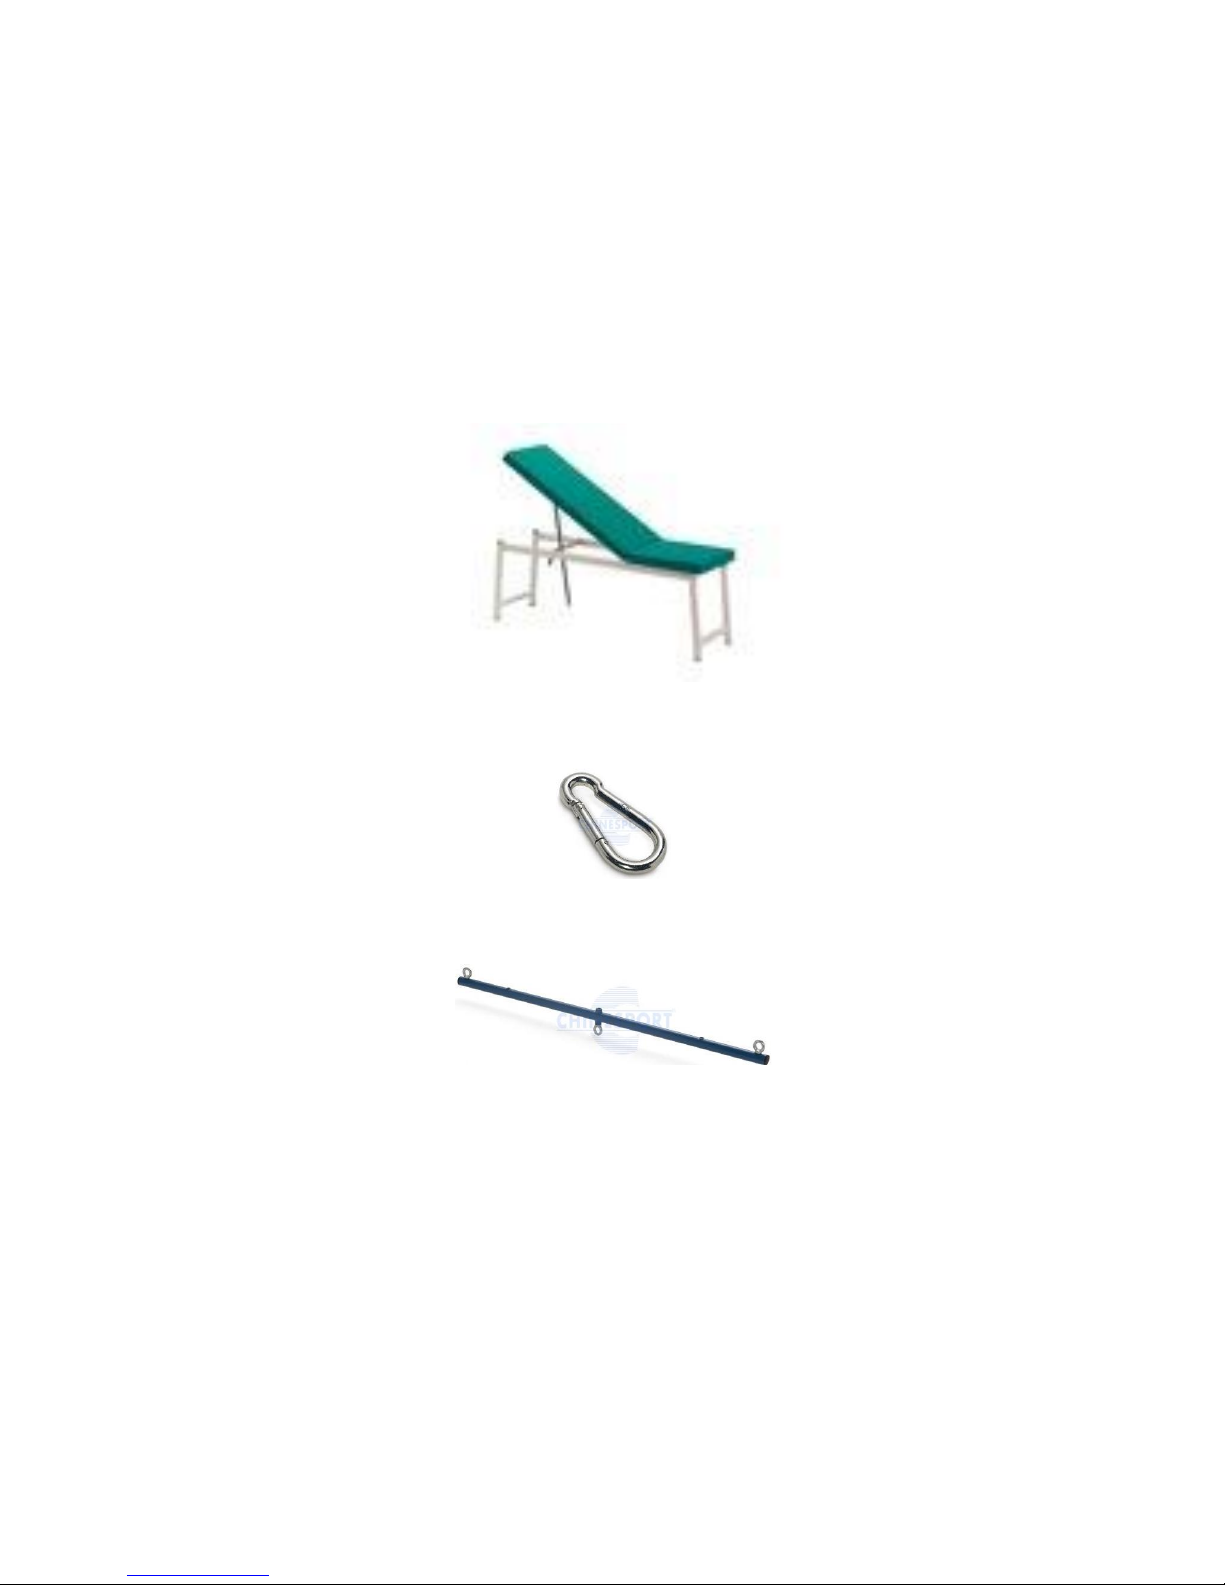
Accessories and “OTHER MODE”
Using the following accessories greatly increases the choice of exercises you can perform, helps with the
correct posture and with targeting the right muscle group you want to involve in the exercise.
Throughout the text, these options are identified as
OTHER MODE
Corona Mat 185
11000
Snap hook
AC0094
Ankle strap AC0059
Ginny Bench
4840
Exercise bar
AC0302
Bench 04820
Poliercolina 07415
Corona Mat 185 11000
Exercise Bar
AC0302
Ankle strap AC0059
Ginny Bench 4840
Ab bench 04720
Using the bar
This bar can either be used with the basic Ercolina or with Poliercolina by fitting it to the appropriate ropes with
one or two snap hooks.
Snap hook eyelet for Poli Ercolina
Snap hook eyelet for basic Ercolina

8
Exercises recommended by Chinesport
One of the most recurring factors in the onset of any back conditions is no doubt to do with a micro trauma
resulting from an incorrect load distribution on the lumbosacral junction.
To understand how this condition arises, we need to understand the biomechanics of how forces spread
through the spine; we draw from Tony Nett's "Muscletraining" studies (1967) as it provides a comprehensive
explanation on this topic.
Fig. 1 A
Fig. 1B
We know the spine has 33 bony segments
(vertebrae) that are stacked and interlinked
between them (Fig. 1A). The spine is highly
flexible thanks to the intervertebral discs that
separate the vertebrae and act as shock
absorbers, so any pressures causing a strain on
the spine are cushioned.
The intervertebral disc structure consists of two
different parts: a central part and a peripheral
part. The central part is called nucleus (N - Fig.
1B), while the peripheral part is called fibrous ring
(A - Fig. 1B) and is formed by a series of
concentric fibrous layers that cross obliquely.
This system keeps the pressure in the nucleus equalized in a stiff shell that stops any possible leak (Fig. 1B).
This clever structure is particularly resistant to compression, but it has one single "defect": the lack of blood
vessels means that, should the disc tissue be damaged or destroyed, it cannot be repaired or replaced.
After this brief introduction, we can use some mechanical calculations to analyze the loads affecting the disc
between the fifth lumbar vertebra and the first sacral vertebra (L5-S1), a disc that seems to suffer the most
stress as, when we stand, it is subjected to a permanent load that is the equivalent of the weight of the trunk
plus the weight of the upper limbs and the head.
If we take a person who is 180 cm tall and weighs 93 kg, who is
lifting a 30 kg load (Fig. 2), if we consider that disc L5-S1
supports the weight of trunk, upper limbs and head in addition to
the load, we can show some examples of the situations created
as a result of the upper body bending (increase in the length of
the lever) and reaching the following values:
Fig. 2
Fig. 3Aa, 3Ab, 3Ac
We need to point out that, on bending, loads are spread axially (Fig.
3A), so when a force "P" is applied through the vertebral plate the
disc is compressed and widens, the nucleus flattens, its internal
pressure increases significantly and spreads laterally towards the
outer ring fibers, causing tension to increase (Fig. 3Aa); this means
that a vertical load turns into lateral compression as a result of the
nucleus spreading the pressure (Fig. 3Ab).
Instead, when the upper body flexes, the upper vertebra slides
forwards and tilts towards the side with the heavier load, which
reduces the intervertebral space at the front (Fig. 3B).
With static work on a slightly bent vertebra, force "P" splits into a
force "N" that firmly presses the upper vertebra down onto the lower
vertebra, and a force "E" that tends to push the nucleus back against
the fibrous ring, increasing tension at its back and creating a situation
of tension on the back fibers of the intervertebral disc.
Fig. 3Ba, 3Bb, 3Bc
As discs are highly resistant to compression but do not stretch easily, such a situation combined with an
excessive load causes a traumatic effect which, if repeated several times, can lead to small cracks and cavities
in the fibrous ring that may allow the nucleus matter to filter through.
Lever
Lever
angle
Lever angle
10° on disc L5-S1 means a 207 kg load
50° on disc L5-S1 means a 593 kg load
90° on disc L5-S1 means a 728 kg load
Compression
Traction
angle
9
When straightening after bending forwards, the lumbar column regains its normal lordotic position. This may
push some of the nucleus matter out which collects in the intervertebral foramina (Fig. 4.4)
The nerve endings from the spine in that area may be compressed and affected by this mass, and this causes
a sharp pain in the lumbar region as well as back stiffness. This initial, acute lumbago can regress
spontaneously or with medication, but repeated, identical episodes could cause degenerative mechanisms
that may result in potentially very serious outcomes such as severe pain, feeling of powerlessness and even
paralysis.
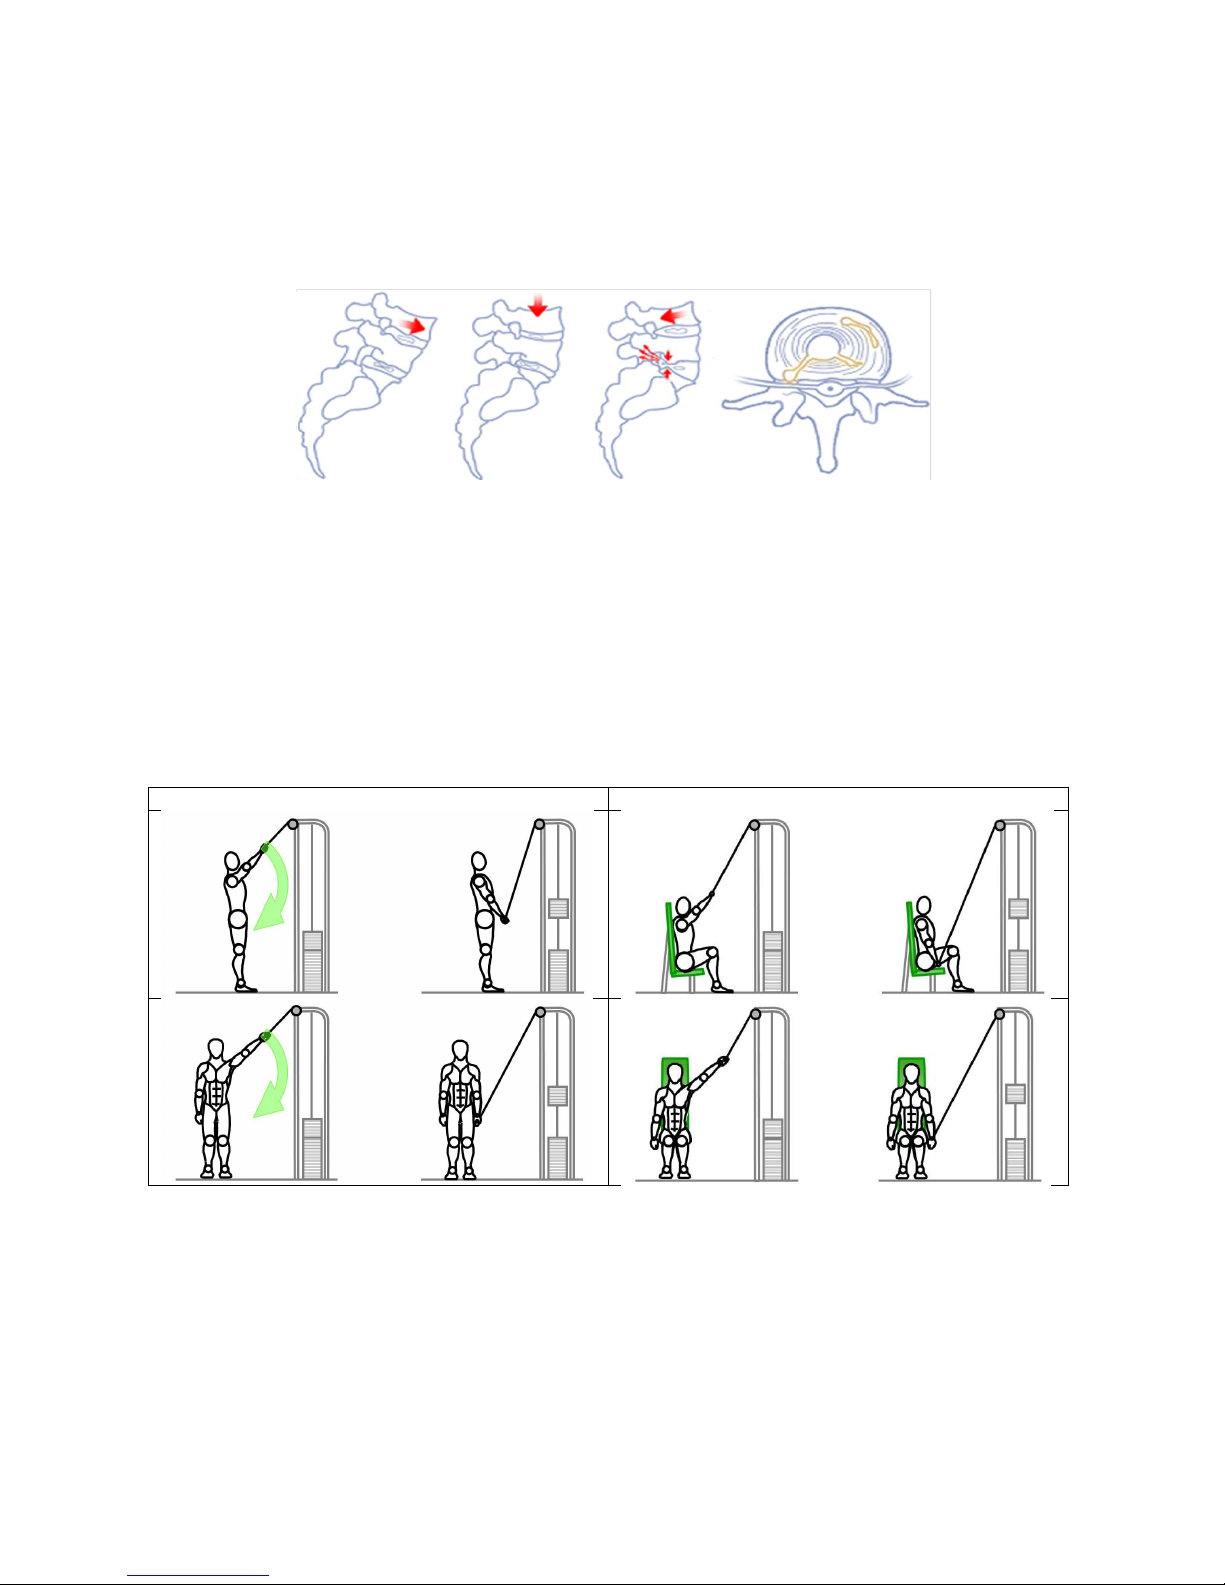
“Recommended exercises” by Chinesport
As you can see, the mechanics involved in distributing loads through the spinal column should not be
underestimated, in fact they should be taken into serious consideration by raising particular awareness on the
potential risks arising from ignoring them. We therefore recommend that the choice of exercises ensures that
the spine is always supported and any load is distributed axially so the pressure applied on the intervertebral
discs is even across the whole surface.
In order for exercises to be more easily applied when using Ercolina and Poliercolina, even if Chinesport
equipment involves very small loads, we have chosen to identify them as “recommended exercises” in this
manual when, performed in combination with the appropriate accessory, they can minimize body postures and
behaviors that might cause stress to the system in some way, leading to microtraumas in the long term.
example
Exercise as described
Exercise as recommended

10
How to use this information to prepare rehabilitation protocols
Details about the MAIN MECHANICAL ACTION can be found in the description of each exercise.
Please note that this is to identify the motor activity performed by the muscle ridge (undergoing rehabilitation);
This means that the MAIN MECHANICAL ACTION involves a muscular effort that is the same regardless of the
condition (as a result of trauma or illness) which is addressed by the activity itself.
In addition, other factors are needed to create an exercise protocol, such as:
the load,
the period of time over which the exercise protocol needs to be carried out
how to increase the load from one session to the next
With regard to the load for the patient, this can only be decided by the rehabilitation professional after having
assessed a patient, their current conditions and their real needs and capabilities, so that the most appropriate
load is identified and no further stress is caused to their muscular/articular system.
Statistically, we know that for healthy individuals the exercise load can be proportional to the patient's weight,
but this ratio only applies indicatively to individuals undergoing rehabilitation.
This variable must be determined by the rehabilitation professional.
With regard to other variables such as the period of time over which the exercise protocol needs to be
carried out and how to increase the load from one session to the next, we must refer to the physiological
principle that determines the body's response to a motor stress, which was described and identified by Selye
as “general adaptation syndrome”.
This temporary adaptation arrangement in response to a motor stimulation can be programmed using a
particular software called
“Exercise and sports training programming software”
Procedures for preparing exercise protocols for functional recovery and training for amateur and competitive
sports.
11
Definitions
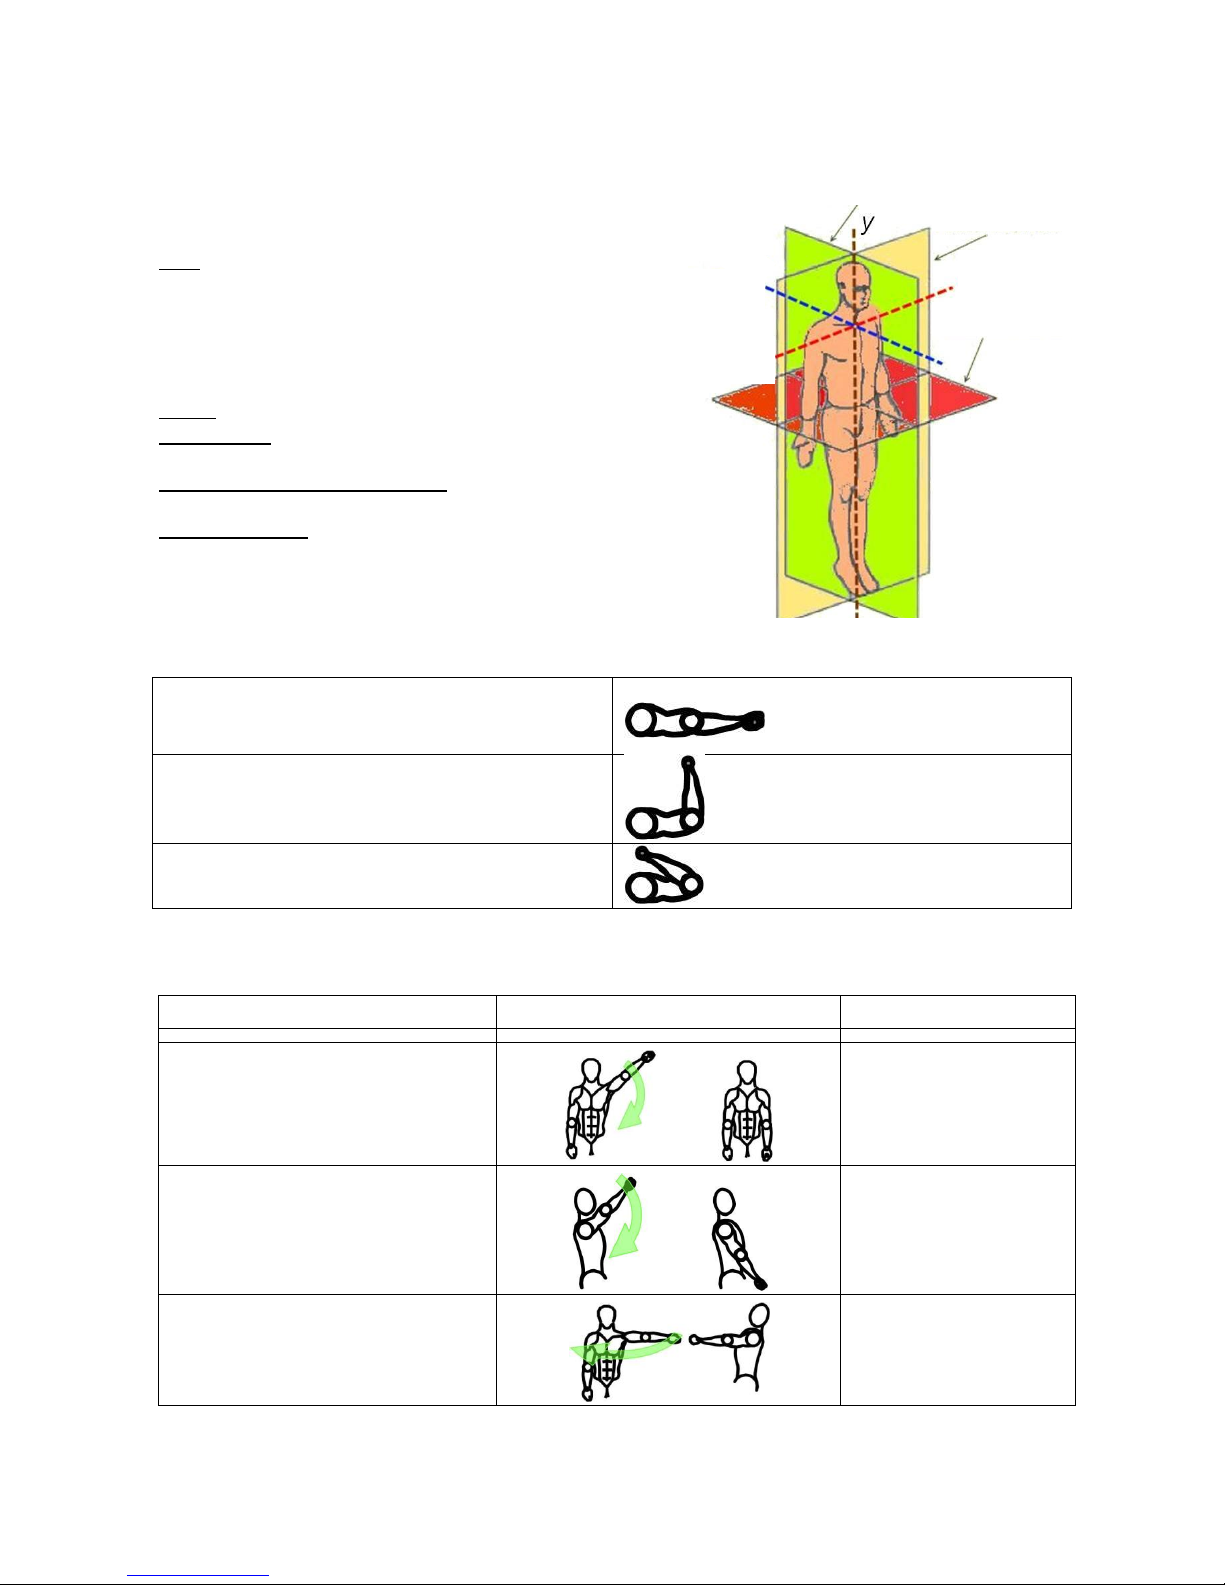
Axes and Planes
Axes are straight lines that intersect a body following three
Cartesian directions:
x –transverse axis
y –longitudinal axis
z –anteroposterior or sagittal axis.
Planes are determined by axes intersecting on:
frontal plane (intersection between transverse axis and
longitudinal axis);
anteroposterior or sagittal plane (intersection between
antero-posterior or sagittal axis and longitudinal axis);
transverse plane (intersection between transverse axis and
transverse axis;
Limb position
Stretched
Bent
Curled
Body segments movements
Main mechanical action
Exercises
Lateral arm adduction
Lowering the scapulohumeral girdle
2
Frontal arm adduction
Lowering the scapulohumeral girdle
11, 1, 28
Arm adduction on transverse plane
Lifting the scapulohumeral girdle at the
front
23
SAGITTAL PLANE
FRONTAL PLANE
axis z
axis x
sagittal
axis
longitudinal axis
TRANSVERSE PLANE
transverse
axis

12
Lateral arm abduction
Lifting the scapulohumeral girdle
4, 7, 21, 27, 29
Frontal arm abduction
Lifting the scapulohumeral girdle
5, 25, 26
Arm abduction on transverse plane
Lifting the scapulohumeral girdle at the
back
20
Lifting the arm at the back
3, 6, 22
Lifting the arm at the front
17, 24
Flexing the forearm over the arm
3, 10, 11, 17, 21, 22,
32
Extending the forearm on the arm
8, 9, 17, 24, 25, 26, 27,
28, 30, 31
Hand dorsal flexion
18
Hand palmar flexion
19
Internal rotation on the sagittal plane
14
External rotation on the sagittal plane
15
Internal rotation on the transverse
plane
12

13
External rotation on the transverse
plane
13
Upper body lateral flexion
16, 17, 49, 50
Cervical rachis lateral flexion
43
Cervical rachis forward flexion
42
Cervical rachis backward flexion
41
Lumbosacral rachis forward flexion
44, 45, 47
Upper body twist
17, 46, 47
Lumbosacral rachis extension
48
Leg curl over thigh
34, 40
Thigh extension at the pelvis
33, 48
Thigh flexion over the pelvis
34, 44, 45, 47
Leg extension over the thigh
39
Thigh abduction
35

14
Thigh adduction
36
Thigh internal rotation
37
Thigh external rotation
38
Position in relation to Ercolina
FRONT
SIDE (hip)
BACK

15
Exercises
Below is a list of exercises that can be performed with a basic Ercolina or a Poliercolina. Each exercise
comes with details on
handle set-up
starting position
execution
main mechanical action
key muscles involved (with pictures included)
any exercises recommended depending on the accessory in use
“other mode” if required by a particular accessory
N.B.: Exercises are presented according to the accessory in use
The following exercises refer to the basic Ercolina (see picture A);
exercises can be performed simultaneously with both limbs using the bar (picture B). A similar scenario is
described for Poliercolina (picture C and D).
Each exercise description comes with a pictorial representation that carries the relevant Symbols A, B, C and
D.
Basic Ercolina
Poliercolina
Handle
Bar
Handle
Bar
A
B
C
D
Symbols
A
B
C
D
16
Exercises that may also involve accessories:
Ginny Bench 4840
Snap Hook AC0094
Exercise Bar AC0302
17
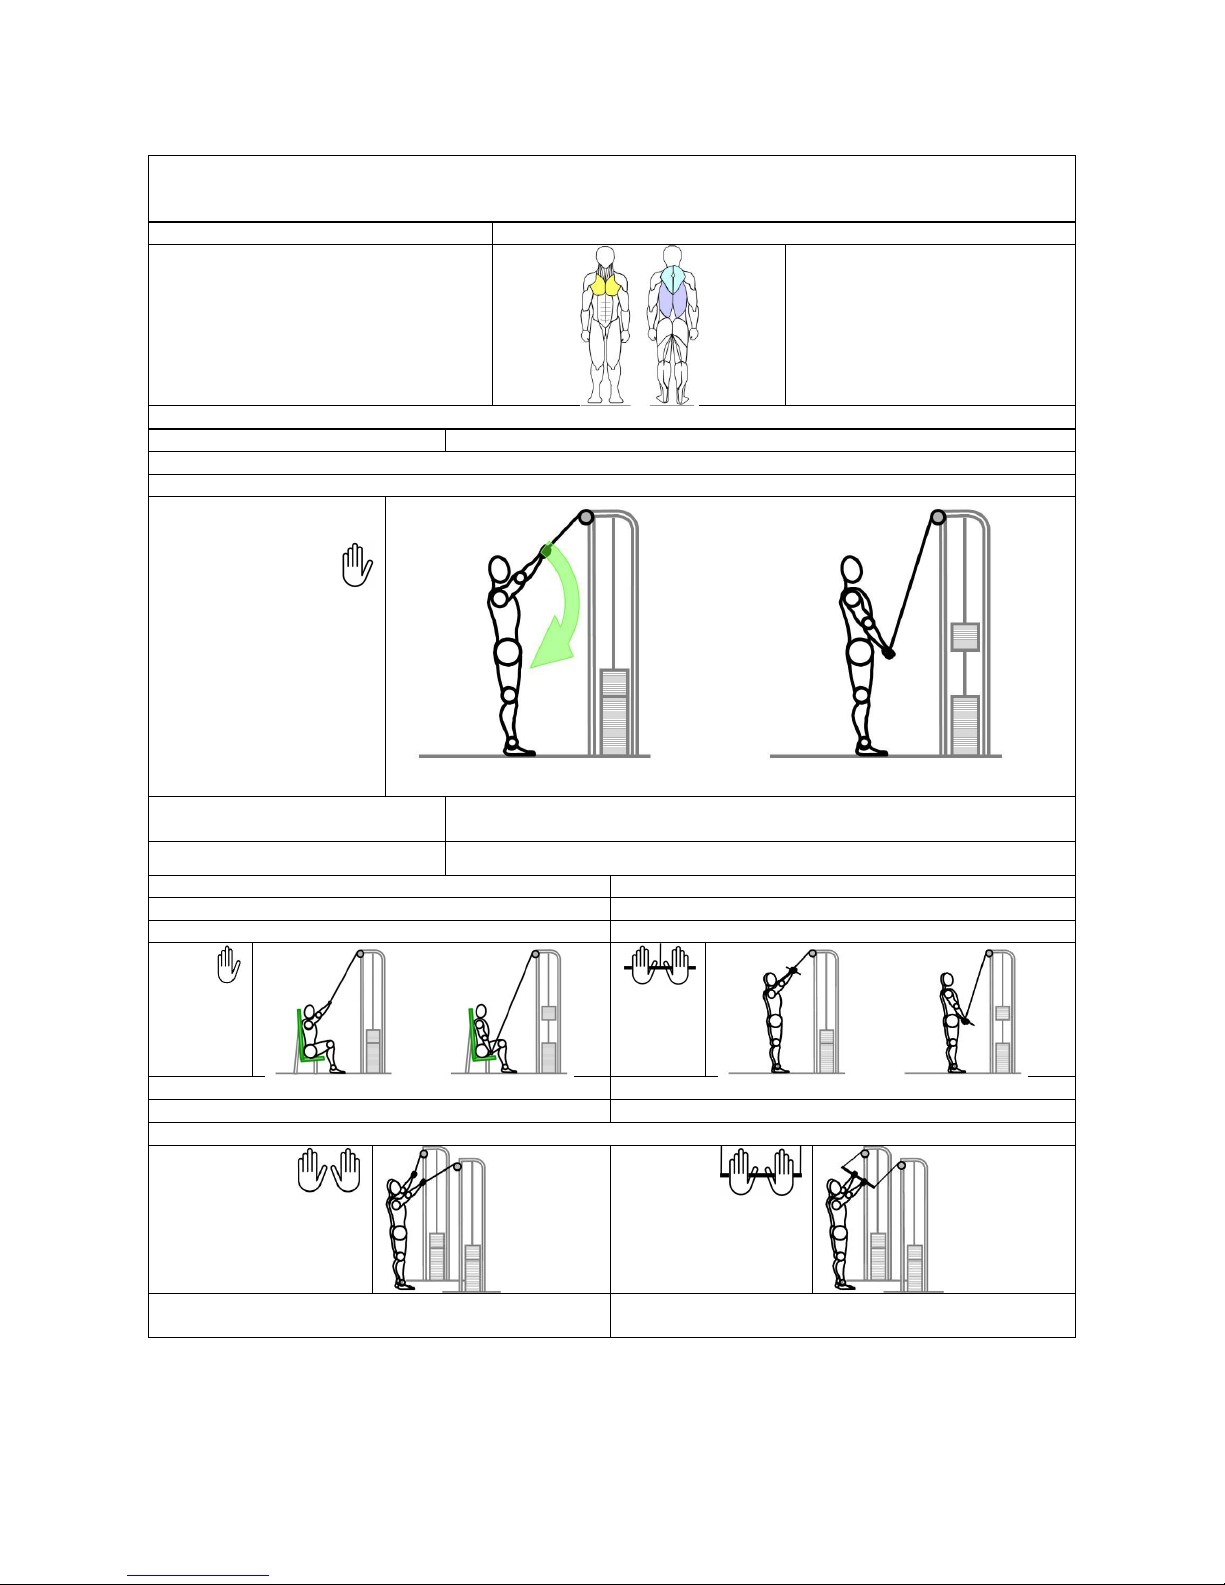
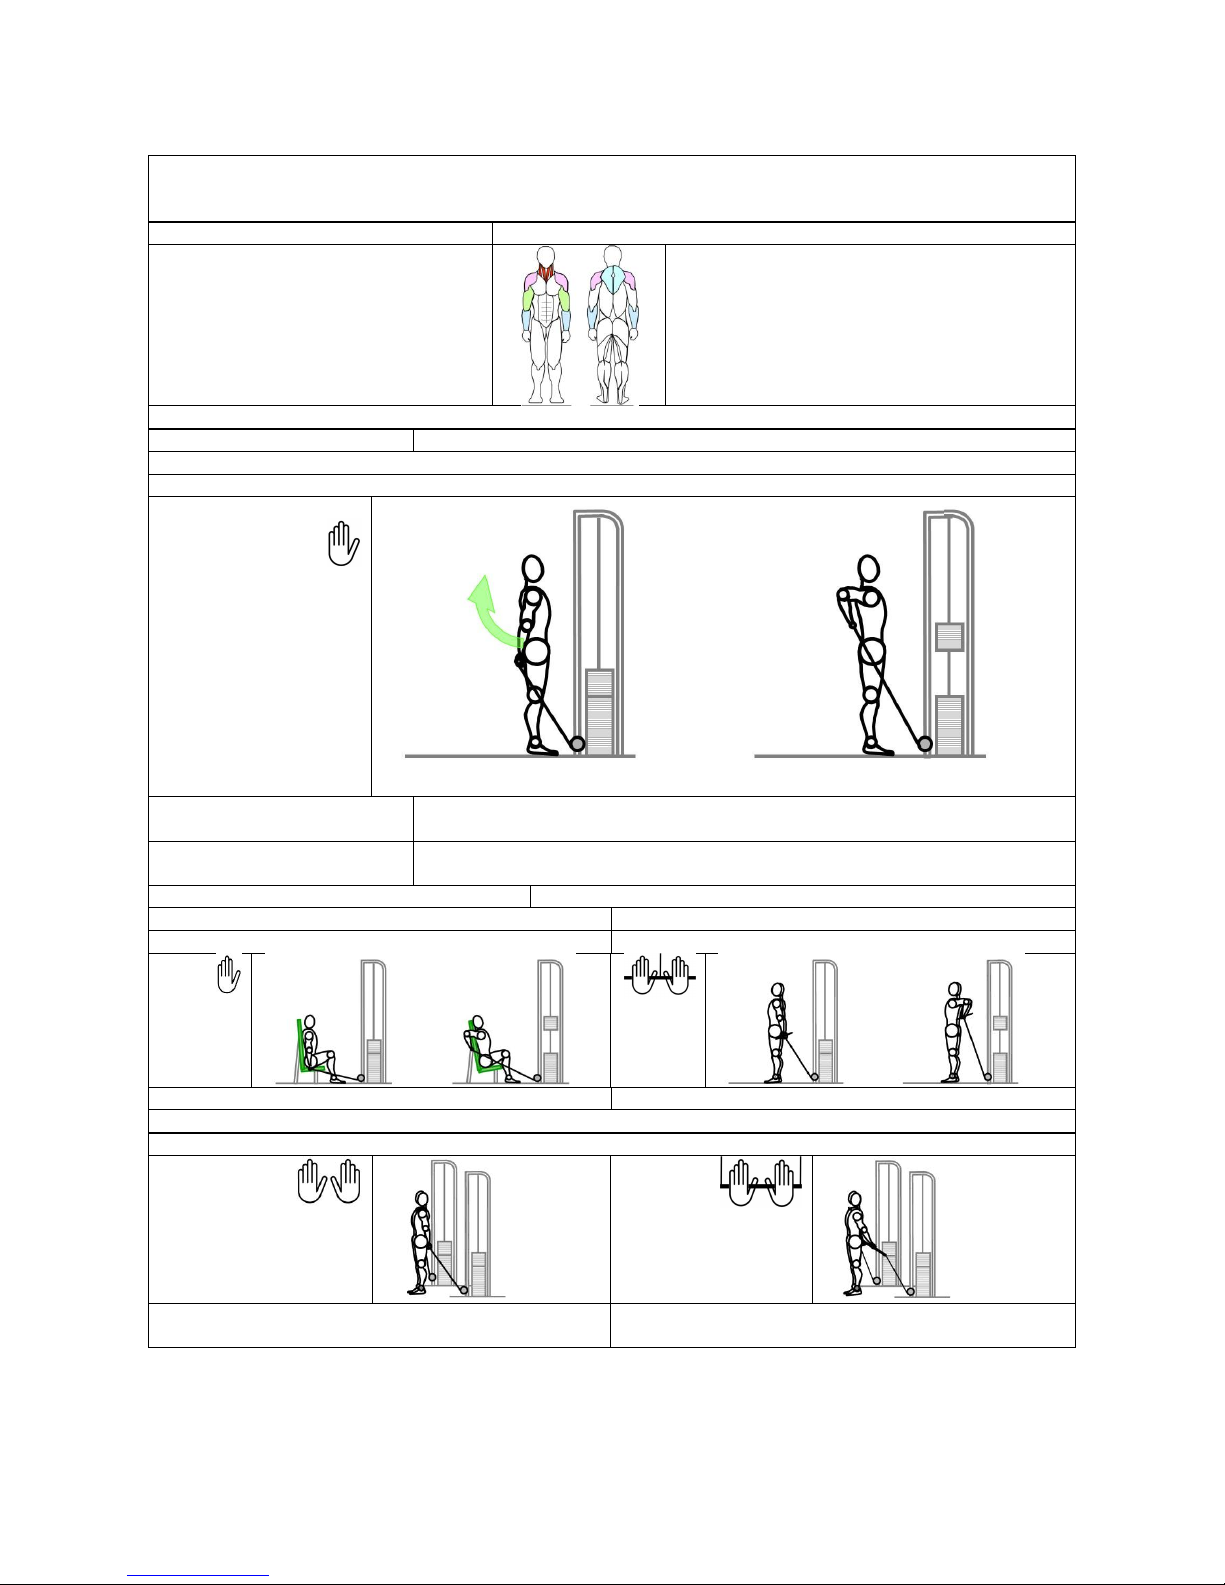
Exercise 1 FRONTAL ADDUCTION
MAIN MECHANICAL ACTION:
KEY MUSCLE INVOLVEMENT
Frontal arm adduction
pectoralis major, serratus
anterior, dorsal major, teres
major, trapezius
handle set-up
top section
BASIC ERCOLINA MODE
1 2
1 - Starting position:
standing straight facing Ercolina, upper limb is stretched forwards and
upwards, holding the handle fitted in the top section;
2 - How to do it
pull the handle downwards keeping the limb in exactly the same position.
RECOMMENDED MODE
OTHER MODE
Ginny Bench
Bar
Starting Position: sitting facing Ercolina
Starting Position: standing facing Ercolina
POLIERCOLINA OPTION
Starting Position: standing or sitting facing Ercolina
...
Starting Position: standing or sitting, facing Ercolina
...
18
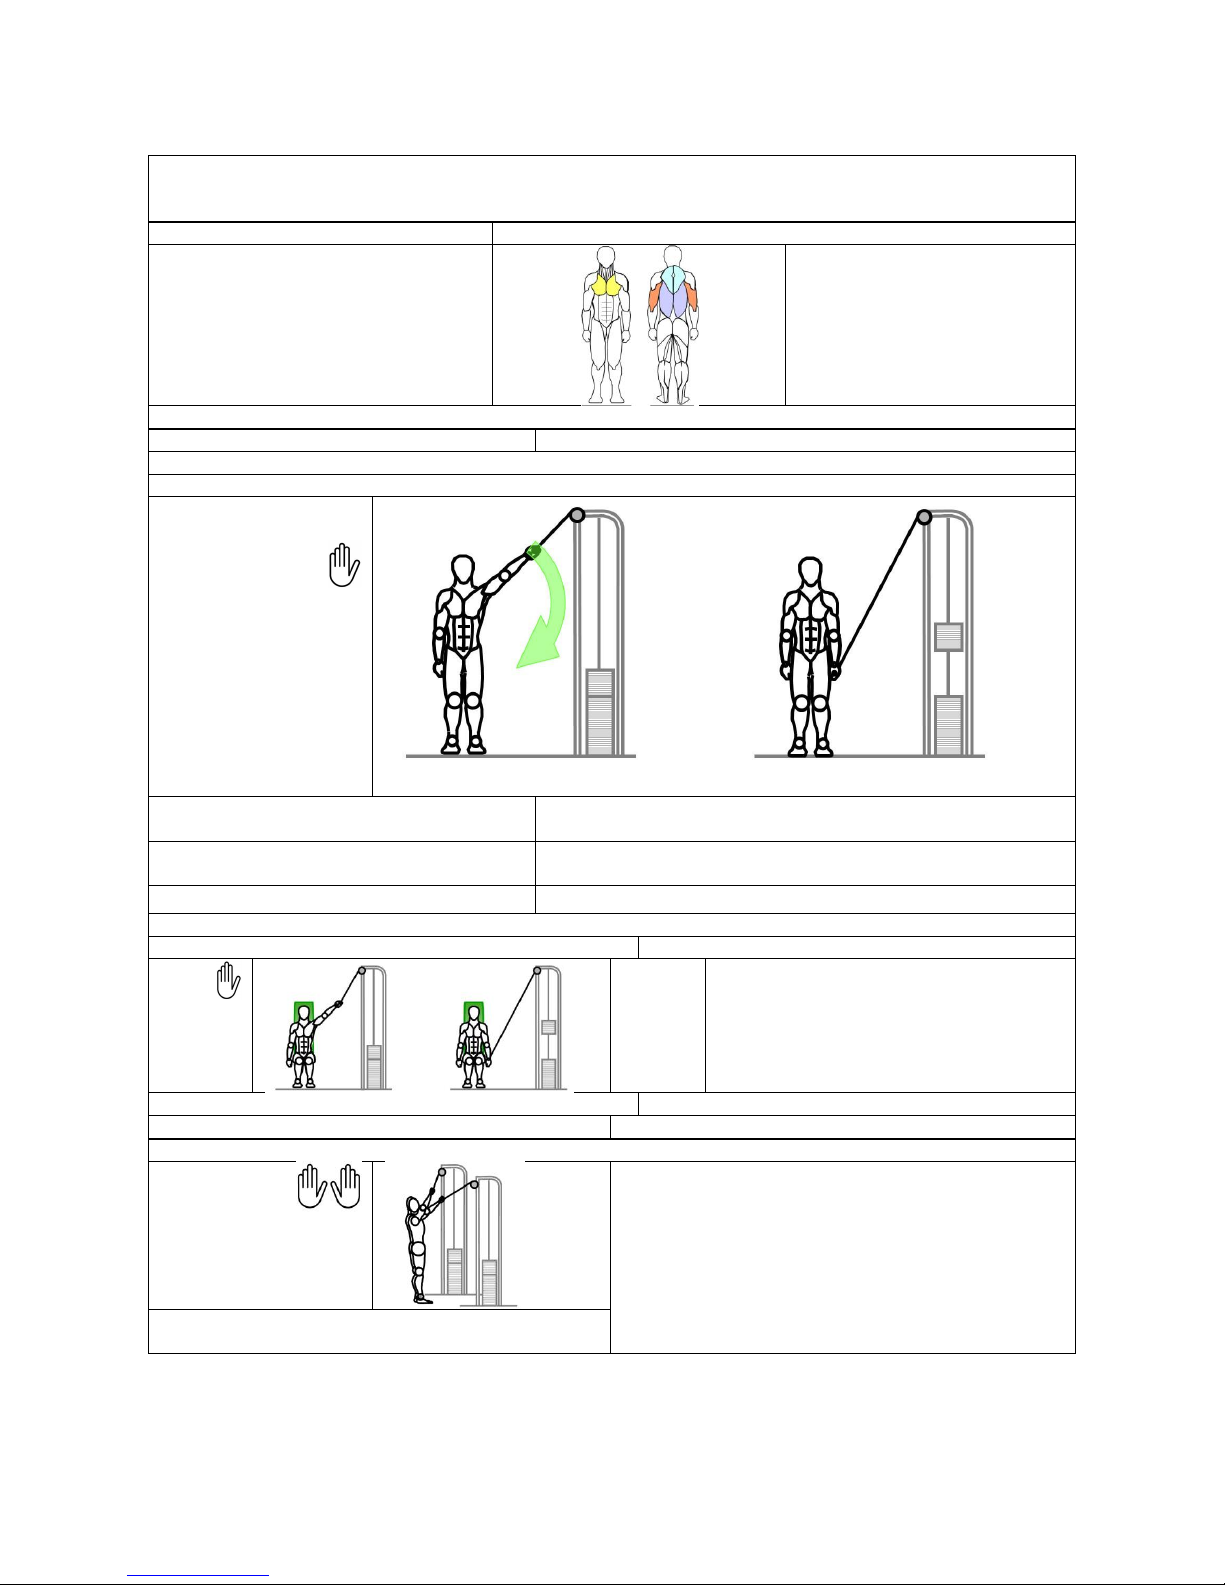
Exercise 2: LATERAL ADDUCTION
MAIN MECHANICAL ACTION:
KEY MUSCLE INVOLVEMENT
Lateral arm adduction
pectoralis major, serratus
anterior, trapezius, subscapular,
dorsal major, teres major,
coracobrachial, brachial triceps
(long head)
handle set-up
top section
BASIC ERCOLINA MODE
1 2
1 - Starting position:
standing beside Ercolina, upper limb is stretched outwards and
upwards, holding the handle fitted in the top section;
2 - How to do it
lower the limb until bringing it to touch the trunk, keeping it in
exactly the same position.
RECOMMENDED MODE
Ginny Bench
Starting Position: sitting beside the equipment
POLIERCOLINA OPTION
Starting Position: standing or sitting facing Ercolina
...
19
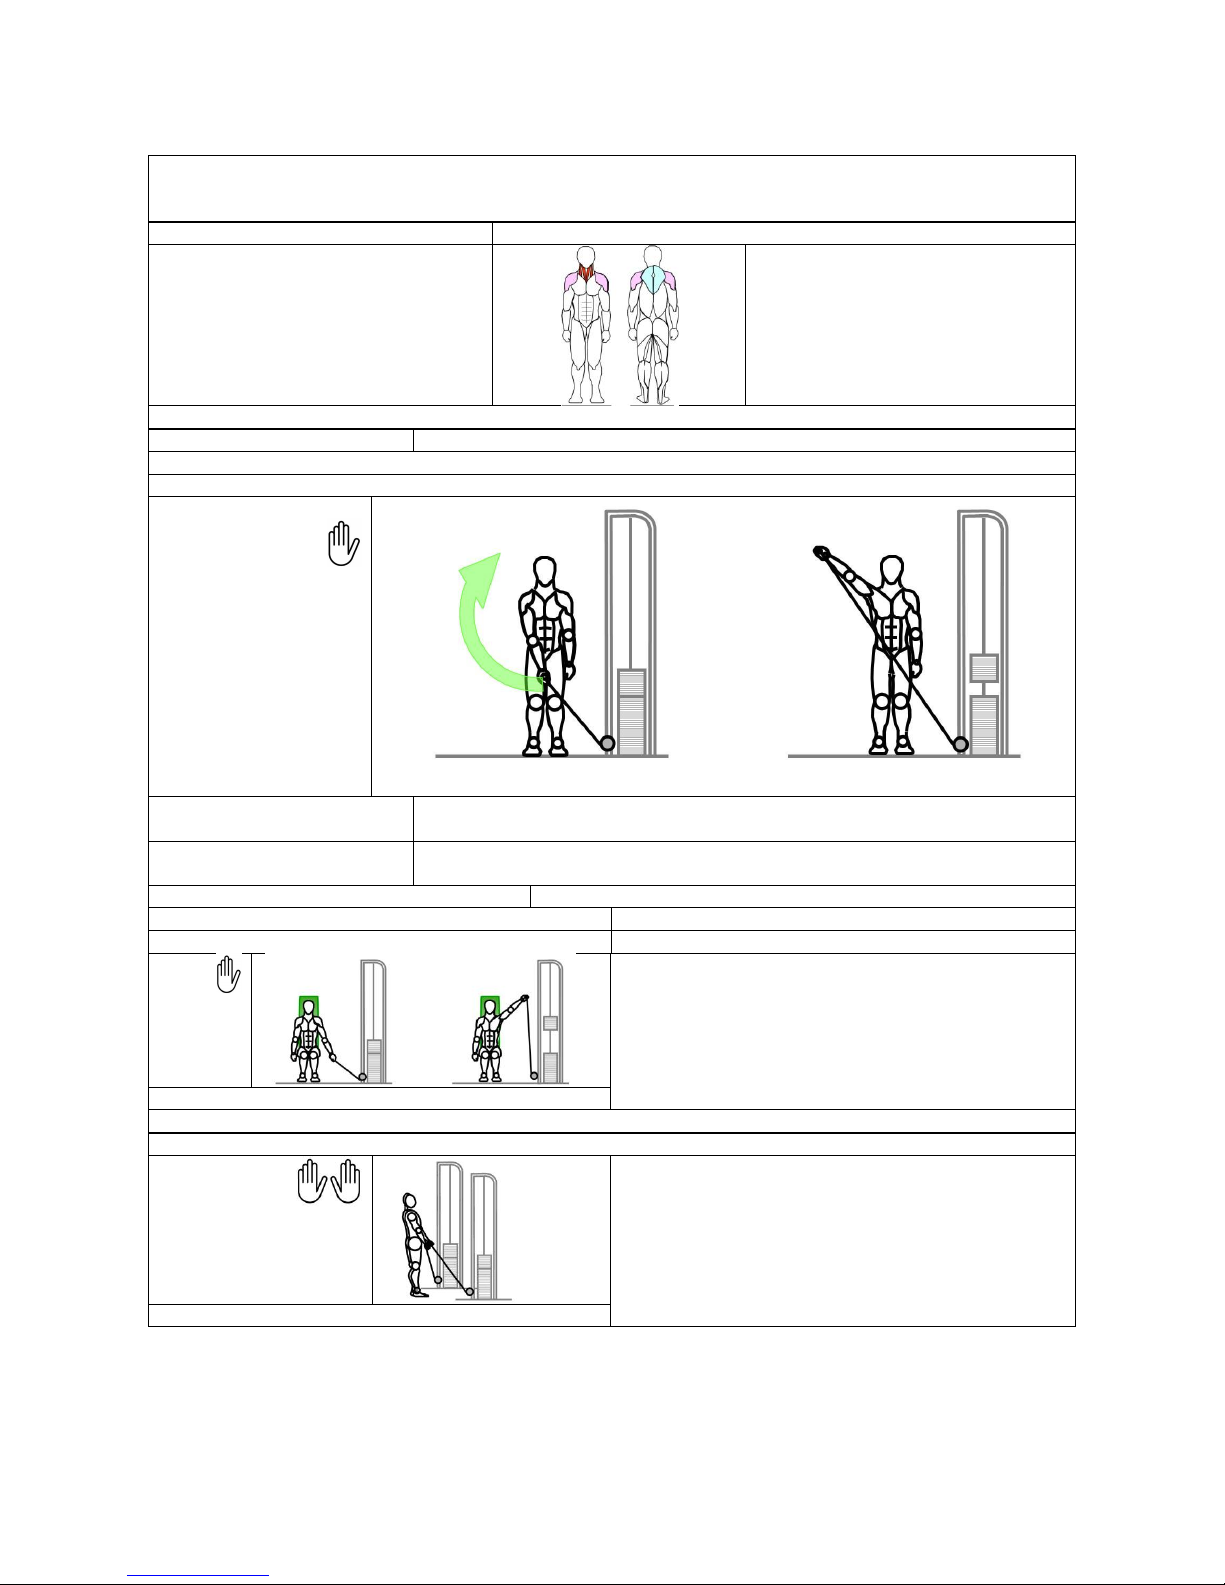
Exercise 3: BACK PULL
MAIN MECHANICAL ACTION:
KEY MUSCLE INVOLVEMENT
Lifting the arm at the back, flexing the
forearm over the arm
deltoid, trapezius, rhomboid, levator scapulae,
teres major, long pronator, brachial anterior,
sternocleidomastoid, brachial biceps,
supraspinatus, infraspinatus, teres minor,
carpus ulnar flexor, superficial flexor, palmaris
longus, carpus radial flexor
handle set-up
bottom section
BASIC ERCOLINA MODE
1 2
1 - Starting position:
standing facing Ercolina, arm is stretched downwards and backwards, holding
the handle fitted in the bottom section;
2 - How to do it
flex the arm until it is bent.
RECOMMENDED MODE
OTHER MODE
Ginny Bench
Bar
Starting Position: sitting facing Ercolina
Starting position: Standing, back towards Ercolina
POLIERCOLINA OPTION
Starting Position: standing with the back towards
Ercolina ...
Starting Position: standing with the back towards
Ercolina ...
20
Exercise 4: LATERAL RAISE
MAIN MECHANICAL ACTION:
KEY MUSCLE INVOLVEMENT
Arm lateral abduction
(scapulohumeral girdle lift)
deltoid, trapezius, rhomboid, levator
scapulae, sternocleidomastoid,
supraspinatus
handle set-up
bottom section
BASIC ERCOLINA MODE
1 2
1 - Starting position:
standing beside Ercolina, upper limb is stretched downwards at the back,
holding the handle fitted in the bottom section;
2 - How to do it
raise the arm outwards and upwards without changing its position.
RECOMMENDED MODE
Ginny Bench
Starting Position: sitting beside Ercolina
POLIERCOLINA OPTION
Starting Position: standing facing Ercolina ...
This manual suits for next models
1
Table of contents
Popular Fitness Equipment manuals by other brands


G-FITNESS
G-FITNESS AIR ROWER user manual

CAPITAL SPORTS
CAPITAL SPORTS Dominate Edition 10028796 manual

Martin System
Martin System TT4FK user guide

CIRCLE FITNESS
CIRCLE FITNESS E7 owner's manual

G-FITNESS
G-FITNESS TZ-6017 user manual

Accelerated Care Plus
Accelerated Care Plus OMNISTIM FX2 CYCLE/WALK user manual


