Chiptech SEVEN - 4G PERS User manual
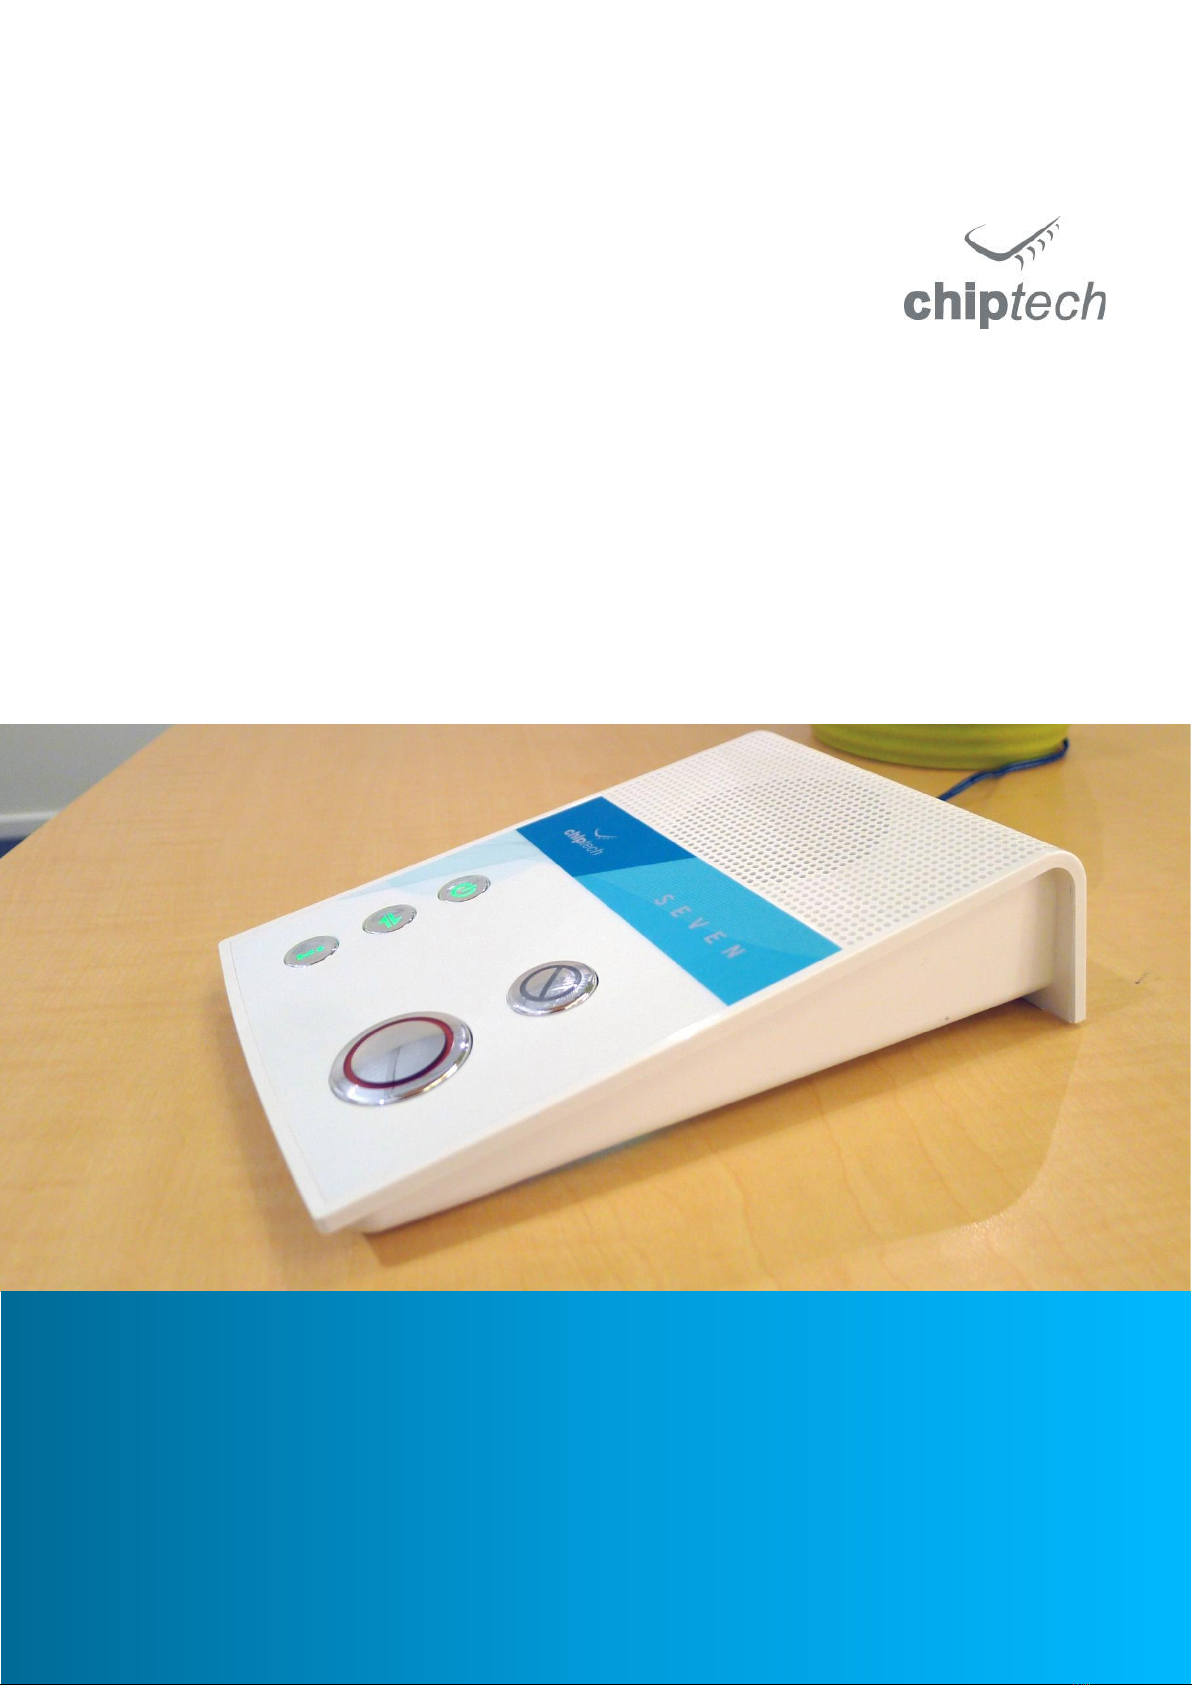
SEVEN - 4G/3G PERS
Product Manual and Installation Process
The future of telecare base units; 4G/3G cellular communication.
SEVEN offers superior functions and reliability, while operating with
existing Chiptech personal help buttons and peripherals.
V1.03

DESIGN | MANUFACTURE | SUPPORT
2
Contents
1Introduction 3
2SEVEN - Overview 4
2.1 Top Panel 4
2.2 Underside 5
3Extended Aerial Version 6
3.1 Introduction 6
3.2 How to Attach the Aerial 6
4Buttons and Indicator Lights 7
4.1 Power 7
4.2 Connect 8
4.3 Info 9
4.4 Cancel 10
4.5 Help 10
4.6 Button Combinations 11
5Personal Help Button Overview 12
5.1 Pearl 12
5.2 Pearl Advanced 12
5.3 Pearl Attachment Kit 13
5.4 Chiptech GO mPERS Device 13
6Installation Considerations 14
7Installing SEVEN 15
8Installer Setup Menu 19
8.1 Installer Setup Options: 19
8.2 ‘Clear All RF Devices’ Details 20
9RF Learn 20
9.1 Learn or Replace an RF Device 20
9.2 Active/Inactive RF Devices 20
10 RF Test 21
10.1 RF Test Mode 21
10.2 RF Test Process 22
11 Reminders 23
11.1 Reminder Reports 23
11.2 Additional Voice Phrases 23
12 Messaging 24
12.1 SMS Format 24
12.2 Messaging Format 24
12.3 Pre-recorded Voice Phrases 25
13 Silent Mode 26
14 Connection Status 26
14.1 Cellular 26
14.2 Internet Communication (Wi-Fi and Ethernet) 28
15 Reporting Process 28
15.1 To Activate an Emergency Alert: 28
15.2 Pearl Reporting 28
16 Communication Pathway Test 29
16.1 Manual Pathway Test 29
16.2 Automatic Pathway Test 29
17 Servicing and Updating 29
17.1 Batteries 29
17.2 Chiptech Wizard 30
17.3 Fleet Management 31
18 Troubleshooting 32
18.1 Power Button 32
18.2 Connect Button 32
18.3 Communication Pathway Test Fail 33
18.4 Pearl Issues 34
19 Technical Specifications 35
20 Disclaimer 35

SPECIALISTS IN DIGITAL TELECARE
3
chiptech.co.nz
1Introduction
SEVEN 4G LTE / 3G cellular reporting base unit, supports users to stay safe, confident, and maintain their
independence for longer. SEVEN features a simple user interface, combining status indicators with buttons to keep
users informed of any changes to their system that could impact its performance. Voice messages and lights are used
to provide event notifications and reminders, along with automated system messages.
There are four hardware variants of the SEVEN 4G/3G base unit, these are ordered with their own unique code:
1. SEVEN LE is full featured with dual SIM, Wi-Fi and Ethernet, it includes comprehensive hardware for future
proof applications.
2. SEVEN LE-X is the extended aerial version, it has no internal cellular antennas and must have an external
cellular aerial fitted to the SMA connector to operate.
3. SEVEN L is a 4G LTE/3G reporting base unit with reduced hardware; single SIM slot, and the removal of the
GPS functionality, Wi-Fi, Ethernet, Bluetooth and under-glow LEDs.
4. SEVEN L-X is the extended aerial variant of the above.
SEVEN is compatible with existing Chiptech Pearl and SID products, as well as Chiptech software. This includes
Chiptech Wizard for updating and SmartCare Cloud connectivity to enable fleet management.
*An asterisk throughout this document denotes a configuration value. Values may vary depending on what
configuration file is applied to a SEVEN base unit.

DESIGN | MANUFACTURE | SUPPORT
4
2SEVEN - Overview
This section of the product manual outlines the overall functions of the SEVEN and associated telecare products.
Please note: SEVEN labelling and settings will depend on the customised choices selected by your organisation and
some features may vary. SEVEN can be supplied with one or both SIM cards fitted at factory, depending on your
organisation’s requirements.
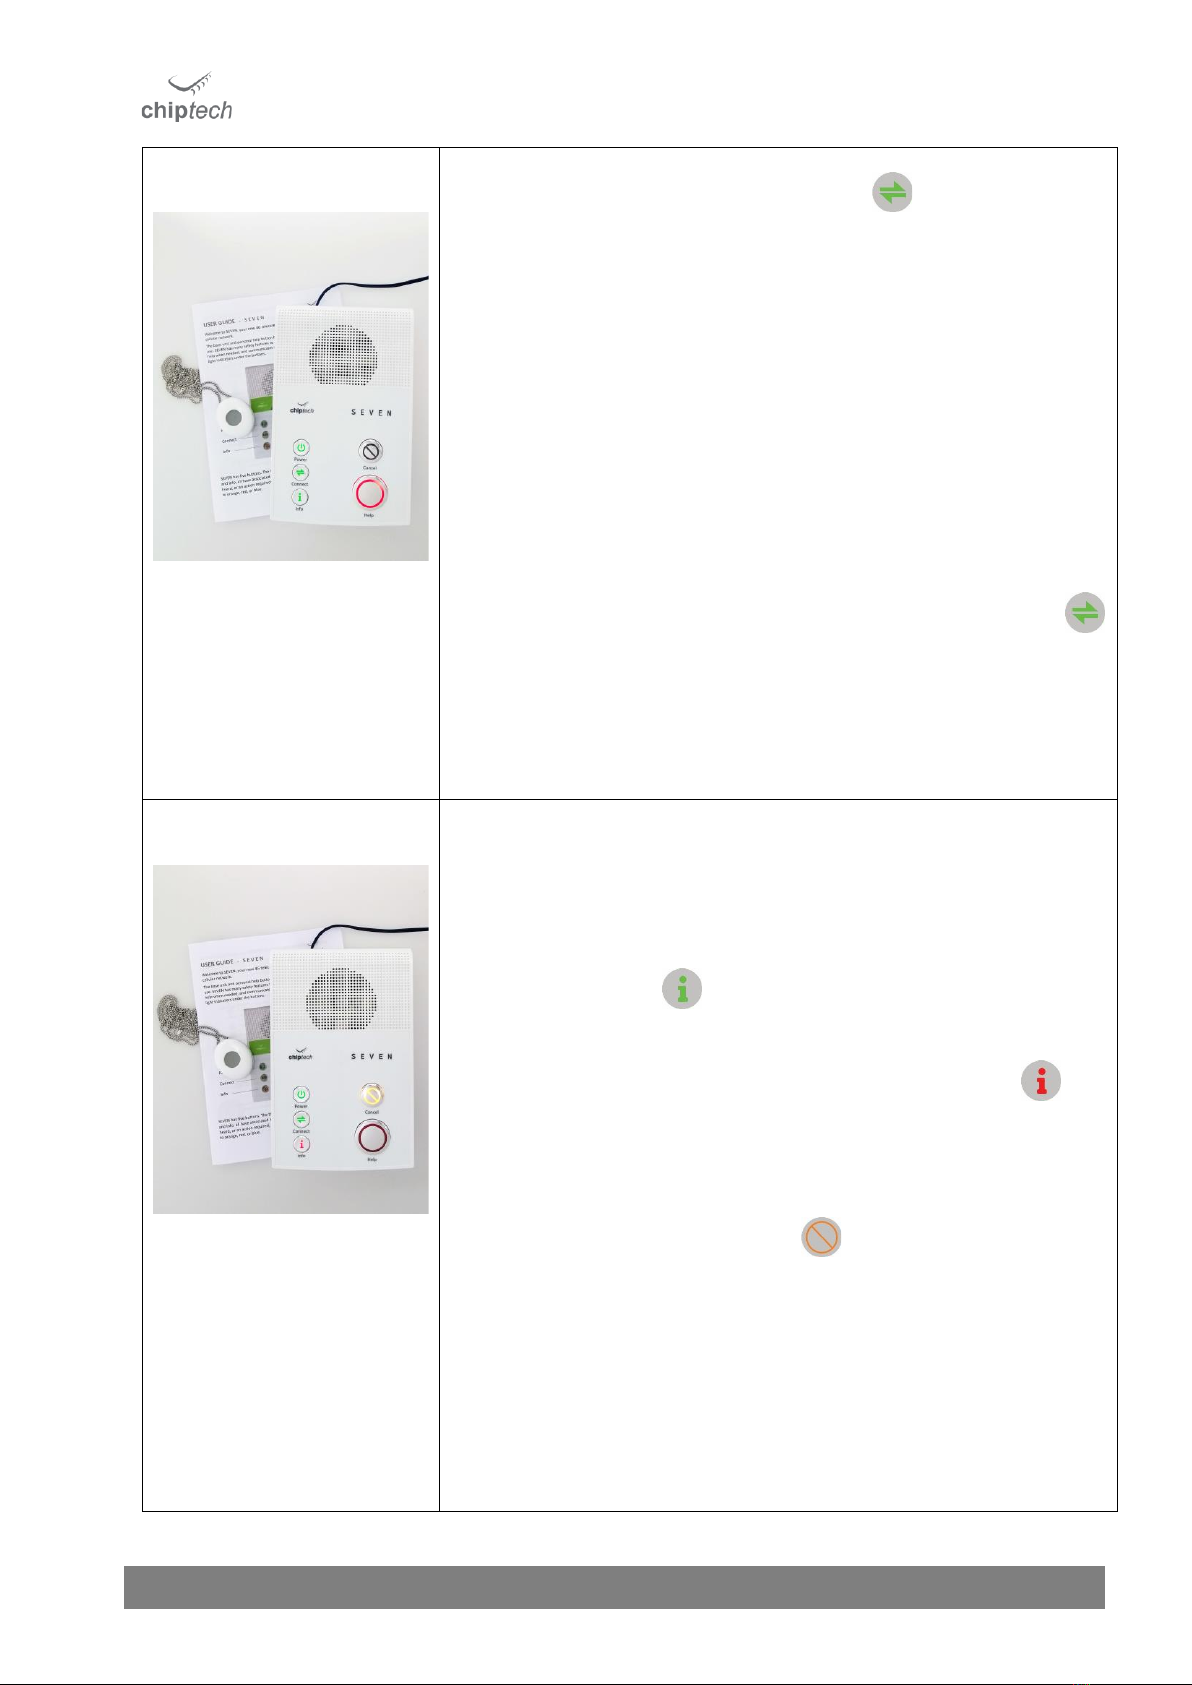
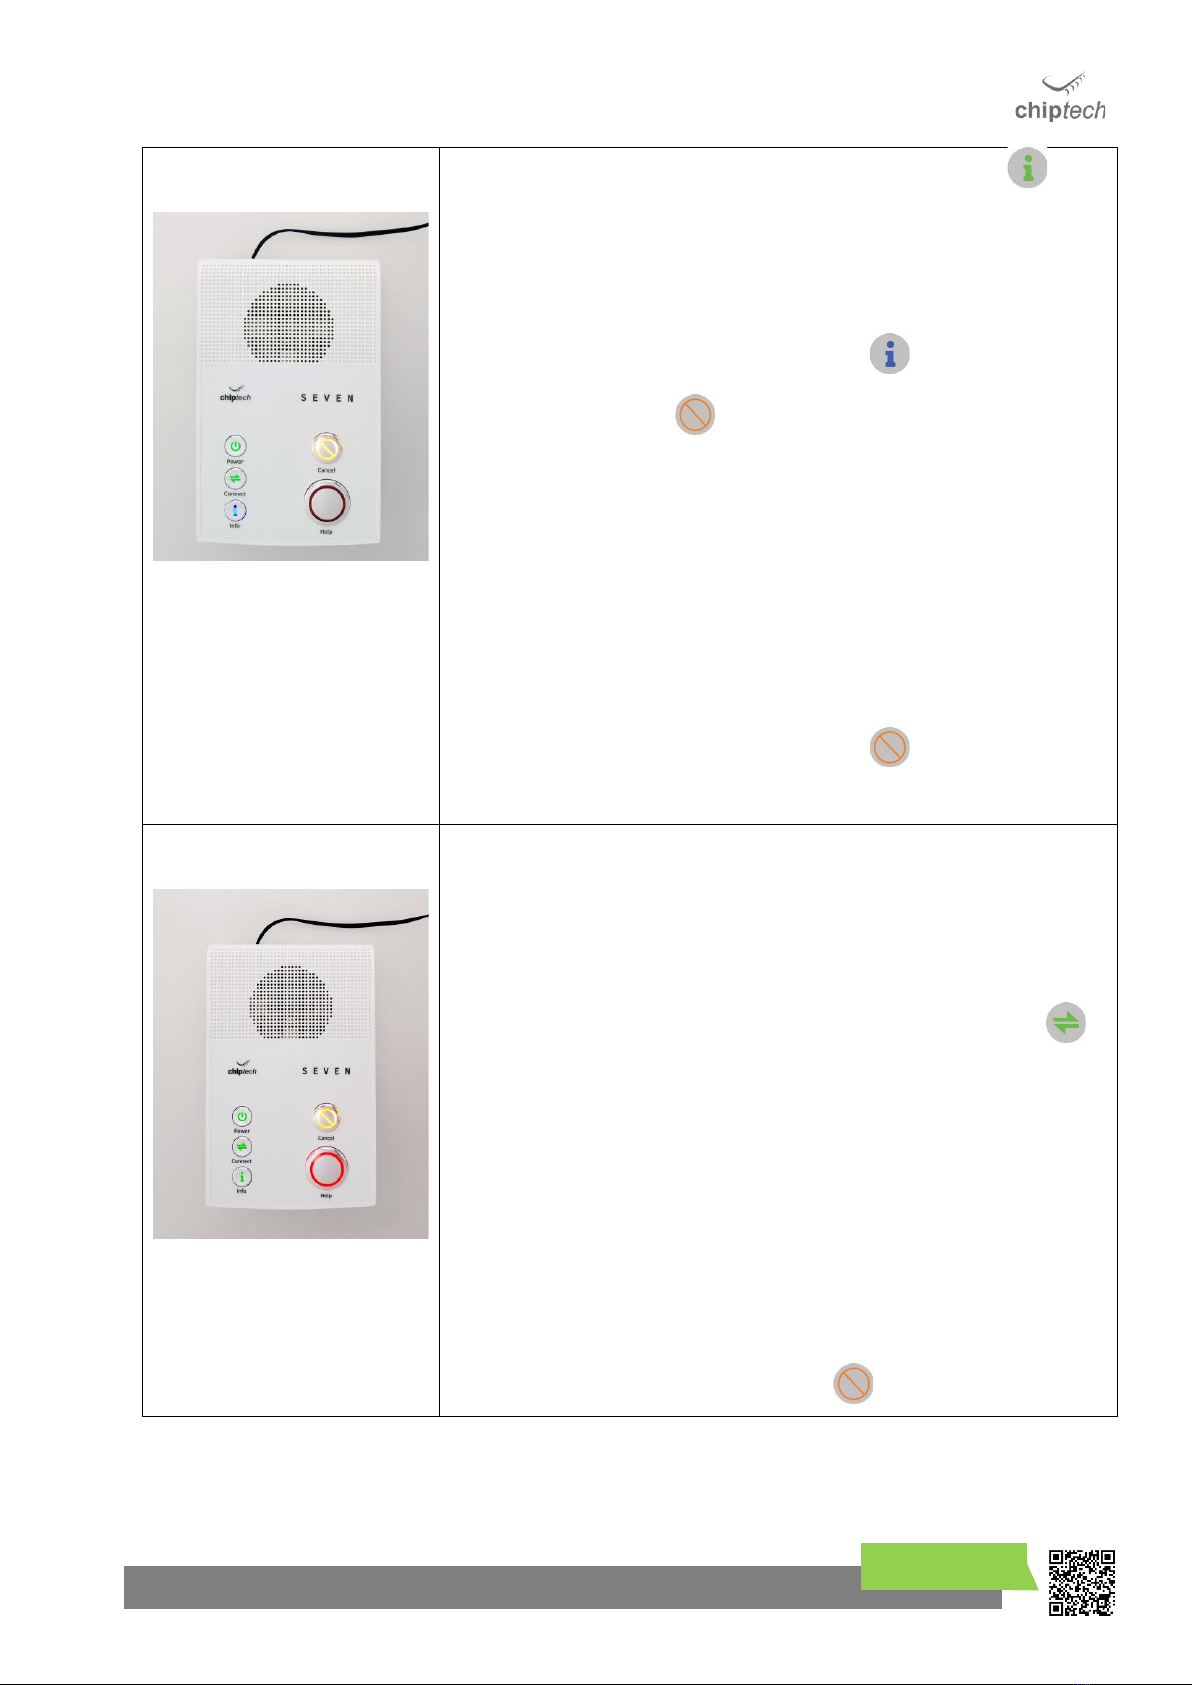
2.1 Top Panel
SEVEN provides information to end users via voice messages and light indicators under the buttons. SEVEN has five
buttons, four of which are multifunctional. The three buttons on the left; Power, Connect, and Info, all have
associated notifications. If there is a message to be heard, or an action required, these buttons will change colour to
orange, red, or blue.
Power
Solid green when the base
unit is turned on and
operating as expected.
Connect
Solid green when the base
unit is turned on and
operating as expected.
Press to send Daily Check
report, if enabled.
Info
Flashes blue, green,
orange or red to indicate a
message, reminder or
pendant test request.
Press to hear the request.
Speaker and Ambient
Light Sensor
Located under the speaker
grill is a sensor that
adjusts the brightness of
all SEVEN lights to suit the
environment. Please do
not cover.
Cancel
Press to cancel an alert
during the pre-alarm
period.
Help
Press to activate an
emergency alert. This
button illuminates in a
clockwise direction to let
the user know their call
for help is being sent.
Microphone
Customised Top Label

SPECIALISTS IN DIGITAL TELECARE
5
chiptech.co.nz
2.2 Underside
Screw
Slot
Ethernet Connection
For communicating
to monitoring, and
located in the cable
cavity.
SIM Card Holders
SEVEN has two micro SIM
card holders, and these
are located under the
battery pack.
Power connection
9V DC
Battery Compartment
This contains one
rechargeable battery
pack, with an expected
battery life of up to five
years.
Backup battery life is up
to 70 hours.
The label placed here
contains standards.
To Wall Mount
Use the two available
screw slots to mount
SEVEN to the wall or wall
mount bracket.
Expansion Card Slot
An expansion card can be fitted to provide
additional functions. This is located under the
battery pack.
Option Port
This port is used to
connect to a
computer for
programming via the
Chiptech Wizard
Microphone –Part of the hands-free
speakerphone system.
Screw
anchor
Slot
Under glow lights
These are aesthetic
and dim to adjust to
the environmental
lighting in a room.

DESIGN | MANUFACTURE | SUPPORT
6
3Extended Aerial Version
3.1 Introduction
The extended aerial variant of the base unit, SEVEN LE-X or SEVEN L-X, has been
designed for easy installation in areas where there is limited cellular coverage of the
4G/3G network.
SEVEN LE-X or SEVEN L-X with an extended aerial connection is a different hardware
build and order code. Please note: a standard SEVEN base unit cannot be
converted to work with an extended aerial.
4G/3G Aerials can be purchased from a number of organisations, and must come
with a SMA male connection. The aerial must be designed to work with the 4G/3G
telecommunications frequencies in your region. Contact Chiptech for an up to date
list of suppliers.
3.2 How to Attach the Aerial
Attach the external aerial directly or with a coax cable to the SMA
connector, which is located on the back panel of SEVEN X.
This only needs to be tightened to finger tight force. Over tightening the
aerial may cause potential issues if the connection is ‘over-tightened.’ Over-
tightening could result in damage inside the base unit, with the possibility
of shearing the internal cable.
When the extended aerial is connected, check the cellular connection
strength by pressing the Connect button. When adequate cellular coverage
is obtained make sure the customer is aware of the warnings in the SEVEN
LE-X or SEVEN L-X User Guides:
•Do not unplug the aerial from the base unit, as this will prevent
the base unit from connecting to the cellular network.
•Do not reposition the aerial from the installed location.
SMA Female Connector

SPECIALISTS IN DIGITAL TELECARE
7
chiptech.co.nz
4Buttons and Indicator Lights
4.1 Power
POWER
The Power button is backlit green to indicate that SEVEN is on.
Press the Power button to hear the power status spoken.
Hold the Power button to turn the base unit off, press to turn it on.
On
Flashes orange when the mains power is disconnected. A voice message will play after three
mins of no mains power, and an alert is sent to monitoring following a period* of time, typically
1-4 hours.
•Solid red when the base unit battery is no longer functioning, or the battery is missing.
•Flashes red when the base unit battery is low.
No light –base unit is off.
INSTALLER
INFO
The Power button is used for turning the base unit on from battery power, turning the base unit off, and
resetting the base unit to return it to its normal operating mode.
4.1.1 Turn On
•Plug SEVEN into mains power to automatically start the unit. SEVEN will play a voice file and
the Power button will display green (recommended process).
•It is not recommended to start SEVEN on battery. If you need to do so, press the Power
button for three (3) seconds, SEVEN will speak, and the Power button will flash orange.
4.1.2 Turn Off
•Unplug the SEVEN plug pack from the wall, then press and hold the Power button. Keep
holding the Power button until SEVEN has beeped four (4) times (with the final beep in a
lower tone). The beeps help you determine how long to hold the button before it switches
off.
•The Power indicator will have no lights showing when the unit is turned off correctly.
NOTE: If configured to do so, SEVEN can be turned off even if the mains power is still supplied.
CAUTION: When SEVEN is turned OFF and there is NO Power indicator, then the system WILL NOT
operate.
4.1.3 Restart
•Turn off SEVEN using the Power button as described above.
•When SEVEN has turned off, press and hold the Power button until the Power button
indicates that the base unit has restarted. No settings will be lost when performing this
function, but alerts to monitoring will be cleared, and normal operation will be restored.
NOTE: When ‘Power off only if mains removed’ is set in the configuration, then the restart
process the mains power plugged in and hold the Power button for three (3) seconds.

DESIGN | MANUFACTURE | SUPPORT
8
4.2 Connect
CONNECT
Press the Connect button to hear the connection status for all enabled communication pathways to the
monitoring centre. When flashing blue, it can be pressed to send a ‘Daily Check’ to monitoring, if
configured to do so.
All enabled connections are connected and available.
•Solid orange when starting up and first connecting to the cellular network.
•Flashes orange to let you know there is a connection that is not working, (but there is still one
able to be used to send an alert). This function is only applicable when there is more than one
pathway enabled to send a report on, therefore does not apply for SEVEN L and SEVEN L-X base
units.
The red flash indicates there are no connections to monitoring, an alert will not work.
Flashes blue when a ‘Daily Check’ is required. Press the button to send a report to monitoring,
and the light will return to normal.
No light –base unit is off.
INSTALLER
INFO
4.2.1 Cellular Connection at Start-up / Reset
The Connect button will turn solid orange for a short period of time when connecting to the cellular
network; this will occur every time SEVEN starts up or is reset. It will typically take about 15 seconds to
connect to a local cellular tower, but sometimes this process can take up to one minute.
If an issue is detected, the light will change colour and flash to indicate a connection issue.
4.2.2 Connection Status
Press the Connect button to hear what communication pathways are enabled along with the current
status of the connection. Depending on the base unit and configuration, these could include any
combination of Cellular A, Cellular B, WiFi or Ethernet.
4.2.3 Communication Pathway Testing
Press and hold the Connect button to initiate the Communication Pathway Test. Each unique pathway
that has been enabled will be used to send a test report to monitoring to confirm it is available. As the
test runs, SEVEN announces each of the pathways that it is testing along with the “Pass” or “Fail” result
for each test.
4.2.4 Daily Check
Daily Check is an optional setting and can be set to occur after power on/restart, or at a predefined time
set in the configuration.
The Connect button will flash blue to indicate that it should be pressed to send a ‘Daily Check’ report to
monitoring. Press the Connect button and SEVEN will announce, “Sending your Daily Check”. The blue
flashing will be cleared once the button has been pressed.
SPECIALISTS IN DIGITAL TELECARE
9
chiptech.co.nz
If Daily Check is always enabled, the Connect button will not turn blue, but can be pressed at any time
to send a report to monitoring as often as needed.
Daily Check will not require an operator’s response, but the lack of the Daily Check report can generate
an alert to contact the end user, to check that they are ok.
4.2.5 Cloud Connection
Press the Connect button three times to perform an immediate Cloud connection. This enables a
scheduled action in SmartCare Cloud, such as an update or a log retrieval to occur immediately (rather
than waiting for an automatic Cloud connection to occur).
4.3 Info
INFO
Press the Info button to hear the voice notifications. Messages can include a request to test your
personal help button, a reminder, or an event notification. Some messages will play immediately and
repeat, some will only play when the Info button is pressed.
•If light is solid green, there are no messages.
•If it flashes green this indicates that a Low priority message is waiting to be played.
Flashes orange to request that a task be performed. Press to hear the request.
Flashes red when there is a Critical warning message for, e.g. evacuation notices or emergency
events.
Flashes blue when a ‘Pendant Test’ is required.
No light –base unit is off.
INSTALLER
INFO
4.3.1 Info Messages
Messages are categorised into Low Priority, friendly messages (green flashing), Action Request (orange
flashing) if the user needs to perform a task, Critical Warning (red flashing), and a request to Test the
System (Blue flashing).
4.3.2 Radio Frequency (RF) Functions
4.3.2.1 RF Learn
Press the Info button three (3) times to enter RF Learn Mode. A voice message will play “RF Learn,
please activate all your RF devices”, and the Info button will be solid red. See Section 9.1 for more
details.
4.3.2.2 RF Test
Press and hold the Info button for three (3) seconds to enter RF Test Mode. SEVEN will play “There are
no messages”, beep, and then play “RF test, please activate all your RF devices, or press cancel to
finish.” The Info light will be solid blue while in RF Test. See Section 10 for more details.
NOTE: An emergency alert can still be sent during RF Test or RF Learn by pressing the Help button.
NOTE: Unlike previous base units from Chiptech, SEVEN does not indicate ‘RF Device Low Battery’to
the end user. This report is sent to monitoring.

DESIGN | MANUFACTURE | SUPPORT
10
4.4 Cancel
CANCEL
Press to cancel any operation, including voice notifications, and to cancel an alert during the pre-alarm.
The Cancel button will illuminate solid orange when an activity (such as pre-alarm) can be
cancelled or when reminders and messages can be cleared.
Reminders and messages can be cleared by pressing the Cancel button while they are playing.
The Cancel button is also used to enable and disable the ‘Away Function’ by holding it during
normal operation. Flashes left to right when the ‘Away Function’ is enabled.
No light –normal operation.
INSTALLER
INFO
The Cancel button will light up when an operation can be cancelled. If the Cancel button does
not have any lights showing, this indicates that it cannot be used to cancel a current function.
The Cancel button behaves differently when using Installer Mode. In the Installer Setup menu,
press the Cancel button to move to the next setting option.
NOTE: The Cancel button cannot be used to exit the Installer Setup. To exit, press the Power
Button, or leave to time out after two minutes.
4.5 Help
HELP
Press the Help button to send an emergency alert to monitoring. The lights under the Help
button will rotate while the alert is in progress.
The Help button is subtly backlit with four LED lights during normal operation, so it can be easily
located in the dark.
The lights on the Help button display the cellular signal strength on SEVEN during various
operations, such as when the Connect button is pressed. The number of lights showing indicates
the cellular signal strength from the current location. The lights displayed are accompanied by a
voice announcement. See Section 13, for more information.
During normal operation, the lights on the Help button DO NOT display signal strength, but are
subtly lit to make the Help button visible in the dark.

SPECIALISTS IN DIGITAL TELECARE
11
chiptech.co.nz
4.6 Button Combinations
CONNECT and INFO = Base Unit Details
+
Press and hold the Connect and Info buttons at the same time, for three (3) seconds. SEVEN will announce
the configuration version (typically this is ‘standard’), and then announce the account number (CSID) that is
assigned to the base unit so it can be uniquely identified.
CONNECT and INFO and CANCEL = Installer Setup
++
To access the Installer Setup, press and hold the Connect, Info, and Cancel buttons at the same time, for
three (3) seconds.
SEVEN will announce, “Installer Setup” followed by the first option in the menu. The Installer Menu options
available are determined by the configuration file applied to SEVEN. These options have been preselected by
your organisation, so some Installer Menu options may not be available to select. See Section 8, Installer
Setup Menu, for more information.

DESIGN | MANUFACTURE | SUPPORT
12
5Personal Help Button Overview
5.1 Pearl
•Pearl has a large button surface area to make it easy to press in an
emergency and is recessed to reduce false activations.
•Bi-directional communication with the base unit (transceiver).
•A light ring around the outer edge of Pearl will flash red to let a user
know that their alert has been received by the base unit, and will be
sent to monitoring.
•Range testing for installers is made easy with the light ring confirming
communication with a base unit.
•Pearl is hot waterproof and can be worn in the bath or shower.
•Pearl has excellent range to a base unit, with 300m+ being typical in
open air.
•The use of quality components and rigorous testing ensures each Pearl
will work when needed.
•Pearl self-tests to the base unit. This signal is logged and tracked. A
report will be sent if a Pearl stops working.
•Typical life of a Pearl battery is five years.
•Pearl reports when the battery capacity has reduced to 20%, providing
ample time to organise a replacement.
5.2 Pearl Advanced
Pearl Advanced is a smart, easy to wear transceiver with fall detection technology. When a fall is detected Pearl
Advanced communicates bi-directionally with SEVEN which then sends an alert to the monitoring centre, summoning
help for the user.
•Pearl Advanced has an elegant, discrete casing that is hot waterproof and can be worn in
the bath or shower.
•Pearl Advanced automatically detects a fall and sends a fall alert when help is needed.
•Pearl Advanced is designed to detect a significant fall from standing, and subsequent
impact. Chiptech recognises that people fall in different ways and it is possible some types
of falls will not be detected. The help button on Pearl Advanced can always be pressed to
summon assistance.
•Pearl Advanced has a comprehensive six stage algorithm. When a significant fall and impact is detected by Pearl
Advanced, the pendant looks for movement. If none is found, then it sounds warning beeps for ten seconds, to
signify it is about to send an alert for help to the monitoring centre. During this pre-alarm sequence, the Pearl
Advanced unique ‘Shake to Cancel’ feature can be utilised to stop an alert from being sent to the base unit.
Shaking the pendant quickly from side to side cancels an alert, so false activations are minimised.
•When the alert has been received by an operator, they can call back and speak to the user through the automatic
speakerphone on the base unit, and organise assistance if required.
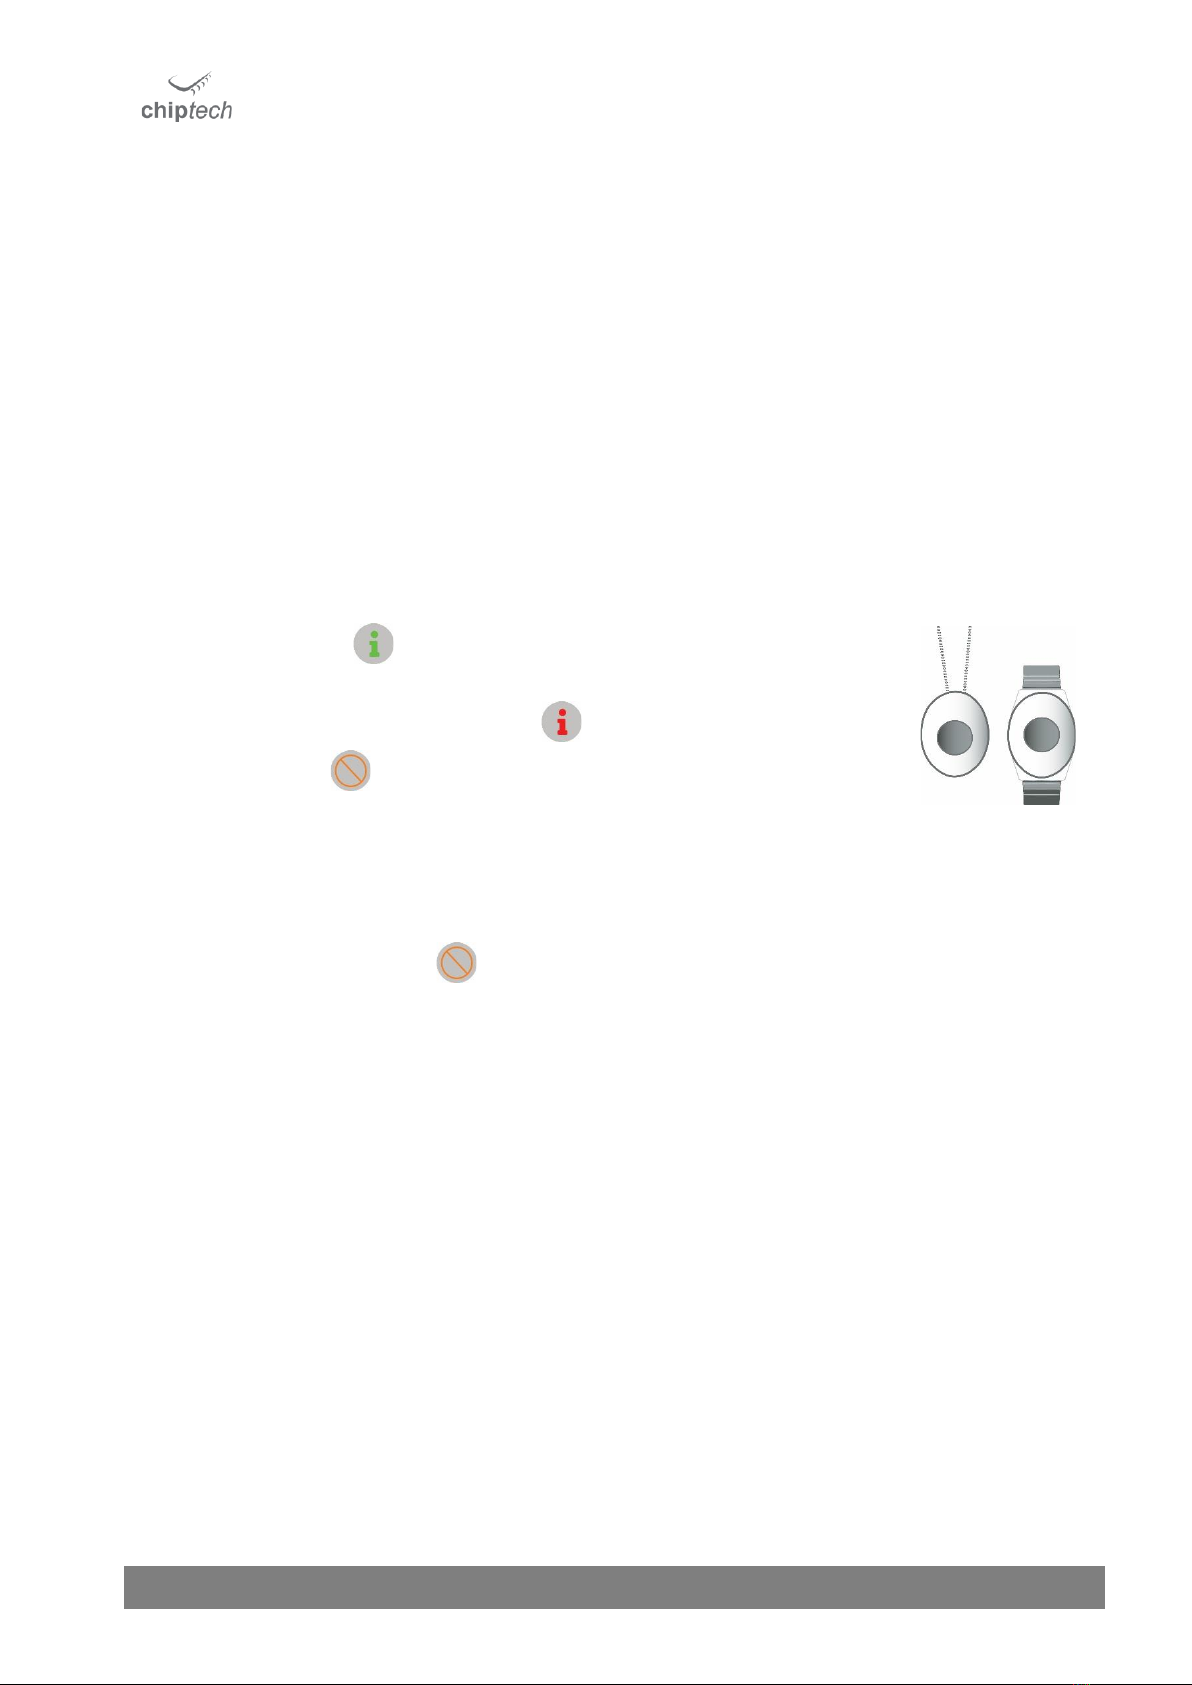
Pearl Pendant
Pearl Wristwatch
Pearl Brooch
Pearl with Easy Press
Sleeve / Wall Mount
Option
Ways to Wear and Use
Pearl

SPECIALISTS IN DIGITAL TELECARE
13
chiptech.co.nz
5.3 Pearl Attachment Kit
The attachment pieces can be supplied separately, and are fitted to a Pearl Watch to make the adaptations.
A full Pearl Attachment Kit is available and includes:
Easy Press Sleeve
Belt Clip Attachment
Pendant Attachment
Stainless steel chain and watch pins
(Please note: The kit does not include a Pearl Watch).
5.4 Chiptech GO mPERS Device
GO is a mobile personal emergency response system (mPERS) with cellular and global
positioning system (GPS) technology that can be used at home or away. When activated (by
pressing both buttons together), it sends an alert followed by GPS location data to the
monitoring centre. Voice messages and coloured lighting around the outer edge of GO keep
the user informed as their alert for help is being sent. They can speak to an operator over
the handsfree speakerphone.
GO can be paired with a SEVEN base unit, utilising the same Pearl bi-directional RF
technology. If an alert is sent when GO is in range of the base unit, it will report to the
monitoring centre that the user is ‘home’, so they can be quickly located. The operator can
speak to the user over the GO speakerphone.
5.4.1 Reporting Redundancy
When learned into SEVEN, GO will always send an alert using its own cellular system
first. In the unlikely event that GO cannot communicate with the monitoring centre
(typically because of a lack of cellular coverage), then GO will hand over the control
to the base unit when within range. The SEVEN will pre-alarm and follow its
standard reporting process. The GO speakerphone system will stay active in case it
can be contacted when the cellular connection restores.

DESIGN | MANUFACTURE | SUPPORT
14
6Installation Considerations
There are a number of factors that need to be considered during a SEVEN install to ensure the best possible
positioning of the base unit.
6.1.1 Find a central location that is frequently used, and visible:
•Install SEVEN in an accessible position, at waist height is ideal.
•A central location within the premises will generally have the best RF range to personal help devices.
•A frequently used location means the user is more likely to be within audio range and experience better
audio quality when voice contact is made over the speakerphone system in an emergency. This also makes
it easier for the user to be informed of any issues with their system.
•Do not install SEVEN in a position where it can be knocked into a volume of liquid, or in a location where
liquid can spill on it.
6.1.2 Make sure connectivity is easy:
•Wall outlets for the power and Ethernet (if applicable) need to be within a convenient distance so that no
additional cords are needed. The cords must be tidy and out of the way so they are not a trip hazard.
•SEVEN must be installed in a location that has “Good”to “Excellent" cellular coverage.
6.1.3 Radio frequency considerations:
•Avoid positioning SEVEN within 100cm of electronic devices that may affect the range or audio quality.
•Avoid devices such as computers, televisions, touch lamps, old cordless phones.
•Also avoid placing SEVEN next to large metal objects, e.g. a water cylinder, microwave, or fridge.
•Remember to use the ‘line of sight’ rule when installing. Positioning SEVEN near a window can increase the
range to personal help buttons if they are being used outside.
•RF interference can be caused by large transmitting equipment such as a cell phone tower within close
proximity. This can affect the range between SEVEN and the personal help device.
•To increase installation options, SEVEN can be wall mounted by utilising the screw slots on the base unit.
•The construction of the house can affect the range between RF devices and SEVEN. For example, buildings
with concrete or metal-based walls will tend to reduce range. Foil insulation and metal garage doors can
also affect the range. To improve RF range, move the base unit away from the corner of rooms and ensure
thorough range testing is conducted.
6.1.4 Likely to fall?
•If a user has previously had falls or turns, consider providing a fall detector. Ensure that the range testing
includes places that they reportedly had previous falls, e.g. outside in the garden, or in the bathroom.
PACEMAKER WARNING –The SEVEN base unit utilises both low power RF and cellular technology,
therefore it is recommended that a base unit be installed a minimum distance of 30cms away from a
pacemaker. For example, install the base unit 30cm or more away from a bed or a favourite chair
where the person will be spending much of their time.

SPECIALISTS IN DIGITAL TELECARE
15
chiptech.co.nz
7Installing SEVEN
When installing SEVEN follow all steps starting from Step 1.
Step 1
Choose an installation location near a power outlet and Ethernet connection
(if applicable).
A central location at waist height is ideal.
Step 2
Remove SEVEN, the Pearl personal help button, plug pack and user guide from
the packaging.
The Ethernet cable is not supplied as standard by Chiptech, but can be
purchased as a separate item where required.
NOTE: It is not recommended to start SEVEN on battery, as it may send a
‘Mains Power Failure’ or ‘Base Unit Low Battery’ report to monitoring,
depending on the configuration settings applied and the state of the
battery.
Step 3
If you are NOT installing SEVEN with an Ethernet cable, skip this step and go to
Step 4.
If you are installing SEVEN so it can send reports over the Internet, push the
Ethernet cable through the cable hole at the back of SEVEN, as depicted, and
into the Ethernet socket marked in the base of the cable cavity. Push the cable
from outside SEVEN until you hear it click.
The clip for the Ethernet cable will be visible when inserting it into the socket on
SEVEN. (This is how you can check the cable connection is the correct
orientation and enables you to unclip the cable later.) Plug the other end of the
Ethernet cable into an unused DATA port on the modem/router outlet, or
connect into the outlet at the wall, and go to Step 4.
Step 4
Push the blue power cable through the cable hole on the back of SEVEN. Insert
the blue connector into the power socket marked 9V DC in the cable cavity on
the underside of SEVEN.
Connect the plug pack into the power outlet at the wall. Switch on power.
SEVEN will automatically start when the power is supplied.
SEVEN will play a welcome message. The Power and Info button will
be solid green.
The Connect button will be solid orange while it is connecting to the
network.
DESIGN | MANUFACTURE | SUPPORT
16
Step 5
Once connected to the cellular network and all the enabled communication
pathways, the Connect button will be solid green.
•When utilising a single SIM card it should take approximately 15-30
seconds to achieve a cellular connection with the local towers, and you
should NOT continue until this light is green.
•When two SIM cards are enabled it should take approximately 1-2
minutes to achieve a cellular connection with the local towers, and you
should NOT continue until this light is green.
When the Connect button is green press it to hear the connection status. You
need to install the base unit in a location where the cellular connection is either
“Excellent” or “Good.”
You may need to move the SEVEN base unit to another location in the house
to get better signal strength.
When two SIMs are enabled and the Connect button doesn’t turn green
after 1 –2 minutes, press it to confirm which pathway is unavailable. If you are
unable to get an “Excellent” or “Good” connection on both Cellular A and B, you
will need to adjust the unit’s configuration to single SIM only.
(See Section 14.1).
Step 6
The Pearl personal help button supplied in the box will already be learned into
SEVEN. If you do not need to learn in any additional RF devices then proceed to
Step 7.
If you need to learn in other personal help buttons, GO, or RF devices, please
follow the quick guide below. For the full instructions, see Section 9.
•Press the Info button three (3) times.
•SEVEN will beep and play the message, “RF Learn. Please activate all your RF
devices.”
While in the RF Learn mode the Info button will be solid red.
•Press each of the RF devices that you want to learn in (Pearl, SID, and GO).
•SEVEN will announce when a device has been successfully learned into the
base unit, as well as its allocated zone number.
e.g. “One RF Learned, Zone 1.”
•Press the orange Cancel button to exit or it will time out after two
minutes*.
oIf a device has been learned, SEVEN will play “RF devices saved.”
oIf no changes have been made, SEVEN will play “RF devices
restored.”
oRange is reduced while in RF Learn mode.
oAfter exiting, the lights under the Info button will return to green,
or blue if a message is pending and the Cancel button will not
display a light.
SPECIALISTS IN DIGITAL TELECARE
17
chiptech.co.nz
Step 7
•Perform an RF Test by pressing and holding the Info button for
three (3) seconds. SEVEN will play the voice message, “There are no
messages”, and then will sound a beep.
•SEVEN will then announce “RF Test, please activate all your RF devices,
or press Cancel to finish.” (Voice message will repeat until this is done.)
•While in the RF Test mode the Info button will be solid blue.
•The Cancel button light also turns on to indicate you can press it
to exit this mode. Alternatively, the RF Test mode will time out after
ten (10)* minutes.
•Range test all the RF devices.
•Fixed RF devices should be tested from their location.
•Pearl personal help buttons should be tested from multiple locations
around the home and garden.
oCheck the Pearl outer edge flashes red after each button
press. See section 10.2.1
oRange testing with GO is more detailed, please refer to
Section 10.2.3
•When completed, press the Cancel button once to end the
process, SEVEN will announce “RF Test end.”
Step 8
If you only have a single communication pathway for connecting to monitoring
(i.e. one SIM card, no Ethernet), skip to Step 9.
If you have more than one communication pathway enabled (i.e. SIM A and SIM
B, or Ethernet and SIM A), then you will need to perform a Communication
Pathway Test to ensure all the Internet and Cellular connections are working as
expected.
To initiate a Communication Pathway Test, press and hold the Connect
button until SEVEN announces “Pathway test started.” The lights under the Help
button will rotate but there will be no pre-alarm.
Each unique pathway that has been enabled will be used to send a test report to
monitoring to confirm it works. As the test runs, SEVEN announces each of the
pathways that it is testing along with the “Success” or “Failure” result for each
test.
If you hear “Fail” after a pathway is tested, you will need to take note of the
communication pathway that failed, and the number of the slot position. Refer
to Section 18.3, Communication Pathway Test Fail.
You can perform the Communication Pathway Test multiple times.
To exit at any stage, press the Cancel button.

DESIGN | MANUFACTURE | SUPPORT
18
Step 9
Always send a test call to demonstrate to the customer what will happen
when they send an alert for help. Please emphasise that there are always
people in the monitoring centre ready to receive calls for help, and the user
should press their button as soon as they need assistance.
•Make sure the customer is wearing their personal help button.
•Explain what will happen when they press their button in an emergency
situation.
•To start a request for help, ask them to press their personal help button
while counting to three.
•Show them the flashing lights around the outer edge of the personal help
button.
•Explain how to stop an emergency activation being sent by pressing the
Cancel button on SEVEN during the pre-alarm period.
•Ask them to listen to the voice messages, and point out the
flashing Help button while SEVEN is connecting to monitoring.
•Wait for the operator to phone back and let the speakerphone pick up so
the customer can hear the operator speak. Have the customer introduce
themselves, to practise using the speakerphone system.
•Let the operator disconnect the test call, and wait for SEVEN to hang up.
Multiple Report Lockout for Individual Devices:
If you need to send multiple activations, please be aware that SEVEN features
report lockout. This means if you press the same personal help button within
two (2) minutes* of the first activation, it will not send another alert to the
monitoring centre. This is designed to stop multiple alerts being sent to the
monitoring centre.
To send additional alerts you can either restart SEVEN by following
steps in Section 4.1.3, activate another personal help button that
is being used, or press the Help button on SEVEN.
Step 10
Place supplied customer User Guide under SEVEN for easy reference.

SPECIALISTS IN DIGITAL TELECARE
19
chiptech.co.nz
8Installer Setup Menu
Press and hold the Connect, Info, and Cancel buttons (at the same time) for three seconds, to access the Installer
Setup.
++
SEVEN will beep three times and announce “Installer Setup”, followed by the first option in the menu that you have
the option of changing. The installer setup options available are determined by the configuration file applied to
SEVEN. The options have been preselected by your organisation, so some may not be available to change.
•The Help button will be lit which indicates that it can be pressed to change a setting.
(The value is saved each time it is changed.)
•The voice message with the current value applied will repeat if left for ten (10)* seconds.
•Any volume setting voice announcement will be followed by a beep to indicate the volume level.
•Press the Cancel button to move to the next setting in the menu.
•To exit, press the Power button.
If left, the Installer Setup Menu will timeout after two (2) minutes.
8.1 Installer Setup Options:
Depending on the configuration file applied to SEVEN, some of these settings may not be included in the Installer
Setup Menu. Volume level is not spoken, beep indicates audio level.
Note: The Installer Setup Menu options are designed to be used during installation to make customer specific changes
to SEVEN. Additional changes to SEVEN operation can be made remotely through the Chiptech Wizard software.
INSTALLER SETUP MENU
Notification Volume
Disabled
Level 1
Level 2
Level 3
Level 4
General Volume
Disabled
Level 1
Level 2
Level 3
Level 4
Ring Volume
Disabled
Level 1
Level 2
Level 3
Level 4
Pre-alarm Volume
N/A
Level 1
Level 2
Level 3
Level 4
Cellular Pathway
Disabled
A
B
A and B
Internet Pathway
Disabled
Wi-Fi
Ethernet
Wi-Fi and Ethernet
RF Device Testing
Disabled
30 days
60 days
90 days
180 days
Unit Testing
Disabled
Daily
7 days
30 days
Clear All RF Devices (see below)
No
Yes
DESIGN | MANUFACTURE | SUPPORT
20
8.2 ‘Clear All RF Devices’ Details
This is a new feature for Chiptech base units.
When “Yes”is selected and the installer moves to the next option OR exits the Installer Setup, then SEVEN will
announce “RF devices cleared. Enter learn mode to add devices”. SEVEN will clear the Device List of all the RF Devices
that have been previously learned in. No RF device will be able to activate SEVEN.
An installer can swap back and forth between “Yes”and “No’ without clearing All RF Devices, only moving to the next
option or exiting will Clear All RF Devices.
9RF Learn
Chiptech RF devices include personal help button transceivers such as Pearl pendant, Pearl watch, Pearl Advanced
with fall detection, and Chiptech GO. These should be worn at all times and can be worn in the bath or shower. Other
Chiptech transceivers include, SID fitted with third party environmental monitoring products, and fixed position help
buttons.
9.1 Learn or Replace an RF Device
•Press the Info button three (3) times.
•SEVEN will beep and play the message, “RF Learn. Please activate all your RF devices.”
•While in the RF Learn mode, the Info button will be solid red.
•The Cancel button light also turns on to indicate how to exit the RF Learn mode.
Alternatively, the RF Learn mode will time out after two (2) minutes*.
•Press each of the RF devices that you want to learn in (Pearl, SID, and GO).
•SEVEN will announce when a device has been successfully learned into the base unit, as well as its allocated zone
number i.e. “One RF Learned, Zone 1.”
•Your organisation may require you to note down and supply the zone location of each device.
•Press the orange Cancel button to exit. If a device has been learned, SEVEN will play “RF Devices Saved.” If
no changes have been made, SEVEN will play “RF Devices Restored.” Info button light will return to green.
•If there is no space to learn another RF device or the RF device has a low battery, then SEVEN will announce
“There is a problem learning this RF Device.”
NOTE: There is reduced range in SEVEN when in RF Learn mode, and this reverts to maximum once back in standard
mode.
9.2 Active/Inactive RF Devices
•When an RF device is learned into SEVEN it becomes active, which means it is continually being tracked by the
base unit. It will ‘fail to test’ if out of range or not working.
•If only one RF device is learned in, then it is the only active device, and any other devices previously learned into
that base unit are now INACTIVE. (Inactive devices are not checked by the SEVEN base unit).
•When you want to learn in two or more RF devices, then they all need to be done in one learn session. All the
devices learned in during this one session will be active, all others will remain inactive.
•There are 16 slots to learn pendants. When these are full the oldest inactive pendant is deleted, allowing more
pendants to be learned in.
•Pressing the button on an inactive pendant at any time will make it active again.
This manual suits for next models
1
Table of contents
Other Chiptech Personal Care Product manuals


Popular Personal Care Product manuals by other brands

Waterpik
Waterpik WP-100 Series instructions

Philips
Philips HeartStart Home owner's manual

Sencor
Sencor NAC-3001DF user manual

TENA
TENA SmartCare Change Indicator Instructions for use

EMP
EMP NEW TherapyZone Multi-Positioning Tower Assembly instructions

Luminess Air
Luminess Air EVERYDAY Getting started guide


ergoline
ergoline BALANCE 700 HYBRID PERFORMANCE operating instructions

Anzzi
Anzzi BA-LMDFX013AL Installation & operation manual

Balance
Balance KH 8070 operating instructions

Nuga
Nuga T9 user manual

Princess Nail Studio
Princess Nail Studio NS225-2F86 instruction manual

Vulpes Electronics
Vulpes Electronics Vulpini Welcome guide