Chiptech GO User manual
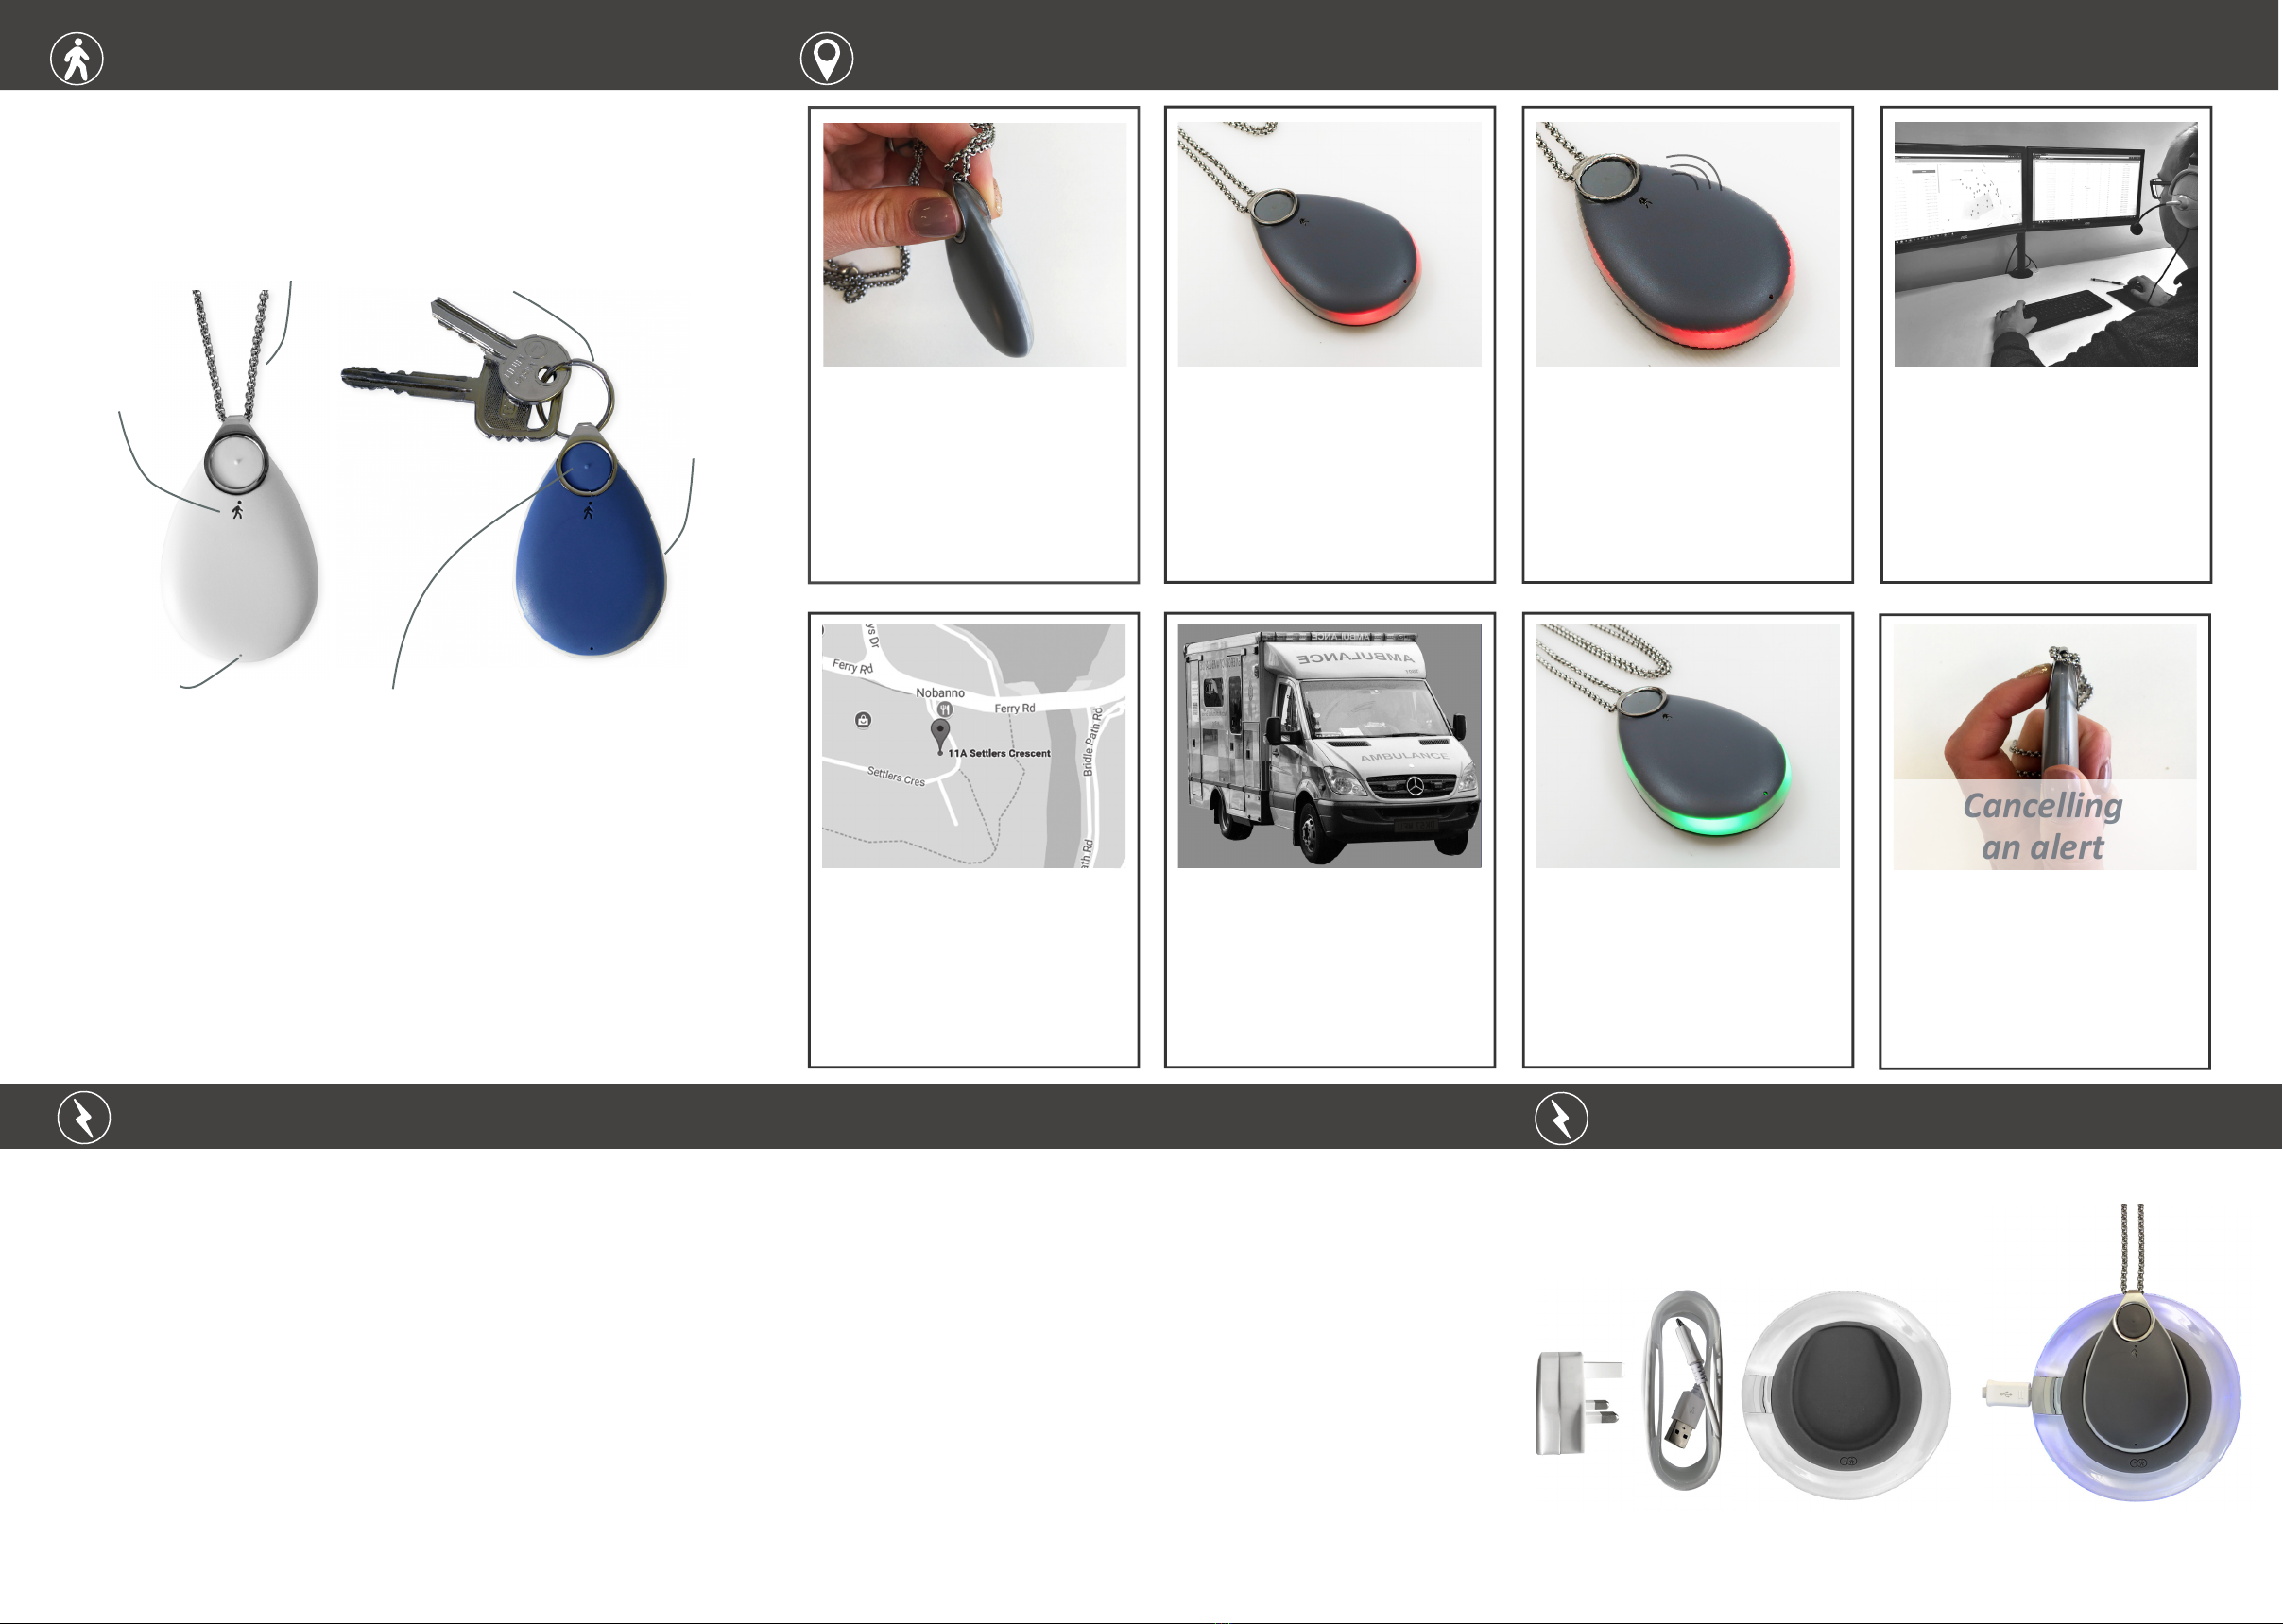
During the pre-alarm sequence you can
press and hold one buon on Chiptech
GO to cancel your request for help.
Chiptech GO will announce: “Cancelled.”
If the alarm has proceeded to the Alarm
Receiving Centre, simply speak to the
operator and let them know you do not
require assistance.
Overview Requesng Help
To send an alert for help, any me of the
day or night, press and hold both buons
at the same me on your Chiptech GO.
This will start the short pre-alarm
sequence with a disnct tone and
vibraon.
The light-ring around Chiptech GO will
ash red to let you know an alert is being
sent to the Alarm Receiving Centre (ARC).
A voice message will play, “Help alert in
progress.”
Once the alarm has been received, a voice
message will play and repeat: “The alert
has been received by monitoring; you will
soon be contacted by an operator.”
An ARC operator will call back;
Chiptech GO will ring and automacally
answer. Chiptech GO has a hands-free
speakerphone system; speak clearly and
slowly to the operator.
While you are speaking with an operator,
Chiptech GO will work in the background
to obtain your current locaon and send
it to the ARC.
Once you have been located, the
operator will send assistance, or organise
emergency services if required, to your
locaon.
When an operator ends the call Chiptech
GO will ash green to indicate that the
ARC can sll call back, and your locaon
connues to be sent.
Chiptech GO automacally stops
reporng your locaon aer
a period of me, the green lights
will no longer appear.
Cancelling
an alert
67
34
5
1 2
Chiptech GO is a wearable device with 3G cellular and GPS technology. When acvated
it sends an alert along with your GPS locaon data to the Alarm Receiving Centre (ARC).
You will be able to talk with the operator over the speakerphone, and they will organise
assistance if required.
1. Connect the plug pack and supplied cable to the charging base, plug into power.
2. Place your device on the wireless charger. Be sure to check that the ‘walking person’
symbol faces upwards; the charger and Chiptech GO will illuminate blue to indicate
that charging has started.
3. Charging duraon is approximately three to ve hours from low baery.
4. When Chiptech GO is charged its light ring will illuminate green. If Chiptech
GO has automacally updated during charging, it will ash white and if setup to do so,
it will announce: “Update completed,” when removed from the charger.
5. To use your device at any me, simply remove it from the wireless charger.
Please Note: You will need to perform a System Check at the locaon of your charger to ensure
Chiptech GO has coverage for any automac updates.
Chiptech GO will need a charge approximately every month with regular use, however, it
will inform you when it needs to be placed on the charger. Chiptech GO will also need to be
charged if you have recently sent an alert for help, as this event uses more baery power.
Charging and Baery Nocaons
Speaker
Split ring
• Requesng Help: press and hold both buons.
• System Check: press and hold one buon.
• Cancel: press and hold one buon.
Wearing Chiptech GO with a Pacemaker:
If you have a pacemaker you cannot wear Chiptech GO as a pendant. Instead, aach Chiptech
GO to the supplied split ring, which can be aached to a belt clip or keys. Chiptech GO must be
kept at a minimum distance of 25cm from your pacemaker at all mes.
If you have a Chiptech Base Unit at Home:
When you send an alert, and Chiptech GO is in range of your base unit, it will report that you are
‘Home’ to the ARC so they quickly know where you are located. Once the ARC has received your
alert, they will speak with you over Chiptech GO’s speakerphone system, no maer where you
are on the property. In the unlikely event that Chiptech GO cannot communicate with the ARC,
the base unit will take over and try to send the alert for help.
Stainless steel
Hypoallergenic chain
Microphone
Light ring
illuminates
around
Chiptech GO
Important Charging Notes:
• If you have a pacemaker, you should be sure to keep the wireless charger and
Chiptech GO at least 25cm away from your pacemaker during charging.
• Place the charger on a at surface and please make sure all parts of the charger are
properly connected before use.
• Do not use the charger if any parts of the charging system are damaged.
• Do not place anything metal on top of the charger.
• Do not cover the charger with any material, including the chain.
• Do not place the charger in direct sunlight, recommended charging temperature
between 10°C to 35°C.
• During charging Chiptech GO can become warm to the touch.
Low Baery Nocaons:
• When your baery is low, Chiptech GO will periodically play the following voice
message: “Low baery, please place me on the charger today,” and will ash orange.
• When your baery is crically low, Chiptech GO will periodically play the following
voice message: “Crically low baery, please place me on the charger immediately.
An alert may fail,” and will ash red.
• Automated voice messages will only play during day me hours.
Charging Cord Charger
Plug Pack
Charging Components
Blue when charging

Flight Mode & Lost Mode
Oh, the places you will GO!
Whether you are heading to the shops, walking through the park or going to
visit friends, Chiptech GO has your safety covered every step of the way.
Chiptech GO encourages you to have more independence in your day to day
acvies, either at home or when you are out and about. You can be condent
knowing that help is at your ngerps.
System Check
Standards
EN 55032
EN 50130-4
EN 301489 (-1,-3-19,-52)
EN 301908-1
EN 300220-3-1
EN 62209-2
EN 60950-1
EN 60529 (IP67 compliant).
Important Notes
Charging Chiptech GO:
The charging system is designed specically for Chiptech GO. Please do not change any
parts of the charging system and do not use the charger with any other devices.
Your Chiptech GO device may not funcon, or may stop funconing during an alert for
help, if it does not have sucient baery level.
Tesng:
To test Chiptech GO to ensure it is funconing as expected, send an alert (as described in
‘Requesng Help’). When the operator calls, let the operator know that you are tesng.
Cellular, GPS and RF Limitaons:
Chiptech GO requires access to a 3G cellular network to communicate, and the availability
of the GPS (Global Posioning System) satellite network to determine its locaon.
Chiptech GO may not funcon correctly, or at all, in any of the following situaons:
• Your Chiptech GO device will not be able to send an alert, or your locaon, if it is in an
area with no coverage from the 3G cellular network of the telecommunicaons provider
it has been set up with, or if there is a transmission failure.
• It will not work on any other cellular network.
• You cannot take Chiptech GO overseas as it will not work in any other country.
• GPS technology can be aected by certain atmospheric condions, radio interference,
buildings, or other forms of interference that can block Chiptech GO connecng to GPS
satellites. Your locaon informaon may not be available if the GPS satellites are
unavailable, or the GPS signal is blocked.
• Locaon informaon will also not be able to be displayed to your provider if the locaon
mapping service used by your provider is unavailable.
• Communicaon between Chiptech GO and a Chiptech base unit may be aected by
distance or radio frequency interference.
Disclaimer:
To the maximum extent permied by law, the manufacturer of Chiptech GO will not
be liable or responsible to you for any damage, loss or injury, you may suer or incur in
connecon with any failure of your Chiptech GO device due to incorrect usage, and usage
that is inconsistent with this guide, including a failure to follow the various warnings set out
in this guide.
If you have any quesons about the funcons of Chiptech GO, please
contact your service provider for more informaon.
• GO is designed to provide voice messages only during day me hours, so that you will not
be disturbed at night. If you send an alert for help during the night, Chiptech GO will operate
as per usual with the pre-alarm sequence and voice messages.
• If the baery is detected as being low at night it will ash orange. It will not vibrate or make
any sounds. Voice messages will resume in the morning.
• If your Chiptech GO beeps connually, this indicates it is not funconing as expected. Please
contact your provider immediately.
3G
Plug pack:
EN 60950.
Wireless Charger:
EN 55011
EN 60950
Qi Compliant.
GO-1 complies with the following standards:
Flight Mode: If you are going to be taking Chiptech GO on an aircra, you must enable Flight
Mode before takeo. To enable Flight Mode, press and hold one buon on either side of
Chiptech GO for 10 seconds, unl this voice message plays: “Flight Mode enabled. All funcons
suspended unl buon press or placed on a charger.” To disable Flight Mode press one buon
on either side of Chiptech GO (this will start a System Check), or place Chiptech GO on a
charger. If you require help, press and hold two buons to send an emergency alert, this will
override Flight Mode.
Lost Mode: Lost Mode sends GPS coordinates to the ARC when no movement has been
detected over a period of me, so it can be found. If lost, contact your provider to check
where your Chiptech GO is located.
Cleaning & Maintenance
• Your device can be cleaned with a damp cloth and a non-corrosive, non-abrasive cleaner.
• Please do not sck objects into either the microphone hole or speaker hole.
• Chiptech GO has a dust proof casing and is water resistant (rated IP67).
Voice Messages and Sounds
UK v1
The System Check informs you of the baery level, cellular coverage at your locaon, and
checks that you can obtain GPS coordinates to log your current locaon. Before going
out always check that your Chiptech GO has adequate baery. To do this, press a single
buon on either side of Chiptech GO, which will start the System Check. The baery level
is announced rst, and a voice message will tell you if it is excellent, good , low or crically
low (see 1. Baery). You can cancel the remaining System Check by pressing one buon on
either side of Chiptech GO. It will tell you it has been “Cancelled.”
You should perform a full System Check in places that you commonly visit to ensure that
the cellular coverage will be excellent or good, if you need to send an alert for help.
Performing a Full System Check:
Press one buon on either side of Chiptech GO. Please do not press both buons together,
as this will send a request for help. A chime will play and Chiptech GO will illuminate blue to
let you know that the System Check has started. It will announce baery level rst.
1. Baery: A voice message will play: “My baery is…” (then one of the following):
“Excellent”, “Good”, “Low baery; please place me on the charger today,” or, “Crically low
baery; please place me on the charger immediately. An alert may fail.” This will also be
accompanied by a status light.
2. Cellular Connecon: Chiptech GO will then announce; “Checking cellular connecon.”
Chiptech GO will check the cellular coverage of your locaon and will then announce;
“The connecon is...” (then one of the following): “Excellent”, “Good”, “Poor” or
“Unavailable.” If unavailable, Chiptech GO will return to normal operaon.
If Chiptech GO indicates that cellular coverage is poor or unavailable, and you send an
alert for help from that locaon, it may not be successful.
3. GPS Coordinates: Following a successful cellular check, and if congured to do so,
Chiptech GO will announce; “Finding your locaon.” When successful, a voice message
will announce; “Current locaon has been sent,” and Chiptech GO will return to normal
operaon. If GPS is unavailable in your locaon, Chiptech GO will announce; “Locaon check
unsuccessful.” Chiptech GO will automacally me out.
To cancel the System Check at any me, press and hold one of the buons on either side of
Chiptech GO. A voice message will play and the light ring will ash red to let you know that
this funcon has been “Cancelled.”
Excellent or good Poor Unavailable
Excellent or good Low Crically low
™
User Guide
Other manuals for GO
2
Other Chiptech Personal Care Product manuals


Popular Personal Care Product manuals by other brands

VANITY PLANET
VANITY PLANET Leda user guide

HoMedics
HoMedics FAC310AU Instruction manual and warranty information

Climax Technology
Climax Technology WTRQ Series quick start guide

AQUADERM
AQUADERM AD-300 AQUAFUSION user manual

Braun
Braun 5780 user manual

Anzzi
Anzzi BA-LMDFXBT005WH Install & Operation Manual

Croydex
Croydex HANG 'N' LOCK MADISON WC147369E manual

Methode Brigitte Kettner
Methode Brigitte Kettner Clarifying Brush manual

bort medical
bort medical X-Walker Achillo Instructions for use

Omron
Omron SoftTouch HV-F158-E instruction manual

Scarlett
Scarlett SC-952 instruction manual

ResMed
ResMed Swift LT-F user guide


