Chiptech GO User manual

GO Pendant™
Product Manual and Installation Process
Virtual Home Care are a digital telecare provider bringing the best of
breed products to assist with independent living.
Chiptech GO™is a market leading digital mPERS solution encouraging
user confidence and independence. Daily activities can be enjoyed
whether at home or out and about, knowing that safety is covered
every step of the way.
V 002
Table of Contents
Chiptech GO Overview 3
Requesting Help - Overview 6
Cancelling an Alert 7
System Check 7
Installing Chiptech GO 9
Sending a Request for Help (Detailed Process) 11
Global Position System Location Reports 13
Fall Detection and Reporting 15
Battery and Charging 16
Installer Mode 19
Cloud Connect 21
Additional Reports to Monitoring 23
Real Time Clock (RTC) 24
Automated Internal Safety Tests 24
Log File 25
Configuration File (Settings) 25
Voice File 25
Cleaning and Maintenance 25
RFID Tag 26
Estimated Data Usage 27
SIM Cards with a ‘Private Access Point Name’ (PAPN) 27
Troubleshooting 28
Frequently Asked Questions - FAQ 29
Chiptech GO Specifications 31
Disclaimer 32

Chiptech GO Overview
Chiptech GO is designed to give the user confidence and independence to go beyond the
boundaries of their home. Whether they are heading to the shops, walking through the
park, or going to visit friends; Chiptech GO has their safety covered every step of the way.
Chiptech GO is a wearable device with 3G cellular and GPS technology. When activated it sends an
alert along with the GPS location data to the Alarm Receiving Centre (ARC). The user will be able to
talk with the operator over the speakerphone, and assistance will be organised if required.
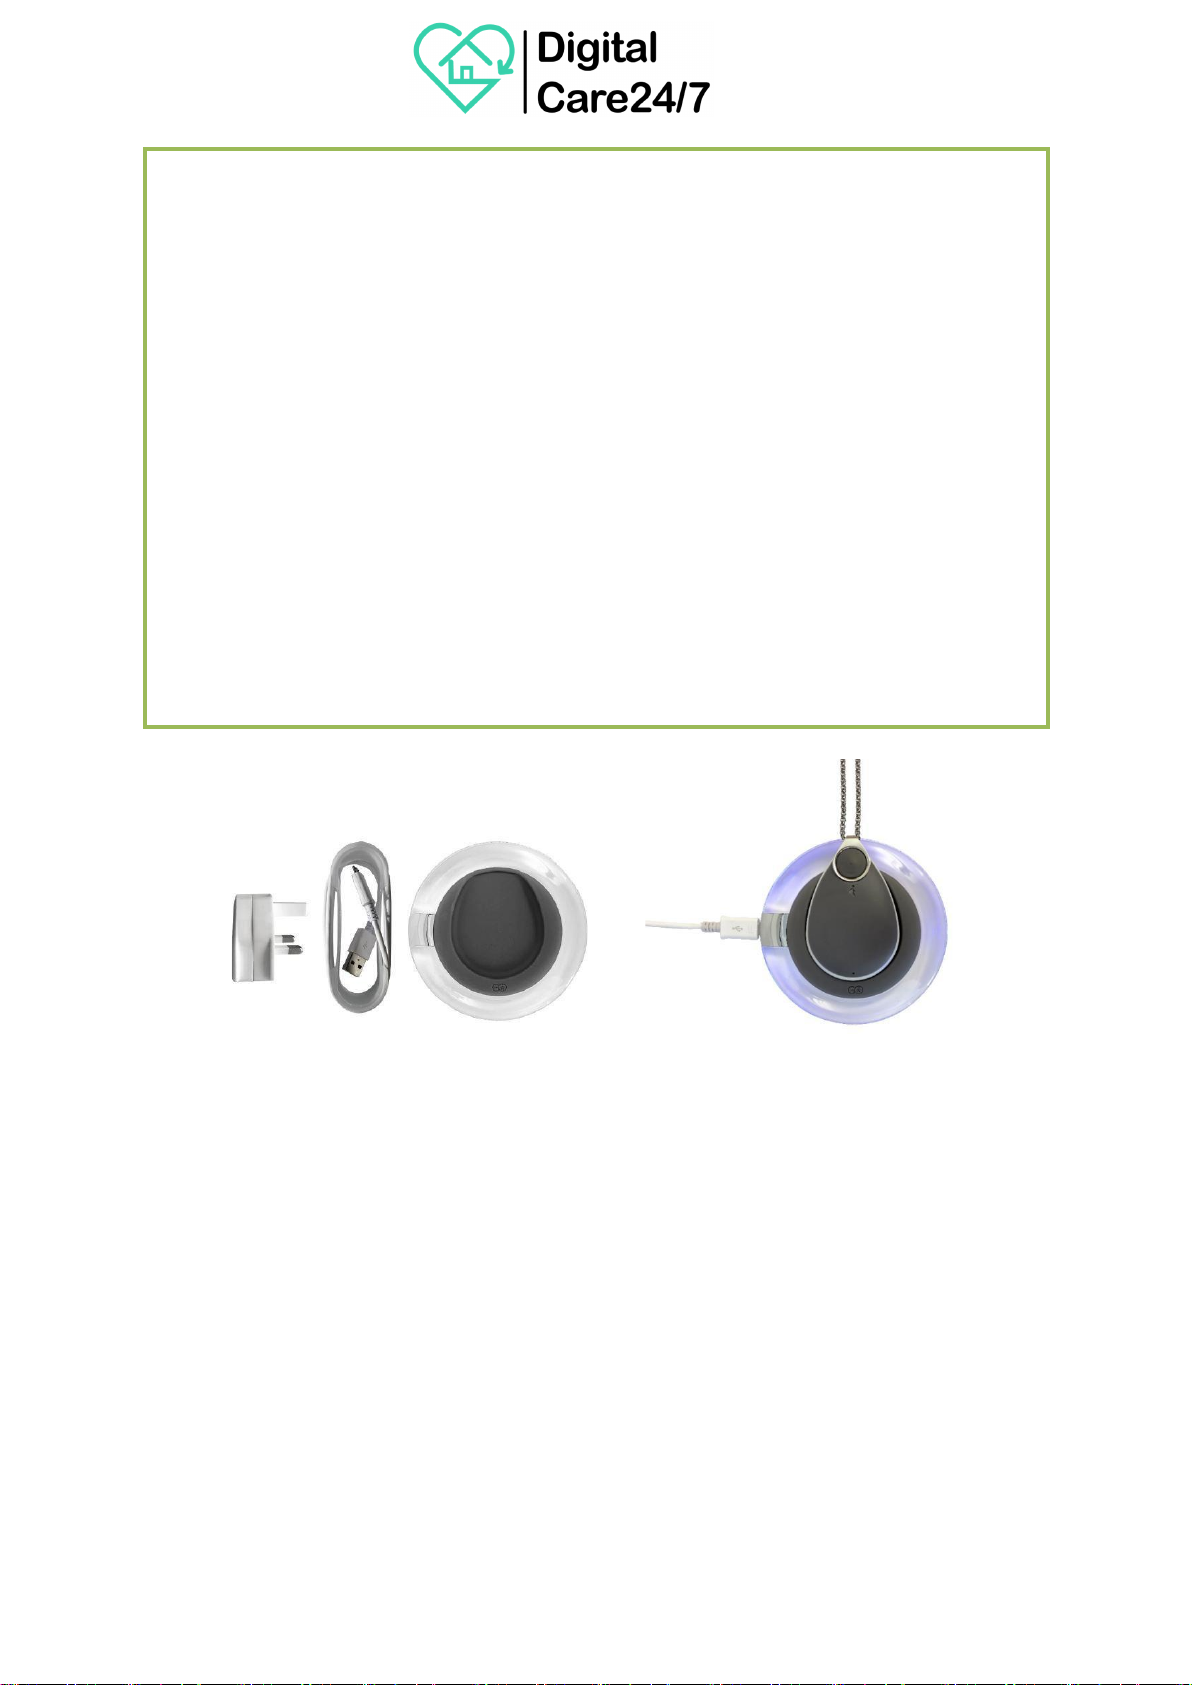
The Chiptech GO system is supplied with the following:
•A hypo-allergenic stainless steel chain so it can be worn as a pendant.
•A split ring which enables Chiptech GO to be attached to a key ring, belt clip or lanyard.
•QI compliant wireless charger, plug pack and cable.
•Chiptech GO has an internal RFID chip which stores information to identify the device.
•Chiptech GO is fitted with a nano SIM card and only works on the 3G cellular network it has
been set up with.
•A step-by-step user guide.
•Recyclable packaging.
Plug Pack Charging Cord Charger User Guide
1.1
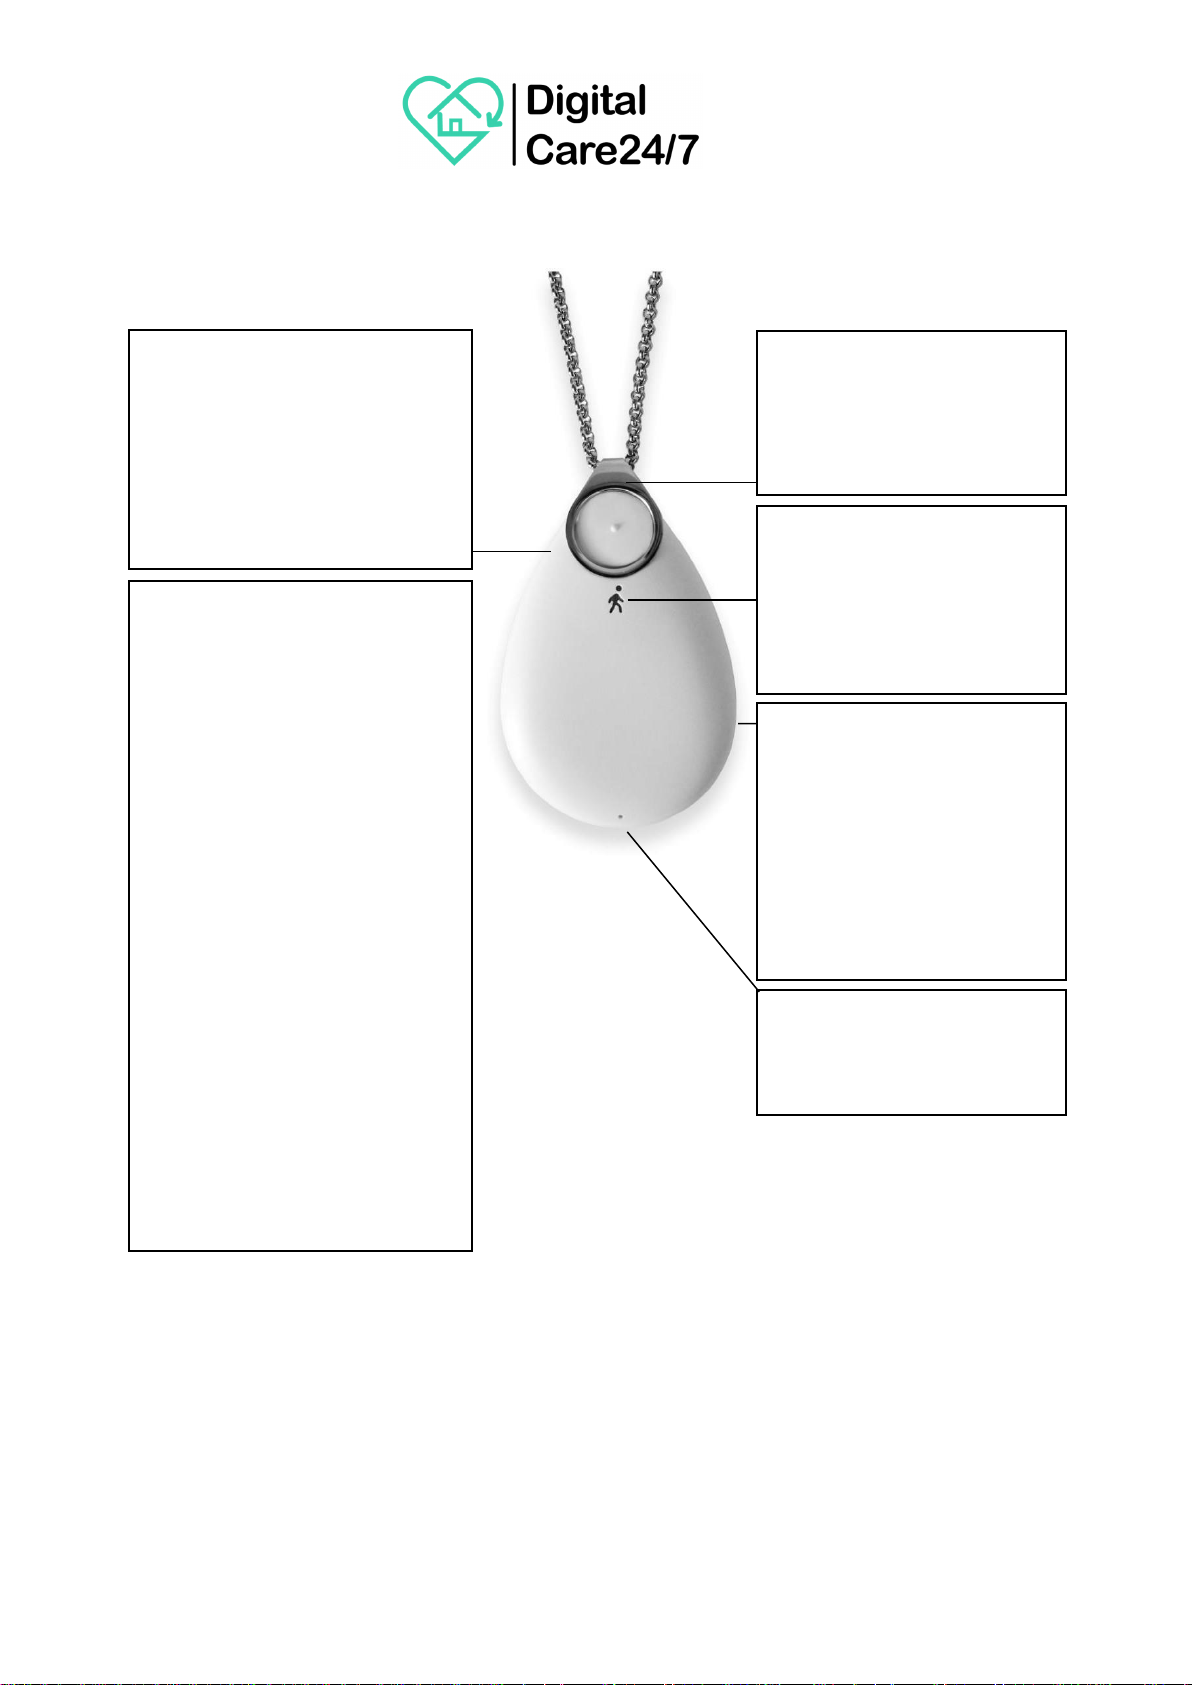
Key Functions
Light Ring
Colours will illuminate around
Chiptech GO to indicate status
when the buttons are pressed,
or it is placed on the charger.
Also illuminates during
automated low battery
notifications.
Speakerphone
This allows the ARC operator
to speak to the user, and for
voice messages to play.
Clip
This enables Chiptech GO to
be worn as a pendant or
attached to a key chain.
Dual Button Press –To send an
alert for help, press and hold both
buttons at the same time. A loud
pre-alarm will sound and voice
messages will announce the steps
being taken to send the alert.
Microphone
The user is able to speak to the
ARC operator.
Single Button Press
1. System Check –press and hold
one button on either side of
Chiptech GO to start a system
check. Lights will indicate status
and voice messages will announce
battery level, cellular connection,
and check if the current GPS
location can be obtained and sent.
2. Cancel –to cancel an activation
or System Check at any time, press
and hold one button on either side
of Chiptech GO until it announces,
“Cancelled.”
3. Flight Mode –press and hold
one button on either side of
Chiptech GO for ten seconds to
enable flight mode.

1.2
Attachment Methods
1.3
Voice Messages and Sounds
Chiptech GO is designed to provide its voice messages only during day time hours, so it is
not disturbing the user at night.
•If an alert for help is sent during the night, Chiptech GO will operate as per usual with the
pre-alarm sequence and voice messages.
•If the battery is detected as being low at night, it will flash orange and vibrate periodically,
but not make any sounds.
•If Chiptech GO beeps continually this indicates it is not functioning as expected, and the user
should contact the provider immediately.
Important Note:
Wearing Chiptech GO with a pacemaker - If the user has a pacemaker, they cannot wear
Chiptech GO as a pendant. Instead, attach Chiptech GO to the supplied split ring, which can be
attached to a belt clip or keys. Chiptech GO must be kept at a minimum distance of at least
25cm from their pacemaker at all times.
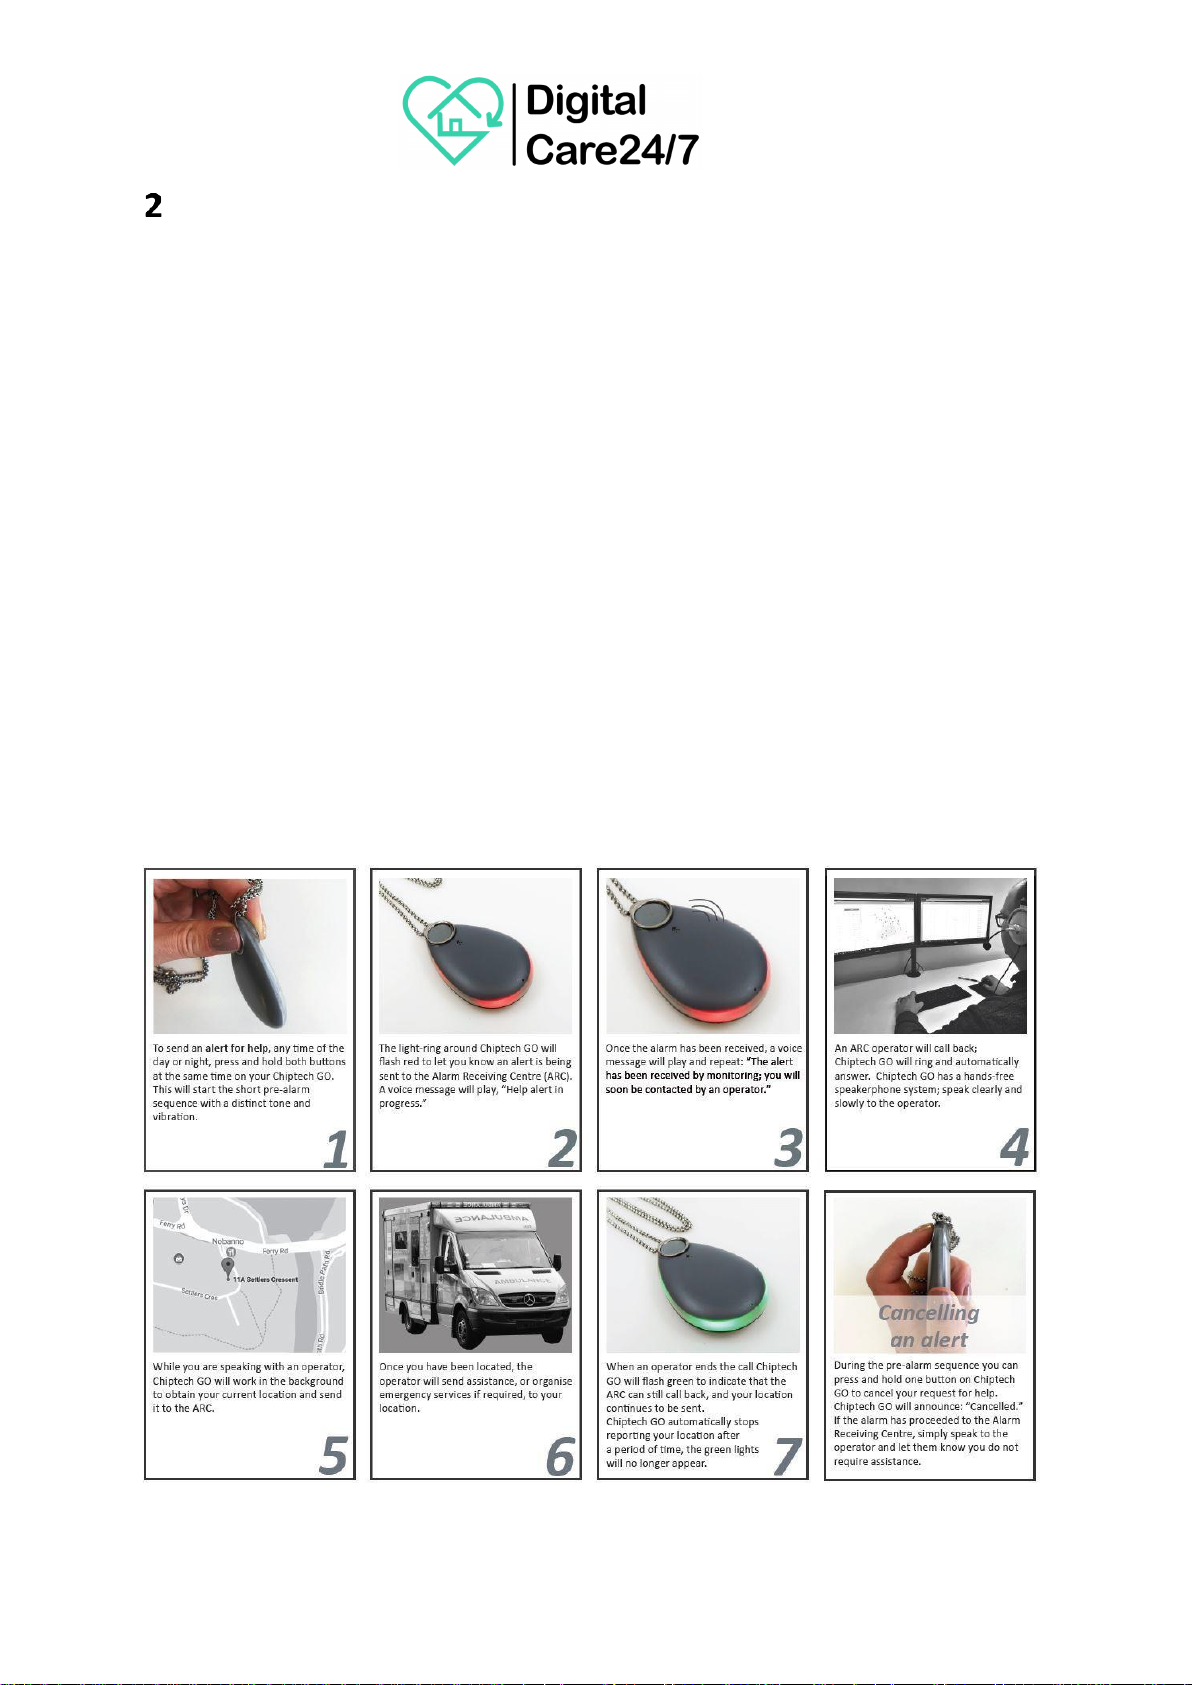
Requesting Help - Overview
Chiptech GO can send an emergency alert from anywhere there is adequate 3G cellular connection on
the telecommunications provider it is setup to operate on.
•To send an alert for help, any time of the day or night, press and hold both buttons at the
same time on Chiptech GO. This will start the short pre-alarmperiod.
•The light-ring around Chiptech GO will flash red to let the user know an alert is being sent to
the ARC. A voice message will play, “Help alert inprogress.”
•Once the alarm has been received, a voice message will play and repeat: “The alert has been
received by monitoring; you will soon be contacted by an operator.”
•An ARC operator will call back; Chiptech GO will ring and automatically answer. Chiptech GO
has a hands-free speakerphone system; speak clearly and slowly to the operator.
•While speaking with an operator, Chiptech GO will work in the background to obtain its
current location and send it to the ARC.
•Once Chiptech GO has been located, the operator will send assistance, or organise
emergency services if required to the location.
•When an operator ends the call Chiptech GO will flash green to indicate that the ARC can still
call back and the location continues to be sent. Chiptech GO automatically stops reporting
the location after a period of time.
Excerpt from Chiptech GO User Guide.
Cancelling an Alert
To cancel an alert, press and hold one button on either side of Chiptech GO during the pre-alarm
period. Chiptech GO will say, “Cancelled” and vibrate once. If the alarm has already sent, simply
speak to the operator and let them know that assistance is not required.
Different outcomes when cancelling an emergency alert:
•During an emergency event, press and hold a single button on Chiptech GO until it
announces, “Cancelled.” During Pre-alarm it will take one (1) second. After voice contact, it
will take five (5) seconds.
•If configured to do so, an alert for help can be cancelled mid-call with the operator, and this
will end a call and return Chiptech GO to normal operation. No longer sends GPS or receives
voice calls.
•Chiptech GO can be configured to cancel after the voice call has ended. When the operator
hangs up, Chiptech GO will continue to pulse green and send GPS coordinates. Chiptech GO
can be cancelled by pressing one button for five seconds. Chiptech GO willannounce,
“Cancelled” and vibrate once, then return to normal operation.
•If the user does not cancel, and after a predefined period of time where there is no voice
contact (typically twenty minutes), then Chiptech GO will timeout and return to normal
operation.
System Check
A System Check provides the user with current information on the battery level, cellular coverage,
and when configured to do so, Chiptech GO will check that a GPS location can be obtained and the
coordinates logged from the current location.
•When installing Chiptech GO perform some System Checks around the property to
determine whether Chiptech GO will work in and around a user’s home environment, and to
make sure there is good cellular coverage.
•During installation demonstrate to the end user how to perform a System Check so they can
check all the places that they commonly visit to ensure that the cellular coverage is
adequate if an alert for help is required when they are away from home.
To Perform a System Check
Press and hold one button on either side of Chiptech GO.
Please do not press both buttons together, as this will send a request for help.
A chime will play to indicate that System Check has been activated, and Chiptech GO will
illuminate blue to confirm the end user is currently in this function.
BATTERY LEVEL
A voice message will play to confirm Chiptech GO battery status;
•
“My battery is…” (Then one of the following)
o
“Excellent”
o
“Good”
o
“Low battery, please place me on the charger today”, or
o
“Critically low battery; please place me on the chargerimmediately.
An alert may fail.”
•
This will also be accompanied by a status light:
3G CELLULAR COVERAGE
Chiptech GO will then announce, “Checking cellular connection.”
Chiptech GO will check the cellular coverage of its location and will announce after a few
seconds, “The connection is…” (then one of the following)
•
“Excellent”
•
“Good” .
•
“Poor”, or
•
“Unavailable.” If unavailable, Chiptech GO will not try to obtain the current GPS
location as it will have no way of sending this information. The System Check will
finish at this point.
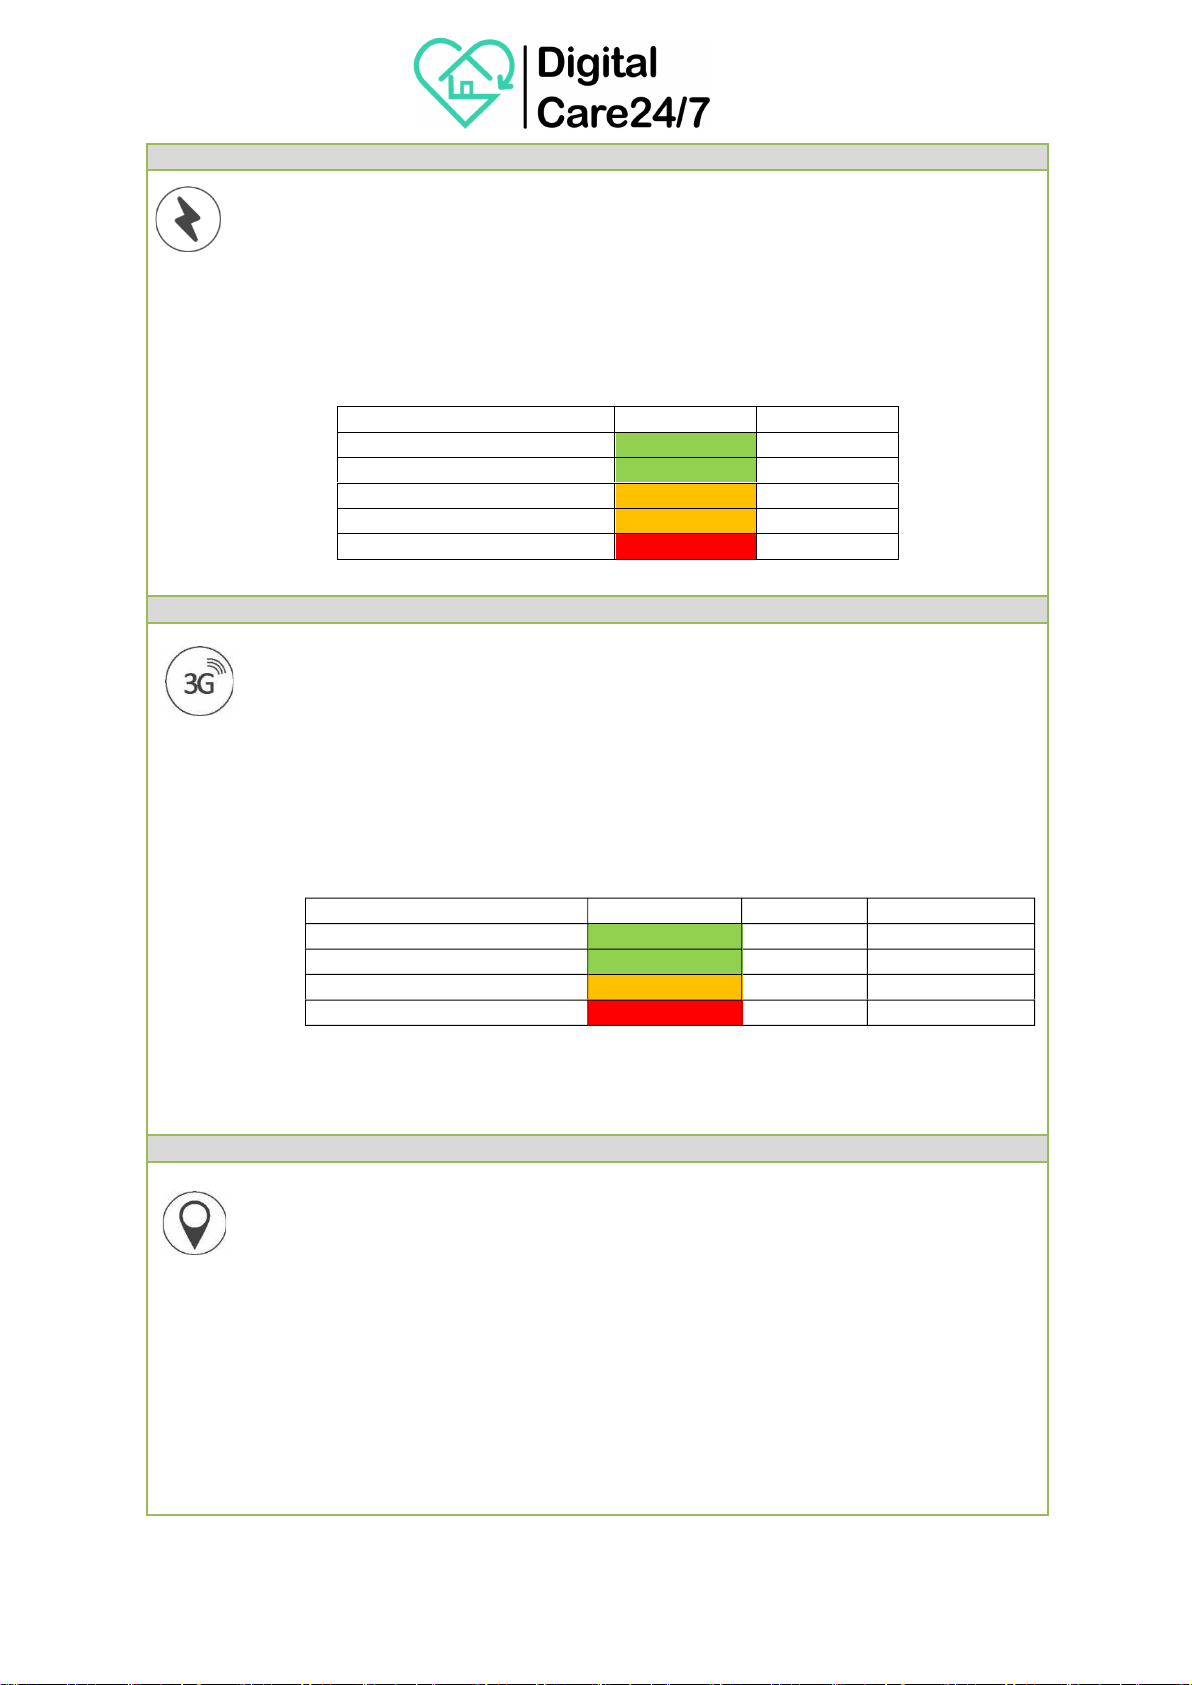
Voice announcement Colour Bars 3G ASU Level
Excellent Green 4 12 to 31
Good Green 2-3 4 to 11
Poor Orange 1 1 to 3
Unavailable Red 0 0 or 99
Please note: If Chiptech GO announces that cellular coverage is poor or unavailable, an
alert for help may not be successful. This should be clearly communicated to the end
user.
LOCATION
Following a successful cellular check, and if configured to do so, Chiptech GO will check if
its GPS coordinates can be obtained and will send coordinates to GPS mapping software.
This can take as little as 15 seconds and up to five minutes.
•
Chiptech GO will announce, “Finding your location…”
o
When successful, a voice message will announce;
“Current location has been sent.”
o
If the current location cannot be obtained, Chiptech GO will announce;
“Location check unsuccessful.”
Following either of these announcements the System Check will end and Chiptech GO will
resume its standard function, no lights should be seen and the sounds will cease.
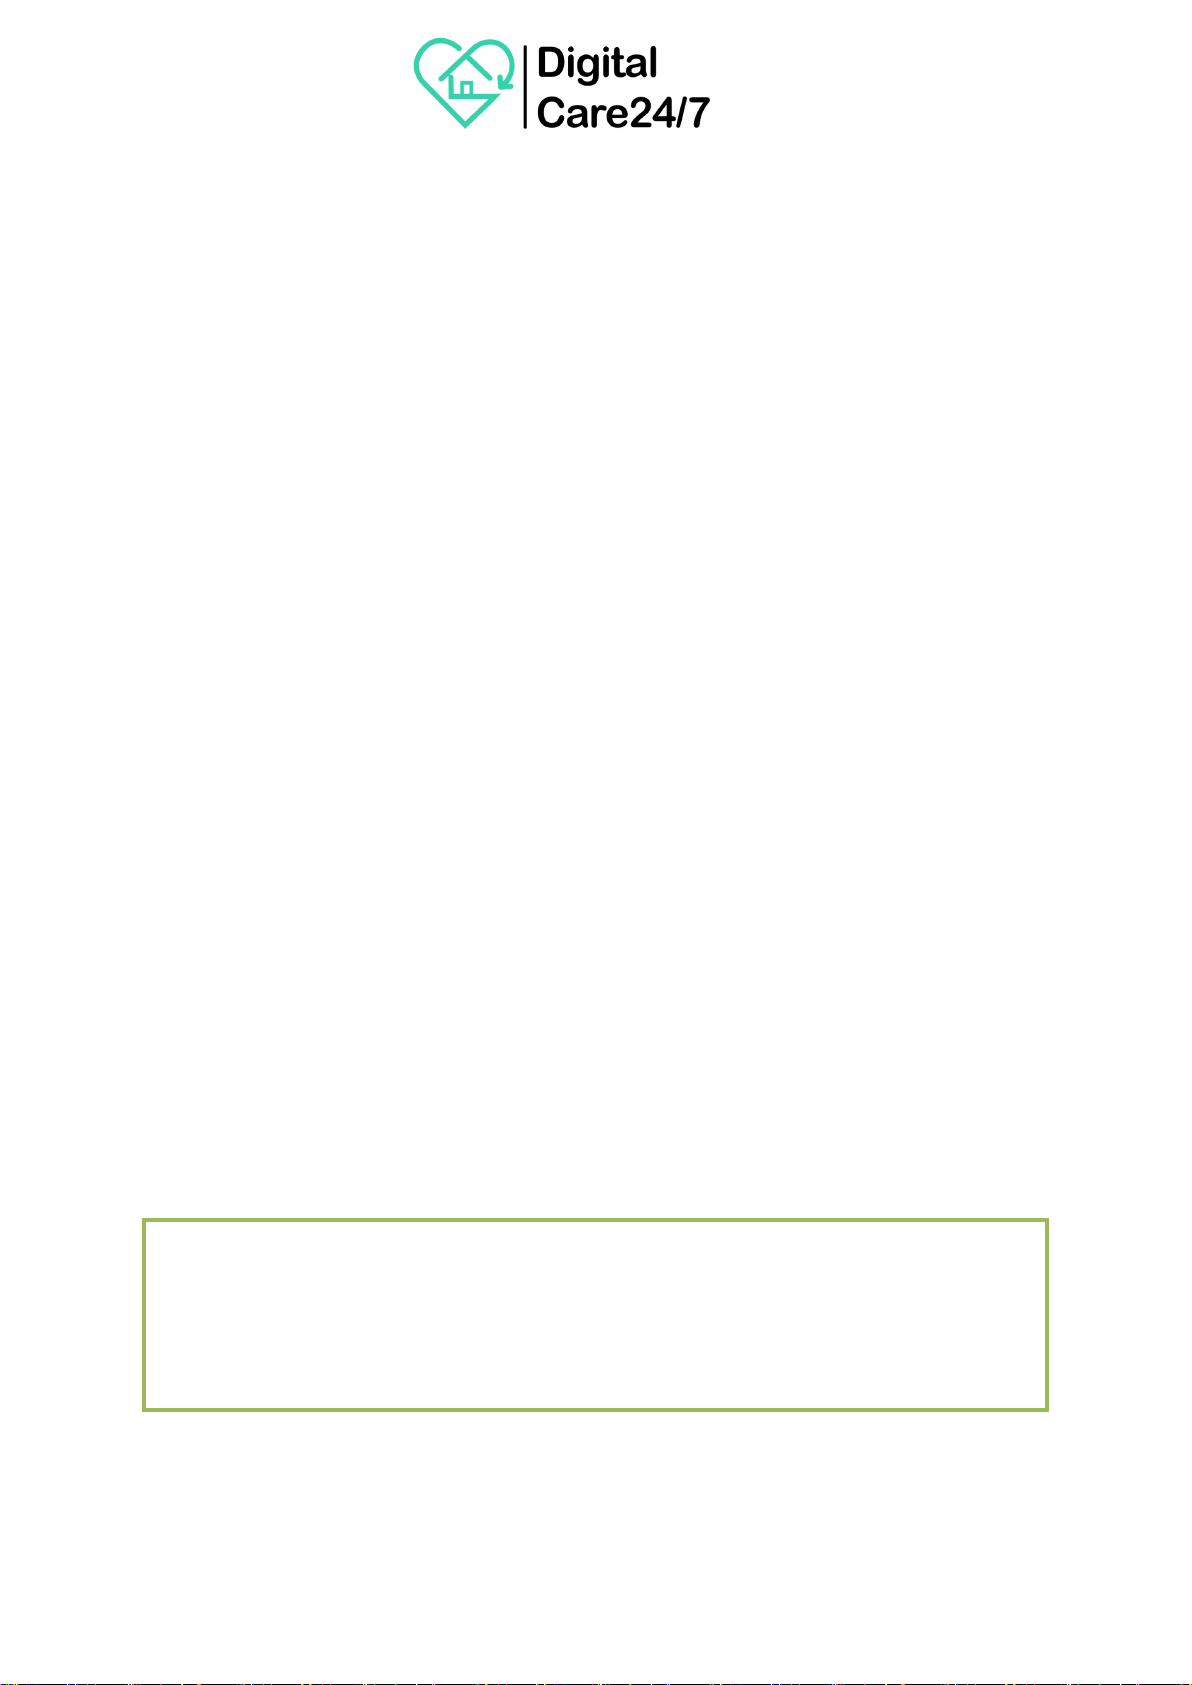
Voice announcement
Colour
Voltage (V)
Excellent
Green
3.8 to 4.1
Good
Green
3.4 to 3.8
Low
Orange
3.2 to 3.4
Critically Low
Red
< 3.2

CANCEL
If at any time the System Check needs to be cancelled, press and hold one of the buttons
on either side of Chiptech GO. A voice message will play and the light ring will flash redto
let you know that this function has been, “Cancelled.”
Installing Chiptech GO
Chiptech GO can be installed as a standalone device, or paired with a Chiptech Base Unit. Follow the
steps below for either option.
5.1
To Install and Demonstrate Chiptech GO (Standalone)
1. Unpack Chiptech GO. The complete system should be supplied to the end user with the
following: Chiptech GO device, user guide, stainless steel chain, split ring, wireless charging
base, USB cable and plug pack.
2. There are a number of limitations and disclaimers associated with the use of a mobile
personal response system. These are outlined in the Chiptech GO User Guide, so please
make sure you, (the installer) are familiar with these, and that they are pointed out and
explained to the end user and their family/supporters.
3. Find a suitable, convenient location for the charger and connect it to the power. Perform a
System Check on Chiptech GO and then place it on the charger to check that there is
adequate cellular coverage at the installation location of the charger. A “good” or
“excellent” cellular connection is required for cloud connects and updates, which are only
initiated when Chiptech GO is placed on the charger.
4. Demonstrate to the user how to place Chiptech GO for charging with the ‘walking person’
facing upwards. Chiptech GO is despatched in flight mode, so placing Chiptech GO on the
charger (or pressing one of the buttons) disables this function.
5. Show the end user the System Check (Section 4) function by pressing and holding one
button. This will announce the battery level, the cellular connection, and send its GPS
location - if enabled to do so, and if it can be obtained. This check of all three functions
should take approximately two minutes. (Encourage the user to perform a System Check
when they visit a new location for the first time.)
6. Perform a request for help by pressing and holding both buttons at the same time on
Chiptech GO for one second. A loud pre-alarm will sound before the report is sent to the
ARC. Wait for the ARC to call back into Chiptech GO to confirm that the test has been
successful. Voice messages will guide you through this process.
5.2
To Install Chiptech GO with a Base Unit
Installing and pairing Chiptech GO with a Chiptech base unit (with or without a Pearl pendant)
requires a few extra steps as set out below:
1. Start by installing the base unit as per the standard installation procedure in the base unit
Installer Manual.
2. Once installation and testing of the base unit has been completed, follow Steps 1 to 4 of the
Chiptech GO installation process as above (section 5.1)
Do not perform a System Check at this point.
3. Enter ‘Learn Mode’ on the Chiptech base unit by pressing the cancel button three times. You
will be asked to press your pendant(s). Please re-learn in any Pearl or other RF devices now,
before learning in Chiptech GO. Learn all devices in the one session.
4. To learn Chiptech GO, press and hold both buttons at the same time for one second, and the
base unit will announce that a new pendant has been learned. The Chiptech GO pre-alarm
will begin, and this will need to be cancelled at this point by holding one of the buttons for
one second. Chiptech GO will announce, “Cancelled”.
5. Chiptech GO will now be learned in. Cancel ‘Learn Mode’ by pressing the cancel button on
the base unit once.
Now that Chiptech GO has been successfully learned into the base unit, you can demonstrate the
System Check (Section 4) and Requesting Help (Section 2)) for Chiptech GO. Check with the ARC that
the GPS report says ‘Home’, instead of giving GPS co-ordinates which should only happen when out
of the range of the base unit.
•If Chiptech GO is activated while within range of the Chiptech base unit, the emergency alert
will still be sent through Chiptech GO. This means that there will be no pre-alarm played from
the base unit and the ARC will speak with the user on Chiptech GO.
•Chiptech GO will send a ‘Home’ report instead of the GPS co-ordinates through to SmartCare
Locate (a purpose-built website application), or mapping software, to confirm that the Chiptech
GO is in range of the base unit.
Sending an alert via the Chiptech Base Unit:
As a backup, if Chiptech GO for any reason is unsuccessful in sending an alert after a round of
attempts, Chiptech GO will send another alert to the base unit. Once confirmed by the base unit,
it will take over the event and send the activation through to the ARC.

Sending a Request for Help (Detailed Process)
6.1
Requesting Help with a Chiptech GO (Standalone)
1. Press and hold both buttons at the same time until the pre-alarm sound activates. Chiptech
GO will flash red and vibrate during the pre-alarm stage to indicate a request for help has
been activated.
2. At the completion of the pre-alarm, an alarm report is sent to the ARC.
3. Chiptech GO will play periodic voice notifications to inform the user of the alarm report
progress as it attempts to connect with the ARC. Chiptech GO will continue to flashred.
4. Chiptech GO will attempt to dial out using the Destination Sequence List (DSL) set in
configuration. This has four (4) destinations and can consist of IP addresses and/or DNS
locations. Chiptech GO can only report to the ARC using a data connection on the cellular
network. If this is unavailable for any reason, then Chiptech GO will not be able to
communicate to the ARC.
5. If a destination address fails, then Chiptech GO will move onto the next destination in the
list. If for whatever reason the entire list fails, Chiptech GO will go back through the list
again.
6. An additional voice message will play to let the user know that there is an issue sending their
alert and that Chiptech GO is trying again.
7. Chiptech GO will continue trying to send the alert. If after a set number of attempts it still
cannot send the alarm report, it will slow down the time between retries (this is typically set
to 12 attempts). At this point it is likely that the 3G connection is not working due to
location or the network being down. Chiptech GO will slow down frequency of attempts
(typically to once a minute) in order to preserve battery power.
8. Chiptech GO will continue to retry sending an alert for help until the battery goes flat. There
is no timeout for this operational process, unless the end user cancels their help alert.
9. When the emergency alert is successfully received at the ARC and confirmed back to
Chiptech GO, it opens a voice channel to an operator so they can ring back.
10. When voice contact is made, Chiptech GO will ring twice and then automatically answer.
11. The hands-free speakerphone system will automatically switch between the operator and
the Chiptech GO. By default, if nobody talks, the speakerphone system is set up to listen to
the user.
12. After the first voice call has ended Chiptech GO will flash green. Depending on the
configuration applied the user may or may not be able to resend an alert. If resending is
disabled and the user tries to press both buttons again an audio file will play, “Alert has been
received by monitoring.” This will happen every time the user presses both buttons until
Chiptech GO is manually cancelled, or the timeout period occurs.
13. Once each call into Chiptech GO is complete, Chiptech GO will start a timeout window,
(typically set to twenty minutes). If there are no further calls back to Chiptech GO in this
time, it shuts down its cellular module and stops sending GPS locations.
14. This timer will automatically restart every time a call is placed to Chiptech GO.
6.2
Sending an Alert from Chiptech GO when Learned into a Base Unit
When activated, Chiptech GO sends an RF signal to check if it is within range of the base unit. The
RF transceiver gets a confirmation from the base unit when within range, and then sends the
emergency alert to the ARC. The base unit will not pre-alarm. Once the first emergency alert from
Chiptech GO has been received by the ARC, Chiptech GO sends a second report that says it is ‘home’
instead of sending GPS coordinates. Following this, Chiptech GO continues to send GPS coordinates
in case the user’s situation changes. The ARC will speak with the user over the Chiptech GO
speakerphone system, so they can communicate with them no matter where they are on the
property.
6.3
Reporting Redundancy for Chiptech GO learned into a Base Unit
Chiptech GO will always try to send an alert using its own cellular system first. In the unlikely event
that it cannot communicate with the ARC, typically because of a lack of a cellular coverage, then
Chiptech GO will hand over the report to the base unit. When the alert is received by the base unit,
it will send a confirm back to Chiptech GO. Chiptech GO will then play a voice message, “Base unit
activated you will soon be contacted by an operator.” This message will play twice.
The base unit will pre-alarm and follow the standard reporting process. The ARC will communicate
through the base unit, or alternatively, the operator can attempt to call back directly into Chiptech
GO. The lights around Chiptech GO will flash red periodically to show that it is operating and can be
called back into until the device times out.
There are a number of situations that can affect the ability for Chiptech GO to send an alert, and
these have been taken into consideration when developing the reporting system to ensure that end
user safety is prioritised.
•If Chiptech GO is not in range of the base unit, then Chiptech GO will try the second
destination in its reporting list. Failing that, it will send another RF signal, repeating these
attempts through all four (4) destinations. Chiptech GO will continue to cycle through the
reporting list, as outlined in the company specific configuration file.
•As a precaution, the receiver on Chiptech GO will be enabled for a set period of time. This
gives the operator the option of establishing contact either with the base unit or Chiptech
GO (if able to be contacted). Once the timeout is reached the receiver will turn off and
Chiptech GO will resume its normal mode.
Important Note:
It may be possible that the RF alarm is received by the base unit but no confirmation is
received back by Chiptech GO. In this rare case, both the base unit and the GO will try to
send individual help reports to monitoring.

Global Position System Location Reports
How GPS and Chiptech GO operate together:
Global Position System (GPS) works on a separate system from
the cellular network. The GPS is a network of approximately 30
satellites orbiting the Earth. Wherever anyone is on the planet,
at least four GPS satellites are ‘visible’ at any time.
Each satellite transmits information about its position and the
current time at regular intervals. These signals, travelling at the
speed of light, are processed by Chiptech GO which calculates
how far away each satellite is based on how long it took for the
messages to arrive. Once Chiptech GO has information on how
far away at least three satellites are, it uses a process called trilateration and finds a central location
and transmits these coordinates to ARC GPS location software, or SmartCare Locate. The more
satellites there are above the horizon, the more accurately Chiptech GO can determine its location.
During an alert Chiptech GO will send through periodic GPS locations to SmartCare Locate, a
purpose-built website application, or to other ARC GPS software. The interval between sending
locations can be configured in the Chiptech GO configuration and is set in minutes. Typically,
Chiptech GO is set to send updated coordinates every five minutes.
7.1
Rough GPS Location
Once the emergency alert is sent to the ARC, Chiptech GO obtains the first GPS location and
immediately sends it, this is known as a ‘rough’ location. This is a single GPS location that has been
obtained as quickly as possible to give the ARC operator a good indication of the area where
Chiptech GO is located. If Chiptech GO has been learned into a base unit and is within range, then a
‘home’ report will be sent instead of the rough GPS coordinate. Chiptech GO will then continue to
send smart GPS coordinates at predefined intervals.
A rough GPS location will also be sent when a ‘GPS check’ is performed as part of the Chiptech GO
System Check.
7.2
Smart GPS Locations
To improve GPS accuracy Chiptech has developed ‘Smart GPS’. The algorithm has been
designed specifically to improve GPS accuracy using statistical data analysis on multiple
GPS fixes, and the most likely location is sent.
All GPS data sent through after the initial ‘rough’ fix will be ‘smart’ fixes.
These calculations are accurate when the device is in a static position, and not travelling.
7.3
Assisted GPS
Chiptech GO uses a feature known as Assisted GPS (A-GPS). This allows Chiptech GO to retrieve
satellite positional data over a 3G data connection rather than directly from the satellites. This
method is used to speed up the processes of retrieving a location; for example, instead of waiting 15
minutes for a GPS fix, it can take as little as 20 seconds.
The positional data of the satellites is stored in a server and this is known as a Secure User Plane
Location (SUPL). All android phones use this data and it is commonly used among 3G GPS
devices. The data downloaded from the server is known as the almanac and ephemeris data. This
data retrieval also has built in security. Chiptech GO uses an encrypted TCP port to connect to the
SUPL servers. As part of this security an SSL Certificate is issued to Chiptech to allow us to make the
encrypted connection.
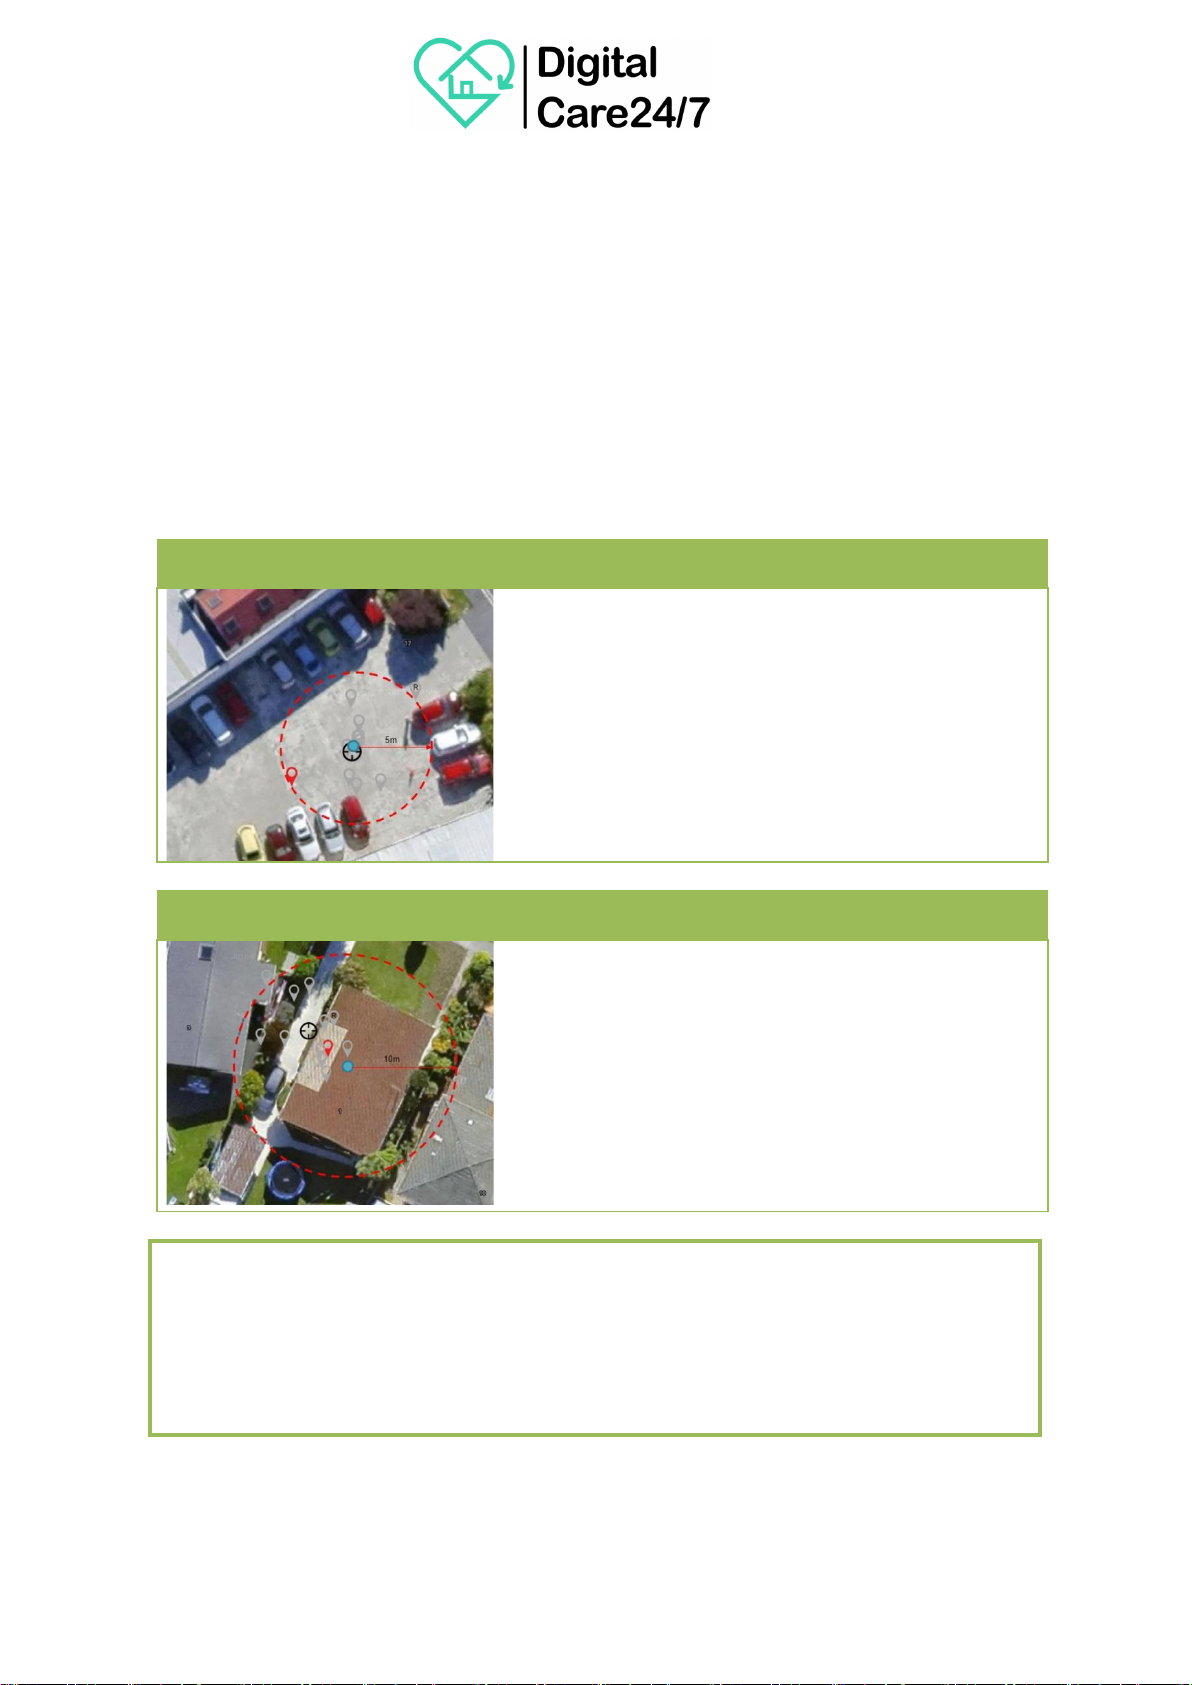
7.4 Open Air Testing
Chiptech’s carpark, clear blue sky. Chiptech GO was placed
on a chair, 10 Smart GPS samples taken.
Results:
o
Worst case individual Smart GPS error = 5m
o
‘Find best location’ error < 1m
o
Interval time between GPS samples = 5mins
o
Maximum number of consecutive GPS fixes taken during
one Smart GPS result = 52 samples in 5 minutes
7.5 Inside House Testing
Brick house in flat urban environment, with a decramastic
(metal tiles) style roof. Chiptech GO was placed on coffee table
in lounge.
11 Smart GPS samples taken
Results:
o
Worst case individual Smart GPS error = 10m
o
‘Find best location’ error = 4m
o
Interval time between GPS samples = 5mins
o
Maximum number of consecutive GPS fixes taken during
one Smart GPS result = 35 samples in 5 minutes
Important Note:
These results are typical but not guaranteed. There are a number of factors which can
influence the overall accuracy of the GPS system in Chiptech GO. These include; body contact,
satellite signal strength, objects that impede signals such as buildings and trees, and signal
reflections off surrounding objects.

Fall Detection and Reporting
The fall detection function on Chiptech GO can be enabled or disabled in Installer Mode (Section 10).
Chiptech GO must be worn as a pendant around the neck for the fall detection algorithm to work as
intended. Using or attaching Chiptech GO in any other manner will not provide accurate fall
recognition and may result in a fall being missed.
When enabled, fall detection is constantly looking for a free fall period, then an impact, followed by
a short period of no movement. Therefore, it needs to be noted that having fall detection enabled
will consume more battery.
This is the same algorithm used on Chiptech Pearl Advanced with a standard setting. The Chiptech
GO fall detection setting cannot be changed to be more sensitive. Please note: Although advanced
technology is used to detect a fall, there are certain types of falls that are less likely to trigger the
automatic fall detection system. Falls that may not be detected include slumping, falling into an
object that breaks the fall, or falling from an object that is not average standing height. While every
effort is made to detect a significant fall from standing, there are circumstances where Chiptech GO
will not automatically activate. If the user is able, they can activate Chiptech GO by pressing both
buttons at the same time. (Requesting Help, Section 2)
•When Chiptech GO detects a fall has occurred, it will play the pre-alarm sound andthen
announce, “Fall detected,” and the light-ring will flash red.
•A ‘fall’ report will be sent to the ARC.
The fall detection algorithm is set up as follows:
•For the fall detector to switch from activity mode to fall detection mode, activity level must
exceed 0.35g in any axis.
•To successfully detect free fall, Chiptech GO must be falling <= 0.5 g for a minimum period of
200ms.
•Impact with the ground must be >= 5g.
8.1
Suggested Testing for Demonstrating Fall Detection
When fall detection has been enabled, demonstrate or test this function in the following way:
1. Hold Chiptech GO including the chain in one hand at eye level.
2. Hold the other hand out at hip height and keep it steady.
3. Drop and catch Chiptech GO and hold it still. It should start to pre-alarm and announce, “Fall
detected.”
4. If a fall is not detected, try again and ensure there is a 30cm drop gap between the hand that
is dropping, and the hand that is catching. Try to keep your catching hand steady.
o To steady your catching hand, you can rest it on a table/bench or sit with your hand
in your lap.

Battery and Charging
•The battery level on Chiptech GO can be checked at any time by performing a
‘System Check’.
•Chiptech GO also provides automatic notification for low battery level when it requires
charging.
9.1
Low Battery Notification
When Chiptech GO reaches low battery (approximately 20% of capacity remaining) it will announce,
“My battery is low. Please place me on the charger today.” The light ring will illuminate orange. This
announcement will repeat once every three hours. Without being used, Chiptech GO should last more
than 48 hours, giving a user sufficient time to charge the device.
•One ‘low battery’ report will be sent to the ARC when a low battery level is detected. A
‘battery charging’ report will only be sent when Chiptech GO is placed on the charger and
the battery reaches an adequate level.
•During operator voice contact (after an alert has been sent), a low battery notification (beep)
will be played over the speaker so both the user and ARC operator can hear.
9.2
Critical Battery Notification
When Chiptech GO reaches critically low battery it will announce, “My battery is critically low. Please
place me on the charger immediately. An alert may fail.” The light ring will illuminate red. No report is
sent to the ARC in order to conserve the remaining battery life. This announcement will repeat three
hourly, until placed on the charger or Chiptech GO runs flat.
9.3
Battery Life Expectancy
You can expect to have approximately 80% capacity after 350 -500 charges (when charged in
temperature 25°C and fully discharged between cycles), when the battery is less than three to five (3-5)
years old.
Important Note:
Night time hours apply to both low and critically low battery voice announcements. The
light ring will illuminate, but Chiptech GO will not play the voice notification during night
time hours.
WARNING
Non-essential functions are disabled when the Chiptech GO battery status is critically low.
Chiptech GO will not perform a system check or send a test signal. Chiptech does not
guarantee successful reporting to the ARC while Chiptech GO is critically low.

9.4
Charging Chiptech GO
1. Connect the plug pack and supplied cable to the charging base, plug into power and turn the
power on.
2. Place Chiptech GO on the wireless charger. Be sure to check that the ‘walking person’
symbol faces upwards. The charger and Chiptech GO will illuminate blue to indicate that
charging has started.
3. Charging duration is approximately three to five (3 –5) hours from low battery.
4. When Chiptech GO is charged its light ring will illuminate green.
•If Chiptech GO has automatically updated while charging, when removed from
the charger, it will announce: “Update completed” and flash white for
ten seconds (If configured to do so).
5. To use Chiptech GO at any time simply remove it from the wireless charger.
Chiptech GO will need a charge approximately every one to two (1 –2) months with regular use.
When the battery is low, or critically low, Chiptech GO will inform the user when it needs to be
placed on the charger. Chiptech GO will also need to be charged if an alert for help has been recently
sent, as this event uses more battery power.
•Testing has shown the lithium-ion battery will run for approximately one to two (1 –2) months
with standard use before requiring recharging. Standard use is: 7 hourly RF test transmissions,
test signals every second day, and two System Checks per week being performed. It is
recommended that Chiptech GO is charged after an alert.
Please Note:
You will need to perform a System Check at the location of your charger to ensure Chiptech GO
has coverage for any automatic updates.
Please Note:
When Chiptech GO has sent a low battery report and is placed on the charger it will send a
‘battery charging’ report to the ARC. It will only send this report if Chiptech GO has been on the
charger for at least 30 minutes, has cellular coverage, and the battery voltage is equal to or
above 3.7 volts.
Plug Pack Charging Cord Charger Chiptech GO on charger,
while charging.
Important Notes on Battery
➢Chiptech GO may not function, or may stop functioning during an alert for help if it does
not have sufficient battery level.
➢During charging Chiptech GO can become warm to the touch.
➢When charging the chain must not sit between Chiptech GO and the charger.
➢If the user has a pacemaker, the wireless charger and Chiptech GO should be kept at least
25cm away from the pacemaker during charging.
➢Place the charger on a flat surface.
➢Please make sure all parts of the charger are properly connected before use.
➢Do not use the charger if any part of the charging system is damaged.
➢Do not place anything metal on top of the charger.
➢Do not cover the charger with any material.
➢Do not place the charger in direct sunlight, recommended charging temperature between
10°C to 35°C.
➢Perform a System Check in the charger’s location to ensure that Chiptech GO will have
adequate cellular coverage during charging.

Installer Mode
10.1
Accessing Installer Mode
•To access Installer Mode, place Chiptech GO on the charger with the ‘walking person’ facing
up.
•Check that the device is charging or charged. The light ring on Chiptech GO will illuminate
blue or green, and the charging dock will illuminate blue to indicate that charging has
started.
•Press and hold the top button for at least ten (10) seconds while the device is on the
charger.
•A voice message will play stating ‘Installer Mode’ has started; the light-ring will illuminate
purple on Chiptech GO.
•The following message will be played: “Installer Mode, your ID number is 1234.”
•At this point Chiptech GO can be removed from the wireless charger. Installer Mode will
continue to operate.
•Press a single button on either side to cycle through the various options in Installer Mode.
•Press two buttons at the same time to select and change an option.
•Installer Mode will exit automatically after 10 seconds if no button press occurs.
Installer Mode has the following options:
Option
Possible Settings
Manual cloud connection
To connect to the cloud, press both buttons.
Volume
Volume off, for all notifications
60% volume
80% volume
100% volume.
GPS Check
Enabled
Disabled.
Fall detection
Enabled
Disabled.
10.2
Flight Mode
Flight Mode has been designed to stop all functionality including Lost Mode, 3G test signals, fall
detection (if enabled), Pearl RF test signals, and automated voice notifications for low battery. If a
user intends taking Chiptech GO on an aircraft, Flight Mode must be enabled before take-off.
•During normal operation, press and hold a single button on Chiptech GO for ten (10) seconds
to start Flight Mode. The ‘System Check’ start-up sound will play, but there is no voice
message.
•If you release the button earlier than ten seconds, then the System Check will start.
•When ten seconds is reached a voice file will play, “Flight Mode enabled. All functions
suspended until button press, or placed on a charger.”
•A report is sent to the ARC when Flight Mode is enabled.

o This report will usually take less than a minute, however, it can take up to 16 minutes if
Chiptech GO continues to try and send the Flight Mode report and is unable to do so.
(This is also dependent on the low priority retry attempts assigned in configuration per
customer.)
•Flight Mode is used by those who are flying with their Chiptech GO, and shipping or storing
the product (where Chiptech GO functions need to be turned off to prevent the battery from
going flat too quickly, to stop notifications, and RF transmissions.)
•Any button press will cancel Flight Mode and reinstate normal operation.
•Likewise, putting Chiptech GO on the charger will also wake it from Flight Mode.
•Flight Mode is enabled at Chiptech when units are first supplied, it should be enabled before
shipping to customers.
•Flight Mode is not a configuration option.
10.3
Lost Mode
When Chiptech GO has not been moved for a period of time, it will detect this and send a Lost Mode
notification with its GPS coordinates to SmartCare Locate, or other mapping software, so it can be
found. If Chiptech GO is lost, a user can contact the ARC to check where Chiptech GO is located.
•Lost Mode function can be enabled or disabled, and the timing updated, from the
configuration file only.
•Chiptech GO can been configured so that if it doesn’t sense movement for a period of time
(typically 72 hours) the GPS module will activate and send its current location along with a
‘Lost’ code through to SmartCare Locate (or other ARC mapping software).
•Chiptech GO will then continue to report its GPS location at a predefined period, (typically
every 24 hours). If for any reason Chiptech GO is unable to obtain or send its GPS location, it
will retry once every 24 hours.
•The ‘Lost’ code is only sent to SmartCare Locate or mapping software, and is not a report
that is sent to the ARC.
•If Chiptech GO is moved, this will reset the Lost Mode function, and it will take another
predefined period of time before Chiptech GO will begin to report its ‘lost’ GPS location
again.
Important Notes:
➢If Chiptech GO is left in Flight Mode for a prolonged period of time, the user will not
receive automated voice notifications for “low battery…” or “critically low battery…”
Chiptech GO battery could run flat without the end user knowing.
➢Once Flight Mode is no longer needed, it is recommended that the user starts a
System Check (by pressing a single button on Chiptech GO) and checks the battery
status, to ensure the device will continue to operate as intended. If a full System
Check is not required at this point, it can be cancelled at any time (Section 4,Cancel).
Other manuals for GO
2
Table of contents
Other Chiptech Personal Care Product manuals


Popular Personal Care Product manuals by other brands


Zimmer
Zimmer Soleoline Soleo Sono operating instructions

Invacare
Invacare 5410VC User Manual & Entrapment Guide

Rowen
Rowen RESET & BOOST SKIN DUO quick start guide

Philips
Philips SC526X user manual

evo Medical Solutions
evo Medical Solutions Aeroneb GO 7010 quick start guide

Orliman
Orliman Thermomed Smart 4102 Use and maintenance instructions


