ChM CHARFIX system User manual

ChM sp. z o.o.
Lewickie 3b
16-061 Juchnowiec Kościelny
Poland
tel. +48 85 86 86 100
fax +48 85 86 86 101
www.chm.eu
0197 www.chm.eu
IFU-001/07.19
INTERLOCKING NAIL SYSTEM 3
SYSTEM GWOŹDZI BLOKOWANYCH 13
СИСТЕМА БЛОКИРУЕМЫХ СТЕРЖНЕЙ 24
SISTEMA DE CLAVO DE INTERBLOQUEO 36
VERRIEGELUNGSNAGELSYSTEM 47
SYSTÉM HŘEBŮ S PEVNOU FIXACÍ 58
SISTEMA DI CHIODI AD INCASTRO 68
Charfix Femoral Nail
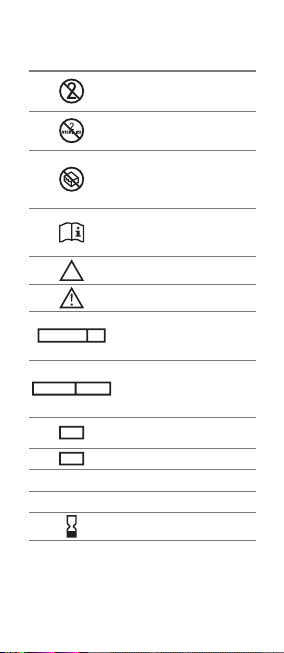
SYMBOL TRANSLATION• OBJAŚNIENIA SYMBOLI•
ПОЯСНЕНИЕ ОБОЗНАЧЕНИЙ• EXPLICACIÓN
DE LOS SÍMBOLOS• SYMBOLERKLÄRUNG•
SYMBOLY PŘEKLADY•TRADUZIONE SIMBOLI
Do not reuse• Nie używać powtórnie• Не
использовать повторно• No reutilizar• Nicht
wiederverwenden• Nepoužívejte opakovaně•
Non riutilizzare
Do not resterilize• Nie sterylizować ponownie•
Не стерилизовать повторно• No reesterilizar•
Nicht resterilisieren• Nepoužívejte resterilizaci•
Non risterlilizzare
Do not use if package is damaged• Nie używać jeśli
opakowanie jest uszkodzone• Не использовать при
повреждённой упаковке• No utilizar si el envase está
dañado• Nicht verwenden falls Verpackung beschädigt
ist• Nepoužívejte, pokud je obal poškozen• Non
utilizzare se la confezione é danneggiata
Consult Instructions for Use• Zajrzyj do instrukcji
używania• Обратитесь к инструкции по
применению• Consultar instrucciones de uso• Siehe
die Gebrauchsanweisung• Řiďte se návodem k použití•
Consultare le instruzioni per l'uso
NON
STERILE
Non-sterile• Niesterylny• Не стерильно• No estéril•
Unsteril• Nesterilní• Non sterile
Caution• Ostrzeżenie• Осторожно• Advertencia•
Vorsicht•Varování• Avvertenza
STERILE R
Sterilized using irradiation• Sterylizowany przez
napromieniowanie• Радиационная стерилизация•
Esterilizado mediante radiación• Sterilisiert durch
Bestrahlung• Sterilizovat zářením• Sterilizzato
mediante irradiazione
STERILE VH202
Sterilized using hydrogen peroxide• Sterylizowany
nadtlenkiem wodoru• Стерилизован перекисью
водорода• Esterilizado con peróxido de hidrógeno•
Sterilisiert mit Wasserstoperoxid• Sterilizováno s
peroxidem vodíku• Sterilizzato mediante perossido
di idrogeno
REF
Catalogue number• Numer katalogowy• Номер по
каталогу• Número de catálogo• Katalognummer•
Katalogové číslo• Numero di catalogo
LOT
Batch code• Kod partii• Код партии• Código de lote•
Chargennummer• Číslo šarže• Codice del lotto
Mat:
Material• Materiał• Материал• Material• Material•
Materiál• Materiale
Qty:
Quantity• Ilość• Количество• Cantidad• Menge•
Množství• Quantita'
Use by• Użyć do• Использовать до• Usar antes de•
Verwenden bis• Použijte do• Da utilizzare entro il
3
SYMBOL TRANSLATION• OBJAŚNIENIA SYMBOLI•
ПОЯСНЕНИЕ ОБОЗНАЧЕНИЙ• EXPLICACIÓN
DE LOS SÍMBOLOS• SYMBOLERKLÄRUNG•
SYMBOLY PŘEKLADY•TRADUZIONE SIMBOLI
Do not reuse• Nie używać powtórnie• Не
использовать повторно• No reutilizar• Nicht
wiederverwenden• Nepoužívejte opakovaně•
Non riutilizzare
Do not resterilize• Nie sterylizować ponownie•
Не стерилизовать повторно• No reesterilizar•
Nicht resterilisieren• Nepoužívejte resterilizaci•
Non risterlilizzare
Do not use if package is damaged• Nie używać jeśli
opakowanie jest uszkodzone• Не использовать при
повреждённой упаковке• No utilizar si el envase está
dañado• Nicht verwenden falls Verpackung beschädigt
ist• Nepoužívejte, pokud je obal poškozen• Non
utilizzare se la confezione é danneggiata
Consult Instructions for Use• Zajrzyj do instrukcji
używania• Обратитесь к инструкции по
применению• Consultar instrucciones de uso• Siehe
die Gebrauchsanweisung• Řiďte se návodem k použití•
Consultare le instruzioni per l'uso
NON
STERILE
Non-sterile• Niesterylny• Не стерильно• No estéril•
Unsteril• Nesterilní• Non sterile
Caution• Ostrzeżenie• Осторожно• Advertencia•
Vorsicht•Varování• Avvertenza
STERILE R
Sterilized using irradiation• Sterylizowany przez
napromieniowanie• Радиационная стерилизация•
Esterilizado mediante radiación• Sterilisiert durch
Bestrahlung• Sterilizovat zářením• Sterilizzato
mediante irradiazione
STERILE VH202
Sterilized using hydrogen peroxide• Sterylizowany
nadtlenkiem wodoru• Стерилизован перекисью
водорода• Esterilizado con peróxido de hidrógeno•
Sterilisiert mit Wasserstoperoxid• Sterilizováno s
peroxidem vodíku• Sterilizzato mediante perossido
di idrogeno
REF
Catalogue number• Numer katalogowy• Номер по
каталогу• Número de catálogo• Katalognummer•
Katalogové číslo• Numero di catalogo
LOT
Batch code• Kod partii• Код партии• Código de lote•
Chargennummer• Číslo šarže• Codice del lotto
Mat:
Material• Materiał• Материал• Material• Material•
Materiál• Materiale
Qty:
Quantity• Ilość• Количество• Cantidad• Menge•
Množství• Quantita'
Use by• Użyć do• Использовать до• Usar antes de•
Verwenden bis• Použijte do• Da utilizzare entro il
INSTRUCTIONS FOR USE
Important product information for
INTERLOCKING NAIL SYSTEM
Charfix Femoral Nail
1 PURPOSE AND INDICATIONS
1. Bone nails of CHARFIX, CHARFIX2, ChFN, ChFN2 systems are intended
for osteosynthesis of long bone fractures.There are the following indica-
tionsforbone treatment: transverse and shortoblique fractures,trochan-
teric zone fractures (per-, inter-, sub-trochanteric), comminuted fractures,
open fractures of I, II, IIIA degree Gustillo-Anderson, pathologic fractures,
disturbanceof union (falsejoint) aftertreatmentusing othermethods,cor-
rective osteotomies, neck base region fractures. Bone nails of CHARFIX FN
system and femoro-tibial nails are used to treat diseases associated with
the knee joint, in particular: failed arthroplasty, periprosthetic fractures,
post-traumatic state which does not allow for implantation of the knee
prosthesis,post-infectionstate,neoplastictransformations,lossof ordam-
age to the knee extensor, knee arthrodesis.
2. Bone nail locking elements: locking screws, reconstruction screws, lock-
ing sets, setting screws, compression screw, join screws, end cap, spiral
screw and nuts, are used to lock the nails of the above-mentioned sys-
tems in the treatment of long bone fractures by means of intramedul-
lary xation method.
3. Stableosteosynthesisofbone fragmentsisobtained by locking the appro-
priatenail inthemedullarycanal with the useoflocking elements suitable
for the given nail and xation method used.
4. Nailsandtelescopic sleeves areintendedfor fracture treatmentin children
and adolescents with congenital osteogenesis imperfecta.
5.Calcaneal nail ofCHARFIX2 system is usedto treatfractures ofthecalcaneus
and for subtalar arthrodesis.
6. When using CHARFIX2 FN nails combined with knee joint resection, use
spacers.
7. The radial nail is intended for treatment of distal radius fractures.
8. For the implantation of the aforementioned products, ChM’s specialist
instrument sets are dedicated. Along with the instrument set, illustrated
surgicaltechniqueis also provided.Surgical technique isnota detailed in-
structionof conduct.Thisis the physician that determinesthe proper tech-
nique and detailed surgical procedure for a particular patient.
2 CONTRAINDICATIONS
1. Contraindications may be relative or absolute. The choice of particular
device must be carefully considered in terms of patient’s overall condi-
tion. Conditions listed below may preclude or reduce the chance of suc-
cessful outcome:
1) Infection local to the operative site.
2) Signs of local inammation.
3) Fever or leukocytosis.
4) Pregnancy.
5) Neuromuscular disorders which can create unacceptable risk of xation
failure or complications in postoperative care.
6) Any other condition which would preclude the potential benefit
of implant application and may disturb the normal process of bone

4
remodeling, e.g. the presence of tumours or congenital abnormalities,
fracture local to the operating site, elevation of sedimentation rate un-
explainedby otherdiseases,elevationof whiteblood cells (WBC) count,
or a marked left shift in the WBC dierential count.
7) Suspected or documented allergy or intolerance to implant materials.
Surgeonshallnd out ifthepatientdevelopsallergicreaction tothema-
terial of the implant (content of the implant material is presented in IM-
PLANT MATERIAL).
8) Any case not needing a surgical intervention.
9) Any case not described in the indications.
10) Any patient unwilling to cooperate with postoperative instructions;
mental illness, a condition of senility or substance abuse may cause
the patient to ignore certain necessary limitations and precautions
in the implant usage.
11) Anycase where the implant components selectedfor use wouldbe too
large or too small to achieve the successful result.
12) Anycase that requiresthe simultaneous use ofelements from dierent
systems that are made of dierent metals.
13) Any case in which implant utilization would disturb physiological
processes.
14) Blood supply limitation in the operative site.
15) Morbid obesity (dened according to the WHO standards).
16) Any case in which there is inadequate tissue coverage of the opera-
tive site.
17) Shaft fractures with a ssure less than 5 cm from the nearest inter-
locking hole of the nail.
2. The above-mentioned list of contraindications is not exhaustive.
3 ADVERSE EFFECTS
1. The adverse eects may necessitate reoperation or revision. The sur-
geon should warn the patient about the possibility of adverse eects
occurrence.
2.The below-mentioned list ofadverseeventsis not exhaustive.There is a risk
of occurrence of adverse events with unknown aetiology which may be
caused by many unpredictable factors.
3. Potential adverse events include but are not limited to:
1) Implant damage (fracture, deformation or detachment).
2) Early or late loosening, or displacement of the implant from the ini-
tial place of insertion.
3) Possibility of corrosion as a result of contact with other materials.
4) Body reaction to implants as to foreign bodies e.g. possibility of tumour
metaplasia, autoimmune disease and/or scarring.
5) Compression on the surrounding tissues or organs.
6) Infection.
7) Bone fractures or “stress shielding”phenomenon causing loss of bone
above, below or at the operative site.
8) Haemorrhage and/or hematomas.
9) Pain.
10) Inability to perform everyday activities.
11) Mental condition changes.
12) Death.
13) Deep vein thrombosis, thrombophlebitis.
14) Occurrenceof respiratory complications, e.g.: pulmonaryembolism, at-
electasis, bronchitis, pneumonia, pulmonary infection, disturbed lung
growth, respiratory acidosis, etc.
15) Scar formation that could cause neurological impairment, or nerves
compression and/or pain.
16) Late bone fusion or no visible fusion mass and pseudoarthrosis.
17) Loss of proper curvature and/or length of bone.

5
4WARNINGS
1. The important medical information provided in this document should
be given to the patient.
2.The selectionof propershape and size oftheimplant appropriatefora spe-
cic patient is crucial to achieve the success of the surgery. The surgeon is
responsible for this choice.
3. Preoperative and operating procedures, including knowledge of surgical
techniques, and correct placement of implants are important and shall
beconsideredby the surgeon inorderto achievesuccess during operation.
4. No implant can withstand body loads without the biomechanical con-
tinuity of the bone.
5. During normal use all surgical implants are subjected to repeated stresses
which can result in material fatigue and failure of the implant.
6. To avoid excessive stress on the implant which could lead to non-union
or implant failure and associated clinical problems, the surgeon must in-
form the patient about the physical activity limitations during the treat-
ment period.
7. Ifthe patient is involvedin anoccupation oractivity(e.g.:substantial walk-
ing, running, weights lifting, muscles strain) which may apply excessive
stresson the implant,the surgeonmust informthe patient that resultant
forces can cause implant failure.
8. A successful result is not always achieved in every surgical case. This fact
is especially true in the case where other patient’s conditions may com-
promise the results.
9. The proper patient selection, compliance of the patient and observance
of post-operative recommendations will greatly affect the results.
The bone union is less likely to occur among smoking patients. These pa-
tientsshouldbe informed aboutthis factandwarnedofthisconsequence.
10. Overweight may cause additional stresses and strains within implant
which can lead to fatigue and deformation of the implant.
11.Patientswhoareoverweight,malnourishedand/or abuse alcoholor drugs,
with weak muscles and low quality bones and/or with nerve palsy are
not the best candidates for the procedure of surgical stabilization. These
patients are not able or not ready to observe the post-operative recom-
mendations and limitations.
12.The implants areintended as anaid tothehealingprocessandareNOT in-
tendedto replace body structuresor bear the body weightwhen the treat-
ment process has not yet nished.
13.The implant maybreak orbecome damaged asa resultofstrenuousactiv-
ity or trauma, and may need to be replaced in the future.
14. The surgeon must warn the patient that the device cannot and does not
restore the function and eciency of a healthy bone.
15. In the case of delayed union or non-union, the load or weight bearing
may eventually cause the implant bending, loosening, disassembling
or fatigue breakage.
16. The surgeon should inform the patient of the resulting total stiening
of the limb when using CHARFIX2 FN implants and femoro-tibial nails.
5 PACKAGING AND STORAGE
1. Implants are single-use devices, provided sterile or non-sterile.
2. Implants not labeled as sterile are non-sterile.
3. Implant packaging must be intact at the time of receipt.
4. Implantscan be deliveredin aunit package.The unit package of the prod-
uct contains:
1) sterile version - one piece of the product in a sterile condition. A dou-
ble packaging made of Tyvek-foil or a single blister are typical pack-
aging material.
2) non-sterile version - one piece of the product. Plastic bags are a typi-
cal packaging material.

6
5. Implants can be delivered on stands, palettes (non-sterile version only).
6. A sterility indicator is placed on the sterile package.
7. Products are delivered with a label. The label (as a primary label) con-
tains e.g.:
1) Sterile product
a) Logo ChM and the address of the manufacturer.
b) Name and size of the device and its catalogue number (REF), e.g.:
3.XXXX.XXX.
c) Production batch number (LOT), e.g. XXXXXXX.
d) Material of the implant (see IMPLANT MATERIAL).
e) STERILE sign - indicating a sterile device and the sterilization method
used, e.g.: R or VH202 (symbols are described in the footer of this In-
structions For Use).
f) Sterilization batch number, e.g.: S-XXXXXXX.
g) Device pictogram and information symbols (described in the footer
of this Instructions For Use).
h) Expiration date and sterilization method.
2) Non-sterile product
a) Logo ChM and the address of the manufacturer.
b) Name and size of the device and its catalogue number (REF), e.g.:
3.XXXX.XXX.
c) Production batch number (LOT), e.g. XXXXXXX.
d) Material of the implant (see IMPLANT MATERIAL).
e) NON-STERILE sign - indicates non-sterile product.
f) Device pictogram and information symbols (described in the footer
of this Instructions For Use).
8. In addition to the device primary label, an auxiliary label with specic
market requirements of a given area may be placed on the unit pack-
age (e.g. legal requirements of the country in which the device will be
distributed).
9. The package may contain: Instructions For Use and labels to be placed
in a patient’s medical record.
10. Depending on the size or type of the product, the following information
may be marked on its surface: manufacturer’s logo, production batch no.
(LOT), catalogue no. (REF), type of material and device size.
11.Implants should bestoredinappropriateprotectivepackagings,in a clean,
dry place witha roomtemperatureandunder conditions that providepro-
tection from direct sunlight.
6 IMPLANT MATERIAL
1. Identication of the materials
1) Depending on the material used, the following symbols may be marked
on the device surface:
a) Steel: symbol (S).
b) Titanium and titanium alloys: symbol (T).
2) The implants are made of:
a) Implantable stainless steel.
b) Implantable titanium alloy.
3) Percent composition of elements in the implantable materials (max.
values):
a) Titanium alloy according to ISO 5832-3/ASTM F136: | Al:6.75 |V:4.5 |
Fe:0.3 | O:0.2 | C:0.08 | N:0.05 | H:0.015 |Ti:balance.
b)Titanium alloyaccordingto ISO 5832-11/ASTMF1295: | Al:6.5| Nb:7.5|
Ta:0.5 | Fe:0.25 | O:0.2 | C:0.08 | N:0.05 | H:0.009 | Ti:balance.
c) Steel according to ISO 5832-1/ASTM F138: | C:0.03 | Si:1.0 | Mn:2.0 |
P:0.025| S:0.01 |N:0.1 |Cr:19.0 | Mo:3.0| Ni:15.0 | Cu:0.5| Fe:balance.
d) Steel according toISO 5832-9/ASTMF1586: |C:0.08 |Si:0.75 | Mn:4.25
| P:0.025 | S:0.01 | N:0.5 | Cr:22.0 | Mo:3.0 | Nb:0.8 | Ni: 11.0 | Cu:0.25
| Fe:balance.
4) ATTENTION: Implantable titanium, titanium alloy and/or implantable
cobaltalloymay be usedtogetherin the same construct.Neverusetita-

7
nium,titaniumalloy and/or cobaltalloy withimplantablestainlesssteel
componentsin the same constructasit maylead tocorrosionandreduc-
tion of mechanical strength of implants.
2. Magnetic resonance compatibility
1) ChM’s implants made completely from or containing elements made
of implantable steel werenot assessed for their safetyand compatibility
with magnetic resonance imaging procedures. The performance of MRI
on these implants (especially in the magnetic eld with a signicant in-
duction) may pose a potential risk of, i.a.:
a) implant displacement or heating up,
b) artifacts on MR images.
2) Implants made of titanium, titanium alloys and cobalt alloys are condi-
tionally compatible with magnetic resonance imaging.
3) The patient can be scanned safely under the following conditions:
a) static magnetic eld of ≤ 3 Tesla,
b) maximum magnetic eld spatial gradient of ≤ 720 Gauss/cm,
c)maximum MR systemreportedwhole-body-averagedspecicabsorp-
tion rate (SAR) of 3W/kg for 15 minutes of scanning.
4) CAUTION: the user should be absolutely familiar with the contraindica-
tionsandwarningsestablished bythemanufacturerof the MRIscanner
to be used for imaging procedure.
5) MR imaging may be interfered with if the area of interest is in the exact
same area or relatively close to the position of the implant.
6) Do not perform MRI if there are doubts about the tissue integrity
and the implant xation or if the proper location of the implant is im-
possible to be established.
7 PRE-OPERATIVE RECOMMENDATIONS
1.Only patientsthat meet the criteria describedinthePURPOSE AND INDICA-
TIONS should be selected.
2. Patients’conditions and/or predispositions such as those addressed
in the above-mentioned CONTRAINDICATIONS should be avoided.
3. Before deciding about implantation, the surgeon shall inform the patient
about indications and contraindications of such procedure and possibility
of complications occurrence after the operation. Patient shall be intro-
duced to the purpose and manner of the procedure, and to functional
and aesthetic eects of such treatment. Proper clinical diagnosis and ac-
curate operation planning and performance are needed to achieve good
nal result of treatment.
4. Where material sensitivity is suspected, appropriate tests should be made
prior to material selection or implantation (alloying elements of implant
material are presented in IMPLANT MATERIAL).
5.The implantation shall becarriedout bythesurgeonfamiliar with adequate
rulesandoperatingtechniques,and whohasacquiredpractical skills ofus-
ing ChM instrument set. The selection of surgical technique adequate
for a specic patient remains surgeon’s responsibility.
6. The operation procedure shall be carefully planned. The size of implant
should be determined prior to the surgery. An adequate inventory of im-
plants with required sizes should be available at the time of surgery, in-
cluding sizes larger and smaller than those expected to be used.
7.Thesurgeon should be familiar with allcomponents of the implant system
beforeuse and should personallyverifyif allcomponents and instruments
are present before the surgery begins.
8. Donot use the implantif the original,sterile packagingis damaged. Steril-
ity cannot be guaranteed if the package is not intact. The package shall
be carefully checked prior to use.
9. Implants are delivered in protective packagings. The package should be
intact at the time of receipt.
10. Unless supplied sterile, all implants and instruments should be washed,
disinfectedandsterilizedbeforeuse.Additionalsterilecomponents should
be available in case of any unexpected need.

8
11. Before procedure begins, all implants should be carefully checked to en-
sure that there is no damage (surface scratching, dents, signs of corrosion
and shape deformations). Damaged implant must not be inserted into
the body.
8 RECOMMENDATIONS FOR IMPLANTS PROVIDED
STERILE
1. Sterile implant - is delivered in sterile packaging, with the inscription:
“STERILE”. Such product is sterile and the manufacturer is responsible
for the process of sterilization. The sterilization is performed with the use
of one of the following methods:
1) gamma radiation, with a minimum dose of 25 kGy,
2) hydrogen peroxide vapour.
2. The symbol designating the sterilization method used is visible on the de-
vice label (symbols are described in the footer of this Instructions For Use).
3. Prior to use of a sterile device the following rules apply:
1) Check out the expiration date of sterilization. Do not use the device with
an overstepped sterility date!
2) Check out if the sterile package is not damaged. Do not use the device
if the sterile package is damaged!
3)Check out the colour ofthesterility indicator onthesterilepackage which
indicates that sterilization of the device was performed. Do not use
the device if the sterility indicator colour is dierent than:
a) red - for devices sterilized with gamma radiation,
b) blue - for devices sterilized with hydrogen peroxide vapour.
4. CAUTION: products should be removed from their packagings in accor-
dance with aseptic rules.
9 RECOMMENDATIONS FOR IMPLANTS PROVIDED
NON-STERILE
1. The following recommendations apply to unused non-sterile implants.
An implant that has been implanted must not be re-processed and re-
used.
2. The implant which has not been used but got contaminated by contact
with the blood, tissue and/or body uids/materials, should not be used
again. The implant should be handled in accordance with applicable
hospital protocol. ChM does not recommend re-processing of contami-
nated implants. Should the contaminated implant be re-processed, ChM
bears no responsibility.
3. Prior to use of a non-sterile device, the following rules apply:
1) The device must undergo cleaning, disinfection and sterilization pro-
cedures.
2)Eective cleaning isa complicatedproceduredepending onthefollowing
factors: the quality of water, the type and the quantity of used deter-
gent,the technique ofcleaning (manual,automated),the properrinsing
and drying,the properpreparationof the device,the time, the tempera-
ture and carefulness of the person conducting this process.
3)The hospitalfacility remains responsible for the eectivenessofthe con-
ducted cleaning, packaging and sterilization processes with the use
of existing equipment, materials and properly trained personnel.
4. Preparation for washing and disinfection (for all methods)
1) Prior to cleaning, remove the implant from the original unit packaging.
Dispose of the packaging. Protect patient labels, provided with the im-
plant, against accidental loss or damage.
2) To avoid contamination, the implants should not have contact with
the contaminated devices/instruments.
3) Rinse under running water and remove possible surface dirt (resulting
from e.g.: damage to the unit packaging) using adisposable cloth, paper
towel or plastic brushes (nylon brushes are recommended).
4)CAUTION: Itisforbidden touse brushes made ofmetal,bristles ormateri-

9
als which could damage the implant.
5. Cleaning and disinfection process
1)This InstructionsforUse describes twovalidatedbyChM cleaning and dis-
infection methods: manual with ultrasound cleaning and automated
method. It is recommended to use automated procedures for cleaning
and disinfection (in the washer-disinfector).
2) The chosen washing and disinfecting agents must be suitable and ap-
provedfor use withmedicaldevices.It is importantto followthe instruc-
tionsandrestrictionsspecied bytheproducerof thosecleaning agents.
It is recommended to use aqueous solutions of washing-disinfecting
agentswitha pH valuebetween10.4and10.8. ChM used the following
materials during the validation process of the described recommenda-
tions for cleaning and disinfection. It is allowed to use other materi-
als than those listed below which may also give a comparable eect:
a) detergent - Dr.Weigert (producer) neodisher® MediClean forte (name
of the detergent);
b) disinfectant - Dr.Weigert (producer) neodisher® Septo Active (name
of disinfectant).
3) Manual with ultrasound cleaning
a) Equipment and materials: a device for ultrasound cleaning, soft, lint-
free cloths, plastic brushes, aqueous solutions: of cleaning agent, dis-
infecting agent or washing – disinfecting agent.
b) Prepare an aqueous solution of cleaning agent at temperature
of 40+/-2 °C and a pH of 10.4 - 10.8 (follow the information contained
in the instructions prepared by the manufacturer of the agent, in re-
spect of temperature, concentration, exposure time and water quality).
c) Immerse the implant in the aqueous solution of the cleaning agent
and subject it to ultrasound cleaning for 15 minutes.
d) Rinse the implant thoroughly under running water, paying particular
attention to the holes and places dicult to be cleaned. It is recom-
mended to rinse with demineralized water.
e)Visually inspecttheentiresurface ofthedevice for debrisand impurity.
Damagedimplants must beremoved.For dirty implants, the cleaning
process should be repeated.
f) Dry the device thoroughly using disposable, soft, lint-free cloth.
g) Prepare an aqueous solution of disinfecting agent at a temperature
of 20+/-2 °C using 20g of the agent per 1 liter of water. Immerse
the implant in the solution, exposure time – 15min (follow the in-
formation contained in the instructions prepared by the manufacturer
of the agent, in respect of temperature, concentration, exposure time
and water quality).
h) After the exposure time, rinse the product thoroughly under running
water, paying particular attention to the holes and places dicult
to be cleaned. It is recommended to rinse with demineralized water.
i) Dry the device thoroughly. It is recommended to dry the implant
in a dryer at a temperature ranging from 90°C to 110°C.
j) Visually inspect the entire surface of the device.
4) The automated method using a washer - disinfector
a) Equipment and materials: a washer - disinfector, aqueous solutions
of cleaning agent.
b) CAUTION: The equipment used for washing/disinfection should meet
the requirements of ISO 15883. Procedure of washing in the washer-
disinfector shall be performed according to internal hospital pro-
cedures, recommendations of the washing machine manufacturer,
and Instructions for Use prepared by the washing-disinfecting agent
manufacturer.
c)The device shouldundergoaprocessof machinewashing inthewash-
er-disinfector using the followingcycle parameters: (1) - pre-washing
in cold tap water, duration – 2min; (2) - washing in an aqueous solu-
tion of cleaning agent at 55+/-2 °C and pH of 10.4 - 10.8, duration –
10min; (3) - rinsing under demineralized water, duration – 2min; (4)

10
- thermal disinfection in demineralised water at 90°C, minimal dura-
tion– 5min; (5) -drying ata temperaturerangingfrom90°C to110°C,
duration - 40min.
6. Packaging
1) Washed and dried devices shall be packed in a packaging intended
for the recommended steam sterilization. The packaging and pack-
aging process have to meet the requirements of ISO 11607 standards.
The packagingproceduremust beperformed incontrolledpurity condi-
tions. The device must be packed in such a way that during its removal
fromthe packaging,when used,there is norisk for itsre-contamination.
7. Sterilization
1) Washed, disinfected, and dried device shall undergo the sterilization
process in accordance with the applicable procedures of the customer.
The recommendedmethodof sterilizationis vacuum-type steamsteril-
ization (with water vapor under overpressure):
a) temperature: 134°C,
b) minimum exposure time: 7 min,
c) minimum drying time: 20 min.
2) CAUTION
a) The sterilization process must be validated and routinely monitored
in accordance with the requirements of EN ISO 17665-1.
b) Sterilization must be eective and in accordance with requirements
of the EN 556-1 standard to ensure the required level of guaran-
teed sterility SAL10-6 (where SAL stands for Sterility Assurance Level).
c) The implant cannot be sterilized in the unit package in which it was
delivered.
d) The method of sterilization using ethylene oxide, gas plasma and dry
heat should not be used, unless the Instructions for Use for the prod-
uct contains sterilization recommendations using these methods.
e)The above-mentioned principlesfor cleaningand sterilizationmust be
applied to all implants intended for implantation.
f) The surgical instruments used for implants insertion should also be
covered by cleaning and sterilization procedure.
10 RE-STERILIZATION
1. It is permitted to re-sterilize a device in case, when its sterile packaging
hasbeen damaged or opened. In this case,the product should be washed
and sterilizedin the mannerdescribed inthechapter RECOMMENDATIONS
FORIMPLANTS PROVIDED NON-STERILE.
1) ATTENTION: Implant that has been in contact with body tissues or uids
of a patient cannot be re-sterilized or implanted to another patient.
11 PRECAUTIONS
1. Implant is intended for single use only. After removing the implant from
the patient’sbody,it mustbesecured against re-use,andthen nally dis-
posed of in accordance with current hospital procedures.
2. Underno circumstances is it allowedtore-use or re-implant onceused de-
vice. Even if the removed implant appears to be undamaged, it may have
small latent defects or internal stresses, which could lead to early failure,
fatigue wear, and as a result to e.g. an implant breakage.
3. Misuse of instruments or implants may cause injury to the patient or op-
erative personnel.
4. Avoid damaging implant surface and deforming its shape during the im-
plantation; the damaged implant cannot be implanted or left in the pa-
tient’s body.
5. Insertion, removal and adjustment of implants must only be done with
instruments specially designated for those implants and manufactured
by ChM sp. z o.o.
6. Use of ChM’s implants and instruments in combination with implants
and instruments from other manufacturers may cause damage or failure
of those implantsor instrumentsandmay lead to improper course of sur-

11
gery and healing process.
7.While rare,intraoperativefractureor breakage oftheinstrument can occur.
Instrumentswhichhavebeensubjected toprolongeduseorexcessiveforce
aremoresusceptibleto fractures,depending oncaretakenduring surgery,
numberof proceduresperformed and attention paid. Instruments should
be examined for wear or damage prior to surgery.
8. While inserting the screw, it is essential to correctly set the screwdriver
in relationto the screw.Followingthe instructionsgivenallowsfor reduc-
tion of the risk of mechanical damage to the screw, screwdriver, or hole
in the bone:
1) screwdriver should be set in the screw axis,
2) apply proper axial pressure to ensure that the screwdriver goes as deep
in the head of the bone screw as possible,
3) the nal phase of tightening shall be performed carefully.
12 POST-OPERATIVE RECOMMENDATIONS
1. Itis essential tofollow all ofphysician’spostoperativedirections and warn-
ings.
2. It is essential to conrm proper position of the implant by roentgeno-
graphic examination.
3. In postoperative treatment period, the correctness of implant position-
ing and immobilization of union should be conrmed by roentgeno-
graphic examination.
4. The patient should be warned about the risk should he fail to follow
the above-mentioned rules, or should he be unavailable for follow-up
clinical examination.
5. The surgeon must instruct the patient to report any unusual changes
of the operative site to his/her physician. If any change at the site has
been detected, the patient should be closely monitored.
6. The patient should be informed about the type of implant material.
7. The patient should be warned to inform the medical sta about the in-
serted implants prior to any MRI procedure.
8.The patient shouldbe advisednotto smokeorconsumealcohol excessively
during the period of treatment.
9. If the patient is involved in an occupation or activity which may apply
excessive stress on the implant (e.g. substantial walking, running, lifting,
or muscle strain) the surgeon must advisethepatientthat resultant forces
can cause implant failure.
10.The surgeon mustinstructthepatientregardingappropriateand restricted
activities during consolidation and maturationofthefusion mass in order
to preventplacingexcessivestresson the implants whichmay leadtoxa-
tion or implant failure and further clinical problems. The implant may
break or become damaged as a result of strenuous activity or trauma,
and may need to be replaced in the future.
11. Failure to provide appropriate immobilization of bone when delayed
or non-union occursmaylead toexcessivefatiguestressesin the implant.
Fatiguestressesmaybe a potentialcause ofimplant becoming bent, loos-
ened or fractured. If non-union or implant bending, loosening or fracture
occurs, the patient should be immediately revised, and the implants
should be removed before any serious injuries occur.The patient must
be appropriately warned about these risks and closely monitored to en-
sure compliance during the treatment until the bone union is conrmed.
12.Afterlocking the nail inthebone itis necessaryto verifywhether the lock-
ing screws have been inserted in the nail holes.
13 CONSIDERATIONS FOR REMOVAL OF THE IMPLANT
AFTER TREATMENT
1. When bone union is achieved, the implants serve no functional purpose
and theirremovalis recommended.Thepossibility ofanothersurgical pro-
cedure and associated risks must be analysed and discussed with the pa-

12
tient.The nal decision on implant removal is up to the surgeon. In most
patients, removal is indicated because the implants are not intended
to transfer forces developed during normal activities.
2. If the device is not removed following completion of its intended use, one
or more complications may occur, in particular:
1) Corrosion and local tissue reaction or pain.
2) Migration of the implant, possibly resulting in injury.
3) Risk of additional injury from postoperative trauma.
4) Bending, loosening, or breakage, which could make implant removal
dicult or impossible.
5) Pain, discomfort, or abnormal sensation due to the presence of the im-
plant.
6) Increased risk of infection.
7) Bone loss due to the stress shielding.
8) Potentially unknown and/or unexpected long term eects.
3. Implant removal should be followed by adequate postoperative manage-
ment to avoid fracture, re-fracture, or other complications.
4. Implantable stainless steel implant shall be removed after period of not
more than two years after its implantation.
5. Remove CHARFIX2 FN implants and femoro-tibial nails only in the case
of complications.
If these instructions appear unclear, please contact the manufacturer, who
shallprovide all required explanations.
Updated INSTRUCTIONS FOR USE are available at the following website:
www.chm.eu IFU-001/07.19; Date of verication: July 2019

13
INSTRUKCJA STOSOWANIA
Ważne informacje dotyczące produktu
SYSTEM GWOŹDZI BLOKOWANYCH
Charfix Femoral Nail
1 PRZEZNACZENIE I WSKAZANIA
1. Gwoździe kostne należące do systemu CHARFIX, CHARFIX2, ChFN, ChFN2
służą do śródszpikowej osteosyntezy złamań kości długich. Wskazaniem
do leczenia złamań kości są: złamania poprzeczne i krótkoskośne, złama-
nia w stree krętarzowej (przez-, między-, podkrętarzowe), złamania wie-
loodłamowe, złamania otwarte I, II, IIIA stopnia wg Gustillo-Andersona,
złamania patologiczne, zaburzenia zrostu (stawy rzekome) powstałe po
leczeniu innymi metodami, osteotomie korekcyjne, złamania podstawy
szyjki.GwoździekostnesystemuCHARFIX2 FNoraz gwoździeudowopod-
udziowe mają zastosowanie w przypadku chorób związanych ze stawem
kolanowym, a w szczególności: nieudana alloplastyka stawu, złamania
okołoprotezowe,stanpourazowy,którynie pozwala na implantacjeendo-
protezykolana,stanpoinfekcji,zmiany onkologiczne,utratalub uszkodze-
nie aparatu wyprostnego, artrodeza stawu kolanowego.
2.Elementy blokujące gwoździekostne:wkręty blokujące, wkręty rekonstruk-
cyjne, zestawy blokujące, śruby ustalające, śruba kompresyjna, śruby ze-
spalające, śruba zaślepiająca, śruba spiralna oraz nakrętki służą do bloko-
wania gwoździ kostnych ww. systemów stosowanych w leczeniu złamań
kości długich metodą zespolenia śródszpikowego.
3. Stabilne zespolenieodłamów kostnych uzyskuje się poprzez zablokowanie
właściwego gwoździa w kanale szpikowym kości przy użyciu elementów
blokujących, odpowiednich dla określonego typu gwoździa oraz zastoso-
wanej metody zespolenia.
4. Gwoździei tuleje teleskopoweprzeznaczonesą do leczeniazłamańu dzieci
i młodzieży z wrodzoną łamliwością kości.
5.GwóźdźpiętowysystemuCHARFIX2 stosowanyjest do leczeniazłamań kości
piętowej i artrodezy stawu skokowo - piętowego.
6.Wprzypadku stosowaniagwoździsystemu CHARFIX2 FNpołączonego z re-
sekcją stawu kolanowego stosować dystanse.
7. Gwóźdź promieniowy przeznaczony jest do leczenia złamań części dal-
szej kości promieniowej.
8. Do implantacji wyżej wymienionych wyrobów przeznaczone są specjali-
styczne instrumentaria rmy ChM. Wraz z instrumentarium dostarcza-
na jest m.in. ilustrowana technika operacyjna. Technika operacyjna nie
stanowi szczegółowej instrukcji postępowania-o wyborze odpowiedniej
techniki i szczegółowego postępowania chirurgicznego dla określonego
pacjenta decyduje lekarz.
2 PRZECIWWSKAZANIA
1. Przeciwwskazania mogą być względne i bezwzględne. Wybór odpowied-
niego implantu musi być dokładnie rozważony w oparciu o całościową
ocenę stanu pacjenta. Wymienione poniżej stany mogą uniemożliwić lub
zmniejszyć szansę na powodzenie zabiegu:
1) Infekcja miejsca zabiegu operacyjnego.
2) Objawy miejscowego zapalenia.
3) Gorączka lub leukocytoza.
4) Ciąża.

14
5)Chorobyukładu nerwowo-mięśniowego,któremogą stwarzać wysokiego
stopnia ryzyko niepowodzenia operacji lub powikłań pooperacyjnych.
6) Każdy inny stan wykluczający osiągnięcie potencjalnych korzyści z za-
stosowania implantu i zaburzający normalny proces przebudowy kości,
np.: obecność nowotworów lub wad wrodzonych, złamanie w pobliżu
miejsca operacji, przyspieszone OB nie wyjaśnione innymi chorobami,
podwyższona liczba białych krwinek lub wyraźne przesunięcie w lewo
rozmazu białych krwinek.
7)Podejrzewanalubudokumentowanaalergiabądźnietolerancjana mate-
riałimplantu.Lekarzpowinien ustalić, czypacjentreagujealergiczniena
materiał implantu (składniki stopowe materiałów implantowych przed-
stawiono w rozdz. MATERIAŁ IMPLANTU).
8) Każda sytuacja, w której nie jest potrzebna interwencja chirurgiczna.
9) Każda sytuacja nieopisana we wskazaniach.
10) Każdy pacjent odmawiający przestrzegania zaleceń pooperacyjnych;
choroba psychiczna, podeszły wiek lub uzależnienie (stany te mogą
sprawić,iż pacjent będzie ignorował ograniczenia i środki ostrożnościpod-
czas stosowania implantu).
11) Każda sytuacja, w której wybrane elementy implantu byłyby zbyt duże
lub zbyt małe, aby uzyskać pozytywny rezultat.
12) Każda sytuacja, w której wymagane jest łączenie elementów różnych
systemów wykonanych z odmiennych metali.
13) Każda sytuacja, w której zastosowanie implantu zaburzyłoby pro-
cesy zjologiczne.
14) Zaburzenia ukrwienia w rejonie implantacji.
15) Chorobliwa otyłość (określona zgodnie z normami WHO).
16) Każda sytuacja, w której miejsce operacji nie jest dostatecznie po-
kryte tkanką.
17) Złamania trzonowe, jeżeli odległość szczeliny złamania od najbliższego
wkręta blokującego gwóźdź będzie mniejsza niż 5 cm.
2. Powyższa lista nie wyczerpuje wszystkich przeciwwskazań.
3 SKUTKI NIEPOŻĄDANE
1. Skutki niepożądane mogą wymagać reoperacji lub rewizji. Chirurg powi-
nien ostrzec pacjenta o możliwości wystąpienia skutków niepożądanych.
2. Poniższa lista nie wyczerpuje wszystkich zdarzeń niepożądanych. Istnieje
ryzyko wystąpieniazdarzeńniepożądanychonieznanej etiologii, na które
może się złożyć wiele czynników.
3. Do potencjalnych zdarzeń niepożądanych należą m.in.:
1) Uszkodzenie implantu (złamanie, deformacja lub rozłączenie).
2)Wczesnelubpóźne poluzowanielub przemieszczeniesię implantu zpier-
wotnego miejsca osadzenia.
3) Możliwość korozji wynikająca z kontaktu z innymi materiałami.
4)Reakcjaorganizmu na implantyjakociałaobce,jak na przykładmożliwość
utworzeniasięnowotworu,rozwinięciasięchorobyautoimmunologicz-
nej i/lub bliznowacenia.
5) Ucisk na otaczające tkanki lub narządy.
6) Infekcja.
7) Pęknięcia kości lub zjawisko„stress shielding”powodujące ubytek kości
powyżej, poniżej lub w operowanym miejscu.
8) Krwotok z naczyń krwionośnych i/lub krwiaki.
9) Ból.
10) Niemożność wykonywania normalnych, codziennych czynności.
11) Zmiana stanu psychicznego.
12) Zgon.
13) Zakrzepica żył głębokich, zakrzepowe zapalenie żył.
14) Wystąpienie trudności z oddychaniem, np.: zatorowość płucna, nie-
dodma, zapalenie oskrzeli, zapalenie płuc, infekcje płucne, zaburzenia
wzrostu płuc, kwasica oddechowa, itp.
15) Tworzenie się blizn, które mogą skutkować zaburzeniami neurologicz-
nymi lub uciskiem wokół nerwów i/lub bólem.

15
16) Opóźnienie zrostu kostnego lub brak widocznej masy zrostowej i wy-
kształcenie stawu rzekomego.
17) Utrata właściwej krzywizny i/lub długości kości.
4 OSTRZEŻENIA
1. Pacjentowi należy przekazać ważne informacje medyczne znajdujące się
w tym dokumencie.
2. Wybór odpowiedniego kształtu i wielkości implantu dla każdego pacjenta
jestnajważniejszym elementem zapewniającympowodzenieoperacji.Za
wybór ten odpowiedzialny jest chirurg.
3. Procedury przedoperacyjne i operacyjne, w tym znajomość technik chirur-
gicznychoraz odpowiednieumiejscowienie implantów są bardzoważnymi
czynnikami decydującymi o powodzeniu operacji.
4. Żaden implant nie jest w stanie przenosić obciążeń wynikających z ciężaru
ciała bez zachowania biomechanicznej ciągłości kości.
5. Wszystkie implanty chirurgiczne są podczas użytkowania poddawane po-
wtarzającym się naprężeniom,któremogąskutkowaćzmęczeniemmate-
riału i doprowadzić do zniszczenia implantu.
6.Aby zapobiec nadmiernymnaprężeniomw implancie, które mogłyby dopro-
wadzić do braku zrostu lub uszkodzenia implantu i towarzyszących temu
problemówklinicznych, chirurg musi poinformowaćpacjenta o ogranicze-
niach dotyczących aktywności zycznej w okresie leczenia.
7.Jeżelipraca lub aktywnośćpacjenta (m.in.: ciągłechodzenie,bieganie, dźwi-
ganie ciężarów, obciążanie mięśni) może wpłynąć na nadmierne obciąża-
nie implantu, pacjent musi być poinformowany, że wynikające z nich siły
mogą spowodować zniszczenie implantu.
8. Osiągnięcie pozytywnego wyniku nie zawsze jest możliwe u każdego pa-
cjenta.Tazasada odnosisięszczególniedoprzypadków operacji, w których
inneczynniki związane ze stanempacjenta mogą uniemożliwićosiągnię-
cie pożądanego rezultatu.
9. Ogromny wpływ na uzyskane rezultaty ma również odpowiedni dobór
pacjenta i przestrzeganie przez pacjenta stosownych zaleceń poopera-
cyjnych. U pacjentów palących tytoń dochodzi rzadziej do zrostu kości.
Pacjentów takich należy poinformować o tym fakcie i ostrzec ich przed
takimi konsekwencjami.
10.Nadwaga pacjenta może powodowaćdodatkowenaprężeniai odkształce-
niawyrobu, co możeprzyspieszać zmęczenie materiałuz któregojest wy-
konany implant i prowadzić do jego deformacji lub zniszczenia.
11. Pacjenci z otyłością, źle odżywiający się i/lub nadużywający alkoholu lub
narkotyków, jak równieżo słabejmuskulaturzei gorszej jakościkości i/lub
zporażeniem nerwówrównieżniesą najlepszymikandydatami do zabie-
gów stabilizacji chirurgicznej. Pacjenci ci nie mogą lub nie są gotowi do
przestrzegania zaleceń i ograniczeń pooperacyjnych.
12.Implanty sąprzeznaczonedo wspomagania procesuleczenia i NIE sąprze
-
znaczonedo zastępowania struktur i przenoszenia ciężaru ciaław sytuacji
niezakończonego procesu leczenia.
13. Implantmożepęknąć lub ulecuszkodzeniuw wyniku wzmożonej aktyw-
ności lub urazu oraz może w przyszłości wymagać wymiany.
14. Chirurg musi poinformować pacjenta, iż wyrób nie może i nie przywraca
w pełni funkcji i sprawności zdrowej osoby.
15.W sytuacjiopóźnionegozrostulubbraku zrostu kości, obciążanie implantu
możebyć przyczynąpotencjalnegowygięcia, obluzowania,rozłączenialub
złamania zmęczeniowego implantu.
16. Chirurg powinien poinformować pacjenta o całkowitym usztywnieniu
kończyny w przypadku zastosowania implantów systemu CHARFIX2 FN
oraz gwoździ udowo podudziowych.
5 OPAKOWANIE I PRZECHOWYWANIE
1. Implanty są wyrobami jednorazowego użytku, dostarczane są w postaci
sterylnej lub niesterylnej.

16
2. Implanty nieoznaczone jako sterylne są niesterylne.
3. Opakowanie implantu w momencie jego otrzymania musi być niena-
ruszone.
4. Implantymogą byćdostarczane wopakowaniujednostkowym. Opakowa-
nie jednostkowe wyrobu zawiera:
1) wersja sterylna - jedną sztukę wyrobu w stanie sterylnym. Typowym
opakowaniem jest podwójne opakowanie wykonane z tyvek-folii lub
pojedynczy blister.
2) wersja niesterylna - jedną sztukę wyrobu. Typowym opakowaniem
są torebki foliowe.
5. Implanty mogą być dostarczane na statywach, paletach (wyłącznie w wer-
sji niesterylnej).
6. Na opakowaniu sterylnym umieszczony jest wskaźnik sterylności.
7. Wyroby dostarczane są z etykietą. Etykieta ta (jako podstawowa) zawie-
ra m.in.:
1) Wyrób sterylny
a) Logo ChM i adres producenta.
b) Nazwę i rozmiar wyrobu oraz nr katalogowy wyrobu (REF),
np.:3.XXXX.XXX.
c) Nr partii produkcyjnej (LOT), np.: XXXXXXX.
d) Materiał implantu (patrz rozdział MATERIAŁ IMPLANTU).
e) Symbol STERILE - oznaczający wyrób sterylny oraz symbol meto-
dy sterylizacji, np. R lub VH2O2 (symbole opisano w stopce niniej-
szej instrukcji).
f) Numer partii sterylizacji, np.: S-XXXXXXX.
g) Piktogram wyrobu oraz symbole informacyjne (opisane w stopce
niniejszej instrukcji).
h) Datę ważności oraz metodę sterylizacji.
2) Wyrób niesterylny
a) Logo ChM i adres producenta.
b) Nazwę, rozmiar wyrobu oraz nr katalogowy wyrobu (REF),
np.:3.XXXX.XXX.
c) Nr partii produkcyjnej (LOT), np.: XXXXXXX.
d) Materiał implantu (patrz rozdział MATERIAŁ IMPLANTU).
e) Symbol NON-STERILE - oznaczający wyrób niesterylny.
f) Piktogram wyrobu oraz symbole informacyjne (opisane w stopce
niniejszej instrukcji).
8. Oprócz etykiety podstawowej wyrobu, na opakowaniu może być również
umieszczona etykieta pomocnicza, zawierająca specyczne wymagania
określonego obszaru rynku (np. wymagania prawne państwa, w którym
wyrób będzie dystrybuowany).
9.Wewnątrzopakowaniamożeznajdowaćsię:instrukcjastosowaniaorazety-
kietyprzeznaczonedoumieszczeniaw dokumentacji chorobowejpacjenta
(tzw. „etykiety pacjenta”).
10. W zależności od rozmiaru lub rodzaju wyrobu, na jego powierzchni
mogą być umieszczone następujące informacje: logo producenta, nr
partii produkcyjnej (LOT), nr katalogowy wyrobu (REF), rodzaj mate-
riału oraz rozmiar.
11. Implanty należy przechowywać w przeznaczonych dla nich opakowa-
niach ochronnych, w czystym i suchym pomieszczeniu w temperaturze
pokojowej i w warunkach zapewniających ochronę przed bezpośred-
nim nasłonecznieniem.
6 MATERIAŁ IMPLANTU
1. Identykacja materiałów
1) W zależności od użytego materiału, na powierzchni wyrobu mogą być
umieszczone następujące symbole:
a) Stal: symbol (S).
b) Tytan i jego stopy: symbol (T).
2) Implanty wykonane są:

17
a) Ze stali implantacyjnej.
b) Z implantacyjnego stopu tytanu.
3) Procentowa zawartość pierwiastków w materiałach implantacyjnych
(wartości max):
a) Stoptytanu wg ISO 5832-3/ASTM F136: | Al:6,75 |V:4,5 | Fe:0,3| O:0,2
| C:0,08 | N:0,05 | H:0,015 | Ti:reszta.
b) Stop tytanu wg ISO 5832-11/ASTM F1295: | Al:6,5 | Nb:7,5 | Ta:0,5 |
Fe:0,25 | O:0,2 | C:0,08 | N:0,05 | H:0,009 |Ti:reszta.
c) Stal wg ISO 5832-1/ASTM F138: | C:0,03 | Si:1,0 | Mn:2,0 | P:0,025 |
S:0,01 | N:0,1 | Cr:19,0 | Mo:3,0 | Ni: 15,0 | Cu:0,5 | Fe:reszta.
d) Stal wg ISO 5832-9/ASTM F1586: | C:0,08 | Si:0,75 | Mn:4,25 | P:0,025
| S:0,01 | N:0,5 | Cr:22,0 | Mo:3,0 | Nb:0,8 | Ni: 11,0 | Cu:0,25 | Fe:reszta.
4) UWAGA: elementy wykonane z implantacyjnego tytanu, stopu tytanu
i/lub stopu kobaltu mogą być stosowane łącznie, w ramach tego same-
gozestawuimplantów.Nigdy nienależy stosować elementów z tytanu,
stoputytanu i/lub stopu kobaltuw połączeniuz komponentamistalowy-
mi, ponieważ może to prowadzić do korozji i osłabienia wytrzymałości
mechanicznej implantów.
2. Kompatybilność z rezonansem magnetycznym
1) Implanty rmy ChM wykonane w całości lub zawierające elementy
ze stali implantacyjnej nie były oceniane pod kątem bezpieczeństwa
i kompatybilności z procedurami obrazowania metodą rezonansu ma-
gnetycznego.Wykonanie badania MRI dla tych implantów (w szcze-
gólności w polu magnetycznym o znacznej indukcji) może wiązać się
z potencjalnym ryzykiem, m.in.:
a) przemieszczenia lub rozgrzania implantu,
b) artefaktów na obrazach MR.
2)Implanty wykonanewcałości lub zawierające elementy ztytanu,stopów
tytanu i stopów kobaltu są warunkowo zgodne z badaniem metodą re-
zonansu magnetycznego.
3) Pacjent może być bezpiecznie skanowany przy zachowaniu następu-
jących parametrów:
a) statyczne pole magnetyczne o indukcji ≤ 3 tesli,
b) gradient przestrzenny pola magnetycznego ≤ 720 gausów/cm,
c)maksymalny dla danegosystemu MRIwspółczynnikabsorpcji swoistej
(SAR) wynoszący 3W/kg dla 15-minutowego czasu trwania skanu.
4) UWAGA: użytkownik powinien się bezwzględnie zapoznać z przeciw-
wskazaniami i ostrzeżeniami producenta urządzenia MRI, na którym
jest planowane wykonanie badania.
5) Obraz MR może być zakłócony, jeżeli obszar zainteresowania jest do-
kładnie w tym samym obszarze lub w obszarze zbliżonym do pozy-
cji implantu.
6) Nie należy wykonywać badania rezonansem magnetycznym jeżeli wy-
stępują wątpliwości odnośnie integralności tkanek oraz prawidłowo-
ści zamocowania implantu lub jeśli właściwa lokalizacja implantu nie
jest możliwa.
7 ZALECENIA PRZEDOPERACYJNE
1. Do procedury powinni zostać wybrani wyłącznie pacjenci spełniający kry-
teria opisane w rozdziale PRZEZNACZENIE I WSKAZANIA.
2. Należy unikać stosowania procedury u pacjentów, u których występują
takie stany i/lub predyspozycje, jakie wymieniono w rozdziale PRZE-
CIWWSKAZANIA.
3. Przed podjęciem decyzji o implantacji, lekarz powinien poinformować
chorego o wskazaniach i przeciwwskazaniach do tego typu zabiegu oraz
możliwości wystąpienia powikłań po operacji. Pacjent powinien również
zrozumieć cel i sposób przeprowadzenia zabiegu, a także poznać efekt
funkcjonalny i estetyczny tego sposobu leczenia. Właściwa diagnoza kli-
nicznaidokładne zaplanowanie operacji wrazz jejperfekcyjnym wykona-
niem rozstrzygają o dobrym wyniku końcowym leczenia.
4. Lekarz powinien ustalić, czy pacjent reaguje alergicznie na materiał im-

18
plantu, zlecając wykonanie odpowiednich testów (składniki stopowe ma-
teriałów implantowych przedstawiono w rozdziale MATERIAŁ IMPLANTU).
5.Zabieg implantacji powinien wykonaćchirurgznający odpowiednie zasady
itechnikioperacyjne oraz posiadającypraktycznąumiejętność posługiwa-
niasięinstrumentarium rmy ChM. Zawybórodpowiedniej techniki ope-
racyjnej dla danego pacjenta jest odpowiedzialny lekarz.
6. Zabieg musi być starannie zaplanowany. Rozmiar implantu niezbędnego
dla danego przypadku należy ustalić jeszcze przed rozpoczęciem operacji.
Wchwiliprzystąpienia dooperacjidostępnypowinienbyćodpowiedniza-
pasimplantówowymaganych rozmiarach,a także większychi mniejszych
od tych, jakie mają być użyte.
7. Chirurg powinien być zaznajomiony z poszczególnymi elementami sys-
temu implantów jeszcze przed ich użyciem, a także powinien osobiście
sprawdzić kompletność wszystkich potrzebnych części i instrumentów
przed rozpoczęciem operacji.
8.Implantu nie możnaużyć,jeżeli pierwotneopakowaniesterylnejest uszko-
dzone.Sterylnośćnie możebyćzagwarantowana,jeżeli opakowaniezosta-
ło zniszczone. Sprawdzić dokładnie przed użyciem.
9. Implanty dostarczane są w opakowaniach ochronnych. W chwili odbioru
opakowania powinny być nienaruszone.
10. Wszystkie implanty i narzędzia przed użyciem należy poddać procesom
mycia, dezynfekcji i sterylizacji, chyba że zostały dostarczone w stanie
jałowym. Na wszelki wypadek powinny być dostępne dodatkowe, ste-
rylne elementy.
11.Przed rozpoczęciemzabiegu przeznaczonedo wszczepieniaimplanty nale-
żydokładnie skontrolowaćpodkątempotencjalnychuszkodzeń(takichjak
zarysowaniapowierzchni, wyszczerbienia, ślady korozjii deformacje kształ-
tu). Implant uszkodzony nie może zostać wszczepiony.
8 ZALECENIA DLA IMPLANTÓW DOSTARCZANYCH
JAKO STERYLNE
1. Implant sterylny - jest dostarczany w opakowaniu sterylnym, na którym
umieszczono napis:„STERILE”. Napis oznacza, że wyrób jest sterylny, a za
proces sterylizacji w pełni odpowiedzialny jest producent. Sterylizacja
przeprowadzana jest z użyciem jednej z następujących metod:
1) promieniami gamma, stosując minimalną dawkę 25kGy,
2) parą nadtlenku wodoru.
2. Etykieta wyrobuzawierasymbol informującyo użytej metodziesterylizacji
(symbole opisano w stopce niniejszej instrukcji).
3. Przed użyciem wyrobu sterylnego należy przestrzegać poniższych zasad:
1) Sprawdzić datę ważności sterylizacji. Nie używać wyrobu z przekroczo-
nym terminem sterylności!
2) Sprawdzić,czy opakowaniesterylne jestnieuszkodzone.Nie używać wy-
robu w uszkodzonym opakowaniu sterylnym!
3) Sprawdzić kolor wskaźnika sterylności na opakowaniu sterylnym, który
świadczy o przeprowadzonej sterylizacji wyrobu. Nie należy używać
wyrobu posiadającego inny kolor wskaźnika niż:
a) czerwony – dla wyrobów sterylizowanych promieniami gamma,
b) niebieski – dla wyrobów sterylizowanych parą nadtlenku wodoru.
4. UWAGA: produkty należy wyjmować z opakowań w sposób zgodny z za-
sadami aseptyki.
9 ZALECENIA DLA IMPLANTÓW DOSTARCZANYCH JAKO
NIESTERYLNE
1. Poniższe zalecenia dotyczą postępowania z nieużywanymi implantami
niesterylnymi. Raz wszczepionego implantu nigdy nie wolno poddawać
reprocesowaniu i używać ponownie.
2. Implant, który nie był używany a uległ zabrudzeniu przez kontakt z krwią,
tkankąi/lub płynami/materiałami ustrojowymi, nie powinienbyćużywa-
nyponownie.Należyz nim postępowaćzgodnie ze stosowanymw szpitalu

19
protokołem.Firma ChM nie zalecareprocesowaniazabrudzonychimplan-
tów. W przypadkuzastosowaniareprocesowaniawobeczabrudzonychim-
plantów rma ChM nie ponosi żadnej odpowiedzialności.
3.Przed użyciem wyrobuniesterylnego należy przestrzegaćponiższychzasad:
1)Wyróbmusi byćpoddany procesom czyszczenia,dezynfekcji i sterylizacji.
2) Dokładne czyszczenie jest procesem złożonym, którego powodzenie
zależy między innymi od: jakości wody, ilości i rodzaju środka myjące-
go, metody czyszczenia (ręcznej, automatycznej), dokładności płukania
i suszenia, prawidłowego przygotowania wyrobu, czasu, temperatury
oraz staranności osoby odpowiedzialnej za przebieg czyszczenia, itp.
3) Placówka szpitalna pozostaje odpowiedzialna za skuteczność prze-
prowadzenia przez nią procesów czyszczenia, pakowania i sterylizacji
z użyciem posiadanego sprzętu, materiałów oraz odpowiednio prze-
szkolonego personelu.
4. Przygotowanie do czyszczenia i dezynfekcji (dla wszystkich metod)
1) Przed czyszczeniem implant należy wyjąć z oryginalnego opakowa-
nia jednostkowego. Opakowanie należy wyrzucić. Etykiety pacjen-
ta dostarczone wraz z implantem należy chronić przed zagubieniem
lub zniszczeniem.
2) Aby uniknąć skażenia, implanty nie powinny mieć kontaktu z zabrudzo-
nymi wyrobami/narzędziami.
3) Płukaćbieżącą wodą iusunąć ewentualne zabrudzenia powierzchni (po-
wstałenp. w wynikuuszkodzeniaopakowaniajednostkowego),używając
ściereczekjednorazowych, ręcznikówpapierowychlub szczotekwykona-
nych z tworzyw sztucznych (zalecane są szczotki nylonowe).
4) UWAGA: zabrania się stosowania szczotek metalowych i wykonanych
z włosia oraz materiałów, które mogłyby spowodować uszkodzenie
wyrobu.
5. Proces czyszczenia i dezynfekcji
1) Niniejsza instrukcja zawiera opis dwóch zwalidowanych przez rmę
ChM metod czyszczenia i dezynfekcji: ręczną z czyszczeniem ultradź-
więkowym oraz metodę automatyczną. Zaleca się używanie zautoma-
tyzowanych procedur czyszczenia i dezynfekcji (w myjni dezynfektorze).
2) Wybrane z dostępnych na rynku środki myjące i dezynfekujące powinny
być odpowiednie i zatwierdzone do użycia z wyrobami medycznymi.
Należy postępować zgodnie z instrukcjami i zastrzeżeniami podanymi
przezproducentówtakichśrodków. Zalecasię stosowanie wodnych roz-
tworów środków myjących i dezynfekujących o wartości pH pomiędzy
10,4 a 10,8. Firma ChM stosowała następujące materiały eksploatacyj-
ne podczas procesu walidacji opisywanych zaleceń dotyczących czysz-
czenia i dezynfekcji. Dopuszcza się stosowanie innych niż wymienione,
dostępnych materiałów eksploatacyjnych, które mogą również dawać
porównywalny efekt:
a) środek myjący - Dr.Weigert (producent) neodisher® MediClean forte
(nazwa środka myjącego);
b)środek dezynfekujący-Dr.Weigert (producent)noedisher® Septo Active
(nazwa środka dezynfekującego).
3) Metoda ręczna z czyszczeniem ultradźwiękowym
a) Wyposażenie i środki: urządzenie do czyszczenia ultradźwiękowe-
go, miękkie, niepozostawiające włókien tkaniny, szczotki z tworzyw
sztucznych, wodny roztwór środka myjącego, dezynfekującego lub
myjąco – dezynfekującego.
b) Przygotować wodny roztwór środka myjącego o temperaturze 40+/-
2 °C i wartości pH 10,4 - 10,8 (należy postępować zgodnie z informa-
cjami zawartymi w instrukcji opracowanej przez producenta danego
środka,odnośnie temperatury,stężenia, czasu ekspozycji i jakości wody).
c) Implant całkowicie zanurzyć w wodnym roztworze środka myjącego
i poddać czyszczeniu ultradźwiękowemu przez 15 minut.
d) Implant starannie wypłukać pod bieżącą wodą, zwracając szczególną
uwagę na otwory i miejsca trudnodostępne. Zalecane jest płukanie
w wodzie zdemineralizowanej.

20
e) Wzrokowo skontrolować całą powierzchnię implantu w celu zapew-
nienia, że usunięto wszystkie zanieczyszczenia. Uszkodzone implanty
muszązostaćusunięte.Implanty zabrudzone powinny zostać poddane
procesowi czyszczenia ponownie.
f) Wyrób starannie wysuszyć jednorazową, miękką, niepozostawiają-
cą włókien tkaniną.
g) Przygotować wodny roztwór środka dezynfekującego o temperatu-
rze 20+/-2 °C, stosując 20g środka na 1 litr wody. Implant zanurzyć
całkowicie w roztworze, czas ekspozycji 15 minut (należy postępo-
wać zgodnie z informacjami zawartymi w instrukcji opracowanej przez
producenta danego środka, odnośnie temperatury, stężenia, czasu eks-
pozycji i jakości wody).
h) Po upływie czasu ekspozycji wyrób starannie wypłukać pod bieżącą
wodą,zwracającszczególnąuwagęna otworyi miejsca trudnodostęp-
ne. Zalecane jest płukanie w wodzie zdemineralizowanej.
i) Wyrób starannie wysuszyć. Zalecane jest suszenie w suszarce, w tem-
peraturze z zakresu od 90°C do 110°C.
j) Wzrokowo skontrolować całą powierzchnię wyrobu.
4) Metoda automatyczna z użyciem myjni – dezynfektora
a) Wyposażenie i środki: myjnia-dezynfektor, wodny roztwór środka
myjącego.
b) UWAGA: Sprzęt do mycia/dezynfekcji powinien spełniać wymogi
określone w normie ISO 15883. Mycie w myjni-dezynfektorze należy
przeprowadzić zgodnie z wewnątrz-szpitalnymi procedurami postę-
powaniaorazzaleceniami producenta danego urządzeniamyjąco-de-
zynfekującego,a takżezgodnie zinstrukcjąstosowaniadanegośrodka
myjącego opracowaną przez jego producenta.
c) Implant poddać myciu maszynowemu w myjni-dezynfektorze stosu-
jącnastępująceparametry cyklu:(1)- mycie wstępne w zimnejwodzie
wodociągowej, czas 2min; (2) - mycie w wodnym roztworze środka
myjącego w temperaturze 55+/-2 °C i wartości pH 10,4 - 10,8, czas
10 min; (3) - płukanie w wodzie zdemineralizowanej, czas 2min; (4) -
dezynfekcja termiczna w wodzie zdemineralizowanej o temperaturze
90°C, czas minimum 5 min; (5) – suszenie w temperaturze z zakresu
od 90°C do 110°C, czas 40min.
6. Pakowanie
1) Wyczyszczone i wysuszone implanty należy zapakować w opakowanie
przeznaczone do zalecanej sterylizacji parowej. Opakowanie oraz pro-
ces pakowania muszą spełniać wymagania norm serii EN ISO 11607.
Pakować w warunkach kontrolowanej czystości.Wyrób musi być tak
zapakowany, aby podczas wyjmowania z opakowania, w chwili użycia
nie nastąpiła ponowna kontaminacja.
7. Sterylizacja
1)Wyrób umyty,zdezynfekowanyi wysuszonypoddaćprocesowisterylizacji
zgodnie z obowiązującymi procedurami klienta. Zalecana metoda ste-
rylizacji to próżniowa sterylizacja parowa (parą wodną w nadciśnieniu):
a) temperatura: 134°C;
b) minimalny czas ekspozycji: 7 min;
c) minimalny czas suszenia: 20 min.
2) UWAGA:
a) Proces sterylizacji musi być zwalidowany i rutynowo kontrolowany
zgodnie z wymaganiami normy EN ISO 17665-1.
b) Metoda sterylizacji musi gwarantować skuteczność i być zgodna
z wymogami normy EN 556-1 w celu spełnienia wymaganego po-
ziomu gwarantowanej sterylności SAL 10
-6
(gdzie SAL oznacza Ste-
rility Assurance Level).
c) Implant nie może być sterylizowany w opakowaniu jednostkowym,
w którym został dostarczony.
d)Metody sterylizacjitlenkiemetylenu, plazmą gazowąi ciepłem suchym
niepowinnybyćstosowane,chyba żeinstrukcjastosowaniadladanego
wyrobuzawierazaleceniadotyczące sterylizacjizapomocą tychmetod.
This manual suits for next models
3
Table of contents
Languages:
Other ChM Medical Equipment manuals

Popular Medical Equipment manuals by other brands


IEM
IEM Mobil-O-Graph Instructions for use

ARJO HUNTLEIGH
ARJO HUNTLEIGH Voyager Portable Instructions for use

BioMedical Life Systems, Inc.
BioMedical Life Systems, Inc. BioStim NMS2 instructions

Smith & Nephew
Smith & Nephew TRIGEN SURESHOT user manual

DaVinci
DaVinci Hypermax OXYGEN instruction manual

ARJO HUNTLEIGH
ARJO HUNTLEIGH Enterprise 8600 Instructions for use