Sun-Tech CT40 User manual

Spot-check Vital Signs Device
Advanced Configuration Application

80-0072-00-MO-RevCSunTech CT40 Advanced Configuration Application | 2
2016/08/17
Changes
This manual is identified as Part number: 80-0072-00. The most recent is available for download from the SunTech
Medical website. Should you notice errors or omissions in this manual, please notify us at:
SunTech Medical, Inc.
507 Airport Boulevard, Suite 117
Morrisville, NC 27560 USA
Tel: 800.421.8626
919.654.2300
Fax: 919.654.2301
Email: CustomerService@SunTechMed.com Web: www.SunTechMed.com
User Responsibility
Your SunTech CT40 is designed to perform in conformity with the description contained in this operation manual and
accompanying labels and inserts, when assembled, operated, maintained and repaired in accordance with the
instructions provided.
Further, the user of the device bears sole responsibility for any malfunction that results from improper use, faulty
maintenance, improper repair, damage or alteration by anyone other than SunTech Medical or authorized service
personnel.
Copyright Information
All content in this manual is the proprietary information of SunTech Medical and is provided solely for purposes of
operation, maintenance or service of the SunTech CT40. This manual and the SunTech CT40 described in it are
protected under copyright law under which they may not be copied, in whole or in part, without written consent of
SunTech Medical.
The information in this manual is furnished for guidance only, is subject to change without notice, and should not be
construed as a commitment by SunTech Medical. SunTech Medical assumes no liability for errors or inaccuracies
that may appear in this manual.
© 2016 SunTech Medical. All rights reserved.

80-0072-00-MO-RevCSunTech CT40 Advanced Configuration Application | 3
2016/08/17
Welcome to the SunTech CT40
Thank you for choosing this SunTech CT40 for accurate spot checking of vital signs.
The SunTech CT40 is designed to be very easy and efficient to use. The mobile device provides a lot of functionality
in a compact, cost-effective package. The device can perform automatic blood pressure checks, including averaging
of multiple blood pressure readings. It also offers an option to use a stethoscope for traditional auscultatory blood
pressure measurement. The SunTech CT40 offers robust memory and also can connect to your EMR system. In
addition, there are options for pulse oximetry and temperature measurement. The device can easily connect to a
barcode scanner or printer.

80-0072-00-MO-RevCSunTech CT40 Advanced Configuration Application | 4
2016/08/17
Table of Contents
Changes.................................................................... 2
User Responsibility................................................... 2
Copyright Information.............................................. 2
Welcome to the SunTech CT40............................... 3
1. Introduction........................................................ 5
System Requirements.............................................. 5
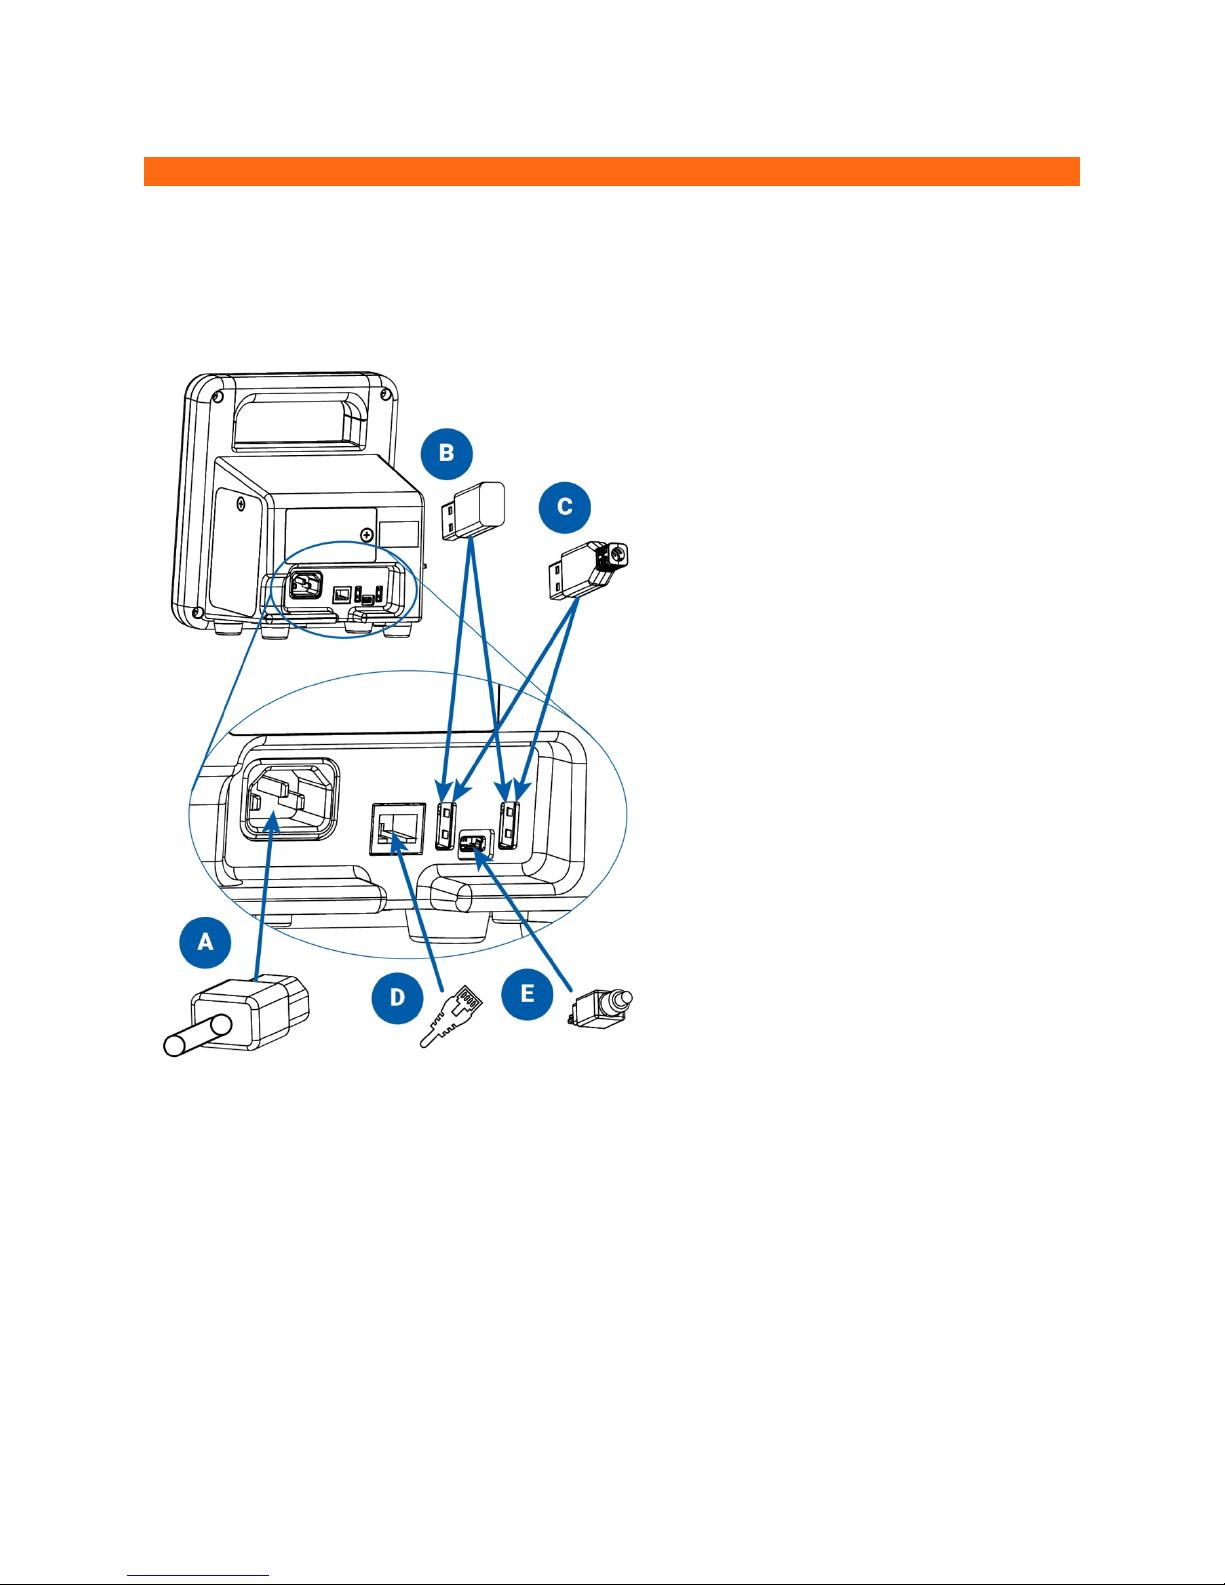
2. Connecting the CT40 .......................................... 6
3. Accessing the application ................................... 7
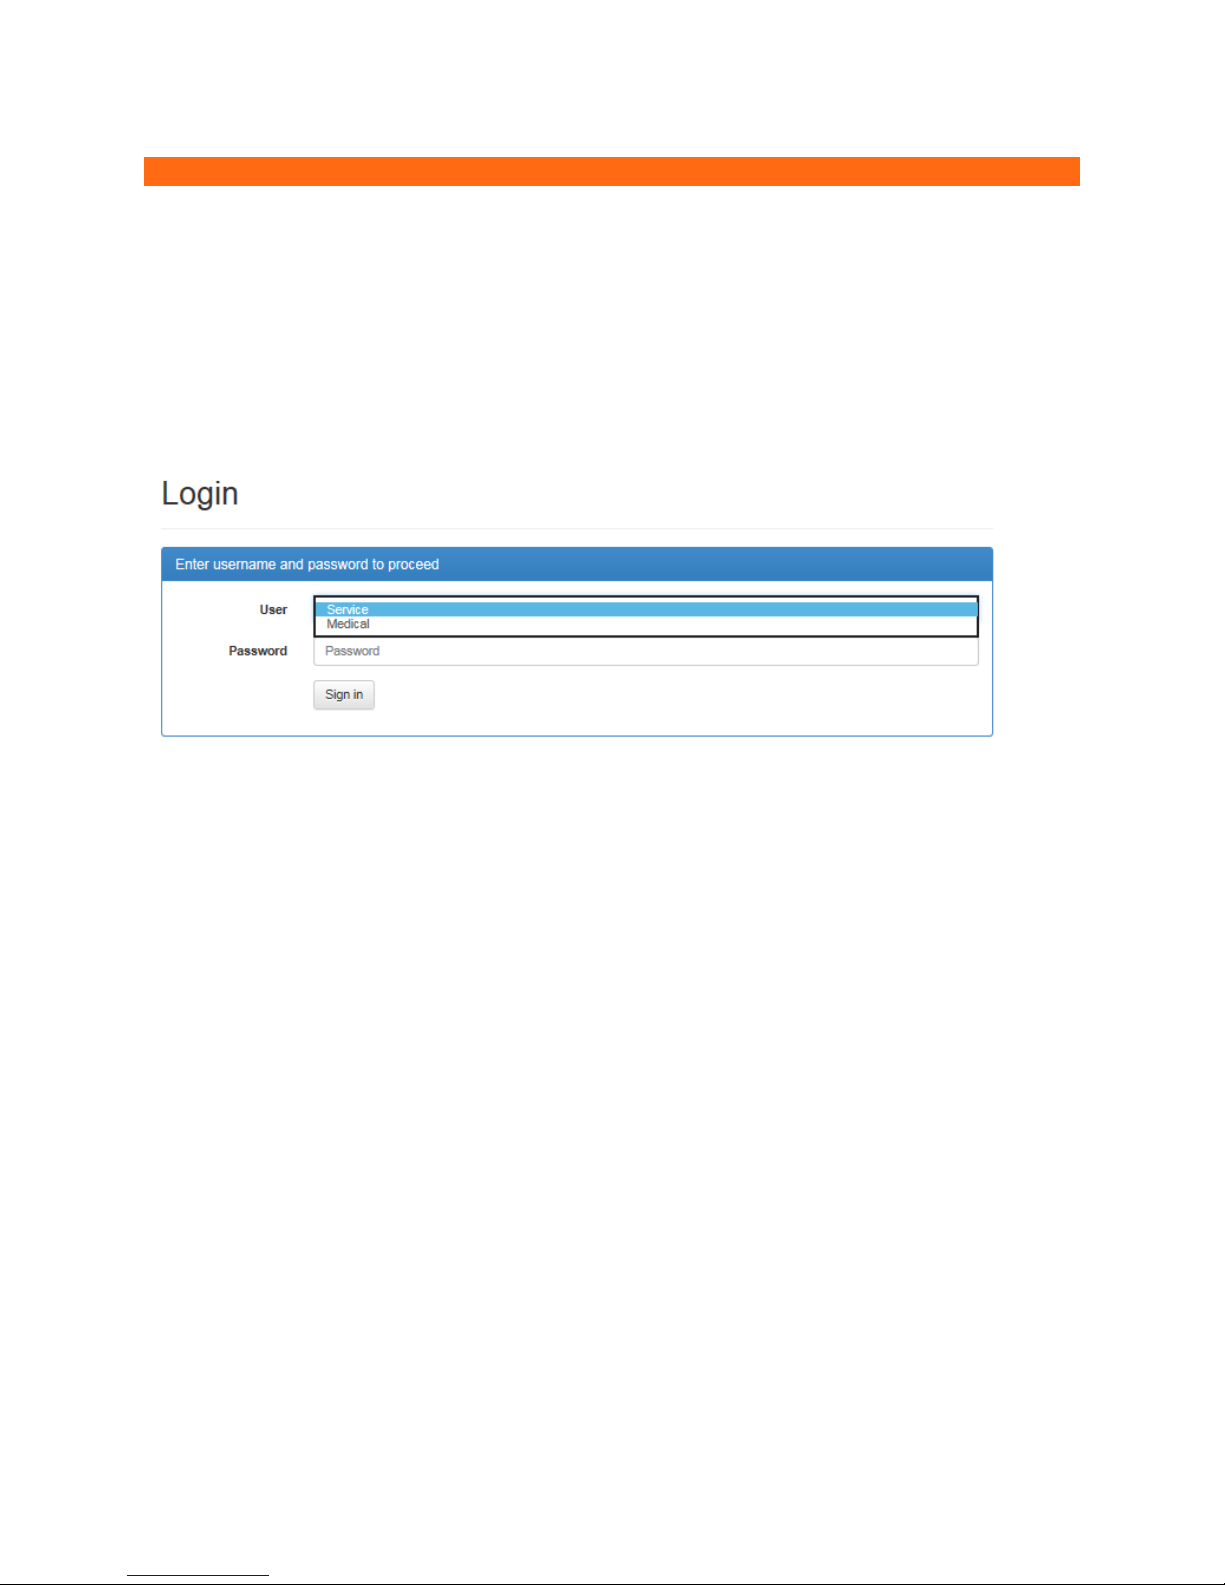
Login ......................................................................... 7
Logout....................................................................... 8
Session Timeout ...................................................... 8
Connection Lost ....................................................... 9
Help........................................................................... 9
4. Medical Profile ..................................................10
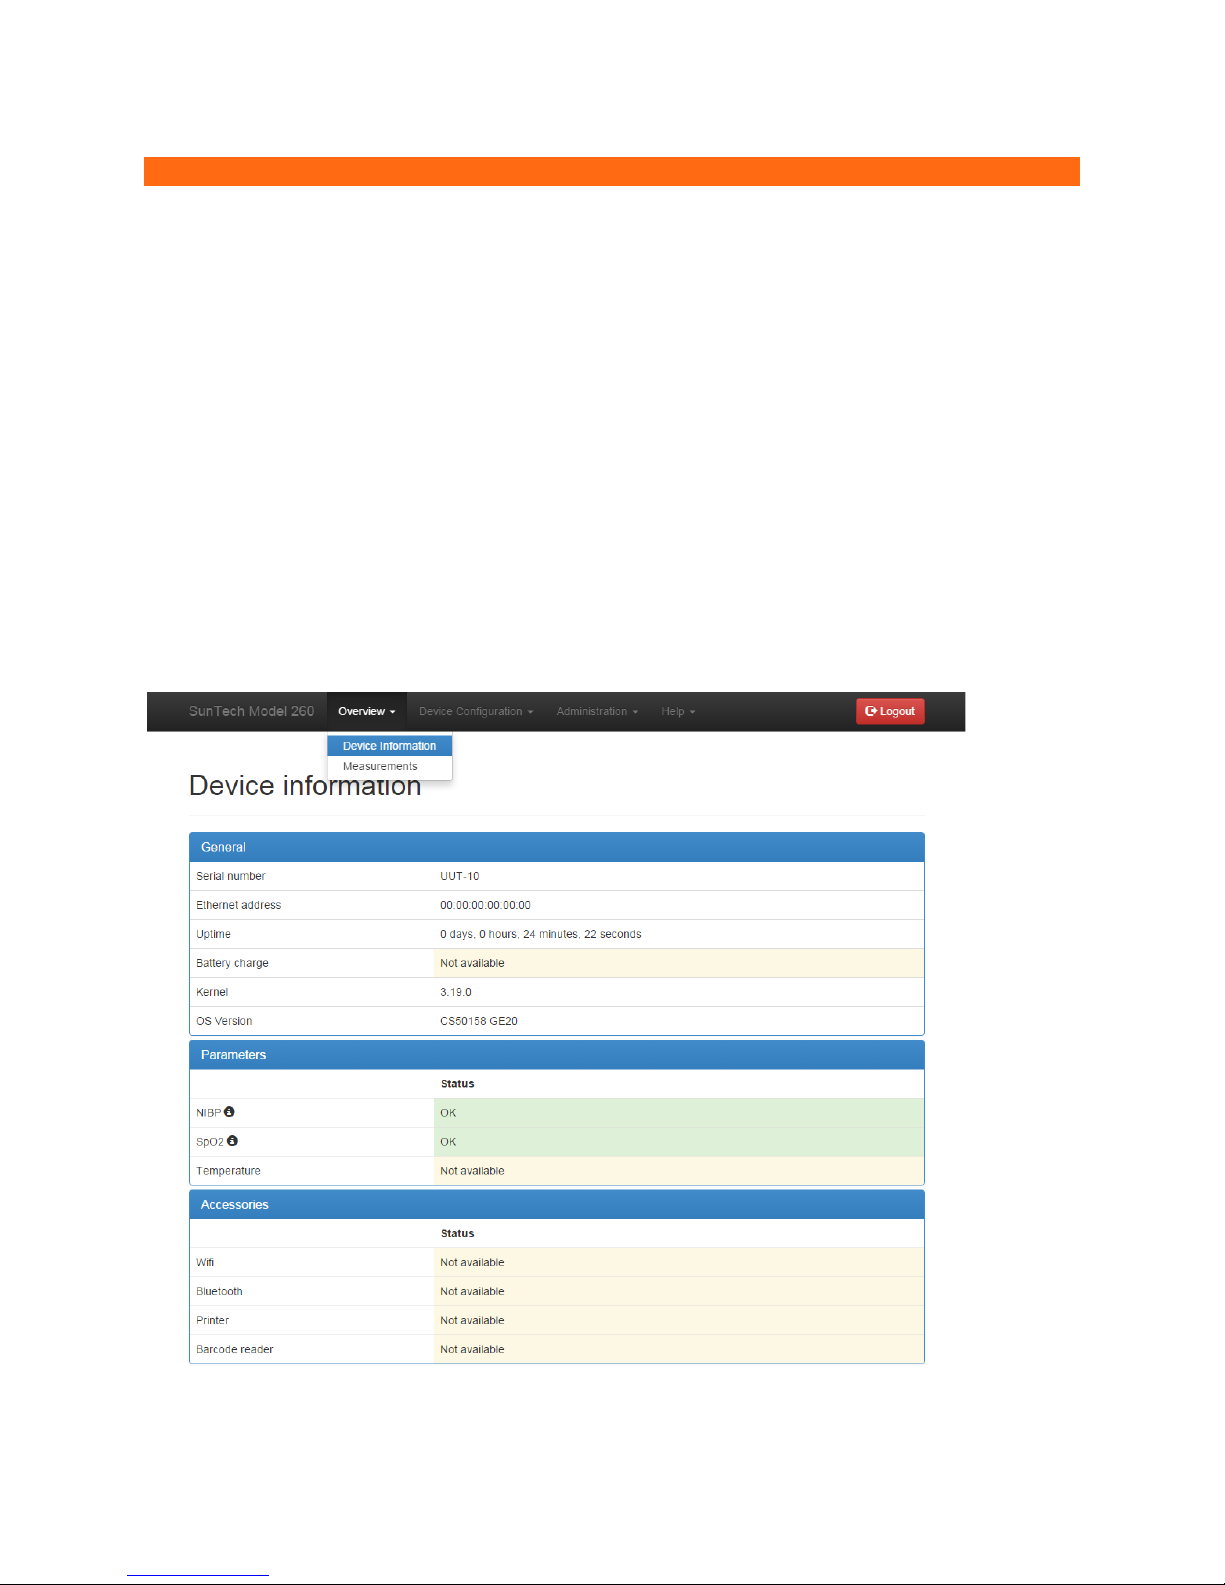
Overview: Device Information................................ 10
Overview: Measurements ...................................... 12
Device Configuration: Measurements / Display ... 13
Administration: System Log .................................. 15
5. Service Profile ...................................................16
Overview: Device Information................................ 17
Device Configuration: Ethernet.............................. 18
Device Configuration: Wi-Fi ................................... 19
Device Configuration: NIBP calibration................. 20
Overview: Measurements / Display....................... 22
Device Configuration: EMR Settings ..................... 23
Device Configuration: EMR Server Certificates .... 26
Device Configuration: EMR Client Certificates ..... 27
Device Configuration: EMR connection test ......... 28
Device Configuration: Date/Time and Language.. 29
Device Configuration: Power management .......... 30
Administration: Update firmware .......................... 30
Administration: Reset to factory defaults ............. 31
Administration: System Log .................................. 32

80-0072-00-MO-RevCSunTech CT40 Advanced Configuration Application | 5
2016/08/17
1. Introduction
While the SunTech CT40 Spot Vital Signs Device can be used out of the box without any additional programming, the
CT40 also has an Advanced Configuration Application that can be used to make changes to the device’s advanced
settings if necessary. The Advanced Configuration Application is a web-server application inside the CT40, and does
not require the installation of any external software programs. This document explains these advanced settings and
functions, including how to upgrade the CT40 firmware, and how to configure the device to connect to an EMR.
System Requirements
1. Computing device such as a PC, laptop, or tablet
2. Windows 7, 8, 10
3. SunTech CT40 Spot Vital Signs Device
4. Mini-USB to USB cable

80-0072-00-MO-RevCSunTech CT40 Advanced Configuration Application | 6
2016/08/17
2. Connecting the CT40
In order to access the CT40’s Advanced Configuration Application, the user must connect a Windows-based
computing device to the CT40 using a Mini-USB to USB connection cable (one of these cables comes with the CT40
Main Unit). Connect the Mini-USB end of the cable to the plug on the back of the CT40 device shown in (E) below:
A. AC power cord
B. WIFI USB dongle (optional)
C. Printer or barcode scanner USB cable (optional)
D. Ethernet cable (optional)
E. Mini USB cable
Connect the other end of the cable to a USB port on the Windows-based Computing device.
NOTE: Please visit http://www.suntechmed.com/ct40-drivers to download and install the driver required for connecting
the CT40 to a PC. The driver MUST be installed in order to access the application.

80-0072-00-MO-RevCSunTech CT40 Advanced Configuration Application | 7
2016/08/17
3. Accessing the application
After connecting the USB cable, open a web browser such as Internet Explorer or Google Chrome on the Windows-
based computing device. In the address bar, enter the address http://model260.local/ to launch the Advanced
Configuration Application.
Login
Figure 3.1: Login page
The login page has two options:
1) Medical: The Medical profile allows the user to make changes to clinically-related advanced settings, and also
allows access to review patient information. The Medical Profile does NOT include functions for network settings or
service-related functions. Details about the Medical Profile are listed in Section 4 of this manual.
2) Service: The Service profile allows the user to make changes to all advanced device settings, including network
and other service-related functions, but does not allow access to any patient information. Details about the Service
Profile are listed in Section 5 of this manual.
After choosing one of the two profiles, enter the appropriate password and click the ‘Sign in’ button.
NOTE: The first time the Advanced Configuration Application is used, the default password should be entered (“service”
and “medical”, respectively). The user will then be prompted to change the password before continuing.
NOTE: It is strongly recommended that the user change the passwords to both the Service and Medical accounts to a
new (not “service” or “medical”) password before using to ensure the unit is secured from tampering.

80-0072-00-MO-RevCSunTech CT40 Advanced Configuration Application | 8
2016/08/17
Figure 3.2: Change password page
Logout
To logout at any time, simply click on the red ‘Logout’ button in the upper right corner of the Menu Bar:
After pressing the ‘Logout’ button, the Logout confirmation screen will appear:
Figure 3.3: Logout confirmation
The user can return to the Login screen by clicking “Back to login.”
Session Timeout
After 10 minutes of inactivity, the device will automatically log the user out.

80-0072-00-MO-RevCSunTech CT40 Advanced Configuration Application | 9
2016/08/17
Figure 3.4: Timeout logout
Clicking “OK” will bring the user to Login page (see Figure 3.1.)
Connection Lost
When the CT40 loses connectivity to the computer, the “Connection lost!” message will be displayed.
Figure3.5: Connection Lost
The CT40 could lose its connection because the device was turned off, or the Mini-USB Cable was disconnected from
either the CT40 or the computer. Check to make sure that the CT40 is powered on, and that the USB cable is securely
connected. Clicking “OK” will bring the user to the Login page (see Figure 3.1.)
Help
The Help menu can be used to download the SunTech CT40 User Manual:
Figure3.6: Download User manual link
Clicking on “User manual” will open the Downloads page on SunTech’s web site for the CT40, where the manual can
be downloaded.
Clicking on “Licenses” will open a page containing all of the license information for the SunTech CT40 Advanced
Configuration Application.
Clicking on “About” will open a window showing basic copyright information.

80-0072-00-MO-RevCSunTech CT40 Advanced Configuration Application | 10
2016/08/17
4. Medical Profile
The Medical Profile allows access to clinically-relevant functions in the CT40 Advanced Configuration Application:
•Overview menu
oDevice Information
oMeasurements
•Device Configuration menu
oMeasurements / Display settings
•Administration menu
oChange Password function
oSystem Log
•The entire Help menu
Change Password and Help functions are covered in Section 3 of this guide.
Overview: Device Information
Figure 4.1: Device Information main page

80-0072-00-MO-RevCSunTech CT40 Advanced Configuration Application | 11
2016/08/17
The Device Information page shows information about the device such as the device Serial Number, the amount of
time the device has been on (Uptime), what Parameters are installed, and what kinds of Accessories are connected to
the device.
Figure 4.2: Hovering over
Hovering over the next to NIBP, SpO2, or Temperature gives information about that parameter such as the module
firmware versions and module serial number.
Figure 4.3: Error with SpO2
If there is an error with the device, the parameter or accessory will be highlighted in red, and the Error Code will be
shown in parentheses—“Error (150)” in the example above.
NOTE: A complete list of Error Codes can be found on both the Quick Reference Cards attached to the device or in
Section 12 of the CT40 User Manual.
If the parameter or accessory is working as expected, it will be highlighted in green and will be labeled ‘OK’. If the
parameter or accessory is not communicating to the CT40 because it is not connected, it will be highlighted in yellow
and will be labeled ‘Not available’.

80-0072-00-MO-RevCSunTech CT40 Advanced Configuration Application | 12
2016/08/17
Overview: Measurements
Figure 4.4: Measurements main page
The Measurements page allows the user to view the measurements saved on the device and the current
measurement being displayed. The “Latest” table shows the measurement currently displayed on the CT40. This
measurement can be in memory or before a measurement is saved. The “Stored” table allows the user to navigate
through and view the stored measurements.
The user is able to download the measurements from the “Stored” table to the computer or any connected network
location. To begin the download process, click the download icon in the “Stored” table header:
Figure 4.5: Download Stored Measurements Icon
Clicking the download icon will open the Windows Save As window, where you can choose the computer or network
location where vital signs information is stored.

80-0072-00-MO-RevCSunTech CT40 Advanced Configuration Application | 13
2016/08/17
Figure 4.6: “Save As” window showing default file name
Downloaded files will be in .csv (comma delimited) format. The default file name will be in the following format:
SunTech_Model260_Records_YYYY-MM-DD-HH-MM-SS.csv
The file name can be changed as desired, but should retain the .csv file extension.
Device Configuration: Measurements / Display
Figure 4.7: Measurements / Display main page
To make changes, check the box next to the desired settings and click the “Apply” button.

80-0072-00-MO-RevCSunTech CT40 Advanced Configuration Application | 14
2016/08/17
Enable MAP mode: Checking this box will activate the Mean Arterial Pressure (MAP) feature for blood pressure
measurements. NOTE: The MAP function is not validated for use within the United States or its territories.
Use pulse rate from SpO2 module: Checking this box will cause the displayed heart rate to be sourced from the pulse
oximetry (SpO2) module instead of blood pressure. Heart rate displayed will be from the SpO2sensor UNTIL a heart
rate is available from the NIBP measurement. Then, when a heart rate measurement is available after an NIBP
reading, the heart rate from NIBP will be displayed. See Section 7 of the SunTech CT40 User Manual (p/n 80-0067-00)
for details on the SpO2pulse rate function.
Ignore first NIBP measurement in average mode: Checking this box will result in the exclusion of the first NIBP
measurement from the average blood pressure measurement calculation when the SunTech CT40 is in Averaging
Measurement Mode. See Section 3 of the SunTech CT40 User Manual (p/n 80-0067-00) for details.
Display date in US format (MM-DD-YYYY): The date format can be changed by checking or unchecking this box. If
unchecked, the date format will be YYYY-MM-DD.
Scanned barcodes contain check digits: Check this box if the last digit will be used as a check digit. Certain barcode
types will use this feature, others will not. If unsure, leave this box unchecked.
Use HL7 connection to validate scanned patient IDs: Checking this box will cause the Patient ID to be automatically
sent to the EMR system for validation when it is entered. This ensures that the entered ID exists in the database.
NOTE: The SunTech CT40 must be configured to communicate with the EMR in order for this function to work properly
(this can be done by IT personnel using the Service Profile). See Section 4 of this manual for additional information.
Use HL7 connection to send measurement results to EMR: Checking this box will cause the measurement and
patient information displayed on the SunTech CT40 screen to be automatically sent to the EMR system when the
Memory Button is pressed.
NOTE: The SunTech CT40 must be configured to communicate with the EMR in order for this function to work properly
(this can be done using the Service Profile). See Section 4 of this manual for additional information.

80-0072-00-MO-RevCSunTech CT40 Advanced Configuration Application | 15
2016/08/17
Administration: System Log
Figure 4.8: System Log page
The System Log can be used for troubleshooting by service personnel. The log can be viewed by using the scroll bar,
or it can be downloaded as a .csv (comma delimited) file by clicking on the download icon.
Figure 4.9: Download System Log icon

80-0072-00-MO-RevCSunTech CT40 Advanced Configuration Application | 16
2016/08/17
5. Service Profile
The Service Profile allows access to service-related functions in the CT40 Advanced Configuration Application:
•Overview menu
oDevice Information
•Device Configuration menu
oEthernet (LAN) network settings
oWi-Fi (WLAN) network settings
oNIBP Calibration function
oMeasurements / Display settings
oEMR settings
oEMR server certificates
oEMR client certificates
oEMR connection test
oDate / Time and Language settings
oPower Management settings
•Administration menu
oChange Password function
oSystem Log
•The entire Help menu
Change Password and Help functions are covered in Section 3 of this guide.

80-0072-00-MO-RevCSunTech CT40 Advanced Configuration Application | 17
2016/08/17
Overview: Device Information
Figure 5.1: Device Information main page
The Device Information page shows information about the device such as the device Serial Number, the amount of
time the device has been on (Uptime), what Parameters are installed, and what kinds of Accessories are connected to
the device.
Figure 5.2: Hovering over

80-0072-00-MO-RevCSunTech CT40 Advanced Configuration Application | 18
2016/08/17
Hovering over the next to NIBP, SpO2, or Temperature gives information about that parameter such as the module
firmware versions and module serial number.
Figure 5.3: Error with SpO2
If there is an error with the device, the parameter or accessory will be highlighted in red, and the Error Code will be
shown in parentheses—“Error (151)” in the example above.
NOTE: A complete list of Error Codes can be found on both the Quick Reference Cards attached to the device or in
Section 12 of the CT40 User Manual.
If the parameter or accessory is working as expected, it will be highlighted in green and will be labeled ‘OK’. If the
parameter or accessory is not communicating to the CT40 because it is not connected, it will be highlighted in yellow
and will be labeled ‘Not available’.
Device Configuration: Ethernet
Figure 5.4: Ethernet page (Use DHCP not selected)
NOTE: Ethernet functionality should only be used with the approval and under the supervision of qualified IT personnel
within your healthcare facility. Check with IT before connecting this device to your network.

80-0072-00-MO-RevCSunTech CT40 Advanced Configuration Application | 19
2016/08/17
In order to configure the SunTech CT40 for a LAN network, first choose whether or not DHCP should be enabled. If
DHCP is disabled, then the user must enter the appropriate IP-address, Subnet mask, Gateway and DNS server. After
entering all of the necessary settings, click the “Apply” button.
Device Configuration: Wi-Fi
Figure 5.5: Wi-Fi settings page (Use DHCP not selected)
NOTE: Wireless Ethernet functionality should only be used with the approval and under the supervision of qualified IT
personnel within your healthcare facility. Check with IT before connecting this device to your wireless network.
In order to configure the SunTech CT40 for a WLAN network, enter the SSID for the appropriate wireless router, along
with the router’s encryption key.
Then choose whether or not DHCP should be enabled. If DHCP is disabled, then the user must enter the appropriate
IP-address, Subnet mask, Gateway and DNS server.After entering all of the necessary settings, click the “Apply”
button.

80-0072-00-MO-RevCSunTech CT40 Advanced Configuration Application | 20
2016/08/17
Device Configuration: NIBP calibration
This function should only be performed by qualified personnel using a calibrated pressure sensor. It is essential that
a calibration verification is performed after calibrating to ensure device accuracy. See Section 11.1 in the SunTech
CT40 Service Manual for detailed information on NIBP calibration setup and function.
Figure 5.6: Initial NIBP Calibration screen
Activate calibration check mode on the SunTech CT40 by follow the instructions on the screen. After a calibrated
pressure sensor has been connected to the CT40, ensure that the manometer reads 0 mmHg, then click the Calibrate
button. If the 0 mmHg calibration process is successful, the following screen will appear:
Figure 5.7: Post 0mmHg calibration screen
After the 0 mmHg calibration has successfully completed, the user will be prompted to conduct another calibration at
250 mmHg. If there is an error during the 0mmHg calibration process, the Calibrate NIBP module screen will re-
appear with a red screen header:
Other manuals for CT40
2
Table of contents
Other Sun-Tech Medical Equipment manuals
Popular Medical Equipment manuals by other brands

Boston Scientific
Boston Scientific Precision Montage SC-1200 Directions for use

Coviden
Coviden Kangaroo user manual

RR Mechatronics
RR Mechatronics Starrsed ST Service manual

Spencer
Spencer DAVIS SR01010A user manual

ARJO HUNTLEIGH
ARJO HUNTLEIGH Akron Streamline 2211 Instructions for use

Mindray
Mindray Panorama Quick reference guide