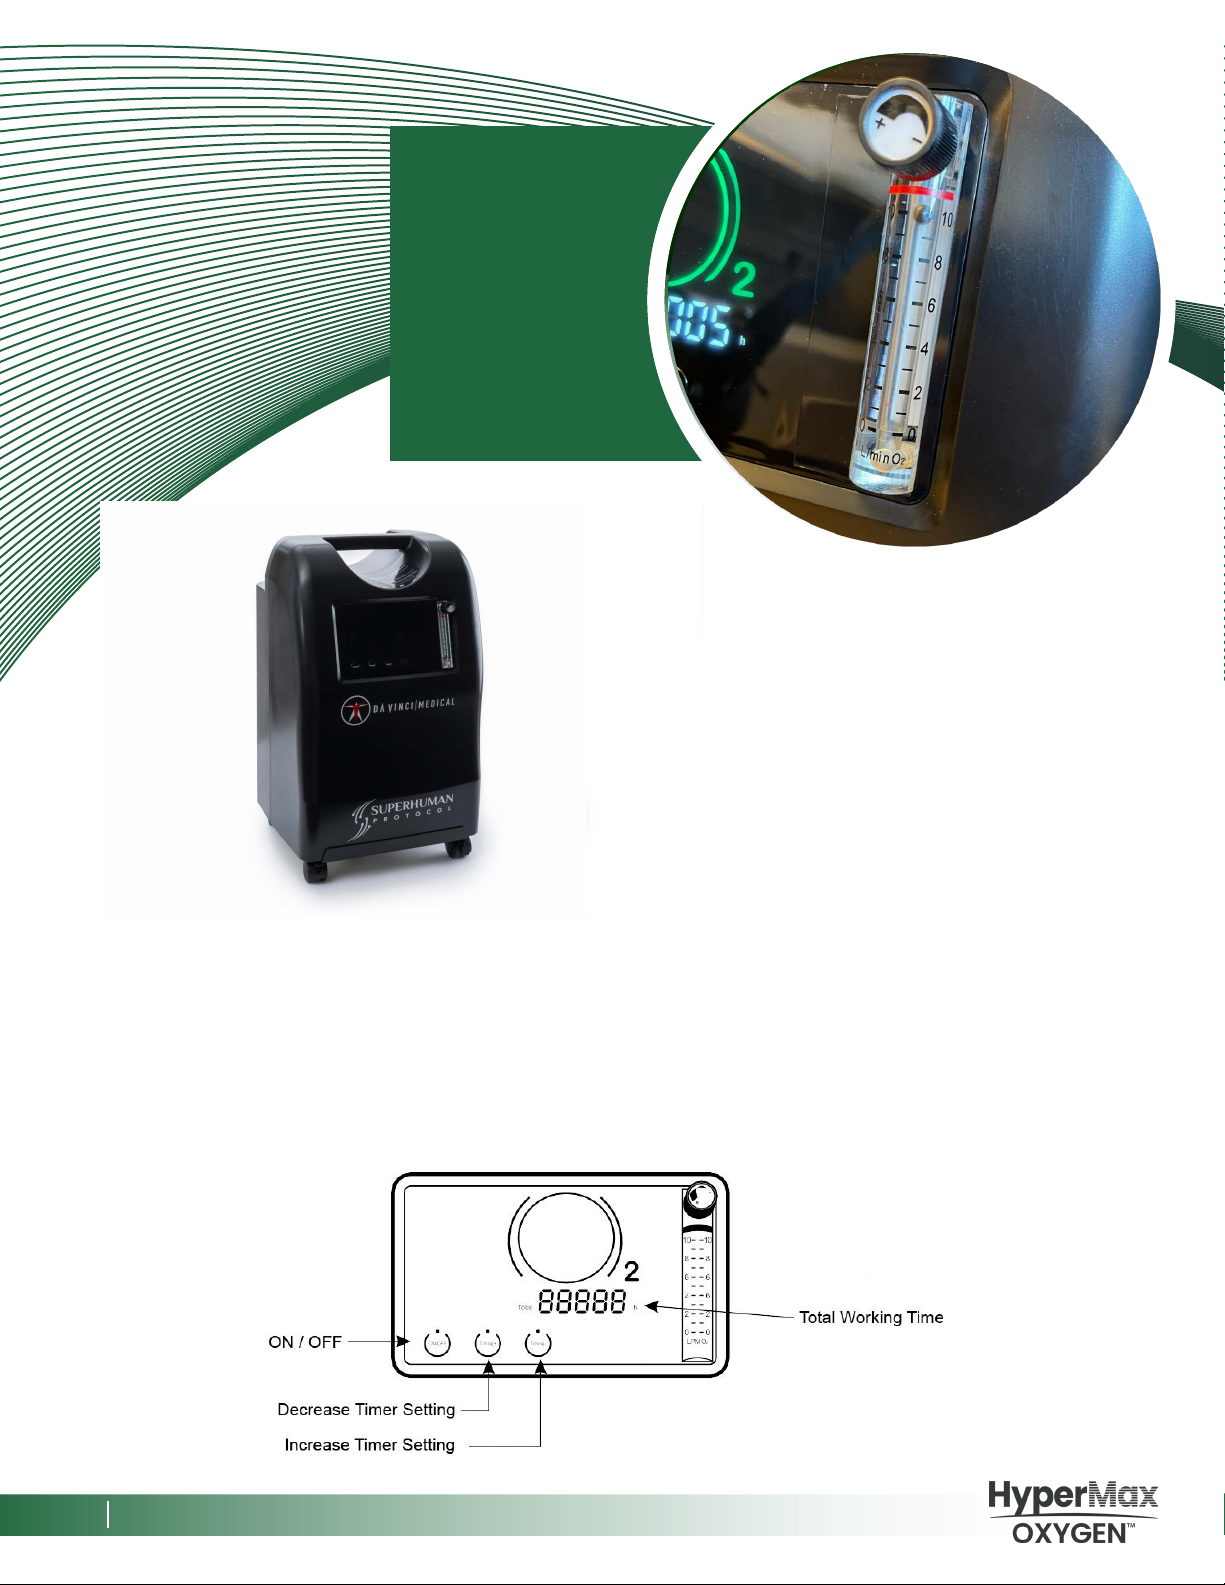
DaVinci Hypermax OXYGEN User manual

SET-UP
Instruction
MANUAL
QUICK START
set up & usage videos
(aim camera at this image to begin)

WARNING ⚠
DO NOT USE SYSTEM IF YOU HAVE
COPD and/or severe COPD
with CO2 retention.

(1) PVC Frame Top
(1) PVC Frame Bottom with
Base Plate & Hose Elbow
(4) PVC Long Frame Poles
(Separate Box)
(4) 1 lb Weights (Attached
to Frame Top) - Optional
(1) 900 Liter Oxygen Bag/Cylinder
(1) Red Capped Relief Valve
(Peep Valve)
(1) Mask & Strap
(1) Thin ¼” Supply Hose
(Concentrator to Cylinder)
(1) 10’ Breathing Hose
(Cylinder to Mask)
(1) Green Breathing Valve
(1) Inline Back Flow Valve
(1) Velcro Hose Holder
(1) Flexible “Gooseneck”
Long Arm Clip
PACKAGE CONTENTS
© 2022 HyperMax Oxygen

Congratulations on receiving your HyperMax
Oxygen System — atrue scientific breakthrough for
improving your health, immunity, endurance and
longevity. We created the HyperMax Oxygen
Wellness System to help people like you restore
and increase their body’s oxygen levels and greatly
improve their overall Health, Fitness and Well-Being.
This instruction manual will help you set up your
unit smoothly and easily, from start to finish, and
you’ll be on your way to 93% oxygen in no time.
davincimedicalusa.com
4

STEP
ONE
1
OXYGEN
CONCENTRATOR
davincimedicalusa.com
5
Start by unpacking the HyperMax Oxygen concentrator that was shipped to
you in a large and heavy box. First lay the box on its side, and carefully slide
the Oxygen concentrator unit out from the shipping container.
Then stand the HyperMax Oxygen concentrator back in its upright position.
CONTROL PANEL

CONTROL PANEL
davincimedicalusa.com
6
1. Select a location that allows the concentrator unit to draw in room air
without being restricted. Make sure that the unit is at least 4 inches
(10cm) away from any wall, furniture, or curtains that could impede
adequate airflow. Do not place the unit near any heat source.
2. Plug the power cord into an electrical outlet.
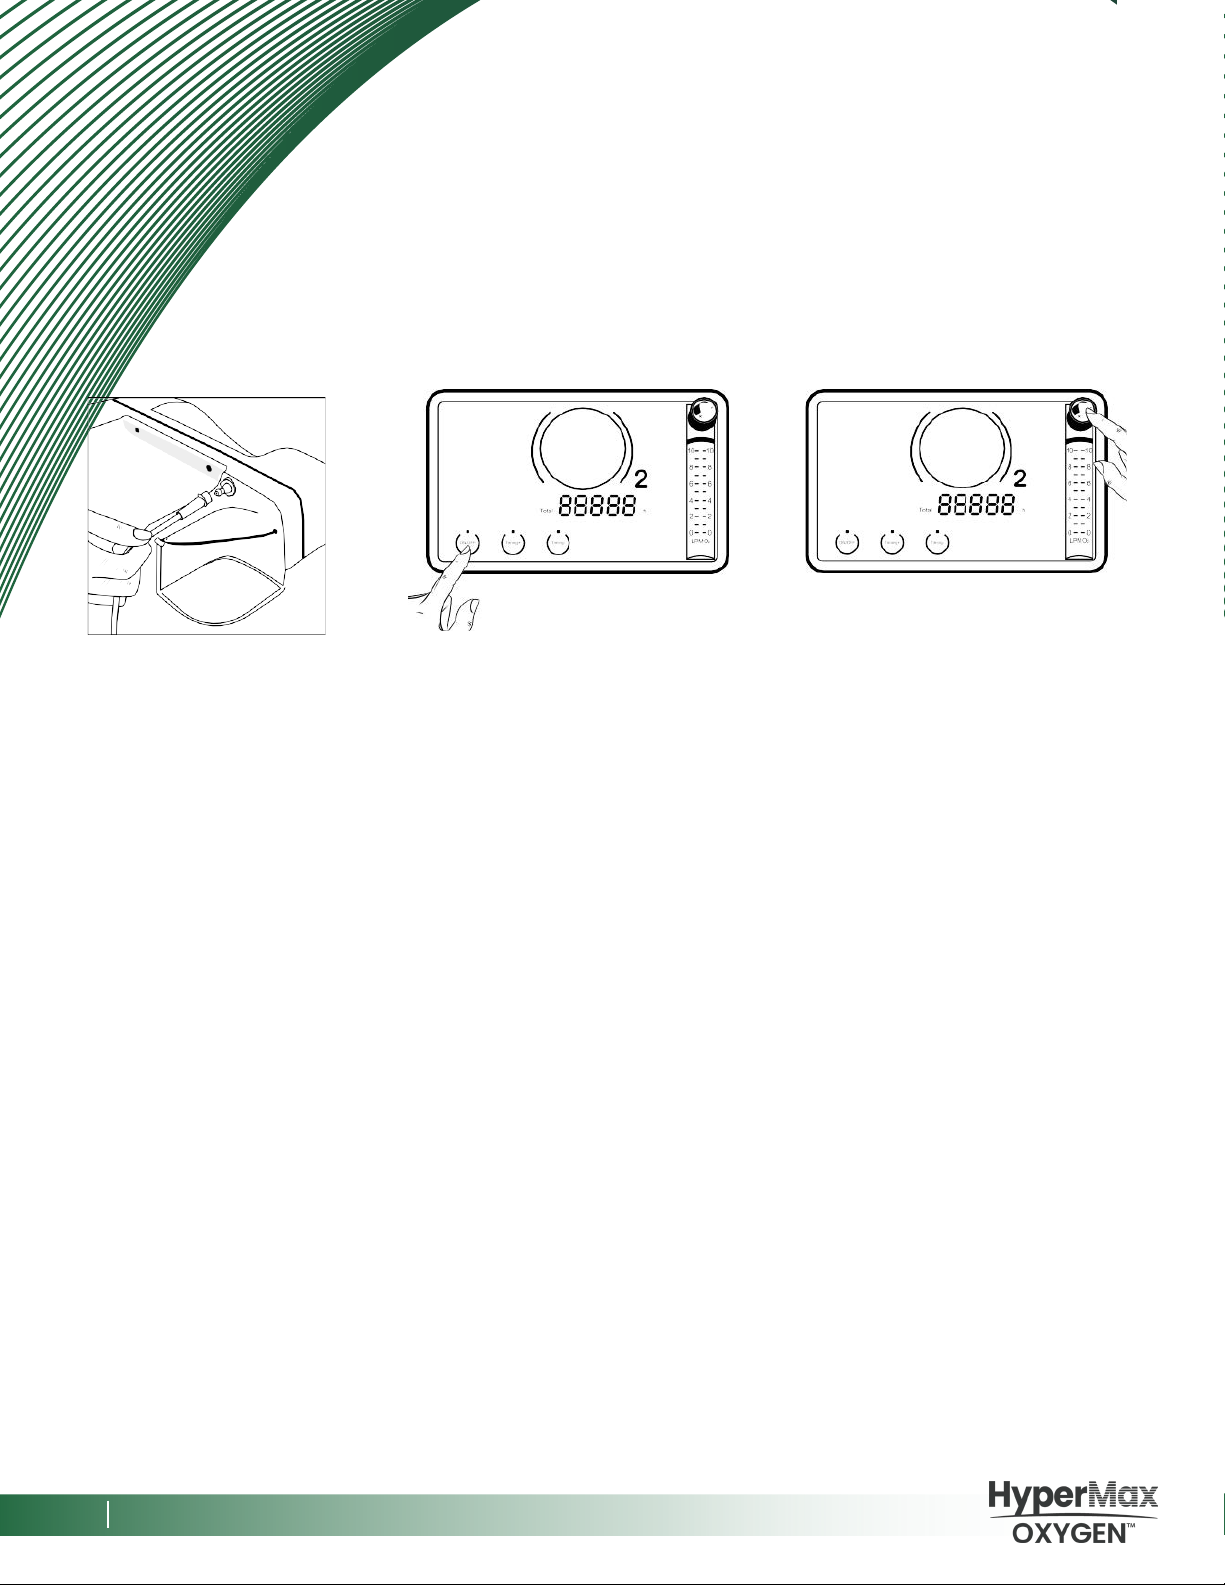
3. Connect the provided silicon tubing to port at top right rear of the
machine as shown in Image 1.
4. Press the power switch to the ON [I] position. The LED display screen will
illuminate.
5. Press the ON/OFF power button once to turn the unit on. The oxygen will
begin flowing from the unit immediately.
6. Adjust the flow by turning the knob on the top of the flow meter until the
ball is centered at 10. See Image 3 for knob reference.
7. When the oxygen concentrator is not in use, press the power switch to
the OFF [O] position.
Image 1 Image 2 Image 3

•Continuous Working Mode - By pressing the ON/OFF button, oxygen
will begin to flow from the oxygen concentrator, using a "continuous"
working state (will stay on until you manually turn it off). The LCD screen
will display the total usage time your generator has been used (like a car
odometer).
•Timer Working Mode - Once the oxygen has begun flowing, press the
"timing+" button - this will allow the unit to begin in the timed working
mode. Each time the "timing+" button is pressed, the preset time will be
increased by 10 minutes. The maximum preset time is 480 minutes. By
pressing the "timing-" button, the preset time will decrease, in
increments of 10 minutes.
davincimedicalusa.com
7
MODE OPTIONS
(Continuous and Timer)
The Da Vinci 10 LPM Oxygen Concentrator has two different mode options
available:

1. Set the oxygen timer for 90 minutes for the first time to completely fill
the bag.
2. If the bag is half full after your session, you will only need to set the
oxygen timer for 40 minutes to fill the bag.
3. To double or triple the speed at which your bag is filled, you would
simply add a second or third generator.
4. You may leave the oxygen generator running during your exercise
sessions.
davincimedicalusa.com
8
BAG FILLING TIPS

Next, set up the HyperMax frame located in the other large box you received.
After opening this box, take your mask out and set it to the side. Then remove
the entire HyperMax frame from the box as one unit. Once your frame is out
of the box, separate the top of the frame from the short colored poles used
for shipping, and then set this top frame to the side.
FRAME
SET-UP
STEP
TWO
2
davincimedicalusa.com
9

Locate the long, thin shipping tube you received from HyperMax. This
long tube contains the four poles you will need to complete the set up of
your HyperMax frame.
One at a time, you want to remove the short colored poles and set them
aside. These small poles are temporary and designed for shipping — but
the long black poles are used for the actual HyperMax frame.
Start by inserting each long pole, one at a time, into each hole at the base
of the frame. It’s important to make sure that you get all four rings on a side
of the Oxygen Bag/Cylinder onto a pole, and then repeat this step three more
times. Once you have all four poles in the frame bottom, with all four rings on
each pole, you will then push each pole down firmly into its proper fitting.
These poles will connect the bottom to the top of the frame.
FRAME
SET-UP
(CONT’D)
STEP
THREE
3
davincimedicalusa.com
10

Next, lay the entire frame down on its side. Take the frame top you removed
earlier and position it directly on top of each of the four poles, fitting it snugly
onto the poles. Make sure that you secure each pole firmly into its proper
position on the top of the frame, so that the frame doesn't separate when
the HyperMax Cylinder is full of oxygen. Once the frame top is secure, then
lift the entire frame back up to its permanent upright position.
FRAME
SET-UP
(CONT’D)
STEP
FOUR
4
davincimedicalusa.com
11

Now check your HyperMax Bag/Cylinder to make sure that every pole and
each of its rings are fitted correctly, and that the Cylinder bag slides up and
down freely. If everything is properly installed, you’re now ready to start
filling the HyperMax Bag/Cylinder with 93% pure oxygen.
FRAME
SET-UP
(CONT’D)
STEP
FIVE
5
davincimedicalusa.com
12

HOSE
SET-UP
You’re now ready to attach the hoses.
NOTE: there are two very different hoses. First, the smaller hose is for the
HyperMax Oxygen concentrator. This small hose will connect to the port of
the oxygen concentrator at top right rear as shown. Make sure that the
hose is securely attached to the port.
The bigger second hose has a bright red cap on its end. This red end cap is
designed with a spring on the inside that is preset from the factory — so
there’s no need for adjustment. The end-cap allows the HyperMax Bag/
Cylinder to fill with oxygen without the bag/cylinder over-inflating and/
or letting any oxygen be released until you're ready — so make sure the
red end-cap is on ONLY when filling your bag with oxygen.
STEP
SIX
6
davincimedicalusa.com
13

PLACING MASK ON
HEAD AND FACE
When you’re ready to beging a
new HyperMax Oxygen session,
you will attach the large
breathing hose to your mask.
Start by pulling the bright red
cap off the hose and connect
the hose onto the green port of
your mask The green port is for
“oxygen intake” and the port
with yellow arrows pointing
outward is for “oxygen exhaust.”
Your oxygen intake will supply
the 93% oxygen purity as you
breathe in, and the oxygen
exhaust will be for your exhale, as
you breathe out. First, the mask
must be properly fitted to your
face.
STEP
SEVEN
7
davincimedicalusa.com
14

PLACING MASK ON
HEAD AND FACE
(CONT’D)
The first step to correctly
placing the mask straps on your
head, is to make sure that the tag
at the back of the strap is facing
outwards. Position the straps
properly so that the two openings
- one large and a smaller opening -
are at the back of the strap
assembly. The smaller opening is
put at the lower back of your
head.
An effective fitting method is to
initially put your mask on with one
of the straps disconnected. When
getting started, ensure the nose
cup is on top when placing the
mask on your face.
STEP
EIGHT
8
davincimedicalusa.com
15

STEP
NINE
9
PLACING MASK ON
HEAD AND FACE
(CONT’D)
Before use, make sure everything
is snug comfortable and without any
gaps that allow air leaks at the top or
bottom of the mask. When fitted
correctly, you should be able to
breathe smoothly, easily and
effectively through your mask. To
start a new HyperMax Oxygen
session, pull the strap on completely
over your head and you will be ready
to go!
davincimedicalusa.com
16

IMPORTANT NOTE: When it's time to place the fitted mask and straps onto
your head, make sure that you have just three straps on while leaving one strap
off temporarily. Then to fully secure your mask on your face, simply pull the
remaining strap down over your head and easily secure that final strap to the
mask.
After all straps are secured, find the Velcro straps connected to the top of the
mask. Undo the Velcro on that top section, pull tightly and evenly, and then
secure the Velcro back down to the strap.
PLACING MASK ON
HEAD AND FACE
(CONT’D)
STEP
TEN
10
STEP
TEN
10
davincimedicalusa.com
17

STEP
ELEVEN
PLACING MASK ON
HEAD AND FACE
(CONT’D)
Locate the lower straps at the
back of the head and bottom of
your neck. Reach back to undo
the Velcro straps and pull
evenly to adjust - then reattach
the Velcro back down onto the
strap. Use a mirror if needed.
Finally, once your mask is totally
secure and you cannot detect any
gaps, you are now ready to attach
the breathing hose to the mask.
STEP
ELEVEN
11
davincimedicalusa.com
18

CONNECTING MAIN
HOSE ONCE MASK IS
ATTACHED TO FACE
Start by removing the bright red valve from the end of the main breathing hose
and connect the hose onto the green “oxygen intake” port of your mask
(without the yellow arrows). With mask on and hose attached, you are set to
begin your workout.
NOTE: Take particular care when attaching the hose so that use of excessive
force does not push the white adapter bracket through the mask. This white
adapter needs to stay in the mask to properly connect the breathing valve.
When done correctly, all aspects of the mask/strap and hose are secure,
tight and ready to work for you as designed.
STEP
TWELVE
12
davincimedicalusa.com
19

YOU’RE NOW
READY TO
BEGIN!
You are now ready to begin your first HyperMax Oxygen session! Start your aerobic
workout, achieve a slightly elevated heart rate, and simply breathe in the 93% oxygen
purity delivered by the HyperMax Oxygen system during your exercise session.
Required workout time: Ideally, you should breathe in the entire 900 liters of Oxygen
from the Oxygen Cylinder in every session. So your workout should end when your
HyperMax Oxygen cylinder is fully deflated. This usually takes about 15-20 minutes.
DESIRED EXERCISE INTENSITY: With your mask on and hose attached, you are
ready to start exercising. Remember, your goal is to achieve the strongest cardio
intensity you can, while making sure to exercise safely and within the parameters of
your doctor’s recommendations, (if needed). For best results, maintain a strong and
steady aerobic pace that you are comfortable with and accustomed to during your
entire workout.
PLEASE NOTE: You should never exceed your maximum heart rate while exercising.
You can calculate your maximum heart rate by subtracting your age from 220. For
example, if you’re 70 years old, subtract 70 from 220 to get a maximum heart rate of
150. This is the average MAXIMUM number of times your heart should beat per minute
during exercise.
davincimedicalusa.com
20
Table of contents
Other DaVinci Medical Equipment manuals
Popular Medical Equipment manuals by other brands

BEYES
BEYES Maxso E600B Instructions for use

MYHEALTHCONNECTED
MYHEALTHCONNECTED MedWell Smart Pill Box Setup instructions

SYSMEX
SYSMEX CyFlow Cube 8 operating manual

GERATHERM
GERATHERM Bodystik Instructions for use

Wellue
Wellue Checkme Pro Health Monitor user manual

Synthes
Synthes Anspach Instructions for use