CHMER WIRE EDM User manual

WIRE - EDM
QUICK START
SOFTWARE
:
W5F
MANUAL VER
:
A
DATE
:
2006.07
Copyright Reserved
CHING HUNG MACHINERY & ELECTRIC INDUSTRIAL CO., LTD.
886-4-23500333
Please Read This Manual Thoroughly Before Operation

Please Read This Manual Thoroughly Before Operation
Thank you for buying our product, and for the chances of being able to offer you our high
quality wire EDM series machinery and also the best after-sale services.
In order to maintain machine’s peak performance and extend its life span as long as possible,
we sincerely suggest all the operators carefully read this manual for first time operation. Also,
for your safety, please read the following “must-known” precautions:
1. Wire EDM operators should have received relative training from our local
agency, or directly from CHMER headquarter.
2. CHMER wire EDM can only applied to the machining of several kinds of
metal work-piece, such as steel, aluminum, tungsten steel, copper and graphite.
Push emergent-stop before executing any one of following tasks:
(1). Cleaning or sorting waste wire.
(2) Replacing resin or paper filter.
(3) Filling up water tank.
(4) Opening power cabinet.
3. Push emergency-stop and turn off rotary switch immediately when any one
of the following situations occurs.
(1) Hearing of funny noise, or any abnormality occurs during machining.
(2) Unloading any machine’s power wire (in power cabinet, water tank, or
cooling machine.). Please contact our local agency first, or CHMER headquarter for
this.
4. To avoid dangerous shock, be sure to stop electricity discharging before
installing copper wire and work-piece.
5. Do not touch any part around worktable (upper/lower head, wire and water)
during machining to prevent from high voltage strike.
6. Do not modify electrical circuit.
7. Please take reference to relative chapter in this manual for daily
maintenance.
8. Please keep this manual closely with the machine.
Thank you again for purchasing CHMER’s product. Please call our Service Department at
886-4-23500333 anytime for technical support and repair.
It is our honor to be at your service.
9. Caution
:
After every system reboot, SEARCH HOME must be performed before starting
operation.
(Please refer to chapter 1 of Quick Start Manual)

CHMER WIRE EDM QUICK START
INDEX
CHAPTER 1. START UP OF OPERATION-------------------------------------------- 1
1.1
Booting Up Procedures------------------------------------------------------
1
1.2
BASIC ACCESSORIES---------------------------------------------------- 3
1.3
PRE-MACHINING SETUP------------------------------------------------
7
CHAPTER 2. ----------------------------------------------------------------------------------
15
2.1
FILE MANAGEMENT & GRAPH SIMULATION-------------------- 15
CHAPTER 3. SETUP FOR CUTTING---------------------------------------------------
25
3.1
Set Z axis height--------------------------------------------------------------
25
3.2
Call up a job file for simulation-------------------------------------------- 26
3.3
MEM DATA Set--------------------------------------------------------------
26
3.4
Call up cutting technology--------------------------------------------------- 28
3.5
Reset Local Coordinate------------------------------------------------------ 28
CHAPTER 4. WIRE POSITIONING FUNCTIONS----------------------------------
29
4.1
Edge Find----------------------------------------------------------------------
29
4.2
Find Slot Center-------------------------------------------------------------- 30
4.3
Find Hole Center------------------------------------------------------------- 31
4.4
Angle Rotation (AR)---------------------------------------------------------
32
4.5
Find Board Center (BOARD CP.)------------------------------------------
32
4.6
MDI. MOVE------------------------------------------------------------------
35
4.7
CYLIND C.P (Find Cylinder Center)------------------------------------- 36
4.8
CORNER MOVE(find corner position)--------------------------------
37
4.9
MEM ZOOM(MEMF10)---------------------------------------------
38
CHAPTER 5. F.A.Q. & TROUBLE SHOOT--------------------------------------------
39

CHMER WIRE EDM QUICK START
CHAPTER 6. SAMPLE PROGRAM-----------------------------------------------------
48
6.1
Straight Cutting---------------------------------------------------------------
48
6.2
Taper Cutting----------------------------------------------------------------- 52
6.3
UV Cutting--------------------------------------------------------------------
54
6.4
AWT Application with Sub-Program--------------------------------------
57
CHAPTER 7. MAINTENANCE INSTRUCTION-------------------------------------
59
VER:E5B-1086A
CHMER WIRE EDM QUICK START
CHAPTER 1. START UP OF OPERATION
1.1 Booting Up Procedures
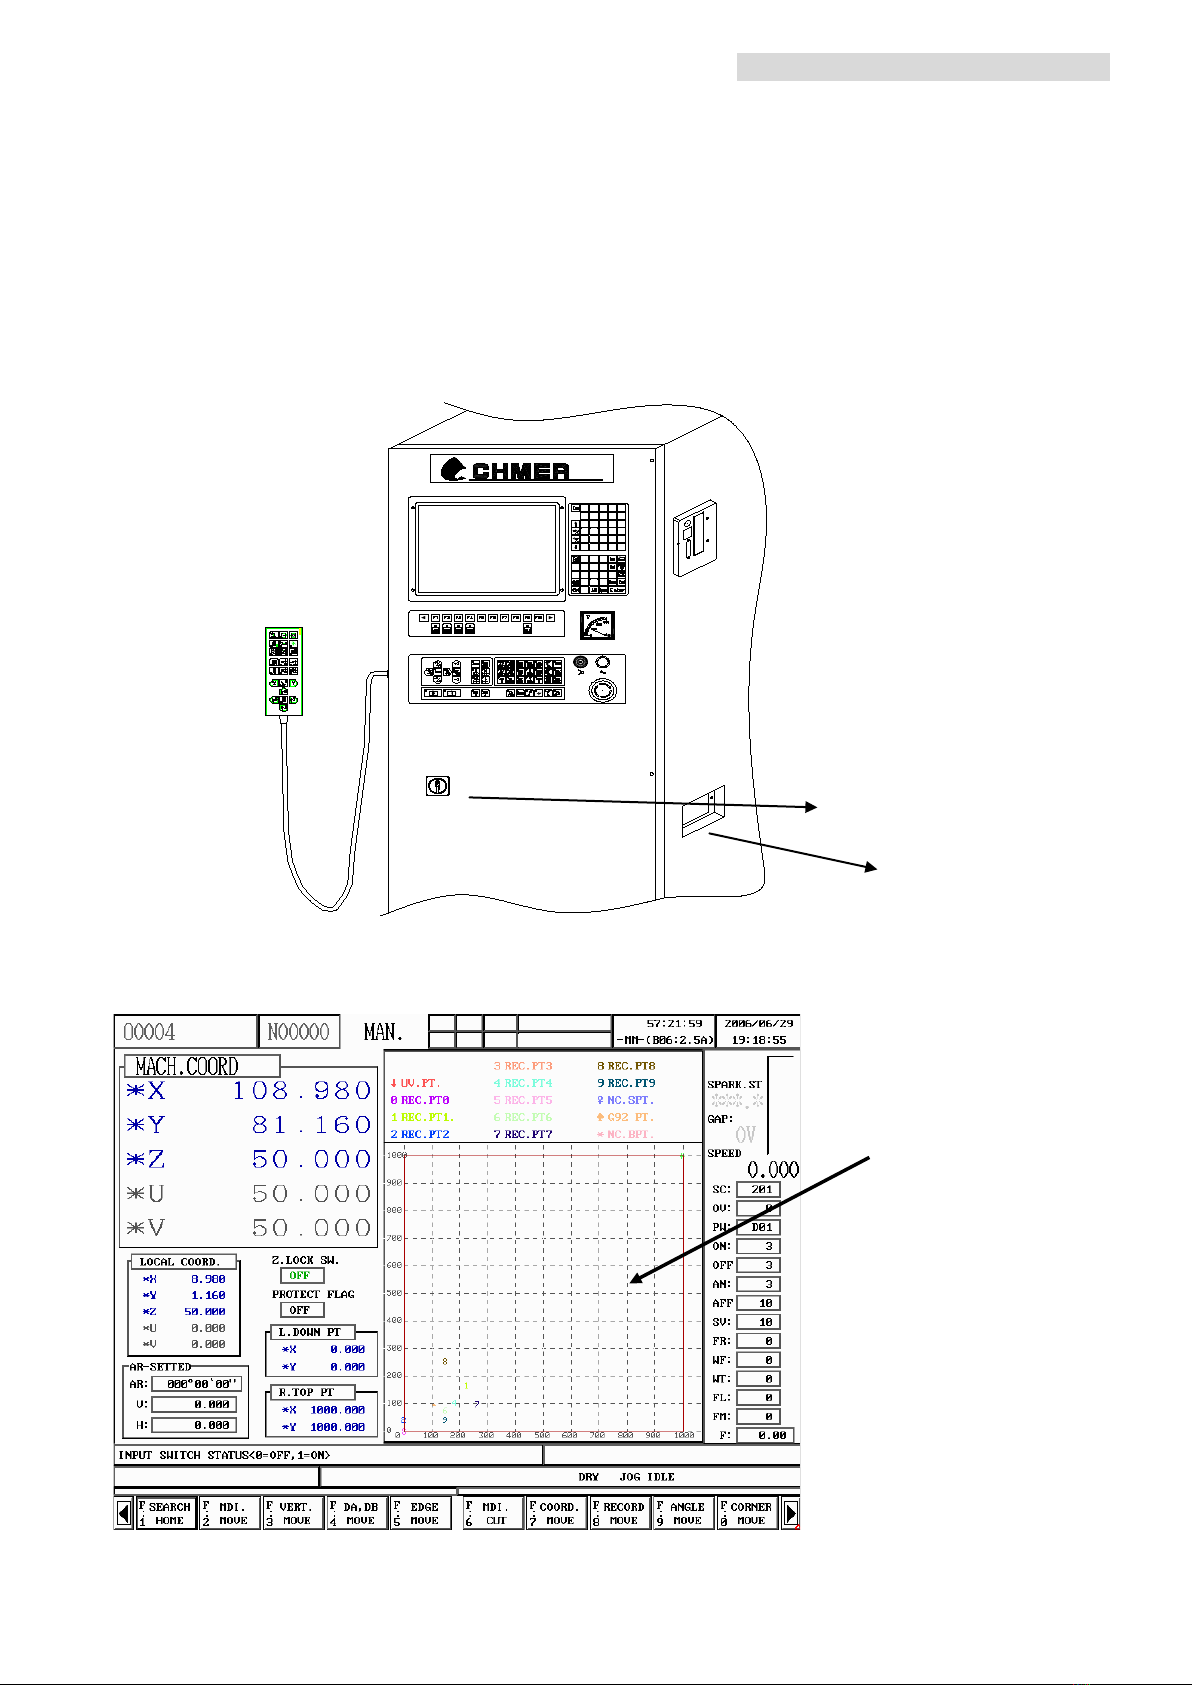
1. Turn on the main power.
2.Turn (right) on the rotary switch.
3. A few seconds later after boot procedure
EDM
X Y ,.
,
Z
+
&
--
+
\
=
1
4
7
0.
)
*
2
5
$
@
%
8
3#
^
6
/
(
9
A
P
U
K
F
M
R
H
W
Q
V
L
G
S
{
[
N
I
BCD
T
]
}
O
J
E
Main power
Rotary switch
Operation screen
- 1 -
CHMER WIRE EDM QUICK START
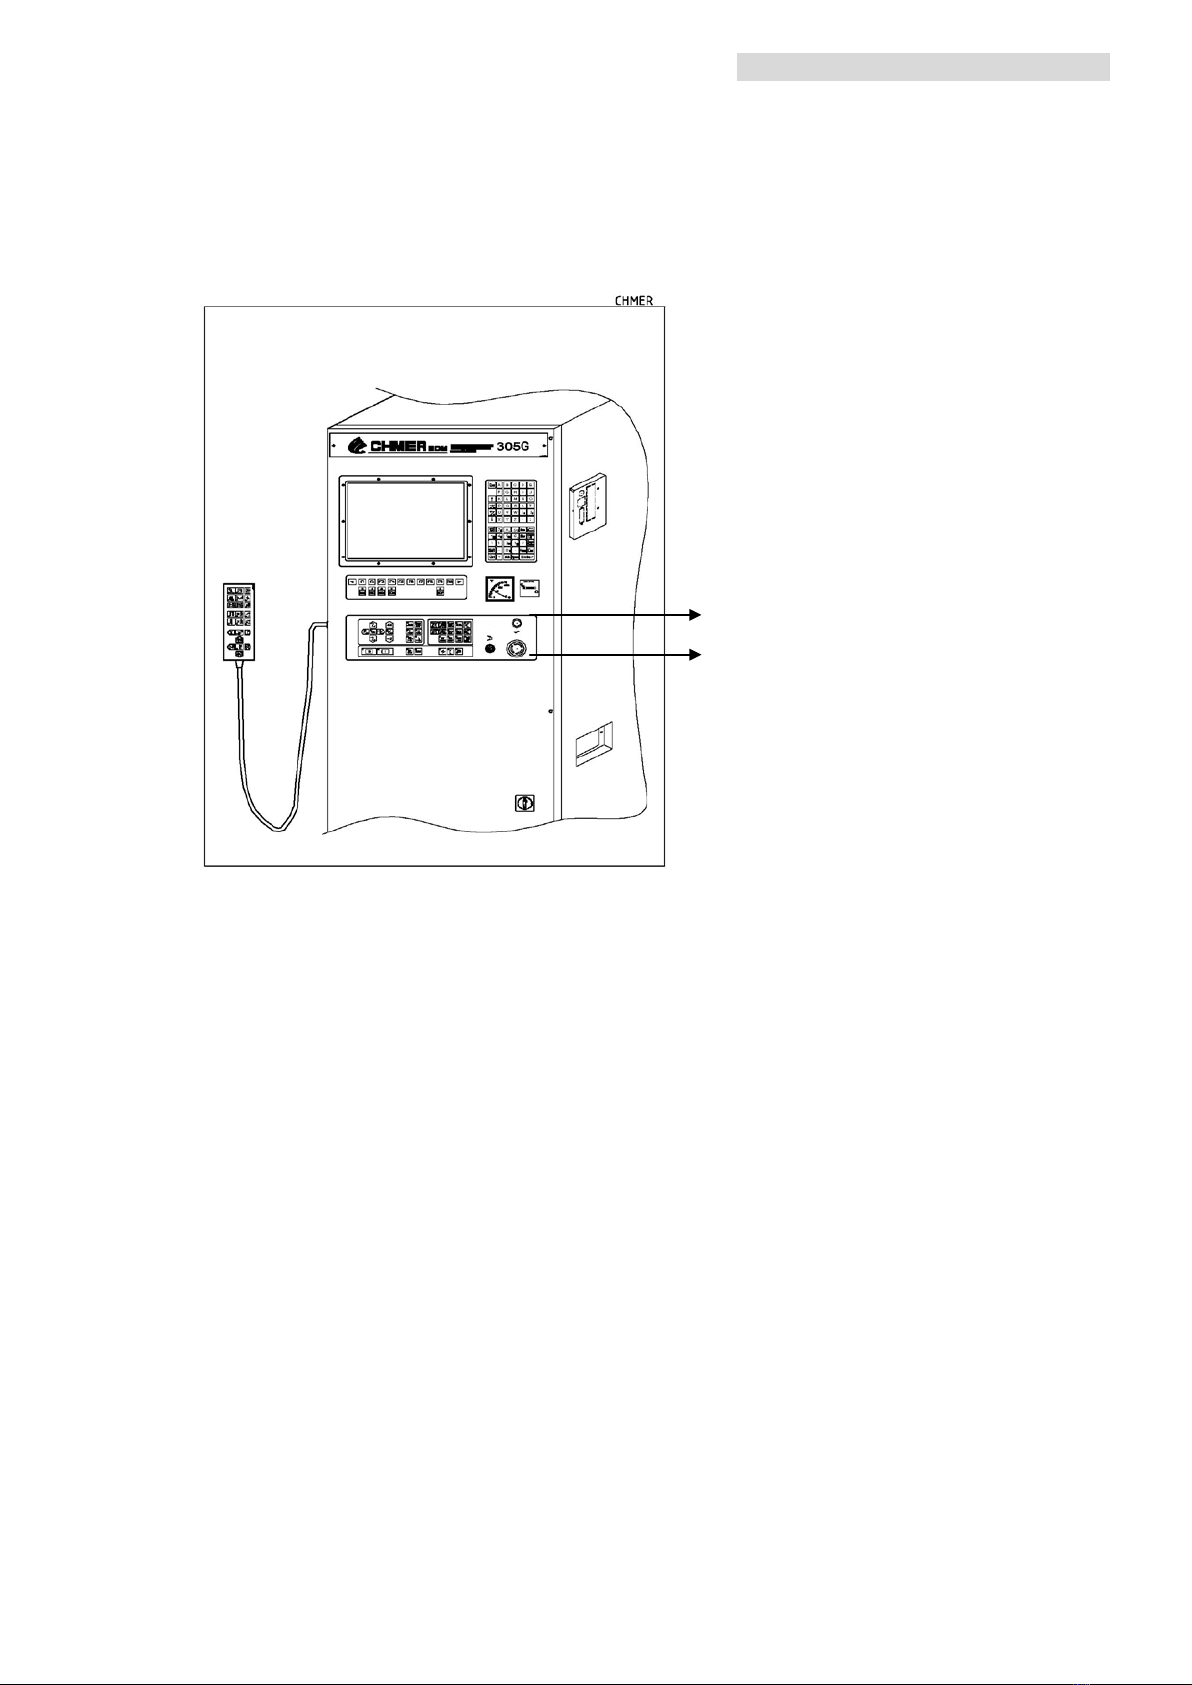
4. Release Emergency-stop button
5. Press green button (to stand by)
Release Emergency-stop
Green Button
- 2 -

CHMER WIRE EDM QUICK START
1.2 BASIC ACCESSORIES
1. Diamond Guide
(1). Normal Diamond Guide (upper & lower exchangeable)
(2). AWT Diamond Guide (upper & lower non-exchangeable)
uppe
lowe
- 3 -

CHMER WIRE EDM QUICK START
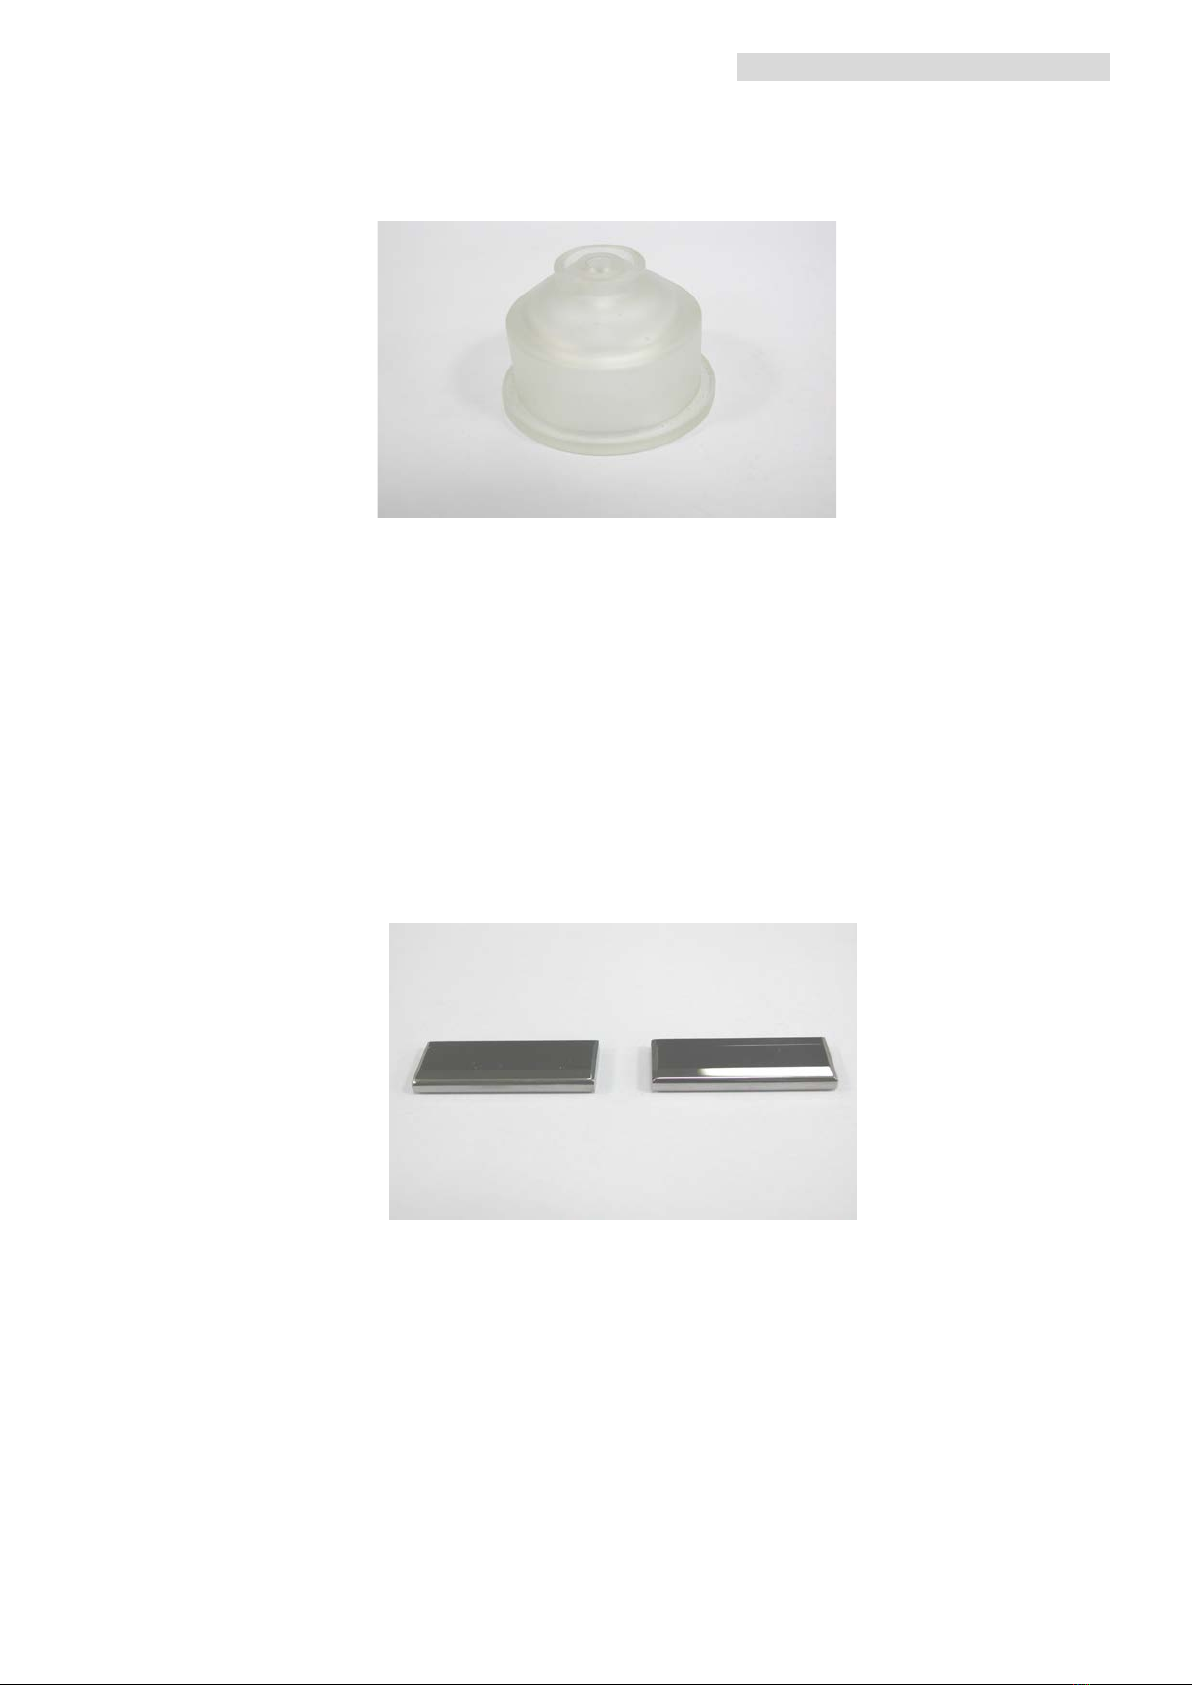
2. Nozzle
(1). AWT Nozzle (upper)
(2) AWT Nozzle (lower)
- 4 -
CHMER WIRE EDM QUICK START
(3). Normal Nozzle (upper & lower exchangeable)
3.Energizing Plate (for bothAWT and non-AWT)
- 5 -
CHMER WIRE EDM QUICK START
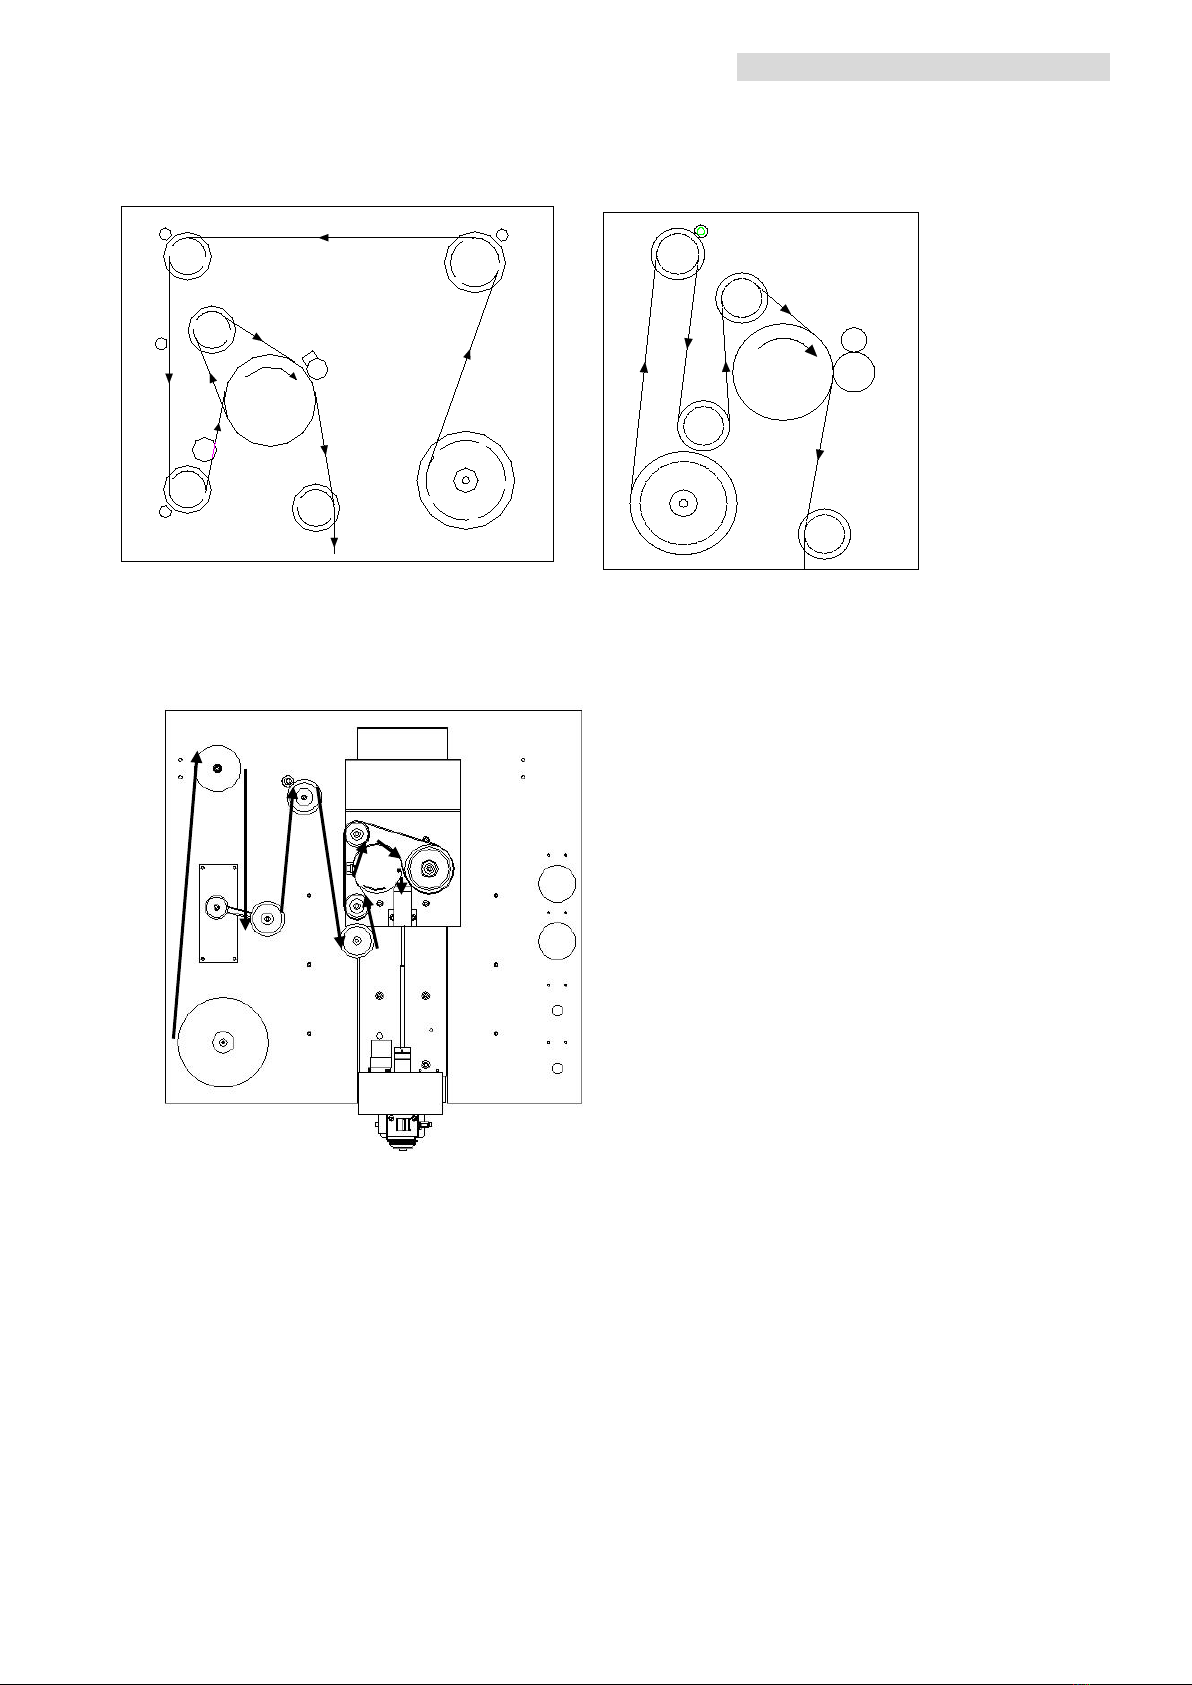
4. Lead cutting wire through threading system (follow arrows)
non-AWT non-AWT
AWT model
- 6 -
CHMER WIRE EDM QUICK START
1.3 PRE-MACHINING SETUP
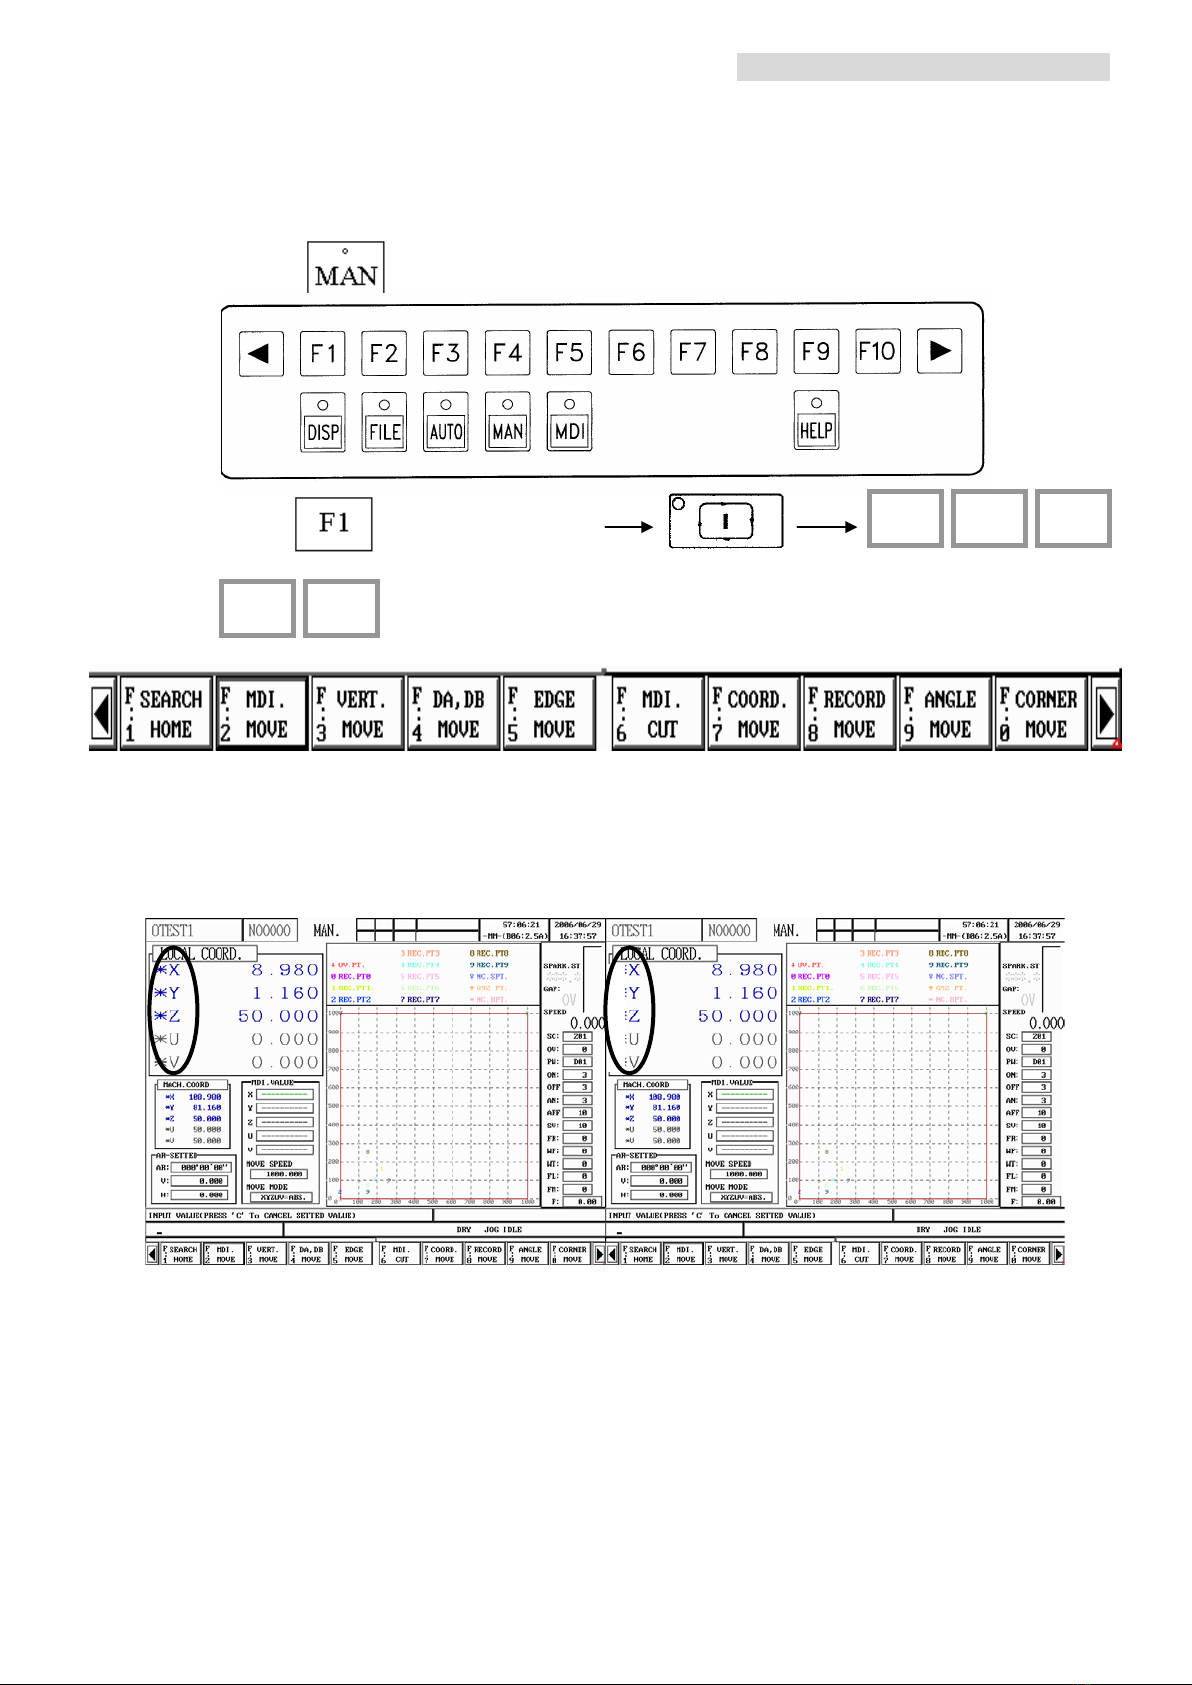
1.3.1 SEARCH HOME
1. Press
2. Press (SEARCH HOME)
3. The star mark, “ * ”, beside an axis name (*X,*Y,*Z,*U,*V) would disappear
after machine point is found. If not, move that one axis with direction key and do
Home Search again.
1.3.2 VERTICALALIGNMENT
Use Alignment Jig to find out vertical points after parts replacement such as
upper/lower Head, Diamond Guide or Ceramic Plates. Before executing Vertical
Alignment, theAlignment Jig has to be well located on work-table and connect its
-V
+Z
-X
-Y
-U
Note:Please turn off
AR
function before SEARCH
HOME to avoid Alarm 10500.
- 7 -

CHMER WIRE EDM QUICK START
signal cable to VER I/O port. Then follow steps listed below:
1.Press twice quickly if its LED not lit on.
2. Press (VERT. MOVE)
2. Align either XU or YV at one time
Select direction【2 (-X) or 1 (+Y)】, press to begin.
3. When vertical points are found (repeat accuracy within 5μ), alignment process
will stop, and the text of UV will change to color gray from red.
4. Press to reset 5 axes local coordinate value.
Alignment Jig
VER I/O port
DA,DB Switch
Vertical position (U,V)
- 8 -
CHMER WIRE EDM QUICK START
Note. Before executing Vertical Alignment:
(1) Turn off DA/DB Switch (DA DB OP. SW=OFF). Important!!
(2) Well dry upper head.Any water drip left will worsen alignment accuracy.
(3) To keep aligning the same axis, select the same direction in 2ND STEP.
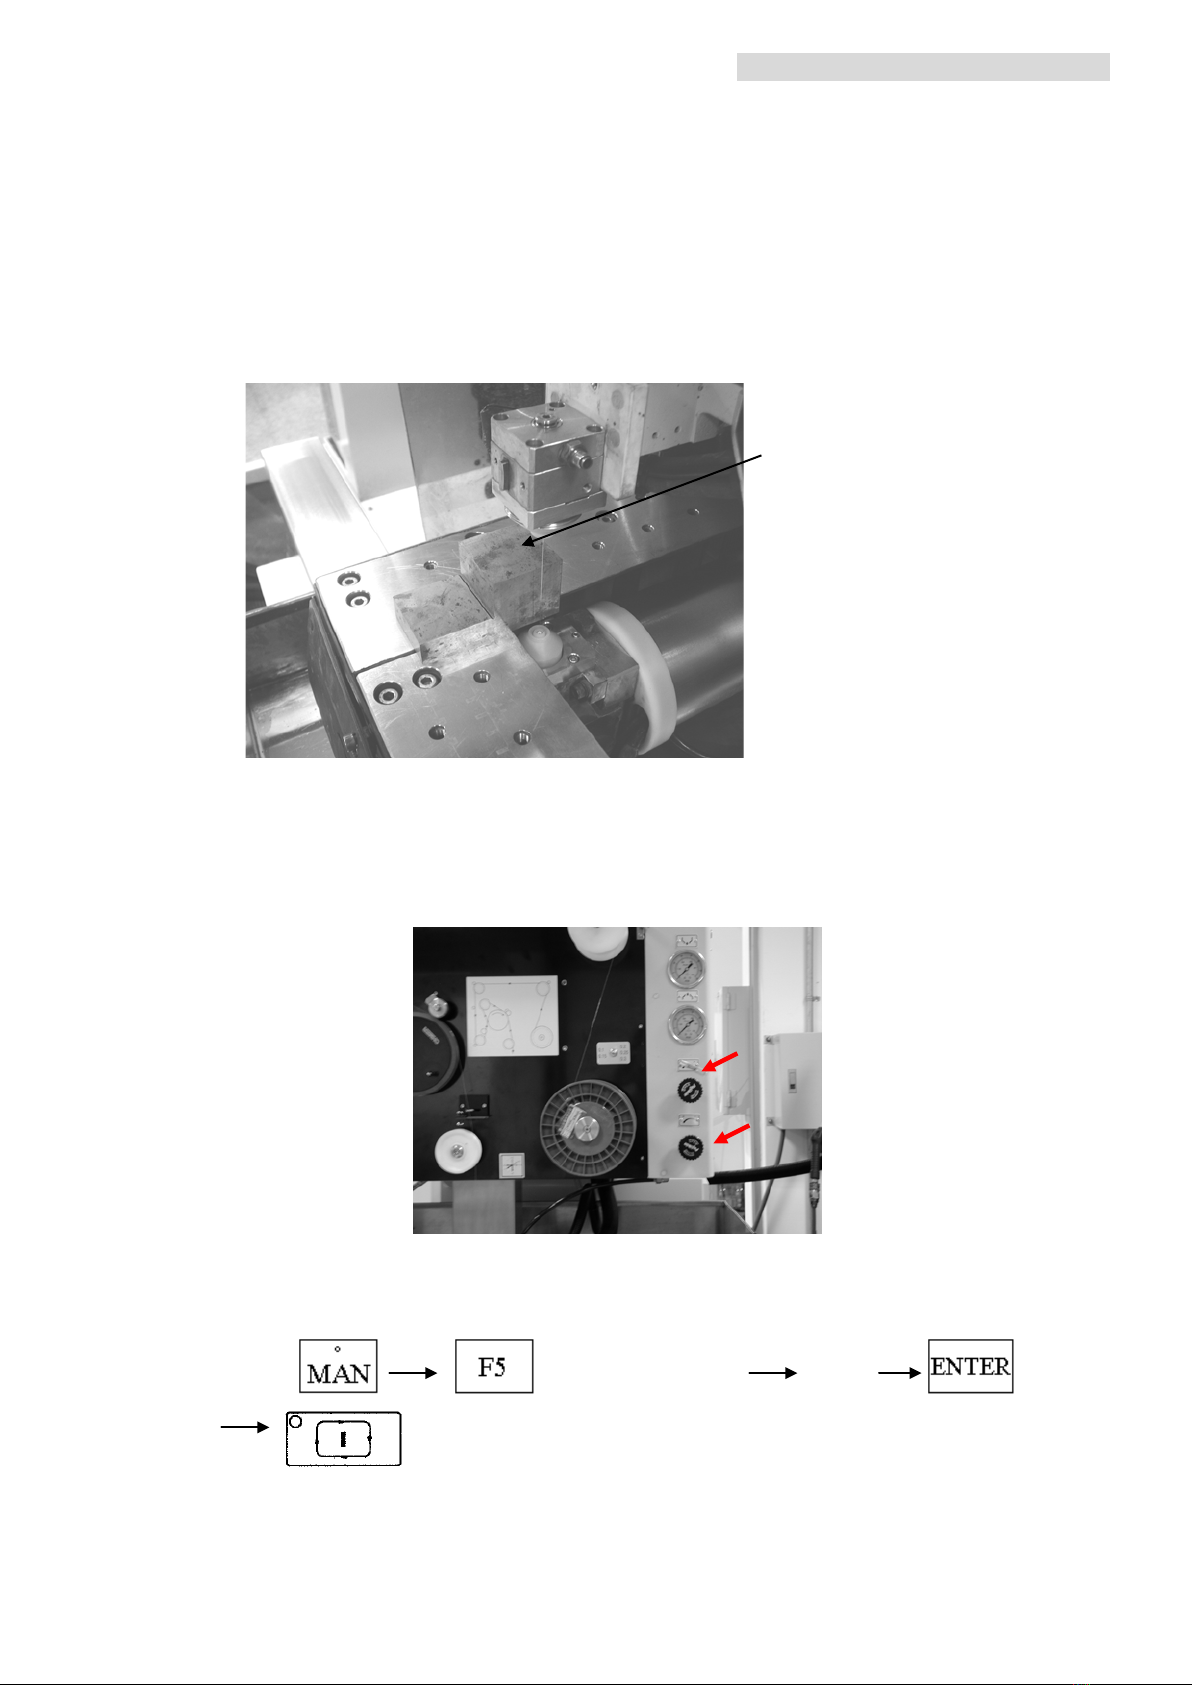
Except for using Alignment Jig, L-Block can be used for manually aligning
the axis with spark appears on wire:
1. Locate L-Block on Work-table and well align it with indicator.
2. Turn (right) off two water knobs to block flush water from upper and lower head.
3. Do EDGE in –X direction:
Press
(EDGE MOVE)
2(-X)
L-Block
- 9 -

CHMER WIRE EDM QUICK START
4. Press to reset 5 axes local coordinate value.
5. Set PW=A01.The other S-code items are the same (ON:1,OFF:15,AN:1,AFF:15,
SV:50, FR:10,WF:5,WT:10,WL:0,F:0). (Set WT=10 forΦ0.2wire; set WT=12 for
Φ0.25 wire).
6. Press
7. Move Y and V axis with
ML
or
L
speed until spark appears evenly on wire. Then,
move table back and forth in Y direction.
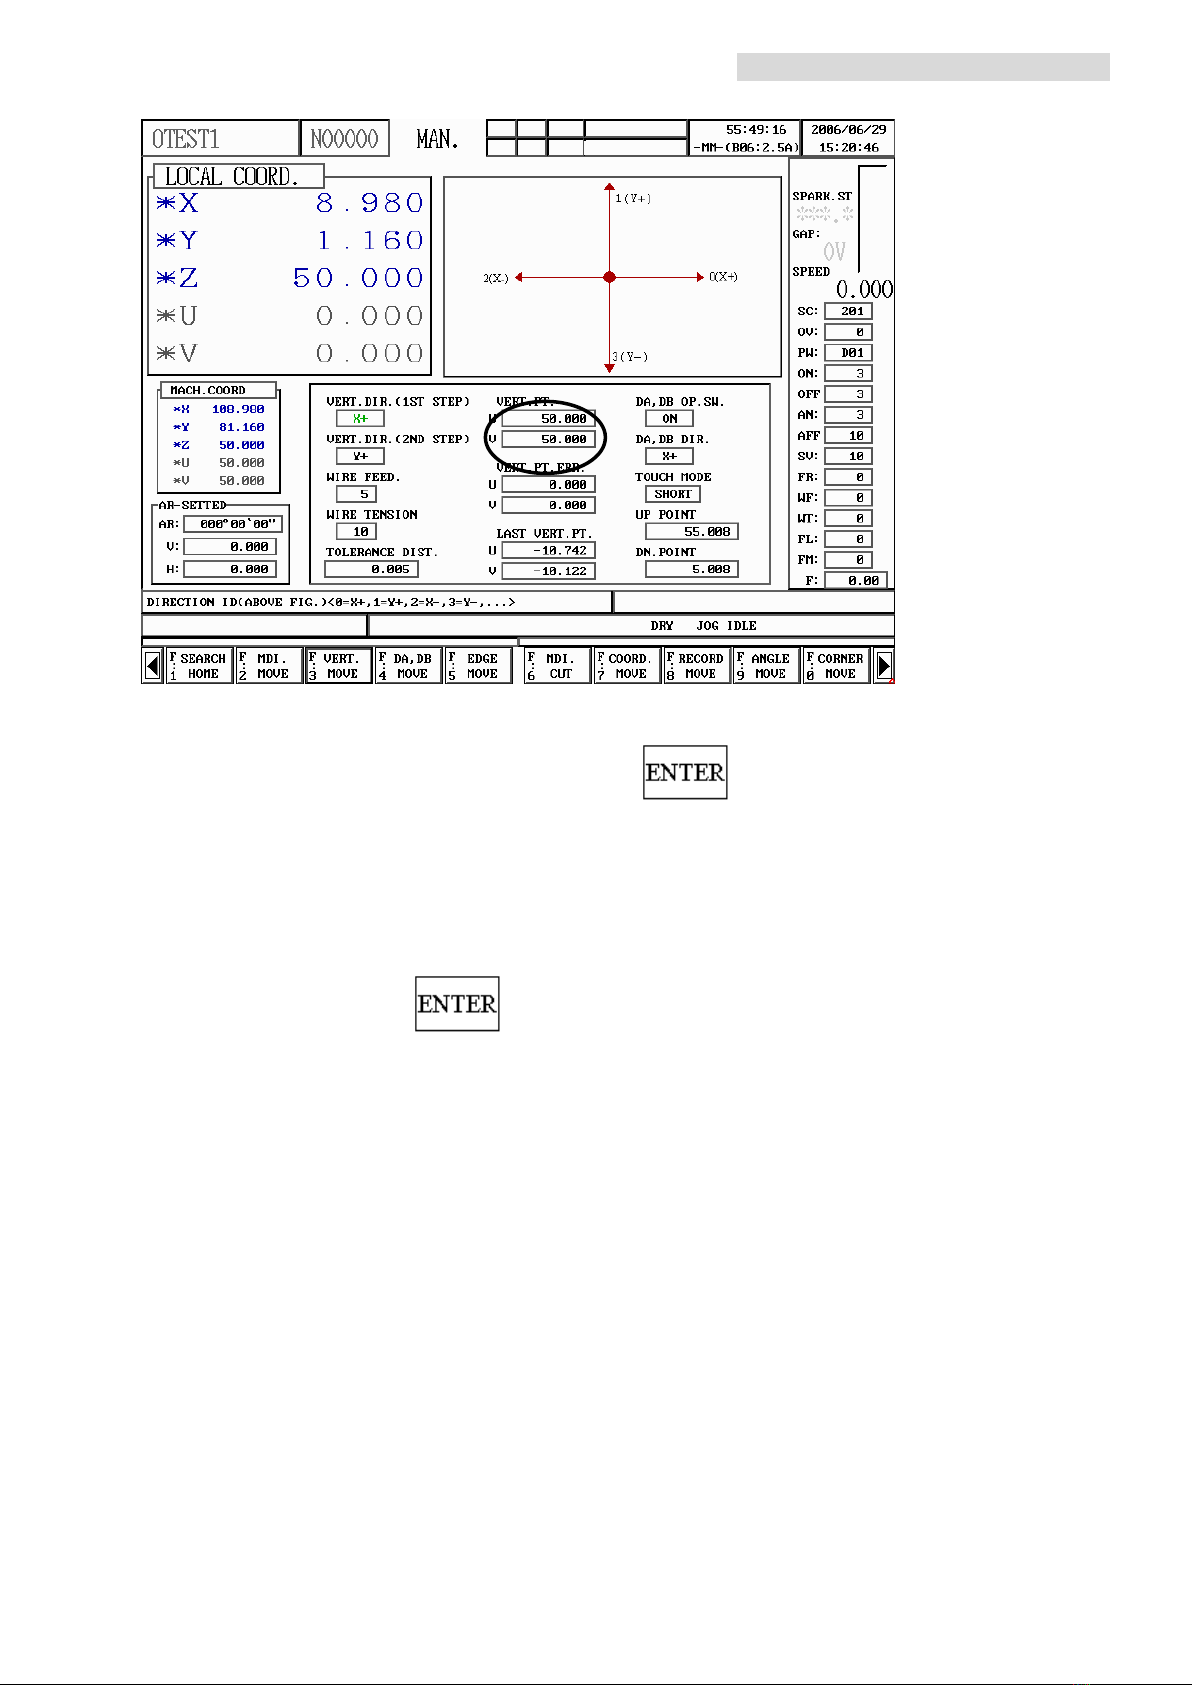
8. If the spark appears evenly while table moving, write down axis V machine
coordinate value and input them into VERT. PT. Press (VERT MOVE)
and VERT. PT. will appear on screen.
- 10 -
CHMER WIRE EDM QUICK START
9. Input the coordinate value and press to save.
10. Repeat 3~9 for XU axis alignment.
Tip
:
To copy machine coordinate to VERT. PT., move Green Bar to VERT. PT.,
press Cand
- 11 -

CHMER WIRE EDM QUICK START
1.3.3 SET UPTAPER DATA: DA/DB
Need to re-setup DA/DB after parts replacement such as upper/lower Head,
Diamond Guide or Ceramic Plates. Please follow steps listed below:
1.Set up Z axis height
(1). Put a L-Block (45mm) on the worktable.
(2). Press a to set
Z HEIGHT=250.0
. Next, do Z axis
search home.
(3). Lower down Z axis slowly to just slightly touch the surface of L-Block.
Keep 0.2mm gap away from upper nozzle.
(4). Now, write down current machine coordinate value of Z axis (assume
H1=46.0)
(5). Use the equation below to get the tolerance value Z1
:
Z1=
(
H2-H1
)
+Z0
Z1=
(
45.00-46.00
)
+250= ─1+250=249.00
(6) Input new Z1 in Z HEIGHT and do
search home again.
- 12 -

CHMER WIRE EDM QUICK START
(8). When Home Search is done, press twice, and lower Z axis down to
keep a 0.2 mm distance above the 45mm L-Block.
(9). If on the screen, Z coordinate value is not approximately 45.2 mm, then
repeat above step (1).~(8).
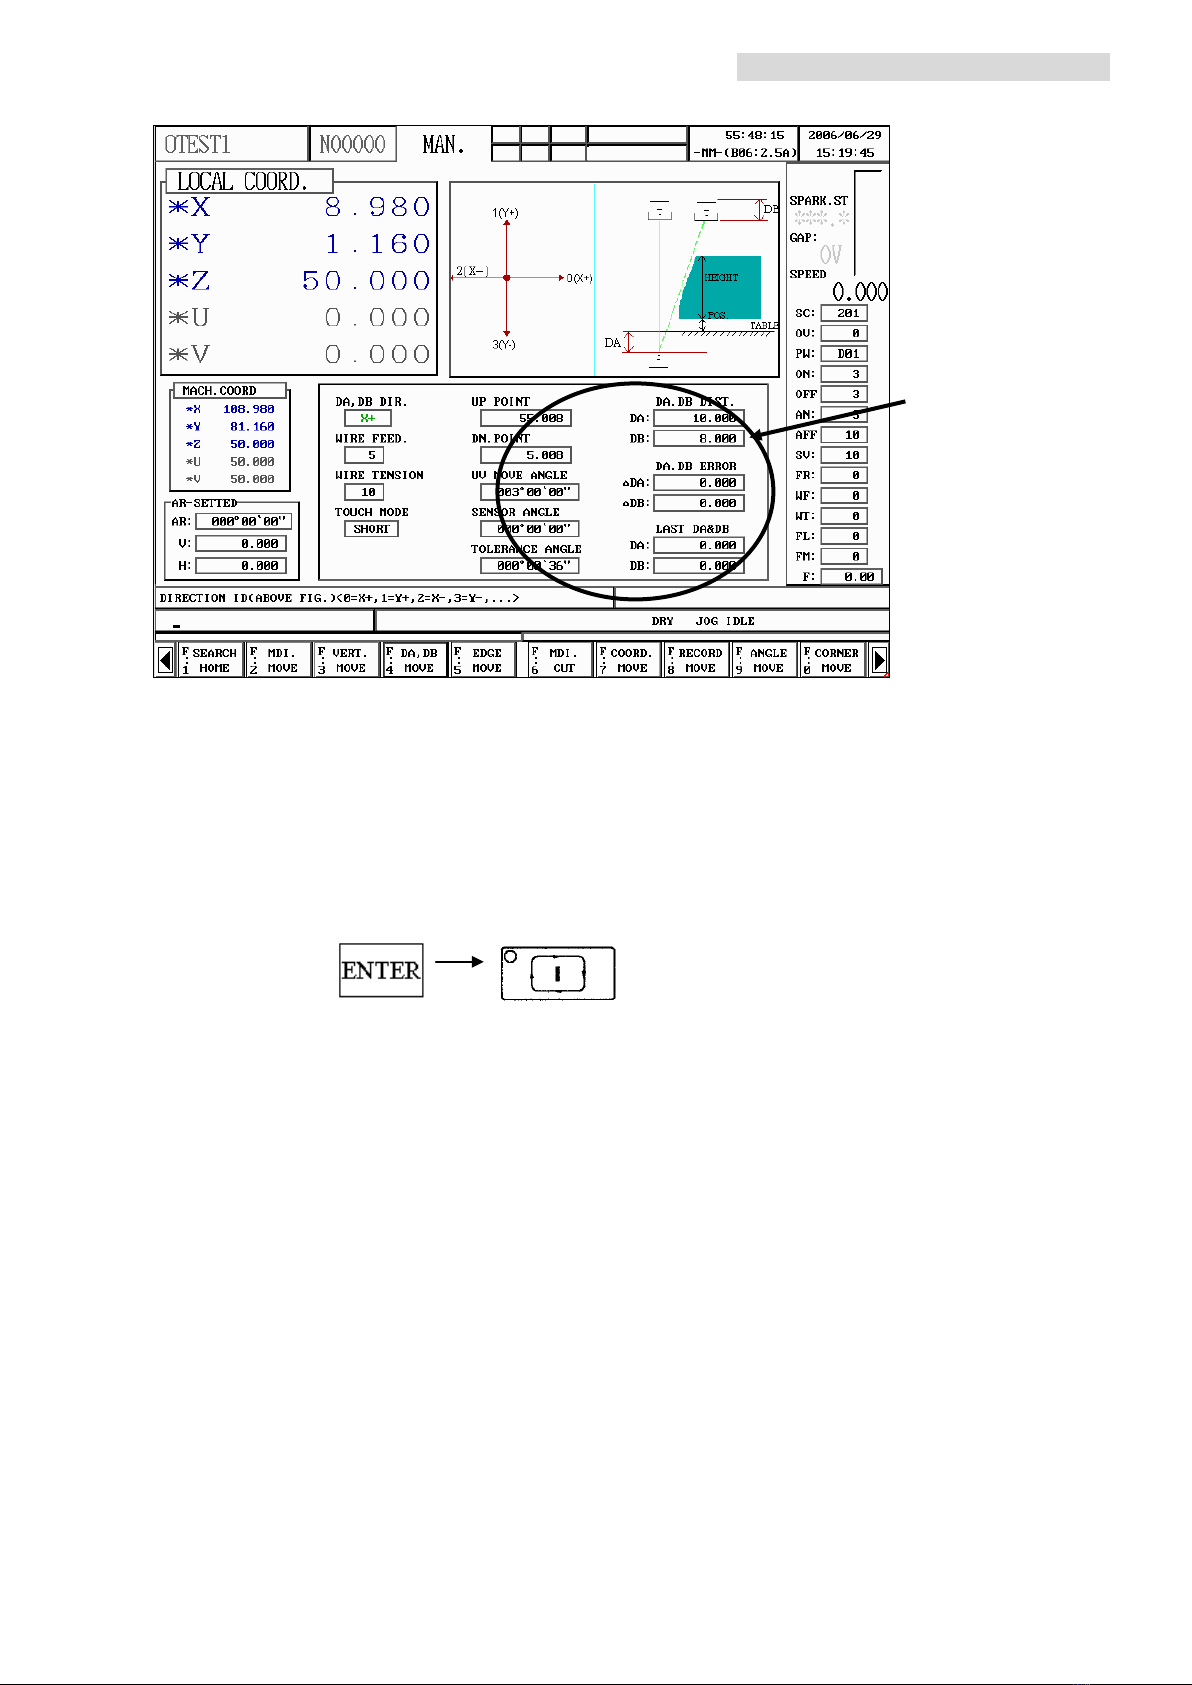
2. Setup DA, DB.
(1) Put L-Block on Work-Table as indicated by figure below.
(2) Edge Find in–X ( please refer to Chapter 4.1, page 32. )
(3) Move the wire away from L-Block in +X for at least 15mm by key panel or
MDI MOVE (refer to Chapter 4.6).
(4) Press (DA, DB MOVE)
(5) Input DA, DB MOVE info:UV MOVE ANGLE=3.000, UP POINT=45.000,
DN POINT=0.000,TOLERANCE ANGLE=0.0050
L-Block
Cutting wire
- 13 -
CHMER WIRE EDM QUICK START
(6) Set TOUCH MODE=0 (short) for L-Block. Set TOUCH MODE=1 (IO) if
Alignment Jig is used.
(7) Set WIRE TENSION= 4~15.
(8) Set DA. DB DIR.= 2 (-X)
(9) Press to start DA, DB MOVE.
DA DB MOVE info
- 14 -

CHMER WIRE EDM QUICK START
2.1. FILE MANAGEMENT & GRAPH SIMULATION
2.1.1. Browse a floppy disk
1. Press
2. Press (NC.NAME BROWSER)
3. Press (FLOPPY BROWSER)
2.1.2 Copy file from floppy to DOC (Disk On Chip)
1. Press
- 15 -
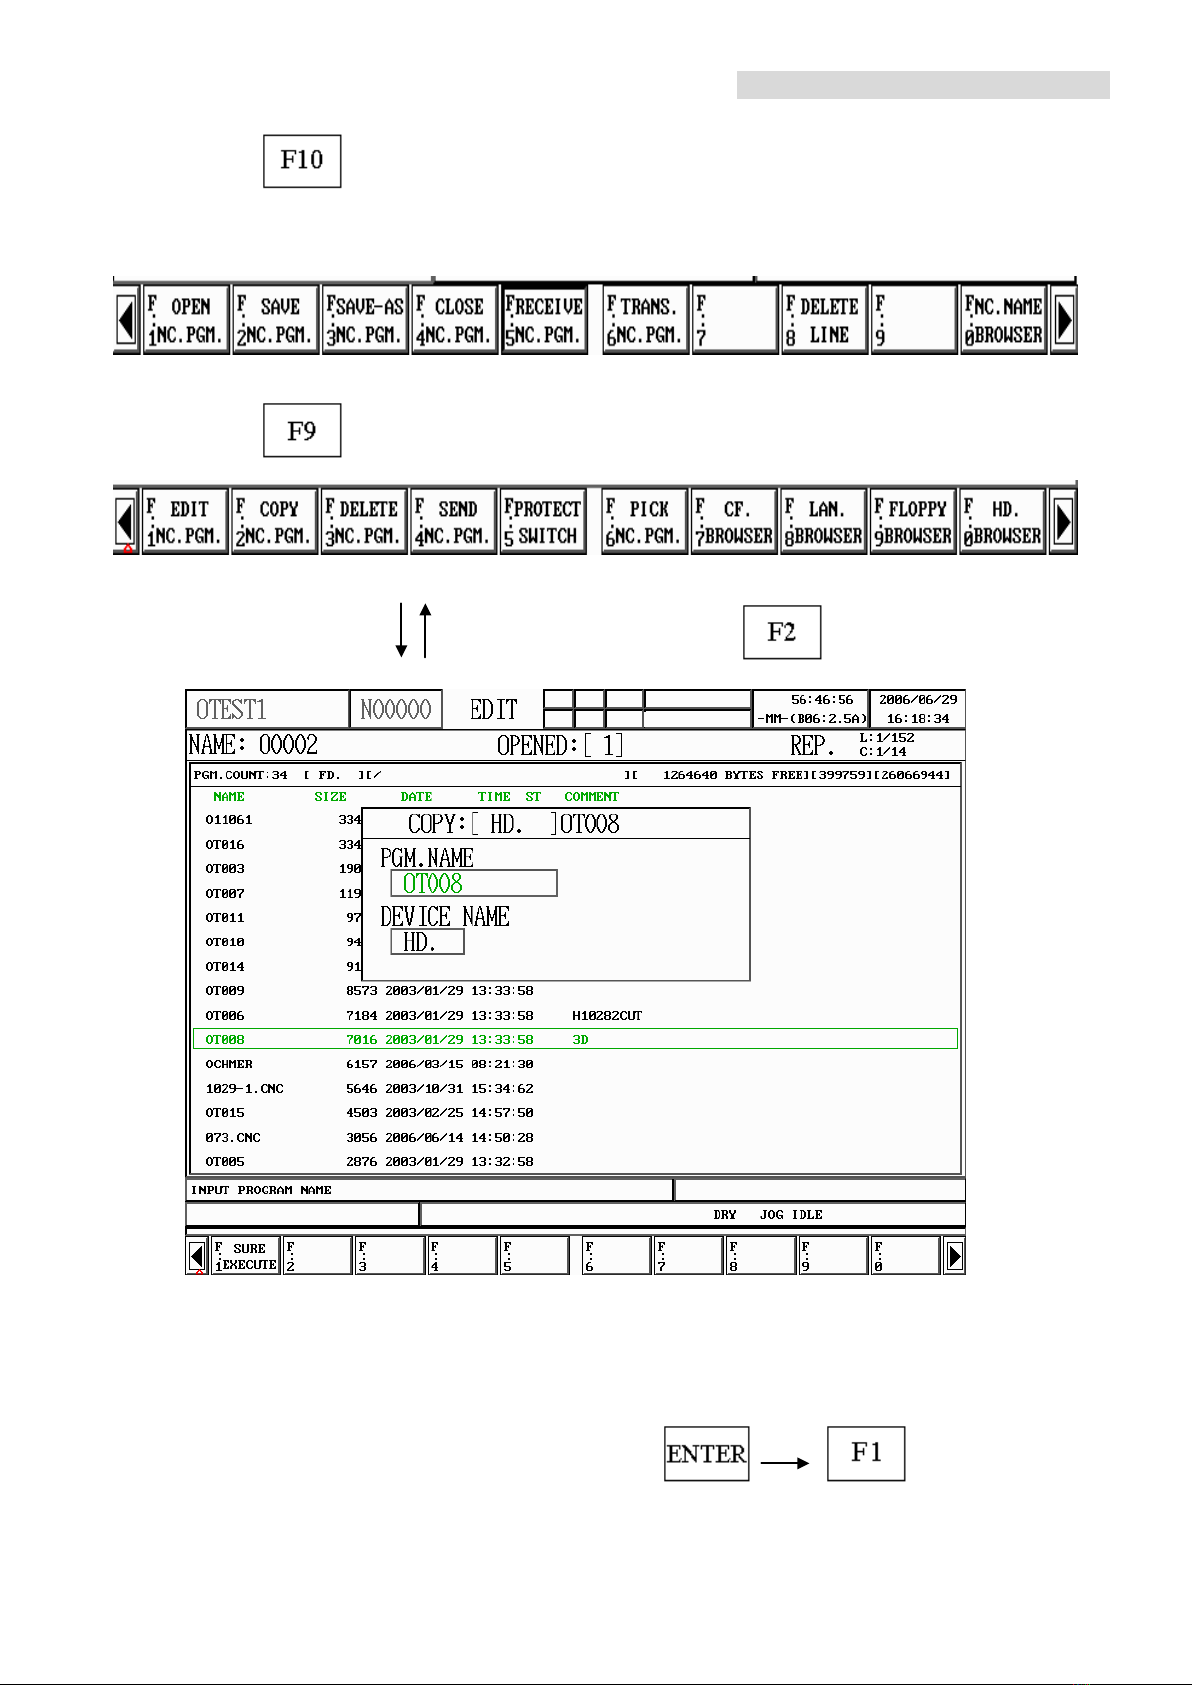
CHMER WIRE EDM QUICK START
2. Press (NC.NAME BROWSER)
3. Press (FLOPPY BROWSER)
4. Move cursor with to select a file and press (COPY NC. PGM)
Dialogue box shows current file name, which could be modified. To specify a new
file name, for example O0301, then press .
- 16 -
Other CHMER Industrial Equipment manuals


