ChoiceMMed BP201 User manual

WRIST BLOOD PRESSURE MONITOR
INSTRUCTION MANUAL
Models: BP201
English Instruction Guide Ver1.0

Table of Contents
IMPORTANT INFORMATION ………….………. (3)
DELETING MEASUREMENT FROM THE MEMORY.…….. (10)
PRECAUTION FOR USE……..…………….…….(4)
EVALUATING BLOOD PRESSURE FOR ADULT... .(11)
BEFORE YOU START….………..………. ……(4)(5)
SPECIFICATIONS……………………………….….. (12)
MONITOR COMPONENTS…...…......…………. .(5)
TROUBLE SHOOTING…………………………(13)(14)
DISPLAY OF LCD……………..……………….. . (6)
BOX CONTENTS…….…………………….. ……….(15)
TIPS FOR BLOOD PRESSURE MONITORING. ..(7)
SYMBOLS………………………..…………………..(15)
LCD DISPLAY FOR BLOOD PRESSURE……….(8)
LIMITED ONE YEAR WARRANTY....….…….…. ...(16)
CLOCK AND DATE ADJUSTMENT. . . …………. (9)
IRREGULAR HEARTBEAT INDICATOR……. . (10)
2

IMPORTANT INFORMATION
Please read this instruction manual thoroughly so that you completely
understand the operations, cautions, performance and limitations with this
monitor. After reading this manual, please keep it for future reference.
You should not use this blood pressure monitor for self-diagnosis,
self-treatment or to change medication without consulting your physician or
other health care professional. Should you have any doubt or question about
your blood pressure measurements, you should consult your physician or other
health care professional.
This device is contained high-precision parts; therefore, avoid exposing it to
extreme temperature or humidity or to direct sunlight, shock and dust.
Do not attempt to calibrate or repair this monitor. If you have any questions
regarding the function or operation of this monitor, please contact our service
agent so we can provide you with accurate information.
Should the monitor or cuff need cleaning, use a dry, soft cloth or a cloth
dampened with water and a mild detergent. Never use alcohol, benzene,
thinner or other harsh chemicals to clean the monitor or cuff.
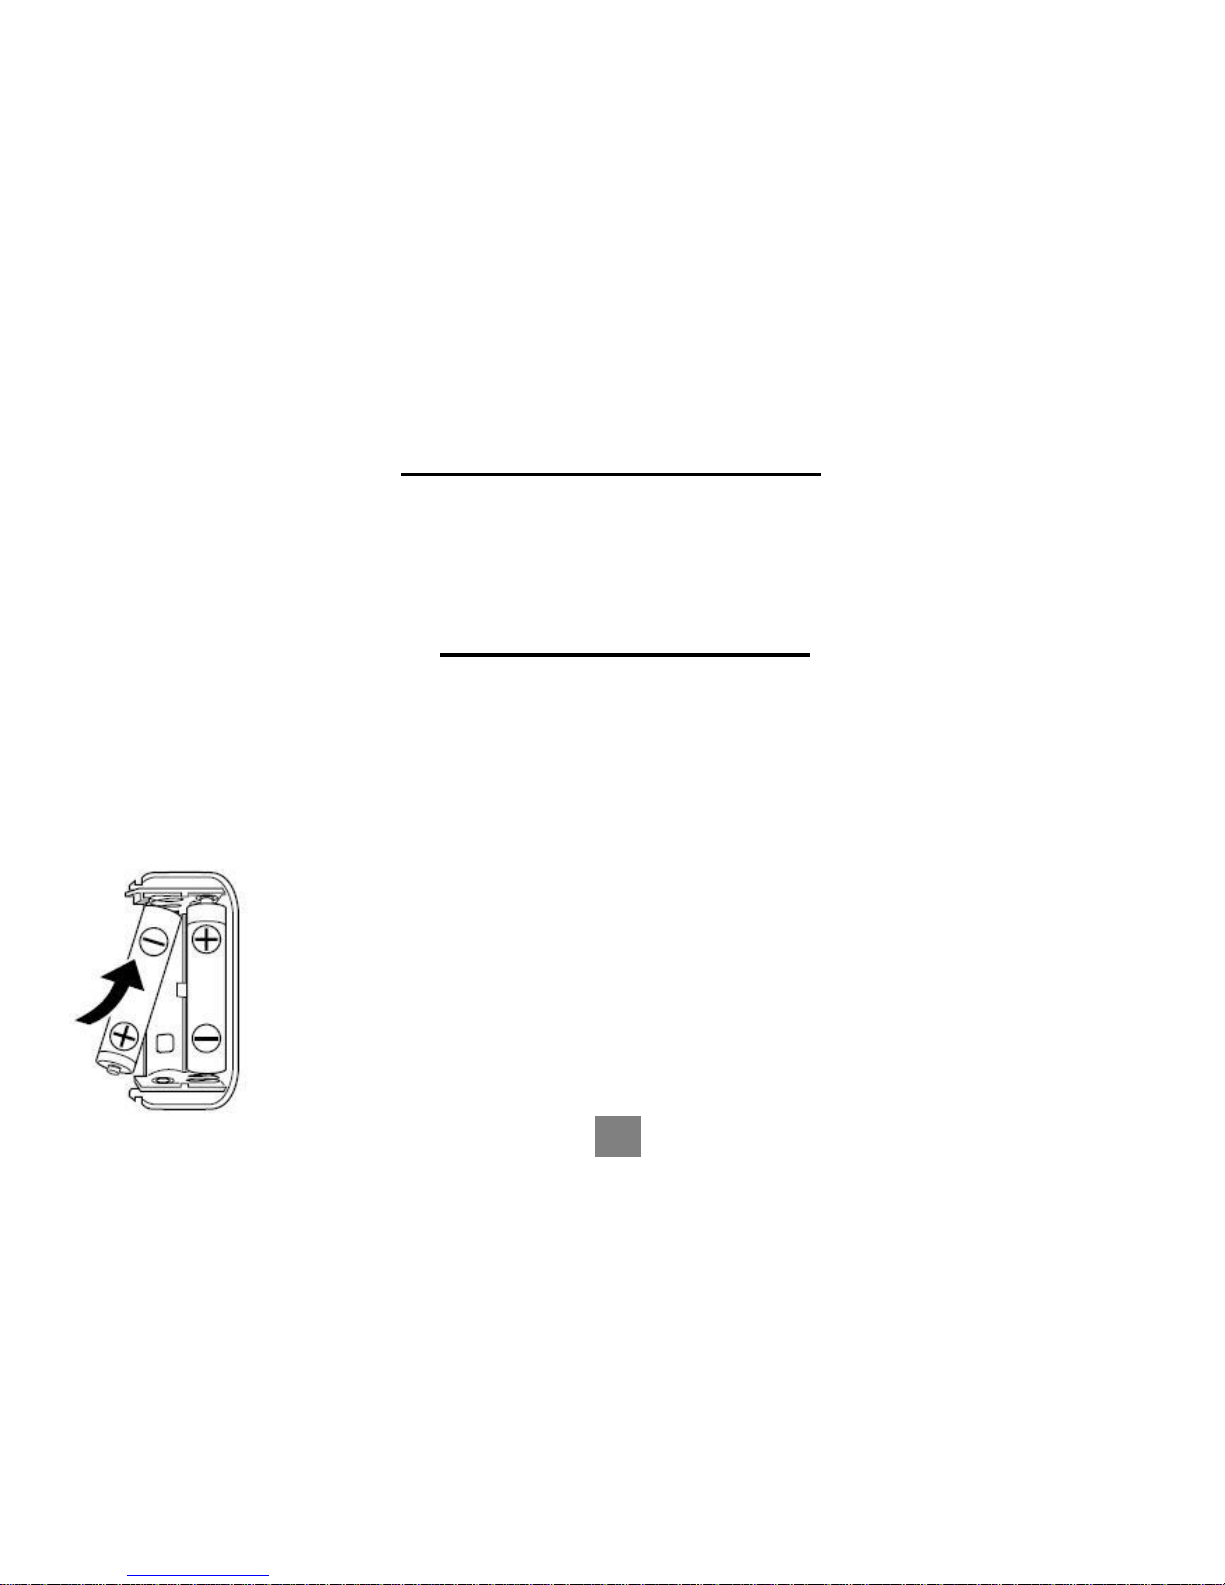
Remove and replace the batteries if the monitor is not used for more than 6
months. Alkaline batteries recommended.
3

PRECAUTION FOR USE
The BP201 Wrist Automatic Blood Pressure Monitor is designed to be operated by anyone
who is eighteen years and older or by medical professionals to monitor blood pressure
(systolic and diastolic) and pulse rate.
BEFORE YOU START
Please make sure you have installed 2 AAA (3 volt) batteries (alkaline batteries
recommended), to install batteries or replace them if the “Low Battery” symbol appears
on display), proceed as follows:
■Battery Loading
★Remove the battery compartment cover by gently pushing down
on arrow and sliding cover forward.
★Place batteries with positive “+” and negative “-“ terminals into
compartment and make sure they match the indicated terminals in
the compartment.
★Close the battery cover by gently sliding it into the compartment
and pressing it into place.
4

Note:
★When the LCD display shows “Low Battery” signal ,the batteries
must be replaced for accurate readings.
★Do not use rechargeable batteries with a voltage of 1.2Veach because
they are not suitable for this product and will cause inaccurate readings.
★Remove the batteries if the monitor will not be used for six month or
longer to avoid damage from the possibility of leaking batteries.
★All the measurements will remain in the memory should the batteries
become drained, removed, or replaced.
M
MO
ON
NI
IT
TO
OR
R
C
CO
OM
MP
PO
ON
NE
EN
NT
TS
S
5
★“MEMORY” Button /Clock Setting
★“ON/OFF” Button / Clock Adjusting
★LCD Display
★Systolic Indicator
★Diastolic Indicator
★Pulse Indicator

DISPLAY OF LCD
6
Mode for LCD display:
(1) Date: Month - Day
(2) Time: Hour - Minute
(3) Systolic Blood Pressure
(unit: mmHg)
(4) Diastolic Blood Pressure
(unit: mmHg)
(5) Pulse (unit: beat/minute)
(6)WHOBPClassificationIndicator
(7) Inflation / Deflation Indicator
(8)Blood Pressure MeasurementUnit
(9) Low Battery Indicator
(10) Irregular heartbeat Indicator
(11) Memory Record Number

TIPS FOR BLOOD PRESSURE MONITORING
★Relax for about 5 minutes before measurement.
★Do not smoke or ingest caffeine at least 30 minutes prior to measurement.
★Remove any constricting clothing or watch and place the cuff on a bare wrist.
★Keep still and do not talk until the measurement is complete.
★The cuff must be neither too tight nor too loose. Using a little force, you should be able
to place two fingers between the cuff and your wrist.
TAKING A MEASUREMENT
(1) POSTURE FOR TAKING BLOOD
PRESSURE MONITOR
7
★Make yourself comfortable and sit-up
straight
★Place the wrist with cuff in front of
you on the table with the palm up.
Do not bend your wrist or curl your
fingers.
★Cuff should be at the same height as
your heart.

(2) HOW TO WRAP THE CUFF
ON YOUR WRIST?
LCD DISPLAY FOR TAKING BLOOD PRESSURE
After you are in a comfortable position, press the “ON/OFF”
button. The device will verify itself showing all “8s”, then
LCD will show “00”.
8
★Place the cuff around a bare wrist ½ or ¾ of an
inch above the wrist joint on the opened-hand
side of the wrist.
★Keep the cuff at the same level as your heart.
★Unless your physician recommends otherwise,
use the left wrist to measure pressure.
★The cuff should be snug but not too tight. You
should be able to insert two fingers between the
cuff and your wrist.

CLOCK AND DATE ADJUSTMENT
★When the monitor is turned off, press ON/OFF and the
‘MEMORY’buttons for 3 seconds at the same time.
The number of the year will blink on the LCD display.
When the MEMORY button is again pressed and released,
the month will blink. Repeat the process and the day
of the month, the hour and minute will blink.
★When the number that you wish to set is blinking, each time
you press and release the ‘MEMORY’button, the number
will increase by one for the year, month, day, hour or minute.
Note: The hours are displayed as 1 through 24
Rather than 12 AM hours and 12 PM hours
★When batteries are replaced, the time and date must be reset.
9

IRREGULAR HEARTBEAT INDICATOR
If an irregular heartbeat is detected, the Irregular
Heartbeat symbol will appear and blink
in the display window.
DELETING MEASUREMENT FROM THE MEMORY
Press and hold the ‘MEMORY’BUTTON until all numbers change
to ‘ZERO’.
10

EVALUATING BLOOD PRESSURE FOR ADULTS
The following standards for assessing high blood pressure (without regard to age or
gender) have been established as a guide according to WHO (World Health Organization).
Please note that other risk factors (e.g. diabetes, obesity, smoking, etc.) need to be taken
into consideration and may affect these figures. Always consult with your physician or
other health care professional for accurate assessment.
WHO CLASSIFICATION OF BLOOD PRESSURE
11
Blood
Pressure
Classification
SBP
(mmHg)
DBP
(mmHg)
COLOR
INDICATOR
Optimal
<120
<80
GREEN
Normal
120-129
80-84
High-Normal
130-139
85-89
Stage 1
Hypertension
140-159
90-99
YELLOW
Stage 2
Hypertension
160-179
100-109
ORANGE
Stage 3
Hypertension
≥180
≥110
RED

SPECIFICATION
Model No.:
Type:
Measurement
Range:
Accuracy:
Power Supply:
Battery Life:
BP201
-------------------------------------
Oscillometric; Automatic air
inflation by air pump and
automatic deflation
-------------------------------------
Pressure: 40~280mmHg
Pulse: 30~160 Pulses
-------------------------------------
Pressure: within ± 5mmHg
Pulse: within ± 5%
3V DC (2 “AA” batteries)
-------------------------------------
Approx. 250 times (180mmHg,
once /day, 22°C)
Operation Environment:
Storage Environment:
Classification:
Cuff Size:
Memory:
Dimensions:
Weight:
Temperature: 5~40°C
Humidity: < 85%RH
----------------------------------------
Temperature: -20~60°C
Humidity: < 95%RH
Class II, type B
----------------------------------------
11.42” x 2.83” (+/-0.2”)
----------------------------------------
90 measurements including date
and time
----------------------------------
65.5mm (2.57inch)------(L)
63.5mm (2.5nch) ------(W)
62mm (9.84inch) -------(H)
----------------------------------------
141.5g (0.31 LB)
12

TROUBLE SHOOTING (1)
Abnormality
Probable Reason
Corrective action
LCD shows Low Batter
symbol
Batteries are low.
Install new batteries.
The unit does not
measure. Readings
are too high or too low.
Pneumatic system blocked or cuff
is too tightly wrapped.
Make certain the cuff is wrapped around
your arm correctly and re-measure.
Pressure system was unstable
before measurement.
Measure again. Stay calm. Do not move
or speak during measurement.
The cuff position is not correct.
Sit comfortably and still. Make sure the
cuff is at the same level at your heart.
An irregular heartbeat
symbol occurs.
Irregular heartbeat
Relax for about 5 minutes and measure
again. If the symbol appears again,
consult your physician or other health care
professional.
Incorrect operation
Some interference in inflation or
wrong operation during measuring
Refer to the inflation step in “Taking blood
pressure” and process again.
13

TROUBLE SHOOTING (2)
Abnormality
Reason
Checkout
LCDshows“Er U”
Insufficient inflation
Wait for 5 minutes and re-measure.
If operation is still abnormal, contact
manufacture or agent (see the last page)
LCDshows“ErH”
Inflation over 305 mmHg
LCDshows“Er1”
Undetectable the pulse
LCDshows“Er2”
Radiation interference
Move away the radiation source
LCDshows“Er3”
Measured result appears wrong
Measure again
14Box Contents

Box Contents
1 Wrist Blood Pressure Monitor
1 Plastic Carrying Box
1 Product Instructions
2 AAA Alkaline Batteries
Symbols
Type B Applied Part
Attention and Caution
Serial Number
Date of Manufacture
Consult Accompanying Documents
Storage Temperature & Relative Humidity
15B

LIMITED ONE YEAR WARRANTY
ChoiceMMed America Co. warrants to the original purchaser that this equipment will be free from defects
in materials and workmanship for a period of one year from the date of purchase.
To obtain full warranty coverage, please be sure to complete your product registration within 30 days from
date of purchase.
REGISTER ONLINE:
Visit www.choicemmedamerica.com/register
Fill out required information
If you are unhappy with this product, we’ll replace it or give you your money back.
For questions or comments, or report any problems,
please email to support@choicemmedamerica.com.
Distributed by:
ChoiceMMed America Co.
2558 Pearl Buck Road, Suite 8A
Bristol, PA 19007 © 2014 ALL RIGHTS RESERVED
Revised Date: July 23, 2014 Ver1.0
16B
Table of contents
Other ChoiceMMed Blood Pressure Monitor manuals