ChooChoo SC180012-1 User manual

Kitchen Island Cart
SC180012-1/SC180012-2
/SC180012-3/SC180012-4
www.choochoofurniture.com

Assembly Instructions
We have designed our furniture with you,the customer in mind.Our clear,
easy to follow step by step instructions will guide you through the project
from start to finish. Feel confident that this will be a fun and rewarding project.
The final product will be a quality piece of furniture that will go together smoothly
and give years of enjoyment.
If you have any questions just email us at
Find more services please visit
www.choochoofurniture.com
Please do not return to the store
Broken or missing Hardware?
Neen help with Assembly?
25
×2
24
×2
23
×2
22
×2
21
×2
1920
19
18
17
16
15
14
13
12
11
10
9
8
7
6
5
4
3
2
1
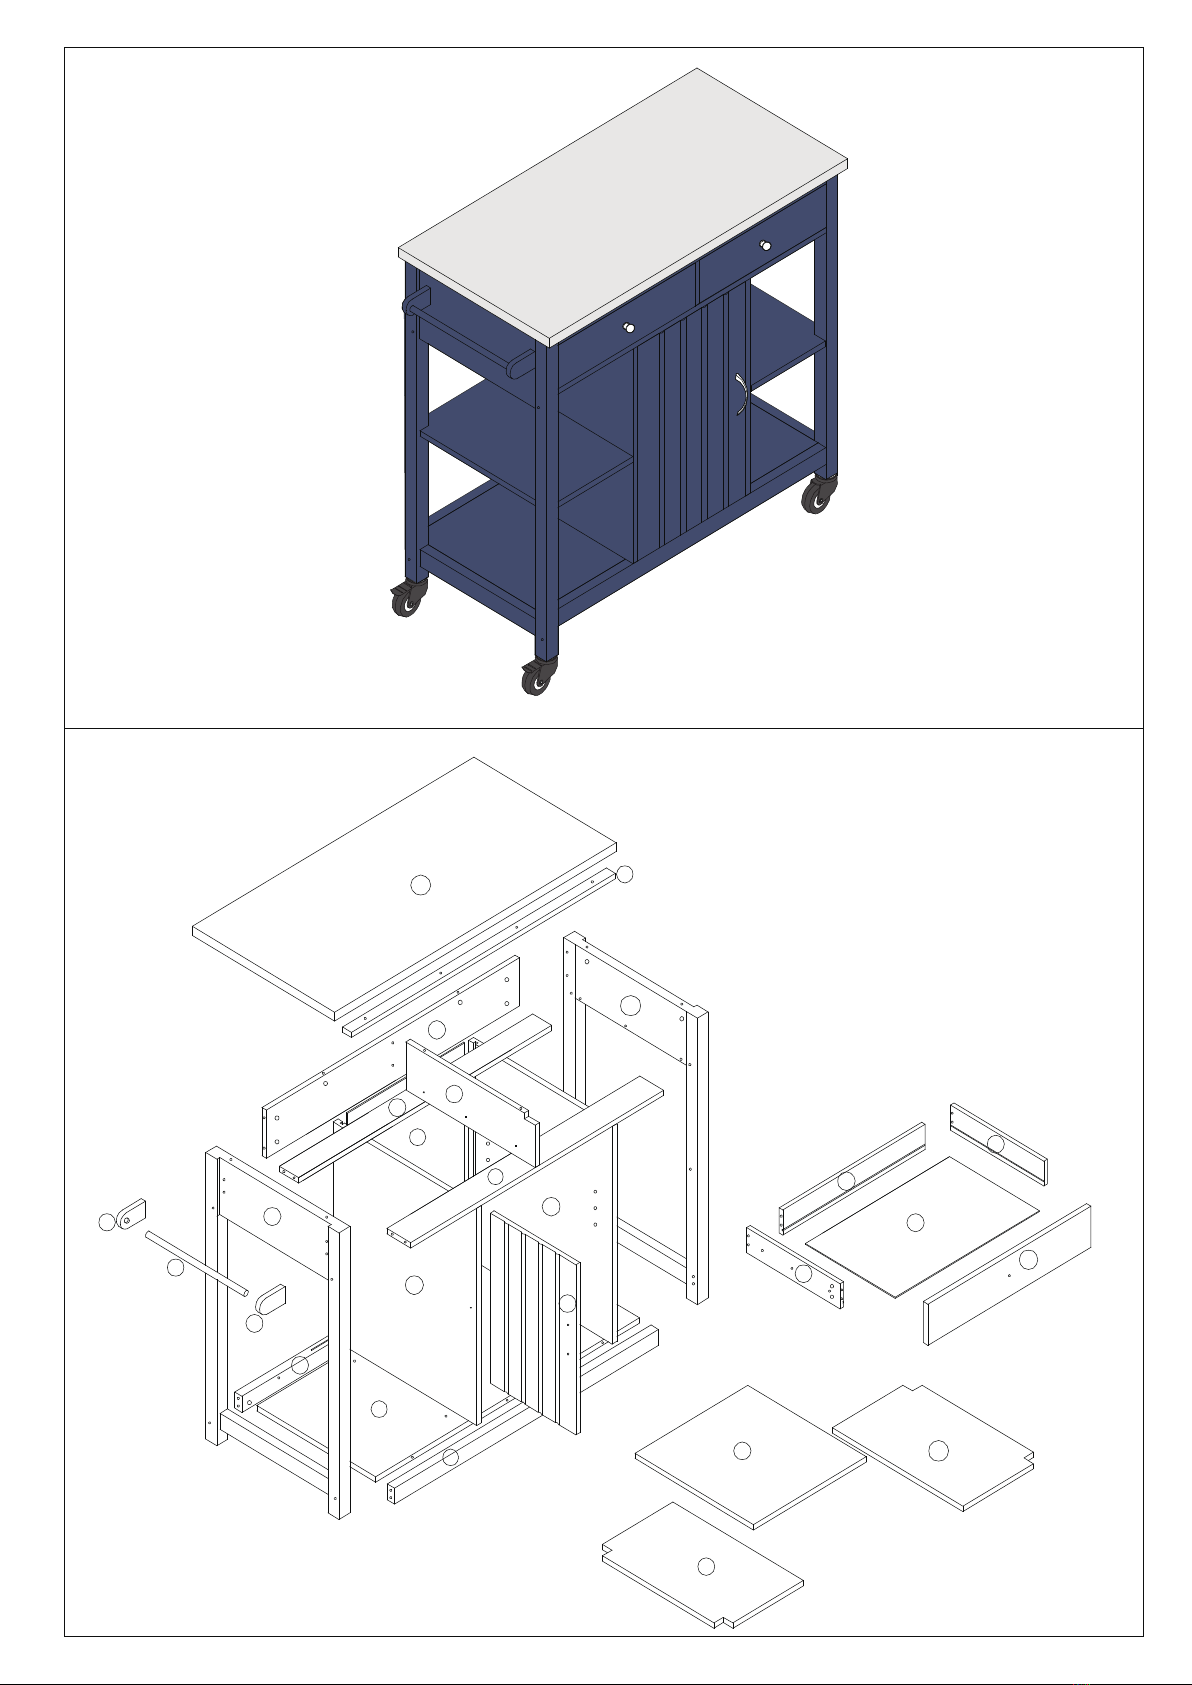
Parts description
Completed assembly

3 4
6 10
1 2 5
78 9
11 12 13 14 15
16 17 18 19 20
21 22 23 24 25
Left Side Panel Right Side Panel Top Panel Top Support Bar Back Support Bar
Support Bar Support Bar Support Bar Left Side Panel Right Side Panel
Back Panel Bottom Back Support Bar Bottom Support Bar Bottom Panel Left Handle Panel
Right Handle PanelCart Handle Door Shelf Panel Adjustable Shelf Panel
Left Drawer Side Panel Drawer Back Panel
Right Drawer Side Panel Drawer Bottom Panel Drawer Front
1pc
1pc
1pc
1pc
1pc
1pc
1pc
1pc
1pc
1pc
1pc
1pc
1pc
1pc
1pc
1pc
1pc
1pc
1pc
2pcs
2pcs2pcs2pcs
2pcs2pcs
Please make sure you are following each installation steps, and please also check if you are consistent with
the illustration of this manual.
Assembly preparation:
1.Please verify all parts & fittings according to part description, if there are something missing
please contact us for replacement.
2.Please read the instruction carefully, use cross screwdriver to assemble part a and
its associated section.
3.Divide drawer rail into two parts(Please see page 5), pre-install them at corresponding section
(Please see page 5 - 6)
☆Attention:
Drawer rails L1 for Part ⑦should be installed in opposite direction!
Please also mind the alignment of two rails.
4. Please clean wood chips in the holes of part E & F.

P
AB C D
E F G H
IJ K L
N
M O
30pcs 30pcs 16pcs 20pcs
10pcs 10pcs 36pcs 12pcs
4pcs 4pcs2pcs
2pcs2pcs 2pcs
1pc
1pc
Cam Bolt Cam Lock Wooden Dowel Screw
Bolt Lock Nut Screw Shelf Supporter
Bolt Knob Handle Slider
Wheel Hinge WrenchWheel(with brake)
-1-
9
10
C
CC
C
D
D
D
D
9
10
14
12
13
11
C x4
D x4
14
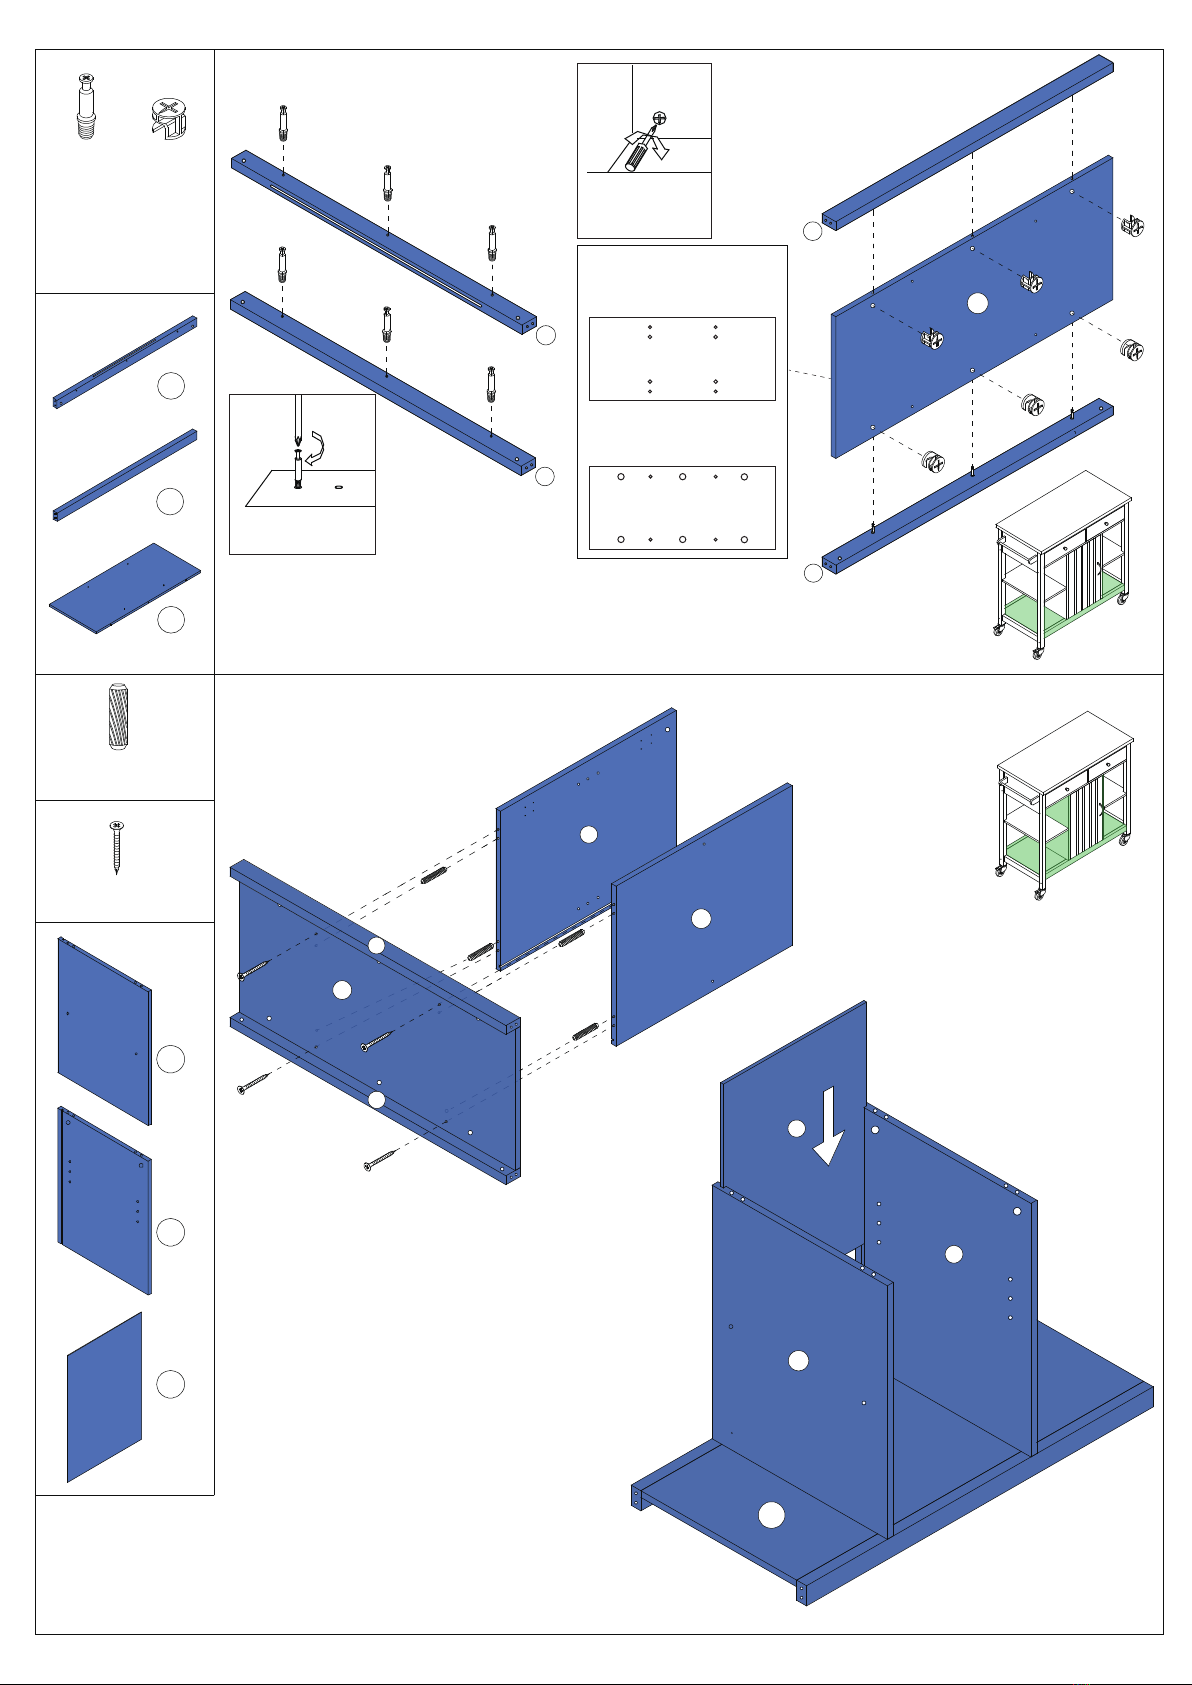
1.Attach Left Side Panel (9) and Right Side Panel (10) to Back Support Bar (14)
using Screw (D) and Wooden Dowel (C)
2. Insert Back Panel (11) between Left Side Panel (9) and Right Side Panel (10)
09
10
11
B
B
BB
B
B
12
13
14
A x6 B x6
Gently screw cam
bolt into the
threaded anchor.
Insert cam lock with
arrow pointing down.
Screw the cam firmly
into locked position.
1.Attach Cam Bolt (A) to Bottom Back Support Bar (12) and Bottom Back Support Bar (13)
2.Attach Bottom Back Support Bar (12) and Bottom Back Support Bar (13) to Bottom Back
Support Bar (14) using Cam Bolt (A) and Cam Lock (B)
pay attention to the oritentation of Bottom Support Bar!
(Part 12 & 13)
14
12
13
12
13
Fitting A
is always
associated with
Fitting B
Attach Fitting A to Part 12 &13
in the holes shown below.
1. Front must face up, and part 12's
surface with groove should be
attached along with Front.
2. Back must face down, and the
opposite surface of part 12 with
groove should be attached along
with Back.
Part 14 instruction
Step1
Step 3
Step 2
Step 4
(Long)

BB
Bin
Bin
9
10
14
13
12
7
8
6
5
B x 4
Attach Support Bar (8) and Support Bar (6) to Left Side Panel (9) and
Right Side Panel (10) using Cam Bolt (A) and Cam Lock (B)
A
A
A
A
Fitting A
is always
associated with
Fitting B
8
C x 2
D x 2
7
8
6
Attach Support Bar (8) and Support Bar (6) to Support Bar (7) using Wooden Dowel (C) and Screw (D)
6
8
6
A
A
A
A
8
D
D5
7
6
A
A
A
A
A x 4
-2-
DD
D x 2
Attach Support Bar (7) to Support Bar (5) using Screw (D)
7
5
7
5
Step 5
Step 6 Step 7
Step 8
(Long)

-3-
9
10
14
1
B
B
C
C
C
E
E
E
E
F
F
F
F
A x 2 B x 2
C x 4
E x 4 F x 4
C
EF
Attach Left Side Panel (1) to assembly using Cam Bolt (A) ,
Cam Lock (B) , Wooden Dowel (C) , Bolt (E) and Lock Nut (F)
Pay attention that all metals should be assembled according
to the corresponding hole position!
1
A
A
A
A
1
8
6
9
10
14
2
P
P
1
2
B
B
C
C
C
E
E
E
E
F
F
F
F
M
M
O
O
A x 2 B x 2
C x 4
E x 4 F x 4
M x 2 O x 2
C
1.Attach Right Side Panel (2) to assembly using Cam Bolt (A) , Cam Lock (B) , Wooden Dowel (C) ,
Bolt (E) and Lock Nut (F)
2.Attach Wheel(with brake) (O) to Left Side Panel (1) using a wrench
3.Attach Wheel (M) to Right Side Panel (2) using a wrench
Pay attention that all metals should be assembled according to the corresponding hole position!
Attention!
Wheel O with brake should be installed as same side as cart handle.
2
A
A
Step 9
Step 11
Step 12
Step 10
Please clean wood chips in the holes of part E & F.
The groove of F fitting must towards
to E as shown in picture.
You can either install all wheels after main part is assembled.

-4-
15
16
17
15
16
17
Put Left Handle Panel (15),Cart Handle (16) and Right Handle Panel (17) together according to illustration.
x 2
x 2 x 2
C
E
E
F
F
C
C
E
E
F
F
①
Attach Cart Handle to Left Side Panel (1) using Bolt (E),
Lock Nut (F) and Wooden Dowel (C)
Step 13
Step 14
The groove of F fitting must towards to E
as shown in picture.

-5-
LL1
L2
x 4
The four Slider (L) are divided into two parts according to the diagram respectively
This step is very important, Please perform according to the diagram!
Beware that certain amount of lude oil on the drawer rail,
please wear glove as protection.
L
2
1.The Slider (L) after separation becomes the (L1) part and the (L2) part of the illustration
2.There are 4 Sliders (L1) and 4 Sliders (L2)
L1
G x 12
L1 x 4
G
G
G
L
L
L
L
G
GG
1
1
1
1
⑦
①
②
1.Attach Slider (L1) to both sides of Support Bar (7) using Screw (G)
2.Attach Slider (L1) to Left Side Panel (1) and Right Side Panel (2) using Screw (G)
Please note: the hole of both sides of Support Bar (7) are different!
Please check the instruction for drawer rails and
pay attention to the alignment of each hole.
G
GG
L
1
G
G
G
L
1
⑦
G
GG
L
1
⑦
G
G
G
L
1
Push to separate drawer rail
Step 15
Step 16

Step 17
Step 18
Step 19
Step 20
21
24 22
25
23
A
A
A
A
B
B
B
B
I
J
21
24
22
DD
D
D
D x 4
A x 4 B x 4
G x 6
I x 1
J x 1
L2 x 2
2
2
21
24
22 G
G
G
G
G
G
L
L
25
25
-6-
Attach Left Drawer Side Panel (21) and Right Drawer Side Panel (22) to
Drawer Back Panel (24) using Screw (D)
1.Insert Drawer Bottom Panel (23) between Left Drawer Side Panel (21) and Right Drawer Side Panel (22)
2.Attach Drawer Front (25) to Left Drawer Side Panel (21) and Right Drawer Side Panel (22) using Cam
Bolt (A) and Cam Lock (B)
1.Attach Slider (L2) to Left Drawer Side Panel (21) using Screw (G)
2.Attach Slider (L2) to Right Drawer Side Panel (22) using Screw (G)
Attach Knob (J) to Drawer Front (25) using Bolt (I)/
Pay attention to the orientation of Slider!
G
G
L
G
2

-7-
19
19
20
20
19
H x 12
x 2
H
1.Attach Shelf Supporter (H) to assembly according to the diagram.
2.Attach Shelf Panel (19) to assembly, attach Adjustable Shelf Panel (20) to assembly.
HH
HH
H
HHH
H
①
②
⑨
⑩
20
19
18
G
G
I
I
K
N
N
18
M
G
G
G
G
G
G
I x 2
K x 1
G x 12
M x 2
⑨
⑩
1.Attach Handle (K) to Door (18) using Bolt (I).
2.Attach Hinge (N) to Door (18) and Left Side Panel (9) using Screw (G).
Step 21
Step 22

-8-
BB
B
B
BB
BB
B x 8
Attach Top Panel (3) to assembly using Cam Lock (B).
3
4
4
D
D
D
4
D
D x 4
3
Attach Top Support Bar (4) to Top Panel (3) using Screw (D).
3
3
AA
AAA
A
A
A
A x 8
Attach Cam Bolt (A) to Top Panel (3).
3
Step 23
Step 24
Step 25
-9-
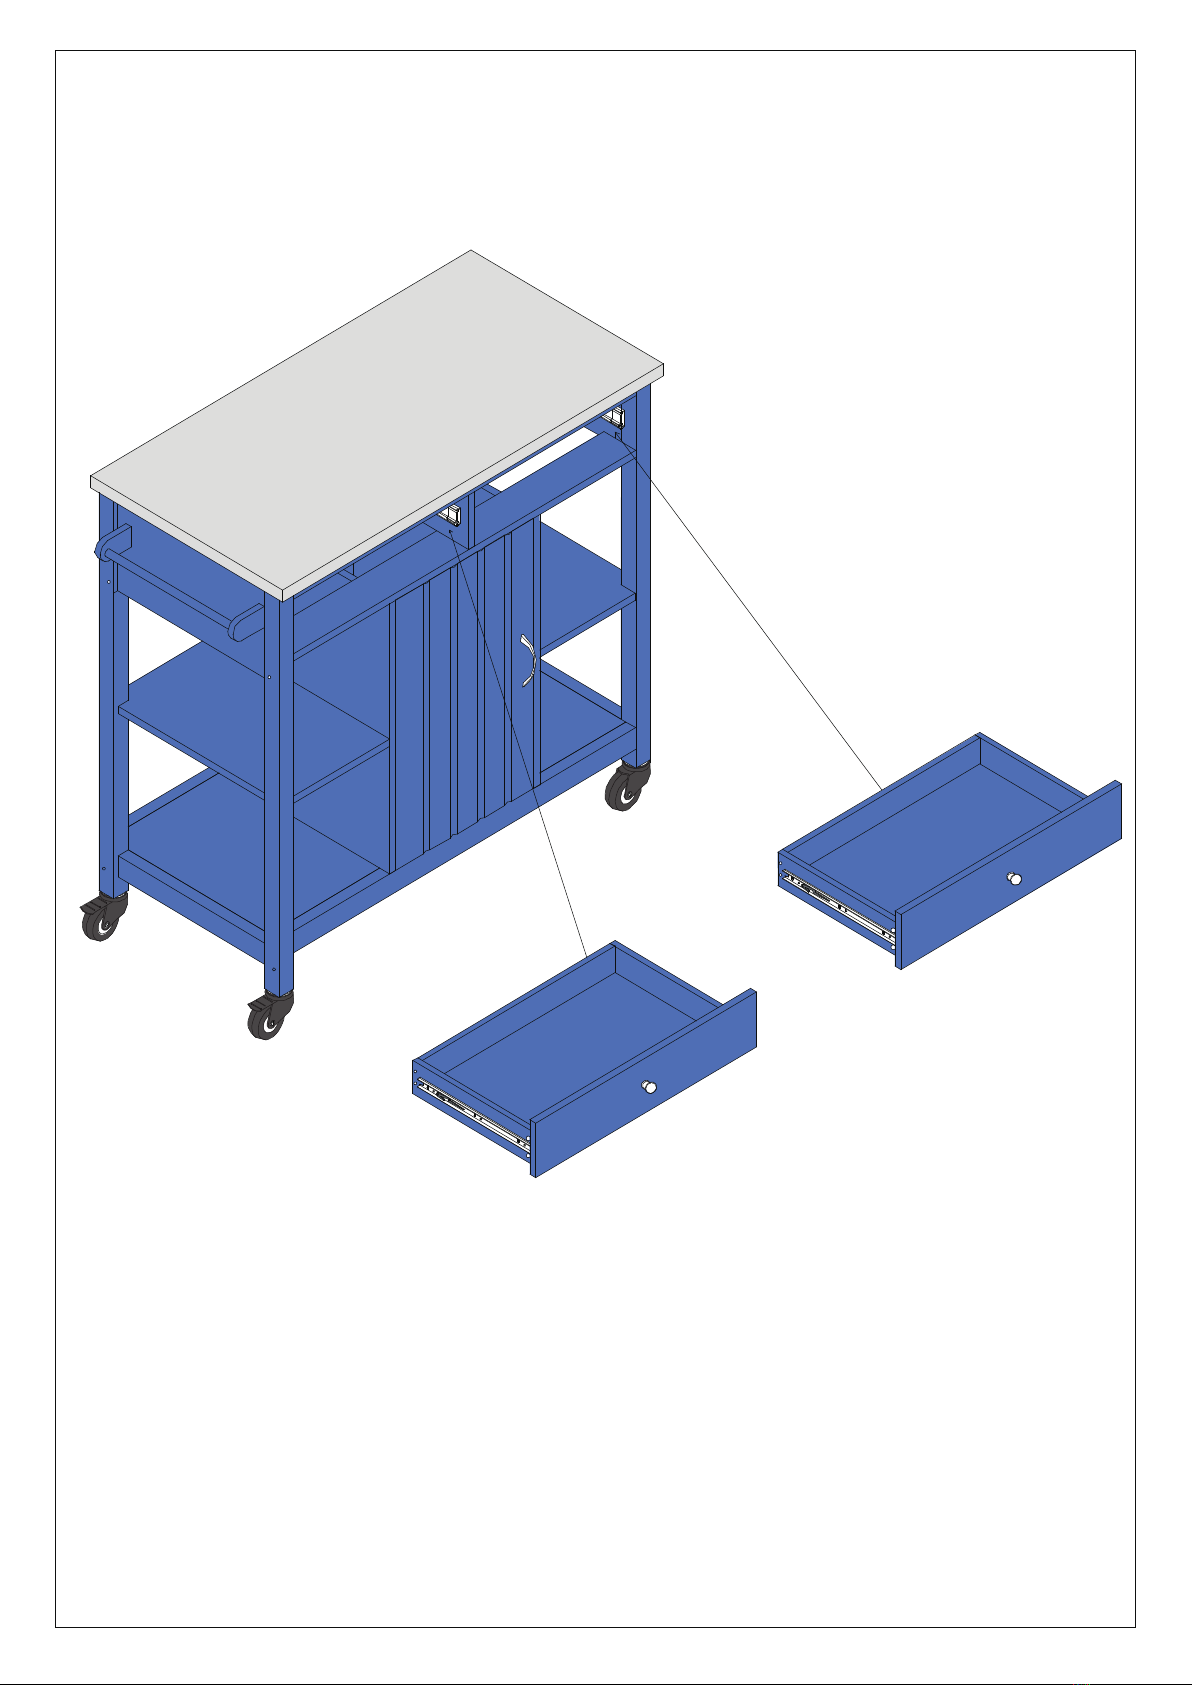
Install two drawers into the kitchen island, and pay attention to Slider (L1) and Slider (L2).
Step 26
This manual suits for next models
3
Table of contents
Other ChooChoo Indoor Furnishing manuals


Popular Indoor Furnishing manuals by other brands

ROBERTO FIORE
ROBERTO FIORE Cabinets To Go SBA36 Assembly instructions

Furniture Solutions
Furniture Solutions KIRRA 14KIR482 Assembly instruction

Fulltime System
Fulltime System FTS-5500 Series user manual

Ametrix
Ametrix Ametrix Vault Specification sheet

modway
modway MOD-6282 quick start guide

BCP
BCP SKY5962 instruction manual


hygena
hygena Tall boy 528/9060 Assembly lnstructions

Iron Age Office
Iron Age Office LUXE SINGLE Assembly instructions

Birlea
Birlea URBAN COAT RACK AND BENCH Assembly instructions

Costway
Costway GIANTEX CB10251 user manual

Furniture Solutions
Furniture Solutions Zica manual

Homelegance
Homelegance 5686-32 Assembly instruction