CHORTAU B-T27 User manual

CHORTAU
Dual 1080P Dash Cam Front and Inside
User Manual
Model: B-T27


A. CHORTAU B-T27 dual lens dash cam
B. Car charger power cord
C. Suction cup mount
D. Type C data cable
E. B-T27 dual dash cam user manual
F. Pin (use to insert/remove the micro sd card)
1. What's in the packing box?
01
A
D
E
C
B
F
EN

Very important !!!
1. This car camera is intended for use in motor vehicle
only. Do not install the camera where it might block the
driver’s view of road (including the mirrors) or the
deployment of the air bags.
2. Please use a genuine micro SD memory card from
16GB to 32GB with a speed rating of class 10 or higher.
Insert the memory card into the camera’s card slot until
it clicks. To insert/remove the card, please power off the
camera first, then push the card into the slot until it clicks
again.
Before use the card, please format it correctly follow
below steps:
Step 1: Turn off the camera, then insert card, after
inserted card into camera then turn on camera, press
M button to enter setup, if the camera is recording video,
click OK button to stop recording, then long press M
button to enter video setup page.
Step 2: After enter setup, short click M button again
enter system settings menu, then click down button to
highlight format option, click OK button to confirm, finally
click down button to select OK option, then click OK
button to confirm format, card formatted.

Warm tips:
1. Ideally, the Micro SD card should be formatted
monthly to maximize the lifetime of the memory card.
2. Please do not remove the card while the camera
is recording to prevent data loss/corruption.
3. This camera features built-in battery as internal
power, it’s used only for emergency recording and
saving settings after external power supply cuts off
(car turns off). This dash camera will not turn on
without external power supply. Please keep it plug
in always.
4. To avoid damage, be sure the car camera lens is
clean and there is nothing blocking the lens.
5. The camera is design to operate in temperatures
from -86°F〜+158°F, temperatures outside this range
risk degrading. The dash cam’s performance work
and causing damage. To avoid damage, in summer,
do not leave the camera in direct sunlight for a long
period of time when car parked, or where the
temperature could go above 140°F (60°C) inside car.
In cold winter, like -22°F (-30°C) or lower, detach the
camera from the windshield when not in use, and
store in the glove box.
03
EN


Basic Key Function & Shortcut key:
NO.
1
2
3
4
5
6
7
Name
Front camera lens
Speaker
Inside camera lens
IR LED lights
LCD display screen
Power button
Up button
Description
Front facing camera for video recording
road view
Record sound & delivery sound during
video playback
Rear facing camera for in-car video
recording
4 IR LED lights enhance night vision
in the car
1.5 inch color LCD display screen
Power On/Off
When you are driving, short click power
button, to turn off screen, get into screen
-saver mode(camera is still keep recording),
short click power button again to turn on
screen.Long press power button, to turn
on /off camera.
Move select up
Short click up button to switch screen
display mode, there are 4 display mode,
picture in picture /half front and half inside
/only front /only inside.Long press up
button to turn on /off IR LED light.
Long press up button to turn on /off IR
LED light.

8
9
10
OK button
Down button
Confirm the action; Stop/Start the video
recording In video recording mode, short
press to start and stop recording.
In photo taking mode, short press to take a
photo.In playback, short press to start/stop
playing the video.In setting menu, short
press to confirm selection.
Move select down Short click down button to
turn On /Off audio record directly,Long press
down button to turn on /off parking mode.
Menu button
Enter /Exit setup menu When camera is
recording, short click M button directly to
lock /unlock current video, long press M
button to take picture directly.When camera
is not recording, click M button to enter take
picture mode, short click M button again to
enter picture album, click up/down button to
view picture album.Long press M button to
enter video setting page directly, short click
M button again to enter system setting page.
In setting menu, short press to switch
between mode setting and system general
setting.
11 Type C port Type C port for charging or transferring data
Connect to the dash cam suction cup mount
Use a pin to click/poke to force reset the
camera
Insert micro SD card, provide storage space
up to 32GB
12 Mount connector
13 Reset button
14 Micro SD card slot
07
EN
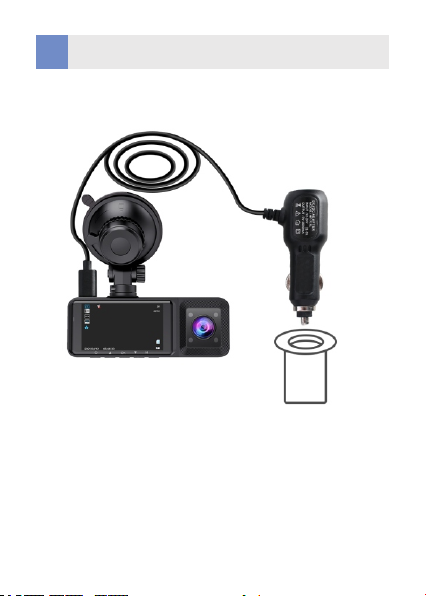
Install the dash cam
1. Attach the suction cup mount to the camera’s mount
connector, pushing it in until it clicked.
2. Clean the car windshield.
3. Wipe the suction mount pad clean on the suction cup
mount.
4. Attach the suction cup mount to the windshield, then
rotate the locking clamp on the mount 90° upward
until it clicks.
3.


6. Insert car charger into the car’s cigarette lighter port.
7. Start the car, the power cord car charger red indicator
will light up. The dash cam will auto power on and
start recording.

Get started
4.
1. Before use this dual dash cam, please kindly
charge the camera 2 - 3 hours.
When charge, please using the supplied car charger,
make sure the car camera and cable are well
connected. When the dash cam is charging,
the charger red LED indicator light will keep on.
2. Insert a memory card.
Please use a 16GB - 32GB micro SD memory card,
with speed class 10 or higher. Turn off dash cam,
then use the supplied pin, carefully insert the micro
SD card into the camera’ s card slot until it clicks
then turn on dash cam. If you need remove the card,
please power off the camera first.
11
EN

Operating Mode:
The B-T27 operates in 3 modes:
A: Video Recording Mode,
B: Photo Mode,
C: Playback Mode,
These modes also have menus to help you configure
recording and taking photos, press Mode Button to
access the mode you want. Watch the icon on top
right corner of the screen for each mode.
Display screen overview:
Red light is visible: Camera is charging ( Photo 1)
Red light turn purple and blinks: Camera is recording
( Photo 2)
Photo 1
Photo 2

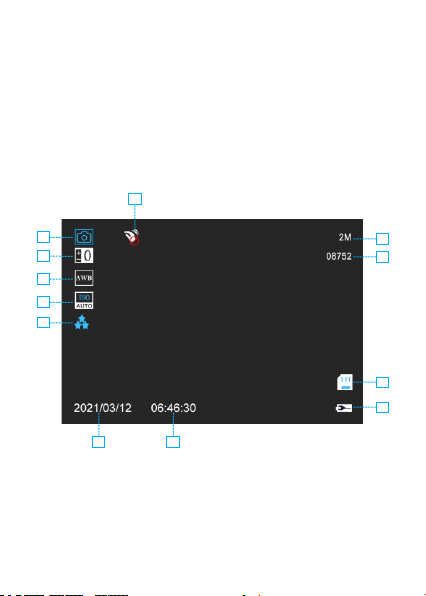
A: Video Recording Mode:
1. Recording status 2. Loop recording
3. White balance 4. Motion detection
5. Audio on
6. Date /Time (current date, YY/MM/DD,24H)
7. Recording time(current clip)
8. Resolution 9. Parking mode on
10. Gravity sensor on 11. HDR on
12. IR light on 13. Memory card inserted or not
14.Current battery level
1
2
3
4
5
6
14
13
12
9
8
7
1011
13
Current battery level
Battery is charging
EN
(Battery is charging, )
In all 3 operating mode, you can press the MENU once
to access the menu settings for that particular mode,
and press twice to display System Setting Menu.
Press and to scroll through the various settings
and press OK to select, Press Menu button again to
exit the setting menu.
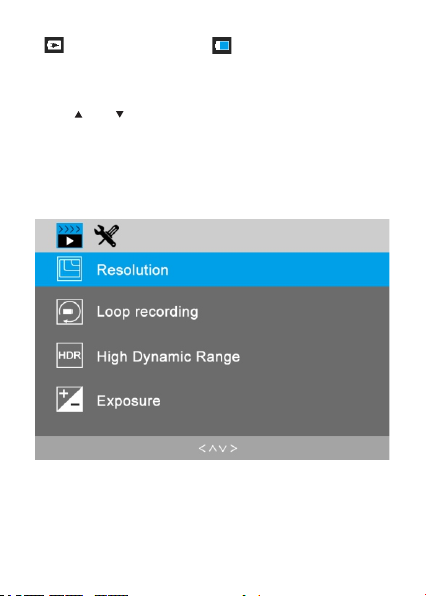
Video recording menu:
14
Current battery level

In standby mode, long press the “M” button to enter the
setting menu of video recording mode, short press the
“M” button again to enter the system setting menu.
If camera is in recording situation, click OK button to
stop recording first, then long press M button to enter
video setting menu.
Resolution: By default (dual camera recording mode),
both cameras record at 1080P and 720P options are
available.
Loop recording: This function allows you to set video
file length to 1/3/5 minutes per video clip. Press OK to
enter and click down button to change the duration:
1 /3 /5 minutes or off. Select a value to activate loop
recording, so when storage fills up, it will automatically
loop back to the earliest file and record over it.
High Dynamic Range: Off /On, It’s a technique used
to combine high light and low light in a picture to get
a proper exposure image effect, so there will not be
overexposed or underexposed. Recommend to turn
on to get a better video quality.
Exposure: Adjustable exposure value, used to change
the image brightness, Default is 0. Pressing OK gives
the following options: 0, -1, -2, -3, 0,+1, +2, +3.
15
EN

Motion Detection: This function allows the camera to
start recording when it detects movement. Default setting
is Off, press OK and press down button to select Off/On.
Audio: Default is On. Press the OK button to toggle it
On/Off.
Gravity sensing(Emergency recording):
Critical event detection is triggered by the Gravity Sensor
and will auto-detect vehicle impacts and collisions. This
will cause the camera to protect the current video clip
from being overwritten by locking it and saving the footage
in the “Video /EMR” folder, and cannot be automatically
overwritten. It will need you delete them manually. The
gravity sensitivity is adjustable with 3 settings: Low
/Medium /High. It is set to medium by default. The
gravity sensing can also be deactivated in video setup.

Warm tips:
EMR folder has accumulated 30% of the card capacity.
Please regularly transfer and save important videos to
your computer or another storage location like external
hard drive. To maintain good read/write performance, the
micro SD card should be formatted every 1 or 2 weeks.
Parking monitor: Default is Off. Press down followed
by OK to toggle it Off/On.Parking mode operates as a
sensory function under different situations. To activate
parking mode, go to “Record setup” to find “Parking
monitor”, press OK and select On.Parking Mode
operates as a sensory function under different situations.
In Parking Mode, with this function on, after you stop the
car and the camera powers off, it will stay in standby,
when camera detects shocking, it will automatically turn
on and take a short video and locked it, then shut down
automatically. The sensor sensitivity can be adjusted
to Low /Medium/ High in gravity sensing option to set.
Warm tips:
To ensure the camera is able to function in parking
mode, please keep it powered with a mobile power
bank or use hard wire kit install it directly to the car
battery. We do not recommend running the camera
continuously for more than 12 hours.
17
EN
B.Photo Taking Mode
In standby mode, long press the “M” button to enter the
setting menu of video recording mode, short press the
“M” button again to enter the system setting menu.
If camera is in recording situation, click OK button to
stop recording first, then long press M button to enter
video setting menu.
1
2
3
4
5
6 7
9
8
11
10
12
Other manuals for B-T27
1
Table of contents
Other CHORTAU Dashcam manuals


