manuals.online logo
Brands
  1. Home
  2. •
  3. Brands
  4. •
  5. Kogan
  6. •
  7. Dashcam
  8. •
  9. Kogan KACARDCFHDA User manual

Kogan KACARDCFHDA User manual

Table of Contents
Introduction..................................................................................................................................................................... 2
First Time Setup............................................................................................................................................................. 2
Camera Layout................................................................................................................................................................ 3
Display Icons.............................................................................................................................................................. 3
Event Triggering....................................................................................................................................................... 4
Menu peration.............................................................................................................................................................. 4
Video Setup Menu......................................................................................................................................................... 4
Resolution................................................................................................................................................................... 4
Image Quality............................................................................................................................................................ 5
Metering Mode Setting........................................................................................................................................... 5
Light Frequency........................................................................................................................................................ 5
Date Stamp................................................................................................................................................................. 5
ADAS – Advanced Driver Assistance System.................................................................................................6
Record Time / Loop Setting................................................................................................................................. 6
Speed Setting............................................................................................................................................................ 6
Time Zone................................................................................................................................................................... 6
AE Bias (Automatic Exposure)............................................................................................................................ 7
LED Setting................................................................................................................................................................ 7
G-Sensor (Gravity Sensor).................................................................................................................................... 7
Motion Sensor............................................................................................................................................................ 7
General Setup Menu...................................................................................................................................................... 8
Language.................................................................................................................................................................... 8
System Mode............................................................................................................................................................. 8
Driver ID / Licence Plate Setting........................................................................................................................8
Time Setup.................................................................................................................................................................. 8
Format.......................................................................................................................................................................... 9
Default Setting.......................................................................................................................................................... 9
Backlight ff Setting.............................................................................................................................................. 9
Beep Sound Setting................................................................................................................................................ 9
Version Info................................................................................................................................................................ 9
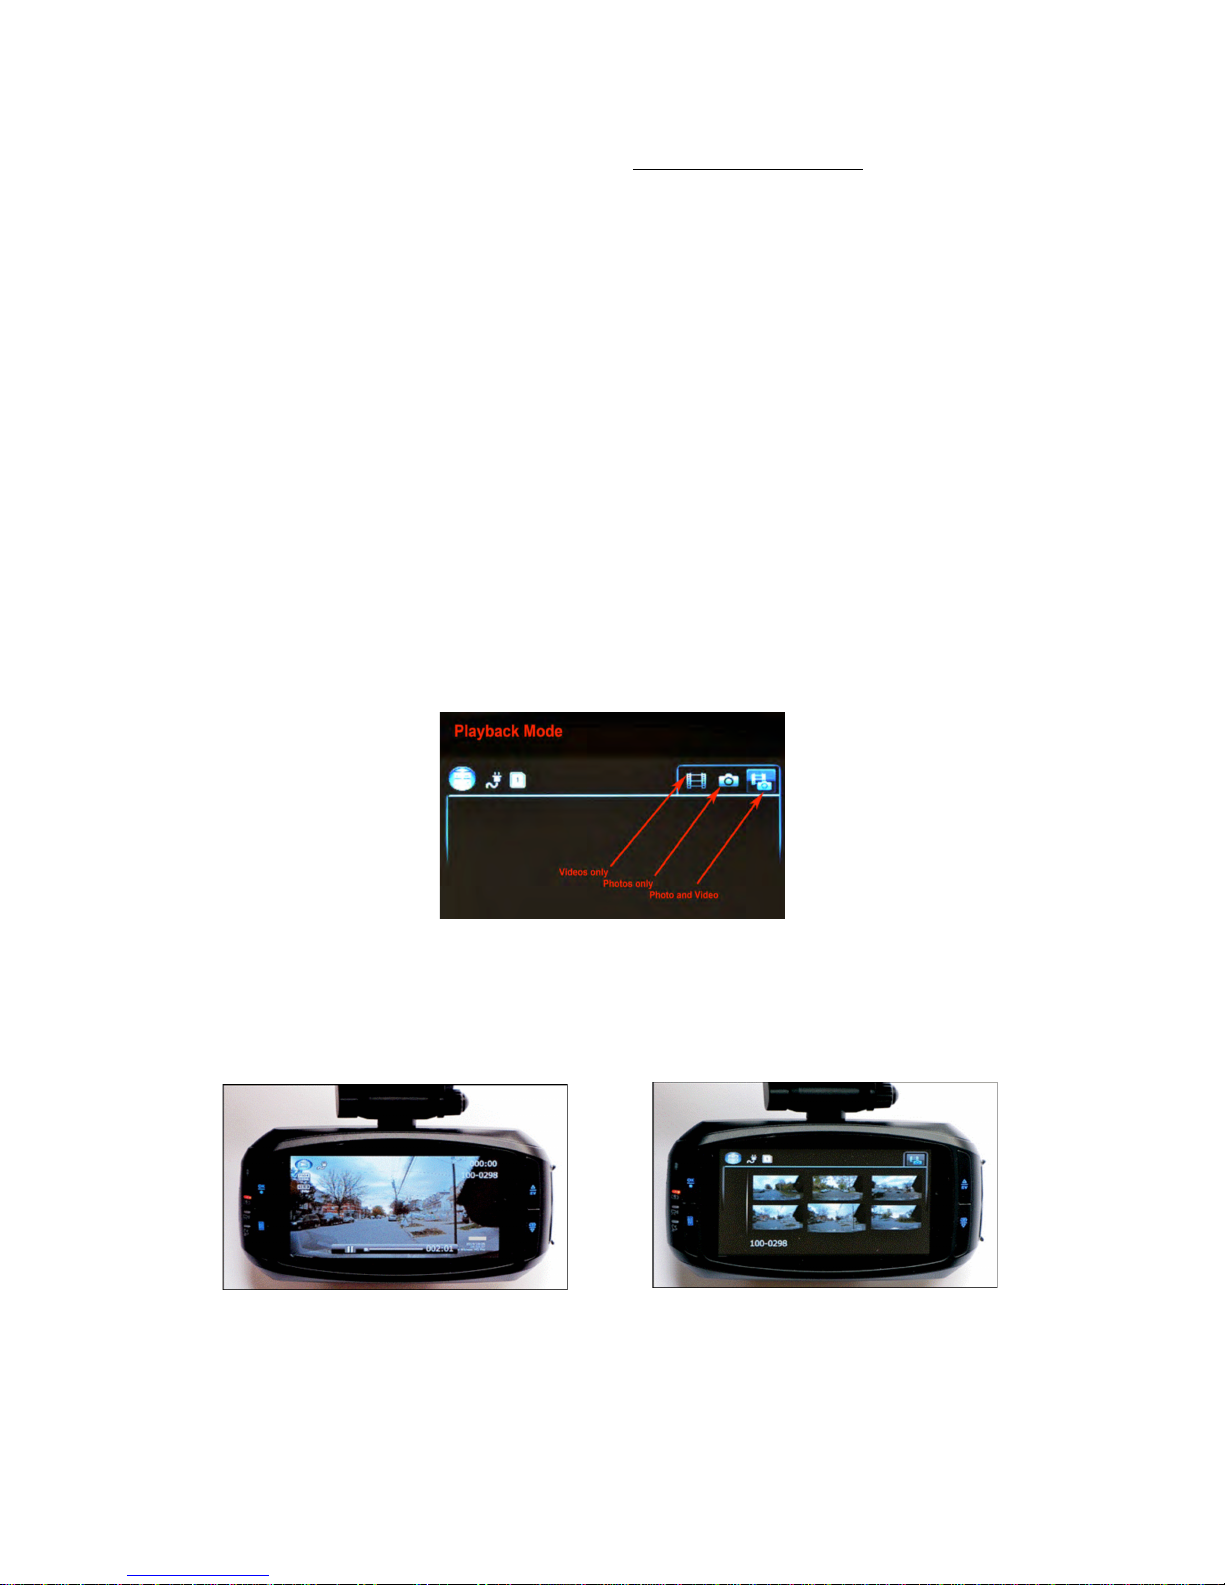
Playback...................................................................................................................................................................... 9
Connecting To PC/MAC............................................................................................................................................. 10
Microphone............................................................................................................................................................... 10
Hardwiring...................................................................................................................................................................... 10
1
Introduction
Do not leave the camera powered on while mounting on the windshield under direct sunlight in a
parked car. This may lead to overheating, which will cause malfunctions and unit failure.
The FullHD Crash Camera Video Recorder is designed to automatically turn N when it receives
power to the DC IN port. It also automatically shuts down and records for a few extra seconds
using the internal battery when the power is shut off (to avoid any sudden power cuts and
possible corruption of data). Under default settings, the camera will cycle, or “loop” the memory
card so that you will always be recording and never run out of space.
Certain camera functions such as Motion Sensor and G-sensor should remain FF under normal
operating conditions. They are intended to be used NLY when the vehicle is stationary and
would interfere with normal camera operations while driving. Please only change the settings as
required.
First Time Setup
1. Remove the protective tape from the Fixed
plate, then install the plate to the windscreen
glass. (We recommend you clean the
installation area with rubbing alcohol first).
2. Install the memory card into the card slot.
(If you have trouble, try using the edge of a 5
cent coin to put it in until it clicks into
position).
3. Slide the camera onto the fixed plate, then adjust the vertical and horizontal positions.
4. Connect the power cord to the 5V cigarette
lighter socket in your car.
5. Connect the power cord to the DC IN
camera power socket.
2
Camera Layout
1. Menu button 9. Blue light indicator – Recording
2. K / Manual record button 10. Green light indicator – GPS (optional)
3. Mode / Down button 11. Microphone
4. EV / Up button 12. Wide angle lens
5. Memory card slot 13. DC IN – Power port
6. System reset button 14. HDMI port (cable not included)
7. GPS module port 15. USB port
8. Red light indicator – Power / Charging 16. Manual power button
Display Icons
1. Mode: Video / Photo / Playback
2. External Power Connection / Battery
3. Memory Card (x – no card or defective card)
4. G-Sensor status (recommended mode is FF, as shown in image)
5. Video file lock (*EVENT* function) will be active when an event is triggered
6. Recording
7. Recording time
8. Microphone N/ FF
9. GPS Status (turns green with optional GPS module only)
10. ADAS: Advanced Driver Assistance System
11. Speed Limit: Preset speed limit (with optional GPS module only)
12. EV: Exposure value, “+” brighter, “-” dimmer
13. Video resolution
14. Length of video file – 2/5/10 minutes each file
15. Current date / time / speed (speed with optional GPS module only)
3
Event Triggering
In the event of an emergency, or for any other reason where you want to save the recorded
moment, simply press the MENU button (#1) while the camera is recording. The camera will
display the “!” symbol on the LCD display, and the current and previous file (2 min, 5 min or 10
minutes – depending on your settings) will be locked and saved as a READ NLY file. This will
prevent the camera from overwriting it the next time it is under cyclic recording.
You can browse the Memory Card on your computer, or connect the camera via USB to view the
file.
WARNING: Formatting the memory card will erase ALL of the information on the card, including
“READ NLY” files.
Menu Operation
The camera has two menus. The Video Setup menu and the General Setup menu.
Press MENU while the camera is not recording to activate the Menu.
Press MENU button again to switch between Video and General Setup menus.
Use UP or D WN buttons to highlight the desired option, then press K to enter the submenu.
Confirm the selection by using the UP and D WN buttons to select the item, then press K to
confirm the setting.
Video Setup Menu
esolution
Video resolution can be selected up to 2304 x 1296P. Higher resolution produces a higher quality
image, however the higher the resolution, the higher the file size.
A standard 32GB microSD card will hold approximately 8 hours of the highest resolution mode
available.
2560x1080 30P 21:9 / 2304 x 1296 30P / HDR 1920 x 1080 30P / 1920 x 1080 30P /
1280 x 720 60P / 1280 x 720 30P
4
Image Quality
Higher Quality = Larger File Size
S. Fine / Fine / Normal
Metering Mode Setting
Metering mode refers to the way in which the camera determines the exposure.
A erage / Center / Spot
Light Frequency
Light frequency (reduce flickering)
Auto / 60Hz (USA standard) / 50Hz (European standard)
Date Stamp
You can select to have the Date & Time stamped onto the video.
ON / OFF
The current speed is also stamped when N when the GPS module is present.
5
ADAS – Advanced Driver Assistance System
ON / OFF
Lane Departure Warning
If a lane change occurs, a warning image will alert the driver and the camera will beep.
Low Light Warning
Under low-light conditions, the camera will remind you to turn on your headlights.
Driver Fatigue Warning
The camera will display a warning picture and a warning tone when you have been driving
continuously for more than four hours, followed by the same warning every two hours.
ecord Time / Loop Setting
Using the record time function, you can have the camera split the video files into either 2, 5 or 10
minute files. The recording is continuous, but the files are split into smaller chunks so they are
easier to work with.
2 min / 5 min / 10 min
Speed Setting
Set the units at which the unit will measure your travelling speed.
M/h / KM/h
Time Zone
Using the UP and D WN buttons (#4 and #5), set the proper time zone for your region
(eg Melbourne -10). Press K to confirm. Press MENU to exit the menu mode.
WARNING: Setting the correct time zone is very important to ensure the GPS can correctly
identify the correct location on the map.
-12 / -11 / -10 / -9 …... +9 / +10 / +11 / +12
6
AE Bias (Automatic Exposure)
Exposure value: + is brighter, - is dimmer
LED Setting
You can turn off the LED backlights for the buttons.
ON / OFF
G-Sensor (Gravity Sensor)
(Set to FF under normal operation)
The G-sensor is used when the vehicle is stationary or under special application options. When
there is a collision or a sudden change in the XYZ axis, the G-sensor determines the direction of
the collision and records the event. It creates a separate EVENT folder and stores the files there.
These files are saved and are not overwritten when the camera files loop.
Adjust the sensitivity parameter of the sensor so that the camera does not automatically lock all
of the recorded videos.
High / Medium / Low / Off
Motion Sensor
(Set to FF under normal operation)
Like the G-sensor, the motion detection function is used when the vehicle is stationary or under
special application options. If you have the camera hardwired, you can set the motion detector
to N, then when motion is visible in the field of view, the camera records the time set. It creates
a separate EVENT folder and stores the files there. These files are saved and are not overwritten
when the camera files loop.
This function should be turned FF under normal opreration (when driving)!
Off / On
7
General Setup Menu
Language
Use this setting to adjust the menu to your preferred language.
English / [other foreign languages if a ailable]
System Mode
This setting can be adjusted when you use the AV cable or HDMI cable to connect the camera to
your TV (AV and HDMI cables not included). You can use the playback feature to display the
footage on your TV. In Australia, use PAL.
NTSC / PAL
Driver ID / Licence Plate Setting
You can provide your licence plate number or drivers licence number here. This number will then
be stamped into the video at the bottom right corner, along with the time and date.
Press K then use UP and D WN to select the first letter or number. Press MENU to go to the
next number or letter. After you have set your identification number, press K to save.
Time Setup
Adjust the current date and time.
Select Year, Month, Day, Hour, Minute – then press K to save.
Select the year by using the MENU button, then set the year using the UP and D WN button.
Then select the month using the MENU button, then set the correct month using the UP and
D WN button. Follow these steps to set the day, hour and minutes, then press K to save.
8
Format
This function deletes all data on the memory card, including protected data.
Default Setting
This resets all settings to the factory default.
Backlight Off Setting
Off / 1 min / 3 min / 5 min
Beep Sound Setting
N/ FF function for Power N/ FF chime and beep with each key press.
Version Info
Current firmware version
Playback
•Press M DE button to select the playback mode and thumbnail view.
•Press UP to select the video files.
•Press K to play the video.
•Press MENU to delete the file.
9
Connecting To PC/MAC
Connect the USB cable to the USB port of the camera on the side (#15 – N T DC-IN) and
connect the other end of the USB cable to the USB port on your PC/MAC. The red LED on the
camera will turn on.
Press the Power button (#16) on the camera. The screen will turn blue.
The computer will now show the camera as a removable drive that you can browse.
Microphone
You can turn the microphone N or FF by holding the K button while the camera is
recording. You should see the icon change in the display.
Hardwiring
Depending on your vehicle and where your cigarette lighter is located, you may choose to use
the included power adapter, or opt for a “hardwire” stealth kit (not supplied).
Some vehicles have a switched cigarette lighter output, so if you
connect it here, the camera will always turn on and off with the car.
ther vehicles, such as older European cars, have an always-on
outlet, so you will either have to manual connect/disconnect the
camera, or you can hardwire it.
The included power adapter is approximately 12 feet long and can be routed around your
windscreen and down the pillar, under the glove box and to the cigarette lighter outlet for a
clean install.
If you have any questions or concerns regarding the use of this product, please contact the
Kogan.com customer support team.
10

Other manuals for KACARDCFHDA

1

Other Kogan Dashcam manuals

Kogan Y2 Operator's manual

Kogan

Kogan Y2 Operator's manual

Kogan KARVMWDNRCA User manual

Kogan

Kogan KARVMWDNRCA User manual

Kogan KACAR12DVRA User manual

Kogan

Kogan KACAR12DVRA User manual

Kogan KADCAMG98A User manual

Kogan

Kogan KADCAMG98A User manual

Kogan KARVMWDNRCA User manual

Kogan

Kogan KARVMWDNRCA User manual

Kogan KACARDCFHDA User manual

Kogan

Kogan KACARDCFHDA User manual

Kogan KADVR2CGPS User manual

Kogan

Kogan KADVR2CGPS User manual

Kogan KADVR1CGPS User manual

Kogan

Kogan KADVR1CGPS User manual

Kogan D6 DUAL LENS User manual

Kogan

Kogan D6 DUAL LENS User manual

Kogan KACAR12DVRA User manual

Kogan

Kogan KACAR12DVRA User manual

Kogan KADCAM4KFRA User manual

Kogan

Kogan KADCAM4KFRA User manual

Kogan KADCAMG12A User manual

Kogan

Kogan KADCAMG12A User manual

Popular Dashcam manuals by other brands

Niceboy PILOT XR manual

Niceboy

Niceboy PILOT XR manual

ausdom AD282 instruction manual

ausdom

ausdom AD282 instruction manual

70mai A800 user manual

70mai

70mai A800 user manual

MXN 80CN instruction manual

MXN

MXN 80CN instruction manual

HP f520 user manual

HP

HP f520 user manual

Avic VIEW-i Elite DL2 user manual

Avic

Avic VIEW-i Elite DL2 user manual

Verratek C500 Installation and owner's manual

Verratek

Verratek C500 Installation and owner's manual

Chainavasion CVLL-DV79 instruction manual

Chainavasion

Chainavasion CVLL-DV79 instruction manual

secureView SV- 6912.IR installation instructions

secureView

secureView SV- 6912.IR installation instructions

Streetwize SWREC10 user manual

Streetwize

Streetwize SWREC10 user manual

Kenwood DRV-410 instruction manual

Kenwood

Kenwood DRV-410 instruction manual

Xblitz GORIDE user manual

Xblitz

Xblitz GORIDE user manual

Hyperion D403 user guide

Hyperion

Hyperion D403 user guide

Transcend Drive Pro user manual

Transcend

Transcend Drive Pro user manual

4Sight The Original Dash Cam user manual

4Sight

4Sight The Original Dash Cam user manual

Brickhouse Security VCWV user guide

Brickhouse Security

Brickhouse Security VCWV user guide

Gator HDDVR302 instruction manual

Gator

Gator HDDVR302 instruction manual

A-rival CarCam quick guide

A-rival

A-rival CarCam quick guide

manuals.online logo
manuals.online logoBrands
  • About & Mission
  • Contact us
  • Privacy Policy
  • Terms and Conditions

Copyright 2025 Manuals.Online. All Rights Reserved.