CICLOSPORT Ciclo navic 50 User manual


2
Table of contents
1. General informations .............................................................................................. 3
2. Operational setup................................................................................................... 3
2.1 Charging........................................................................................................ 3
2.2 Installing the handlebar bracket..................................................................... 3
2.3 Attaching to the handlebar bracket................................................................ 4
2.4 Attaching to the wristband (optional) ............................................................. 4
2.5 Using the protective cover............................................................................. 4
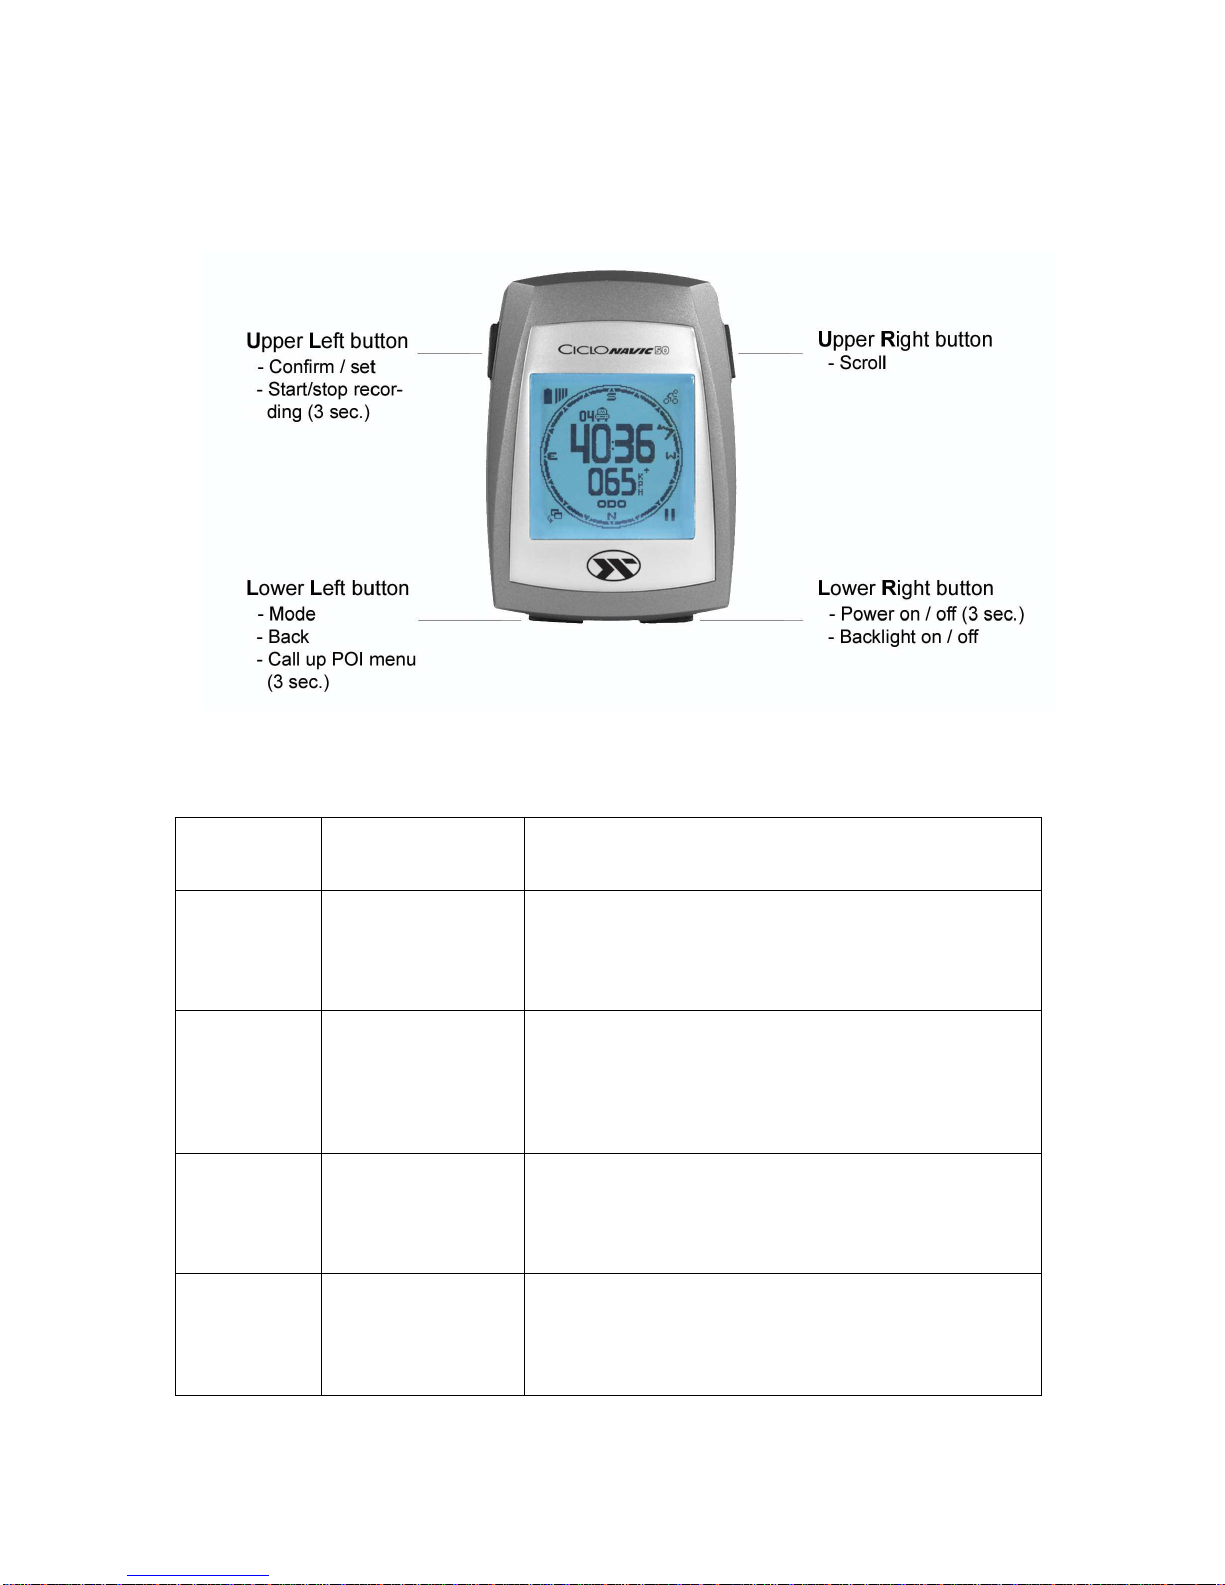
3. Using the buttons.................................................................................................... 5
3.1 Overview ....................................................................................................... 5
3.2 Button functions............................................................................................. 5
4. Usage..................................................................................................................... 6
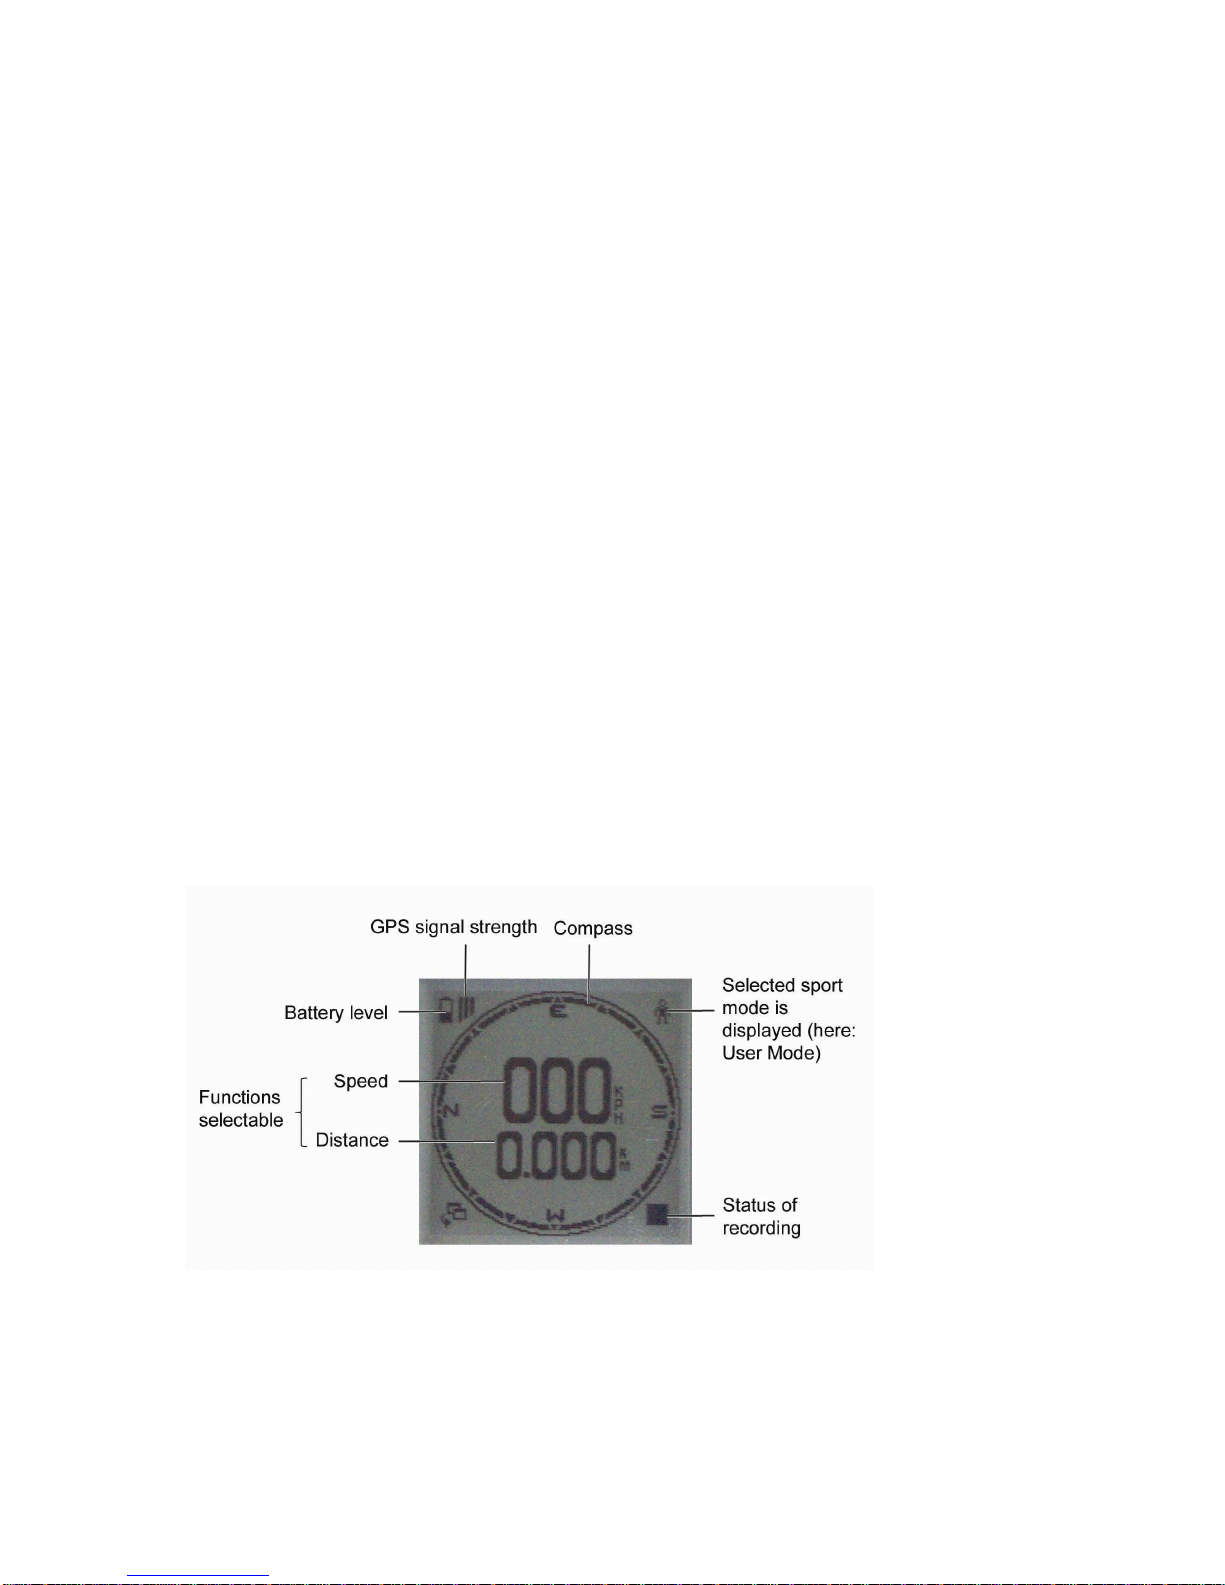
4.1 Main mode..................................................................................................... 6
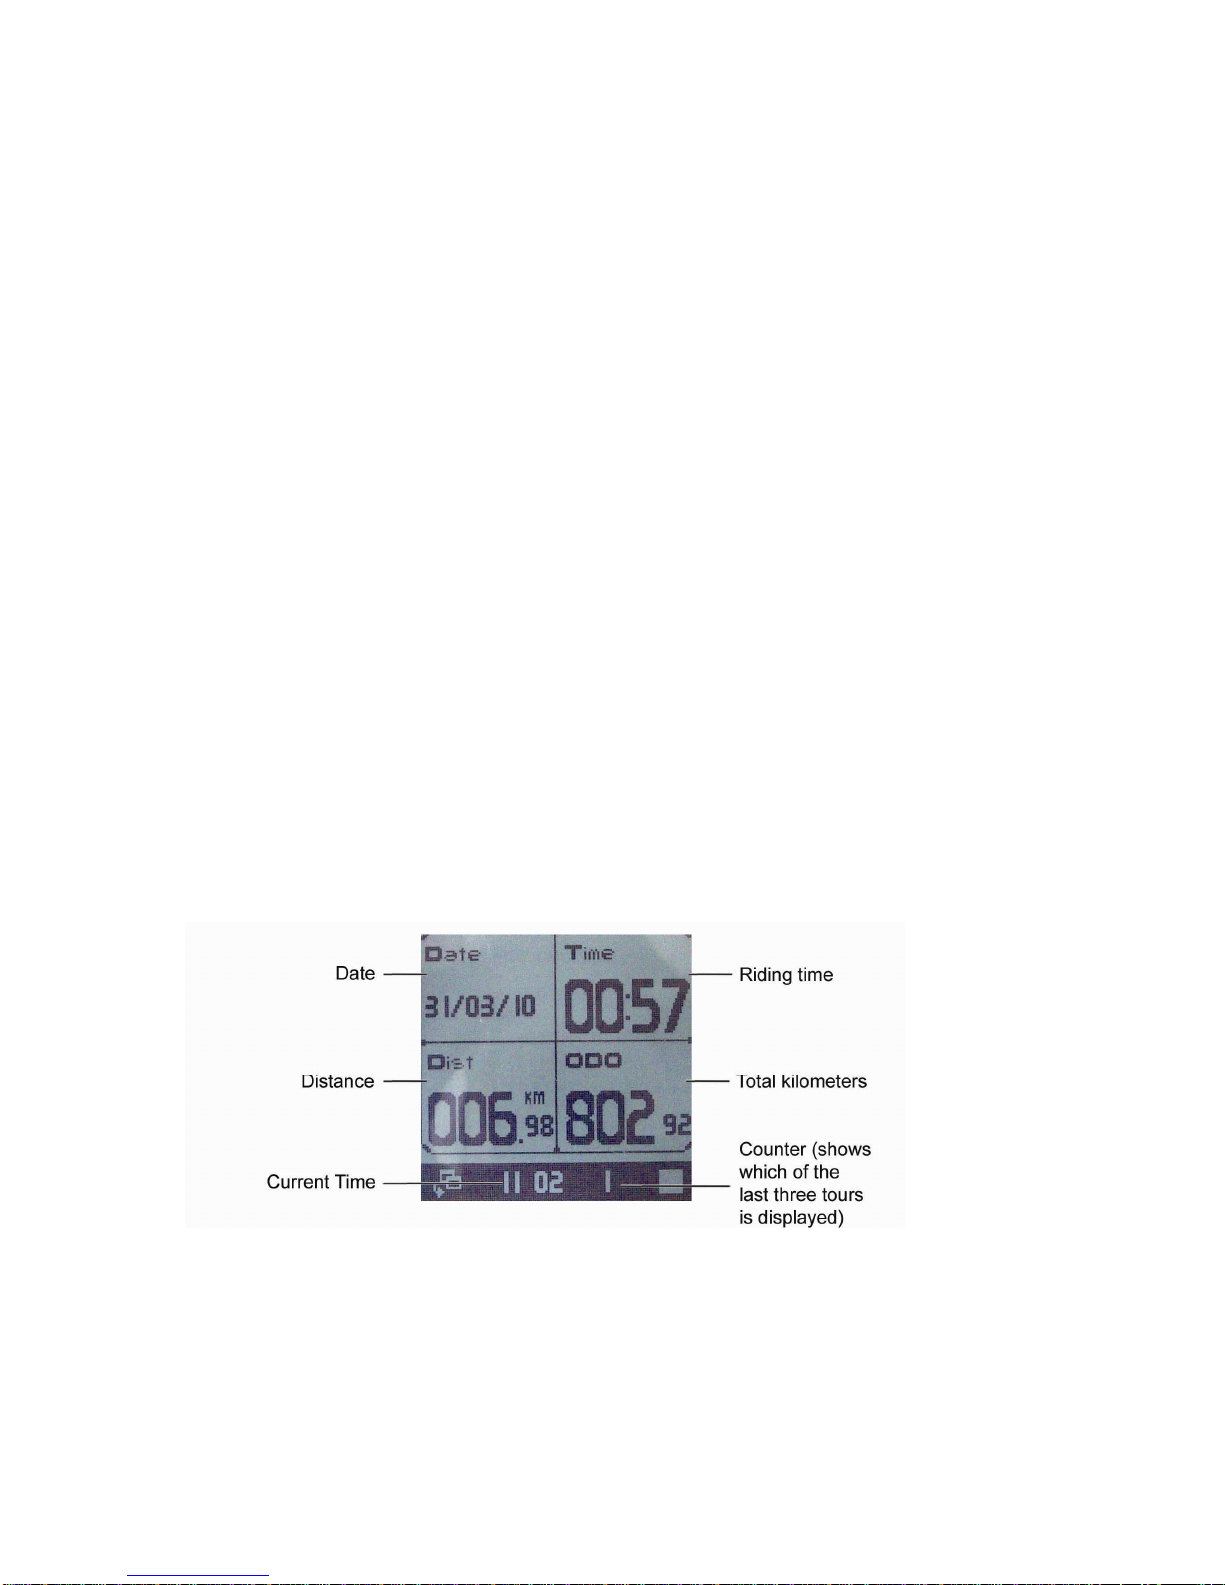
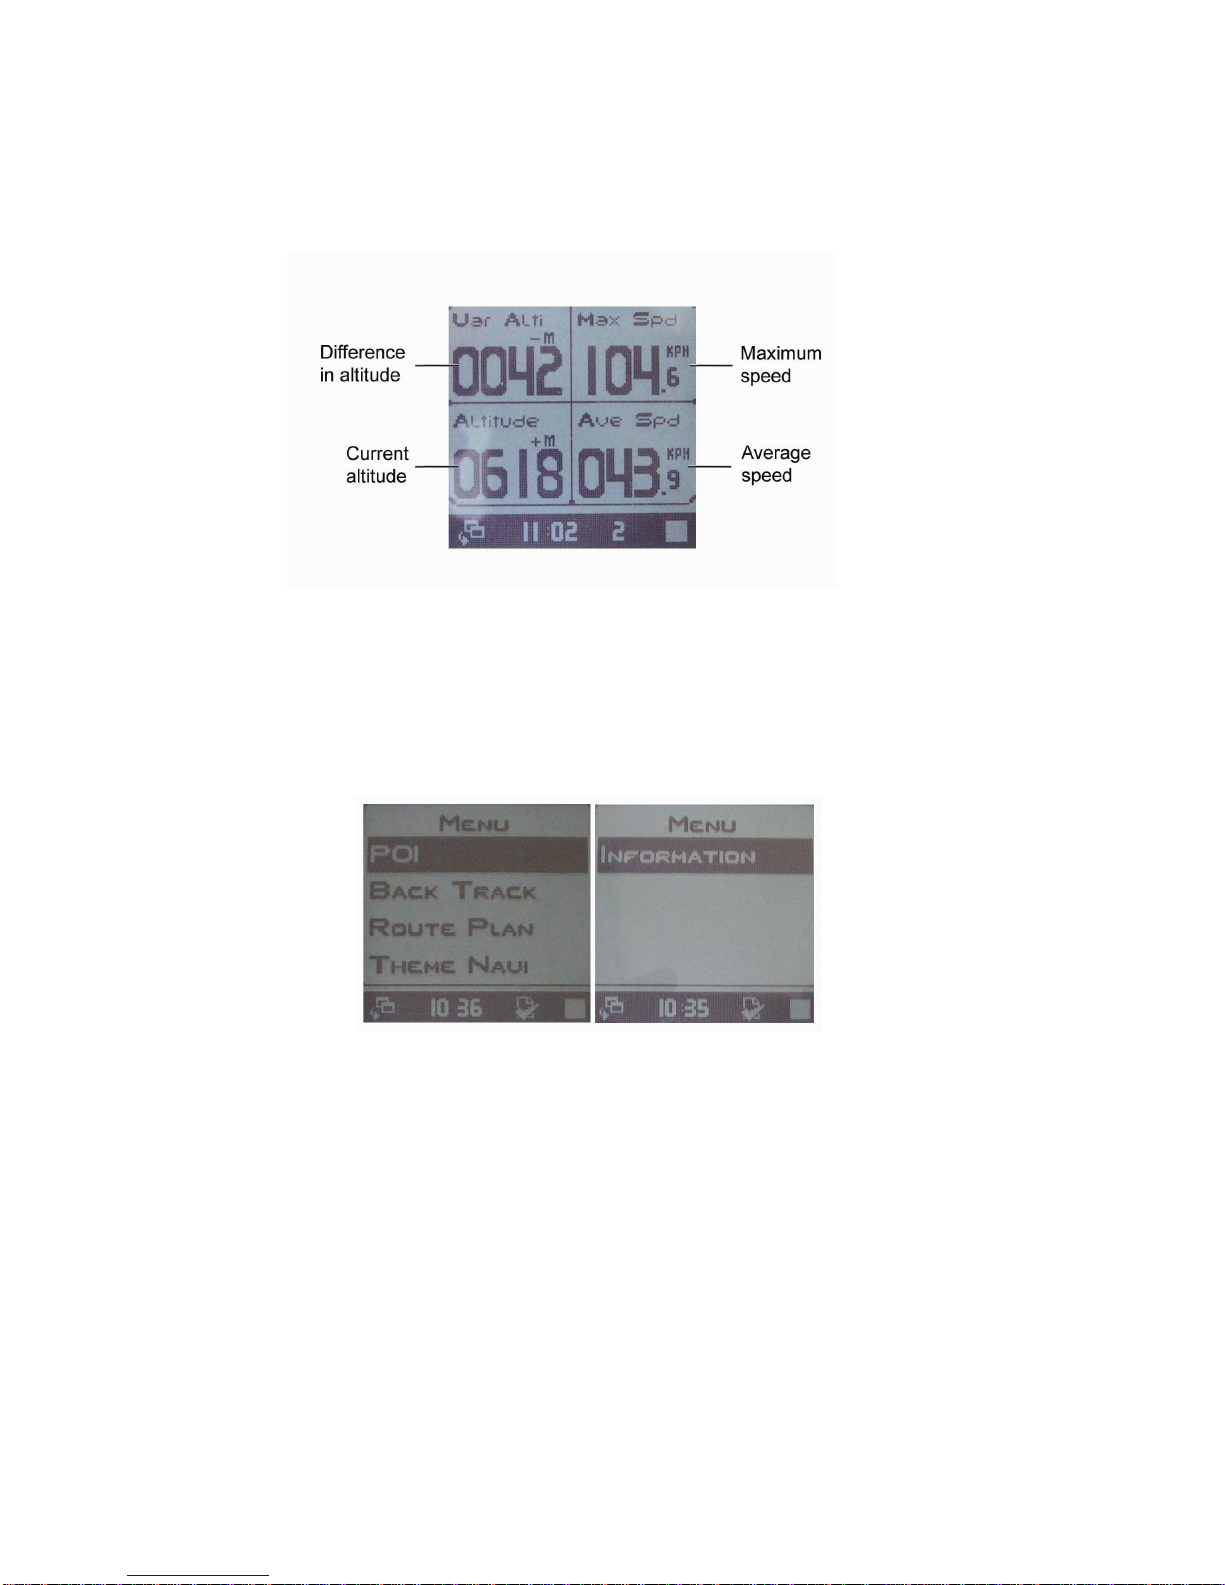
4.2 Bike info mode 1............................................................................................ 7
4.3 Bike info mode 2............................................................................................ 8
4.4 Menu mode ................................................................................................... 8
4.5 Data logging function (recording)................................................................... 9
4.6 Mark a POI (Point of Interest)........................................................................ 9
4.7 Navigation ................................................................................................... 10
4.8 Compass..................................................................................................... 11
4.9 Backlight...................................................................................................... 11
5. Setting mode ........................................................................................................ 11
GPS INFO......................................................................................................... 11
ODOMETER...................................................................................................... 11
SETTING........................................................................................................... 12
CLEAR DATA.................................................................................................... 12
POWER MODE................................................................................................. 12
TIME ZONE....................................................................................................... 12
CALIBRATION .................................................................................................. 13
UNIT.................................................................................................................. 13
TRACK.............................................................................................................. 13
LANGUAGE ...................................................................................................... 14
6. Connect with PC / PC evaluation.......................................................................... 15
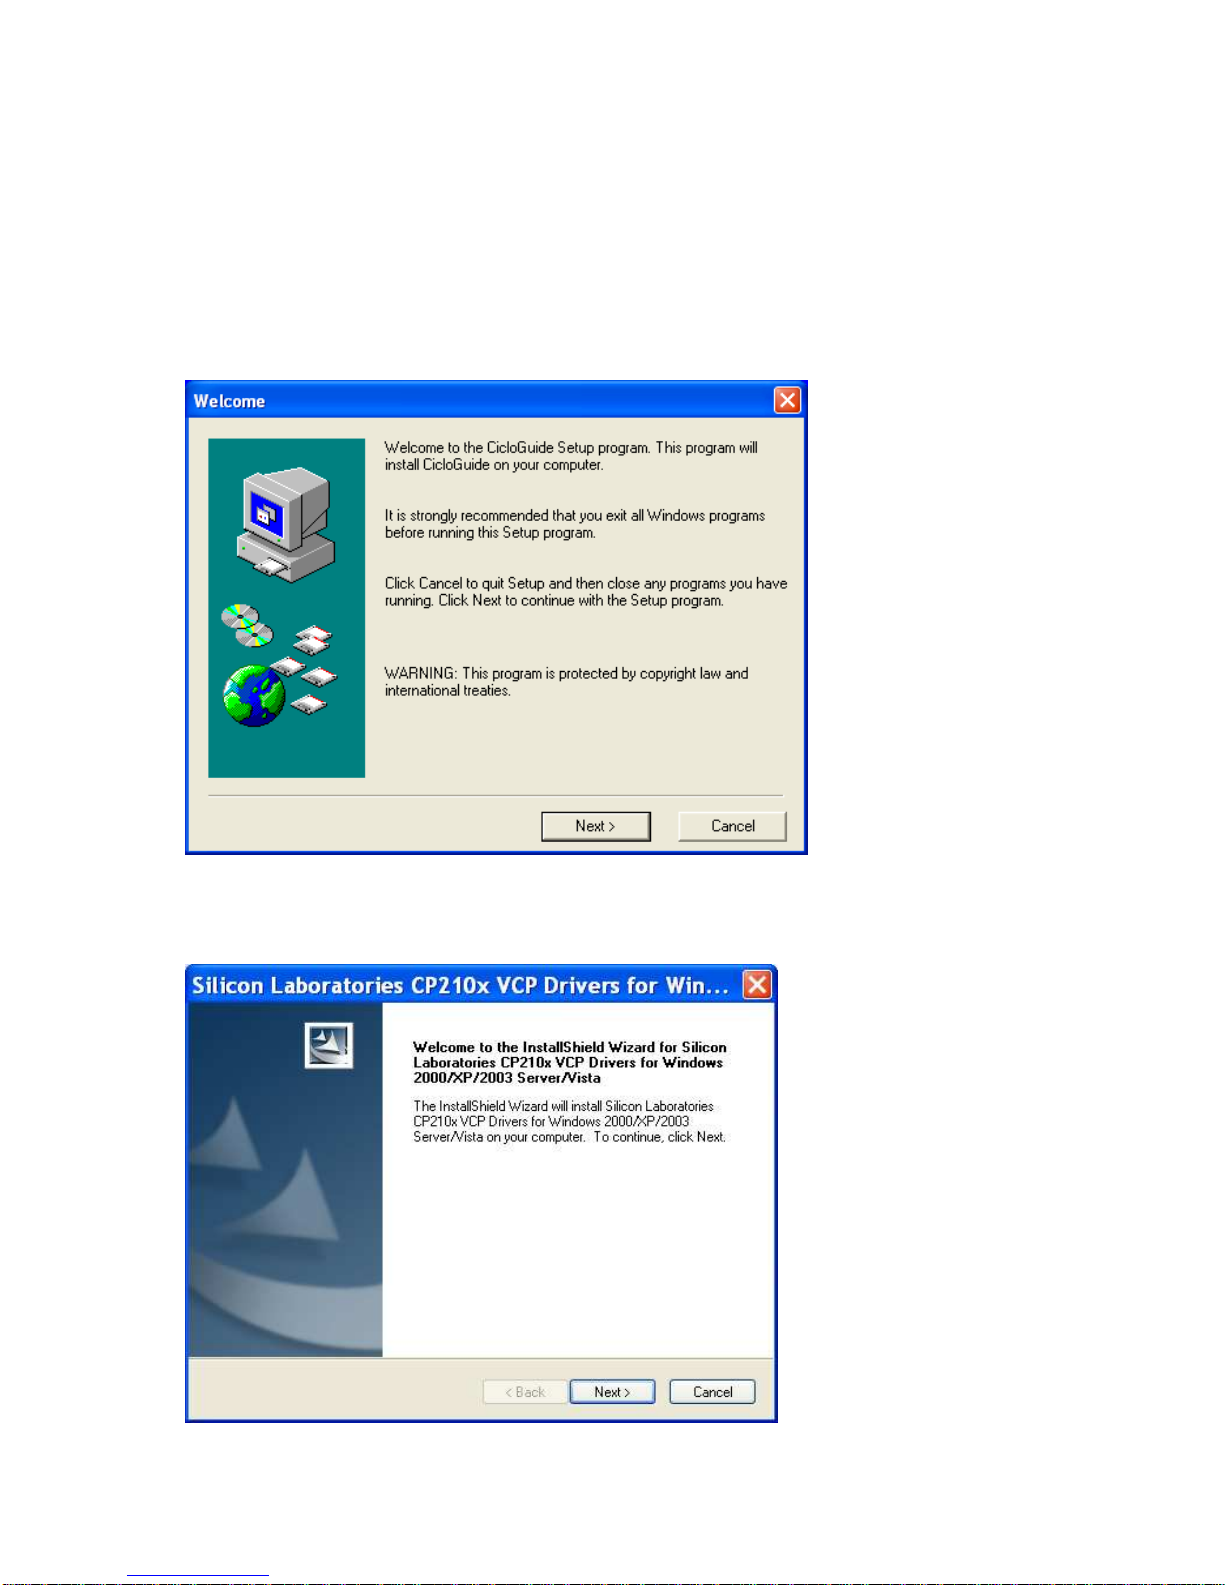
6.1 Installation................................................................................................... 15
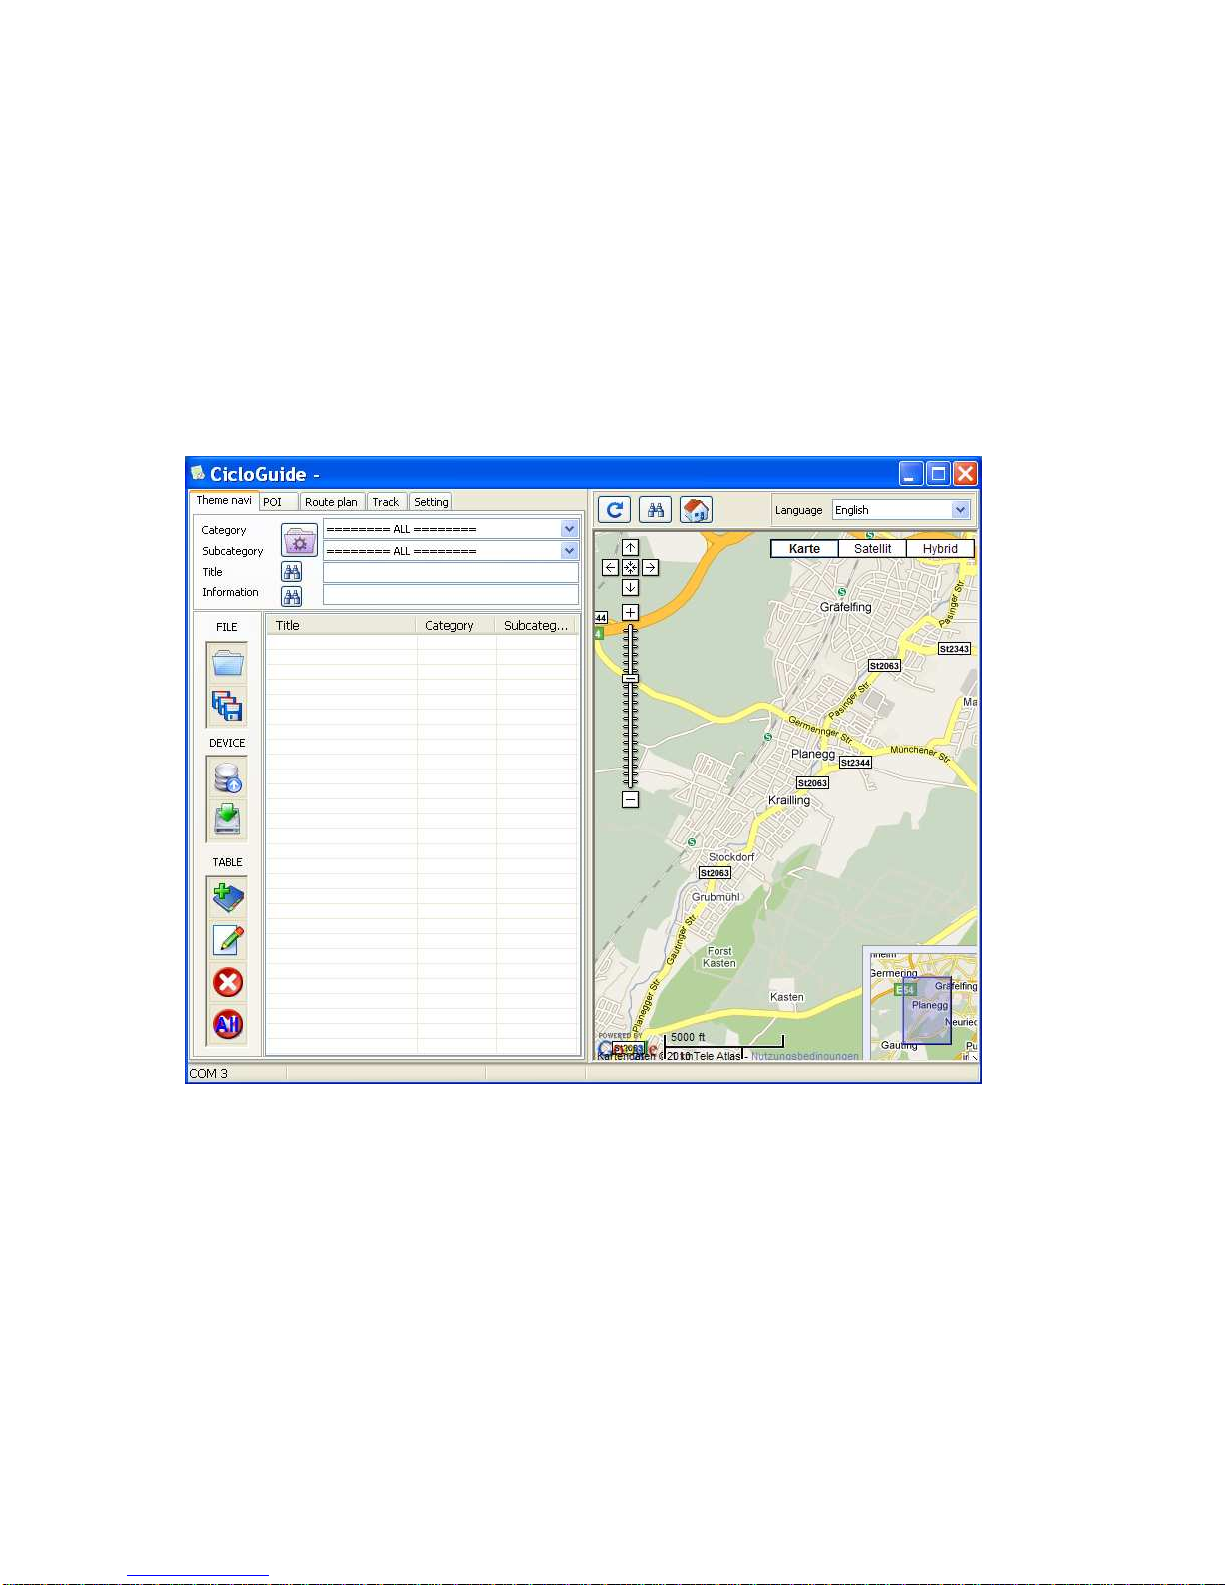
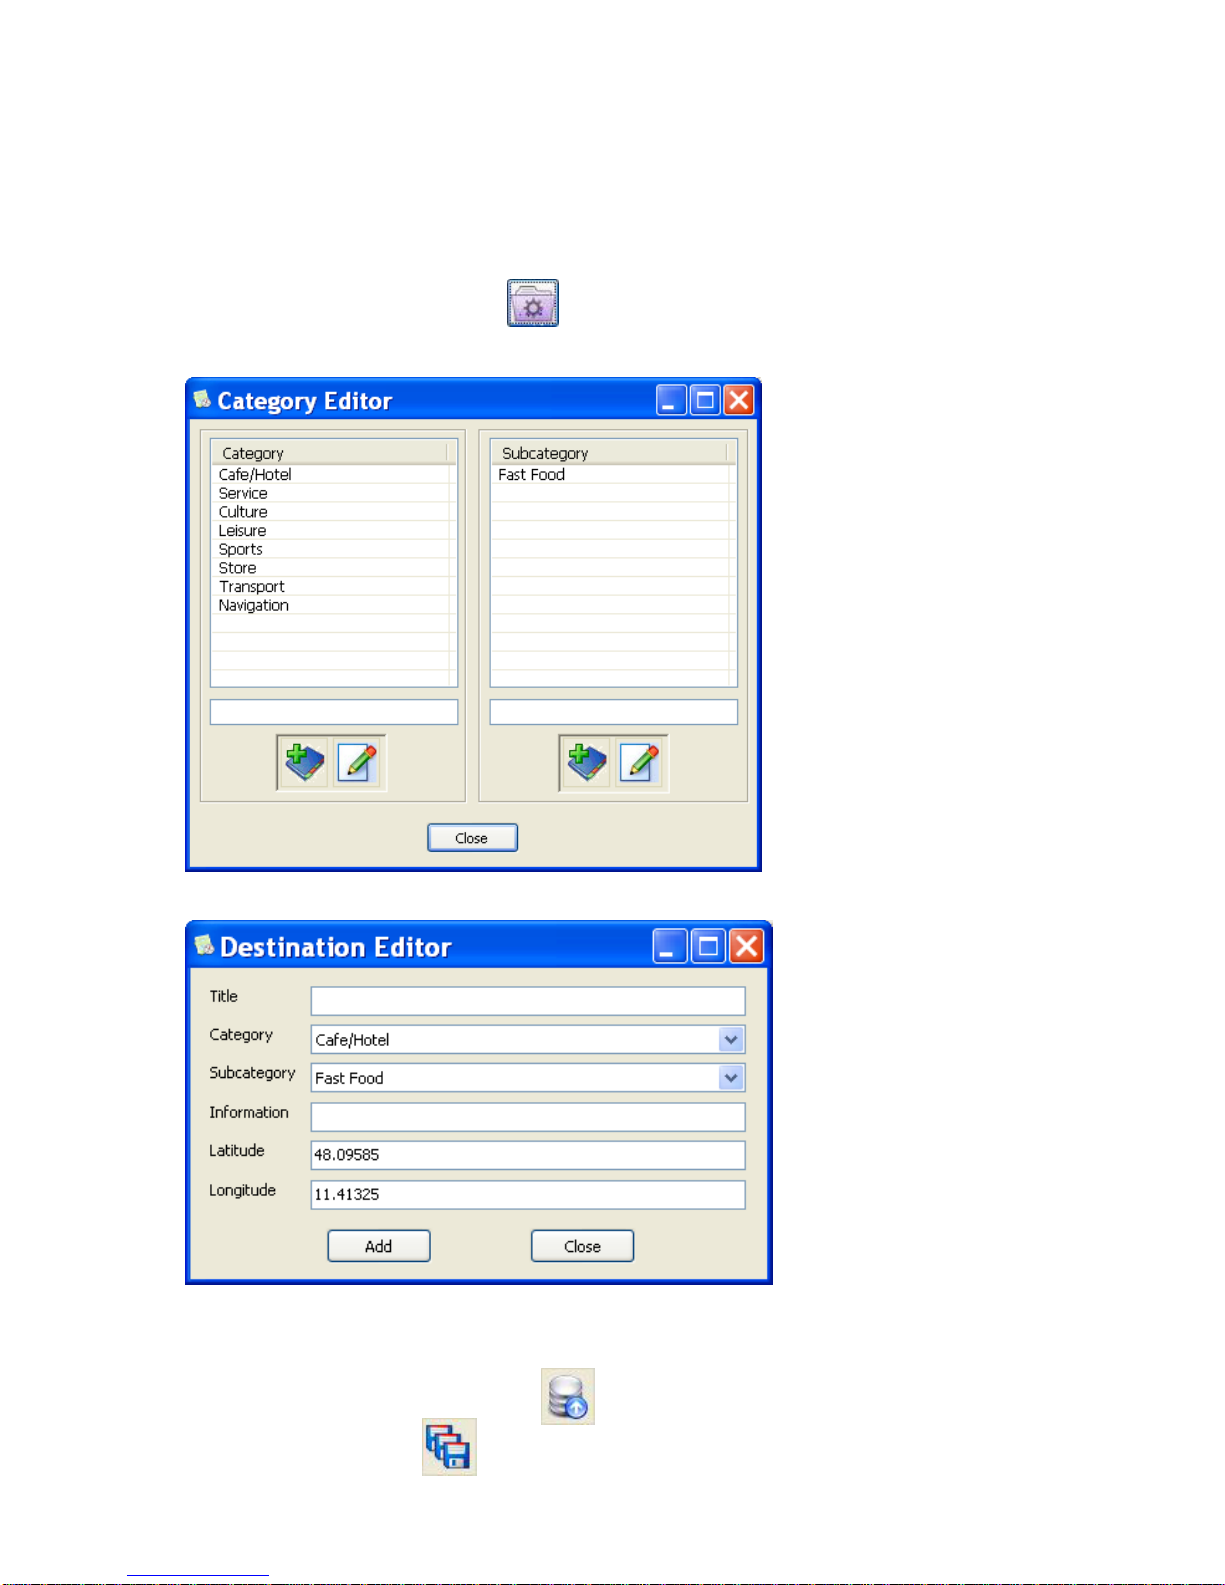
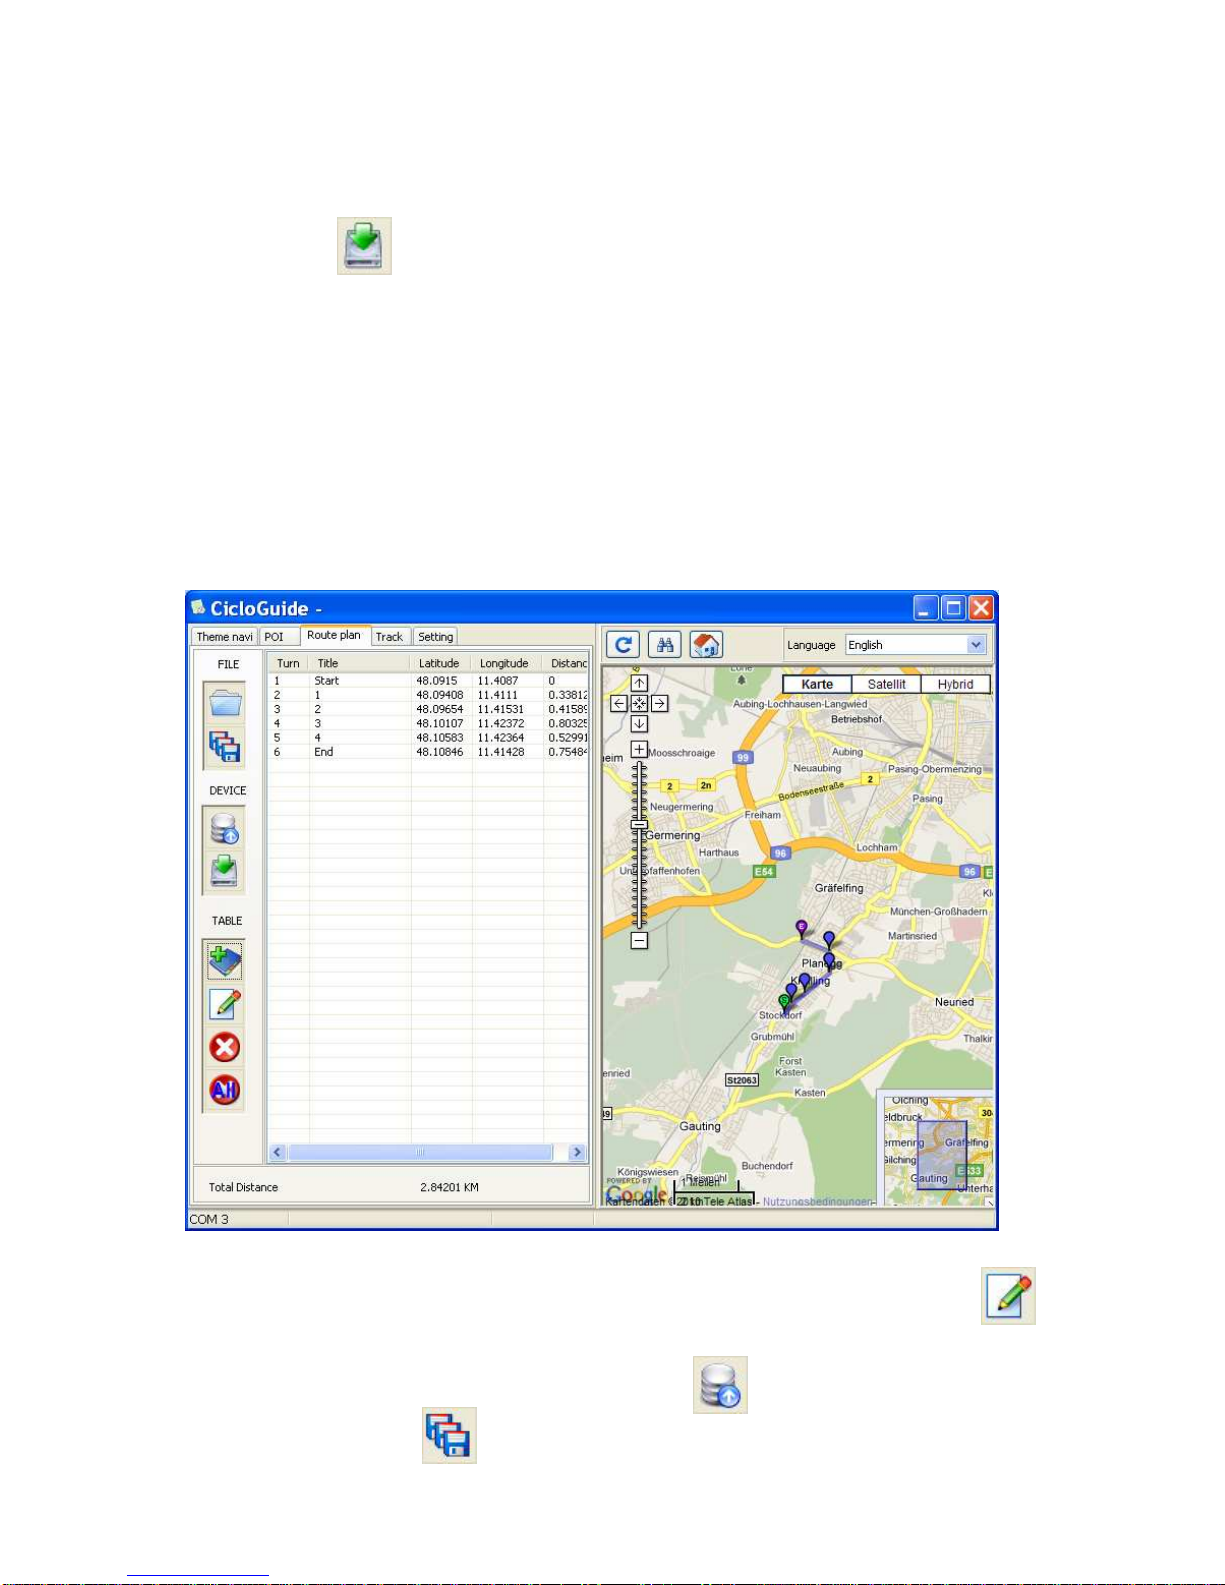
6.2 Using CicloGuide......................................................................................... 16
7. Service and maintenance..................................................................................... 19
8. Trouble shooting................................................................................................... 20
9. Guarantee............................................................................................................. 21
10. Technical Data.................................................................................................... 22
11. Guarantee certificate .......................................................................................... 23
Note:
In order to use all functions of the CicloNAVIC 50 in the correct way, please read
through this operating manual carefully.

3
Congratulations !
By purchasing the CicloNAVIC 50 you have acquired high-level GPS-datalogger with
electronic compass and navigation function.
1. General informations
The CicloNAVIC 50 is equipped with a GPS receiver and is so able to calculate and record
distance and speed. With the program CicloGuide the recorded tours can be displayed on
the PC.
Additionally the CicloNAVIC 50 offers the possibility to reconstruct a tour (with a maximum of
50 waypoints) which was created on the PC. The directional sign in the display is shown by
arrows.
For this the the reception of GPS-satellite signals is required. During the first use it can last a
bit, to receive the first GPS-signals.
The reception of the GPS-signal is shown by vertical bars beside the battery symbol in the
upper part of the display.
Attention: whoever carries out sport should have a general medical check up on his/her
general state of health – especially beginners, persons older than 35 years of age and
anyone who has suffered from illnesses or injuries in the past. It is recommended that a
doctor be consulted in any case in the presence of risk factors, such as smoking, high blood
pressure, high cholesterol values, diabetes, lack of exercise and excess weight.
2. Operational setup
2.1 Charging
To charge the CicloNAVIC 50 remove the rubber plug on the backside of the CicloNAVIC
50. Connect the mini-USB-plug of the USB-cable with the CicloNAVIC 50 and the USB-plug
with a USB-port on your PC.
Charging time is about 2,5 hours.
During the charging a corresponding symbol is shown in upper left display.
After the charging remove mini-USB-plug and close rubber plug.
2.2 Installing the handlebar bracket
The handlebar bracket can be mounted on the handlebar
(pict. A-1) or on the stem (Abb. A-2).

4
For using it on the stem rotate the upper part of
the bracket. Open the 4 screws, rotate it
90°to the left and assemble it again with the 4 sc rews
(pict. B).
Remove the protective tape from the underside of the handlebar bracket,
place the handlebar bracket in the required position on the handlebar (or on the stem) and
press it down slightly. Secure it with the cable ties
2.3 Attaching to the handlebar bracket
To insert the CicloNAVIC 50 into the handlebar bracket, rotate it 45°to the le ft, insert it and
then turn it to the right until it engages
.
To unlock, rotate the CicloNAVIC 50 45°to the left and remove it.
2.4 Attaching to the wristband (optional)
To use the CicloNAVIC 50 also e.g. during hiking an additionally wristband is available (at
your dealer).
The wristband can be fixed on the wrist, but also on the upper arm. To insert the
CicloNAVIC 50 into the wristband operate as described in chap. 2.3.
2.5 Using the protective cover
This package also contents a silicon protective cover for the CicloNAVIC 50. This is useful to
protect the CicloNAVIC 50 e.g. of heavy rain during a ride.
Insert the CicloNAVIC 50 into the cover, so that the big opening is on the display and the
small opening is on the back.
After use during wet weather the protective cover should be taken off for better drying.

5
3. Using the buttons
3.1 Overview
3.2 Button functions
Button
Option
Function
LR-Taste
Press 3 sec.
Press short
• Power on / off the CicloNavic 50
• Backlight on / off
LL-Taste
Press short
Press 3 sec.
• Switch to next mode or display
When in submenu: back to previous mode / display
• Call up POI-menu
UL-Taste
Press short
Press 3 sec.
• Confirm / set function or setting
• Call up recording menu
UR-Taste
Press short
• Scroll to requested function or setting
• Show data of previous tour (in Bike info mode)

6
4. Usage
The CicloNAVIC 50 has four different displays (modes). By short pressing LL-button you can
switch from one mode (display) to the next mode (display).
These modes are:
•Main mode
•Bike info mode 1
•Bike info mode 2
•Menu mode
There are additionally three different sport modes (Walk mode, Bike mode, User mode), to
optimize specific settings (e.g. memory interval for waypoints, turn radius and so on) of the
CicloNAVIC 50 depending on the chosen kind of sport). These sport modes can be chosen
in the settings of the menu mode.
A symbol in the upper right display of the main mode shows which sport mode is currently
chosen.
Note: in order to calculate distance and speed, a recording has to be started before
you start the tour (see chap. 4.5)
4.1 Main mode
Main mode (Main display) appears directly after switching on the CicloNAVIC 50 (to switch
on press LR-button 3 sec.).
This display shows functions like e.g. current speed and distance, compass and – if started –
the navigation by showing arrows in the compass ring.
You can choose by yourself which two functions shall be shown in the middle lines of
the display.
For this shortly press UL-button in main mode, now upper display line starts blinking. By
always shortly pressing UR-button you can scroll between the possible functions, by short
pressing UL-button the function is confirmed and stored and now the lower line starts
blinking. Here you can choose and store the function in the same way.

7
Functions:
•Current speed
Shows current speed in kilometer per hour (kph) or miles per hour (mph).
•Ride time
Shows current riding time.
•Distance
Shows current distance.
•Remaining distance
Shows the still remaining distance to target point (during a navigation)
•Remaining ride time
Shows the estimated remaining ride time to target point (during a navigation)
•Average speed
•Maximum speed
•Current altitude
Shows the current altitude (meter/m or feet/ft).
•Variance altitude
Shows the variance (difference) of the current altitude to the altitude at start time
(meter/m or feet/ft).
4.2 Bike info mode 1
This mode appears after main mode (with short pressing LL-button).
It shows specific tour data (depending on the speed) of the current or last recorded tour.
Note: a recording has to be started in order to calculate these values.
For this press UL-button 3 sec., display shows small popup with symbols. Press again UL-
button and recording is started (the recording symbol is then shown in the bottom line on the
right in the display), see also chap. 4.5.
By short pressing UR-button it shows also the data of the two tours before this one. The
counter in the bottom line shows which one of the last three tours is displayed at the
moment.

8
4.3 Bike info mode 2
Appears after bike info mode 1 and shows more details of the tour.
Like in bike info mode 1 it can show data of the last three tours.
4.4 Menu mode
Appears after bike info mode 2.
Here you can see the POIs, BackTracks (recorded tours), the via PC uploaded tour and
theme navigations and also you can do all necessary settings (see chap. 5).
Choose the requested function (with UR-button) and confirm with UL-button.
Options:
POI
Shows all stored POIs (see chap. 4.6).
BACK TRACK
Here you can choose one of the already stored (recorded) tours for ‚BackTrack’ navigation.
This means you can go back the tour from end to start point. And you can also choose if you
like to go back ‘direct’ (beeline from end to start point) or in ‘sequence’ (same way back as
before).

9
ROUTE PLAN
Here you can choose a tour which you uploaded with the program CicloGuide. It shows the
single waypoints (starting with the end point). If you want to navigate not to the end point, but
to a milestone just choose the requested point by using UR-button and confirm with UL-
button.
THEME NAVI
Here you can choose special points (like POIs) which you can upload with the program
CicloGuide. Useful e.g. during holidays: just store the longitude/latitude of your hotel and
then you can always easily find back to the hotel during your holidays.
Note: If you choose a POI/BackTrack/RoutePlan or Theme Navigation and confirm with UL-
button, the CicloNAVIC 50 switches automatically back to main mode and starts with
navigation.
Simultaneously a recording is automatically started (except when you have chosen a back
track).
Information
Here you can do the settings (see chap. 5).
4.5 Data logging function (recording)
In order to store the tour you make, you have to start a recording before you start:
For this press UL-button 3 sec. In main mode, a small popup appears with 4 symbols:
Choose the function with UR-button and confirm with UL-button. The corresponding
symbol will be shown on the right side of the bottom line in the display.
One tour can have at least 1000 waypoints (in bike mode these means 40 km – the logging
interval for bike mode is preset with 40 m). When 1000 waypoints are stored, the
CicloNAVIC 50 stops automatically the recording and starts a new one.
If you want to store a longer tour, choose user mode (see settings in menu mode) and set
logging interval to 100 m – then you can store up to 100 km in one tour).
4.6 Mark a POI (Point of Interest)
With the CicloNAVIC 50 you can easily store the longitude/latitude of interesting points or
places:
for this press (in main mode) LL-button for 3 sec. In the display appears the POI popup
windows. There you see different symbols (with this symbols you can ‘mark’ your POI – so
you can better recognize them).

10
By using UR-button you can choose a symbol for this POI (you can use one symbol for
more than one POI), by short pressing UL-button the current latitude/longitude is stored
with date, time and the chosen POI symbol.
There is a counter on the right side of the POI popup window, which shows the consecutive
number of the POI.
The stored POIs can be recalled in the menu mode for a (beeline) navigation. There all
stored POIs are shown with their symbol and date/time.
To choose a stored POI for navigation, switch to menu mode and POI, mark it by using UR-
button and confirm with UL-button.
Now CicloNAVIC 50 switches automatically back to main mode, starts the navigation to this
POI and also starts a recording.
Note: if there is no or just a weak GPS signal, the POI popup window won’t appear. Instead
an error message is appearing which shows ‚weak signal’.
If this appears, you can get back to main mode by short press of LL-button.
4.7 Navigation
To use the CicloNAVIC 50 for a navigation, you first have to choose a tour or target point in
the menu mode (see chap. 4.4).
After confirming the chosen tour / target point the CicloNAVIC 50 switches automatically
back to main mode and starts the navigation
The navigation is shown by arrows in the compass ring, the arrow shows the direction of the
target resp. the direction of the next waypoint.
In the display of the main mode a small line (above the two function lines) shows the
description (if there is one used) of the next waypoint resp. of the target point.
After reaching a waypoint or the target point the display is blinking a few times and the next
waypoint is shown resp. the navigation is stopped (if it was the target point).
If you want to delete a selected tour / target point, choose last point in the recording popup
window (with UR-button) and confirm with UL-button (see chap. 4.5)
Note: with this only the selection is deleted, the tour /target point is still stored and can only
be deleted in menu mode.

11
4.8 Compass
The CicloNAVIC 50 is equipped with an electronic compass, which is displayed by a digital
compass ring in main mode.
The cardinal directions are shown as N (= North), E (=East), S (=South) und W (=West).
If the compass shows wrong directions it needs to be calibrated (see chap. 5).
4.9 Backlight
The CicloNAVIC 50 has an integrated backlight. Short press of LR-button switches the
backlight on and off.
In the settings in menu mode you can choose if the backlight should act manually (on / off by
pressing short LR-button) or automatically (switch on by using LR-button, automatically
switch off after the set time period).
See chap. 5.
5. Setting mode
The following applies:
Choose different functions / values with UR-button resp. (ODO) increase the value with
UR-button.
Confirm and store with UL-button.
To get back to the previous display or abort the setting, press LL-button.
Note: if you only choose a setting, but do not confirm with UL-button, still previous setting is
active.
In menu mode you can do different settings.
For this choose point INFORMATION in menu mode with UR-button and confirm with UL-
button.
Now the following appears:
GPS INFO Shows the GPS data (latitude and longitude) of current position.
ODOMETER Here you can set the total kilometers. You can increase the marked number
with UR-button and confirm (and go on) with UL-button.

12
SETTING
Following settings can be done:
CLEAR DATA
Delete the recorded data.
Options:
POI
Back Track
Route Plan
Theme Navi
Choose data with UR-button, delete with short pressing UL-button.
POWER MODE
Settings for backlight and auto suspend can be done here.
Backlight
Select how backlight shall work.
Manual
Backlight is switched on and off by short press of LR-button.
10 sec
30 sec
60 sec
Backlight is switched on by every button press and automatically
switched off automatically after set time period.
Note: by first button press only backlight is switched on, press again
button in order to get the function.
Note: often use of backlight shortens battery life time.
Auto suspend
Select how auto suspend shall work.
Disabled
This setting disables the automatic suspend, i.e. CicloNAVIC 50 stays
on until it is manually switched off by pressing LR-button for 3 sec.
10 min
30 min
60 min
Without GPS signal and without any button press within this time
period CicloNAVIC 50 switches automatically off.
TIME ZONE
Select your time zone.
Options:
Auto
Time zone is automatically set when GPS signal is received.
Note: Changes due to daylight saving time have to be done manually.
Manual
Set time zone manually.
UTC +1
.
.
UTC -1
.
.

13
CALIBRATION
If the compass shows wrong directions it should be calibrated.
Do this best when CicloNAVIC 50 is mounted on the bike or lays on an even
base.
Press short UL-button to start the calibration.
Now rotate the CicloNAVIC 50 (resp. the bike) repeatedly slowly clockwise
(resp. ride a closely circel with the bike). CicloNAVIC 50 shows main mode,
but there are no cardinal directions shown in the display. When they appear,
the calibration is ended.
UNIT
Choose between kilometer/meter and mile/feet.
Options:
km
Meile
TRACK
Based on the sport specific settings can be done.
Options:
Walk Mode
Pre-set value for log range 10m, navigation range 100m and turning range
20m
(Explanations see user mode)
Bike Mode
Pre-set value for log range 40m, navigation range 200m and turning range
40m
(Explanations see user mode)
User Mode
Options:
Log Range
Set the logging interval (how often a waypoint is set and stored).
Options:
10m
20m
30m
40m
100m
Navigation Range
Set in which radius a waypoint is seen as ‚reached’.
Options:
100m
200m
300m
400m
500m
Turning Range
Set the distance to which the CicloNAVIC 50 should navigate back
(turn back) to a not reached waypoint.
Options:

14
20m
30m
40m
50m
100m
LANGUAGE
Choose your language.
Options:
English
Francais
Deutsch
Dutch
Italiano
Espanol

15
6. Connect with PC / PC evaluation
6.1 Installation
To install the program CicloGuide and the needed driver, insert CD and start installation of
CicloGuide.
Installation screen for CicloGuide appears.
Follow the instructions on the screen, after installing the program it automatically installs the
driver.
Follow the instructions on the screen until installation is finished.

16
Now connect CicloNAVIC 50 and PC with the USB cable and CicloNAVIC 50 will be
automatically recognized.
6.2 Using CicloGuide
Double click the icon to start the program.
Note: a connection with the internet is required to show the map.
When CicloNAVIC 50 is already connected with the PC when you start the program, the
corresponding ComPort is automatically recognized and will be shown in the bottom line of
the program.
In the upper line of the program you can find the regarding functions.
6.2.1 Theme Navigation
Theme navigation works with Google map, and it is used to locate some interesting points on
the Google map, and download corresponding data to the CicloNAVIC 50.
Theme navigation is classified into two layers of category, first layer defined as category and
second layer defined as subcategory.

17
- Select “Theme Destination”.
- Creating new theme destination by editing category/subcategory and add interesting points
into category by clicking on the Google map, an icon is shown to mark the location.
- Destination editor will popup for data input, including title, category, subcategory and
information.
To create own categories, click to
To transmit to CicloNAVIC 50 click to .
To store the table click to .

18
6.2.2 POI
Here you can transmit the recorded POIs from CicloNAVIC 50 to PC.
For this click to , now the recorded POIs appear in the table.
By clicking to a POI in the table the corresponding point is shown in the map.
6.2.3 Route
Route plan is designed for long distance waypoints navigation, you can define waypoints in
the route through Google map, then download it to CicloNAVIC 50 and navigate to
destination by sequence or direct options.
- Select “Route” in the menu.
- Double click required locations on the Google map to create waypoints for the route.
-The created waypoints will be linked automatically together to form the route.
The route can have max. 50 waypoints.
To name the single waypoints, click to the corresponding point in the table and then to
Now you can name the waypoint.
To download the route to the CicloNAVIC 50 click to .
To store the route click to .

19
6.2.4 Track
During navigation, some interesting points may want to be recorded. Back Track feature in
CicloNAVIC 50 provides this function to manually record the current location.
In CicloGuide the menu “Track” is used to manage the recorded points in the route and after
downloading from CicloNAVIC 50 , they can be saved as backup files.
For this click to , the transmission to PC is started.
You can see the recorded tours in the table and by clicking on the table you can see them in
the map.
To store click to
To transform in a different format, click to KML, GPX or NEMA.
6.2.5 Settings
Here you can do some special settings and transmit them to the CicloNAVIC 50.
7. Service and maintenance
Protect from direct sunlight, heat and frost (below -10°C and over 50°C).
If not used, store CicloNAVIC 50 in a dry and cool place.
Please do not store
- in a damp and not well-ventilated place
- in the car (especially not in summer)
Do not use or store CicloNAVIC 50 near by strong magnetic or electro magnetic fields (this
could e.g. influence the compass).
The CicloNAVIC 50 is water resistant, but not usable in water.
Cleaning:
Clean the screen of the CicloNAVIC 50 with a dry and smooth cloth.

20
8. Trouble shooting
Problem
Cause / Elimination
No display / no power
Battery not charged
- to charge connect device with PC
Device not powered on
- press LR-Taste 3 sec. to power on
No GPS-signal
- use outside in an open area
- check whether high buildings obstruct the
view
- re-start the device
- try a reset: for this press UR-, UL- and LL-
button simultaneously for 3 sec., then
choose ‘ColdStart’ and confirm
Note: with this reset all stored values, tours
and settings are deleted
No distance shown
No recording started
- to start a recording press UL-button 3 sec.
and confirm with short pressing UL-button
Display shows „weak signal“
No GPS-signal resp. GPS-signal too weak
- press short LL-button to get back
- try again with better GPS-signal
Compass shows wrong value
Magnetic resp. electro-magnetic interference
Calibrate compass (see chap. 5)
No PC-connection
Check usb-cable
Check correct comport setting in program
CicloGuide
Table of contents
Other CICLOSPORT Bicycle Accessories manuals

CICLOSPORT
CICLOSPORT CicloMaster CM 4.2 User manual

CICLOSPORT
CICLOSPORT HAC4 BLACK User manual

CICLOSPORT
CICLOSPORT CicloMaster CM 4.1 User manual

CICLOSPORT
CICLOSPORT CM 8.2 User manual

CICLOSPORT
CICLOSPORT CICLOMASTER CM 2.1 User manual

CICLOSPORT
CICLOSPORT CM 308 User manual

CICLOSPORT
CICLOSPORT Ciclomaster CM 8.3A User manual