Cidco Communications CT250 User manual


iv
Copyright
©
1999 by CIDCO Corporation. All rights reserved.
101911-01 Rev. A
©1998-1999 CIDCO Incorporated. No part of this publication may be
reproduced, transcribed, stored in a retrieval system, or translated into
any language in any form, by any means, without the written permission
of CIDCO Incorporated.One-Time Viewing (OTV) is a registered trade-
mark of CIDCO Incorporated.

i
TABLE OFCONTENTS
❑YOUR CT250 TELEPHONE 1
❑INSTALLING YOUR CT250 2
HOOKING UPYOUR PHONE 3
PERSONALIZING YOUR PHONE 5
❑OPERATING YOUR CT250 11
USING TRADITIONAL DIALING 11
USING SHORT-CUT DIALING 12
USING THE SPEAKERPHONE 14
ADJUSTING VOLUME 14
USING MUTE 14
USING HOLD 15
GETTING TEMPORARY TONE SERVICE 15
ADJUSTING THE CONTRAST 15
READING THE CALL TIMER 15
INTERPRETING THE INDICATOR LIGHTS 16
USING CALLER ID AND CALL WAITING ID OPTIONS 17
RECEIVING CALL RECORDS 17
READING DISPLAY MESSAGES 19
❑USING THE DIRECTORY 21
MAKING YOUR DIRECTORY LIST 21
EDITING ADIRECTORY RECORD 22
ENTERING CHARACTERS AND SYMBOLS 23
REVIEWING DIRECTORY RECORDS 23
DELETING DIRECTORY RECORDS 24
❑USING YOUR CUSTOM CALLING SERVICES 25
3-WAY CALLING 25
AUTO CALL RETURN 26
BUSY REDIAL 26
CALL BLOCK 27
CALL FORWARDING 27
CALL WAITING 28
VOICE MAIL 29
❑TROUBLESHOOTING 30
INDEX 32

ii
InstallingYourCT250
5
INSTALLING YOUR CT250
Before you begin using your CT250, you need to install it properly. There are three
steps to install your phone:
1. Checking the Contents.
2. Hooking Up Your Phone.
3. Personalizing Your Phone.
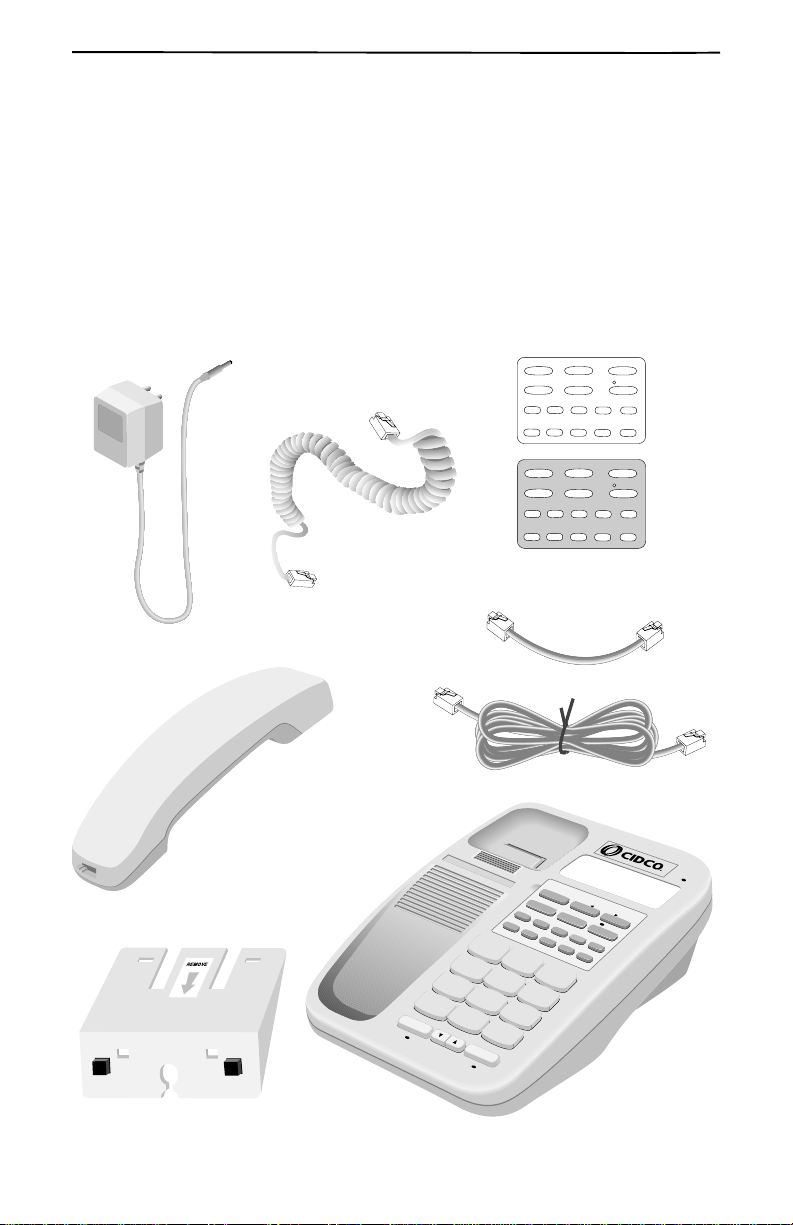
CHECKING THE CONTENTS
Make sure that you have the following:
415-555-1234
SMITH JONATHAN
12:28
20
AM
CALL
8/28
DELETE REVIEW
DIAL
CALL
WAITING
REDIAL HOLD
MUTE
VOLUME
SPEAKER
1
ABC
2
DEF
3
GHI
4
JKL
5
MNO
6
PQRS
7
TUV
8
WXYZ
9
*
OPER
0
#
BUSY
REDIAL
AUTO CALL
RETURN
ON OFF
CALL FORWARD
CANCEL CALL
WAITING
VOICE
MAIL
DIRECTORY
CALL
BLOCK
3 WAY
CALLING
4-Inch Line Cord
6-Foot Line Cord
Paper and Clear Plastic
Handset Cord
AC Adapter
Handset
Mounting Bracket Console
Templates

HookingUpYourPhone
6
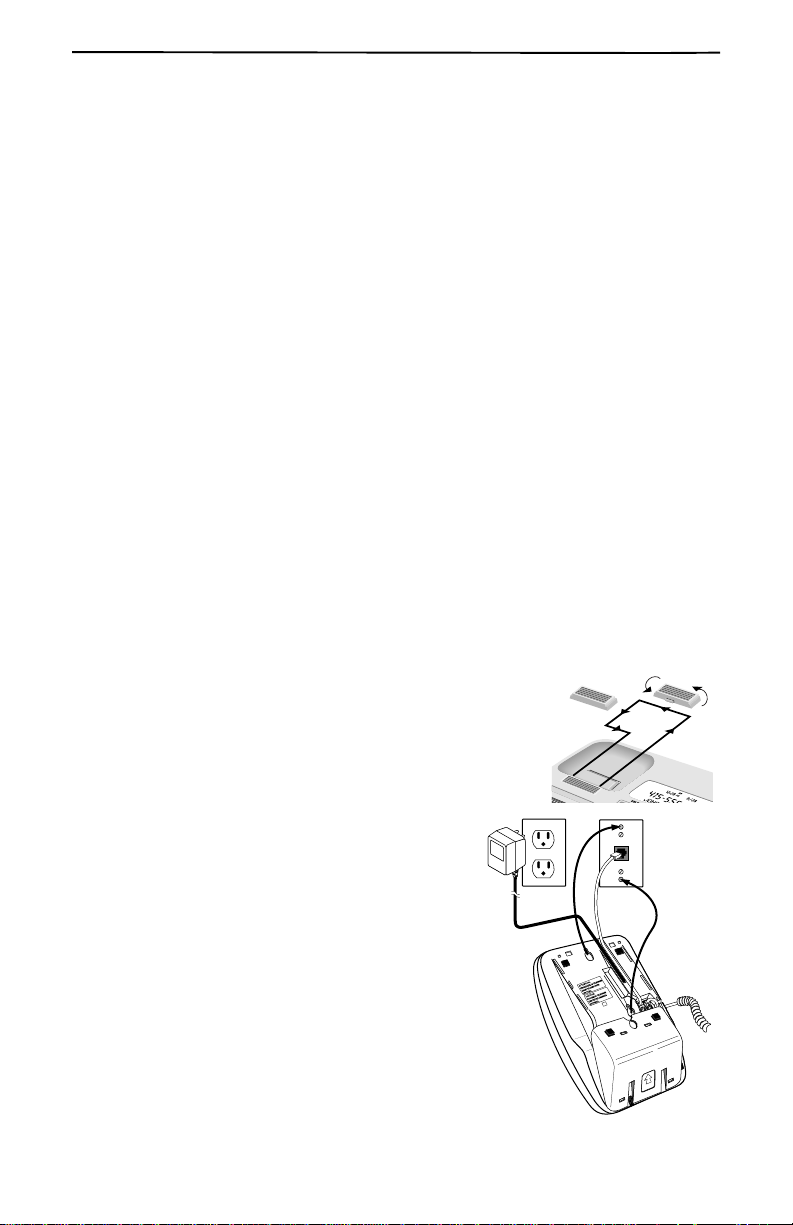
HOOKING UPYOUR PHONE
A.REMOVE THE MOUNTING BRACKET
The CT250 comes with a pre-attached mounting
bracket. In order to install the line cords and AC
adapter, you need to remove the mounting brack-
et.
1. Turn the phone over.
2. Remove the wall mount bracket by pushing
in the direction of the arrow.
B. CONNECT THE AC ADAPTER
!CAUTION
Use only a Class 2 AC adapter conforming to the
specifications indicated. Incorrect polarity or voltage
canseriouslydamagetheunit.
1. Insert the adapter tip into the power jack. Make
sure that the tip is secure.
2. Secure the adapter cord into the channel notch.
3. Plug the adapter into an electrical outlet.
C. ATTACH THE CORDS
The CT250 comes with a handset and a telephone line cord.
Attach the Handset
1. Take the end of the handset cord with the
long straight end and plug it into the jack
labeled HANDSET CORD.
2. Plug the other end into the jack of the
handset.
3. Thread the cord through the notch next to
the HANDSET CORD jack to prevent the
connection from becoming loose.
CAUTION:
DISCONNECT TELEPHONE LINES
FROM WALL OUTLET BEFORE
SERVICING OR REPLACING
BATTERIES.
RINGER
REMOVE
InstallingYourCT250
7
Attaching theLine Cords
1. Take the line cord (the six-foot cord for desk mounting or the four-inch cord
for wall mounting) and plug it into the phone jack marked LINE CORD.
If you are using the six-foot line cord, thread the cord through the
channel above the LINE CORD jack to prevent it from coming
loose.
2. Use either the Desk-Top Installation or the Wall-Use Installation procedures
below to install your telephone.
3. Lift the handset and check for a dial tone once you have installed your phone. If
there is no dial tone, see Troubleshooting on page 29.
For DeskUse:
a. Replace the wall mount bracket. Place the bracket over the top half of the
phone with the hooks in the square slots. The arrow should point down. Push
the bracket up until it snaps into place.
b. Place the phone on a desk or tabletop.
c. Take the remaining end of the six-foot line cord and plug it into the wall jack.
For Wall Use:
a. Replace the wall mount bracket. Place the bracket over the bottom half of the
phone with the hooks in the square slots. The arrow should point up. Push the
bracket down until it snaps into place.
b. Locate the handset hook. (It is a small square plastic
piece located at the bottom of the handset receiver
well.) Slide the handset hook up and turn it around so
that the tab is on the top. Reinsert the handset hook
with the tab exposed.
c. Take the remaining end of the four-inch line
cord and plug it into the wall jack.
d. Slide the phone on the wall jack’s installation
hooks and press down to secure it to the wall.
D
ELE
+
-
REMOVE
FOR WALL MOUNTING

PersonalizingYour Phone
8
PERSONALIZING YOUR PHONE
To ensure your Caller ID Telephone works properly, you must set your options cor-
rectly.
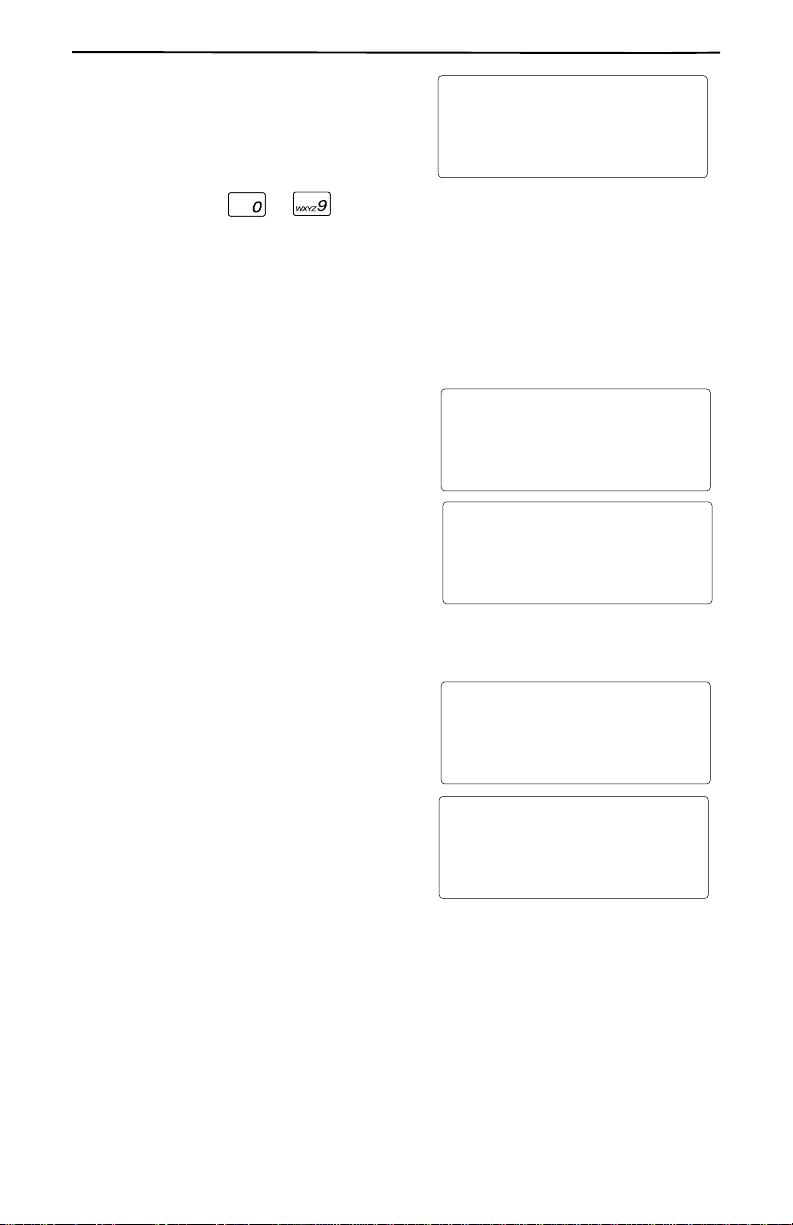
1.BEGINNING THE PROGRAMMING SEQUENCE
Most of the programming options appear in two screens. The programming option
appears in Screen 1, and your choices appear in Screen 2. The two screens flash back
and forth until you make a selection. When you make a selection, the check mark,
“✓”, moves to the selection you have made, and you hear a “beep”. After making a
selection, the next programming screens appear. If you make a mistake, press DE-
LETE to go back to the previous prompt or start the programming sequence again.
To begin the programming sequence, press and hold both FREVIEWEkeys until you
see SELECT LANGUAGE.
2.SELECTING YOUR LANGUAGE
You can choose between two different lan-
guages, English or Spanish.
The screen SELECT LANGUAGE appears.
❑Press FREVIEW to select ENG.
❑Press REVIEWEto select ESP.
3.USING CALLER ID
You must subscribe to Caller ID services from your local telephone company in order
for the following features to work on your phone. Please contact your local telephone
company for more information about Caller ID.
A. Turning Caller ID ON or OFF
If you subscribe to Caller ID service from your local telephone company, Caller ID
must be set to ON in order for your Caller ID Telephone to work properly.
If you do not subscribe to Caller ID service,
turn your Caller ID setting OFF. Setting this
feature does not subscribe or cancel Caller
ID service. You must contact your local
telephone company to request a change in
services.
❑Press FREVIEW to select ON.
❑Press REVIEWEto select OFF.
If you set this option to OFF, you can
skip ahead to Section 4. Select Between
Tone and Pulse on page 10.
PRGM
SELECT LANGUAGE
ENG ESP
✓
PRGM
PRGM
CALLER ID?
ON OFF
✓
PRGM

InstallingYourCT250
9
B.Turning on the Call Light
If you set CALLER ID to OFF, this screen
does not appear.
If you turn this option ON, the LED at the
top of your phone flashes whenever you
have new call information.
❑Press FREVIEW to turn ON the light.
❑Press REVIEWEto turn OFF the light.
C. Setting Area Codes
If you set CALLER ID to OFF, these screens do not appear.
Many regions are changing how customers use their area codes. In order to dial from
your call records and directory records, the CT250 needs to distinguish between local
and long distance numbers.
❑If your region has seven digit dialing (you don’t need to dial your area code
when making a local call), enter YOUR local area code as described in To Set
Your Local Area Code below.
❑If your region requires that you always dial ten digits when making local calls,
also follow the procedure under To Set Other Local Area Codes.
If you are unsure on how your region works, please contact your local telephone
company.
To enter an area code, use the keypad. If you make a mistake, retype the area code.
You can program up to five different area codes, including your area code. You do
not need to program all five different area codes.
To Set Your Local Area Code
The first screen prompt asks you to enter
your area code.
PRGM
CALL LIGHT?
ON OFF
✓
PRGM
PRGM
210
MY AREA CODE

PersonalizingYour Phone
10
ToSet Other Local Area Codes
These area codes also allow the CT250 to distinguish between local and long-dis-
tance calls. If you live in an area where you dial ten digits for telephone numbers in
other local area codes (without dialing a “1”), you can program your other local area
codes in this section.
After you enter your area code, you can enter up to four other local area codes.
Press REVIEWEto skip an area code
D. Setting 1+Dialing
If you set CALLER ID to OFF, this screen
does not appear.
If you dial “1” before long distance calls,
you need to set this option to YES.
❑Press FREVIEW to select YES.
❑Press REVIEWEto select NO.
4.SELECT BETWEEN TONE AND PULSE
The CT250 can dial in either tone or
pulse/rotary mode.
❑Press FREVIEW to select TONE.
❑Press REVIEWEto select PULSE.
PRGM
LOCAL AREA CODE3
PRGM
LOCAL AREA CODE4
PRGM
LOCAL AREA CODE1
PRGM
LOCAL AREA CODE2
PRGM
1 + DIALING?
YES NO
✓
PRGM
TONE PULSE
✓
PRGM
PRGM
DIALING METHOD
InstallingYourCT250
11
5.SELECT ARING SOUND
You can choose from ten different ring
sounds for when the phone rings.
To hear or select a different ring sound,
press a digit key to . When you
are finished, the next screen appears after several seconds.
6.SET VOICE MAIL
If you subscribe to Voice Mail service from your local telephone company, the CT250
can automatically alert you whenever you have new voice mail messages in your
mailbox.
❑Press FREVIEW to set Voice Mail to
YES.
❑Press REVIEWEto set Voice Mail to
NO.
Setting this feature does not subscribe or
cancel Voice Mail service. You must contact
your local telephone company to request a
change in services.
7.SET ATIME FORMAT
The time and date are automatically set by
the first call record that you receive. You
cannot manually set the time and date.
However, you can choose between a
12-hour format and a 24-hour (military)
format.
❑Press FREVIEW to select 12HR, or
standard time.
❑Press REVIEWEto select 24HR, or
military time.
PRGM
RING SOUND 0-9
5
PRGM
VOICE MAIL?
YES NO
✓
PRGM
PRGM
TIME FORMAT
12HR 24HR
✓
PRGM 11:59PM

PersonalizingYour Phone
12
8.ADVANCED SETUP
Use ADVANCED SETUP:
■to turn on Call Waiting ID, OR
■to reset your blue keys
❑Press FREVIEW to select YES.
❑Press REVIEWEto select NO.
A. Turning on CallWaitingID
If you choose not to do ADVANCED SETUP
or if you set CALLER ID to OFF, this screen
does not appear.
If you subscribe to Call Waiting ID, turn
this option ON.
❑Press FREVIEW to select ON.
❑Press REVIEWEto select OFF.
Setting this feature does not subscribe or
cancel Call Waiting ID service. You must
contact your local telephone company to
request a change in services.
B.Adding MoreUnits
If you choose not to do ADVANCED SETUP or if you set CALL WAITING ID to OFF,
this screen does not appear.
If you subscribe to Call Waiting ID and this
is your FIRST Call Waiting ID unit
(the display appears as 1ST CWID UNIT?),
you must select YES.
However, if you already have a
Call Waiting ID unit, you must select NO.
If you do not program this option correctly,
you might not receive Call Waiting ID
records consistently.
❑Press FREVIEW to select YES.
❑Press REVIEWEto select NO.
PRGM
ADVANCED SETUP?
YES NO
✓
PRGM
PRGM
CALL WAITING ID?
ON OFF
✓
PRGM
YES NO
✓
PRGM
PRGM
1ST CWID UNIT?

InstallingYourCT250
13
C. Resetting Your Blue Keys
If you choose not to do ADVANCED SETUP, this screen does not appear.
If you have changed your blue keys into
Speed Dial keys (see Creating a Speed Dial
Key on page 16.), you can reset them back
to their original programming with this op-
tion.
!CAUTION
If you reset the blue keys, all your speed
dialkeyswillbelost.
❑Press FREVIEW to select YES.
❑Press REVIEWEto select NO.
9.COMPLETED SETUP
Once you have finished installing your
CT250, the screen remains blank until you
receive your first call record.
We hope that you enjoy your new phone.
PRGM
RESET BLUE KEYS?
YES NO
✓
PRGM
SETUP COMPLETE

Using TraditionalDialing
14
OPERATING YOUR CT250
The CT250 is as easy to use as your basic telephone except that it also handles
Caller ID and Call Waiting ID information. You can make calls using traditional dial-
ing or using short-cut dialing.
USING TRADITIONAL DIALING
1. Lift the handset or press .
2. Use the keypad to dial the phone
number. The number is displayed on
the screen.
If you make a mistake, hang up and dial again.
USING DIAL
You can enter the telephone number and verify it on the display before you place the
call.
1. Enter the telephone number.
The number appears on the display as
it is entered. (For long distance calling,
you might need to enter a 1 first.)
If you make a mistake, quickly press DELETE twice to erase the entire
phone number, or press FREVIEW to move back over the last digits.
2. Press DIAL to dial the phone number from the speakerphone or lift the handset
to speak with your caller privately.
01:00
4085551234
SPEAKER
DIAL
5:45PM 5/31
4085551234

OperatingYourCT250
15
USING SHORT-CUT DIALING
There are several types of short-cut dialing. You can dial using:
❑Your call records.
❑Your directory records.
❑The REDIAL key.
❑Your speed dial keys.
USING DIAL WITH CALL RECORDS
You can use DIAL to call any number in your Caller ID list.
1. Press FREVIEWEuntil you come to the call record. See Receiving Call Records
on page 20 for more information.
2. Press DIAL to place the call.
USING DIAL WITH DIRECTORY RECORDS
You can use DIAL to call any number in your directory.
1. Press DIRECTORY.
2. Press FREVIEWEuntil you come to the desired directory record. See
Reviewing Directory Records on page 23 for more information.
3. Press DIAL to place the call.
USING REDIAL
Press REDIALand the last telephone number you called is displayed and automatically
dialed.

UsingShort-CutDialing
16
USING SPEED DIAL KEYS
If you are not subscribing to a particular service from your local telephone company,
you can change your blue key into a speed dial key.
However, you cannot change the first blue key ( ) or the Directory key
( ), into a speed dial key.
Creating a Speed Dial Key
Your speed dial key is a dual-function key. It can store two different numbers.
Pressing the key once dials the First Number. Quickly pressing the key twice dials the
Second Number.
You can create up to 8 different speed dial keys, each holding two different numbers.
You can store up to 16 different telephone numbers into the keys using this method.
To Program the First Number:
1. Enter the telephone number you want to speed dial. You can enter up to 16
digits maximum for your speed dial key.
You can also program symbols like , , flashes (“F”), or pauses
(shown as a comma “,”) using the key.
■Press and release to add a flash (“F”). Repeat to add more flashes.
A flash hangs up the phone momentarily to access some of the custom
calling services provided by your local telephone company, such as Call
Waiting.
■Press and hold to add a 3-second pause (“,”). Keep holding to
insert multiple pauses.
A pause allows time for the phone number to be dialed and the line
answered.
2. Verify that the numbers are correct.
3. Press and hold the blue key until you
see NUMBER STORED and hear a
beep.
To Program the Second Number:
1. Follow steps 1-2 in the above procedure.
2. Press the blue key once, and then
quickly press and hold the blue key
until the phone beeps and NUMBER
STORED is displayed on the screen.
CALL
WAITING
DIRECTORY
CALL
WAITING
CALL
WAITING
CALL
WAITING
NUMBER STORED
NUMBER STORED

OperatingYourCT250
17
USING THE SPEAKERPHONE
You can hold a conversation without using a handset.
Press to turn on or off the speakerphone. The Speakerphone light comes on
when the speakerphone is in use.
ADJUSTING VOLUME
You can adjust the volume for the speakerphone, handset, and ringer to a louder or
quieter sound for specific calls.
Adjusting the Speakerphone Volume
To adjust the Speakerphone Volume, press
and use the to adjust the
volume.
Adjusting the Handset Volume
To adjust the Handset Volume, lift the hand-
set and press to adjust the volume.
Adjusting the Ringer Volume
To adjust the Ringer Volume, press
to adjust the volume while the phone is not
in use.
Turning the Ringer Off
To turn off the Ringer, adjust the volume
down key until you see RING OFF.
USING MUTE
The mute function allows you to block your side of the conversation. Press
to turn mute on or off. The light blinks when mute is in use.
SPEAKER
SPEAKER
01:00
SPEAKER VOLUME
HANDSET
01:00
VOLUME
5:45 PM 5/31
RING OFF
4:05 PM 10/31
RING
VOLUME
MUTE

UsingHold
18
USING HOLD
You can place a call on hold.
1. Press HOLD to place the call on hold. The Hold light blinks.
2. Hang up the handset.
3. To take the call off hold, you can:
■pick up the handset.
■press HOLD.
■press to use the speakerphone.
■pick up the call on another extension.
GETTING TEMPORARY TONE SERVICE
If you have Rotary/Pulse service, you can temporarily set your CT250 phone to tone
service for banking and other automated telephone services.
Press after the service prompt and proceed. The phone automatically returns
to Rotary/Pulse after you hang up.
ADJUSTING THE CONTRAST
!CAUTION
Do not press and hold the DELETE key without simultaneously pressing either
FREVIEWE. You could accidently erase the call memory if you press only the
DELETE key.
To lighten the display, press and hold the DELETE key while also pressing
FREVIEW repeatedly until you get the desired result.
To darken the display, press and hold the DELETE key while also pressing
REVIEWErepeatedly until you get the desired result.
READING THE CALL TIMER
The call timer starts automatically when
you make or receive a call. It times the call
up to a maximum of 99 minutes and 59 sec-
onds, then starts again at zero.
SPEAKER
01:00
4085551234

OperatingYourCT250
19
INTERPRETING THE INDICATOR LIGHTS
The lights on your CT250 have many uses.
❑Activity Light Indicator
The red light at the top of your phone has several functions. However, in order
for this light to work, it requires the use of the AC adapter.
■Line in Use Light—becomes lit whenever the CT250 or another phone on
the same telephone line is being used. The light remains lit until the line is
no longer in use.
■New Calls Indicator—flashes
slowly when you receive new
calls. This light continues to flash
until you review the new calls.
The display indicates how many
new calls you have received.
■Private Calls Indicator—flashes
rapidly while the phone rings
when you receive a “private”
call. A “private” call is a caller
blocking the transmission of
his/her name and telephone
number. PRIVATE appears on the phone.
■Voice Mail Messages Indicator—
flashes slowly to alert you when
you receive new messages in
your Voice Mail Messages
mailbox. MESSAGE WAITING
appears on the display.
❑Hold Indicator—flashes slowly when you place a call on hold.
❑Speakerphone In Use—becomes lit when the speakerphone is in
use.
❑Mute Indicator—flashes slowly when mute is in use.
5:45 PM 5/31
10 NEW CALLS
5:45 PM 5/31
-PRIVATE-
CALL 26
5:45 PM 5/31
MESSAGE WAITING
HOLD
SPEAKER
MUTE

UsingCallerIDandCallWaiting IDOptions
20
USING CALLER IDAND CALL WAITING ID OPTIONS
Caller ID and Call Waiting ID Options services from your local telephone company
give the CT250 additional features that are powerful and easy to use.
❑Caller ID allows you to see information about an incoming call BEFORE you
answer the phone.
❑Call Waiting ID lets you see information about a Call Waiting call when you are
on the phone.
You must subcsribe to these services from your local telephone company for all the
features of the CT250 to be used fully.
RECEIVING CALL RECORDS
If you subscribe to Caller ID or Call Waiting ID services from your local telephone
company, the CT250 displays information, called a call record, about a new call so
you can choose whether to answer a call.
❑Caller ID lets you know who is calling before you pick up the phone.
❑Call Waiting ID lets you know who is calling when you hear the Call Waiting
beep.
After you receive a new call, the indicator light flashes and the CT250 displays the call
record information. A call record consists of the following:
❑The caller’s name (if available)
❑The telephone number
❑The time and date of the call
❑A record number to show the
sequence of calls
Caller ID and Call Waiting ID are not available in all areas on all calls, and these mes-
sages are marked UNAVAILABLE. Some numbers might be blocked, and marked
PRIVATE. You must subscribe to Caller ID or Call Waiting ID service in order to re-
ceive call records.
REVIEWING CALL RECORDS
❑Press REVIEWEto see the most recent call record.
❑Press FREVIEW to see earlier calls.
The message, END OF LIST, indicates that
you have reached the end of list. Press either
FREVIEWEto see more records.
5:45 PM CALL
5/31
408-555-1234
MICHAELS CHARLIE
23
END OF LIST
Table of contents
Popular Telephone manuals by other brands

Bell System
Bell System 701B Identification and assembly of parts

Uniden
Uniden FP1220 owner's manual

G-TEL Enterprises
G-TEL Enterprises WP500 instructions

Cortelco
Cortelco 7150 TRENDLINE CALLER ID TYPE II Owner's instruction manual

DIGM Technology
DIGM Technology GSM-680 user manual

Gigaset
Gigaset Fusion manual


