Cinders SLIMFOLD 6 User manual

Model: CINDERS SLIMFOLD 6
OUTDOOR GAS GRILL (PROPANE)
For use with 2 x 20 lb LP-gas cylinders (minimum)
Or 2 x 30 lb LP-gas cylinders (maximum)
PROFESSIONAL USER`S MANUAL (ISSUE 4)
FOR YOUR SAFETY, PLEASE READ THIS MANUAL
CAREFULLY BEFORE USING THIS GRILL
FIRE AND EXPLOSION
MAY RESULT IF THE
INSTRUCTIONS IN THIS
MANUAL ARE NOT
FOLLOWED
FOR YOUR SAFETY:
•THIS GRILL IS FOR OUTDOOR USE
ONLY.
•THIS GRILL IS FOR USE WITH
CYLINDERS MARKED `PROPANE`
ONLY.
•DO NOT store or use gasoline or
other flammable vapours and
liquids in the vicinity of this or any
other appliance.
FOR YOUR SAFETY:
IF YOU SMELL GAS
1. Shut off the gas supply to grill.
2. Extinguish any open flame.
3. If odour continues, immediately
call your gas supplier or fire
department.
•DO NOT store an LP cylinder not
connected for use in the vicinity of
this or any other appliance.
•DO NOT let children operate or play
near the grill.
•This grill is for use with propane
only.
•Never check for gas leaks with a
lighted match of open flame.
•Always leave filled LP cylinders
outdoors.
INSTALLER MUST LEAVE THESE INSTRUCTIONS WITH THE CONSUMER
PLEASE SAVE THIS MANUAL FOR FUTURE REFERENCE
CAUTION! CAUTION! LP Hose assemblies must only be fitted to this
appliance by a competent gas engineer.
DO NOT OVER TIGHTEN
2
LOCATION OF THE GRILL
This grill is designed and certified for OUTDOOR USE in well ventilated area only.
The installation of this appliance must conform with the local codes, in the absence of local
codes, with the current National Fuel Gas Code, ANSI Z223.1/NFPA 54 or CAN/CGA-
B149.1, Natural Gas Propane Installation Code.
Observe the following safety rules before each use:
•DO NOT install in or on recreational vehicles and/or boats.
•DO NOT use inside a building, porch, balcony, garage or any other enclosed or semi-
enclosed area.
•Maintain at least 36 inches (915mm) from all sides of the grill to any combustible material.
•DO NOT locate under an unprotected combustible ceiling or cover.
•DO NOT store anything under the grill. Keep area around and under the grill clear of any
combustible material, gasoline and other flammable liquids and gases, including spare LP
cylinder.
•DO NOT place grill on an uneven or unlevelled surface.
•Locate grill out of traffic`s way. Place the grill in a place where people are not likely to
bump into or tip it over.
•DO NOT use grill if hose is damaged. Inspect the hose before each use of this outdoor
cooking appliance. Replace with a hose assembly as specified by the manufacturer, see
`HOSE`.
•DO NOT store a spare LP-gas cylinder under or near this appliance.
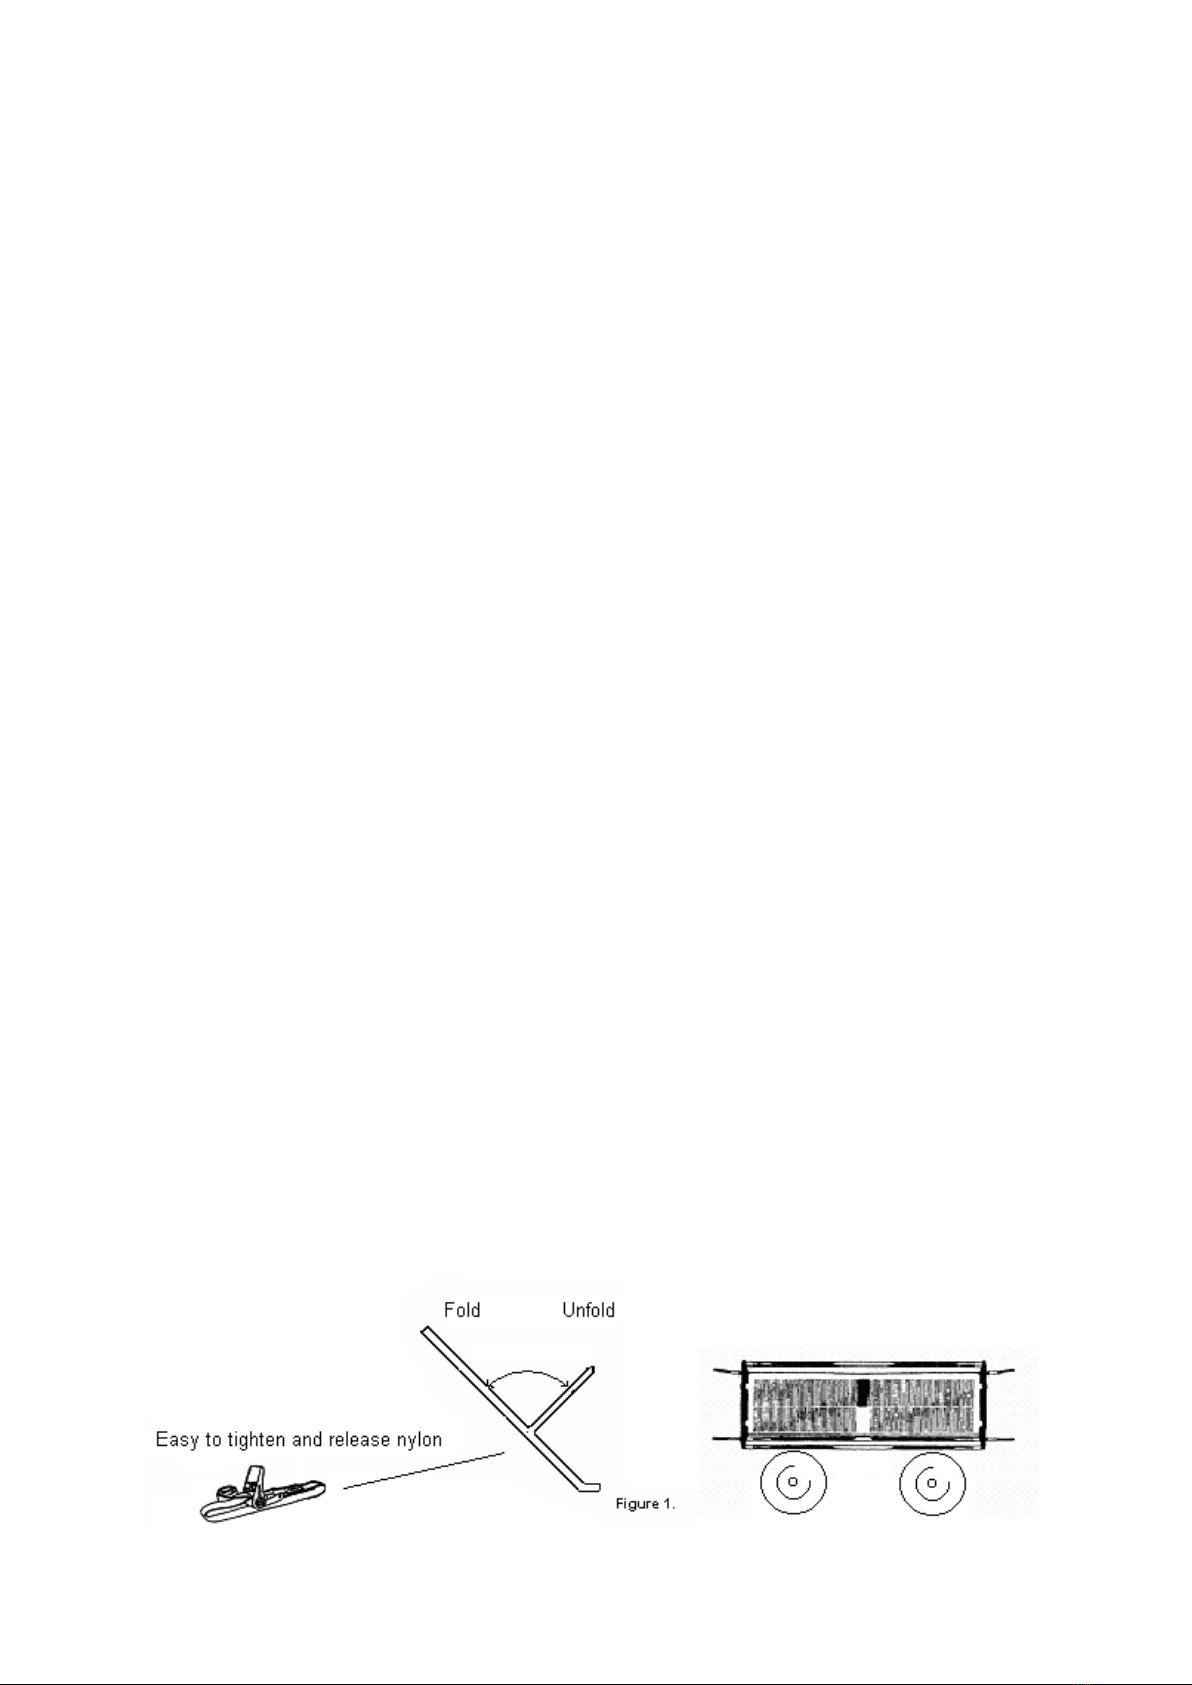
FOLDING AND UNFOLDING OF THE GRILL
To unfold the grill:
•Place the grill on the ground and lift the grill up by a wooden handle. Push the legs down
and swing them away from the grill.
•Unfold the tubular braces from between the legs and place them into the two metal hooks
at the ends of the grill. Push the braces firmly into place.
•Read the section `LP Cylinder` on Page 3 of these instructions before connecting.
To fold the grill:
•Turn both LP tank gas valves completely clockwise to close the supply to the grill.
•Disconnect the gas connection to both LP tanks.
•Remove both LP tanks and put aside.
•Lift the grill by the wooden handles and unhook the tubular braces. Fold the braces in
between the legs and fold the legs under the grill, pushing them firmly into place.
CAUTION: DO NOT attempt to fold the grill while it is hot. Let it cool before folding.
3
GREASE DRIP CAN
Use any standard Pepsi or Beer can with a RING-PULL top. Firmly slide the clip at either
end of the grill inside the RING-PULL opening, so that the opening is below the grease drain.
Secure can as necessary.
LP CYLINDERS
This grill is suitable for use with a minimum of two 20lb or 30 lb LP cylinders only with
approximate dimensions of 12 inch diameter and 21 or 24 inch high. The LP-gas supply
cylinders must be constructed and marked in accordance with the specifications for LP-gas
cylinders of the U.S. Department of Transportation (DOT) or the National Standard of
Canada, CAN/CSA-B339, Cylinder, Spheres and Tubes for the transportation of dangerous
goods. Carefully read and follow the instruction and warning marking
on the LP Cylinders.
•Fill the LP cylinders with propane gas at reputable propane dealer. Never fill the cylinder
beyond 80 percent full. If this instruction is not followed exactly, a fire causing death or
serious injury may occur.
•The LP cylinders must be fastened to the grill in an upright position of proper vapour
withdrawal. An easy to tighten and release nylon strap is located as in figure 1 on both
leg assemblies.
•You MUST use this strap to secure the LP cylinders to the OUTSIDE of the grill legs.
•You must NEVER locate the LP cylinders directly beneath the firebox.
•DO NOT store a spare LP-gas cylinder under or near this appliance. If this instruction is
not followed exactly, a fire causing death or serious injury may occur.
•You must NEVER allow the hose to touch any part of the grill which may become hot.
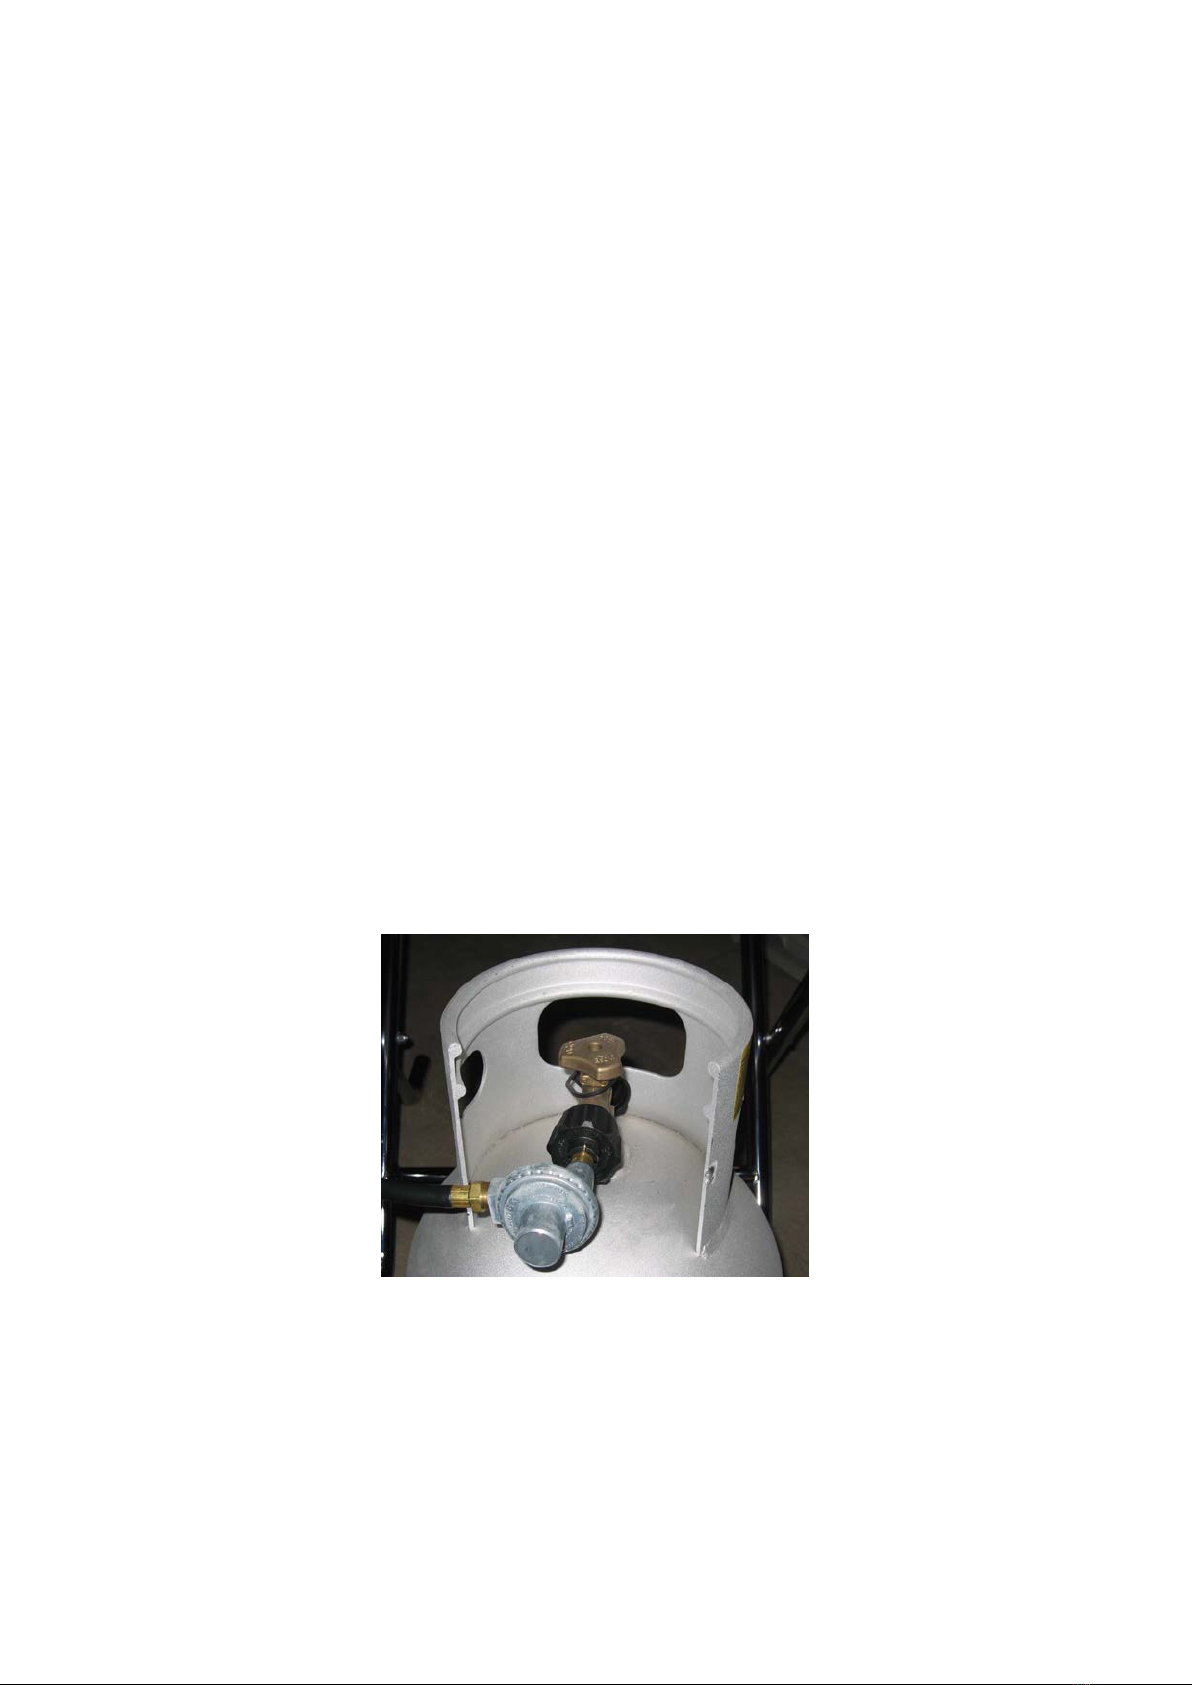
•Regulators and hose must be used. Attach the regulator fittings to the LP cylinder valves.
Firmly tighten the fittings by hand only, turning clockwise B. The hoses to the regulators
must be located horizontal to the regulators to keep any water or liquid from dripping onto
the regulators.
The 11 inch W.C. (2.8 kpa) pressure regulators supplied with the appliance must be used.
•Gas must be turned off and cylinders disconnected at the propane cylinders when the
appliance is not in use.
•When the grill is to be stored indoors, disconnect the LP cylinders from the grill and store
them outdoors in a well ventilated area out of the reach of children.
•When the LP cylinders are connected to the grill, the grill and LP cylinders must be stored
outdoors in a well ventilated area.
•The LP cylinders must include a collar to protect the cylinder valves.

4
HOSES
•A replacement flexible hose connector shall comply with the low pressure requirements of
the Standard for PIGTAILS AND FLEXIBLE HOSE CONNECTORS FOR LP-GAS,
ANSI/UL 569.
•It shall be an integral assembly for use with outdoor cooking appliances, including
connectors permanently attached to either end of the hose.
•A qualified gas engineer must be consulted to ensure the correctness of the connections,
and a `LEAK TEST` must be employed before operating the grill.
•The hose MUST be inspected before each use of this outdoor cooking appliance. Do not
use this grill if the hose is damaged.
LEAK TEST
•Make a solution of one half liquid soap with one half water.
•Turn all the grill control knobs clockwise to the `OFF` position until a positive stop is felt.
•Turn the LP cylinder valve counter-clockwise to turn on the gas supply to the grill.
•Brush the soap solution on all hoses, tubing, fittings, valves and connections.
•Look for any soap bubbles. The bubbles indicate that there is a leak.
•If the gas leak is located at a gas connection, tighten the connection. If the leak can not
be stopped, do not use the grill until the part is properly repaired or replaced.
•Replace all leaky hoses, tubing and valves.
•Turn both LP cylinder valves clockwise to turn off the gas supply to the grill.
•Wipe away soapy bubbles at end of test.
BEFORE OPERATING THE GRILL
Make sure everyone who operates the grill reads and understands the information in this
manual.
Conduct the following checks before operating the grill:
•Inspect the hoses. If it is evident there is excessive abrasion or wear, or a hose is cut, it
must be replaced prior to the outdoor cooking gas appliance being put into operation.
The replacement hose assembly shall be that specified by the manufacturer.
•Check the proper mounting of the LP cylinders. See section under `LP CYLINDERS`.
•Perform the mandatory leak test, see section under `LEAK TEST`, before the first use of
the grill, after storing the grill for a long time, after transporting the grill and after filling the
LP tanks.
•Check and clean the burner venturi tubes periodically.
•Check to make sure the control knobs are at the ‘OFF’ position by turning
clockwise until a positive stop is felt before turning on the gas supply at the LP
cylinders.
5
LIGHTING PROCEDURES
If the burner flame goes out while the grill is operating, always turn gas control knobs
to the `OFF` position by turning clockwise until a positive stop is felt and wait 5
minutes before attempting to re-light the grill.
Read the safety instructions in previous sections before lighting.
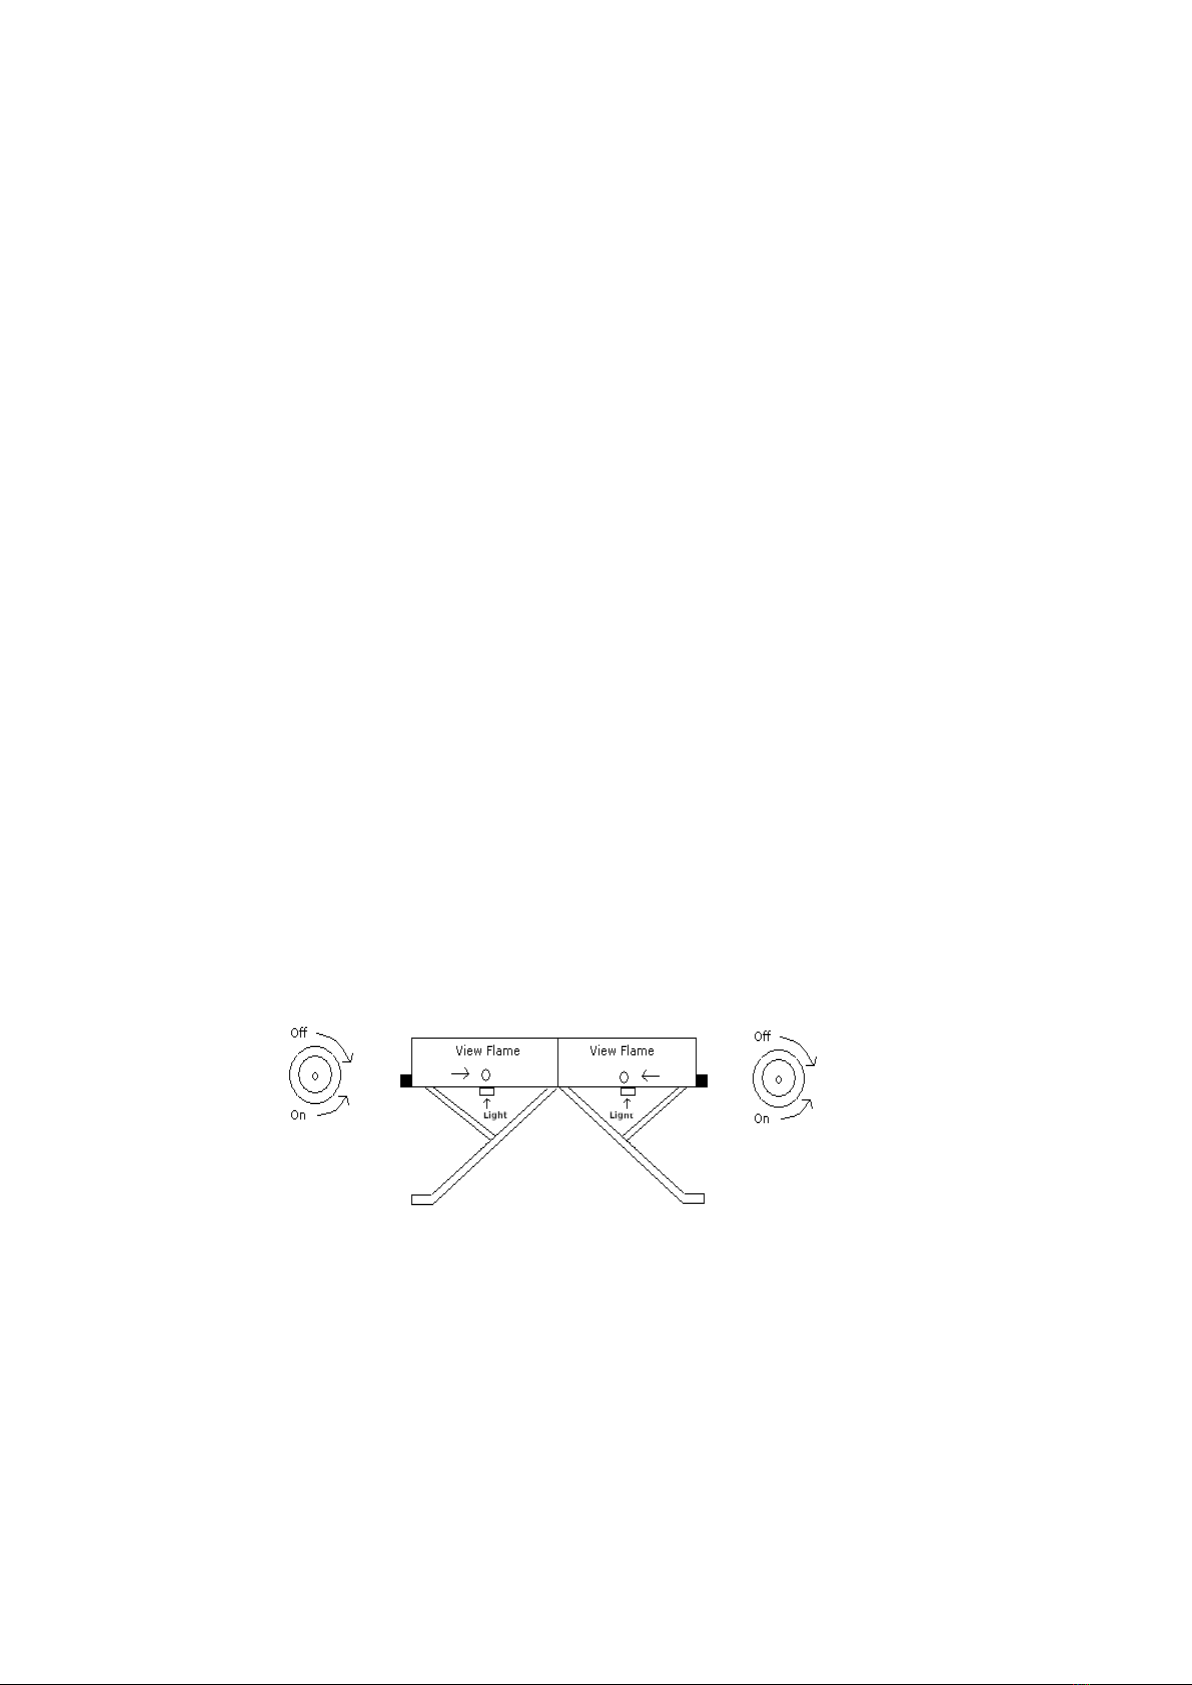
•Turn both control knobs to the `OFF` position by turning clockwise until a positive stop is
felt. See the picture representation below.
•Turn one LP tank gas valve completely counter-clockwise to open gas supply to one side
of the grill.
•Light one side of the grill at a time.
•Immediately place a lighted match through one lighting hole underneath the center of the
grill. There are two lighting holes. Make sure to place the match at right hole, nearest the
control in use.
•If burner fails to light, turn control knob to `OFF` position by turning clockwise until a
positive stop is felt and wait 5 minutes for unburned gases to clear before attempting to
light grill again.
Forcing control knobs will damage valves.

6
WHILE OPERATING THE GRILL
•DO NOT move the grill.
•DO NOT leave the grill unattended
•DO NOT obstruct the flow of combustion and ventilation air.
•Keep any electrical supply cord and the fuel supply hoses away from any heated
surfaces.
•Keep area around the grill clean and clear of debris, combustible materials, gasoline and
other flammable vapours and liquids.
•Turn off the gas at the supply cylinders while not actually in use.
CARE AND MAINTENANCE
•Inspect the grill regularly to make sure that all parts are functioning properly.
•Visually check the burner flames, using the pictorial representation at ‘LIGHTING
PROCEDURES’. If the flames are not steady with blue body and yellow tips and
continuous along both sides of each burner, TURN OFF at the LP-gas tank and consult a
gas engineer.
•Replace all broken or worn parts.
•Burn-off grease build-up by operating the grill at maximum heat setting for 15 minutes at
the end of each use. This will substantially extend the life of your grill.
•Empty or replace grease drip can at the end of each use.
•Clean the grill body, handles and legs with mild detergent.
•Check and remove any dust, debris or spider webs from the burner venturi.
•Inspect the hose. If it is evident there is excessive abrasion or wear, or a hose is cut, it
must be replaced immediately. The replacement hose assembly must be that specified
by the manufacturer. Refer to the last page of this manual.
•Light the appliance, after reading the LIGHTING PROCEDURES section of these
instructions. The burners should light immediately, and be viewed from both sides to
exhibit blue flames with occasional yellow tips. These should extend along the full length
of the single burner in each fire box.
•Replacement parts are available from the manufacturer, through your distributor. Refer to
the contact details on the last page if experiencing difficulty.
STORAGE
•Disconnect the LP cylinders from the grill when not in use and store the LP cylinders as
instructed by labels located on the cylinder. DO NOT store the LP cylinders in an
enclosed area and NOT within the reach of children.
•Complete the procedures in `CARE AND MAINTENANCE` before storage.
•Store the grill in a clean and dry location.

7
MANUFACTURER`S LIMITED WARRANTY
Limited warranty is extended to the original purchaser of the grill. To make a warranty claim
the customer must show proof of purchase.
Stainless steel grill body and support legs are warranted to be free of defects in material and
workmanship under normal use for a period of two years from the date of purchase.
The burners are warranted to be free of defects in material and workmanship under normal
use for life.
The finish and other components of the grill are warranted to be free of defects in material
and workmanship under normal use for a period of two years from the date of purchase.
This warranty does not cover any failure due to abuse, misuse, alteration, improper
assembly, improper installation, improper maintenance or improper storage.
This warranty gives specific legal rights and you may have other rights which vary from state
to state.
CINDERS BARBECUES LIMITED
BENTHAM INDUSTRIAL ESTATE
HIGH BENTHAM
LANCASTER
LA2 7NB
ENGLAND
Tele from USA : 011 44 15242 62900
Fax from USA : 011 44 15242 62955
Email: info@cindersbarbecues.com
United States Office
CINDERS SLIMFOLD LLC
1990 MAIN STREET, STE 750
SARASOTA, FL 34236
PHONE: 941-309-5307
FAX: 941-309-5147
E-MAIL: in[email protected]
TOLLFREE: 1-877-426-2900
Table of contents
Other Cinders Grill manuals


Popular Grill manuals by other brands


Yoder Smokers
Yoder Smokers YS 480 Operation instructions

Küchenprofi
Küchenprofi LUZERN 2133002800 Operating and care instructions

George Foreman
George Foreman The Next Grilleration Super Champ GRP3 Use and care book

Nexgrill
Nexgrill 720-0441-LP Assembly & operating instructions

Bull
Bull Bison Premium 88787 Assembly & operating instructions

RUSTA
RUSTA Kolgrill manual


