CIRCLE FITNESS E7 User manual


1
TABLE OF CONTENTS
TABLE OF CONTENTS ------------------------------------------------------------------ 1
SAFETY PRECAUTIONS -------------------------------------------------------------- 2
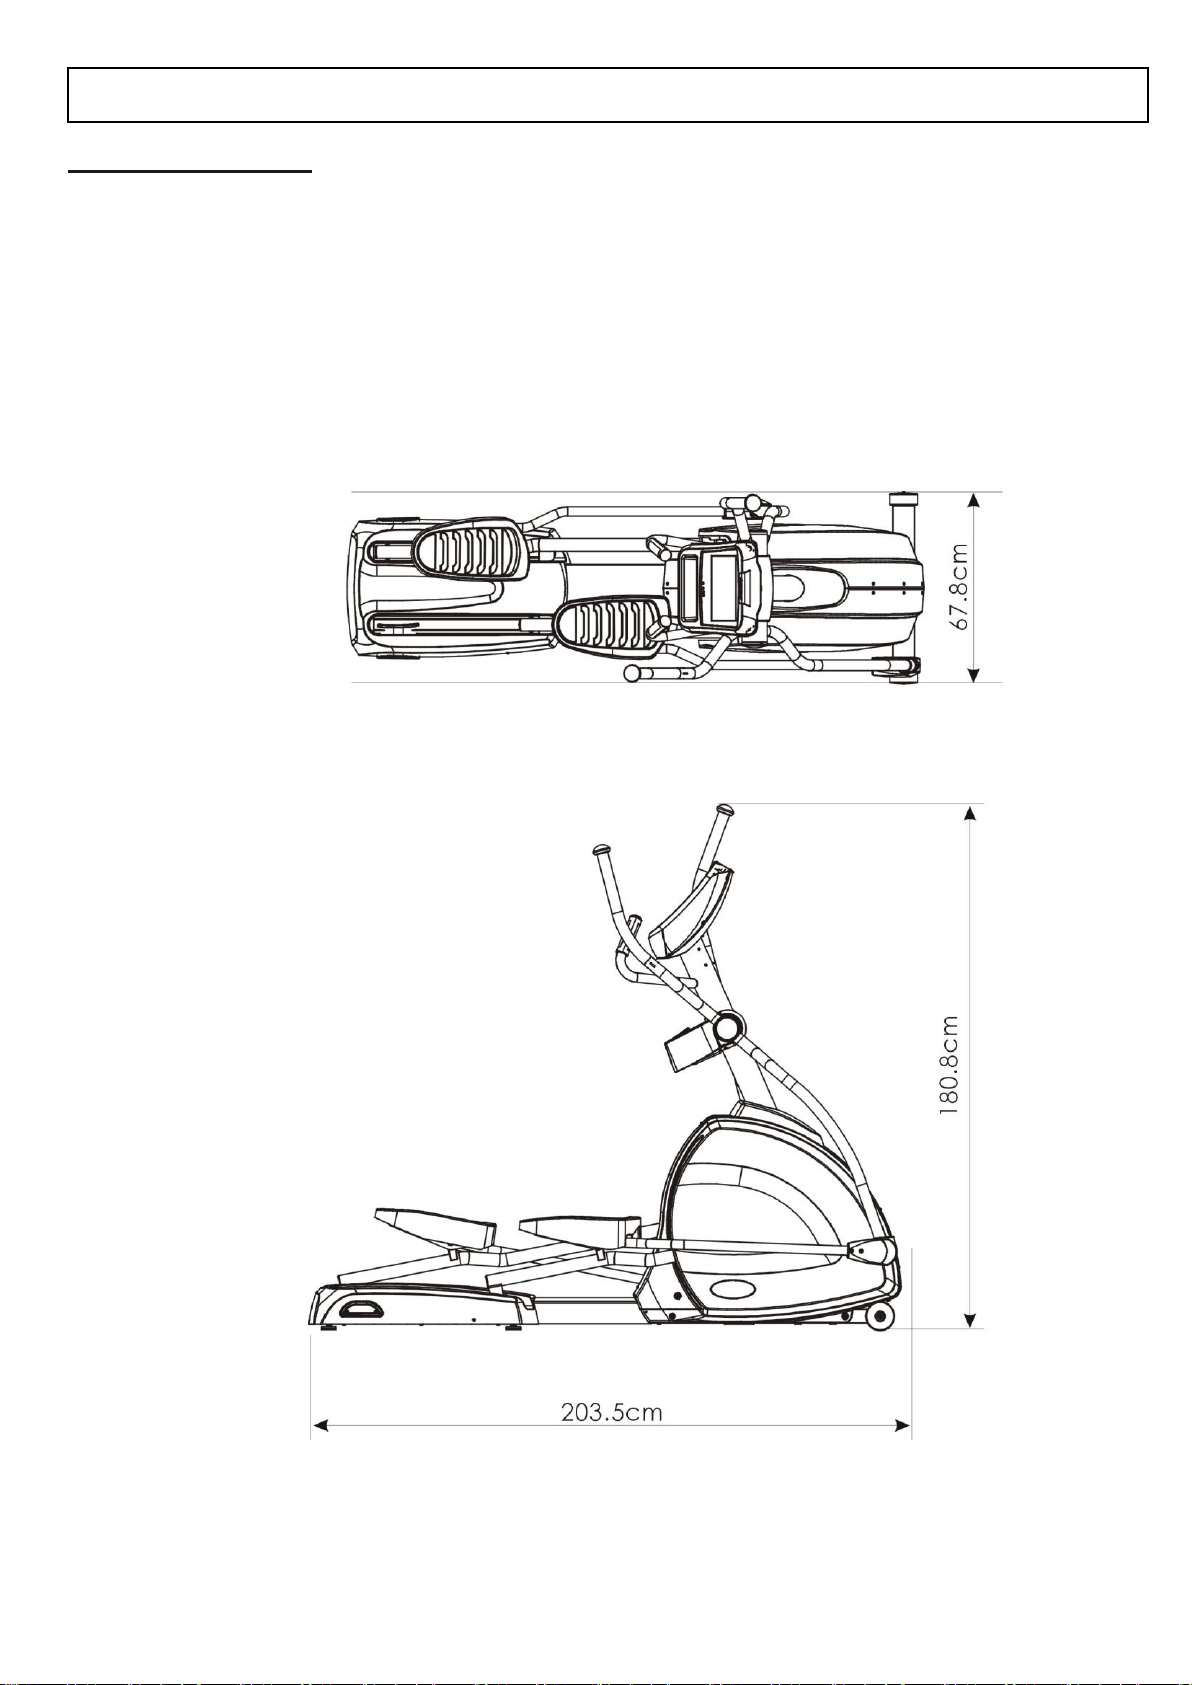
TECHNICAL SPECIFICATIONS ----------------------------------------------------- 3
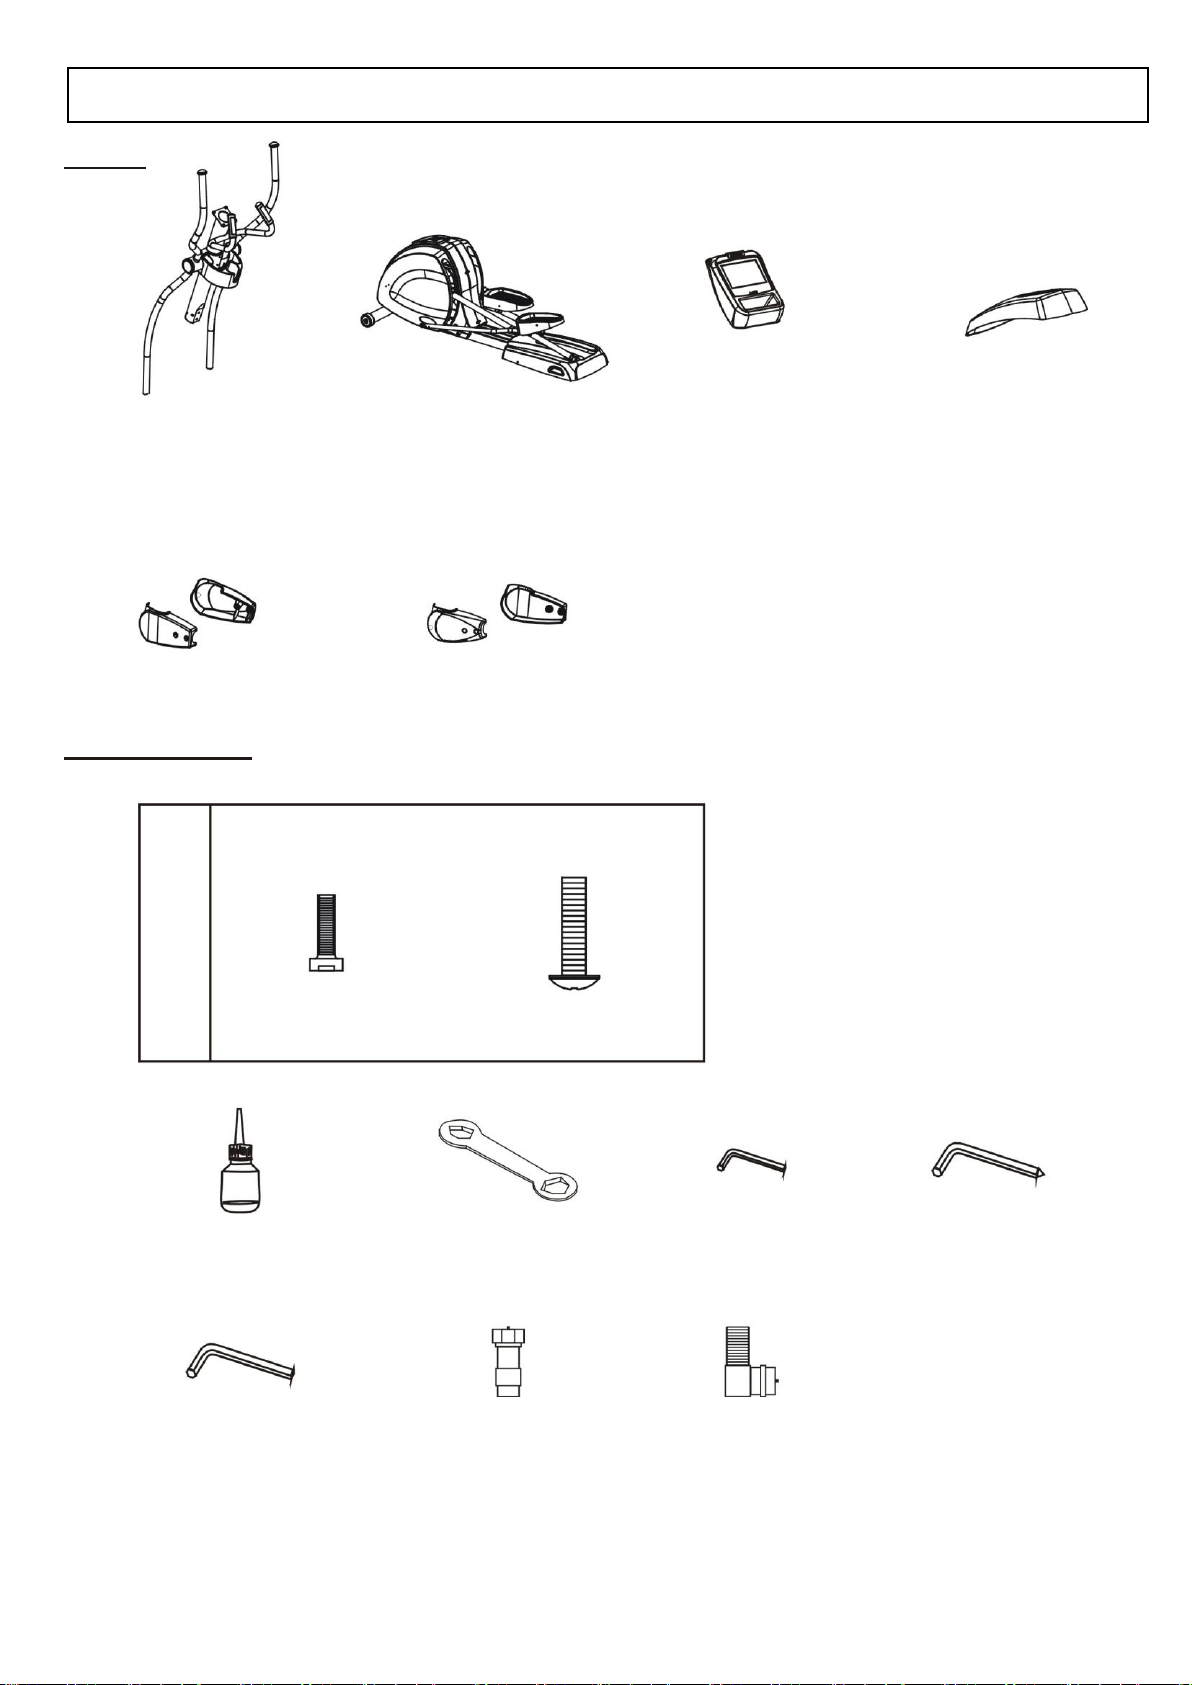
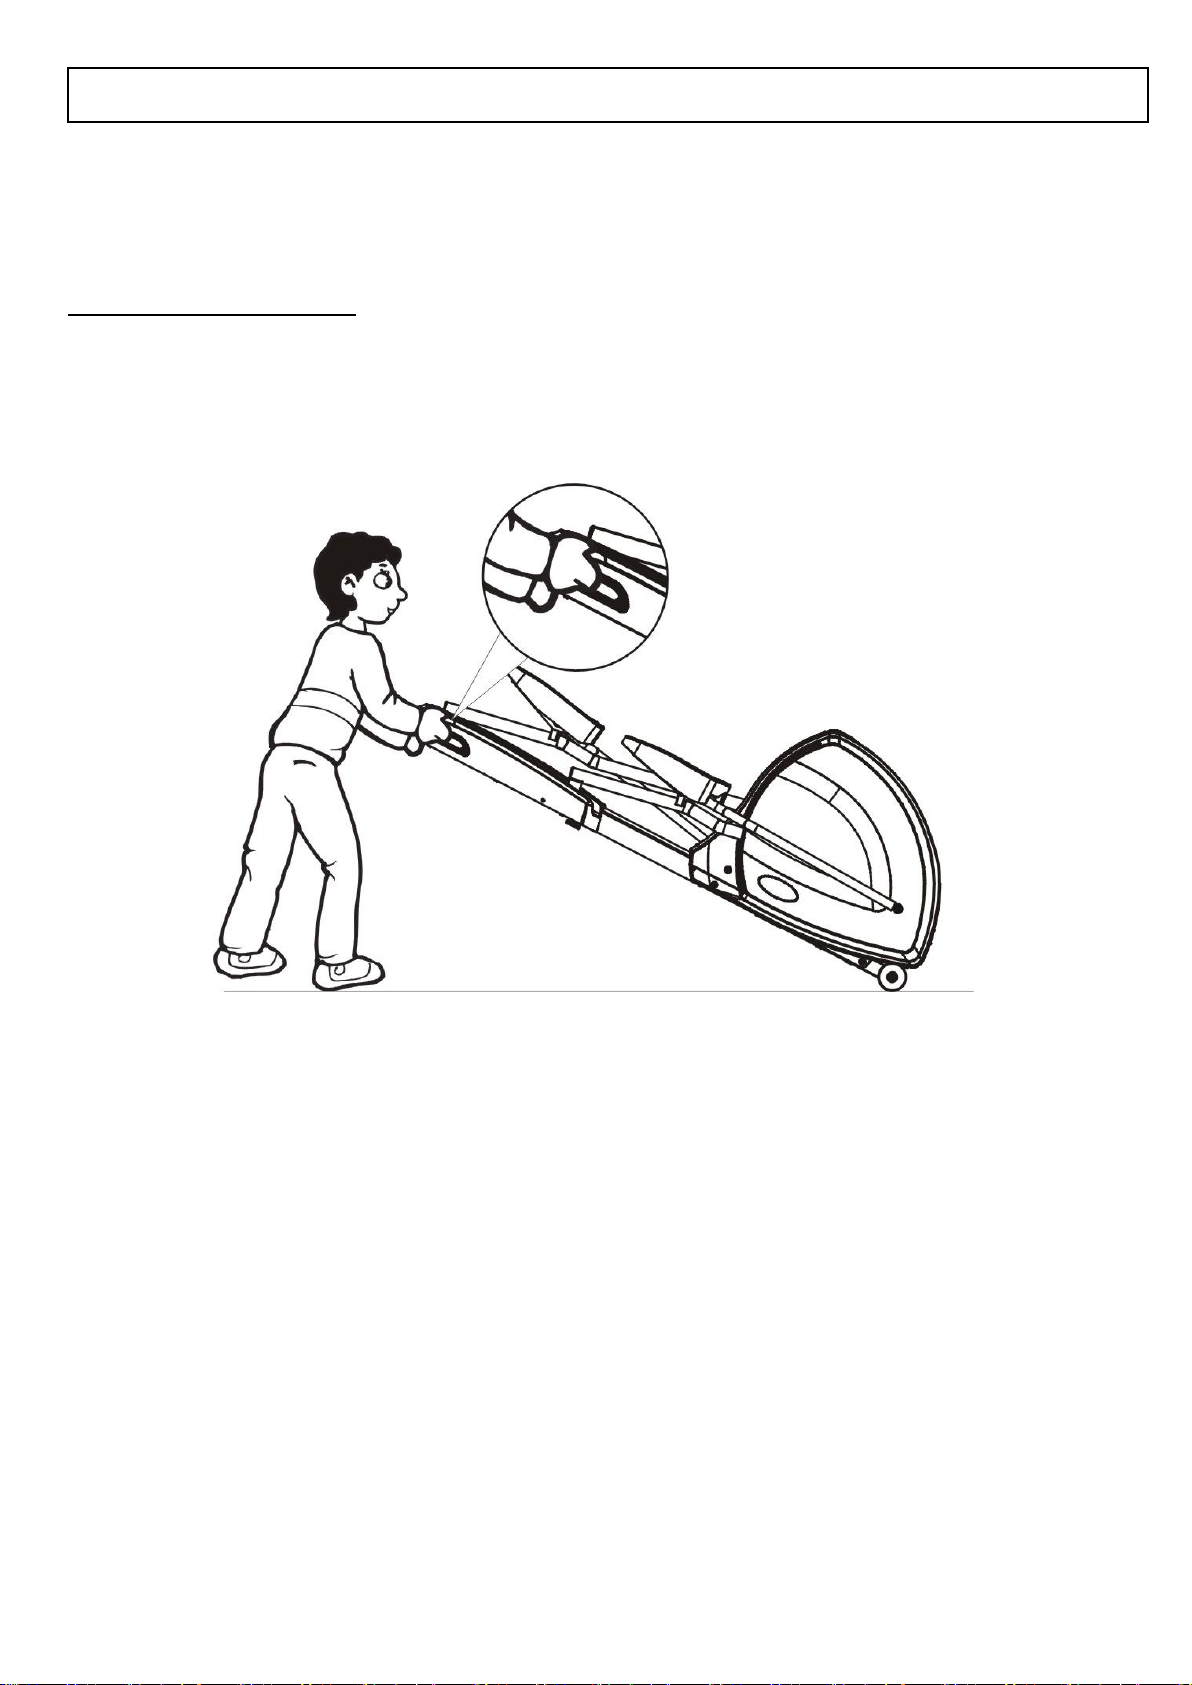
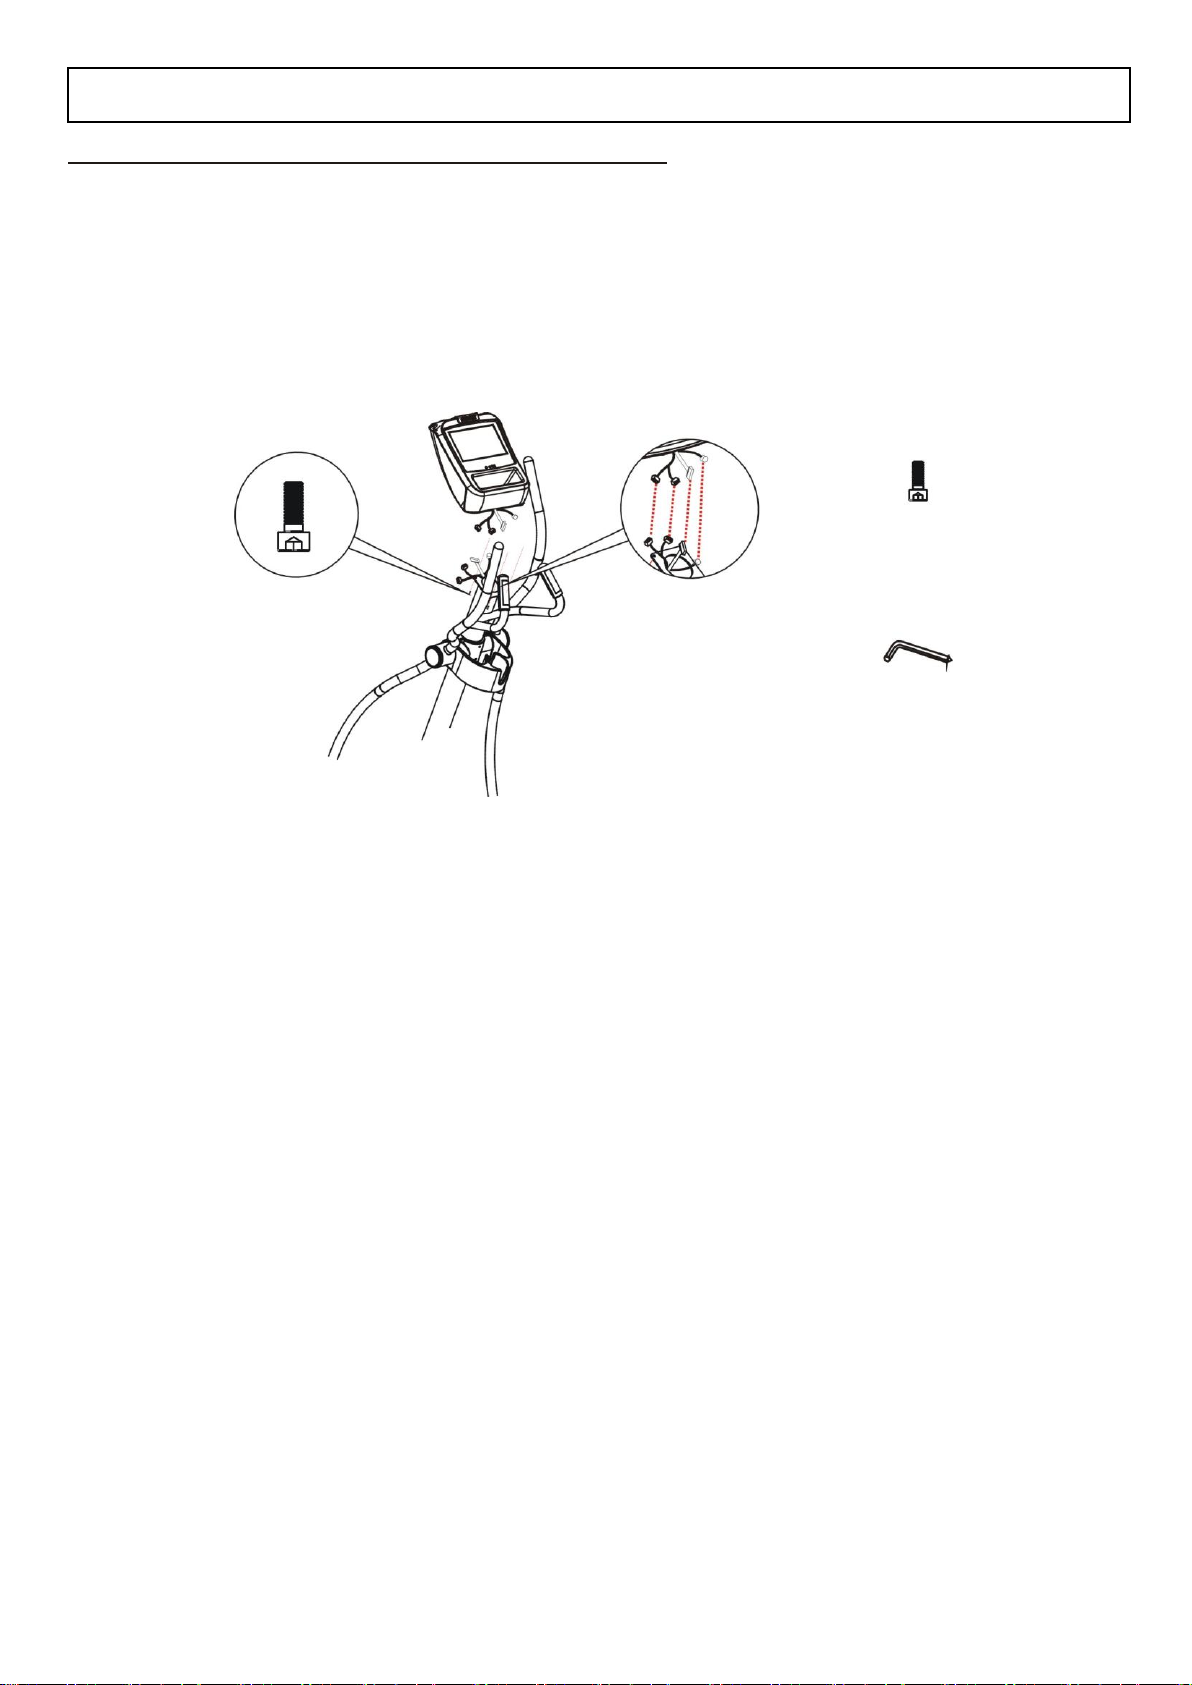
UNPACKING & ASSEMBLY ---------------------------------------------------------- 4-9
WARM UP & COOL DOWN ----------------------------------------------------------- 10
PANEL CONTROL ----------------------------------------------------------------------- 11
PROGRAM --------------------------------------------------------------------------------- 12-14
HOW TO USE THE TRAINER ---------------------------------------------------------- 15-16
OPERATION ------------------------------------------------------------------------------- 17
PREVENTATIVE MAINTENANCE --------------------------------------------------- 18-19
Hint of how to dispose
Do not dispose of electrical appliances as unsorted municipal waste, use separate collection
facilities.
Contact your local government for information regarding the collection systems available.
If electrical appliances are disposed of in landfills or dumps, hazardous substances can leak into the
groundwater and get into the food chain, damaging your health and well-being.
When replacing old appliances with new once, the retailer is legally obligated to take back your old
appliance for disposal at least for free of charge.
Descriptions & Specifications:
This Elliptical trainer is built in compliance with EN 957-9: 2003 with maximum permissible user’s weight of 182 kg
and classified as SA and equipped with speed dependent braking system.
This training equipment is a stationary exercise machine used to simulate walking or running without causing
excessive pressure to the joints, hence decreasing the risk of impact injuries.
Elliptical trainers offer a non-impact cardiovascular workout that can vary from light to high intensity based on the
resistance preference set by the user. It will work the your upper and lower body and increase cardio capacity and
maintain fitness of your body also.
Before beginning any exercise program, consult your doctor.
This is especially important for people aged over 35 or who have previously had health problems, and those who
have not done any sport for a number of years.
Remark:
1. The classification of SA means this elliptical trainer is designed for studio use and with good accuracy
class, the variations of power consuming are within ±5W up to 50W and ±10% over 50W.
2. The braking resistance level is adjustable by the controller; the power consumption is dependent on
the pedaling speed.

2
SAFETY PRECAUTIONS
WARNING:
Read all instructions in this manual before use and keep this user’s manual for entire life of this
product for further reference.
WARNING:
It is owner’s responsibility to ensure that all users of this elliptical trainer are adequately informed
about all safety precautions before use. Use the elliptical trainer only as described in this manual.
WARNING:
Consult your physician before beginning any exercise program.
WARNING:
Do not to use if you feel dizzy or have an acute cold or fever.
WARNING:
To reduce the risk of serious injury, read the following safety precautions before using the
exercise elliptical.
WARNING:
Keep children under the age of 14 and pets away this trainer at all times. Before the training starts,
remove all objects within a radius of 2 meters from the machine.
WARNING:
Never insert objects into any opening in the exercise elliptical. If an object should drop inside,
carefully retrieve it.
WARNING:
Close supervision is necessary when this exercise elliptical is being used by or near children, or
disabled persons.
WARNING:
Warning up exercise is necessary before you start your training.
WARNING:
Your health could be impaired by incorrect or excessive trainings. If you feel pain or dizziness
while exercising, stop immediately and cool down then consult a doctor before beginning a
planned training program.
WARNING:
The pulse sensor is not a medical device. Various factors including the user’s movement, may
affect the accuracy of the heart rate readings. The Pulse sensor is intended only as an exercise
aid in determining heart rate rends in general.
WARNING:
Wear appropriate exercise clothing and when using the trainer. Do not wear loose clothing that
could be caught by this trainer.
WARNING:
Assemble the machine exactly as described in the installation instructions and use the enclosed
parts contained in the parts& tool kits.
WARNING:
Keep the exercise elliptical indoors, away from moisture and dust. Place the exercise elliptical
on a stable & level surface, with a mat beneath it to protect the floor or carpet. Make sure that
there is enough clearance around the exercise elliptical to mount, dismount, and use it.
WARNING:
Inspect and properly tighten all parts regularly and. If any damages were found, keep the
equipment out of use until repair and call our service center or the retailer for further helps.
WARNING:
Always follow the console instructions for proper operation
WARNING:
When mounting and dismounting the exercise elliptical, always hold the handlebars tightly when
the elliptical trainer comes to rest then get off the pedal platform that is in the lowest position and
land on the floor.
WARNING:
When you stop exercising, allow the pedals to slowly come to a stop.
WARNING:
Allow only one person at a time on your machine.

3
TECHNICAL SPECIFICATIONS
SPECIFICATIONS:
Length: 203.5 cm
Width: 67.8cm
Weight of product:117.2kg
Program:Quick start, 3 HRC, constant watt, constant RPM, random, hill, manual.
Standard features: 10.1”digital TFT LCD
Resistance System:AC powered
Stride Length:502 mm

4
UNPACKING & ASSEMBLY
HARDWARE KIT
Handle bar set
Housing
Console set
Allen wrench / 1pcs
(3mm)
Console frame cover
PARTS
M4*12mm / 8pcs
(Left / right cover)
Allen wrench / 1pcs
(5mm)
Allen wrench / 1pcs
(6mm)
#5-3
#5-5
#5-11
#5-12
Left cover, right arm
Right cover, right arm
Left cover, left arm
Right cover, left arm
#5-14
#5-15
M3*30mm / 2pcs
(Left / right cover)
#5-4
1pcs
1pcs
1pcss
(PAL system connector)
Optional
#5-7
Cable Connector
/1pcs
Step6

5
UNPACKING & ASSEMBLY
TO avoid components damage, please unpacking carton carefully, we suggest you to put a pad on
the floor before you put the elliptical down.
NOTE! It might need 2~3 persons to assembly!
Step1 Move the Elliptical.
Please grab the grip back of the Elliptical and raise it up carefully, you may depend on the pair of the
rollers to move it to the position you want.

6
UNPACKING & ASSEMBLY
Step2. Assembly Console frame cover.
1).Assemble Console frame cover on the handle bar set according to instruction.
Step3.Diassemble pre-lock screws.
1).Use Allen wrench (6mm) to take off 2 screws (M8*100mm)、2 screws (M8*110mm)、4 S washers
(M8)、4 washers (M8) on the main frame.
X1
#5-5
Allen wrench
(6mm)

7
UNPACKING & ASSEMBLY
Step4.
1).Connect the console wire.
2). Use Allen wrench (6mm) to lock on 2 screws (M8*100mm) 、2 screws (M8*110mm) 、4 S
washers (M8) 、4 washers (M8) for making the main frame fix to console handle set.
M8*110mm
X2
M8 Washer
X4
M8*100mm
X2
X4
M8*100mm
M8*110mm
#5-13
#5-6
#5-10
#5-16
M8 S Washer
Allen wrench
(6mm)

8
UNPACKING & ASSEMBLY
Step5. Assembly Handle arm on the Pedal linkage.
1).Take off the pre-lock screws.
2).Use 2x M8*23mm screws, M8 washer and M8*16mm screws to fasten Handle arm and Pedal
linkage.
M8*23mm
X2
M8
X2
M8*16mm
X2
Step 6. Assembly Left / right cover on the Pedal Linkage.
1).Assemble right/left arm cover with pedal arm.
2).You may push the pedal to the front of Elliptical for making lock the housing easier.
3).Fasten 4pcs M4*12mm screws on left/right arm cover by 5mm wrench.
4).Fasten 1pcs M3*30mm screw on left/right arm cover by 3mm wrench.
#5-8
#5-17
#5-9
#5-7
M4*12mm
X8
#5-4
M3*30mm
X2
#5-11
#5-12
X1set
#5-14
#5-15
X1set
M4x12mm
M3x30mm
Allen wrench
(6mm)
Allen wrench
(5mm)
Allen wrench
(2mm)
Allen wrench
(5mm)

9
UNPACKING & ASSEMBLY
Step 7. Assembly Console set on the Handle bar set.
1).Connect upper and lower console wire and hand pulse wire.
2).Connect the lower CABLE wire.
3).Fasten console set and handle bar set by 4x M6*15mm screws.
M6*15mm
X4
#5-18
Allen wrench
(5mm)

10
WARM UP & COOL DOWN
A successful exercise program consists of a warm up, aerobic exercise and a cool down. Warming
up is an important part of your workout, and should begin every session. It prepares your body for
more strenuous exercise by heating up and stretching out your muscles. At the end of your workout,
repeat these exercises to reduce sore muscle problems. We suggest the following warm-up and
cool-down exercises:
HEAD ROLLS
Rotate your head to the right for one count, feeling the stretch up the left side of
your neck. Next rotate your head back for one count, stretching your chin to the
ceiling and letting your mouth open. Rotate your head to the left for one count, and
finally, drop your head to your chest for one count.
Repeat this action for several times.
SHOULDER LIFTS
Lift your right shoulder up
toward your ear for one count.
Then lift your left shoulder up
for one count as you lower
your right shoulder.
Repeat this action for several times.
SIDE STRETCHES
Open your arms to the side and
continue lifting them until they
are over your head. Reach your
right arm as far upward toward
the ceiling as you can for one
count. Feel the stretch up your
right side. Repeat this action with
your left arm.
INNER THIGH STRETCH
Sit with the soles of your feet
together with your knees pointing
outward. Pull your feet as close
into your groin as possible. Gently
push your knees toward the floor.
Hold for 15 seconds.
Repeat this action 3-5 times.
HAMSTRING STRETCHES
Keep your right leg straight and the left foot on the floor; try to stretch your right
hand toward the toe, hold this posture for 15 seconds.
Relax, then repeat the action for left leg.
QUADRICEPS STRETCH
With one hand against a wall for
balance, reach behind you and
pull your right foot up. Bring your
heel as close to your buttocks as
possible. Hold for 15 seconds and
repeat with left foot up.
CALF/ACHILLES STRETCH
Step your right foot in front of your
body. Lean against a wall with
your arms and stretch your left foot
backward your body. Bend
forwards your right foot, and
slightly push your buttock toward
to the wall for 15 seconds.
Repeat the action with front left
foot and rear right foot for another
15 seconds.
TOE TOUCHES
Slowly bend forward from
your waist, letting your back
and shoulder relax as you
stretch toward your toes.
Reach down as far as you
can and hold for 15 seconds.

11
PANEL CONTROL
Display
Function
Time
The amount of time remaining in your workout.
Distance
An estimate of your walking or running distance for a comparable amount of
calories expended.
RPM
Your pedal cadence.
Heart Rate
In beats per minute (bpm).
Watts
The amount of mechanical power the elliptical is receiving from your
exercise.
This is not the same as the amount of power your body is using, since the
average person is only about 20% efficient at generating mechanical power.
Mets
Your METS rate.
Calories
An estimate of your calories burned. This doesn't include your basal
metabolic rate, which is about 72 calories per hour for a 150-pound person.
Level
Workload Level.
Buttons
Function
▲or ▼
Adjust workload up and down. Adjust value when program setting.
Select program.
Stop
Stop a workout. Hold it 3 seconds for reset.
Pause
To pause the elliptical while exercising.
Go
Start a workout.Hold it 3 seconds for reset.

12
PROGRAM
1. Quick Start:
1.1. Press Quick Start to start exercise.
1.2. Resistance level starts from level 4, you can press level adjust keys to change exercise level.
2. Heart Rate Control:
2.1. Press 【Heart Rate Control】to enter the program.
2.2. Set Target HR / Time / Weight then press OK to begin workout.
2.3. Begin workout:
2.3.1. Execute the warm up program first for 3 minutes, press Skip can starting workout right
away.
2.3.2. During the program, program will change the level to make your heart rate to reach
the set heart rate. You can press Target Up or Target Down key to change the level.
2.3.3. The program will end when the time counter reaches 0, then enter cool down.
3. Constant Watts:
3.1. Press 【Constant Watts】to enter the program.
3.2. Set Target Watts / Time / Weight then press OK to begin workout.
3.3. Begin workout:
3.3.1. During the program, program will change the level to make your watts to reach the set
watts. You can press Target Up or Target Down key to change the watts setting.
3.3.2. The program will end when the time counter reaches 0, then enter idle mode.
4. Constant RPM:
4.1. Press 【Constant RPM】to enter the program.
4.2. Set Target RPM / Time / Weight then press OK to begin workout.
4.3. Begin workout:
4.3.1. During the program, program will change the level to make your RPM to reach the set
RPM. You can press Target Up or Target Down key to change the RPM setting.
4.3.2. The program will end when the time counter reaches 0, then enter idle mode.

13
PROGRAM
5. Random:
5.1. Press【Random】to enter the program.
5.2. Set Work Level / Time / Weight, press CHANGE LEVEL to change workout profile, press OK
to begin workout.
5.3. Begin workout:
5.3.1. Level will change automatically according to the profile; you can press Level Up or
Level Down to change the exercise level.
5.3.2. The program will end when the time counter reaches 0, then enter idle mode.
6. Hill:
6.1. Press【Hill】to enter the program.
6.2. Set Work Level / Time / Weight, press CHANGE LEVEL to change workout profile, press OK
to begin workout.
6.3. Begin workout:
6.3.1. Level will change automatically according to the profile; you can press Level Up or
Level Down to change the exercise level.
6.3.2. The program will end when the time counter reaches 0, then enter idle mode.
7. Manual:
7.1. Press 【Manual】to enter the program.
7.2. Set Work Level / Time / Weight, press OK to begin workout.
7.3. Begin workout:
7.3.1. You can press Level Up or Level Down to change the exercise level.
7.3.2. The program will end when the time counter reaches 0, then enter idle mode.
8. DTV settings:must be set before use the DTV function.
8.1. Press logo for 5 seconds to enter setting page.
8.2.Press DTV Config key to enter Config page then press Menu.
8.3. Press ▲/▼ to select System Setting then press OK.
8.4. Press ▲/▼ to select Regional Setting then press OK.
8.5. Press ▲/▼ to select Country then press OK will back to Regional Setting page.
8.6. Press BACK to forward page.
8.7. Press ▲/▼ to select Program Search then press OK.
8.8. Select Automatic Search then press OK and wait, system will be searching DTV program
automatically.
8.9. Press SAVE then press EXIT to exit.
8.10. Press Back Menu to finish the settings and back to idle mode.

14
PROGRAMS
Target Heart Rate Chart
Please consult your physician to find your optimal heart rate and Watt setting
MOVING
Increased Performance Range
Aerobic Training Range
Weight Loss Training Range

15
HOW TO USE THE TRAINER
How to Mount and Dismount the Trainer
# Hold swing bars & step forward:
# Hold swing bars & step backward.

16
HOW TO USE THE TRAINER
# Hold handlebars on post & step forward
# Hold handlebars on post & step backward

17
OPERATION
1.
.
Using headphone
Caution! To protect your hearing, avoid listening at a high volume level for long periods of time.
The console is designed for Standard Stereo Headphone. Before connecting the headphone, be
sure your stereo headphone plug (also called a 3.5mm TRS or tip-ring-sleeve connector) is the
same as the following drawing.
Note: If you don’t plug in the standard stereo headphone, you might hear the noises from your
headphone.
Note:
High speaker volume may interfere with the heart rate accuracy. Please decrease the speaker
volume when you are using the heart rate function.
※Warning: After removing the safety key, wait for 5 seconds to re-insert in.
※Please only use USB saver on this MP3 module, do not use MP3 player on this USB plug.
When use MP3 player, please plug on Audio in jack.
2.
USB Port: Mp3 Player
input. For use with
memory sticks containing
Mp3 music files
Music jack (available
for 2.5”plug)
※For head-sets
Music jack
(available for 2.5”plug)
※Not able for head-sets
The connector available for i-phone 4S, i-phone 4,
i-phone 3GS/i-pod touch generation 1~4.
For i-phone 5/ i-pod touch 5 please connect with a
Lightning to 30-pin Adapter.
TRRS, tip-ring-ring-sleeve connector
Ground
Headphone(R)
Headphone (L)
TRS, tip-ring-sleeve connector
TS, tip-sleeve connector
Tip
Sleeve
Ring

18
PREVENTATIVE MAINTENANCE
HOW TO CARE FOR YOUR ELLIPTICAL
The Safety of the equipment can be maintained only if the equipment is examined regularly for
damage or wear. If maintenance is required, keep the equipment out of use until defective parts are
repaired or replaced.
Pay special attention to parts that are subject to wear as outlined in the Preventative Maintenance
Schedule.
The following preventive maintenance will keep the exercise elliptical operating at peak
performance:
●Locate the exercise elliptical in a cool, dry place.
●Clean the top surface of the pedals regularly.
●Keep the display console free of fingerprints and salt build-up caused by sweat.
●Use a 100% cotton cloth, lightly moistened with water and mild liquid cleaning product, to
clean the exercise elliptical other fabrics, including paper towels, may scratch the surface.
Do not finger to press the selection buttons on the console.
●Clean the housing thoroughly on a regular basis.
NOTE
:
Before use the elliptical, please make sure the Aluminum tracks are cleaned and lubricated, this is
to prevent the damage and noise on tracks when you are exercising.
The exercise elliptical can be wiped clean with a soft cloth and mild detergent. Do not use
abrasives or solvents. To prevent damage to the console, keep liquids away from the console and
keep the console out of direct sunlight.

19
PREVENTATIVE MAINTENANCE
F833711-000-02 EP-7A01D1 10609
Preventative Maintenance Schedule
Follow the schedule below to ensure proper operation of the product.
ITEM
WEEKLY
MONTHLY
BI-ANNUALLY
ANNUALLY
Display Console
C
I
Console Mounting Bolts
I
Accessory Tray
C
I
Frame
C
I
Plastic Covers
C
I
Pedals and Straps
C
I
KEY:C=Clean; I=Inspect
Hand pulse
Before/after running, to put your feet separately on each side rein, then hold the hand grip, so as to
avoid any shaking. If the heart beat is too high or irregular, please have your hands out of the hand
grip until the pulse display returns to " 0 ", then redoing the test.
Don't do this test while running.
Other manuals for E7
6
Table of contents
Other CIRCLE FITNESS Elliptical Trainer manuals