CIRCLE Treviso 3S User manual

Treviso 3S

ACHTUNG: Für späteres Nachlesen unbedingt aufbewahren!
NB: Keep these instructions for future reference!
ATENCIÓN: ¡Guardarlas sin falta para una lectura posterior!
ATTENTION: À conserver absolument pour une consultation ultérieure!
ATTENZIONE: Da conservare per future consultazioni!
LET OP: Bewaar deze handleiding zorgvuldig, opdat u ze ook later nog kunt raadplegen!
UWAGA: Zachowaj koniecznie do późniejszego czytania!
POZOR: Pro pozdější referenci bezpodmínečně uschovat!
ВНИМАНИЕ: Не выбрасывать, сохранить для прочтения в дальнейшем!
FIGYELMEZTETÉS: Őrizze meg ezt a tájékoztatót a jövőbeni hivatkozásokhoz!
UPOZORNENIE: Uschovajte tieto pokyny pre ďalšie použitie! Čuvajte ove upute za buduću upotrebu!
Увага: Зберігайте ці вказівки для подальшого користування!
Bedienungsanleitung - DE (01-03)
Instructions for use - EN (04-06)
Instrucciones de uso - ES (07-09)
Instructions de service - FR (10-12)
Istruzioni per l’uso - IT (13-15)
Gebruikshandleiding - NL (16-18)
Instrukcja obsługi - PL (19-21)
Návod k použití - CZ (22-24)
Инструкция по эксплуатации - RU (25-27)
Használati útmutató - HU (28-30)
Návod na použitie - SK (31-33)
Інструкція з експлуатації - UA (34-36)
1b 1b
2a 2c
3
67
2b
1a
4a
5
4b

9a
10a 10b 10c
10d
8
11
9b

DE - 01
• Sichtfenster im Verdeck
• Rückenlehne 4-fach höhenverstellbar
• 5-Punkt Gurt
• Schutzbügel abnehmbar
• Beinstütze höhenverstellbar
• Vorderrad schwenkbar und feststellbar
• Großer Einkaufskorb
• Geprüft nach EN 1888 : 2012
Pege- und Gebrauchshinweise
• Die zur Herstellung unserer Produkte verwendeten Materialien entsprechen der AZO-Anforderung,
EN71-2 und EN71-3, sowie Lichtechtheit für Bekleidung. Wir raten Ihnen trotzdem das Modell nicht
längere Zeit intensiv der Sonne auszusetzen. Abrieb, Ausbluten der Farben und Verblassen bei starker
Sonneneinstrahlung begründen keinen Reklamationsanspruch. Der Stoffbezug dieses Artikels ist waschbar.
Sie können die Bezüge mit der Hand oder mit der Maschine auf Kaltwäsche (Feinwaschmittel) waschen.
• Ein absoluter Regenschutz für unsere Modelle wird nur durch ein im Handel erhältliches ABC-Design
Regenverdeck erreicht.
• Alle Gestelle unserer Modelle sind nach EN1888 : 2012 getestet und entsprechen dieser. Die beweglichen
Teile müssen, um die Sicherheit Ihres Modells dauerhaft zu erhalten, gelegentlich geölt oder bei Bedarf
nachgenietet werden.
ACHTUNG: Zur Ölung bitte nur Silikon-Öl oder Silikon-Spray verwenden.
• Zur Sicherheit und Werterhaltung Ihres Produkts tragen regelmäßige Pege und Wartung in hohem Maße
bei. Umwelteinüsse, wie Salzgehalt in der Luft, Streusalz oder saurer Regen, sowie falsche Unterbringung
fördern die Korrosion.
• Wir empfehlen eine regelmäßige Pege aller lackierten Teile. In gravierenden Einzelfällen gleich nach der
Verunreinigung die Lackoberäche reinigen.
• Überprüfen Sie von Zeit zu Zeit lockere Teile und Verschlussteile und ziehen Sie sie falls nötig fest.
Sicherheitshinweise
Lesen Sie diese Hinweise sorgfältig vor der Benutzung und bewahren Sie sie auf. Wenn Sie diese Hinweise
nicht beachten, kann die Sicherheit Ihres Kindes beeinträchtigt werden.
ACHTUNG:
• Dieser Wagen ist für Kinder ab einem Alter von 6 Monaten und mit einem Gewicht bis 15 kg bestimmt.
• Das Einkaufsnetz kann bis zu einem Gewicht von 2 kg beladen werden.
• Dieser Wagen ist für die Benutzung eines Kindes konstruiert.
• Verwenden Sie ausschließlich zugelassene Zubehörteile Ihres Herstellers.
• Beim Befahren von Stufen oder Treppen oder falls Ihr Kinderwagen gehoben oder getragen wird, sollten Sie
Ihr Kind grundsätzlich aus dem Wagen nehmen.
• Beim Hineinsetzen und Herausnehmen des Kindes muss die Feststellbremse betätigt sein.
• Dieser Wagen ist für Kinder ab einem Alter von 6 Monaten bis 3 jahre und mit einem Gewicht bis maximal
15 kg bestimmt.
WARNUNG:
• Lassen Sie Ihr Kind nicht unbeaufsichtigt.
• Verwenden Sie einen Sicherheitsgurt, sobald Ihr Kind selbständig sitzen
kann.
• Diese Sitzeinheit ist für Kinder unter 6 Monaten nicht geeignet.
• Am Schieber befestigte Lasten beeinträchtigen die Standfestigkeit des
Wagens.
• Es ist vor Gebrauch zu überprüfen, dass der Kinderwagenaufsatz oder die
Sitzeinheit korrekt eingerastet ist.
• Dieses Erzeugnis ist nicht geeignet zum Joggen oder Skaten.
• Führen Sie keine Veränderungen durch, die die Sicherheit in Frage stellen.
• Halten Sie dieses Produkt vor Feuer und anderen Hitzequellen fern.
• Vergewissern Sie sich, dass Ihr Kind beim Aufklappen und
Zusammenklappen des Wagens außer Reichweite ist, um Verletzungen zu
vermeiden.
• Lassen Sie Ihr Kind nicht mit dem Wagen spielen.
• Verwenden Sie immer das Rückhaltesystem.

DE - 02
Hinweise für den Reklamationsfall
• Natürliche Abnutzungserscheinungen (Verschleiß) und Schäden durch übermäßige Beanspruchung stellen
keinen Reklamationsanspruch dar.
• Schäden, die durch unsachgemäße Verwendung entstehen, stellen keinen Reklamationsanspruch dar.
• Schäden, die durch fehlerhafte Montage oder Inbetriebsetzung entstehen, stellen keinen
Reklamationsanspruch dar.
• Schäden, die durch unsachgemäße Änderungen am Produkt entstehen, stellen keinen Reklamationsanspruch
dar.
• Roststellen die durch fehlende Wartung oder unsachgemäße Behandlung vorkommen können, stellen keinen
Mangel dar.
• Kratzer sind normale Verschleißerscheinungen und stellen keinen Mangel dar.
• Feucht gewordene Textilteile, die nicht getrocknet wurden können schimmeln und stellen keinen
produktionsbedingten Mangel dar.
• Durch Sonneneinstrahlung, Schweißeinuss, Reinigungsmittel, Abrieb oder zu häuges Waschen ist ein
Ausbleichen nicht auszuschließen und somit kein Mangel.
• Abgefahrene Räder sind natürliche Verschleißerscheinungen und stellen keinen Reklamationsanspruch dar.
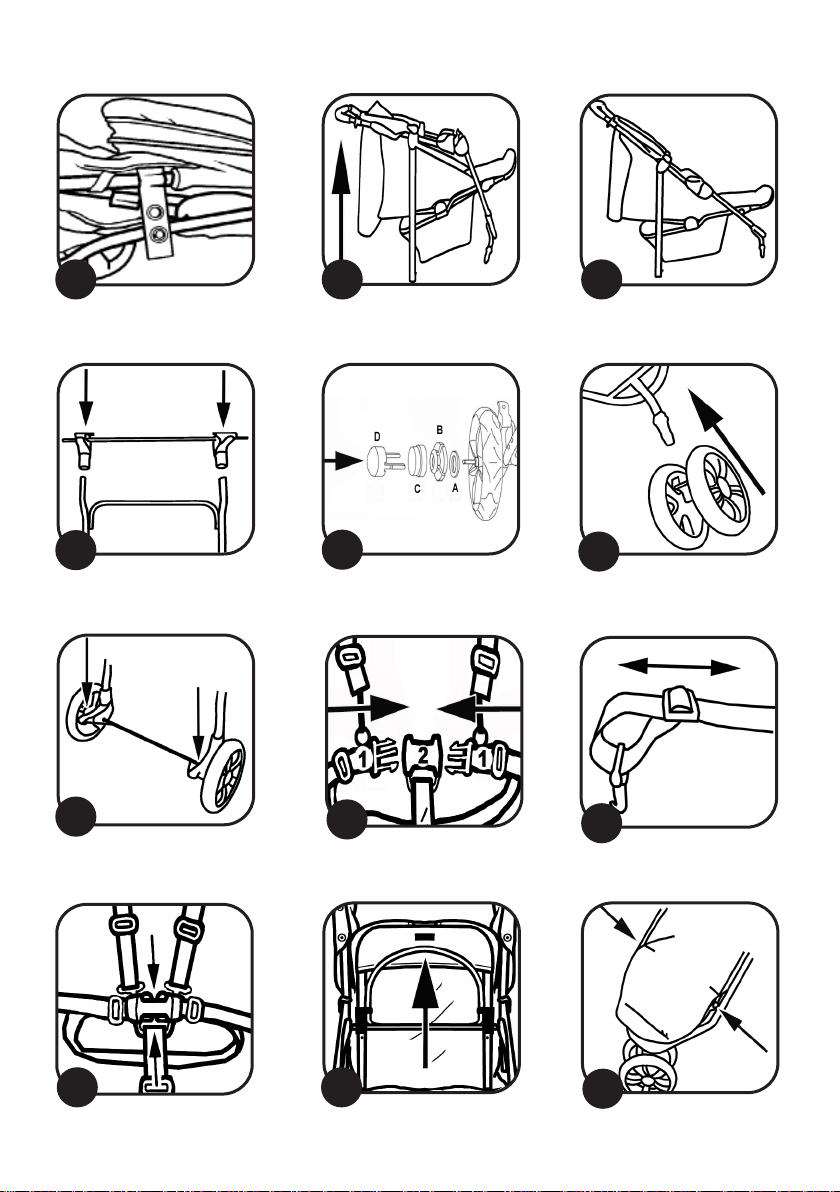
1. Öffnen des Wagens
a. Lösen Sie die Transportsicherung.
b. Klappen Sie den wagen auf.
WARNUNG: Vergewissern Sie sich vor Gebrauch, dass alle Verriegelungen
geschlossen sind.
2. Montage der Räder
a. Stecken Sie die Hinterachse auf das Gestell.
Achtung: Die Bremshebel müssen nach hinten zeigen.
b. Setzen Sie anschließend die Hinterräder auf die Achse.
Schieben Sie die Unterlegscheibe (A) auf die Achse.
Befestigen Sie die Räder mit den Sprengringen (B), drücken Sie die Schutzkappen (C) darüber und
setzten Sie die Radkappen (D) in die Felge ein.
c. Stecken Sie den Vorderradblock auf die Radblockhalterung.
3. Handhabung der Bremsen
Drücken Sie zum feststellen der Bremsen den Hebel nach unten.
Drücken Sie zum lösen der Bremsen den Hebel nach oben.
4. Schließen des Gurtes
Um den Gurt zu schließen, schieben Sie die Schnallen (1) in die Beingurthalterung (2)
Stellen Sie die Gurtverstelleinrichtung so ein, dass das Kind in seiner vorgesehenen Position gehalten wird.
Warnung: Verwenden Sie den Schrittgurt immer in Verbindung mit dem
Beckengurt.
5. Öffnen des Gurtes
Um den Gurt zu öffnen, drücken Sie den Schnallen zusammen und ziehen Sie anschließend den Gurt
auseinander.

DE - 03
6. Verstellen der Rückenlehne
Um die Rückenlehne zu verstellen, ziehen Sie den Bügel an der Rückseite der Rückenlehne nach oben und
verstellen Sie dann die Sitzeinheit in der Höhe. Wenn Sie die gewünschte Position erreicht haben lassen Sie
den Bügel los damit die Position einrastet.
7. Verstellen der Beinstütze
Ziehen Sie die Knöpfe auf beiden Seiten der Beinstütze.
Bringen Sie die Beinstütze in die gewünschte Position und lassen die Knöpfe wieder los, damit sie einrastet.
8. Feststellen und Lösen der Schwenkräder
Drücken Sie den Hebel zum Feststellen der Räder nach unten.
Drücken Sie den Hebel für die Schwenkposition nach oben.
9. Befestigen des Schutzbügels
a. Befestigen Sie die Halterungen am Rahmen des Kinderwagens.
b. Um den Schutzbügel in der Höhe zu verstellen, müssen Sie die beiden seitlichen Knöpfe gedrückt halten
und anschließend den Bügel nach oben oder nach unten drücken.
10. Zusammenklappen des Wagens
a. Drücken Sie zuerst Knopf 1 und halten Sie ihn gedrückt. Danach betätigen Sie Knopf 2 und drücken den
Schieber nach unten bis ein Widerstand spürbar wird.
b. Drücken Sie dann den Hebel nach unten.
c. Klappen Sie den Wagen zusammen indem Sie den Schieber komplett nach unten drücken.
d. Befestigen Sie die Transportsicherung.
11. Anbringen des Verdecks
Befestigen Sie das Verdeck mit den beidem Plastikhalterungen am Sitzrahmen.

EN - 04
• Viewing panel in hood
• Four-height backrest
• Five-point harness
• Detachable guard rail
• Height-adjustable leg rest
• Swivel mode and locked setting on front wheel
• Large shopping basket
• Tested for conformity with EN 1888 : 2012
Care instructions
• The materials used to manufacture our products comply with the AZO requirement, EN71-2 and EN71-3,
and light fastness standards for textiles. Nevertheless, we advise you not to leave the product exposed to
bright sunlight for any length of time. No claims may be made for wear and tear or if the colours fade when
exposed to strong sunlight. The fabric covers on this product can be washed by hand or on a cold cycle in
the washing machine (mild detergent).
• An ABC Design rain canopy is available in retail stores offering complete protection against the rain.
• All the frames on our products have been tested for conformity with EN1888 : 2012 and have met the
required standards. In order to maintain the safety of the product it is necessary to oil the moving parts or
tighten the rivets as and when required.
NB: Please do not use any product for lubrication other than silicone oil or silicone spray lubricant.
• Regular care and upkeep have a major part to play in maintaining the safety and value of the product.
Exposure to such things as salt in the air, road-gritting salt or acid rain will encourage the onset of corrosion,
as will inappropriate storage of the product.
• We recommend regular maintenance of all coated parts. In serious cases of soiling please clean the surface
coating immediately.
• Check for loose parts and fastenings from time to time and tighten if necessary.
Safety instructions
Read these instructions carefully before use and keep them for future reference. Failure to read these
instructions may compromise the safety of your child.
NB:
• This pushchair is designed for children aged 6 months or above and weighing up to 15 kg.
• The net bag can carry up to 2 kg.
• This pushchair is designed to transport a child.
• Do not use any accessories other than those approved by the manufacturer.
• You are advised to take your child out of the pushchair as a matter of principle when negotiating steps or
ights of stairs or if the pushchair needs to be lifted or carried.
• The parking device shall be engaged when placing and removing the child.
• This model is suitable for infants from 6 months to 3 years and up to a maximum weight of 15 kg.
CAUTION:
• Do not leave your child unattended.
• Use a safety harness as soon as your child can sit independently.
• This seat is not suitable for babies under 6 months old.
• Loads attached to the handle affect the stability of the pushchair.
• Before use, check that the pushchair attachment or seat is correctly
engaged in position.
• This product is not suitable for jogging or skating.
• Do not make any modications to the product which compromise its safety.
• Keep this product away from re and other sources of heat.
• To avoid injury ensure that your child is kept away when unfolding and
folding this product.
• Do not let your child play with this product.
• Always use the restraint system.

EN - 05
Customer complaints
• No claims may be made for natural wear and tear or for damage caused by undue demands on the product
or by exceeding the permissible load.
• No claims may be made for damage caused by improper use.
• No claims may be made for damage caused by incorrect assembly or operation.
• No claims may be made for damage caused by improper modications to the product.
• Areas of rust may appear through lack of maintenance or improper care and do not constitute a fault with
the product.
• Scratch marks are normal signs of wear and do not constitute a fault with the product.
• Mildew is likely to appear on textiles which are not dried out after getting wet and cannot be attributed to
shortcomings in production conditions.
• The product may fade if exposed to sunlight, perspiration and detergents, or if subject to abrasion or
excessive washing, therefore fading cannot be attributed to a fault with the product.
• No claims may be made for wheels which become worn out as a natural result of wear and tear.
1. Opening the pushchair
a. Release the transportation lock.
b. Unfold the pushchair.
CAUTION: Ensure that all the catches are engaged before use.
2. Fitting the wheels
a. Fit the rear axle onto the frame.
NB: The brake levers must be pointing rearwards.
b. Place the rear wheels on the axis.
Put the washer (A) onto the axis.
Secure the wheels with the retainers (B), t the protective caps over them (C) and place the wheel caps
(D) in the rim.
c. Fit the front wheel block onto the wheel block tting.
3. Operating the brake
Press the lever down to engage the brake.
Press the lever up to disengage the brake.
4. Fastening the harness
To close the harness, push the clips (1) into the leg harness catch (2).
Adjust the strap to a setting where the baby is held in the correct position.
Caution: Always use the shoulder harness and lap belt together.
5. Unfastening the harness
To open the harness, press the clips inwards and pull the harness apart.
6. Adjusting the backrest
To adjust the backrest, pull the retainer on the rear of the backrest upwards and then adjust the height.
When you have reached the required position, let go of the retainer to allow the backrest to remain in that
position.

EN - 06
7. Adjusting the leg rest
To adjust the leg rest, press in the buttons on both sides and then adjust the height.
Let go of the buttons again so that the leg rest clicks into place.
8. Locking and unlocking the swiveling wheels
Push the lever down to lock the wheels.
Push the lever up to set the wheels in swivel position.
9. Fitting the guard rail
a. Fit the brackets on the pushchair frame.
b. To adjust the height of the guard rail, press and hold down the buttons on each side and push the bar up
or down.
10. Folding the pushchair
a.Hold the button (1) and push the handle knob (2) to unlock the folding mechanism.
b. Then push the lever down.
c. Press the pushbar all the way down to fold the pushchair.
d. Apply the transportation lock.
11. Attaching the hood
Fit the hood on the seat frame with the two plastic brackets.

ES - 07
• Ventanilla con capota
• Respaldo de altura ajustable 4 veces
• Arnés de 5 puntos
• Estribo de protección desmontable
• Reposapiernas de altura ajustable
• Rueda delantera giratoria y bloqueable
• Gran cesta portaobjetos
• homologado según EN 1888 : 2012
Indicaciones de cuidado y de uso
• Los materiales utilizados para la fabricación de nuestros productos cumplen las normas relativas al uso
de colorantes azoicos, EN71-2 y EN71-3, así como la solidez a la luz para revestimientos. No obstante,
aconsejamos no exponer intensivamente el modelo al sol durante un periodo prolongado. Un desgaste por el
roce, sangrado de los colores y una decoloración en caso de irradiación solar no justican una reclamación.
La tapicería de este artículo es lavable. Las fundas se pueden lavar a mano o a máquina en frío (detergente
suave).
• Una protección total contra la lluvia para nuestros modelos se consigue solamente mediante nuestra capota
de ABC-Design que se puede adquirir en el comercio.
• Todos los armazones de nuestros modelos han sido comprobados según EN1888 : 2012 y corresponden
a ella. Para mantener la seguridad de su modelo a largo plazo, se tendrán que engrasar o en caso de
necesidad volver a remachar las piezas movibles.
ATENCIÓN: Para engrasarlas rogamos que utilice solamente aceite o spray de silicona.
• Para mantener la seguridad y el valor de su producto es recomendable un cuidado y mantenimiento
regulares. Las inuencias ambientales tales como el contenido de sal en el aire, sal para esparcir o lluvia
ácida así como guardarlo incorrectamente fomentan la corrosión.
• Recomendamos un cuidado regular de todas las piezas lacadas. En casos individuales agravantes se deberán
limpiar las supercies pintadas justo después de haberse ensuciado.
• Compruebe de vez en cuando las piezas y cierres sueltos y en caso necesario apriételas.
Indicaciones de seguridad
Lea cuidadosamente estas indicaciones antes del uso y guárdelas. La inobservancia de estas instrucciones
puede perjudicar la seguridad de su hijo.
ATENCIÓN:
• Este cochecito está diseñado para niños a partir de una edad de 6 meses y un peso de hasta 15 kg.
• Se puede cargar la bolsa de redecilla hasta un peso de 2 kg.
• Este cochecito está construido para ser usado por un niño.
• Utilice solamente accesorios autorizados por su fabricante.
• Al transitar por escalones o escaleras, o cuando se tiene que levantar o llevar su cochecito para niños, se
debería sacar siempre a su hijo del cochecito.
• El dispositivo de estacionamiento debe estar engranado antes de colocar y sacar al niño del asiento.
• Este cochecito está destinado a niños a partir de 6 meses hasta 3 años de edad y un peso máximo de 15 kg.
ADVERTENCIA:
• No deje a su hijo sin vigilancia.
• Utilice un cinturón de seguridad en cuanto su hijo sepa sentarse por sí
mismo.
• Esta unidad de silla no es adecuada para niños de menos de 6 meses.
• Las cargas colgadas de las empuñaduras perjudican la estabilidad del
cochecito.
• Antes de usarlo se deberá comprobar si el capazo portabebés o la unidad
de silla ha engatillado correctamente.
• Este producto no es adecuado para la práctica del footing o del skating.
• Rogamos que no realice ninguna modicación que pudiera comprometer la
seguridad.
• Mantenga este producto alejado del fuego u otras fuentes de calor.
• Para evitar lesiones, asegúrese de que el niño se mantiene apartado del
proceso de plegado y desplegado del producto.
• No permita que el niño juegue con el producto.
• Siempre use el sistema de retención.

ES - 08
Indicaciones para el caso de reclamación
• La aparición de desgastes naturales (desgaste) y daños por un uso excesivo no representan ningún derecho
a reclamación.
• Los daños causados por un uso inadecuado no representan ningún derecho a reclamación.
• Los daños causados por un montaje o puesta en funcionamiento incorrectos no representan ningún derecho
a reclamación.
• Los daños causados por una modicación inadecuada en el producto no representan ningún derecho a
reclamación.
• Los puntos de oxidación causados por falta de mantenimiento o trato inadecuado no representan ningún
defecto.
• Los arañazos son apariencias de desgaste normales y no representan ningún defecto.
• Las piezas textiles que se han mojado y no han sido secadas pueden cubrirse de moho y no representan un
defecto del producto.
• Por irradiación solar, sudor, productos de limpieza, desgaste por el roce o un lavado frecuente no se puede
excluir un descoloramiento, así que esto no es ningún defecto.
• Los neumáticos desgastados son apariencias de desgaste normales y no representan ningún derecho a
reclamación.
1. Abrir el cochecito
a. Suelte la jación de transporte
b. Abra el cochecito.
ADVERTENCIA: Antes de su uso asegúrese de que todos los enganches
están bien cerrados.
2. Montaje de las ruedas
a. Coloque el eje trasero sobre el armazón.
Atención: Las palancas del freno deben apuntar hacia atrás.
b. Coloque a continuación las ruedas traseras en el eje.
Introduzca la arandela (A) en el eje.
Fije la rueda con el anillo de retención (B), presione la tapa protectora sobre el mismo (C) e inserte la
cubierta de la rueda en la llanta (D).
c. Coloque el bloque de la rueda delantera sobre el dispositivo jador del bloque de la rueda.
3. Apretar y soltar el freno
Para apretar el freno empuje la palanca hacia abajo.
Para soltar el freno empuje la palanca hacia arriba.
4. Cerrar el cinturón
Para cerrar el cinturón introduzca las hebillas (1) en el dispositivo jador del cinturón de piernas (2)
Ajuste el dispositivo de ajuste del cinturón de tal forma para que el niño quede sujeto en su posición
prevista.
Advertencia: Utilice el cinturón de entrepierna siempre junto con el cinturón
de pelvis.

ES - 09
5. Abrir el cinturón
Para abrir el cinturón, presione las hebillas unas contra otras y separe a continuación el cinturón.
6. Ajustar el respaldo
Para ajustar el respaldo Si ha alcanzado la posición deseada, suelte el estribo para que el respaldo engatille
en esta posición.
7. Ajustar el reposapiernas
Para ajustar los reposapiernas se debe presionar los botones de ambos lados hacia dentro y a continuación
ajustar la altura.
A continuación, suelte los botones para que el resposapiernas engatille.
8. Bloquear y soltar las ruedas giratorias
Para bloquear las ruedas delanteras, empuje la palanca hacia abajo.
Empuje la palanca hacia arriba para la posición de giro.
9. Fijar el estribo de protección
a. Fije los dispositivos de sujeción en el armazón del cochecito.
b. Para ajustar la altura del estribo de protección, se deberán mantener pulsados los dos botones laterales,
y a continuación empujar el estribo hacia arriba o abajo.
10. Plegar el cochecito
a. Presione primero el botón 1 y manténgalo presionado. A continuación presione el botón 2 y presione la
empuñadura hacia abajo hasta que note una resistencia.
b. A continuación empuje la palanca hacia abajo.
c. Pliegue el cochecito presionando el manillar completamente hacia abajo.
d. Fije el seguro de transporte.
11) Colocación de la capota
Fije la capota con ambos soportes de plástico en el marco de la silla.

FR - 10
• Fenêtre de vue dans la capote
• 4 réglages du dossier en hauteur
• Ceinture à 5 points
• Barre de protection démontable
• Repose-jambes réglable en hauteur
• Roue avant orientable et xable
• Grand panier de course
• contrôlé selon EN 1888 : 2012
Consignes d’entretien et d’utilisation
• Les matériaux employés pour la fabrication de nos produits satisfont aux exigences des normes AZO, EN71-
2 et EN71-3 ainsi qu’à l’exigence de stabilité à la lumière des revêtements. Nous conseillons malgré tout de
ne pas exposer le modèle au soleil de façon intensive durant une période prolongée. L’abrasion, la déteinte
des couleurs et la décoloration en cas de rayonnement solaire important ne peuvent justier de réclamation.
La housse en tissu de cet article est lavable. Vous pouvez laver les housses soit à la main soit en machine à
froid (lessive pour linge n).
• Nos modèles ne peuvent être protégés ablement contre la pluie qu’avec la capote pour pluie ABC Design
qui est disponible dans le commerce.
• Tous les châssis de nos modèles sont testés selon les normes EN 1888 : 2012 et satisfont aux exigences
de ces dernières. Les éléments mobiles doivent être huilés de temps à autre et les rivets remplacés si
nécessaire an de maintenir durablement la sécurité de votre modèle.
ATTENTION : Veuillez employer uniquement de l’huile silicone ou un spray silicone pour huiler ces éléments.
• Une maintenance et un entretien réguliers contribuent considérablement à la sécurité et au maintien de la
valeur de votre produit. Les inuences atmosphériques, telles qu’atmosphère salée, sel de déneigement ou
encore pluie acide, ainsi qu’une mauvaise mise à l’abri, développent la corrosion.
• Nous recommandons un entretien régulier de toutes les pièces peintes. En cas d’encrassements
particulièrement importants, nettoyer la surface peinte immédiatement.
• Contrôler de temps à temps les pièces de fermeture et autres pour s’assurer qu’elles ne sont pas desserrées
et les resserrer si bien besoin est.
Consignes de sécurité
Veuillez lire cette notice attentivement avant l’utilisation et conservez-la. La non-lecture de cette consigne
peut porter atteinte à la sécurité de votre enfant.
ATTENTION :
• Ce landau est destiné aux enfants de plus de 6 mois et d’un poids jusqu’à 15 kg.
• Le let à provisions peut être chargé d’un poids jusqu’à 2 kg.
• Ce landau a été conçu pour transporter un enfant.
• Employez uniquement les pièces d’accessoires autorisées de votre fabricant.
• Pour monter ou descendre les marches et escaliers ou lorsque votre landau doit être soulevé ou porté, vous
devez toujours sortir l’enfant du landau.
• Assurez-vous que le frein de stationnement est attiré, si vous mettez votre enfant dans la poussette ou si
vous enlevez votre enfant.
• Este cochecito está destinado a niños a partir de 6 meses hasta 3 años de edad y un peso máximo de 15 kg.
AVERTISSEMENT :
• Ne laissez jamais votre enfant sans surveillance.
• Utilisez une ceinture de sécurité dès que votre enfant s’assoit tout seul.
• Cette assise ne convient pas pour les enfants de moins de 6 mois.
• Les charges xées au guidon nuisent à la stabilité du landau.
• S’assurer avant l’utilisation que la nacelle ou le siège soit bien enclenché.
• Ce produit ne convient pas pour faire du jogging ou du roller.
• Veuillez ne procéder à aucune modication susceptible de nuire à la
sécurité.
• Tenez ce produit à l’écart du feu et d’autres sources de chaleur.
•Assurez-vous que votre enfant est hors de portée, si vous ouvrez et repliez
la poussette, pour éviter les blessures.
• Ne laissez pas jouer votre enfant avec la poussette.
• Utilisez toujours l’ensemble de retenue.

FR - 11
Consignes en cas de réclamation
• Les traces d’utilisation naturelles (usure) et les endommagements résultant d’une sollicitation abusive ne
peuvent faire l’objet de réclamation.
• Les endommagements résultant d’un usage non conforme ne peuvent faire l’objet de réclamation.
• Les endommagements résultant d’une mise en service ou d’un montage défectueux ne peuvent faire l’objet
de réclamation.
• Les endommagements résultant d’un usage non conforme ne peuvent faire l’objet de réclamation.
• Les points de rouille dus à un manque éventuel de maintenance ou à une manipulation non conforme ne
sont pas considérés comme des défauts.
• Les rayures sont des traces d’usure normale et ne sont pas considérées comme des défauts.
• Les éléments textiles qui ont pris l’humidité et n’ont pas été séchés ensuite peuvent moisir ; ceci ne peut
pas être considéré comme défaut de production.
• Une décoloration éventuelle due aux rayons du soleil, à l’effet de la sueur, aux produits d’entretien, à
l’abrasion ou à un lavage trop fréquent ne peut pas être exclue et n’est donc pas considérée comme défaut.
• Les roues usées sont des phénomènes d’usure naturelle et ne justient aucun droit de réclamation.
1. Ouverture de la poussette
a. Ouvrez la protection de transport.
b. Dépliez la poussette.
MISE EN GARDE : Assurez-vous avant l’utilisation que tous les verrouillages
sont fermés.
2. Montage des roues
a. Enfoncez l’essieu arrière sur le châssis.
Attention : Les leviers de frein doivent être en arrière.
b. Enfoncez ensuite les roues arrière sur l’essieu.
Placez la rondelle (A) sur l’essieu.
Fixez les roues avec les agrafes (B), placez les capuchons de protection (C) par-dessus et enfoncez les
enjoliveurs (D) dans la jante.
c. Enfoncez le bloc de roues avant dans la xation du bloc de roues.
3. Fixation et desserrage des freins
Pour xer les freins, baissez le levier.
Pour desserrer les freins, levez le levier.
4. Fermeture du harnais
Pour fermer le harnais, enfoncez les boucles (1) dans la boucle de la sangle d’entrejambe (2).
Réglez le harnais de sorte qu’il maintienne l’enfant dans la position prévue.
Mise en garde : Employez la sangle d’entrejambe toujours en combinaison
avec la ceinture ventrale.
5. Ouverture du harnais
Pour ouvrir le harnais, appuyez sur les côtés de la boucle et ouvrez le harnais.

FR - 12
6. Réglage du dossier
Pour régler le dossier, tirez l’anse située au dos du dossier vers le haut et réglez-la en hauteur. Lorsque vous
avez atteint la position souhaitée, lâchez l’anse pour que le dossier s’enclenche dans cette position.
7. Réglage du repose-jambes
Pour régler le repose-jambes, enfoncez les boutons des deux côtés vers l’intérieur, puis régler la hauteur.
Relâchez ensuite les boutons pour que le repose-jambes s’enclenche.
8. Blocage et déblocage des roues pivotantes
Baissez le levier pour xer les roues.
Levez le levier pour la position orientable.
9. Fixation de la barre de protection
a. Fixez les xations au châssis de la poussette.
b. Pour régler la hauteur de l’anse de protection, maintenez les deux boutons latéraux enfoncés et poussez
l’anse vers le haut ou vers le bas.
10. Pliage de la poussette
a. Appuyez d’abord sur le bouton 1 et maintenez-le enfoncé. Appuyez ensuite sur le bouton 2 et poussez le
guidon vers le bas jusqu’à ce que vous sentiez une résistance.
b. Baissez ensuite le levier.
c. Pliez la poussette en rabattant entièrement le guidon vers le bas.
d. Fixez la protection de transport.
11) Montage de la capote
Fixez la capote au châssis du siège avec les deux xations en plastique.

IT - 13
• nestrella sulla capottina
• schienale regolabile in altezza su 4 posizioni
• cintura a 5 punti di ssaggio
• protezione anteriore anticaduta amovibile
• poggiagambe regolabile in altezza
• ruota anteriore piroettante e bloccabile
• ampio cestello porta-spesa
• Omologato EN 1888 : 2012
Istruzioni d’uso e manutenzione
• I materiali utilizzati per la realizzazione dei nostri prodotti sono conformi ai requisiti AZO, EN71-2 e EN71-3
nonché ai requisiti di resistenza alla luce per i capi d’abbigliamento. Vi consigliamo comunque di non esporre
il prodotto ai raggi solari per tempi prolungati. Scolorimenti, alterazioni di colore e sbiadimenti causati da
forte irraggiamento solare non costituiscono giusticato motivo di reclamo. Il rivestimento in tessuto di
questo articolo è lavabile. Potete lavare la fodera a mano o in lavatrice con il programma di lavaggio a freddo
(detersivo per delicati).
• Una protezione sicura contro la pioggia è garantita per i nostri modelli soltanto mediante specica capottina
antipioggia ABC Design reperibile in commercio.
• Tutte le intelaiature dei nostri modelli sono testate e omologate a norma EN1888 : 2012. Per garantire
una lunga durata del vostro passeggino, è necessario oliare e all’occorrenza ribattere di tanto in tanto gli
elementi mobili.
ATTENZIONE: Per oliare, utilizzare esclusivamente olio o spray siliconico.
• Una regolare pulizia e manutenzione del vostro passeggino contribuiscono in modo rilevante a garantirne
la sicurezza e a mantenerlo in buono stato. Gli agenti atmosferici, come il contenuto salino dell’aria, il sale
sparso in inverno sulle strade, le piogge acide e la sistemazione in un luogo non adatto, favoriscono la
corrosione.
• Suggeriamo di pulire regolarmente tutte le parti verniciate. Nei casi più gravi, pulire le superci verniciate
subito dopo che si sono sporcate.
• Di tanto in tanto vericare che non vi siano parti o chiusure allentate, se necessario provvedere a stringerle.
Avvertenze per la sicurezza
Leggete attentamente le seguenti istruzioni prima dell’uso e conservatele per future consultazioni.
L’inosservanza di queste istruzioni può compromettere la sicurezza del vostro bambino.
ATTENZIONE:
• Questo passeggino è idoneo per bambini a partire dall’età di 6 mesi con un peso massimo di 15 kg.
• La rete porta-spesa può essere caricata con un peso massimo di 2 kg.
• Questo passeggino è specicamente costruito per l’utilizzo da parte di un bambino.
• Utilizzate esclusivamente accessori omologati dal produttore.
• Nel salire o scendere gradini o scale o se occorre sollevare o portare a mano il passeggino, è necessario
togliere il bambino dal passeggino.
• Il dispositivo di stazionamento (freno) deve essere inserito durante il posizionamento e la rimozione del
bambino
• Questo modello è idoneo per bambini a partire dall’età di 6 mesi no ai 3 anni e con peso massimo di 15 kg.
AVVERTENZE:
• Non lasciate il vostro bambino incustodito.
• Utilizzate la cintura di sicurezza non appena il vostro bambino è in grado di
stare seduto da solo.
• Questo seggiolino non è adatto per bambini al di sotto dei 6 mesi di età.
• I carichi ssati sul cursore compromettono la stabilità del passeggino.
• Prima dell’uso è necessario vericare che l’alzata o l’unità seggiolino sia
correttamente inseriti e agganciati.
• Questo prodotto non è adatto per praticare jogging o pattinaggio.
• Non apportate modiche che possano compromettere la sicurezza.
• Tenete questo prodotto lontano da amme o da altre fonti di calore.
• Per evitare lesioni assicuratevi che il vostro bambino sia tenuto a debita
distanza quando aprite e/o chiudete questo prodotto
• Non permettete al vostro bambino di giocare con questo prodotto
• Usate sempre le cinture di sicurezza e/o tutti I sistemi in dotazione per
evitare che il bambino fuoriesca dall’apparato.

IT - 14
Informazioni in caso di reclamo
• Naturali segni di usura e danni da eccessiva sollecitazione non costituiscono giusticato motivo di reclamo.
• I danni causati da un uso improprio del prodotto non costituiscono giusticato motivo di reclamo.
• I danni causati da un montaggio o da un primo utilizzo inappropriato del prodotto non costituiscono
giusticato motivo di reclamo.
• I danni causati da modiche improprie al prodotto non costituiscono giusticato motivo di reclamo.
• I punti di ruggine che possono comparire per mancanza di manutenzione o per uso improprio del prodotto,
non costituiscono un difetto.
• Eventuali graf rappresentano normali segni di usura e non costituiscono un difetto.
• Le parti di tessuto bagnate e non opportunamente asciugate, possono essere attaccate da muffe, che non
costituiscono un difetto intrinseco del prodotto.
• In seguito all’esposizione ai raggi solari, all’azione del sudore, all’uso di detergenti, all’usura o ai lavaggi
troppo frequenti non si possono escludere scolorimenti, che pertanto non costituiscono un difetto.
• Il consumo delle ruote è un normale segno di usura e pertanto non costituisce motivo di reclamo.
1. Apertura della carrozzina
a. Togliere la protezione per il trasporto.
b. Aprire la carrozzina.
AVVERTENZA: prima dell’utilizzo, assicurarsi che tutti gli agganci siano
correttamente bloccati.
2. Montaggio delle ruote
a. Inserire l’asse posteriore sul telaio.
Attenzione: la leva del freno deve essere orientata verso la posizione posteriore.
b. Quindi posizionare le ruote posteriori sull‘asse.
Spingere la rondella (A) sull’asse.
Fissare le ruote con gli anelli di arresto (B), applicare i tappi protettivi (C) e inserire i copriruota (D) nei
cerchi.
c. Inserire il blocco ruote anteriori nel relativo supporto.
3. Blocco e sblocco del freno
Per bloccare il freno, spingere la levetta verso il basso.
Per sbloccare il freno, spingere la levetta verso l’alto.
4. Aggancio della cintura
Per agganciare la cintura, inlare le bbie (1) nell’aggancio della cintura centrale (2)
Regolare il dispositivo della cintura in modo tale che il bambino possa essere mantenuto nella posizione
prevista.
Avvertenza: Utilizzare sempre la cintura centrale insieme alla cintura
subaddominale.
5. Sgancio della cintura
Per aprire la cintura di sicurezza, premere le forcelle esterne dell’aggancio e sganciare inne la cintura.

IT - 15
6. Regolazione dello schienale
Per la regolazione dello schienale, tirare verso l’alto la staffa su retro dello schienale e regolare l’altezza. Al
raggiungimento della posizione desiderata, rilasciare la staffa per bloccare lo schienale in posizione.
7. Regolazione del poggiagambe
Per regolare il poggiagambe, premere verso l’interno i pulsanti su entrambi i lati del passeggino e regolare
l’altezza desiderata.
Rilasciare i pulsanti per permettere il bloccaggio in posizione del poggiagambe.
8. Blocco e sblocco delle ruote piroettanti
Spingere verso il basso la levetta per bloccare le ruote.
Spingere verso l’alto la levetta per abilitare il movimento piroettante.
9. Fissaggio della protezione anteriore anticaduta
a. Fissare i supporti al telaio del passeggino.
b. Per regolare in altezza la protezione anteriore anticaduta, è necessario tenere premuti i due pulsanti
laterali ed inne spingere la protezione verso l’alto o verso il basso.
10. Chiusura del passeggino
a. Premere la manopola 1 e tenerla premuta. Poi azionare la manopola 2 e premere il maniglione verso il
basso no a percepire una certa resistenza.
b. In seguito, premere la levetta verso il basso.
c. Chiudere il passeggino premendo il maniglione completamente verso il basso.
d. Fissare la protezione per il trasporto.
11) Montaggio della capottina
Fissare la capottina mediante i due supporti in plastica posti sul telaio del seggiolone.

NL - 16
• Kijkvenster in het dak
• Rugleuning in hoogte verstelbaar (4 standen)
• 5 puntsgordel
• Beschermbeugel afneembaar
• Beensteun in hoogte verstelbaar
• Voorwiel zwenkbaar en vastzetbaar
• Grote boodschappenmand
• Gekeurd volgens EN 1888:2012
Onderhouds- en gebruiksinstructies
• De materialen die voor de vervaardiging van onze producten worden gebruikt, voldoen aan de AZO-
voorschriften, EN 71-2 en EN 71-3, en aan de eisen voor lichtechtheid van bekleding. Toch raden wij u aan
om het model niet gedurende lange tijd aan intensief zonlicht bloot te stellen. Slijtage of het uitlopen en
verbleken van kleuren ten gevolge van sterk zonlicht zijn geen geldige reden tot reclamatie. De stoffen
overtrek van dit artikel is wasbaar. U kunt de overtrek zowel met de hand als in de machine op lage
temperatuur wassen (wasmiddel voor jne was).
• Absolute regenbescherming bieden onze modellen slechts in combinatie met de in de handel verkrijgbare
regenkappen van ABC Design.
• Alle onderstellen van onze modellen zijn getest volgens EN 1888:2012 en goed bevonden. Om de veiligheid
van het model blijvend te garanderen, dienen de beweeglijke onderdelen af en toe te worden geolied en
indien nodig opnieuw te worden vastgeklonken.
LET OP! Gebruik voor het oliën uitsluitend siliconenolie of siliconenspray.
• Een goed en regelmatig onderhoud is bijzonder belangrijk voor de veiligheid en het waardebehoud van uw
product. Milieu-invloeden zoals het zoutgehalte in de lucht, strooizout of zure regen, alsmede een verkeerde
opberging kunnen tot corrosie leiden.
• Wij adviseren een regelmatig onderhoud van alle gelakte onderdelen. In ernstige gevallen dienen de
lakoppervlakken direct na de verontreiniging te worden schoongemaakt.
• Controleer losse en slijtageonderdelen regelmatig en draai ze indien nodig weer vast aan.
Veiligheidsinstructies
Lees deze instructies aandachtig door vóór het gebruik en bewaar de handleiding zorgvuldig. Als u de
instructies niet in acht neemt, kan de veiligheid van uw kind in het gedrang komen.
LET OP!
• Deze wagen is bedoeld voor kinderen vanaf een leeftijd van 6 maanden en met een gewicht tot 15 kg.
• Het boodschappennet kan tot een gewicht van 2 kg worden geladen.
• Deze wagen is gebouwd voor het vervoer van één kind.
• Gebruik uitsluitend goedgekeurde accessoires van de fabrikant.
• Bij het nemen van treden of trappen, of wanneer uw kinderwagen wordt opgetild of gedragen, moet u uw
kind altijd uit de wagen nemen.
• Gebruik de parkeerrem bij het in en uitnemen van het kind.
• Deze wagen is geschikt voor kinderen vanaf 6 maanden tot 3 jaar en met een gewicht van maximaal 15 kg.
WAARSCHUWING!
• Laat uw kind nooit zonder toezicht.
• Gebruik een veiligheidsriem, zodra uw kind zelfstandig kan zitten.
• Deze ziteenheid is niet geschikt voor kinderen onder de 6 maanden.
• Aan de duwstang bevestigde lasten verminderen de stabiliteit van de
wagen.
• Voor elk gebruik dient te worden gecontroleerd of de opbouw van de
kinderwagen of de ziteenheid correct is vastgeklikt.
• Dit artikel is niet geschikt om te joggen of skaten.
• Breng geen veranderingen aan die de veiligheid in gevaar kunnen brengen.
• Hou dit product verwijderd van vuur en andere hittebronnen.
• Houdt uw kind op afstand tijdens het in- of uitklappen van deze wagen om
letsel te voorkomen.
• Laat uw kind niet met deze wagen spelen.
• Gebruik altijd het beveiligingssysteem.
Table of contents
Languages:


