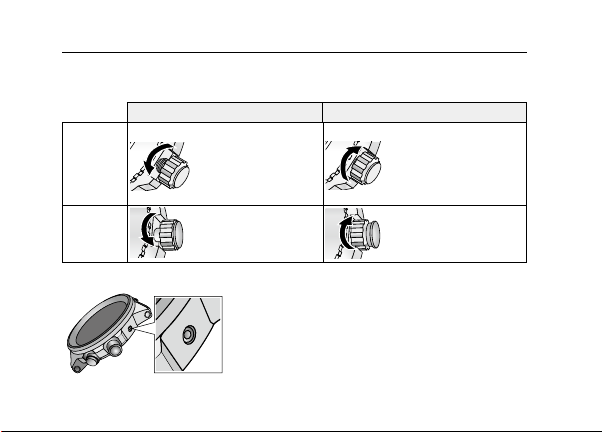
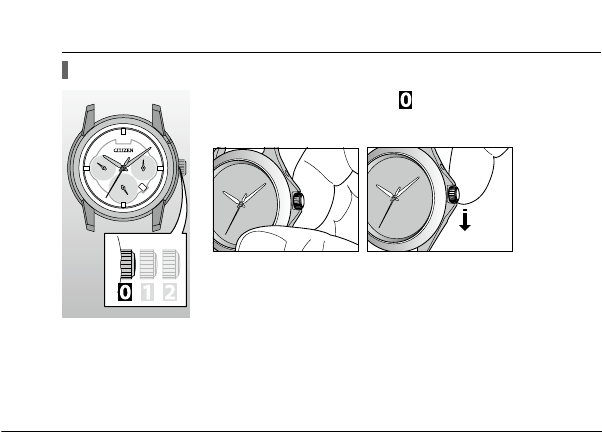
Citizen 9170 User manual

INSTRUCTION MANUAL

ENGLISH
FRANÇAIS
ESPAÑOL
DEUTSCH
ITALIANO
PORTUGUÊS
中文(繁体字)
中文(簡体字)
日本語

1
Thank you for your purchase of this Citizen watch.
Before using the watch, read this instruction manual carefully to ensure correct use.
After reading the manual, store it in a safe place for future reference.
Visit the Citizen website (http://www.citizenwatch-global.com/) to view visual guides
for operation of your watch. Some models may be equipped with external features
(calculation scale, tachymeter, etc.). Visual guides for operation of such external features
can also be found on the website.
To check the movement number
A case number—4 alphanumeric characters and 6 or
more alphanumeric characters—is engraved on the
case back. (Figure on the right)
The first 4 characters of the case number represent
the movement number of the watch.
In the example on the right, “ ” is the
movement number.
Engraving position example
The engraving position may differ
depending on watch model.

2
Safety precautions — IMPORTANT
This manual contains instructions that should be strictly followed at all times not only
for optimal use, but to prevent any injuries to yourself, other persons or property. We
encourage you to read the entire booklet (especially, pages 16 to 25) and understand the
meaning of the following symbols:
■ Safety advisories are categorized and depicted in this manual as follows:
DANGER Highly likely to cause death or serious injury
WARNING Can cause serious injury or death
CAUTION Can or will cause minor or moderate injury or damage
■ Important instructions are categorized and depicted in this manual as follows:
Warning (caution) symbol followed by instructions that should be
followed or precautions that should be observed.
Warning (caution) symbol followed by prohibited matters.

3
Before using this watch
Band adjustment
We do not recommend attempting to adjust the watch band yourself. If not adjusted
correctly, the band may become detached leading to an injury or loss of your watch.
(Some retailers may supply a band adjustment tool with your purchase).
For band adjustment, we recommend you consult the retailer where the watch was
purchased or your nearest Authorized Citizen Service Center.
Some repair shops may charge a nominal fee for adjustment if the watch was not
purchased directly from them.
Protective stickers
Be sure to remove any protective stickers that may be on your watch (case back, band,
clasp, etc.).Otherwise, perspiration or moisture may enter the gaps between the protective
stickers and the parts, which may result in a skin rash and/or corrosion of the metal parts.
How to use a specially designed crown/push button
Some models are equipped with a specially designed crown and/or push button to
prevent accidental operation.

Before using this watch
4
Screw down crown and screw down push button
Unlock the crown prior to operate your watch.
Unlock Lock
Screw down
crown
Rotate the crown
counterclockwise until it
releases from the case.
Push the crown in to the
case. With gentle pressure
towards the case, rotate the
crown clockwise to secure
it to the case. Be sure to
tighten firmly.
Screw down
push button
Rotate the locking screw
counterclockwise, and
loosen until it stops.
Rotate the locking screw
clockwise, and tighten
firmly.
Recessed buttons
Press the button with a narrow-tipped object such as a
wooden toothpick.

Table of contents
Parts identification ............................................................ 6
Winding the mainspring.....................................................7
Adjusting the time ...........................................................10
Adjusting the date (quick date indicator adjustment)........11
Adjusting the day (quick day adjustment).........................12
Adjusting the month ........................................................13
Characteristics of Mechanical watches ..............................14
Water resistance ..............................................................16
Precautionary items and usage limitations .......................19
Specifications...................................................................26
5

S
U
N
J
A
N
M
A
R
N
O
V
M
O
N
S
A
T
T
H
U
F
R
I
W
E
D
J
U
L
M
A
Y
S
E
P
T
U
E
Parts identification
Minute hand
Hour hand
Day hand
Second hand
Month hand
Date indication
24-hour hand
Hidden button
Crown
The actual appearance of the watch may differ from the illustrations on this instruction manual.
6

Winding the mainspring
This is an automatic winding mechanical watch, using a mainspring as power
source. When wearing the watch, your hand’s movement rotates the oscillating
weight to wind the mainspring automatically.
• When your hand’s movement is small and/or a few, winding may become
insufficient.
• Once the mainspring is wound fully, the watch will run for about 42 hours.
The mainspring is wound for about a day movement automatically when wearing
the watch for 8 hours or more a day.
• You can wind the mainspring manually (see page 8).
7

Winding the mainspring Winding the mainspring
Winding the mainspring manually
1Push the crown in to position .
2Rotate the crown to wind the mainspring.
• Turn the crown by rubbing it down from the back
side of the watch.
8

Winding the mainspring Winding the mainspring
• When the watch stops, turning the crown about 40 times will wind the
mainspring fully.
• Turning the crown after the mainspring’s full winding does not damage the
mainspring.
9

Adjusting the time
When the watch stops, wind the mainspring manually
before setting (see pages 7to 9).
1Pull the crown out to position as the second
hand points 0 second.
The second hand stops.
2Rotate the crown to adjust the time.
All the hands and the date indicator move together
(except the second hand).
• Check the 24-hour hand to set AM/PM correctly.
• The hands do not move together when moving hands
counterclockwise.
3Push the crown in to position following a
certain time signal.
10

When the time on the watch is between 8:00 PM and 2:00 AM
Do not execute the quick date indicator adjustment. Otherwise the date indication may change
improperly.
Adjusting the date (quick date indicator adjustment)
1Pull the crown out to position .
2Rotate the crown clockwise to adjust the date.
• The month hand moves each time the date indication
passes the 31st.
• Rotating the crown counterclockwise moves the day
hand.
3Push the crown in to position to finish this
procedure.
The date indicator on the watch is based on a 31-day calendar.
Adjust the date indication on the first days of March, May, July,
October and December.
11

1Pull the crown out to position as the second
hand points 0 second.
2Rotate the crown counterclockwise to adjust the
day.
• To make the day hand pointing the center of day
indication, rotate the crown slightly.
• Rotating the crown clockwise changes the date
indication.
3Push the crown in to position to finish this
procedure.
Adjusting the day (quick day adjustment)
12

Adjusting the month (quick month adjustment)
1Push the hidden button at the 2 o’clock position of
the dial.
• The month hand moves each time you press the
button.
• The month hand moves as you press the button
regardless the position of the crown.
13

Characteristics of Mechanical watches
About time accuracy of mechanical watches
The time accuracy described on this instruction manual is the static accuracy
at normal temperature. The accuracy of mechanical watches may get out of the
described range depending on the following three usage conditions or other
reasons.
• Winding amount of the mainspring
• Attitude
• Usage environment (temperature, magnetism, impact, etc.)
Winding amount of the mainspring
Mechanical watches keep accuracy most stably when the mainspring is sufficiently
wound.
Attitude
Accuracy of mechanical watches varies affected by gravity. The accuracy varies
as the result that may take various attitude while worn and gravitate to a different
direction every moment.
14

Characteristics of Mechanical watches
Usage environment (temperature, magnetism, impact, etc.)
• Metal parts are used for the part for keeping accuracy in mechanical watch. The
accuracy varies affected by their thermal expansion and contraction.
• Metal parts are used in mechanical watches. Magnetism affects them and
accuracy of the watches in consequence. Do not bring them close to things which
have or generate strong magnetism.
• Strong shocks may also affect the accuracy.
Maintenance
Mechanical watches may become inaccurate due to insufficient lubrication or worn
parts. Have the watch disassembled and cleaned (overhaul) every 2-3 years (charge
basis). It may be difficult to restore the watch from degradation after long-term use
to its initial performance even after repairs.
15

16
Water resistance
WARNING Water Resistance
Water-related use
Minor exposure
to water (washing
face, rain, etc.)
Swimming and
general washing
work
Skin diving,
marine sports
Scuba diving
using an air tank
Operate the crown
or button when
the watch is wet
Name
Indication
Specification
Dial or Case back
Non-water resistant — Non-water resistant NO NO NO NO NO
Everyday-use water resistant
watch WATER RESIST(ANT) Water-resistant to 3
atmospheres OK NO NO NO NO
Upgraded everyday use water-
resistant watch
WATER RESIST(ANT)
5 bar
Water-resistant to 5
atmospheres OK OK NO NO NO
WATER RESIST(ANT)
10/20 bar
Water-resistant to 10 or
20 atmospheres OK OK OK NO NO
• Refer to the watch dial and the case back for the indication of the water resistance of your
watch. The following chart provides examples of use for reference to ensure that your watch is
used properly. (The unit “1bar” is roughly equal to 1 atmosphere.)
• WATER RESIST(ANT) ××bar may also be indicated as W.R.××bar.

17
Water-related use
Minor exposure
to water (washing
face, rain, etc.)
Swimming and
general washing
work
Skin diving,
marine sports
Scuba diving
using an air tank
Operate the crown
or button when
the watch is wet
Name
Indication
Specification
Dial or Case back
Non-water resistant — Non-water resistant NO NO NO NO NO
Everyday-use water resistant
watch WATER RESIST(ANT) Water-resistant to 3
atmospheres OK NO NO NO NO
Upgraded everyday use water-
resistant watch
WATER RESIST(ANT)
5 bar
Water-resistant to 5
atmospheres OK OK NO NO NO
WATER RESIST(ANT)
10/20 bar
Water-resistant to 10 or
20 atmospheres OK OK OK NO NO
Water resistance

18
• Non-water resistant models are not designed to come into contact with any moisture. Take care
not to expose a watch with this rating to any type of moisture.
• Water resistance for daily use (to 3 atmospheres) means the watch is water resistant for
occasional accidental splashing.
• Upgraded water-resistance for daily use (to 5 atmospheres) means that the watch may be worn
while swimming, but is not to worn while skin diving.
• Upgraded water-resistance for daily use (to 10/20 atmospheres) means that the watch may be
worn while skin diving, but not while scuba or saturated diving using helium gas.
Water resistance
Table of contents
Other Citizen Watch manuals

Citizen
Citizen D40 Series Operating manual

Citizen
Citizen E650 User manual

Citizen
Citizen Eco-Drive User manual

Citizen
Citizen F100 User manual

Citizen
Citizen 6P75 User manual

Citizen
Citizen 2353 User manual

Citizen
Citizen YF30 User manual

Citizen
Citizen J810 User manual

Citizen
Citizen E030 Manual

Citizen
Citizen Eco-Drive Proximity Specification sheet

Citizen
Citizen 0S21 User manual

Citizen
Citizen J250 User manual

Citizen
Citizen A660H User manual

Citizen
Citizen 1400A-02 Manual

Citizen
Citizen F100 User manual

Citizen
Citizen AQXXX CTZ-B6807 User manual

Citizen
Citizen AV0025-51A User manual

Citizen
Citizen FS10 User manual

Citizen
Citizen 6S20 User manual

Citizen
Citizen 0S21 User manual